isa TOYOTA BZ4X 2022 (in English) Owner's Manual
[x] Cancel search | Manufacturer: TOYOTA, Model Year: 2022, Model line: BZ4X, Model: TOYOTA BZ4X 2022Pages: 674, PDF Size: 120.02 MB
Page 223 of 674
221
4
Owners Manual_Europe_M42D76_en
4-5. Opening, closing the windows
Before driving
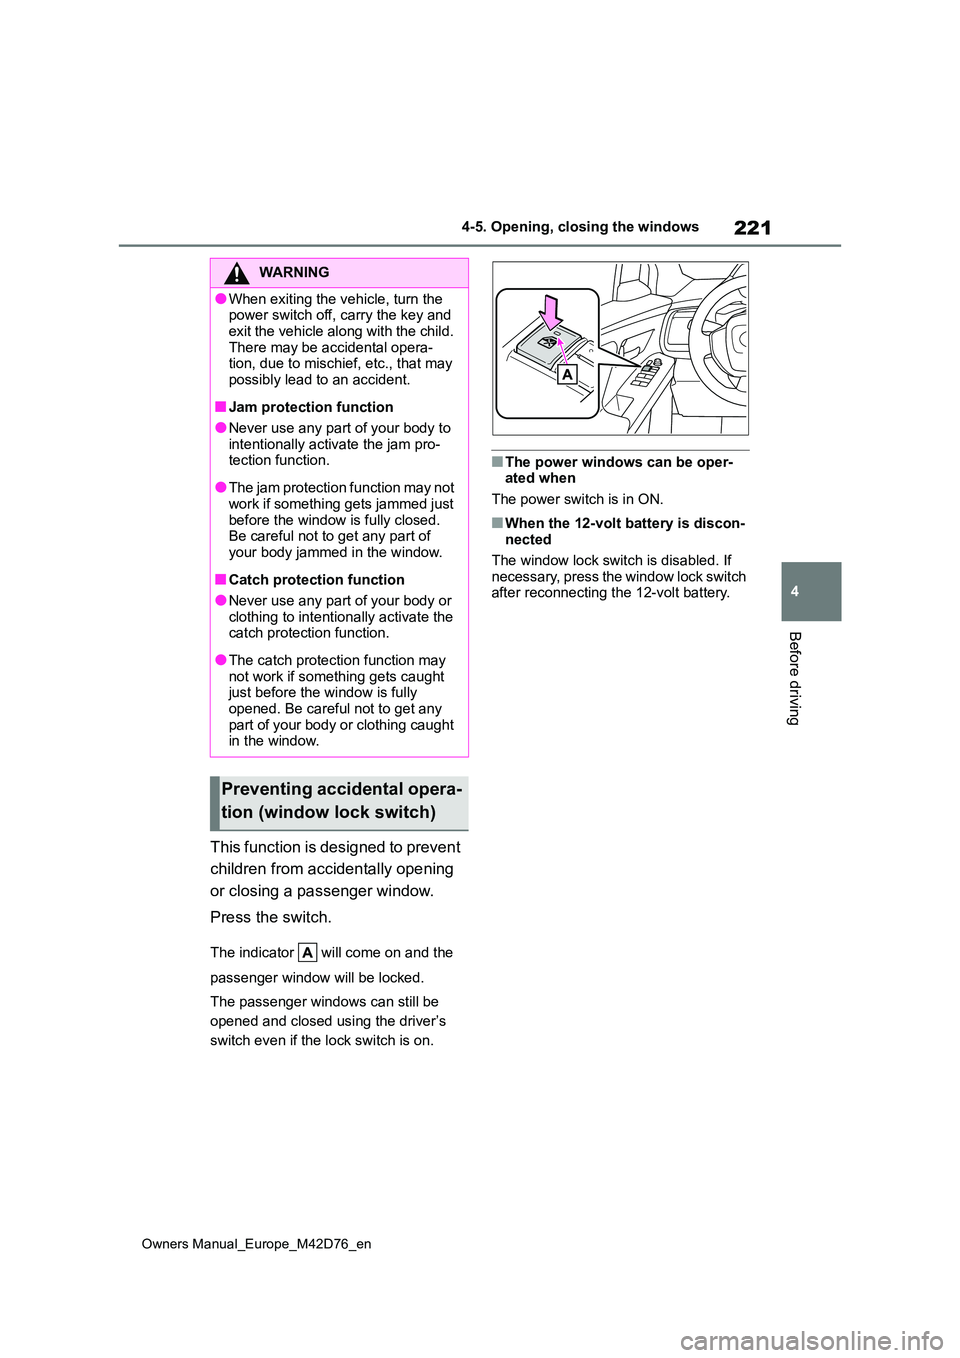
This function is designed to prevent
children from accidentally opening
or closing a passenger window.
Press the switch.
The indicator will come on and the
passenger window will be locked.
The passenger windows can still be
opened and closed using the driver’s
switch even if the lock switch is on.
■The power windows can be oper- ated when
The power switch is in ON.
■When the 12-volt battery is discon- nected
The window lock switch is disabled. If
necessary, press the window lock switch after reconnecting the 12-volt battery.
WARNING
●When exiting the vehicle, turn the power switch off, carry the key and
exit the vehicle along with the child. There may be accidental opera-tion, due to mischief, etc., that may
possibly lead to an accident.
■Jam protection function
●Never use any part of your body to intentionally activate the jam pro-tection function.
●The jam protection function may not work if something gets jammed just
before the window is fully closed. Be careful not to get any part of your body jammed in the window.
■Catch protection function
●Never use any part of your body or
clothing to intentionally activate the catch protection function.
●The catch protection function may not work if something gets caught just before the window is fully
opened. Be careful not to get any part of your body or clothing caught in the window.
Preventing accidental opera-
tion (window lock switch)
Page 251 of 674
249
5
Owners Manual_Europe_M42D76_en
5-2. Driving procedures
Driving
Rotary shifter display:
The current shift position is illuminated.
When selecting the shift position, make
sure that the shift position has been
changed to the desired position by
checking the shift position indicator pro-
vided on the instrument cluster.
P position switch
Fully stop the vehicle and set the park-
ing brake, and then press the P position
switch.
When the shift position is changed to P,
the switch illuminates.
Check that the shift position indicator
shows P.
■Changing the shift position in each power switch mode
●The shift position cannot be changed when the power switch is in ACC or off.
●When the power switch is in ON, if the “READY” indicator is not illuminated,
the shift position can only be changed to N.
●When the “READY” indicator is illumi-nated, the shift position can be
changed from P to D, N, or R.
●When the “READY” indicator is flash-
ing, the shift position cannot be changed from P to any other position, even if the rotary shifter is operated.
Operate the rotary shifter again after the “READY” indicator changes from flashing to illuminated.
■Shifting the shift position from P to
other positions
●While depressing the brake pedal
firmly, operate the rotary shifter. If the rotary shifter is operated without depressing the brake pedal, the
buzzer will sound and the shifting operation will be disabled.
●When selecting the shift position,
make sure that the shift position has
been changed to the desired position by checking the shift position indicator provided on the instrument cluster.
■The shift position cannot be
changed when
In the following situations, a buzzer will sound to inform you that the shift posi-
tion cannot be changed. Use the appro- priate operation to attempt to change the shift position again.
●When attempting to change the shift position from P with the brake pedal
not depressed
●When attempting to change the shift
position from P with the accelerator pedal depressed
●When attempting to change the shift position from N while stopped or driv-ing at an extremely low speed with the
brake pedal not depressed
●When attempting to change the shift
position from N while stopped or driv- ing at an extremely low speed with the accelerator pedal depressed
●When the P position switch is pressed while driving
When driving at an extremely low speed, the shift position may change to
P.
■The shift position automatically changes to N when
In the following situations, a buzzer will
sound to inform you that the shift posi- tion has been changed to N. Use the appropriate operation to attempt to
change the shift position again.
●When attempting to change the shift
position to R while the vehicle is mov- ing forward
When driving at a low speed, the shift
position may change to R.
●When attempting to change the shift position to D while the vehicle is mov-ing backward
When driving at a low speed, the shift
position may change to D.
Page 257 of 674
255
5
Owners Manual_Europe_M42D76_en
5-2. Driving procedures
Driving
ing brake manually. (P.254)
■Turning the automatic mode
off
While the vehicle is stopped and
depressing the brake pedal, press
and hold the parking brake switch
until a buzzer sounds and message
is shown on the multi-information
display.
■Parking brake operation
●When the power switch is not in ON, the parking brake cannot be released using the parking brake switch.
●When the power switch is not in ON, automatic mode (automatic brake set-
ting and releasing) is not available.
■Parking brake automatic release function
When all of the following conditions are
met in manual mode, the parking brake can be released by depressing the accelerator pedal.
●The driver’s door is closed
●The driver is wearing the seat belt
●The shift position is in a forward driv-
ing position or reverse driving position
●The malfunction indicator lamp or brake system warning light is not illu-minated.
When depressing the accelerator pedal, depress it slowly.
If the parking brake is not released when
the accelerator pedal is depressed, release the parking brake manually.
■Parking brake automatic lock func-tion
The parking brake will be set automati- cally under the following conditions:
●The brake pedal is not depressed
●The driver’s door is open
●The driver’s seat belt is not fastened
●The shift position is in a position other
than P or N (The shift position is in P during advanced park operation.) (If
equipped)
●The malfunction indicator lamp or
brake system warning light are not illuminated
■If “Parking Brake Temporarily Unavailable” is displayed on the
multi-information display
If the parking brake is operated repeat- edly over a short period of time, the sys-
tem may restrict operation to prevent overheating. If this happens, refrain from operating the parking brake. Normal
operation will return after about 1 min- ute.
■If “Parking Brake Unavailable” is displayed on the multi-information
display
Operate the parking brake switch. If the message does not disappear after oper-
ating the switch several times, the sys- tem may be malfunctioning. Have the vehicle inspected by any authorized
Toyota retailer or Toyota authorized repairer, or any reliable repairer.
■Parking brake operation sound
When the parking brake operates, a
motor sound (whirring sound) may be heard.
This does not indicate a malfunction.
■Parking brake indicator light
●Depending on the power switch mode, the parking brake indicator light will
turn on and stay on as described below:ON: Comes on until the parking brake
is released. Not in ON: Stays on for approximately 15 seconds.
●When the power switch is turned off with the parking brake set, the parking
brake indicator light will stay on for about 15 seconds.This does not indicate a malfunction.
Page 262 of 674
260
Owners Manual_Europe_M42D76_en
5-3. Operating the lights and wipers
■Light reminder buzzer
A buzzer sounds when the power switch is turned off or turned to ACC and the driver’s door is opened while the lights
are turned on.
■Automatic headlight leveling sys- tem (if equipped)
The level of the headlights is automati-
cally adjusted according to the number of passengers and the loading condition of the vehicle to ensure that the head-
lights do not interfere with other road users.
■12-volt battery-saving function
In order to prevent 12-volt the battery of
the vehicle from discharging, if the light
switch is in the or position
when the power switch is turned off, the
12-volt battery saving function will oper-
ate and automatically turn off all the
lights after approximately 20 minutes.
When the power switch is turned to ON, the 12-volt battery-saving function will be disabled.
When any of the following are per- formed, the 12-volt battery-saving func-tion is canceled once and then
reactivated. All the lights will turn off automatically 20 minutes after the 12-volt battery- saving function has been
reactivated:
●When the headlight switch is operated
●When a door is opened or closed
■Customization
Settings (e.g. light sensor sensitivity)
can be changed. (Customizable features: P.567)
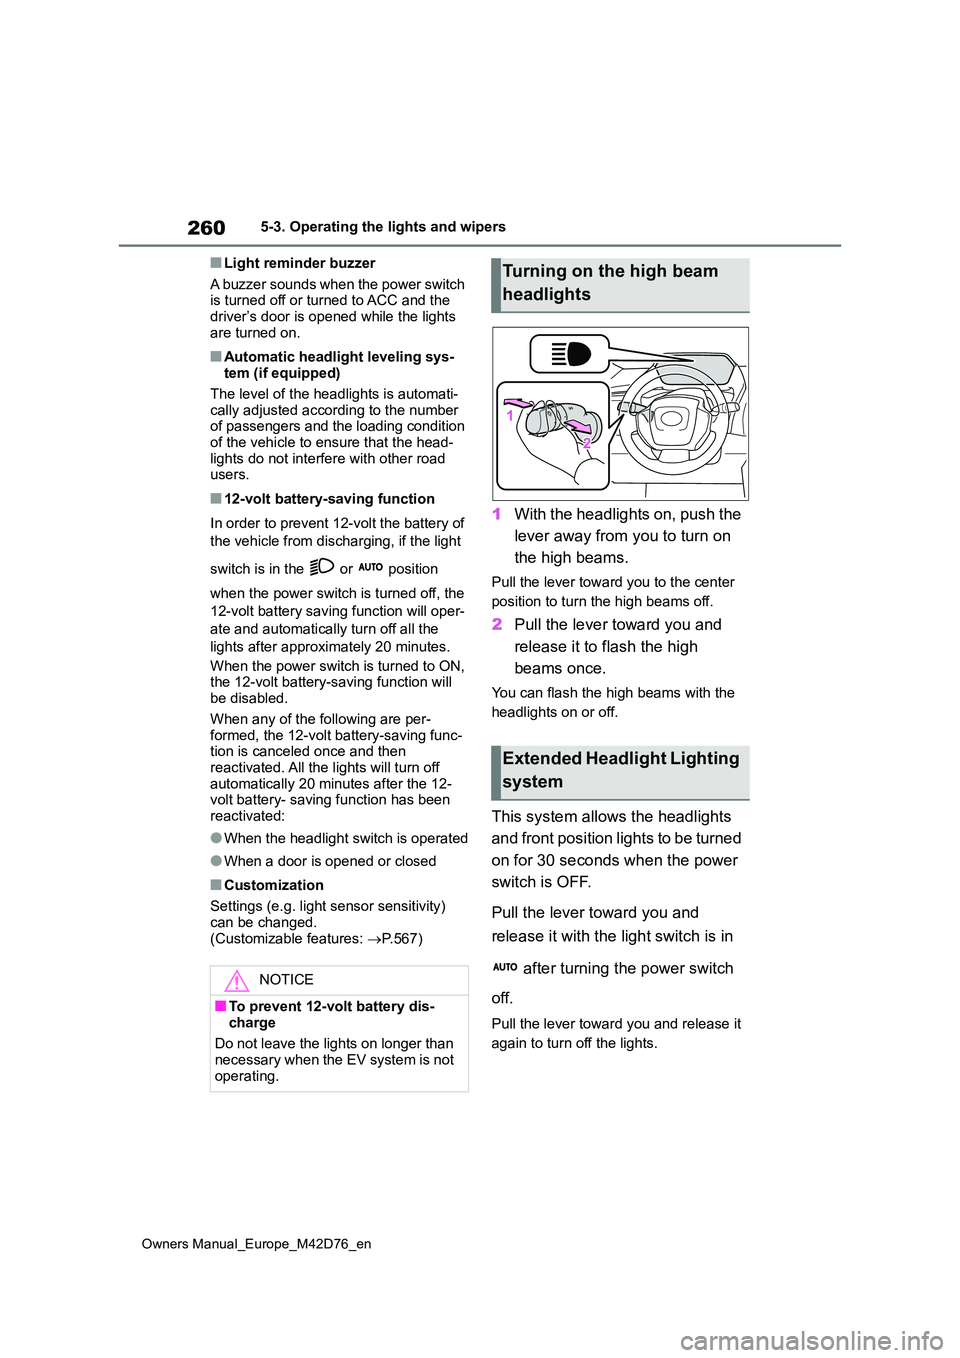
1With the headlights on, push the
lever away from you to turn on
the high beams.
Pull the lever toward you to the center
position to turn the high beams off.
2 Pull the lever toward you and
release it to flash the high
beams once.
You can flash the high beams with the
headlights on or off.
This system allows the headlights
and front position lights to be turned
on for 30 seconds when the power
switch is OFF.
Pull the lever toward you and
release it with the light switch is in
after turning the power switch
off.
Pull the lever toward you and release it
again to turn off the lights.
NOTICE
■To prevent 12-volt battery dis-
charge
Do not leave the lights on longer than necessary when the EV system is not
operating.
Turning on the high beam
headlights
Extended Headlight Lighting
system
Page 264 of 674
262
Owners Manual_Europe_M42D76_en
5-3. Operating the lights and wipers
*: If equipped
According to the vehicle speed,
the brightness and illuminated
area of the high beams are
adjusted.
When driving around a curve, the
system uses the high beams to
brightly illuminate the direction of
travel of the vehicle.
The high beams are illuminated
so that the area around a vehicle
ahead is shaded. (Shaded high
beam)
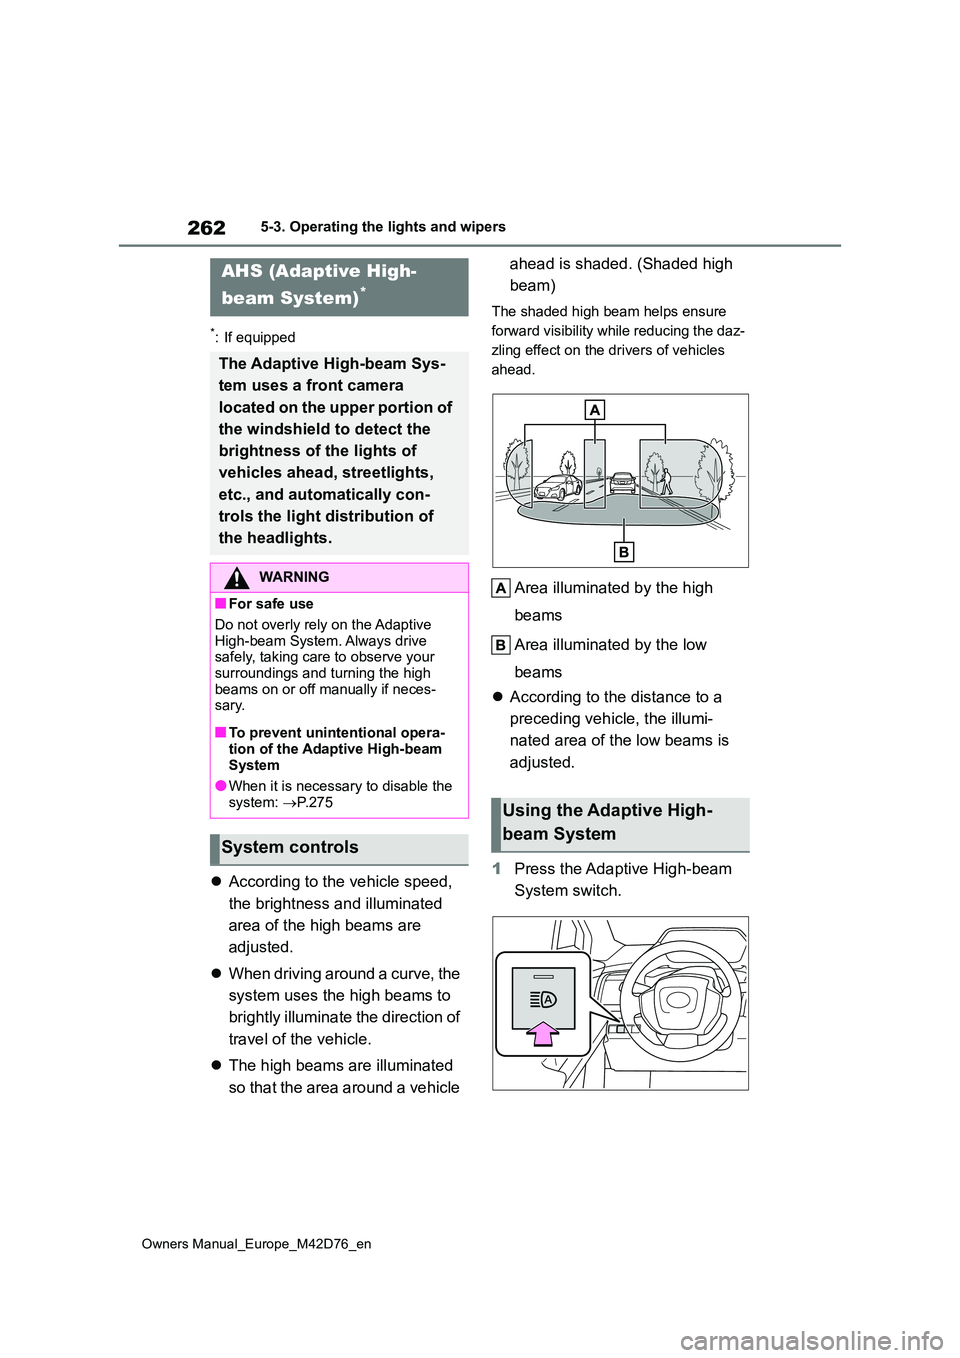
The shaded high beam helps ensure
forward visibility while reducing the daz-
zling effect on the drivers of vehicles
ahead.
Area illuminated by the high
beams
Area illuminated by the low
beams
According to the distance to a
preceding vehicle, the illumi-
nated area of the low beams is
adjusted.
1 Press the Adaptive High-beam
System switch.
AHS (Adaptive High-
beam System)*
The Adaptive High-beam Sys-
tem uses a front camera
located on the upper portion of
the windshield to detect the
brightness of the lights of
vehicles ahead, streetlights,
etc., and automatically con-
trols the light distribution of
the headlights.
WARNING
■For safe use
Do not overly rely on the Adaptive High-beam System. Always drive safely, taking care to observe your
surroundings and turning the high beams on or off manually if neces-sary.
■To prevent unintentional opera-
tion of the Adaptive High-beam System
●When it is necessary to disable the
system: P.275
System controls
Using the Adaptive High-
beam System
Page 266 of 674
264
Owners Manual_Europe_M42D76_en
5-3. Operating the lights and wipers
• When a vehicle ahead is a two-
wheeled vehicle • The condition of the road (gradient, curve, condition of the road surface,
etc.) • The number of passengers and amount of luggage
●The light distribution control of the headlights may not match the driver’s
expectations
●Bicycles and other small vehicles may
not be detected.
●In the following situations, the system
may not be able to correctly detect the brightness of the surroundings. This may cause the low beams to remain
on or the high beams to flash or daz- zle pedestrians or vehicles ahead. In such a case, it is necessary to manu-
ally change between the high beams and low beams.• When there are lights similar to head-
lights or tail lights in the surrounding area• When headlights or tail lights of vehi-
cles ahead are turned off, dirty, chang- ing color, or not aimed properly• When the headlights are repeatedly
changing between the high beams and low beams.• When use of the high beams is inap-
propriate or when the high beams may be flashing or dazzling pedestri-ans or other drivers.
• When the vehicle is used in an area in which vehicles travel on the opposite side of the road of the country for
which the vehicle was designed, for example using a vehicle designed for right-hand traffic in a left-hand traffic
area, or vice versa • When it is necessary to disable the system: P. 2 7 5
• Situations in which the sensors may not operate properly: P. 2 7 9
■Customization
The settings of some functions can be
changed. ( P.567)
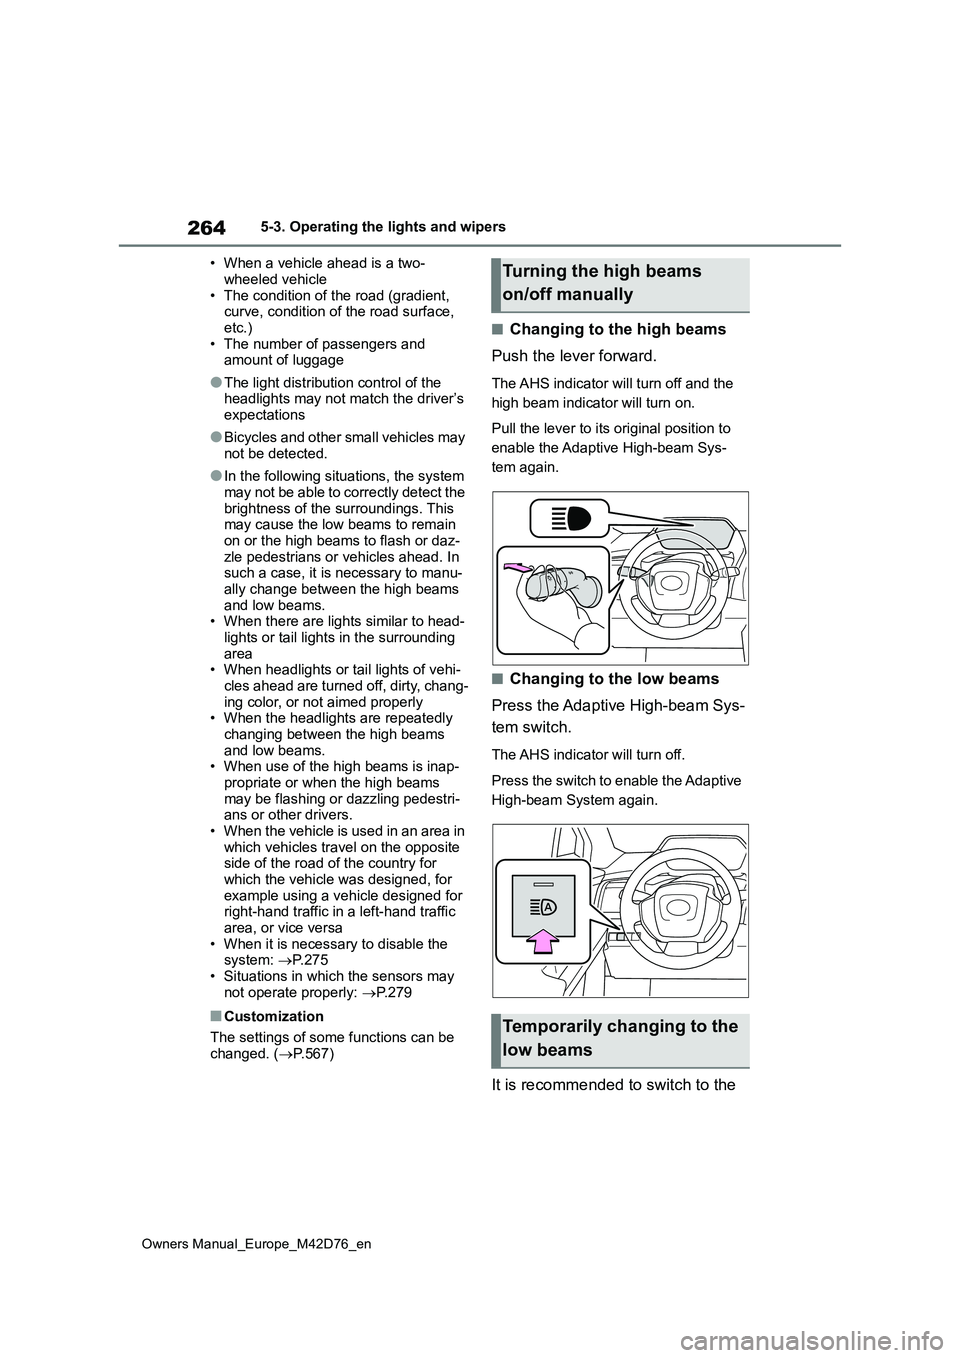
■Changing to the high beams
Push the lever forward.
The AHS indicator will turn off and the
high beam indicator will turn on.
Pull the lever to its original position to
enable the Adaptive High-beam Sys-
tem again.
■Changing to the low beams
Press the Adaptive High-beam Sys-
tem switch.
The AHS indicator will turn off.
Press the switch to enable the Adaptive
High-beam System again.
It is recommended to switch to the
Turning the high beams
on/off manually
Temporarily changing to the
low beams
Page 267 of 674
265
5
Owners Manual_Europe_M42D76_en
5-3. Operating the lights and wipers
Driving
low beams when use of the high
beams is inappropriate or when the
high beams may cause problems or
distress to other drivers or pedestri-
ans nearby.
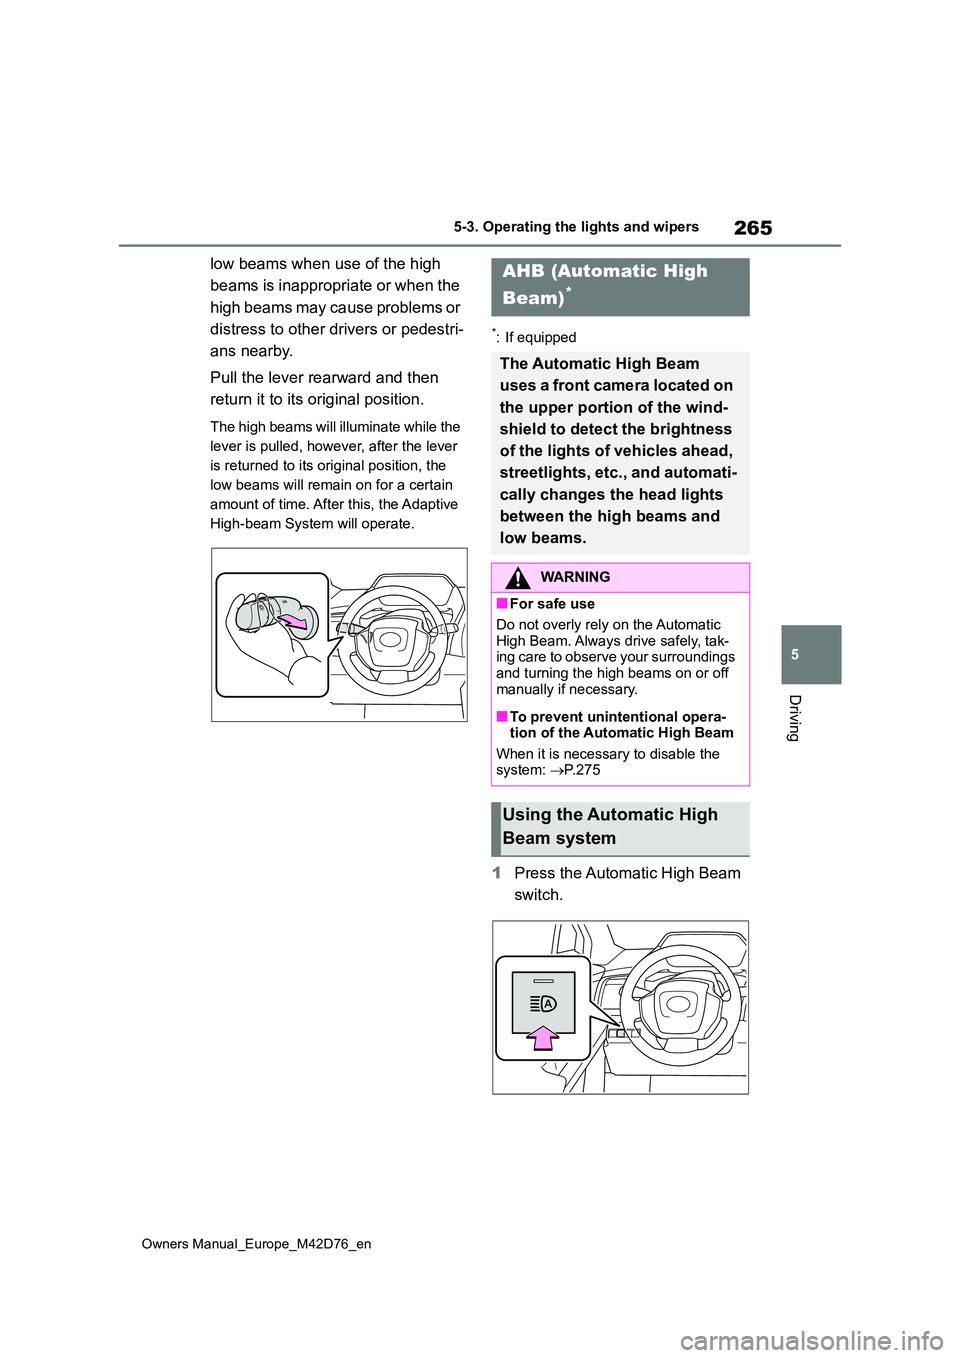
Pull the lever rearward and then
return it to its original position.
The high beams will illuminate while the
lever is pulled, however, after the lever
is returned to its original position, the
low beams will remain on for a certain
amount of time. After this, the Adaptive
High-beam System will operate.
*: If equipped
1 Press the Automatic High Beam
switch.
AHB (Automatic High
Beam)*
The Automatic High Beam
uses a front camera located on
the upper portion of the wind-
shield to detect the brightness
of the lights of vehicles ahead,
streetlights, etc., and automati-
cally changes the head lights
between the high beams and
low beams.
WARNING
■For safe use
Do not overly rely on the Automatic High Beam. Always drive safely, tak-ing care to observe your surroundings
and turning the high beams on or off manually if necessary.
■To prevent unintentional opera-tion of the Automatic High Beam
When it is necessary to disable the system: P.275
Using the Automatic High
Beam system
Page 269 of 674
267
5
Owners Manual_Europe_M42D76_en
5-3. Operating the lights and wipers
Driving
may cause the low beams to remain
on or the high beams to flash or daz- zle pedestrians or vehicles ahead. In such a case, it is necessary to manu-
ally change between the high beams and low beams.• When there are lights similar to head-
lights or tail lights in the surrounding area• When headlights or tail lights of vehi-
cles ahead are turned off, dirty, chang- ing color, or not aimed properly• When the headlights are repeatedly
changing between the high beams and low beams.• When use of the high beams is inap-
propriate or when the high beams may be flashing or dazzling pedestri-ans or other drivers.
• When the vehicle is used in an area in which vehicles travel on the opposite side of the road of the country for
which the vehicle was designed, for example using a vehicle designed for right-hand traffic in a left-hand traffic
area, or vice versa • When it is necessary to disable the system: P. 2 7 5
• Situations in which the sensors may not operate properly: P. 2 7 9
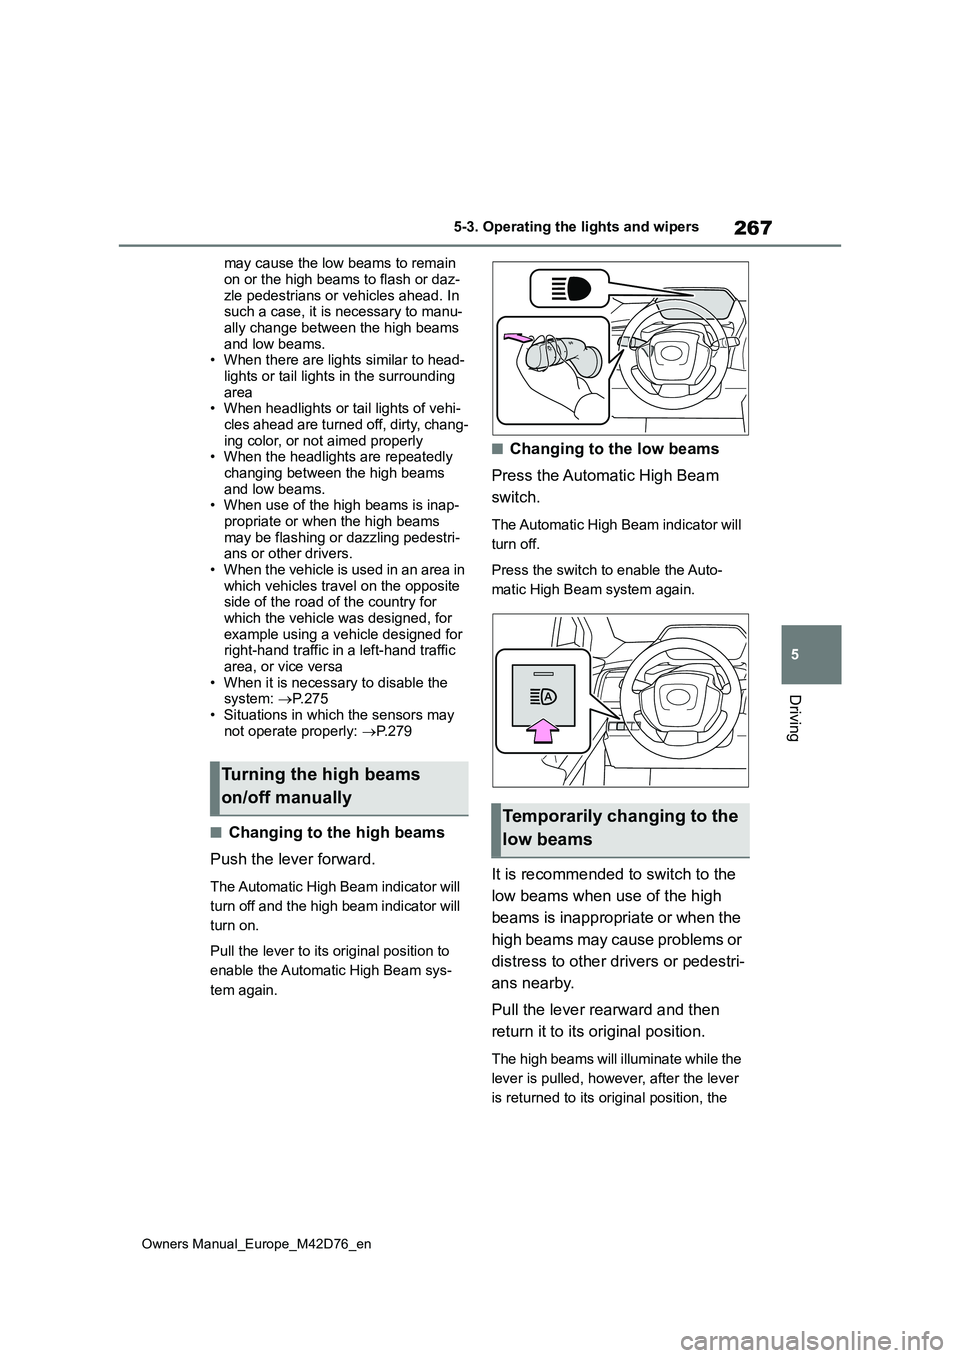
■Changing to the high beams
Push the lever forward.
The Automatic High Beam indicator will
turn off and the high beam indicator will
turn on.
Pull the lever to its original position to
enable the Automatic High Beam sys-
tem again.
■Changing to the low beams
Press the Automatic High Beam
switch.
The Automatic High Beam indicator will
turn off.
Press the switch to enable the Auto-
matic High Beam system again.
It is recommended to switch to the
low beams when use of the high
beams is inappropriate or when the
high beams may cause problems or
distress to other drivers or pedestri-
ans nearby.
Pull the lever rearward and then
return it to its original position.
The high beams will illuminate while the
lever is pulled, however, after the lever
is returned to its original position, the
Turning the high beams
on/off manually
Temporarily changing to the
low beams
Page 275 of 674
273
5
Owners Manual_Europe_M42D76_en
5-4. Using the driving support systems
Driving
5-4.Using the d riving s upport sy ste ms
This Owner’s Manual contains
information for Ver. 1. For the latest
information about the controls, use,
warnings/precautions, etc., of each
function of Toyota Safety Sense
refer to the Digital Owner’s Manual
at the Owner’s Manual website.
If the software of this system has
been updated after initial purchase
of the vehicle, before using this sys-
tem, be sure to read the Owner’s
Manual which corresponds to the
software version of the system.
■Precautions for use
●Be aware that some functions may temporarily be disabled if a legal or
safety related issue occurs.
●If a connected services contract has
not been entered or has expired, soft- ware updates will not be able to be performed wirelessly.
If the software of this system has
been updated after initial purchase
of the vehicle, to access the appro-
priate Owner’s Manual, it is neces-
sary to check the software version
of the system and then visit the
Owner’s Manual website.
■Checking the current software
version on the multimedia dis-
play
The current software version can
be checked from the driving assist
function update notification.
■Using your vehicle’s Toyota
Safety Sense version
1 Access the following URL using
a computer or smartphone:
https://www.toyota-europe.com/ manual?parameter=om42d76e.
Software update
It is necessary to enter a con-
nected services contract, pro-
vided by Toyota to use these
functions. For details, contact
any authorized Toyota retailer
or Toyota authorized repairer,
or any reliable repairer.
WARNING
■For safe use
When the Toyota Safety Sense soft- ware is updated, the operating meth-ods of functions may change. Using
this system without knowing the cor- rect operating methods may lead to an accident resulting in death or seri-
ous injury.
●Make sure to read the Digital
Owner’s Manual which corresponds to the software version of the sys-tem, available at the Owner’s Man-
ual website, before using this system.
Content of the Toyota Safety
Sense Owner’s Manual
Checking your vehicle’s
Toyota Safety Sense version
Page 277 of 674

275
5
Owners Manual_Europe_M42D76_en
5-4. Using the driving support systems
Driving
Toyota Safety Sense
The Toyota Safety Sense con-
sists of the driving assist sys-
tems and contributes to a safe
and comfortable driving expe-
rience:
WARNING
■Toyota Safety Sense
The Toyota Safety Sense operates under the assumption that the driver will drive safely, and is designed to
help reduce the impact to the occu- pants in a collision and assist the driver under normal driving condi-
tions. As there is a limit to the degree of recognition accuracy and control performance that this system can pro-
vide, do not overly rely on this sys- tem. The driver is solely responsible for paying attention to the vehicle’s
surroundings and driving safely.
■For safe use
●Do not overly rely on this system. The driver is solely responsible for paying attention to the vehicle’s sur-
roundings and driving safely. This system may not operate in all situa-tions and provided assistance is
limited. Over-reliance on this sys- tem to drive the vehicle safely may lead to an accident resulting in
death or serious injury.
●Do not attempt to test the operation
of the system, as it may not operate properly, possibly leading to an accident.
●If attention is necessary while per-forming driving operations or a sys-
tem malfunction occurs, a warning message or warning buzzer will be operated. If a warning message is
displayed on the display, follow the instructions displayed.
●Depending on external noise, the volume of the audio system, etc., it may be difficult to hear the warning
buzzer. Also, depending on the road conditions, it may be difficult to recognize the operation of the sys-
tem.
■When it is necessary to disable
the system
In the following situations, make sure to disable the system.
Failure to do so may lead to the sys- tem not operating properly, possibly leading to an accident resulting in
death or serious injury.
●When the vehicle is tilted due to
being overloaded or having a flat tire
●When driving at extremely high speeds
●When towing another vehicle
●When the vehicle is being trans-
ported by a truck, ship, train, etc.
●When the vehicle is raised on a lift
and the tires are allowed to rotate freely
●When inspecting the vehicle using a drum tester such as a chassis dynamometer or speedometer tes-
ter, or when using an on vehicle wheel balancer
●When the vehicle is driven in a sporty manner or off-road
●When using an automatic car wash
●When a sensor is misaligned or
deformed due to a strong impact being applied to the sensor or the area around the sensor
●When accessories which obstruct a sensor or light are temporarily
installed to the vehicle