lights TOYOTA BZ4X 2022 (in English) Owner's Guide
[x] Cancel search | Manufacturer: TOYOTA, Model Year: 2022, Model line: BZ4X, Model: TOYOTA BZ4X 2022Pages: 674, PDF Size: 120.02 MB
Page 229 of 674
5
227
Owners Manual_Europe_M42D76_en
5
Driving
Driving
5-1. Before driving
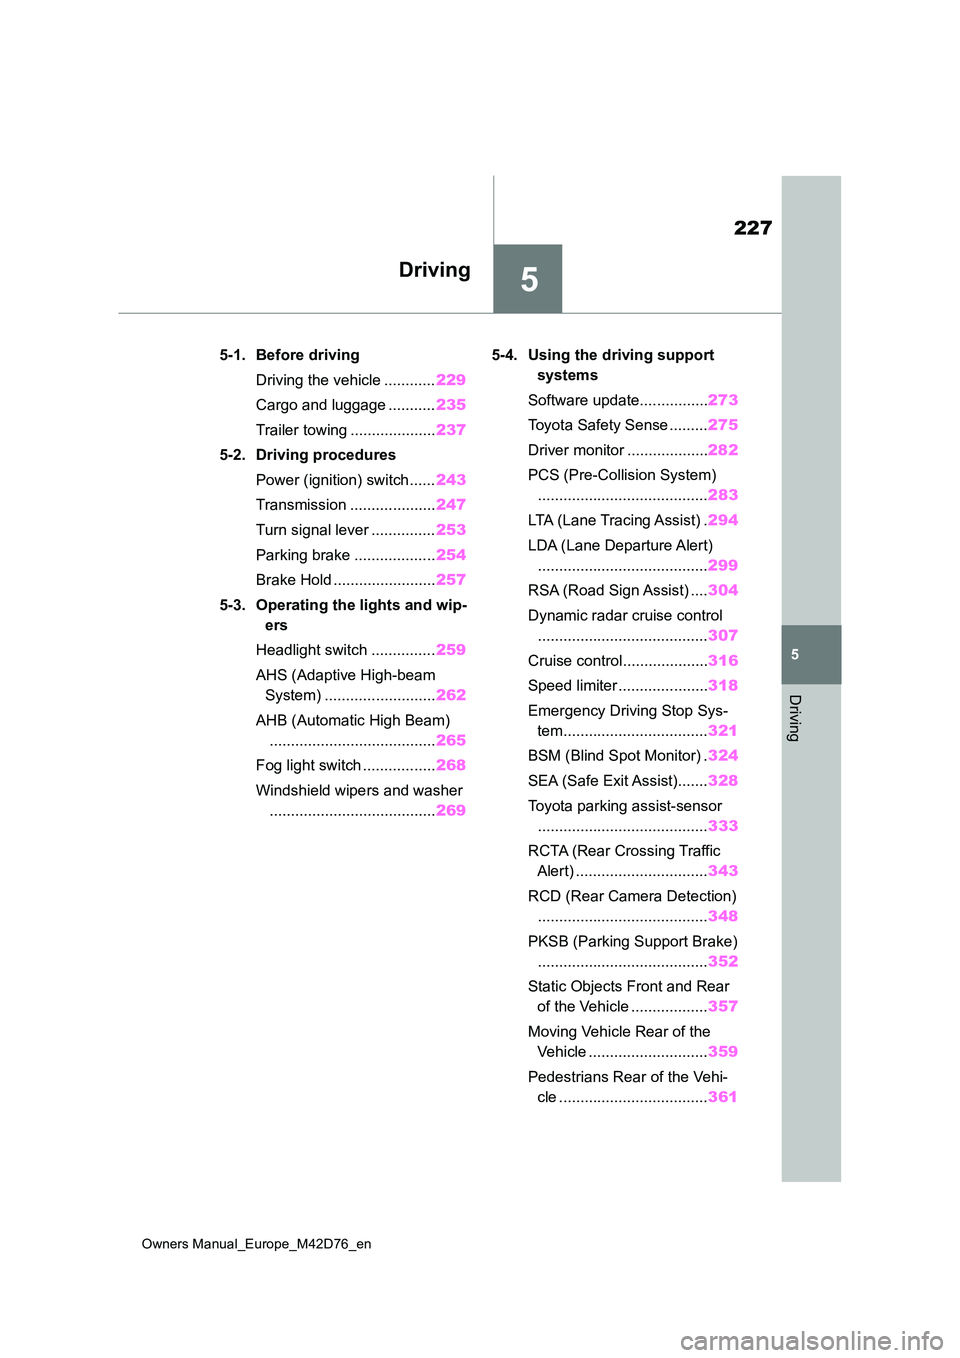
Driving the vehicle ............ 229
Cargo and luggage ........... 235
Trailer towing .................... 237
5-2. Driving procedures
Power (ignition) switch ...... 243
Transmission .................... 247
Turn signal lever ............... 253
Parking brake ................... 254
Brake Hold ........................ 257
5-3. Operating the lights and wip-
ers
Headlight switch ............... 259
AHS (Adaptive High-beam
System) .......................... 262
AHB (Automatic High Beam)
....................................... 265
Fog light switch ................. 268
Windshield wipers and washer
....................................... 269
5-4. Using the driving support
systems
Software update................ 273
Toyota Safety Sense ......... 275
Driver monitor ................... 282
PCS (Pre-Collision System)
........................................ 283
LTA (Lane Tracing Assist) . 294
LDA (Lane Departure Alert)
........................................ 299
RSA (Road Sign Assist) .... 304
Dynamic radar cruise control
........................................ 307
Cruise control.................... 316
Speed limiter ..................... 318
Emergency Driving Stop Sys-
tem.................................. 321
BSM (Blind Spot Monitor) . 324
SEA (Safe Exit Assist)....... 328
Toyota parking assist-sensor
........................................ 333
RCTA (Rear Crossing Traffic
Alert) ............................... 343
RCD (Rear Camera Detection)
........................................ 348
PKSB (Parking Support Brake)
........................................ 352
Static Objects Front and Rear
of the Vehicle .................. 357
Moving Vehicle Rear of the
Vehicle ............................ 359
Pedestrians Rear of the Vehi-
cle ................................... 361
Page 239 of 674
237
5
Owners Manual_Europe_M42D76_en
5-1. Before driving
Driving
Check the allowable towing capac-
ity, GVM (Gross Vehicle Mass),
MPAC (Maximum Permissible Axle
Capacity), and permissible draw-
bar load before towing. ( P. 5 5 4 )
Toyota recommends the use of the
Toyota hitch/bracket for your vehi-
cle. Other products of a suitable
nature and comparable quality may
also be used.
For vehicle where the towing
device blocks any of the lights or
license plate, the following shall be
observed:
Do not use towing devices that
cannot be easily removed or
repositioned.
Towing devices must be
removed or repositioned when
not in use.
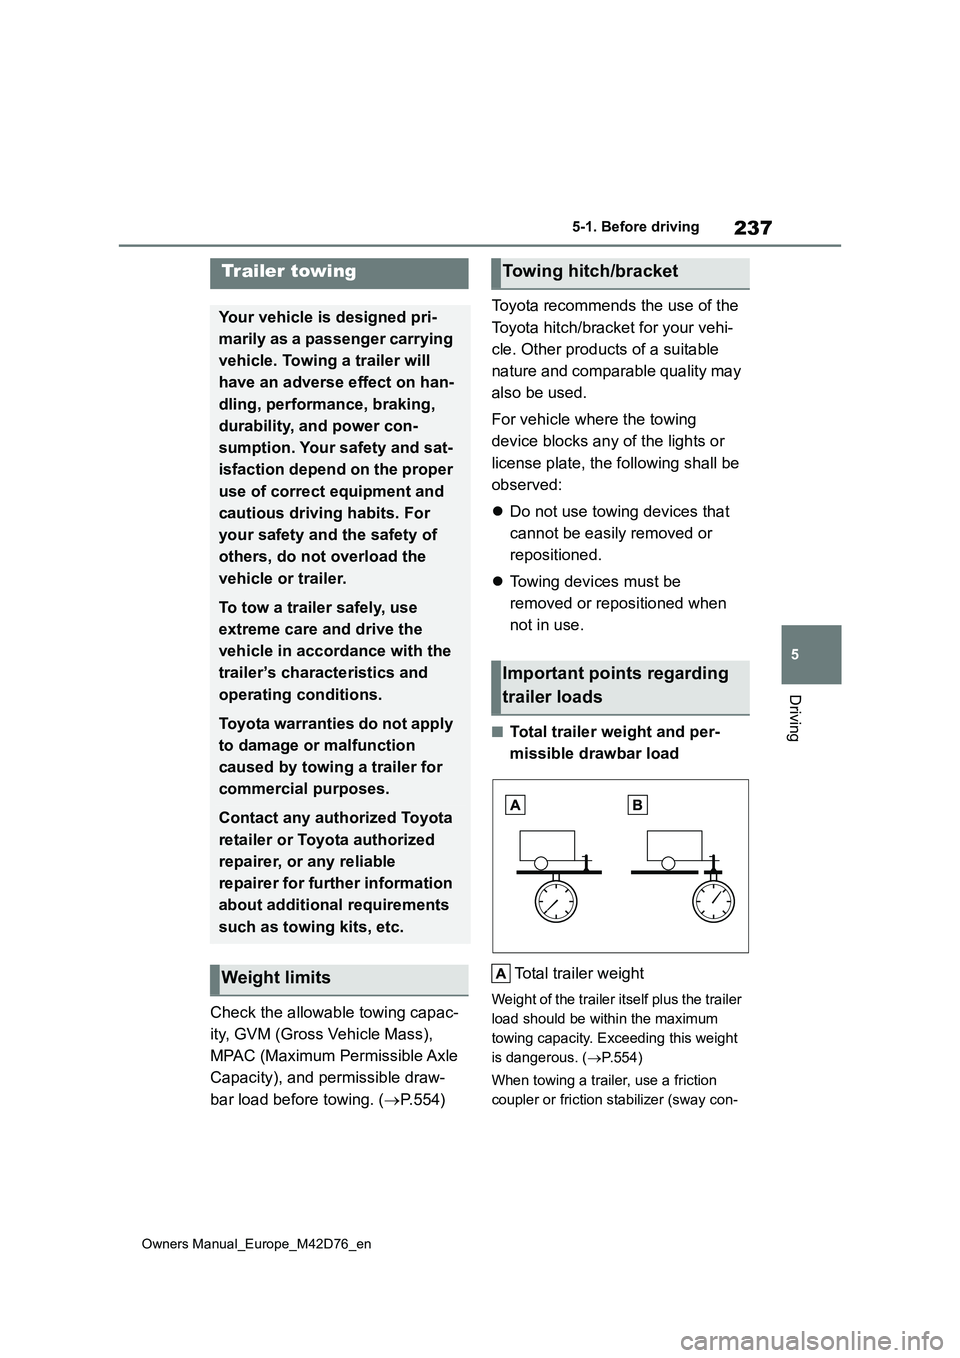
■Total trailer weight and per-
missible drawbar load
Total trailer weight
Weight of the trailer itself plus the trailer
load should be within the maximum
towing capacity. Exceeding this weight
is dangerous. ( P.554)
When towing a trailer, use a friction
coupler or friction stabilizer (sway con-
Trailer towing
Your vehicle is designed pri-
marily as a passenger carrying
vehicle. Towing a trailer will
have an adverse effect on han-
dling, performance, braking,
durability, and power con-
sumption. Your safety and sat-
isfaction depend on the proper
use of correct equipment and
cautious driving habits. For
your safety and the safety of
others, do not overload the
vehicle or trailer.
To tow a trailer safely, use
extreme care and drive the
vehicle in accordance with the
trailer’s characteristics and
operating conditions.
Toyota warranties do not apply
to damage or malfunction
caused by towing a trailer for
commercial purposes.
Contact any authorized Toyota
retailer or Toyota authorized
repairer, or any reliable
repairer for further information
about additional requirements
such as towing kits, etc.
Weight limits
Towing hitch/bracket
Important points regarding
trailer loads
Page 241 of 674
239
5
Owners Manual_Europe_M42D76_en
5-1. Before driving
Driving
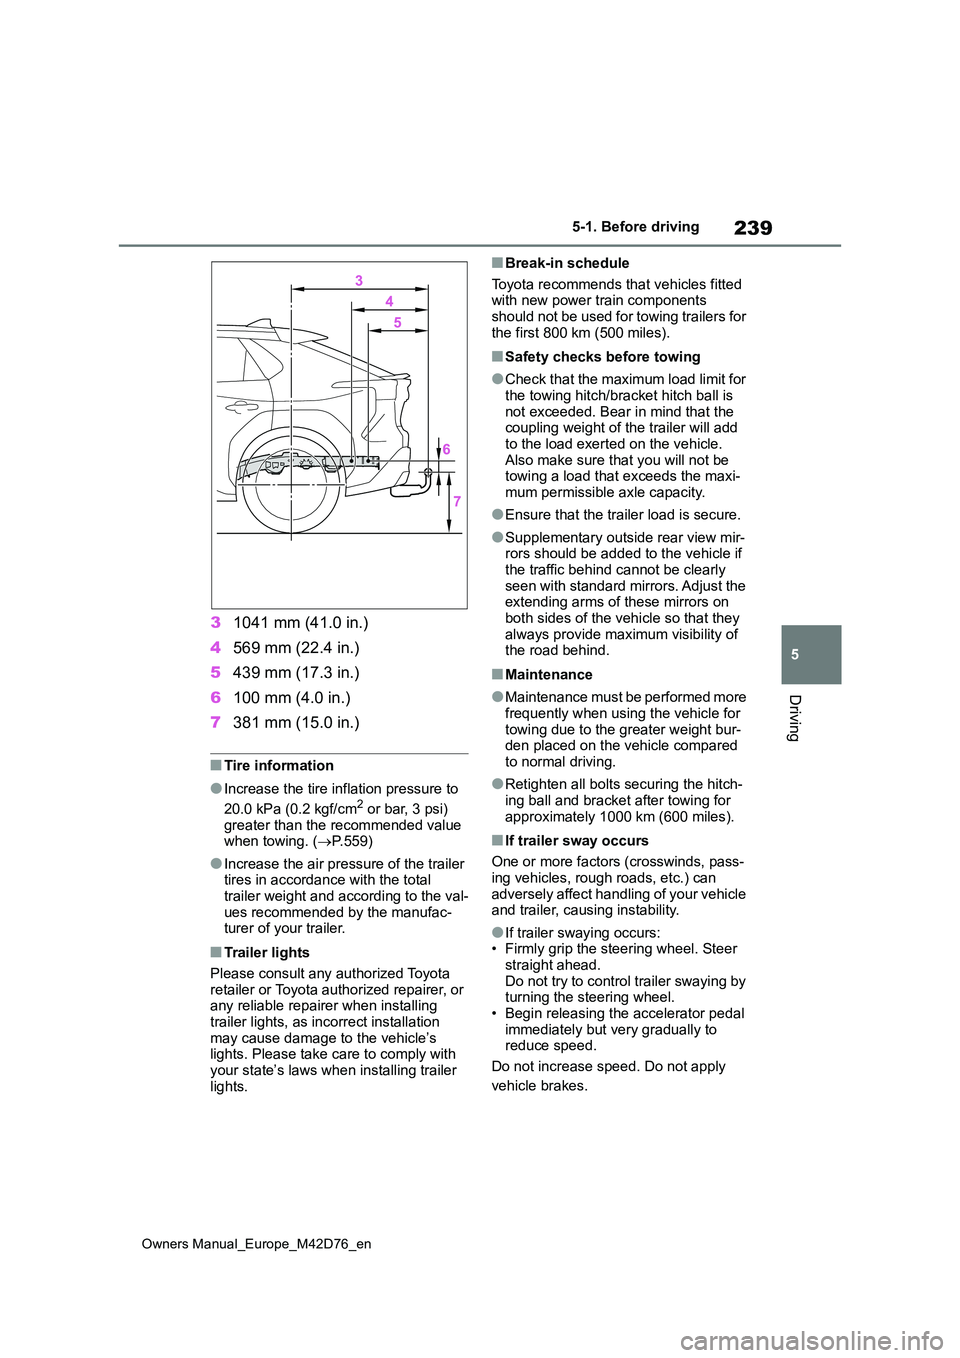
31041 mm (41.0 in.)
4 569 mm (22.4 in.)
5 439 mm (17.3 in.)
6 100 mm (4.0 in.)
7 381 mm (15.0 in.)
■Tire information
●Increase the tire inflation pressure to
20.0 kPa (0.2 kgf/cm2 or bar, 3 psi) greater than the recommended value when towing. ( P.559)
●Increase the air pressure of the trailer tires in accordance with the total
trailer weight and according to the val- ues recommended by the manufac-turer of your trailer.
■Trailer lights
Please consult any authorized Toyota retailer or Toyota authorized repairer, or any reliable repairer when installing
trailer lights, as incorrect installation may cause damage to the vehicle’s lights. Please take care to comply with
your state’s laws when installing trailer lights.
■Break-in schedule
Toyota recommends that vehicles fitted with new power train components should not be used for towing trailers for
the first 800 km (500 miles).
■Safety checks before towing
●Check that the maximum load limit for
the towing hitch/bracket hitch ball is not exceeded. Bear in mind that the coupling weight of the trailer will add
to the load exerted on the vehicle. Also make sure that you will not be towing a load that exceeds the maxi-
mum permissible axle capacity.
●Ensure that the trailer load is secure.
●Supplementary outside rear view mir- rors should be added to the vehicle if
the traffic behind cannot be clearly seen with standard mirrors. Adjust the extending arms of these mirrors on
both sides of the vehicle so that they always provide maximum visibility of the road behind.
■Maintenance
●Maintenance must be performed more frequently when using the vehicle for
towing due to the greater weight bur- den placed on the vehicle compared to normal driving.
●Retighten all bolts securing the hitch-ing ball and bracket after towing for
approximately 1000 km (600 miles).
■If trailer sway occurs
One or more factors (crosswinds, pass- ing vehicles, rough roads, etc.) can
adversely affect handling of your vehicle and trailer, causing instability.
●If trailer swaying occurs:• Firmly grip the steering wheel. Steer straight ahead.
Do not try to control trailer swaying by turning the steering wheel.• Begin releasing the accelerator pedal
immediately but very gradually to reduce speed.
Do not increase speed. Do not apply
vehicle brakes.
Page 242 of 674
240
Owners Manual_Europe_M42D76_en
5-1. Before driving
If you make no extreme correction with
the steering or brakes, your vehicle and
trailer should stabilize.
●After the trailer swaying has stopped: • Stop in a safe place. Get all occupants out of the vehicle.
• Check the tires of the vehicle and the trailer.• Check the load in the trailer.
Make sure the load has not shifted. Make sure the tongue weight is appro-priate, if possible.
• Check the load in the vehicle. Make sure the vehicle is not over-loaded after occupants get in.
If you cannot find any problems, the
speed at which trailer swaying occurred
is beyond the limit of your particular
vehicle-trailer combination. Drive at a
lower speed to prevent instability.
Remember that swaying of the towing
vehicle-trailer increases as speed
increases.
Your vehicle will handle differently
when towing a trailer. In order to
avoid accident, death or serious
injury, keep the following in mind
when towing:
■Checking connections
between trailer and lights
Stop the vehicle and check the
operation of the connection
between the trailer and lights after
driving for a brief period as well as
before starting off.
■Practicing driving with a cou-
pled trailer
Get the feel for turning, stopping
and reversing with the trailer
coupled by practicing in an area
with no or light traffic.
When reversing with a coupled
trailer, hold the section of the
steering wheel nearest to you
and rotate clockwise to turn the
trailer left or counterclockwise to
turn it right. Always rotate a little
at a time to prevent steering
error. Have someone guide you
when reversing to lessen the risk
of an accident.
■Increasing vehicle-to-vehicle
distance
At a speed of 10 km/h (6 mph), the
distance to the vehicle running
ahead of you should be equivalent
to or greater than the combined
length of your vehicle and trailer.
Avoid sudden braking that may
cause skidding. Otherwise, the
vehicle may spin out of control. This
NOTICE
■When the rear bumper strength- ening material is aluminum
Ensure the steel bracket part does not
come directly in contact with that area.When steel and aluminum come into
contact, there is a reaction similar to corrosion, which will weaken the sec-tion concerned and may result in
damage. Apply a rust inhibitor to parts that will come in contact when attach-ing a steel bracket.
■Do not directly splice trailer lights
Directly splicing trailer lights may damage your vehicle’s electrical sys-tem and cause a malfunction.
Guidance
Page 254 of 674
252
Owners Manual_Europe_M42D76_en
5-2. Driving procedures
tor pedal is released, becomes
stronger than usual.
■When Regeneration Boost cannot be used In the following cases, the system does not operate.
●When “X-MODE” is activated (If equipped)
●When the brake system or EV system is malfunctioning
●When regenerative braking is limited
regenerative braking may be restricted
in the following situations:
• When the amount of charge of the
traction battery is high • When the temperature of the traction battery is low or extremely high
• When the temperature of the electric motor or power control unit is extremely high
• When regenerative braking is continu- ally used for a long time
■Regenerative Braking
●The vehicle cannot be stopped by just releasing the accelerator pedal. Step on the brake pedal when the vehicle is
stopped.
●If the power switch is turned off and
then the EV system is restarted, the Regeneration Boost will be turned off.
●When driving at high speeds, the feel-ing of deceleration due to regenera-
tive braking is smaller than in a normal car.
●The maximum deceleration varies depending on the vehicle speed.
●Regeneration Boost cannot be used when the following message is dis-played on the multi-information dis-
play. When decelerating, firmly step on the brake to decelerate.
• “Regeneration Boost Unavailable XMODE Activated”• “Regeneration Boost Temporarily
Unavailable Press Brake to Deceler- ate”
• “Regeneration Boost Temporarily
Unavailable See Owner’s Manual”
■Stop lights turning ON
When the regenerative braking force exceeds a certain level, the stop lights
turns on.
It is suited for driving that suppress
vehicle driving power and improves
power consumption.
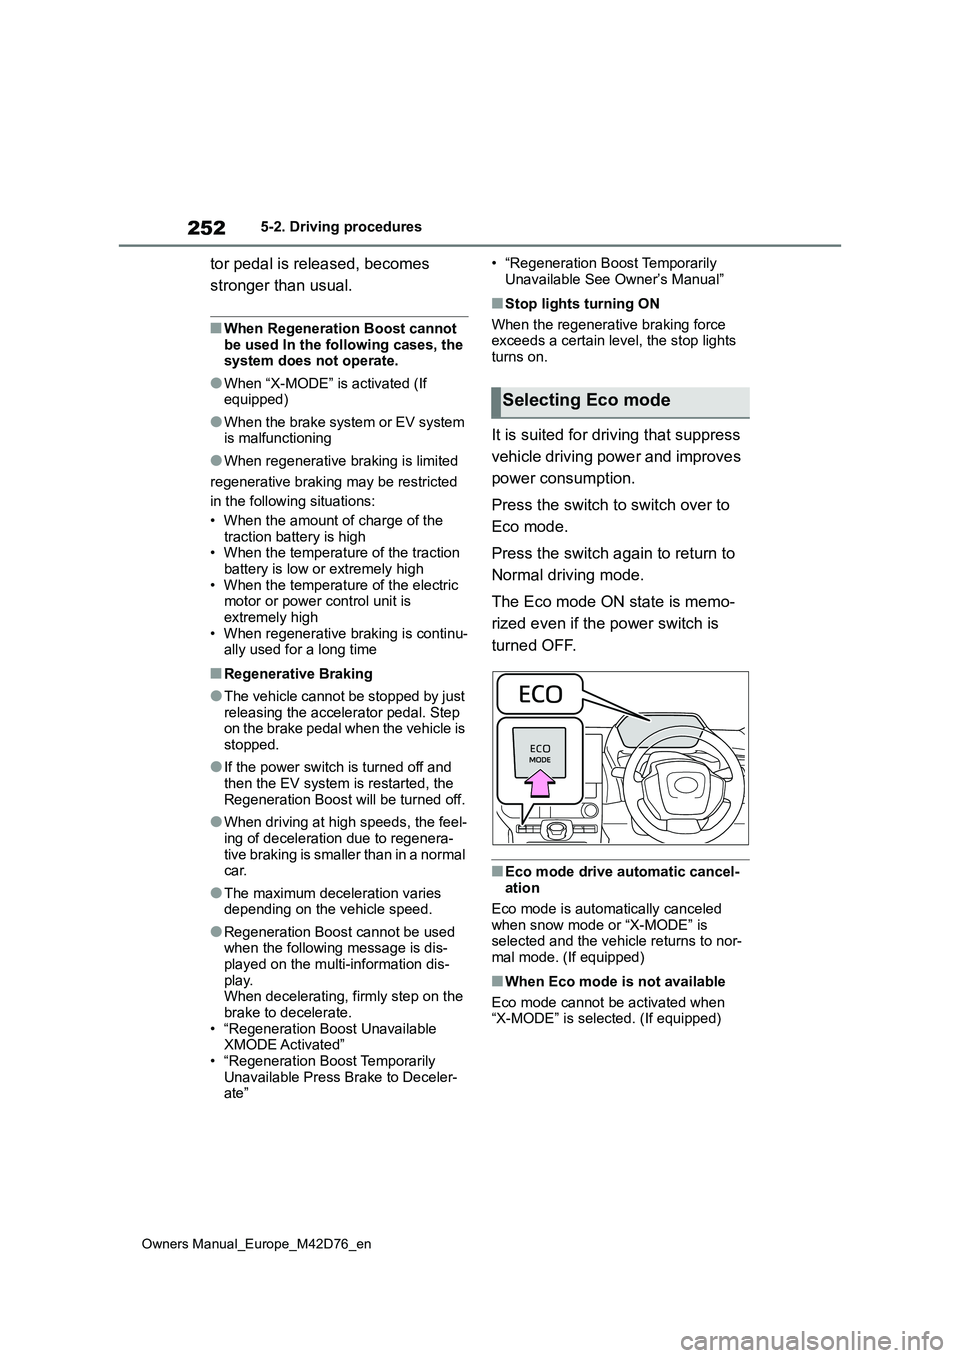
Press the switch to switch over to
Eco mode.
Press the switch again to return to
Normal driving mode.
The Eco mode ON state is memo-
rized even if the power switch is
turned OFF.
■Eco mode drive automatic cancel- ation
Eco mode is automatically canceled
when snow mode or “X-MODE” is selected and the vehicle returns to nor-
mal mode. (If equipped)
■When Eco mode is not available
Eco mode cannot be activated when “X-MODE” is selected. (If equipped)
Selecting Eco mode
Page 255 of 674
253
5
Owners Manual_Europe_M42D76_en
5-2. Driving procedures
Driving
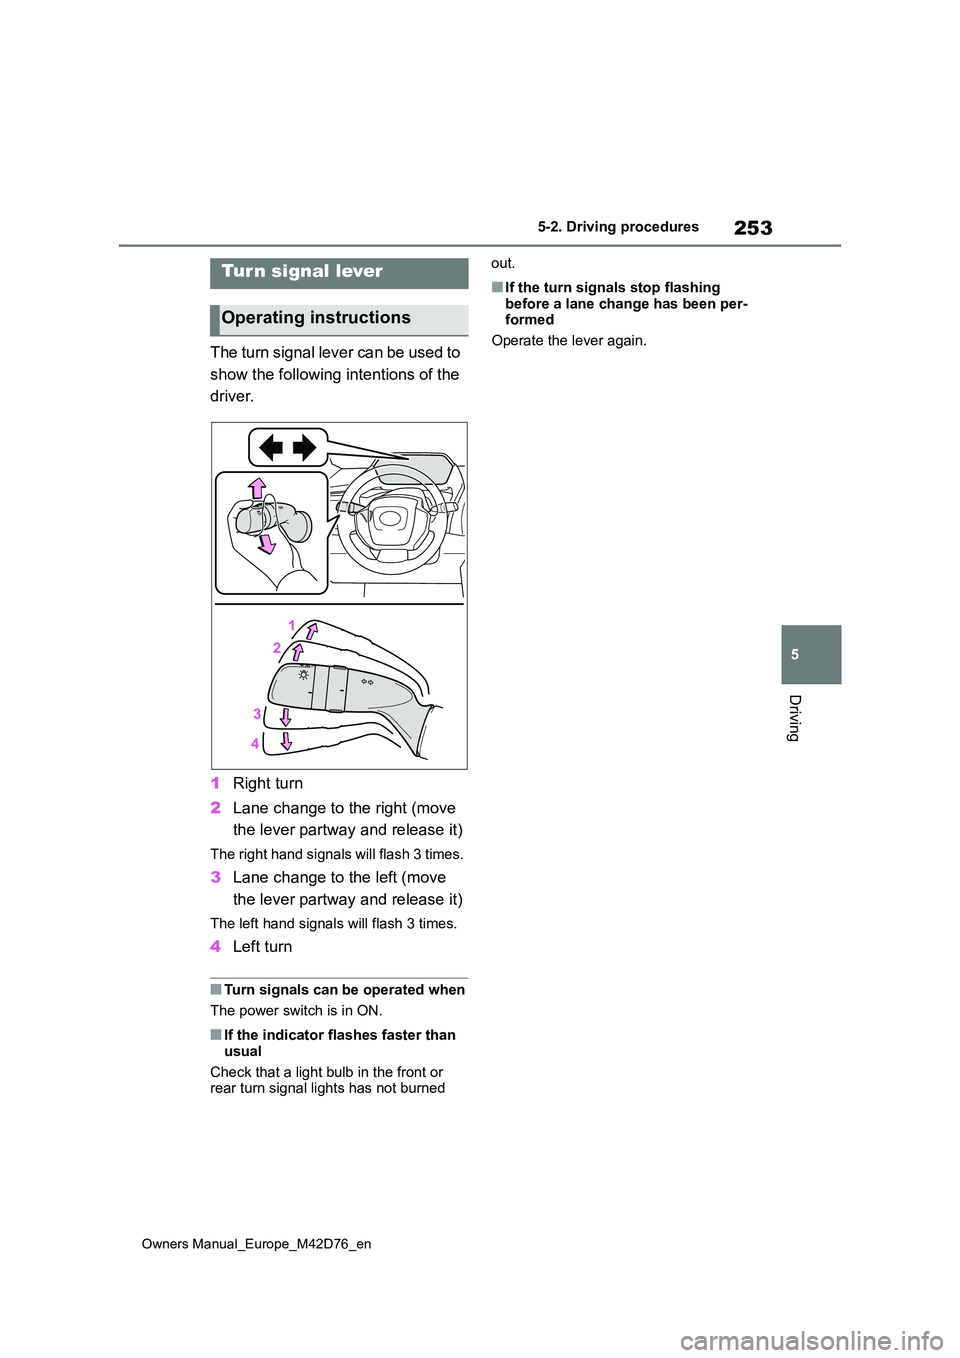
The turn signal lever can be used to
show the following intentions of the
driver.
1 Right turn
2 Lane change to the right (move
the lever partway and release it)
The right hand signals will flash 3 times.
3 Lane change to the left (move
the lever partway and release it)
The left hand signals will flash 3 times.
4 Left turn
■Turn signals can be operated when
The power switch is in ON.
■If the indicator flashes faster than
usual
Check that a light bulb in the front or rear turn signal lights has not burned
out.
■If the turn signals stop flashing
before a lane change has been per- formed
Operate the lever again.
Tur n signal lever
Operating instructions
Page 261 of 674
259
5
Owners Manual_Europe_M42D76_en
5-3. Operating the lights and wipers
Driving
5-3.Operating the lights and wipers
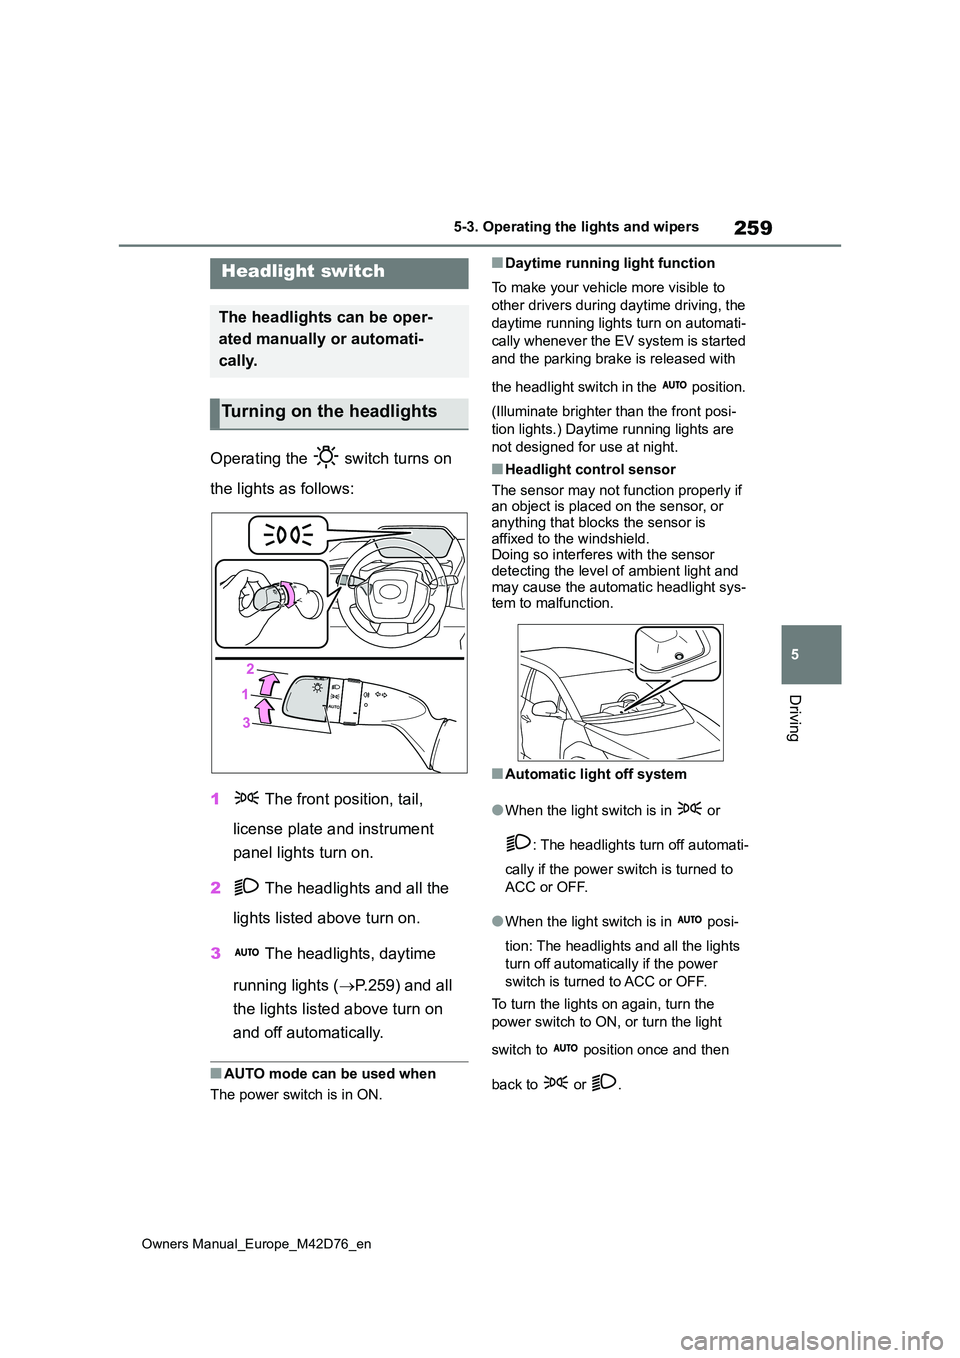
Operating the switch turns on
the lights as follows:
1 The front position, tail,
license plate and instrument
panel lights turn on.
2 The headlights and all the
lights listed above turn on.
3 The headlights, daytime
running lights ( P.259) and all
the lights listed above turn on
and off automatically.
■AUTO mode can be used when
The power switch is in ON.
■Daytime running light function
To make your vehicle more visible to
other drivers during daytime driving, the
daytime running lights turn on automati-
cally whenever the EV system is started
and the parking brake is released with
the headlight switch in the position.
(Illuminate brighter than the front posi-
tion lights.) Daytime running lights are
not designed for use at night.
■Headlight control sensor
The sensor may not function properly if an object is placed on the sensor, or
anything that blocks the sensor is affixed to the windshield. Doing so interferes with the sensor
detecting the level of ambient light and may cause the automatic headlight sys-tem to malfunction.
■Automatic light off system
●When the light switch is in or
: The headlights turn off automati-
cally if the power switch is turned to
ACC or OFF.
●When the light switch is in posi-
tion: The headlights and all the lights
turn off automatically if the power
switch is turned to ACC or OFF.
To turn the lights on again, turn the
power switch to ON, or turn the light
switch to position once and then
back to or .
Headlight switch
The headlights can be oper-
ated manually or automati-
cally.
Turning on the headlights
Page 262 of 674
260
Owners Manual_Europe_M42D76_en
5-3. Operating the lights and wipers
■Light reminder buzzer
A buzzer sounds when the power switch is turned off or turned to ACC and the driver’s door is opened while the lights
are turned on.
■Automatic headlight leveling sys- tem (if equipped)
The level of the headlights is automati-
cally adjusted according to the number of passengers and the loading condition of the vehicle to ensure that the head-
lights do not interfere with other road users.
■12-volt battery-saving function
In order to prevent 12-volt the battery of
the vehicle from discharging, if the light
switch is in the or position
when the power switch is turned off, the
12-volt battery saving function will oper-
ate and automatically turn off all the
lights after approximately 20 minutes.
When the power switch is turned to ON, the 12-volt battery-saving function will be disabled.
When any of the following are per- formed, the 12-volt battery-saving func-tion is canceled once and then
reactivated. All the lights will turn off automatically 20 minutes after the 12-volt battery- saving function has been
reactivated:
●When the headlight switch is operated
●When a door is opened or closed
■Customization
Settings (e.g. light sensor sensitivity)
can be changed. (Customizable features: P.567)
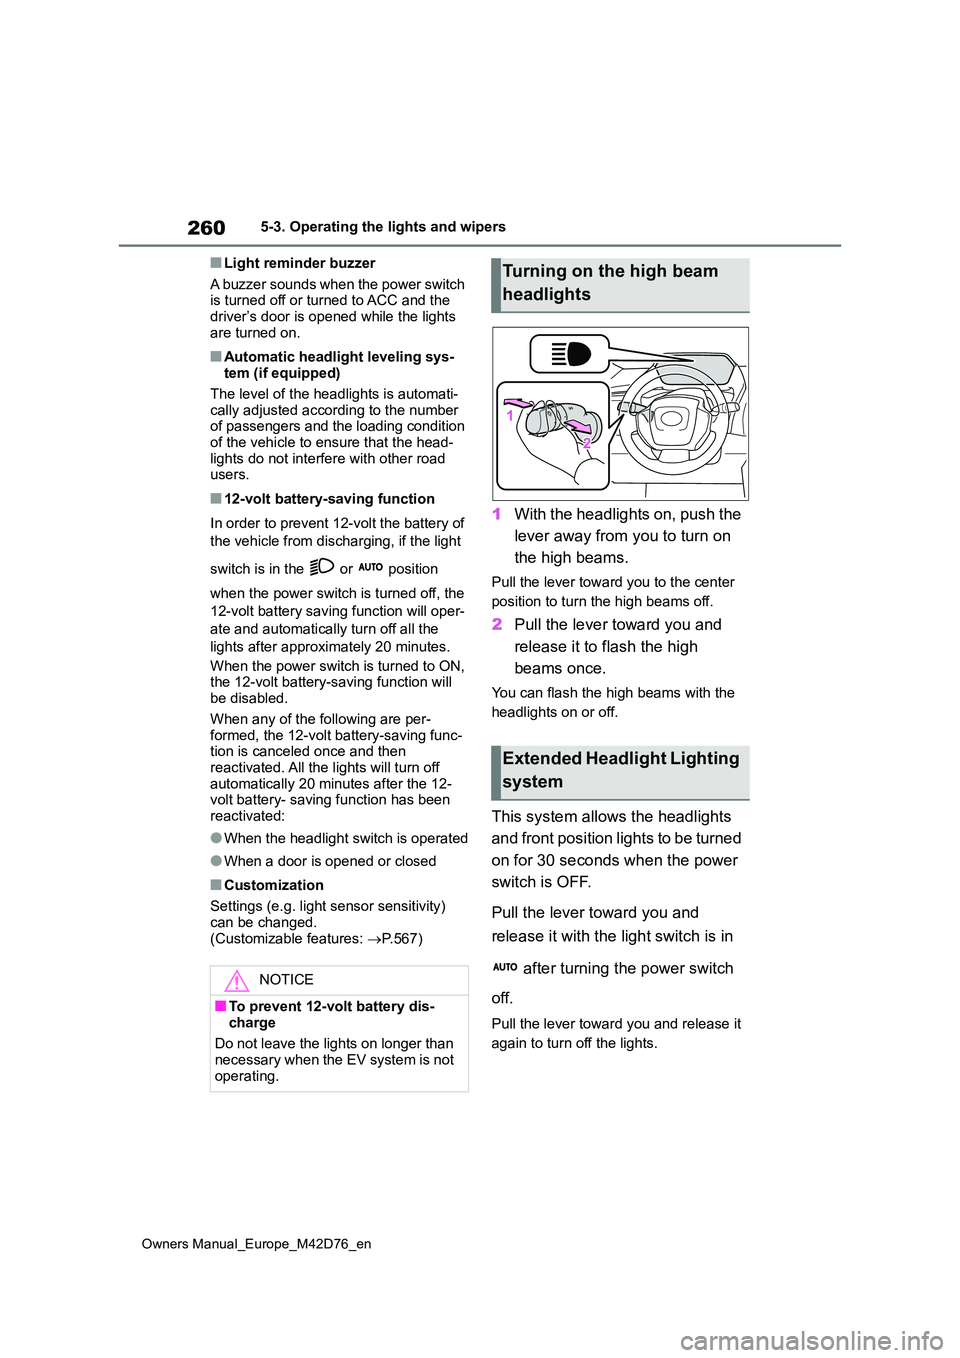
1With the headlights on, push the
lever away from you to turn on
the high beams.
Pull the lever toward you to the center
position to turn the high beams off.
2 Pull the lever toward you and
release it to flash the high
beams once.
You can flash the high beams with the
headlights on or off.
This system allows the headlights
and front position lights to be turned
on for 30 seconds when the power
switch is OFF.
Pull the lever toward you and
release it with the light switch is in
after turning the power switch
off.
Pull the lever toward you and release it
again to turn off the lights.
NOTICE
■To prevent 12-volt battery dis-
charge
Do not leave the lights on longer than necessary when the EV system is not
operating.
Turning on the high beam
headlights
Extended Headlight Lighting
system
Page 263 of 674
261
5
Owners Manual_Europe_M42D76_en
5-3. Operating the lights and wipers
Driving
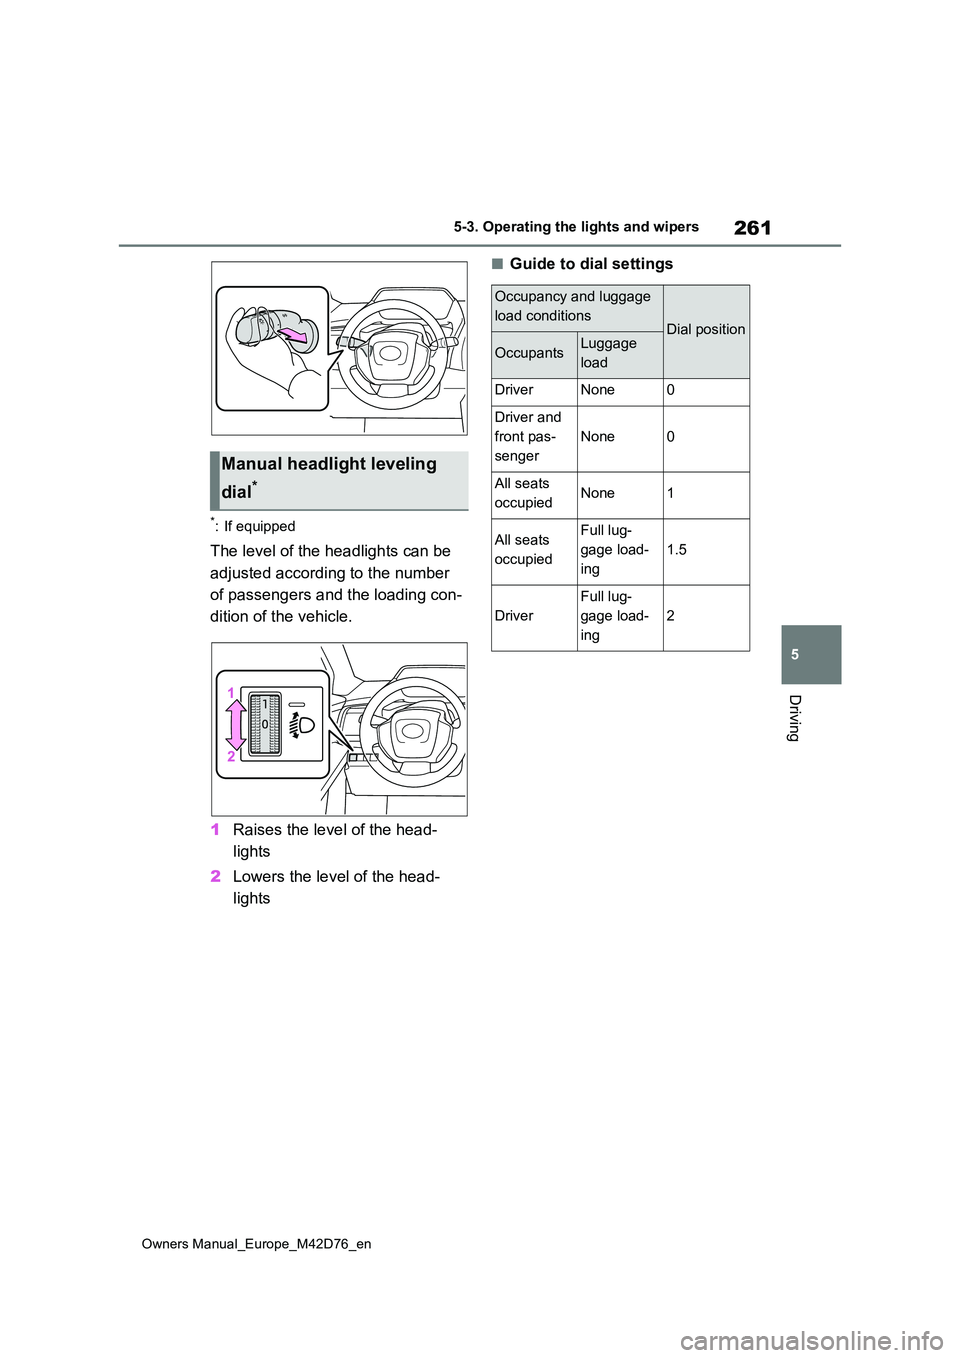
*: If equipped
The level of the headlights can be
adjusted according to the number
of passengers and the loading con-
dition of the vehicle.
1 Raises the level of the head-
lights
2 Lowers the level of the head-
lights
■Guide to dial settings
Manual headlight leveling
dial*
Occupancy and luggage
load conditionsDial position
OccupantsLuggage
load
DriverNone0
Driver and
front pas-
senger
None0
All seats
occupiedNone1
All seats
occupied
Full lug-
gage load-
ing
1.5
Driver
Full lug-
gage load-
ing
2
Page 264 of 674
262
Owners Manual_Europe_M42D76_en
5-3. Operating the lights and wipers
*: If equipped
According to the vehicle speed,
the brightness and illuminated
area of the high beams are
adjusted.
When driving around a curve, the
system uses the high beams to
brightly illuminate the direction of
travel of the vehicle.
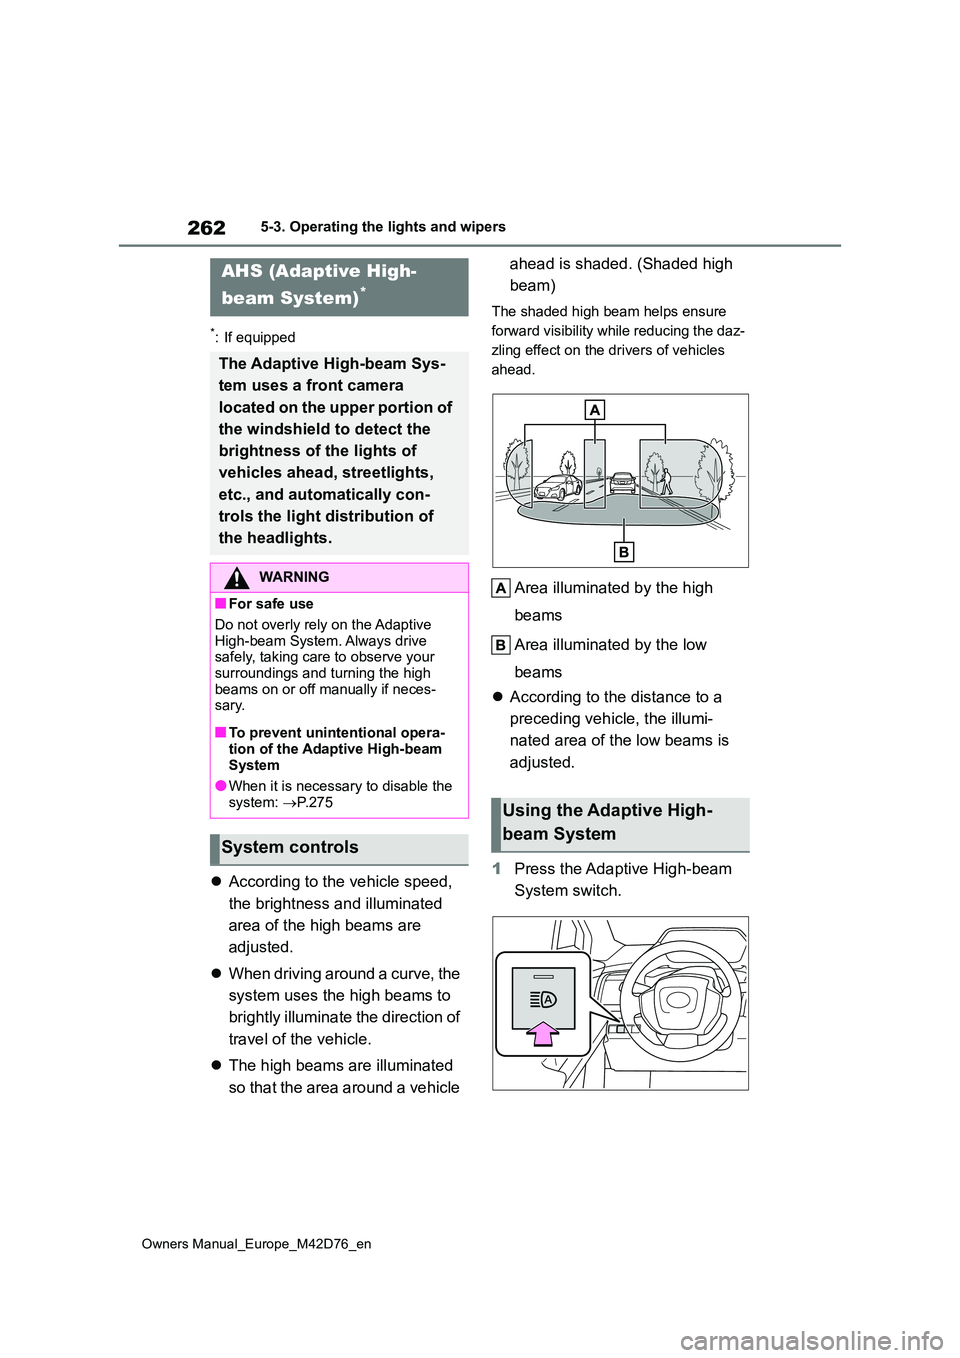
The high beams are illuminated
so that the area around a vehicle
ahead is shaded. (Shaded high
beam)
The shaded high beam helps ensure
forward visibility while reducing the daz-
zling effect on the drivers of vehicles
ahead.
Area illuminated by the high
beams
Area illuminated by the low
beams
According to the distance to a
preceding vehicle, the illumi-
nated area of the low beams is
adjusted.
1 Press the Adaptive High-beam
System switch.
AHS (Adaptive High-
beam System)*
The Adaptive High-beam Sys-
tem uses a front camera
located on the upper portion of
the windshield to detect the
brightness of the lights of
vehicles ahead, streetlights,
etc., and automatically con-
trols the light distribution of
the headlights.
WARNING
■For safe use
Do not overly rely on the Adaptive High-beam System. Always drive safely, taking care to observe your
surroundings and turning the high beams on or off manually if neces-sary.
■To prevent unintentional opera-
tion of the Adaptive High-beam System
●When it is necessary to disable the
system: P.275
System controls
Using the Adaptive High-
beam System