warning lights TOYOTA BZ4X 2023 User Guide
[x] Cancel search | Manufacturer: TOYOTA, Model Year: 2023, Model line: BZ4X, Model: TOYOTA BZ4X 2023Pages: 628, PDF Size: 11.91 MB
Page 149 of 628
1493-1. Instrument cluster
Owners Manual_USA_M42C01_en
3
Vehicle status information and indicators
*1: These lights come on when the power switch is turned to ON to
indicate that a system check is
being performed. They will turn
off after the EV system is started,
or after a few seconds. There
may be a malfunction in a sys-
tem if the lights do not come on,
or turn off. Have the vehicle
inspected by your Toyota dealer.
*2: This light illuminates on the multi-information display with a
message.
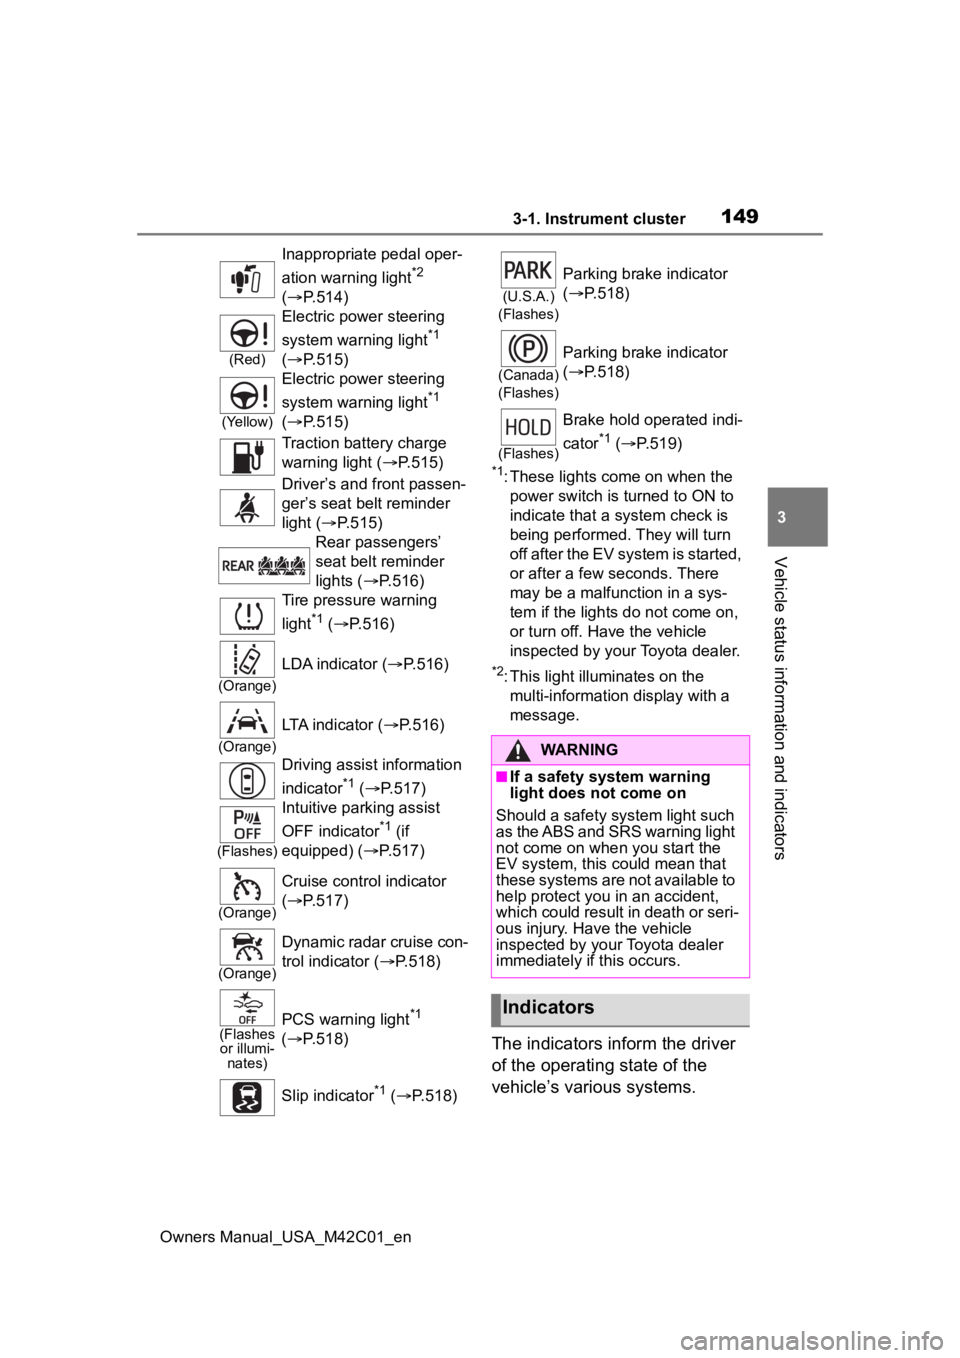
The indicators inform the driver
of the operating state of the
vehicle’s various systems.
Inappropriate pedal oper-
ation warning light
*2
( P.514)
(Red)
Electric power steering
system warning light
*1
( P.515)
(Yellow)
Electric power steering
system warning light
*1
( P.515)
Traction battery charge
warning light ( P.515)
Driver’s and front passen-
ger’s seat belt reminder
light ( P.515)
Rear passengers’
seat belt reminder
lights ( P.516)
Tire pressure warning
light
*1 ( P.516)
(Orange)
LDA indicator ( P.516)
(Orange)
LTA indicator (P.516)
Driving assist information
indicator
*1 ( P.517)
(Flashes)
Intuitive parking assist
OFF indicator
*1 (if
equipped) ( P.517)
(Orange)
Cruise control indicator
( P.517)
(Orange)
Dynamic radar cruise con-
trol indicator ( P.518)
(Flashes
or illumi- nates)PCS warning light*1
( P.518)
Slip indicator
*1 ( P.518)
(U.S.A.)
(Flashes)
Parking brake indicator
( P.518)
(Canada)
(Flashes)
Parking brake indicator
( P.518)
(Flashes)
Brake hold operated indi-
cator
*1 ( P.519)
WARNING
■If a safety system warning
light does not come on
Should a safety system light such
as the ABS and SRS warning light
not come on when you start the
EV system, this c ould mean that
these systems are not available to
help protect you in an accident,
which could result in death or seri-
ous injury. Have the vehicle
inspected by you r Toyota dealer
immediately if this occurs.
Indicators
Page 155 of 628
1553-1. Instrument cluster
Owners Manual_USA_M42C01_en
3
Vehicle status information and indicators
If is displayed when is
selected on the mu lti-information
display, the system may be malfunc-
tioning.
Have the vehicle inspected by your
Toyota dealer.
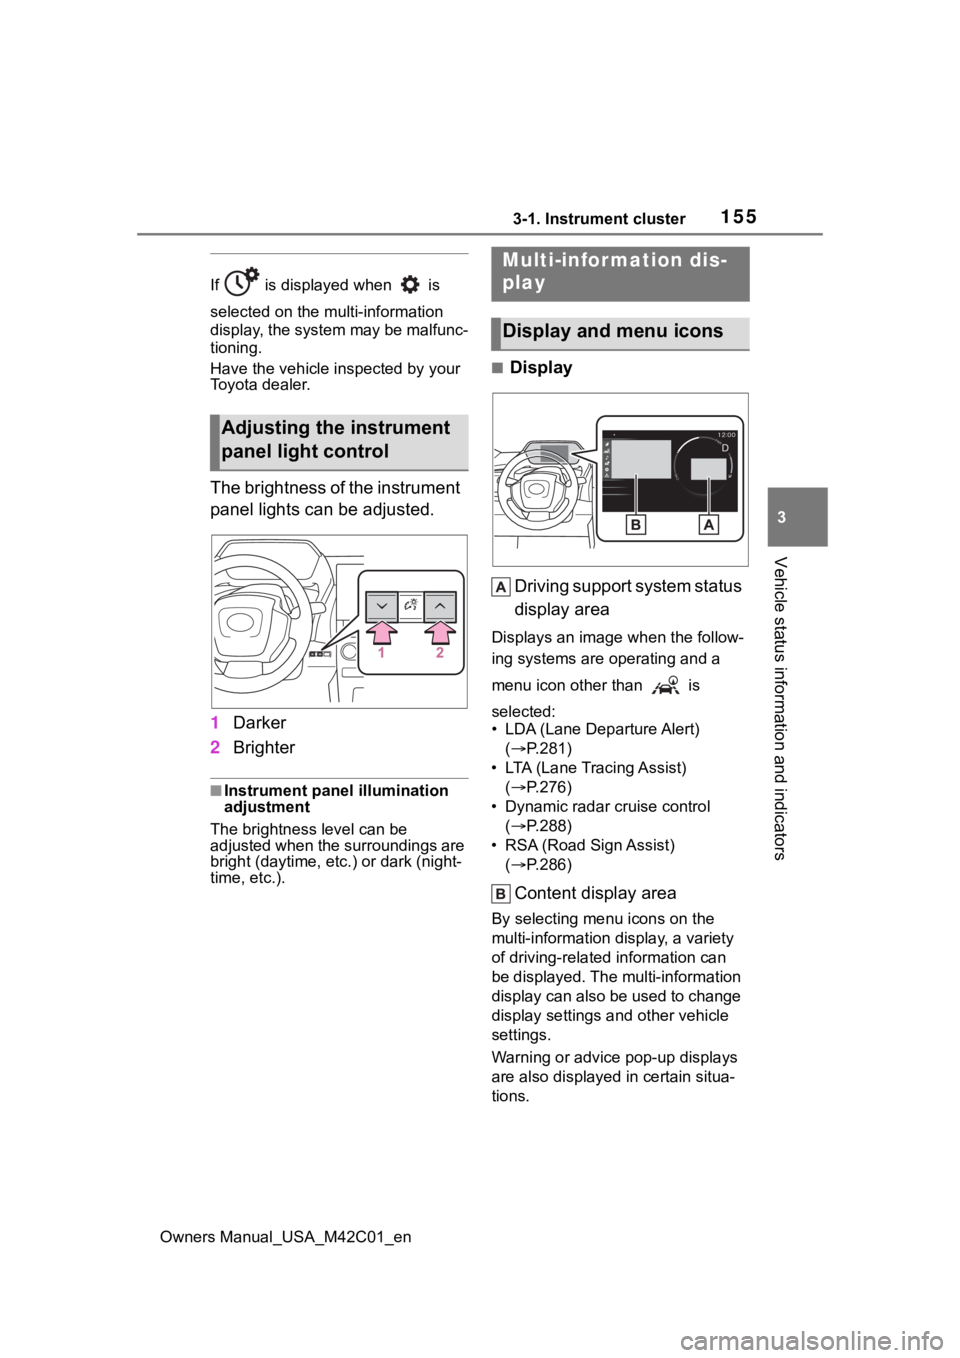
The brightness of the instrument
panel lights can be adjusted.
1 Darker
2 Brighter
■Instrument panel illumination
adjustment
The brightness level can be
adjusted when the surroundings are
bright (daytime, etc.) or dark (night-
time, etc.).
■Display
Driving support system status
display area
Displays an image when the follow-
ing systems are operating and a
menu icon other than is
selected:
• LDA (Lane Departure Alert) ( P.281)
• LTA (Lane Tracing Assist) ( P.276)
• Dynamic radar cruise control ( P.288)
• RSA (Road Sign Assist) ( P.286)
Content display area
By selecting menu icons on the
multi-information di splay, a variety
of driving-related information can
be displayed. The multi-information
display can also be used to change
display settings and other vehicle
settings.
Warning or advice pop-up displays
are also displayed in certain situa-
tions.
Adjusting the instrument
panel light control
Multi-infor mation dis-
play
Display and menu icons
Page 159 of 628
1593-1. Instrument cluster
Owners Manual_USA_M42C01_en
3
Vehicle status information and indicators
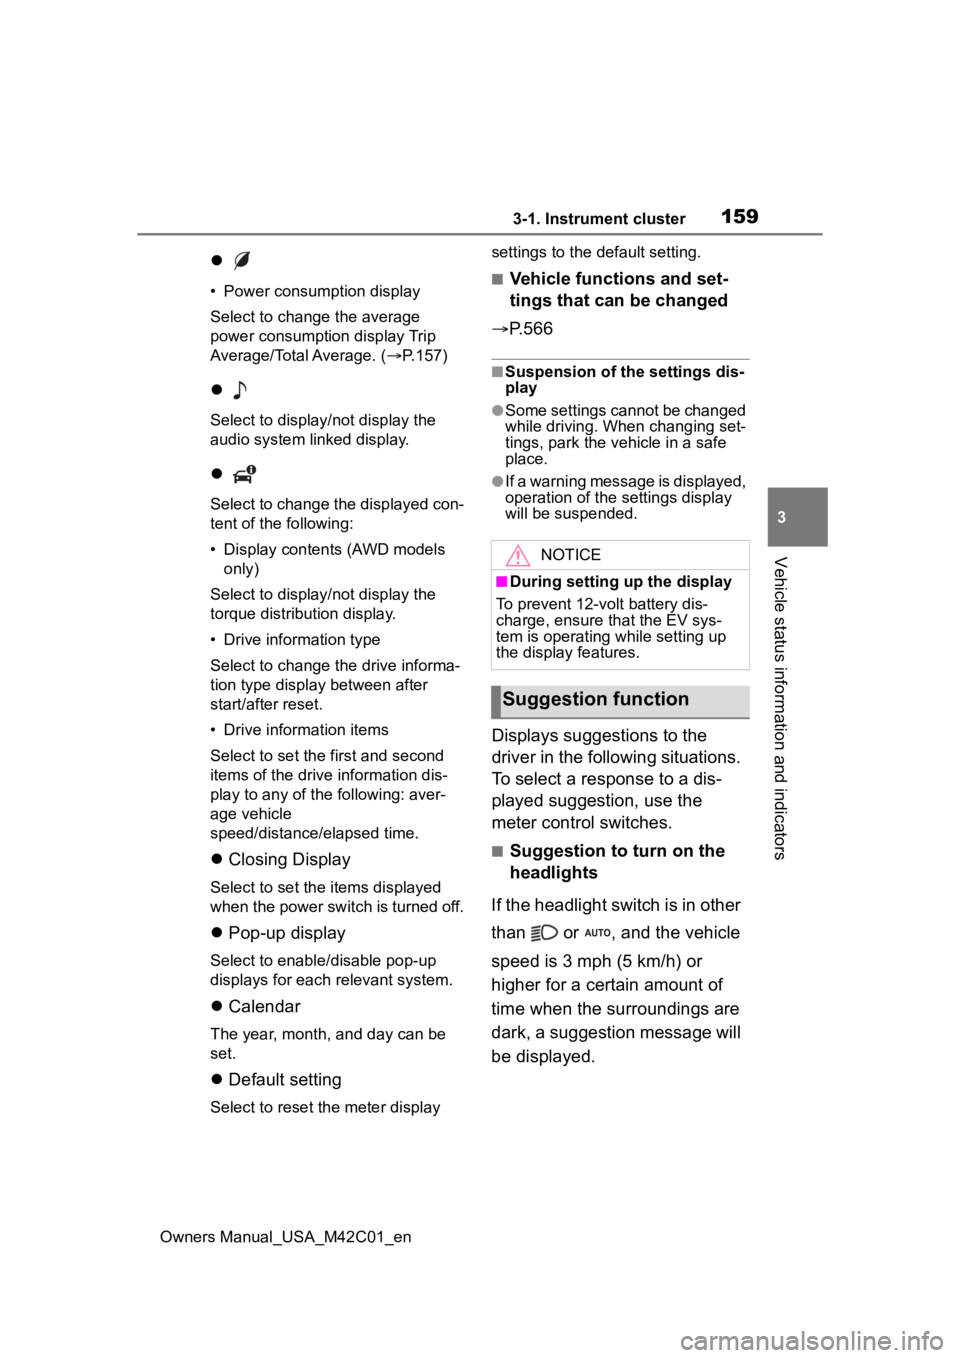
• Power consumption display
Select to change the average
power consumption display Trip
Average/Total Average. ( P.157)
Select to display/not display the
audio system linked display.
Select to change the displayed con-
tent of the following:
• Display contents (AWD models
only)
Select to display/not display the
torque distribution display.
• Drive information type
Select to change the drive informa-
tion type display between after
start/after reset.
• Drive information items
Select to set the first and second
items of the drive information dis-
play to any of the following: aver-
age vehicle
speed/distance/elapsed time.
Closing Display
Select to set the i tems displayed
when the power switch is turned off.
Pop-up display
Select to enable/disable pop-up
displays for each relevant system.
Calendar
The year, month, and day can be
set.
Default setting
Select to reset the meter display settings to the default setting.
■Vehicle functions and set-
tings that can be changed
P.566
■Suspension of the settings dis-
play
●Some settings cannot be changed
while driving. When changing set-
tings, park the vehicle in a safe
place.
●If a warning message is displayed,
operation of the settings display
will be suspended.
Displays suggestions to the
driver in the following situations.
To select a response to a dis-
played suggestion, use the
meter control switches.
■Suggestion to turn on the
headlights
If the headlight switch is in other
than or , and the vehicle
speed is 3 mph (5 km/h) or
higher for a certain amount of
time when the surroundings are
dark, a suggestion message will
be displayed.
NOTICE
■During setting up the display
To prevent 12-volt battery dis-
charge, ensure that the EV sys-
tem is operating while setting up
the display features.
Suggestion function
Page 200 of 628
2004-4. Adjusting the steering wheel and mirrors
Owners Manual_USA_M42C01_en
*: If equipped
The height of the rear view mir-
ror can be adjusted to suit your
driving posture.
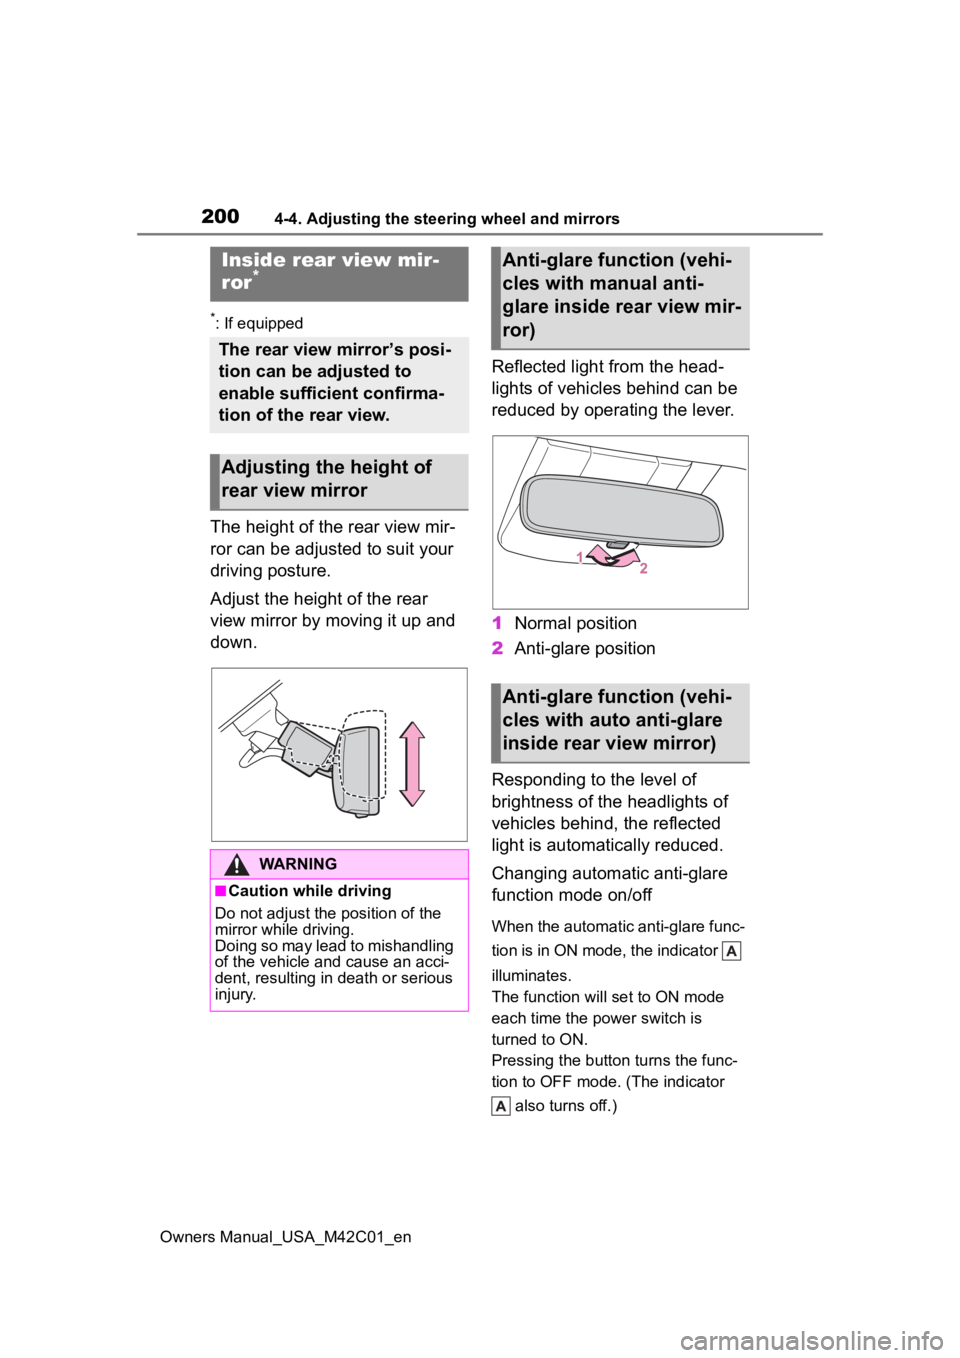
Adjust the height of the rear
view mirror by moving it up and
down.Reflected light from the head-
lights of vehicles behind can be
reduced by operating the lever.
1
Normal position
2 Anti-glare position
Responding to the level of
brightness of the headlights of
vehicles behind, the reflected
light is automatically reduced.
Changing automatic anti-glare
function mode on/off
When the automatic anti-glare func-
tion is in ON mode, the indicator
illuminates.
The function will set to ON mode
each time the power switch is
turned to ON.
Pressing the button turns the func-
tion to OFF mode. (The indicator also turns off.)
Inside rear view mir-
ror*
The rear view mirror’s posi-
tion can be adjusted to
enable sufficient confirma-
tion of the rear view.
Adjusting the height of
rear view mirror
WARNING
■Caution while driving
Do not adjust the position of the
mirror while driving.
Doing so may lead to mishandling
of the vehicle and cause an acci-
dent, resulting in death or serious
injury.
Anti-glare function (vehi-
cles with manual anti-
glare inside rear view mir-
ror)
Anti-glare function (vehi-
cles with auto anti-glare
inside rear view mirror)
Page 206 of 628
2064-4. Adjusting the steering wheel and mirrors
Owners Manual_USA_M42C01_en
■Cleaning the mirror surface
If the mirror surface is dirty, the
image on the display may be dif-
ficult to see.
Wipe the mirror surface gently
using a soft dry cloth.
■Cleaning the camera
If it is difficult to see the Digital
Rear-view Mirror image
because water, snow, mud, etc.
is stuck to the camera lens,
operate the rear camera washer
or change to optical mirror
mode. ( P.253)
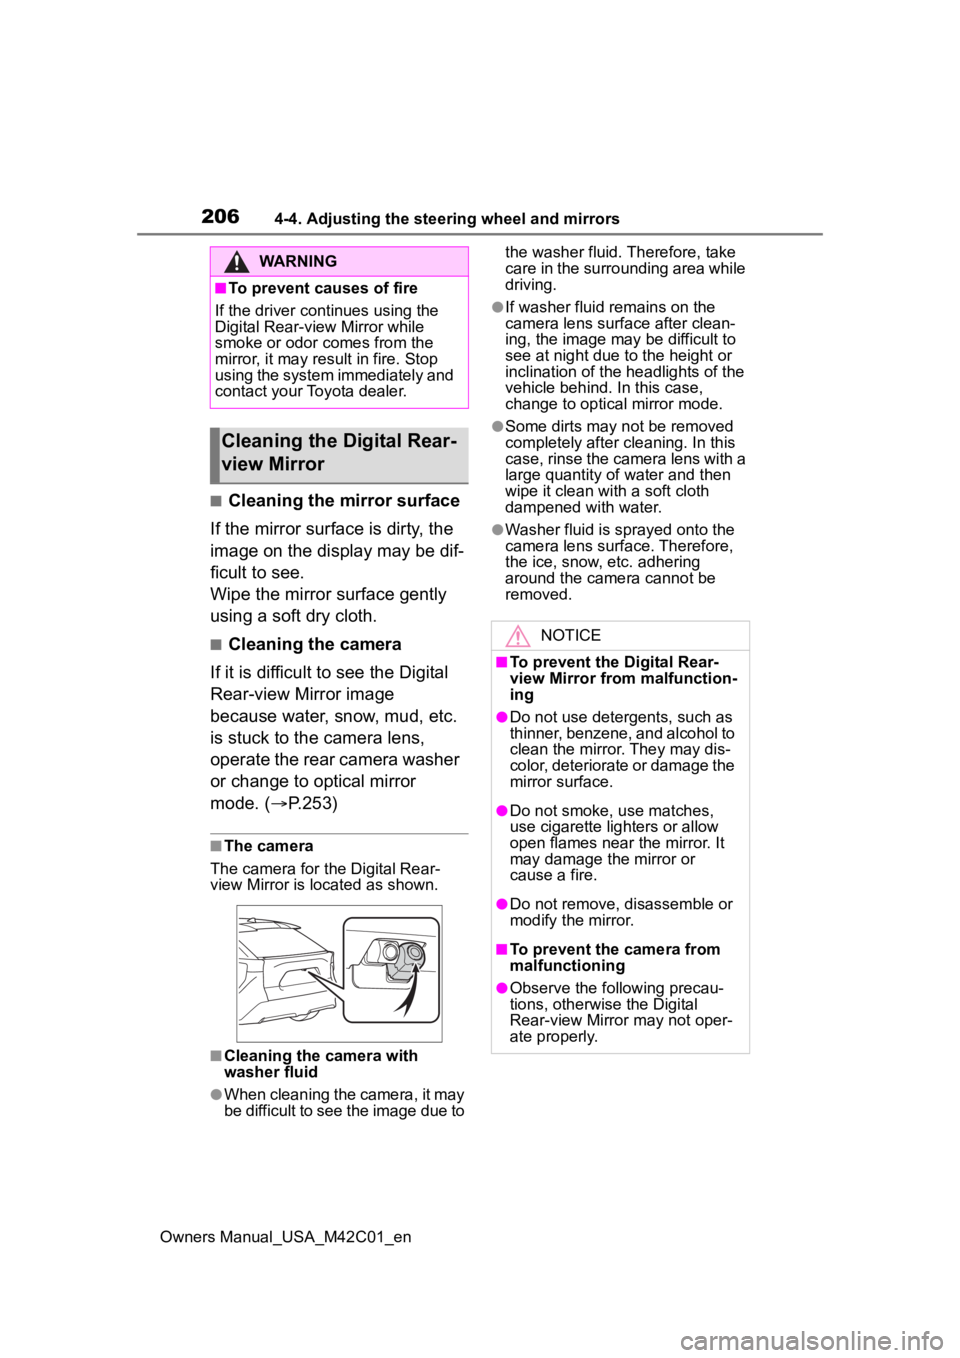
■The camera
The camera for the Digital Rear-
view Mirror is located as shown.
■Cleaning the camera with
washer fluid
●When cleaning the camera, it may
be difficult to see the image due to the washer fluid. Therefore, take
care in the surrounding area while
driving.
●If washer fluid remains on the
camera lens surface after clean-
ing, the image may be difficult to
see at night due to the height or
inclination of the
headlights of the
vehicle behind. In this case,
change to optical mirror mode.
●Some dirts may n ot be removed
completely after cl eaning. In this
case, rinse the camera lens with a
large quantity of water and then
wipe it clean with a soft cloth
dampened with water.
●Washer fluid is sprayed onto the
camera lens surface. Therefore,
the ice, snow, etc. adhering
around the camera cannot be
removed.
WARNING
■To prevent causes of fire
If the driver continues using the
Digital Rear-view Mirror while
smoke or odor comes from the
mirror, it may res ult in fire. Stop
using the system immediately and
contact your Toyota dealer.
Cleaning the D igital Rear-
view Mirror
NOTICE
■To prevent the Digital Rear-
view Mirror from malfunction-
ing
●Do not use detergents, such as
thinner, benzene, and alcohol to
clean the mirror. They may dis-
color, deteriorate or damage the
mirror surface.
●Do not smoke, use matches,
use cigarette lighters or allow
open flames near the mirror. It
may damage the mirror or
cause a fire.
●Do not remove, d isassemble or
modify the mirror.
■To prevent the camera from
malfunctioning
●Observe the fo llowing precau-
tions, otherwise the Digital
Rear-view Mirror may not oper-
ate properly.
Page 250 of 628
2505-3. Operating the lights and wipers
Owners Manual_USA_M42C01_en
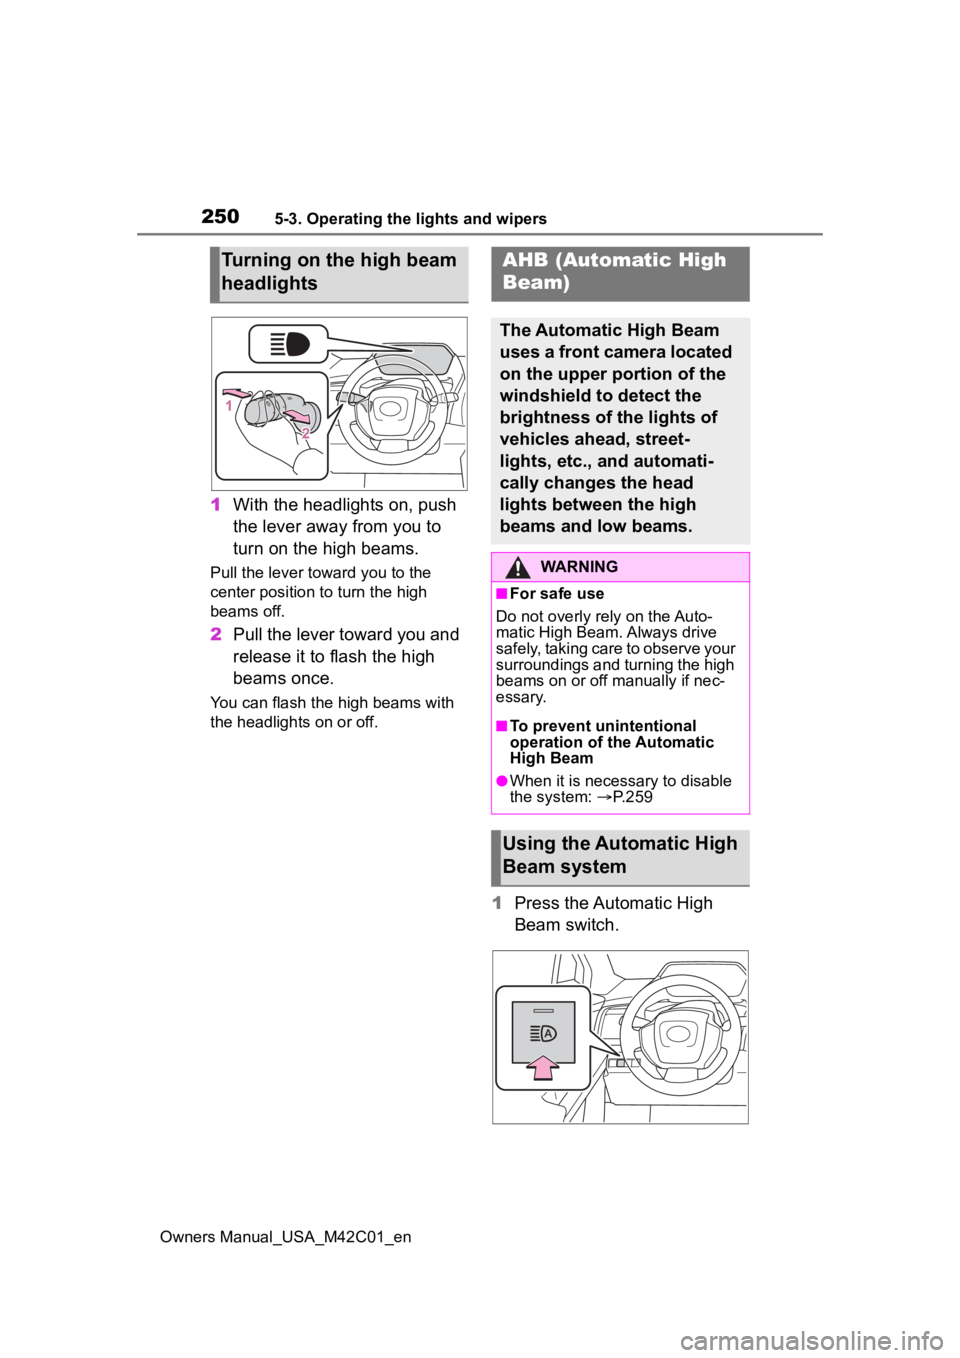
1With the headlights on, push
the lever away from you to
turn on the high beams.
Pull the lever toward you to the
center position to turn the high
beams off.
2Pull the lever toward you and
release it to flash the high
beams once.
You can flash the high beams with
the headlights on or off.
1Press the Automatic High
Beam switch.
Turning on the high beam
headlightsAHB (Automatic High
Beam)
The Automatic High Beam
uses a front camera located
on the upper portion of the
windshield to detect the
brightness of the lights of
vehicles ahead, street-
lights, etc., and automati-
cally changes the head
lights between the high
beams and low beams.
WARNING
■For safe use
Do not overly rely on the Auto-
matic High Beam. Always drive
safely, taking care to observe your
surroundings and turning the high
beams on or off manually if nec-
essary.
■To prevent unintentional
operation of the Automatic
High Beam
●When it is necessary to disable
the system: P.259
Using the Automatic High
Beam system
Page 256 of 628
2565-3. Operating the lights and wipers
Owners Manual_USA_M42C01_ento higher, the wip
er may operate
once to indicate the change of
sensitivity.
●If the temperature of the raindrop
sensor is 194°F (90°C) or higher,
or 5°F (-15°C) or lower, the auto-
matic operation m ay not occur. In
this case, operate the wipers in
any mode other than “AUTO”.
■If no windshield washer fluid
sprays
Check that the wash er nozzles are
not blocked if there is washer fluid in
the windshield washer fluid reser-
v oi r.
WARNING
■Caution regarding the use of
windshield wipers in “AUTO”
mode (vehicles with rain-
sensing windshield wipers)
The windshield wipers may oper-
ate unexpectedly if the sensor is
touched or the windshield is sub-
ject to vibration in “AUTO” mode.
Take care that your fingers or any-
thing else does not become
caught in the windshield wipers.
■Caution regarding the use of
washer fluid
When it is cold, do not use the
washer fluid until the windshield
becomes warm. The fluid may
freeze on the windshield and
cause low visibility. This may lead
to an accident, resulting in death
or serious injury.
NOTICE
■When the washer fluid tank is
empty
Do not operate the switch continu-
ally as the washer fluid pump may
overheat.
■When a nozzle becomes
blocked
In this case, contact your Toyota
dealer.
Do not try to clear it with a pin or
other object. The nozzle will be
damaged.
■To prevent 12-volt battery dis-
charge
Do not leave the wipers on longer
than necessary when the EV sys-
tem is off.
Page 262 of 628
2625-4. Using the driving support systems
Owners Manual_USA_M42C01_en
WARNING
●Always keep the windshield
clean.
• If the windshield is dirty or cov- ered with an o ily film, water
droplets, snow, etc., clean the
windshield.
• Even if a glass coating agent is applied to the windshield, it will
still be necessary to use the
windshield wipers to remove
water droplets, etc. from the
area of the windshield in front of
the front camera.
• If the inner side of the wind- shield where the front camera is
installed is dirty, contact your
Toyota dealer
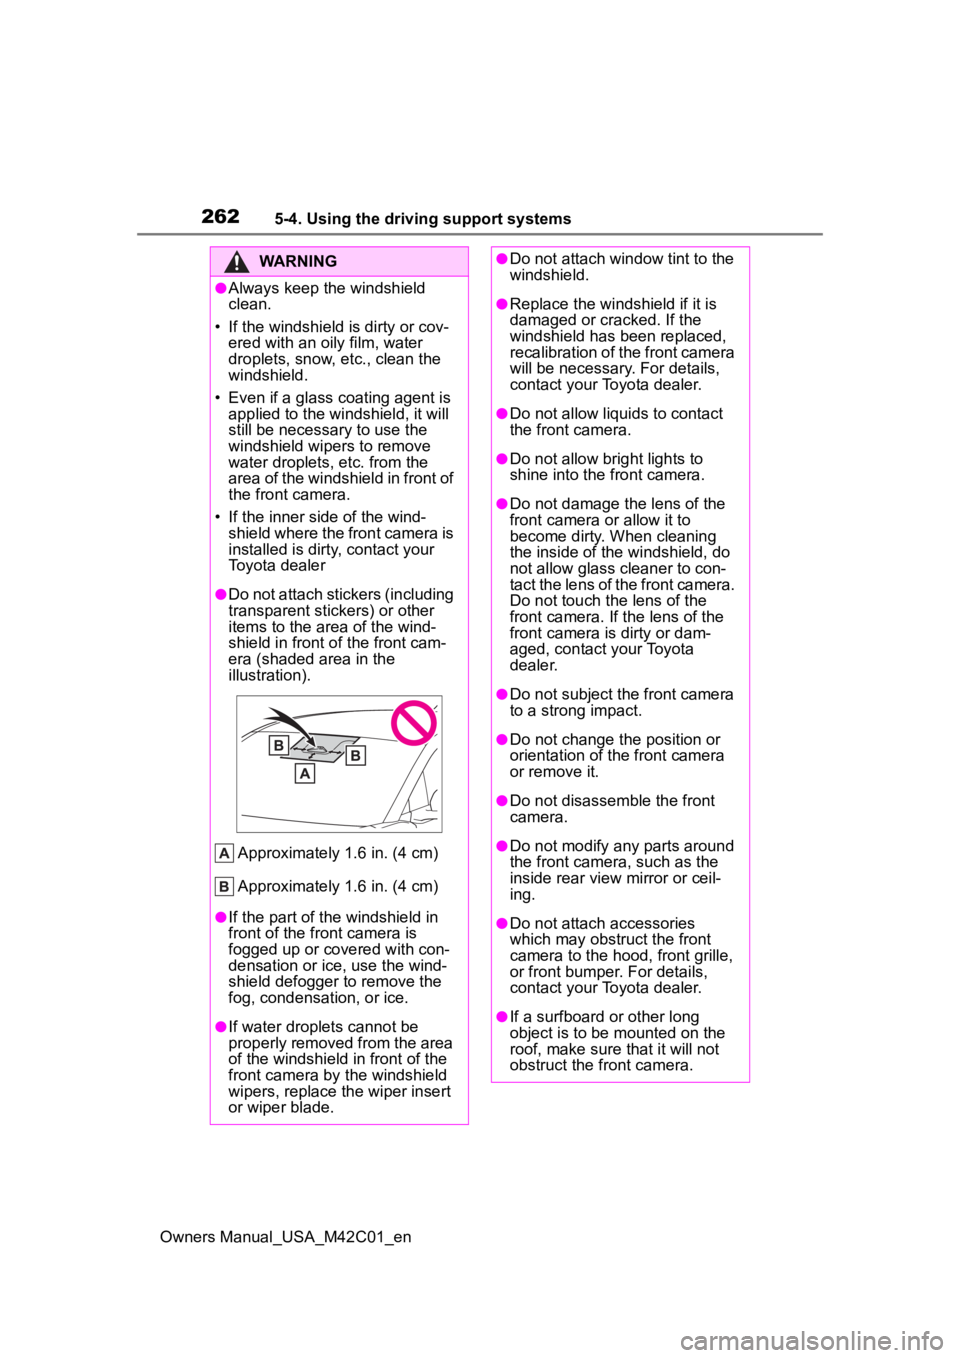
●Do not attach stickers (including
transparent stickers) or other
items to the area of the wind-
shield in front o f the front cam-
era (shaded area in the
illustration).
Approximately 1.6 in. (4 cm)
Approximately 1.6 in. (4 cm)
●If the part of the windshield in
front of the front camera is
fogged up or covered with con-
densation or ice, use the wind-
shield defogger to remove the
fog, condensation, or ice.
●If water droplets cannot be
properly removed from the area
of the windshield in front of the
front camera by the windshield
wipers, replace the wiper insert
or wiper blade.
●Do not attach window tint to the
windshield.
●Replace the windshield if it is
damaged or cracked. If the
windshield has been replaced,
recalibration of the front camera
will be necessary. For details,
contact your Toyota dealer.
●Do not allow liquids to contact
the front camera.
●Do not allow bright lights to
shine into the front camera.
●Do not damage th e lens of the
front camera o r allow it to
become dirty. When cleaning
the inside of the windshield, do
not allow glass cleaner to con-
tact the lens of the front camera.
Do not touch the lens of the
front camera. If the lens of the
front camera is dirty or dam-
aged, contact your Toyota
dealer.
●Do not subject the front camera
to a strong impact.
●Do not change the position or
orientation of the front camera
or remove it.
●Do not disassemble the front
camera.
●Do not modify any parts around
the front camera , such as the
inside rear view mirror or ceil-
ing.
●Do not attach accessories
which may obstruct the front
camera to the hood, front grille,
or front bumper. For details,
contact your Toyota dealer.
●If a surfboard or other long
object is to be mounted on the
roof, make sure that it will not
obstruct the front camera.
Page 263 of 628

2635-4. Using the driving support systems
Owners Manual_USA_M42C01_en
5
Driving
■Situations in which the sensors
may not operate properly
●When the height or inclination of
the vehicle has been changed due
to modifications
●When the windshield is dirty,
fogged up, cracked or damaged
●When the ambient temperature is
high or low
●When mud, water, snow, dead
insects, foreign matter, etc., is
attached to the fr ont of the sensor
●When in inclement weather such
as heavy rain, fog, snow, or a
sandstorm
●When water, snow, dust, etc. is
thrown up in front of the vehicle, or
when driving through mist or
smoke
●When the headlig hts are not illu-
minated while driving in the dark,
such as at night o r when in a tun-
nel
●When the lens of a headlight is
dirty and illumination is weak
●When the headlights are mis-
aligned
●When a headlight is malfunction-
ing
●When a the headlights of another vehicle, sunlight, or reflected light
shines directly into the front cam-
era
●When the brightness of the sur-
rounding area changes suddenly
●When driving near a TV tower,
broadcasting station, electric
power plant, radar equipped vehi-
cles, etc., or other location where
strong radio waves or electrical
noise may be present
●When a wiper blade is blocking
the front camera
●When in a location or near objects
which strongly reflect radio waves,
such as the following:
• Tunnels
• Truss bridges
• Gravel roads
• Rutted, snow-covered roads
• Walls
• Large trucks
• Manhole covers
• Guardrail
• Metal plates
●When near a step or protrusion
●When a detectable vehicle is nar-
row, such as a small mobility vehi-
cle
●When a detectable vehicle has a
small front or rear end, such as an
unloaded truck
●When a detectable vehicle has a
low front or rear end, such as a
low bed trailer
●When a detectable vehicle has
extremely high ground clearance
WARNING
●Do not modify or change the
headlights and other lights.
■Front camera installation area
on the windshield
If the system determines that the
windshield may be fogged up, it
will automatically operate the
heater to defog the part of the
windshield around the front cam-
era. When cleaning, etc., be care-
ful not to touch the area around
the front camera until the wind-
shield has cooled sufficiently, as
touching it may cause burns.
Page 301 of 628
3015-4. Using the driving support systems
Owners Manual_USA_M42C01_en
5
Driving
formed within a certain amount
of time, the system will enter
warning phase 2.
After entering warning phase 2,
a buzzer will sound in short
intervals and a message will be
displayed to warn the driver, and
the vehicle will slowly deceler-
ate. If driving operations, such
as holding the steering wheel,
are not performed within a cer-
tain amount of time, the system
will determine that the driver is
not responsive and enter the
deceleration stop phase.
The audio system will be muted
until the driver becomes respon-
sive.
When the vehicle is decelerating,
the brake lights may illuminate,
depending on the road conditions,
etc.
After entering the deceleration
stop phase, a buzzer will sound
continuously and a message will
be displayed to warn the driver,
and the vehicle will slowly decel-
erate and stop. After the vehicle
stops, the system will enter the
stop and hold phase.
After the vehicle is stopped, the
parking brake will be applied automatically. After entering the
stop and hold phase, the buzzer
will continue sounding continu-
ously and the emergency flash-
ers (hazard lights) will flash to
warn other drivers of the emer-
gency.
Warning phase 2
Deceleration stop phase
Stop hold phase