display TOYOTA BZ4X 2023 Owner's Manual
[x] Cancel search | Manufacturer: TOYOTA, Model Year: 2023, Model line: BZ4X, Model: TOYOTA BZ4X 2023Pages: 628, PDF Size: 11.91 MB
Page 118 of 628
1182-2. Charging
Owners Manual_USA_M42C01_en
■If the DC charging connector
cannot be unlocked
P. 9 5
■After DC charging
Even if the traction battery is
charged to the upper limit value that
is set, the level of charge displayed
on the DC charger may be lower
than the actual one.
■Calendar settings
Charging schedule is performed
according to the date and time
shown on the multi-information dis-
play. Refer to the “Settings display”
( P.158)
If the calendar settings check
screen is displayed when an
attempt was made to register a
charge schedule, check that the cor-
rect date is set. If it is incorrect, be
sure to correct it.
If the calendar information is wrong,
the charging schedule function will
not operate normally.
When registering the charging
schedule, the following settings
can be changed.
■Select the charging mode
One of the two following
charging modes can be
selected.
“Start”
Starts charging at the set time
*
and finishes charging when fully
charged.
“Start-Stop”
AC charging is performed
NOTICE
■Caution after DC charging
●Be sure to attach the DC
charging inlet cap to the DC
charging inlet and then close
the charging port lid after
removing the DC charging con-
nector from the inlet. If the DC
charging inlet cap is not closed,
foreign materials may get into
the inlet and the EV system may
be malfunctioning.
Using the charging
schedule function
AC charging can be carried
out at the desired time by
registering the charging
schedule.
Settings of the charging
schedule function
Page 119 of 628
1192-2. Charging
Owners Manual_USA_M42C01_en
2
Electric Vehicle system
according to the set start time
and stop time.
*
*: There might be a slight error in the timing when charging starts
due to the state of the traction
battery.
■Repeated setting
The periodic charging schedule
can be set by selecting your
desired day of the week. Select
one or more day of the week to
do the charging schedule.
■Turning “Charge Now” on
and off
To start charging without chang-
ing the charging schedule set-
ting, turn “Charge Now” on to
temporarily cancel the charging
schedule and enable charging
after connecting the AC
charging connector.
*
*: If the charging connector is removed during charging while
the charging schedule is regis-
tered and “Charge Now” is on,
“Charge Now” turns off.
■“Next Event”
Of the registered charging
schedules, the closest charging
schedule after the current time
is called the “Next Event”.
For charging schedule, AC
charging will be performed
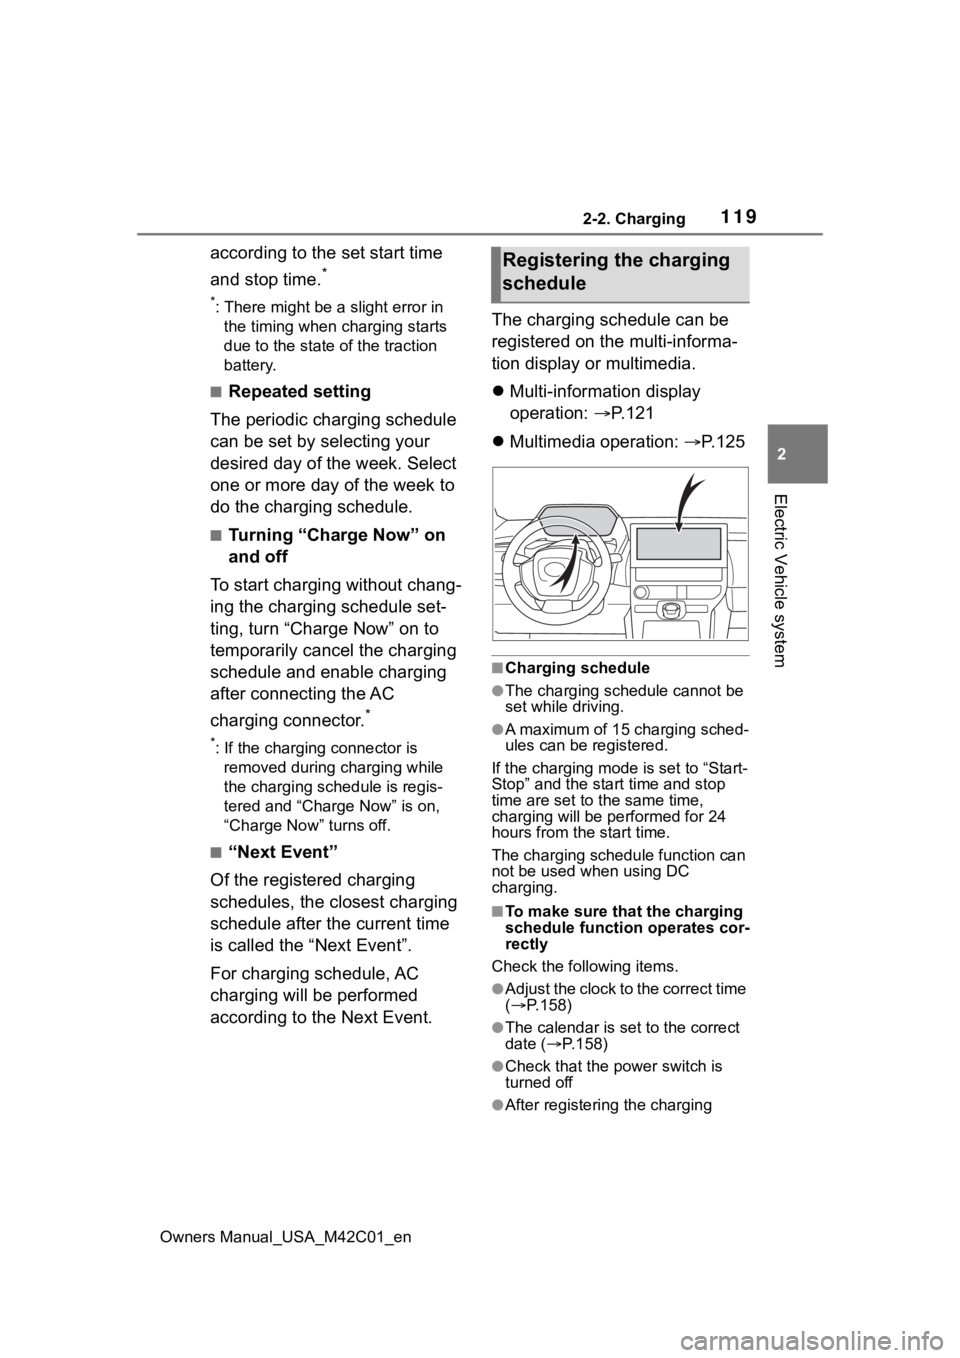
according to the Next Event. The charging schedule can be
registered on the multi-informa-
tion display or multimedia.
Multi-information display
operation: P.121
Multimedia operation: P. 1 2 5
■Charging schedule
●The charging schedule cannot be
set while driving.
●A maximum of 15 charging sched-
ules can be registered.
If the charging mode is set to “Start-
Stop” and the start time and stop
time are set to the same time,
charging will be performed for 24
hours from the start time.
The charging schedule function can
not be used when using DC
charging.
■To make sure that the charging
schedule function operates cor-
rectly
Check the following items.
●Adjust the clock to the correct time
( P.158)
●The calendar is set to the correct
date ( P.158)
●Check that the power switch is
turned off
●After registering the charging
Registering the charging
schedule
Page 121 of 628
1212-2. Charging
Owners Manual_USA_M42C01_en
2
Electric Vehicle system
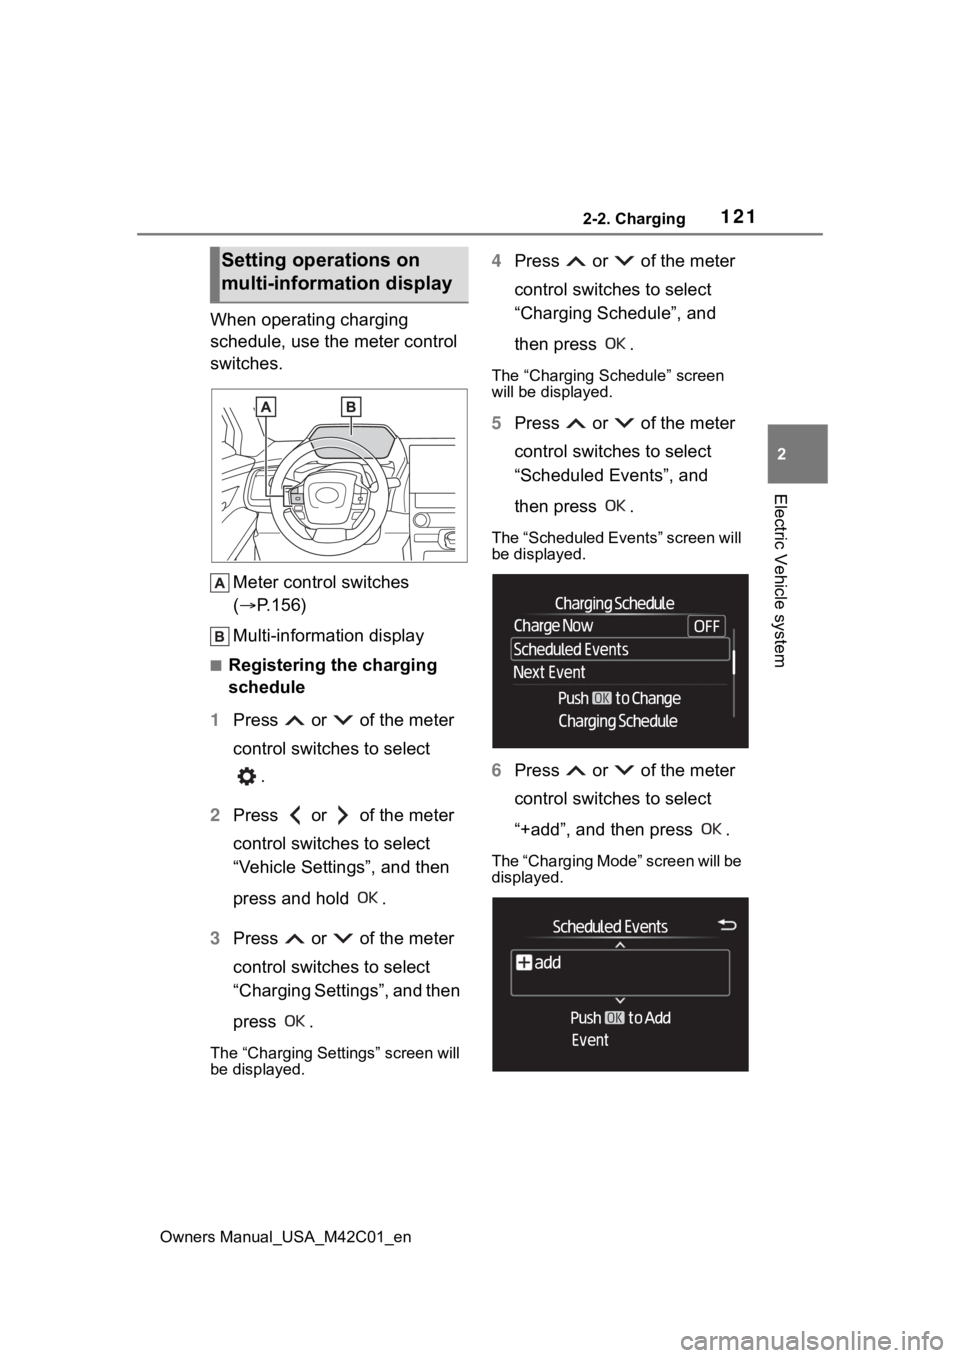
When operating charging
schedule, use the meter control
switches. Meter control switches
( P.156)
Multi-information display
■Registering the charging
schedule
1 Press or of the meter
control switches to select
.
2 Press or of the meter
control switches to select
“Vehicle Settings”, and then
press and hold .
3 Press or of the meter
control switches to select
“Charging Settings”, and then
press .
The “Charging Settings” screen will
be displayed.
4Press or of the meter
control switches to select
“Charging Schedule”, and
then press .
The “Charging Schedule” screen
will be displayed.
5Press or of the meter
control switches to select
“Scheduled Events”, and
then press .
The “Scheduled Events” screen will
be displayed.
6Press or of the meter
control switches to select
“+add”, and then press .
The “Charging Mode” screen will be
displayed.
Setting operations on
multi-information display
Page 122 of 628
1222-2. Charging
Owners Manual_USA_M42C01_en
7Press or of the meter
control switches to select the
item to change with the cur-
sor, and then press or
to change the setting.
When the charging mode is
“Start”, set the charging start
time.
When the charging mode is
“Start-Stop”, set the charging
start time and stop time.
After changing the settings to
the desired settings, press
.
8 Press or of the meter
control switches to select the
desired day to activate for the
repeated setting, and then
press .
Each time is pressed, the
repeated setting switches
between on and off.
When set to on, the charging
schedule is repeated on that
day. It is possible to set more
than one day to on.
After changing the settings to
the desired settings, select
“Done”, and then press .
A screen where the settings
can be saved will be dis-
played. 9
Select “Save” and press
to save the settings.
The settings will be saved.
If you wish to change the set-
tings, press and perform
the setting procedure again.
After setting operations are
complete, when the AC
charging connector is con-
nected to the vehicle,
charging will be carried out
according to the charging
schedule settings.
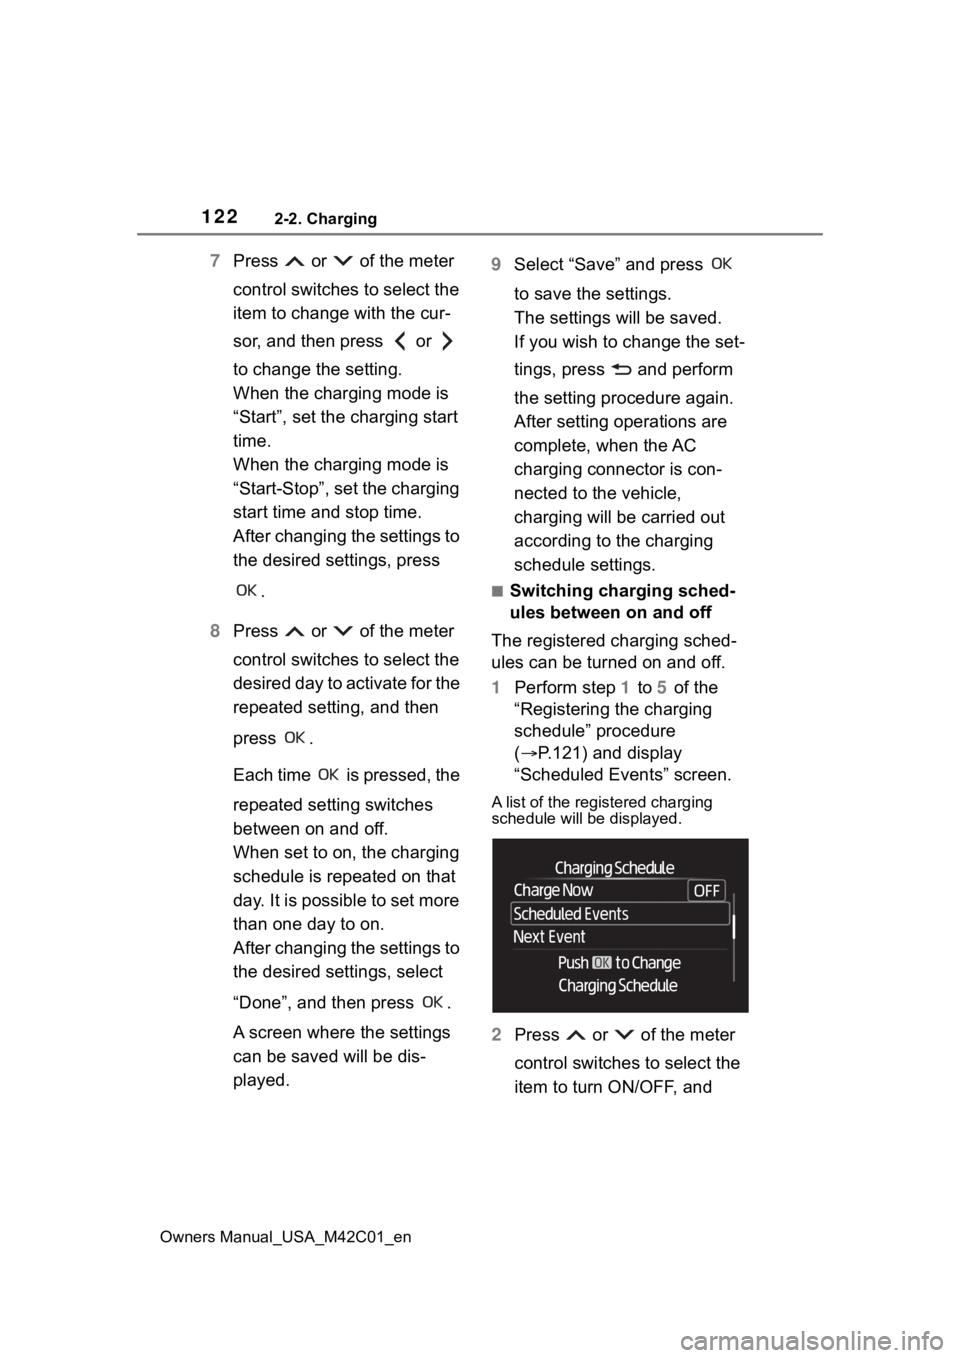
■Switching charging sched-
ules between on and off
The registered charging sched-
ules can be turned on and off.
1 Perform step 1 to 5 of the
“Registering the charging
schedule” procedure
( P.121) and display
“Scheduled Events” screen.
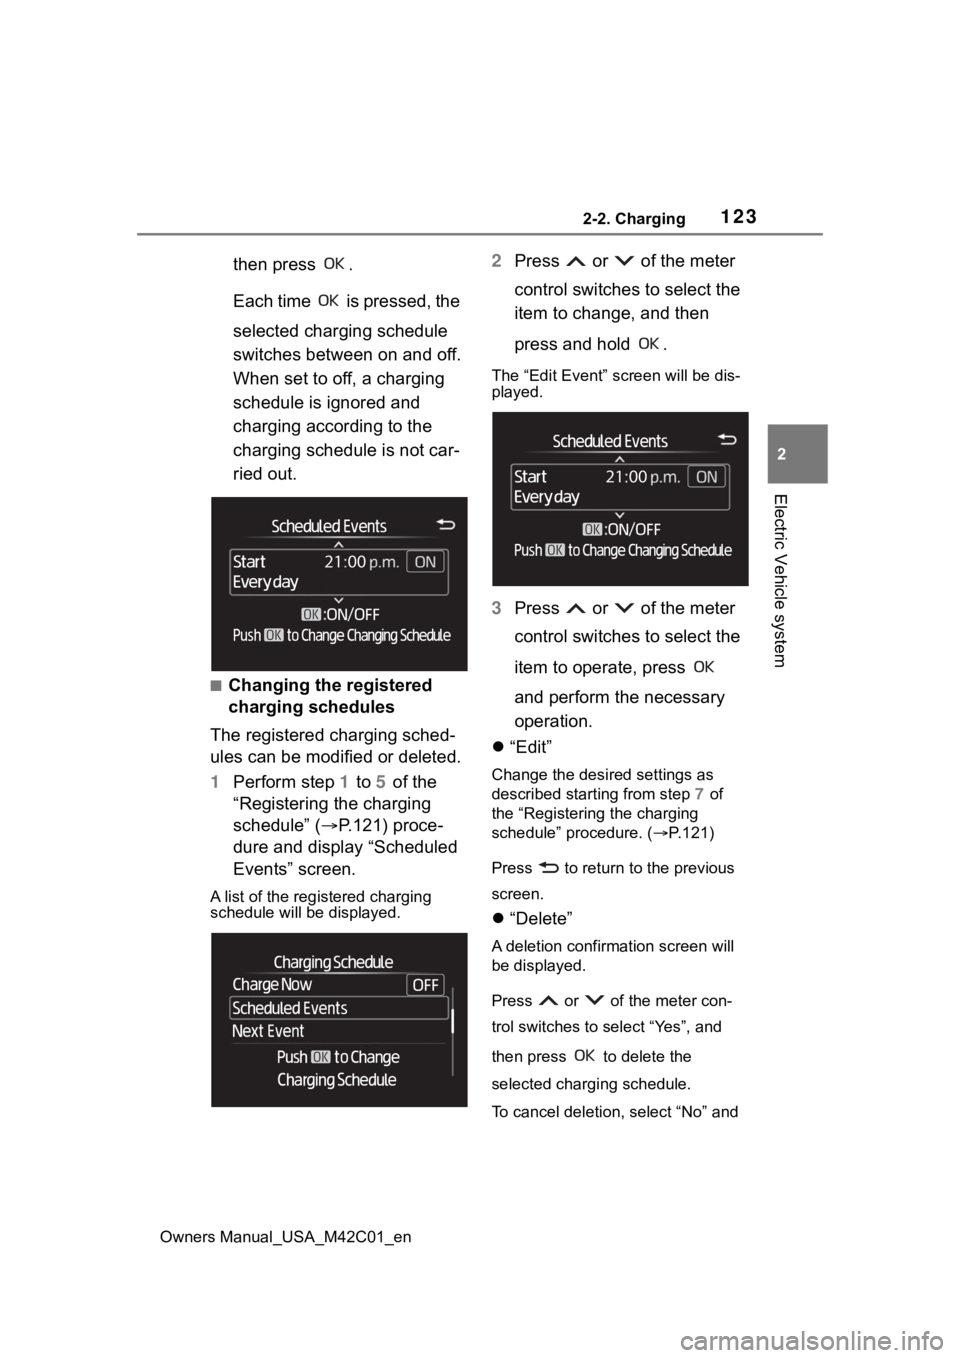
A list of the registered charging
schedule will be displayed.
2 Press or of the meter
control switches to select the
item to turn ON/OFF, and
Page 123 of 628
1232-2. Charging
Owners Manual_USA_M42C01_en
2
Electric Vehicle system
then press .
Each time is pressed, the
selected charging schedule
switches between on and off.
When set to off, a charging
schedule is ignored and
charging according to the
charging schedule is not car-
ried out.
■Changing the registered
charging schedules
The registered charging sched-
ules can be modified or deleted.
1 Perform step 1 to 5 of the
“Registering the charging
schedule” ( P.121) proce-
dure and display “Scheduled
Events” screen.
A list of the registered charging
schedule will be displayed.
2Press or of the meter
control switches to select the
item to change, and then
press and hold .
The “Edit Event” screen will be dis-
played.
3Press or of the meter
control switches to select the
item to operate, press
and perform the necessary
operation.
“Edit”
Change the desired settings as
described starting from step 7 of
the “Registering the charging
schedule” procedure. ( P.121)
Press to return to the previous
screen.
“Delete”
A deletion confirmation screen will
be displayed.
Press or of the meter con-
trol switches to select “Yes”, and
then press to delete the
selected charging schedule.
To cancel deletion, select “No” and
Page 124 of 628
1242-2. Charging
Owners Manual_USA_M42C01_enthen press .
Press to return
to the previous
screen.
■Setting “Charge Now” to on
The “Charge Now” setting can
be changed by performing one
of the two following procedures.
Operation on “Charging
Schedule” screen
1 Perform step 1 to 4 of the
“Registering the charging
schedule” procedure
( P.121) and display
“Charging Schedule” screen.
2 Press or of the meter
control switches to select
“Charge Now”, and then
press .
Each time is pressed,
“Charge Now” switches between
on and off.
Operation on “Closing Dis-
play” screen
*
*: If “Closing Display” is not set to “Charging Schedule” on the
screen of the mu lti-information
display, the “Closing Display” is
not displayed. In this case, check
the settings on the multi-informa-
tion display.
1 Turn the power switch off.
The “Closing Display” screen
is displayed on the multi- information display.
(If the door is opened while
waiting for charging sched-
ule, the same screen will be
displayed.)
2 Press to set “Charge
Now” to on.
After setting operations are
complete, charging starts when
the AC charging connector is
connected.
■Displaying “Next Event”
1 Perform step 1 to 4 of the
“Registering the charging
schedule” procedure
( P.121) and display
“Charging Schedule” screen.
2 Press or of the meter
control switches to select
“Next Event”, and then press
.
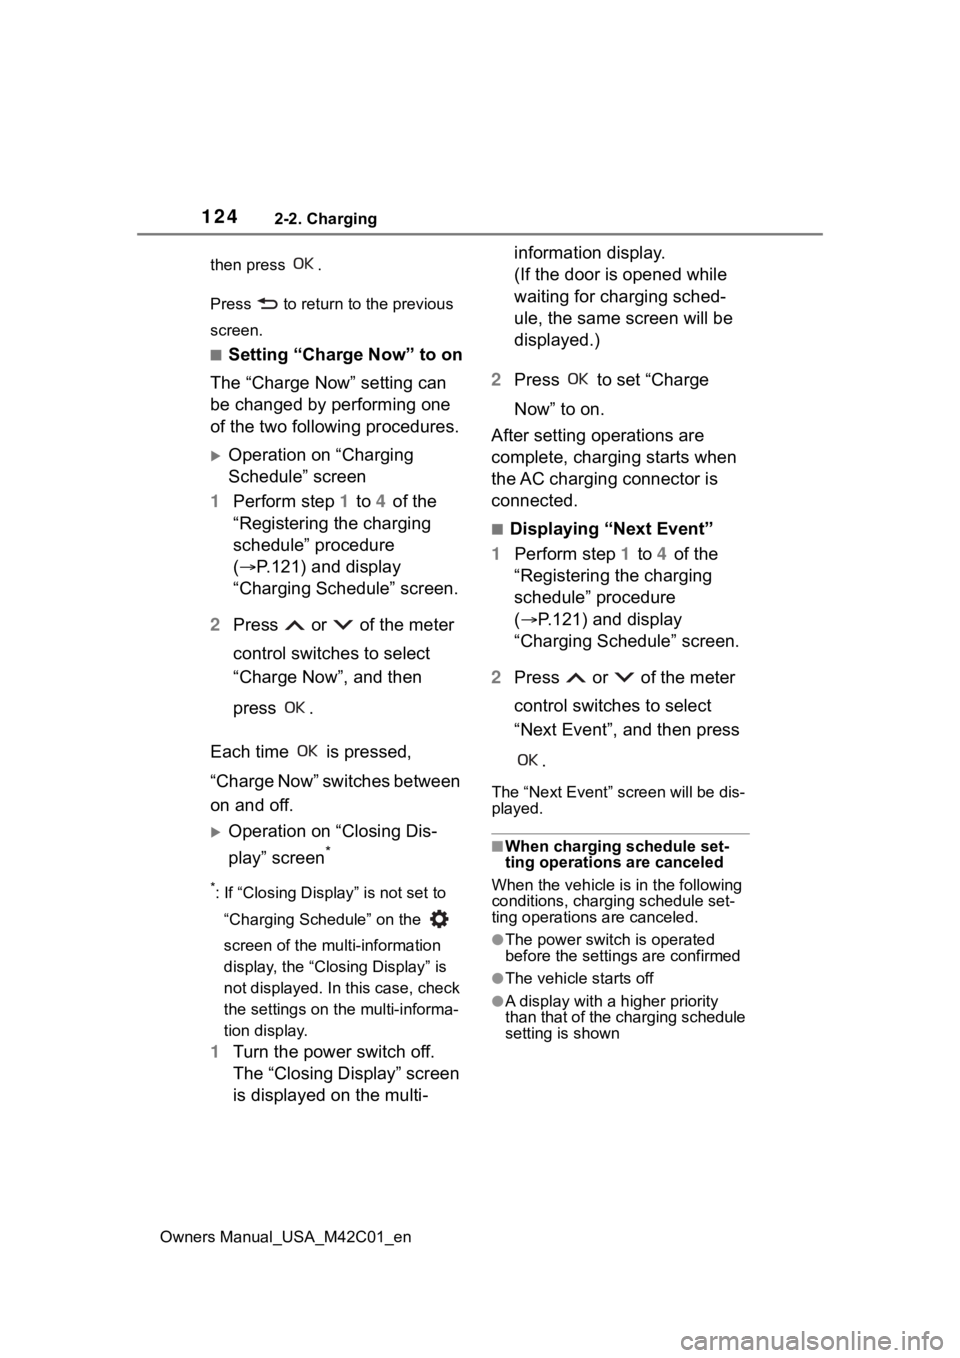
The “Next Event” screen will be dis-
played.
■When charging schedule set-
ting operations are canceled
When the vehicle i s in the following
conditions, charging schedule set-
ting operations are canceled.
●The power switch is operated
before the settings are confirmed
●The vehicle starts off
●A display with a higher priority
than that of the charging schedule
setting is shown
Page 125 of 628
1252-2. Charging
Owners Manual_USA_M42C01_en
2
Electric Vehicle systemFor details on how to operate
the audio system screen, refer
to “MULTIMEDIA OWNER’S
MANUAL”.
Setting operations related to the
charging schedule are per-
formed on the “Charging sched-
ule” screen.
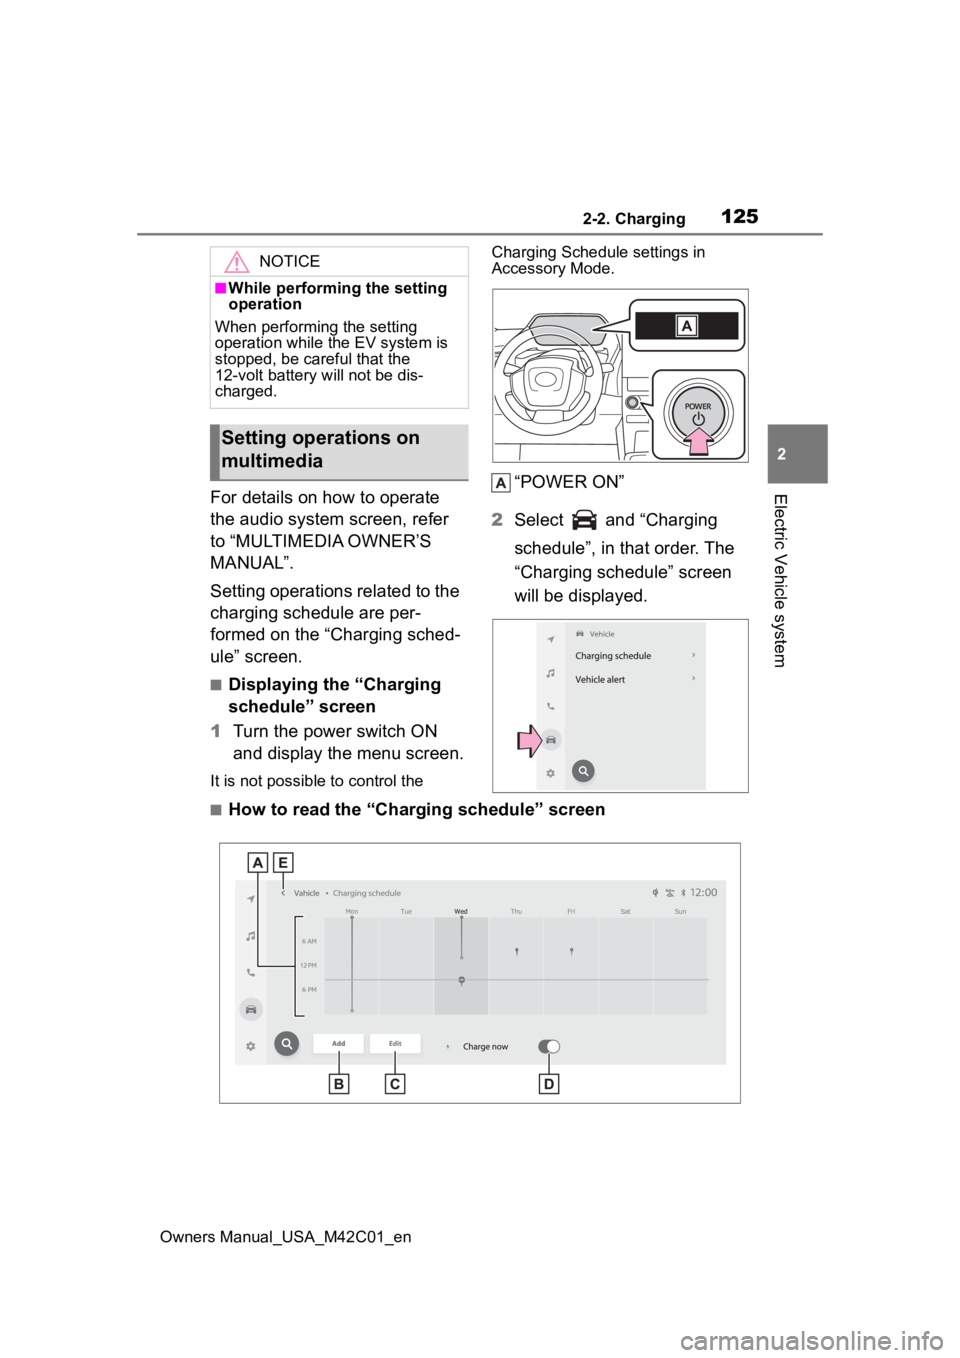
■Displaying the “Charging
schedule” screen
1 Turn the power switch ON
and display the menu screen.
It is not possible to control the Charging Schedule settings in
Accessory Mode.
“POWER ON”
2 Select and “Charging
schedule”, in that order. The
“Charging schedule” screen
will be displayed.
■How to read the “Charging schedule” screen
NOTICE
■While performing the setting
operation
When performing the setting
operation while t he EV system is
stopped, be careful that the
12-volt battery will not be dis-
charged.
Setting operations on
multimedia
Page 126 of 628

1262-2. Charging
Owners Manual_USA_M42C01_en
Charging schedules
Displays the week-long registered charging schedule in a list using icons.
“Add” button
Press to add a new item to the charging schedule. ( P.126)
“Edit” button
Press to change or delete regist ered items on the charging sche dule.
( P.127)
“Charge now” button
Each time the button i s pressed, “Charge now” switches between on and
off. ( P.128)
Return button
Press to close the “Charging schedule” screen.
■Registering the charging
schedule
1 Display the “Charging sched-
ule” screen. ( P.125)
2 Press “Add”.
The “Add event” screen will be dis-
played on the screen.
3Change the schedule to the
desired time.
Charging mode
Press “Start at set time” or “Start
and stop at set times” to set the
desired charging mode.
• When “Start at set time” is selected
Set the charging start time, and press “OK”.
• When “Start and stop at set
times” is selected
Set the charging start time and stop
time, and press “OK”.
Page 127 of 628
1272-2. Charging
Owners Manual_USA_M42C01_en
2
Electric Vehicle system
Repeated settings
Select the day of the week and
press OK.
When turned on, the charging
schedule is repeated on that
day. It is possible to turn more
than one day on.
4 After setting operations are
complete, press “Save”.
The charging schedule is regis-
tered and an icon is added to
the schedule.
To cancel registration of the
charging schedule, press the
return button.
After setting operations are
complete, when the power
switch is turned off and the AC
charging connector is connected
to the vehicle, charging is car-
ried out according to the charging schedule settings.
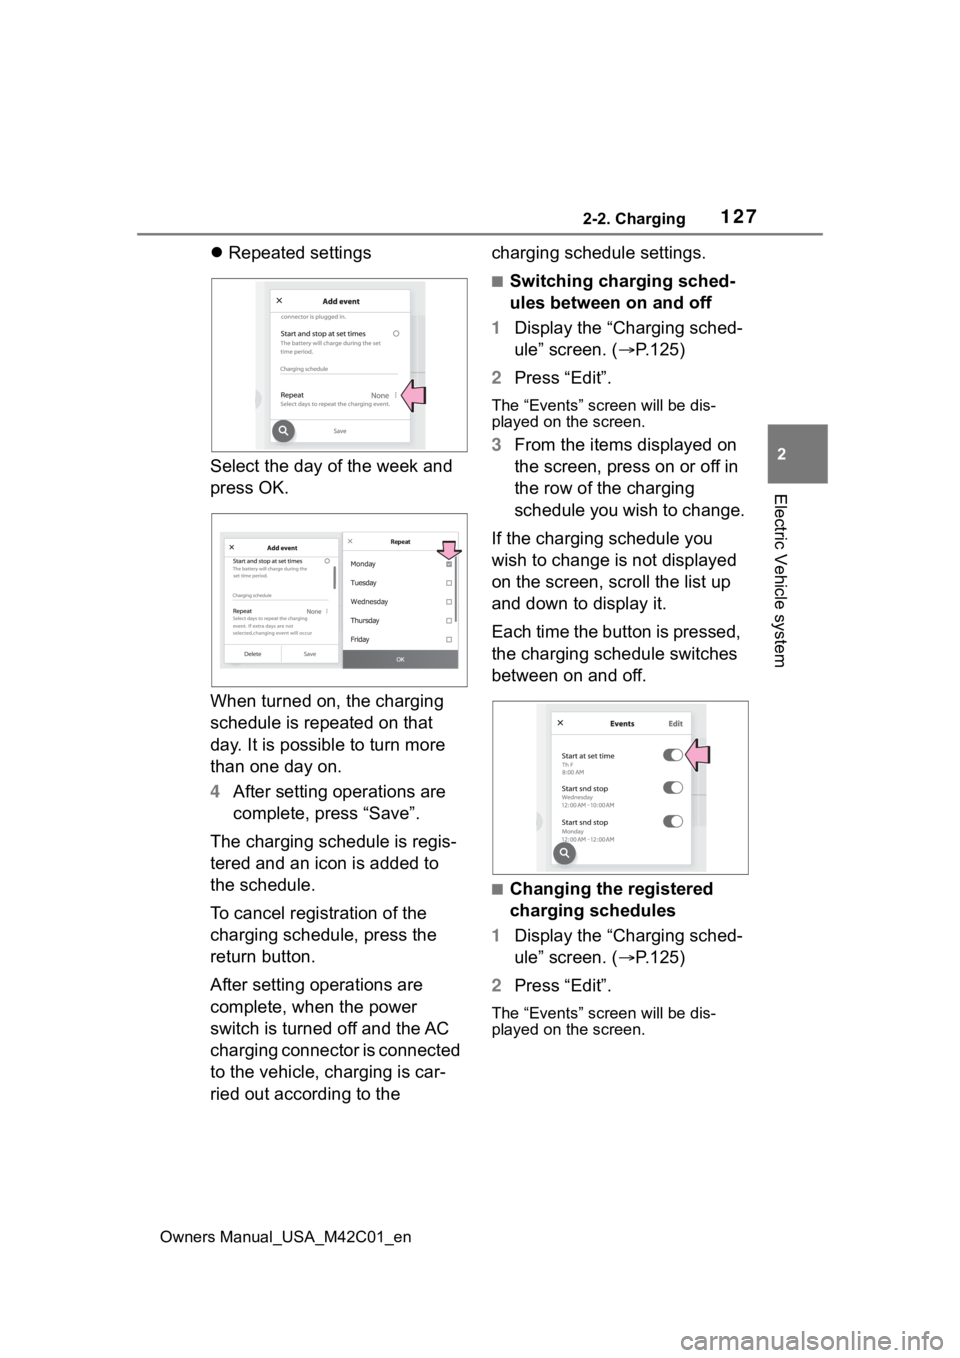
■Switching charging sched-
ules between on and off
1 Display the “Charging sched-
ule” screen. ( P.125)
2 Press “Edit”.
The “Events” screen will be dis-
played on the screen.
3From the items displayed on
the screen, press on or off in
the row of the charging
schedule you wish to change.
If the charging schedule you
wish to change is not displayed
on the screen, scroll the list up
and down to display it.
Each time the button is pressed,
the charging schedule switches
between on and off.
■Changing the registered
charging schedules
1 Display the “Charging sched-
ule” screen. ( P.125)
2 Press “Edit”.
The “Events” screen will be dis-
played on the screen.
Repeat
Page 128 of 628

1282-2. Charging
Owners Manual_USA_M42C01_en
3Press “Edit” on the “Events”
screen.
4 From the items displayed on
the screen, press the
charging schedule you wish
to change.
Changing registered items:
Change the desired settings as
described in step 3 to step 4 of
the “Registering the charging
schedule” procedure. ( P.126)
When a setting is changed, its
icon on the calendar also
changes.
Deleting registered items:
Press “Delete”. A deletion confirmation mes-
sage will be displayed.
Press “Delete” to delete the
selected charging schedule.
To cancel deletion, press “Can-
cel” or the return button.
When a charging schedule is
deleted, its icon is also deleted
from the calendar.
■Turning “Charge now” on
1 Display the “Charging sched-
ule” screen. ( P.125)
2 Press “Charge now”.
Each time the button is pressed,
“Charge now” switches between
on and off.
After setting operations are
complete, charging starts when
the AC charging connector is
connected.
■Changing Next Event
If the multimedia customize con-
tent “ACC customize” is not set
to OFF, the ending screen will
not be displayed. If it is this
case, check the settings of the
multimedia.
Turn the power switch off.