stop start TOYOTA BZ4X 2023 Owner's Manual
[x] Cancel search | Manufacturer: TOYOTA, Model Year: 2023, Model line: BZ4X, Model: TOYOTA BZ4X 2023Pages: 628, PDF Size: 11.91 MB
Page 126 of 628

1262-2. Charging
Owners Manual_USA_M42C01_en
Charging schedules
Displays the week-long registered charging schedule in a list using icons.
“Add” button
Press to add a new item to the charging schedule. ( P.126)
“Edit” button
Press to change or delete regist ered items on the charging sche dule.
( P.127)
“Charge now” button
Each time the button i s pressed, “Charge now” switches between on and
off. ( P.128)
Return button
Press to close the “Charging schedule” screen.
■Registering the charging
schedule
1 Display the “Charging sched-
ule” screen. ( P.125)
2 Press “Add”.
The “Add event” screen will be dis-
played on the screen.
3Change the schedule to the
desired time.
Charging mode
Press “Start at set time” or “Start
and stop at set times” to set the
desired charging mode.
• When “Start at set time” is selected
Set the charging start time, and press “OK”.
• When “Start and stop at set
times” is selected
Set the charging start time and stop
time, and press “OK”.
Page 129 of 628
1292-2. Charging
Owners Manual_USA_M42C01_en
2
Electric Vehicle system
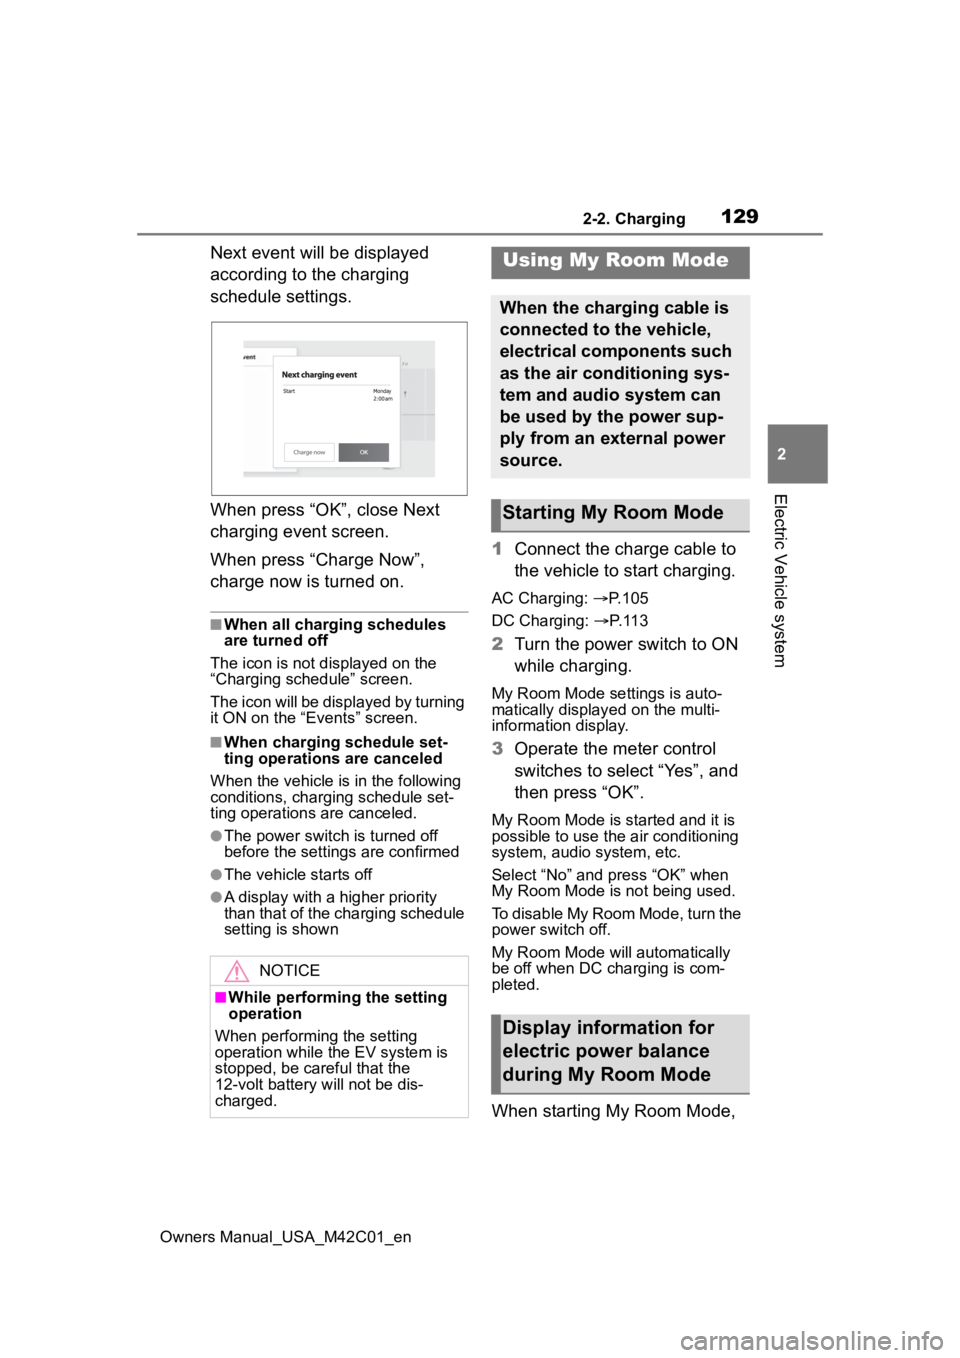
Next event will be displayed
according to the charging
schedule settings.
When press “OK”, close Next
charging event screen.
When press “Charge Now”,
charge now is turned on.
■When all charging schedules
are turned off
The icon is not displayed on the
“Charging schedule” screen.
The icon will be displayed by turning
it ON on the “Events” screen.
■When charging schedule set-
ting operations are canceled
When the vehicle is in the following
conditions, charging schedule set-
ting operations are canceled.
●The power switch is turned off
before the setting s are confirmed
●The vehicle starts off
●A display with a higher priority
than that of the charging schedule
setting is shown
1Connect the charge cable to
the vehicle to start charging.
AC Charging: P. 1 0 5
DC Charging: P. 1 1 3
2 Turn the power switch to ON
while charging.
My Room Mode settings is auto-
matically display ed on the multi-
information display.
3 Operate the meter control
switches to select “Yes”, and
then press “OK”.
My Room Mode is started and it is
possible to use the air conditioning
system, audio system, etc.
Select “No” and press “OK” when
My Room Mode is not being used.
To disable My Room Mode, turn the
power switch off.
My Room Mode will automatically
be off when DC charging is com-
pleted.
When starting My Room Mode,
NOTICE
■While performing the setting
operation
When performing the setting
operation while t he EV system is
stopped, be careful that the
12-volt battery will not be dis-
charged.
Using My Room Mode
When the charging cable is
connected to the vehicle,
electrical components such
as the air conditioning sys-
tem and audio system can
be used by the power sup-
ply from an external power
source.
Starting My Room Mode
Display information for
electric power balance
during My Room Mode
Page 131 of 628
1312-2. Charging
Owners Manual_USA_M42C01_en
2
Electric Vehicle system
traction battery may be consumed.
In this case, charging may be per- formed again.
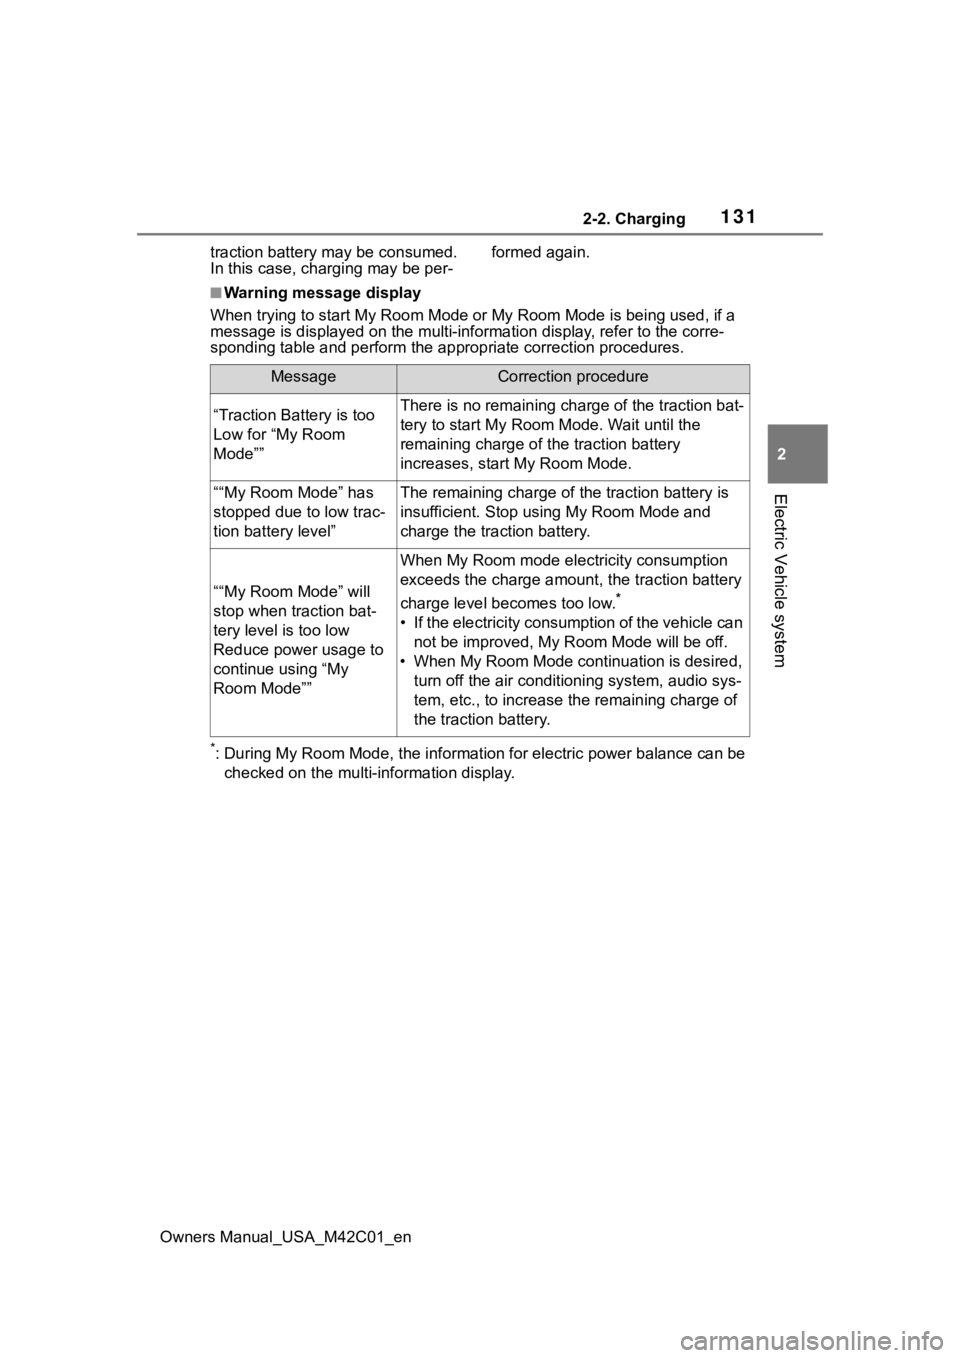
■Warning message display
When trying to start My Room Mode or My Room Mode is being used , if a
message is displayed on the multi -information display, refer to the corre-
sponding table and perform the app ropriate correction procedures.
*: During My Room Mode, the informa tion for electric power balance can be
checked on the multi-information display.
MessageCorrection procedure
“Traction Battery is too
Low for “My Room
Mode””There is no remaining charge of the traction bat-
tery to start M y Room Mode. Wait until the
remaining charge of the traction battery
increases, start My Room Mode.
““My Room Mode” has
stopped due to low trac-
tion battery level”The remaining charge of the traction battery is
insufficient. Stop using My Room Mode and
charge the traction battery.
““My Room Mode” will
stop when traction bat-
tery level is too low
Reduce power usage to
continue using “My
Room Mode””
When My Room mode electricity consumption
exceeds the charge amount, the traction battery
charge level becomes too low.
*
• If the electricity consumption of the vehicle can not be improved, My R oom Mode will be off.
• When My Room Mode continuation is desired, turn off the air conditioning system, audio sys-
tem, etc., to increase t he remaining charge of
the traction battery.
Page 133 of 628
1332-2. Charging
Owners Manual_USA_M42C01_en
2
Electric Vehicle system
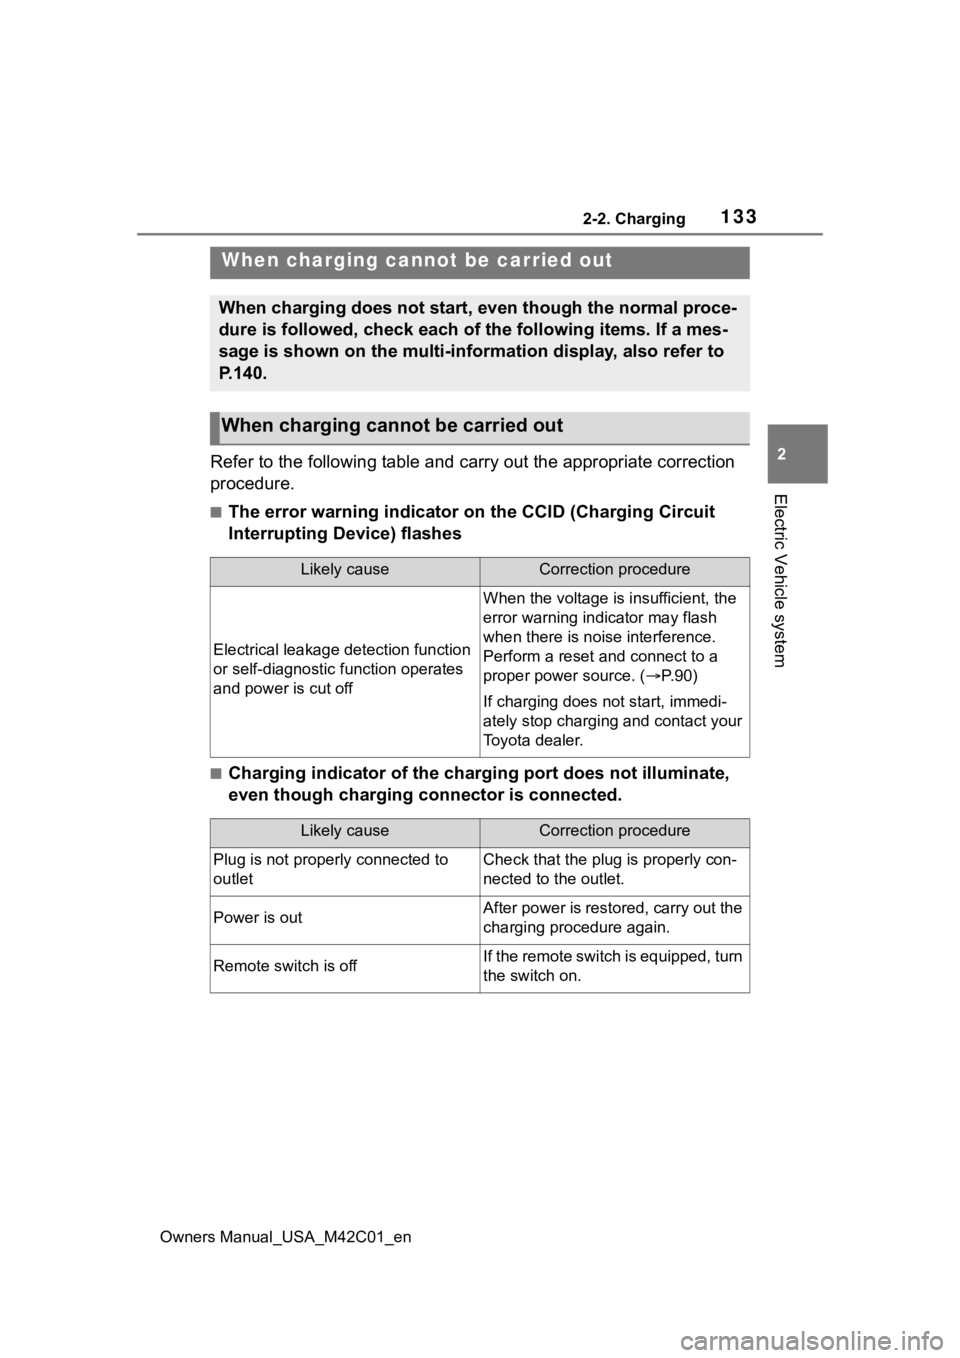
Refer to the following table and carry out the appropriate correction
procedure.
■The error warning indicator on the CCID (Charging Circuit
Interrupting Device) flashes
■Charging indicator of the charging port does not illuminate,
even though charging connector is connected.
When charging canno t be carried out
When charging does not start, even though the normal proce-
dure is followed, check each of the following items. If a mes-
sage is shown on the multi-information display, also refer to
P.140.
When charging cannot be carried out
Likely causeCorrection procedure
Electrical leakage detection function
or self-diagnostic function operates
and power is cut off
When the voltage is insufficient, the
error warning indi cator may flash
when there is noise interference.
Perform a reset and connect to a
proper power source. ( P. 9 0 )
If charging does not start, immedi-
ately stop charging and contact your
Toyota dealer.
Likely causeCorrection procedure
Plug is not properly connected to
outletCheck that the plug is properly con-
nected to the outlet.
Power is outAfter power is restored, carry out the
charging procedure again.
Remote switch is offIf the remote switch is equipped, turn
the switch on.
Page 136 of 628
1362-2. Charging
Owners Manual_USA_M42C01_en
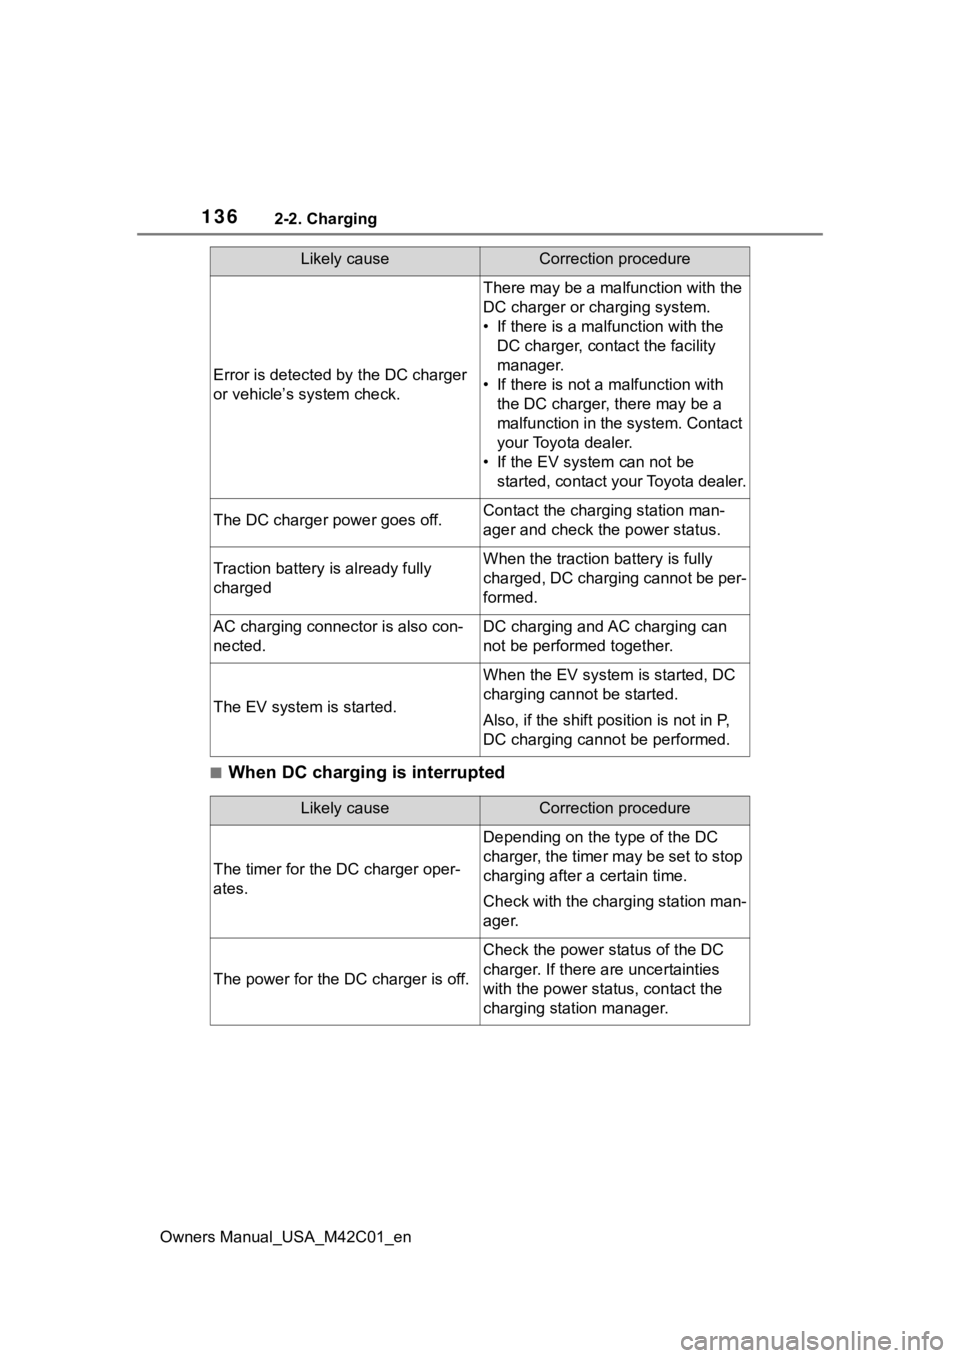
■When DC charging is interrupted
Error is detected by the DC charger
or vehicle’s system check.
There may be a malfunction with the
DC charger or charging system.
• If there is a malfunction with the
DC charger, conta ct the facility
manager.
• If there is not a malfunction with
the DC charger, there may be a
malfunction in the system. Contact
your Toyota dealer.
• If the EV system can not be started, contact your Toyota dealer.
The DC charger power goes off.Contact the charging station man-
ager and check the power status.
Traction battery is already fully
chargedWhen the traction battery is fully
charged, DC charging cannot be per-
formed.
AC charging connector is also con-
nected.DC charging and AC charging can
not be performed together.
The EV system is started.
When the EV system is started, DC
charging cannot be started.
Also, if the shift position is not in P,
DC charging cannot be performed.
Likely causeCorrection procedure
Likely causeCorrection procedure
The timer for the DC charger oper-
ates.
Depending on the type of the DC
charger, the timer may be set to stop
charging after a certain time.
Check with the charging station man-
ager.
The power for the DC charger is off.
Check the power status of the DC
charger. If there a re uncertainties
with the power status, contact the
charging station manager.
Page 137 of 628
1372-2. Charging
Owners Manual_USA_M42C01_en
2
Electric Vehicle system
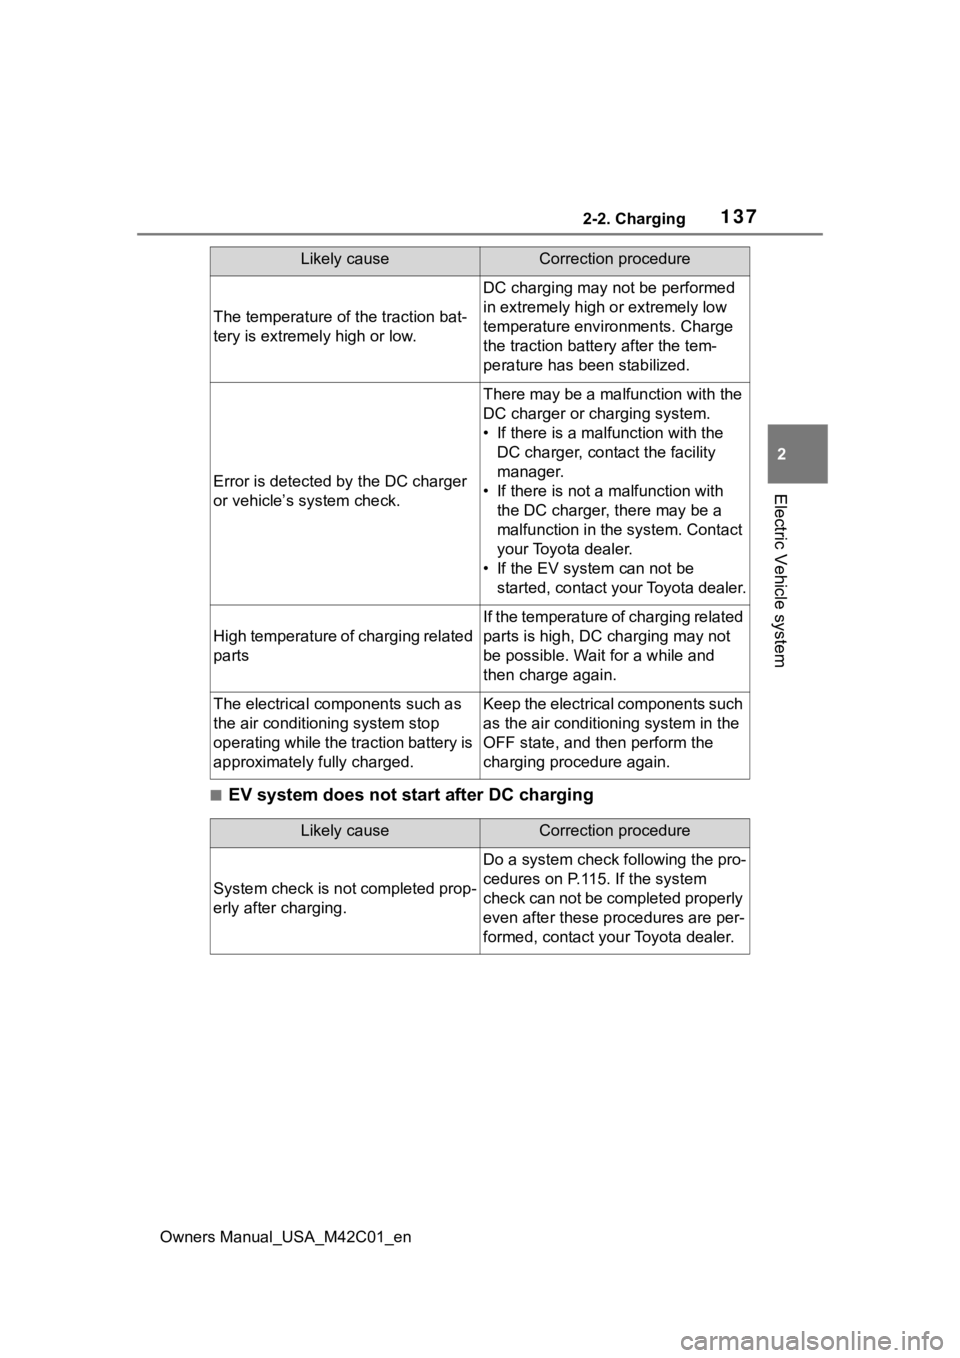
■EV system does not start after DC charging
The temperature of the traction bat-
tery is extremely high or low.
DC charging may not be performed
in extremely high or extremely low
temperature environments. Charge
the traction batte ry after the tem-
perature h as been stabilized.
Error is detected by the DC charger
or vehicle’s system check.
There may be a malfunction with the
DC charger or charging system.
• If there is a mal function with the
DC charger, conta ct the facility
manager.
• If there is not a malfunction with
the DC charger, there may be a
malfunction in the system. Contact
your Toyota dealer.
• If the EV system can not be started, contact your Toyota dealer.
High temperature of charging related
parts
If the temperature of charging related
parts is high, DC charging may not
be possible. Wait for a while and
then charge again.
The electrical components such as
the air conditioning system stop
operating while the traction battery is
approximately fully charged.Keep the electrical components such
as the air conditioning system in the
OFF state, and t hen perform the
charging procedure again.
Likely causeCorrection procedure
Likely causeCorrection procedure
System check is not completed prop-
erly after charging.
Do a system check following the pro-
cedures on P.115. If the system
check can not be completed properly
even after these procedures are per-
formed, contact your Toyota dealer.
Page 138 of 628
1382-2. Charging
Owners Manual_USA_M42C01_en
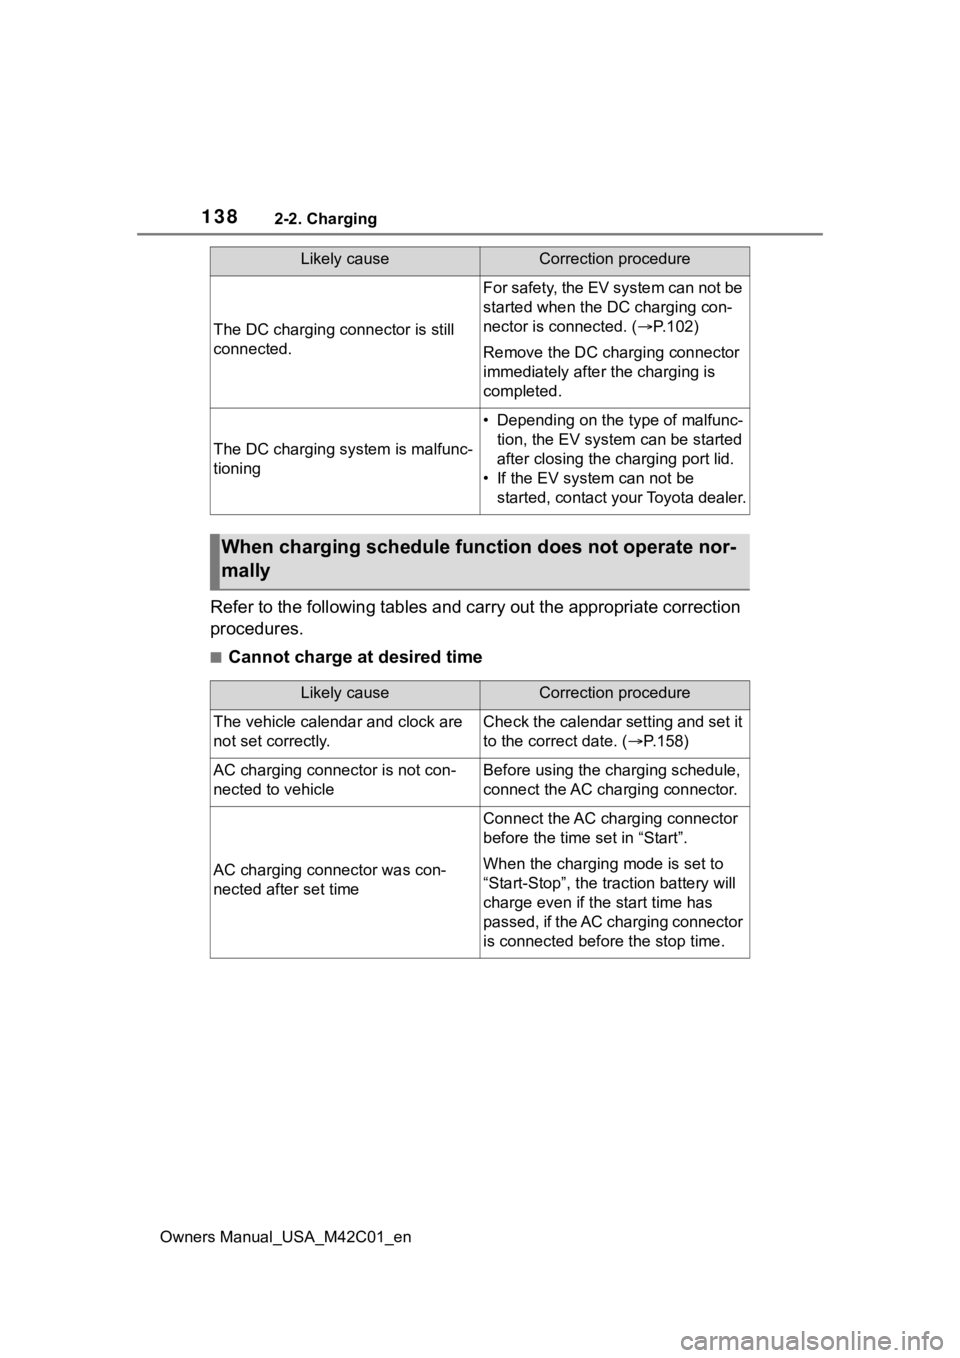
Refer to the following tables and carry out the appropriate correction
procedures.
■Cannot charge at desired time
The DC charging connector is still
connected.
For safety, the EV system can not be
started when the DC charging con-
nector is connected. ( P.102)
Remove the DC charging connector
immediately after the charging is
completed.
The DC charging system is malfunc-
tioning
• Depending on the type of malfunc-
tion, the EV system can be started
after closing the charging port lid.
• If the EV system can not be started, contact your Toyota dealer.
When charging schedule func tion does not operate nor-
mally
Likely causeCorrection procedure
Likely causeCorrection procedure
The vehicle calendar and clock are
not set correctly.Check the calendar setting and set it
to the correct date. ( P.158)
AC charging connector is not con-
nected to vehicleBefore using the charging schedule,
connect the AC charging connector.
AC charging connector was con-
nected after set time
Connect the AC charging connector
before the time set in “Start”.
When the charging mode is set to
“Start-Stop”, the traction battery will
charge even if the start time has
passed, if the AC charging connector
is connected befor e the stop time.
Page 139 of 628
1392-2. Charging
Owners Manual_USA_M42C01_en
2
Electric Vehicle system
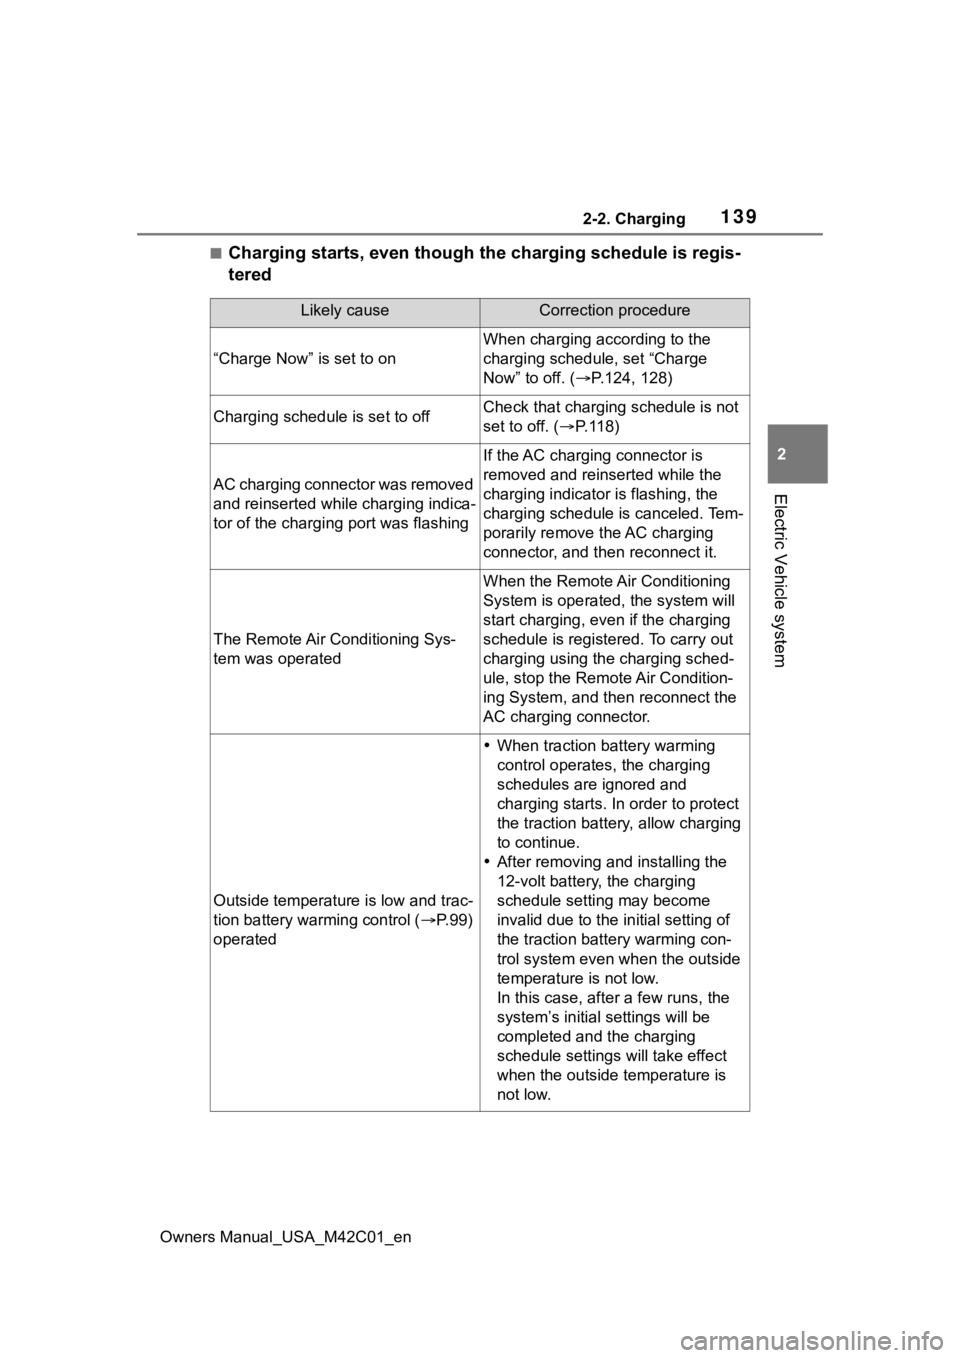
■Charging starts, even though the charging schedule is regis-
tered
Likely causeCorrection procedure
“Charge Now” is set to on
When charging according to the
charging schedule, set “Charge
Now” to off. ( P.124, 128)
Charging schedule is set to offCheck that charging schedule is not
set to off. ( P. 1 1 8 )
AC charging connector was removed
and reinserted while charging indica-
tor of the charging port was flashing
If the AC charging connector is
removed and reinserted while the
charging indicator is flashing, the
charging schedule is canceled. Tem-
porarily remove the AC charging
connector, and then reconnect it.
The Remote Air Conditioning Sys-
tem was operated
When the Remote Air Conditioning
System is operated, the system will
start charging, even if the charging
schedule is registered. To carry out
charging using the charging sched-
ule, stop the Remote Air Condition-
ing System, and then reconnect the
AC charging connector.
Outside temperature is low and trac-
tion battery warming control ( P. 9 9 )
operated
When traction battery warming
control operates, the charging
schedules are ignored and
charging starts. In order to protect
the traction battery , allow charging
to continue.
After removing and installing the
12-volt battery, the charging
schedule setting may become
invalid due to the in itial setting of
the traction battery warming con-
trol system even wh en the outside
temperature is not low.
In this case, after a few runs, the
system’s initial settings will be
completed and the charging
schedule settings will take effect
when the outside temperature is
not low.
Page 144 of 628
1442-2. Charging
Owners Manual_USA_M42C01_en
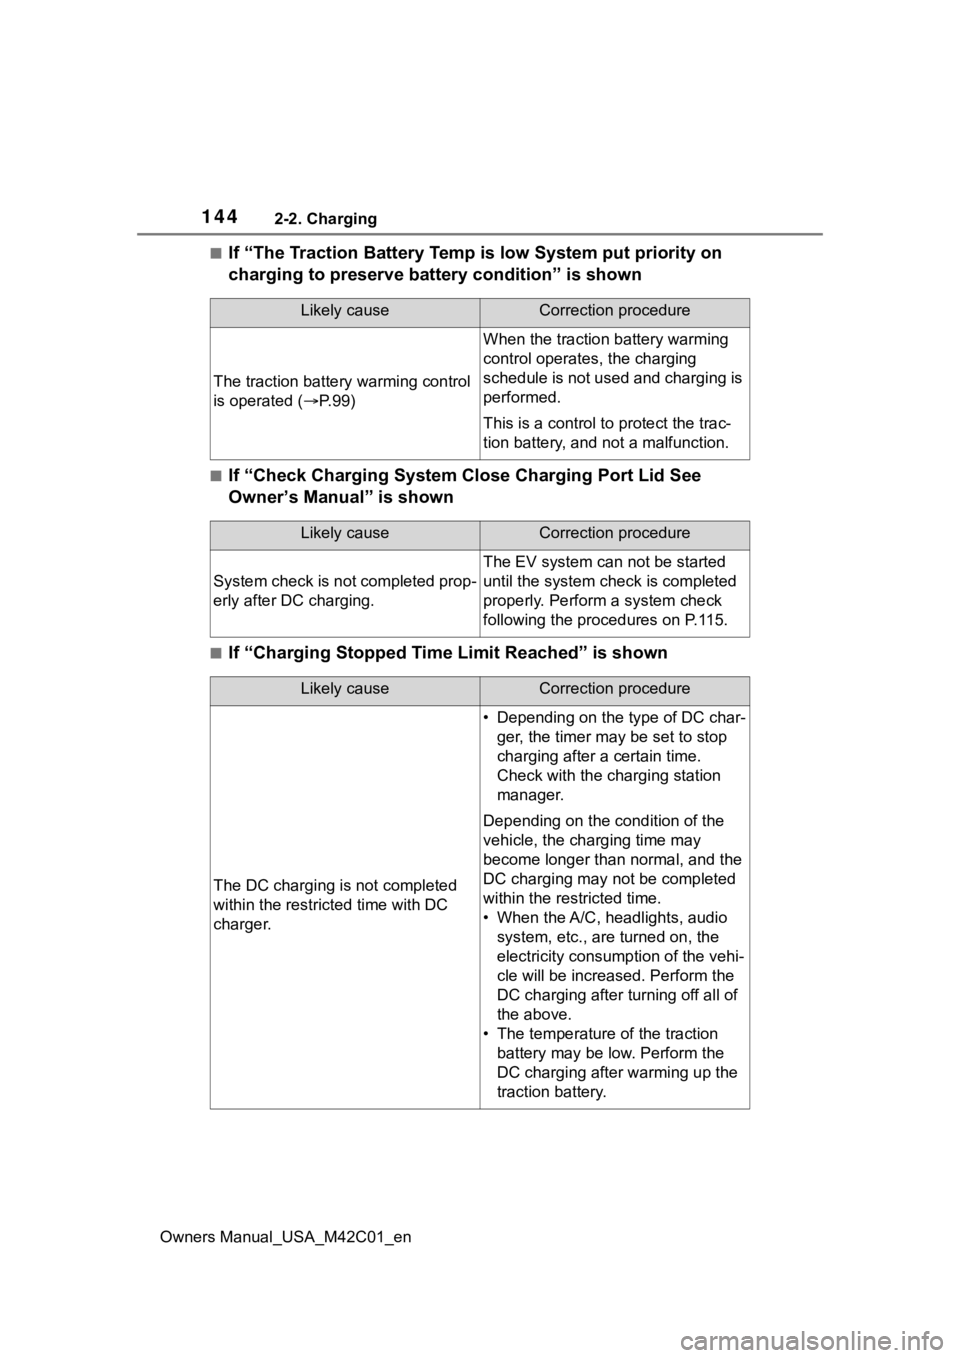
■If “The Traction Battery Temp is low System put priority on
charging to preserve battery condition” is shown
■If “Check Charging System Close Charging Port Lid See
Owner’s Manual” is shown
■If “Charging Stopped Time Limit Reached” is shown
Likely causeCorrection procedure
The traction battery warming control
is operated ( P. 9 9 )
When the traction battery warming
control operates, the charging
schedule is not used and charging is
performed.
This is a control to protect the trac-
tion battery, and not a malfunction.
Likely causeCorrection procedure
System check is not completed prop-
erly after DC charging.
The EV system can not be started
until the system check is completed
properly. Perform a system check
following the procedures on P.115.
Likely causeCorrection procedure
The DC charging is not completed
within the restric ted time with DC
charger.
• Depending on the type of DC char- ger, the timer may be set to stop
charging after a certain time.
Check with the charging station
manager.
Depending on the condition of the
vehicle, the charging time may
become longer than normal, and the
DC charging may not be completed
within the restricted time.
• When the A/C, headlights, audio system, etc., are turned on, the
electricity consum ption of the vehi-
cle will be increas ed. Perform the
DC charging after turning off all of
the above.
• The temperature of the traction battery may be low. Perform the
DC charging after warming up the
traction battery.
Page 158 of 628
1583-1. Instrument cluster
Owners Manual_USA_M42C01_en
meter using the meter control
switches.
This menu icon can be set to be
displayed/not displayed in .
■Display items
Drive information
Torque distribution (if
equipped)
Tire inflation pressure
■Drive information
2 items that are selected using
the “Drive Info. Items” setting
(average speed, distance and
total time) can be displayed ver-
tically.
The displayed information
changes according to the “Drive
Info. Type” setting (since the
system was started or between
resets). ( P.158)
Use the displayed information
as a reference only.
Following items will be dis-
played.
“Trip”
• “Average Speed”: Displays the
average vehicle speed since EV
system start
*
• “Distance”: Displ ays the distance
driven since EV system start
*
• “Total Time”: Displays the elapsed time since EV system start
* *
: These items are r
eset each time
the EV system stops.
“Total”
• “Average Speed”: Displays the
average vehicle speed since the
display was reset
*
• “Distance”: Displ ays the distance
driven since the display was
reset
*
• “Total Time”: Displays the elapsed
time since the display was reset
*
*
: To reset, display the desired item and press and hold the meter
control switch.
■Torque distribution (if
equipped)
Displays the drive status of each
wheel in 6 steps from 0 to 5.
■Tire inflation pressure
Displays inflation pressure of
each tire.
■Meter display settings that
can be changed
Clock setting
P.154
Language
Select to change the language dis-
played.
Units
Select to change the units of mea-
sure displayed.
Vehicle information dis-
play
Settings display