Latch release button TOYOTA BZ4X 2023 Owners Manual
[x] Cancel search | Manufacturer: TOYOTA, Model Year: 2023, Model line: BZ4X, Model: TOYOTA BZ4X 2023Pages: 628, PDF Size: 11.91 MB
Page 89 of 628
892-2. Charging
Owners Manual_USA_M42C01_en
2
Electric Vehicle system
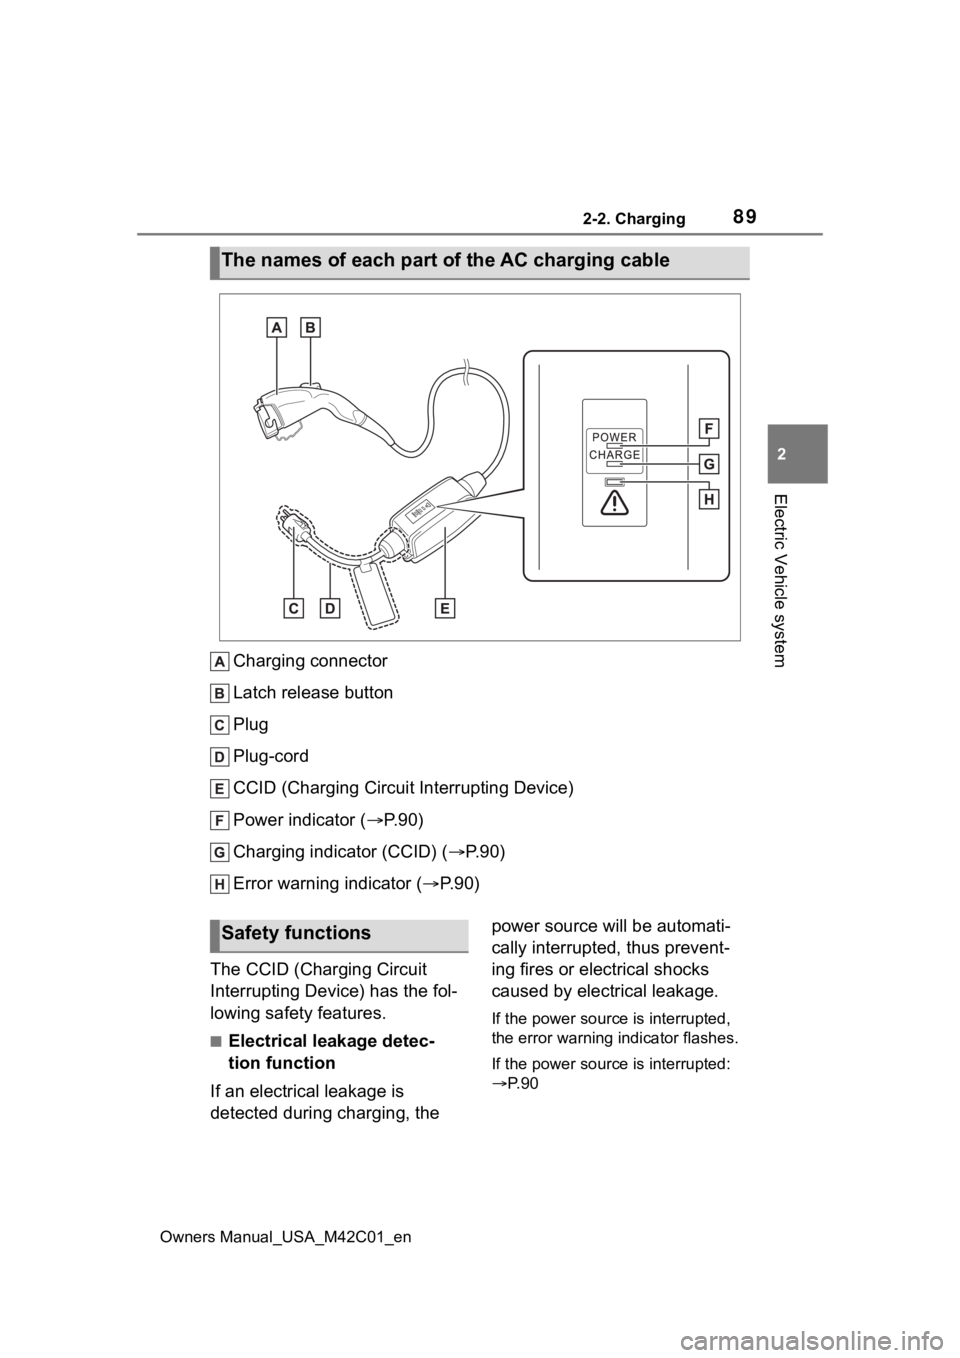
Charging connector
Latch release button
Plug
Plug-cord
CCID (Charging Circuit Interrupting Device)
Power indicator ( P. 9 0 )
Charging indicator (CCID) ( P.90)
Error warning indicator (P.90)
The CCID (Charging Circuit
Interrupting Device) has the fol-
lowing safety features.
■Electrical leakage detec-
tion function
If an electrical leakage is
detected during charging, the power source will be automati-
cally interrupted, thus prevent-
ing fires or electrical shocks
caused by electrical leakage.
If the power source is interrupted,
the error warning
indicator flashes.
If the power source is interrupted:
P. 9 0
The names of each part of the AC charging cable
Safety functions
Page 108 of 628
1082-2. Charging
Owners Manual_USA_M42C01_enthe charging schedule and start
charging, perform any of the follow-
ing procedures.
●Turn “Charge Now” on (
P.124,
128)
●While the charging indicator is
flashing, remove and reconnect
the charging conn ector immedi-
ately
■When the charging connector
cannot be inserted into the AC
charging inlet
P. 9 3
■Safety function
If the latch release button is
pressed, charging will not begin
even if the AC charging cable is
connected.
Also, charging will be stopped if the
latch release button is pressed and
held for several seconds during
charging. When restarting charging,
reinsert the charging connector after
pulling it out , and check that the
charging indicator of the charging
port illuminates.
■Charging time may increase
P. 1 0 4
■When your circuit breaker trips
during charging
The upper limit of the charging cur-
rent can be chan ged on the multi-
information display or multimedia.
●Setting operations on multi-infor-
mation display
1 Press or of the meter
control switches to select .
2 Press or of the meter
control switches to select “Vehi-
cle Settings”, and then press and
hold .
3 Press or of the meter
control switches to select “Charging Settings”, and then
press .
The “Charging Se ttings” screen will
be displayed.
4 Press or of the meter
control switches to select
“Charging Current”, and then
press .
The “Charging Curr ent” screen will
be displayed.
5 Press or of the meter
control switches to select “16A”
or “8A” and then press .
●Setting operations on multimedia
1 Select .
2 Select “Vehicle customize”.
3 Select “Charging”.
4 Select “Charging current”.
5 S e l e c t “ 1 6 A” o r “ 8 A” .
The maximum charging current is
limited to less than or equal to the
selected current.
*
If the breaker still trips while
charging, even after changing the
upper limit of the charging current,
check if the connected power
source meets the specified charging
conditions. ( P.96)
*: Restricting the charging current
will lengthen the c harging time.
■Changing the “Cha rging Limit”
settings
The upper limit of the charge capac-
ity can be chang ed on the multi-
information display or multimedia.
The selected upper limit value is
common to AC charging and DC
charging.
●Setting operations on multi-infor-
mation display
Page 111 of 628
1112-2. Charging
Owners Manual_USA_M42C01_en
2
Electric Vehicle system
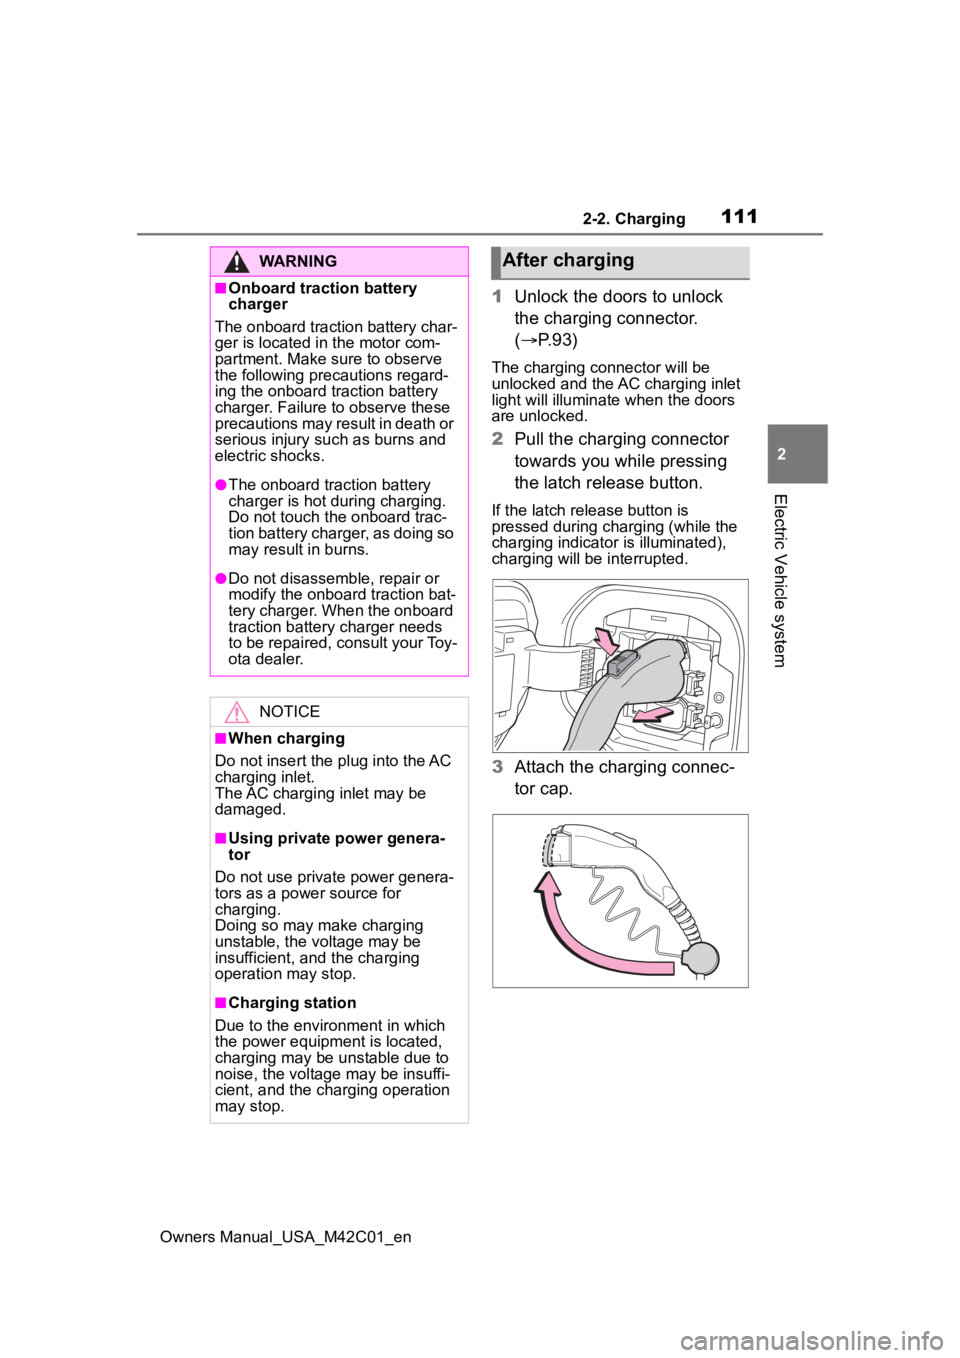
1 Unlock the doors to unlock
the charging connector.
( P.93)
The charging connector will be
unlocked and the AC charging inlet
light will illuminate when the doors
are unlocked.
2Pull the charging connector
towards you while pressing
the latch release button.
If the latch release button is
pressed during charging (while the
charging indicator is illuminated),
charging will be interrupted.
3 Attach the charging connec-
tor cap.
WARNING
■Onboard traction battery
charger
The onboard traction battery char-
ger is located in the motor com-
partment. Make sure to observe
the following precautions regard-
ing the onboard traction battery
charger. Failure to observe these
precautions may result in death or
serious injury suc h as burns and
electric shocks.
●The onboard traction battery
charger is hot during charging.
Do not touch the onboard trac-
tion battery charger, as doing so
may result in burns.
●Do not disassemble, repair or
modify the onboard traction bat-
tery charger. When the onboard
traction battery charger needs
to be repaired, consult your Toy-
ota dealer.
NOTICE
■When charging
Do not insert the p lug into the AC
charging inlet.
The AC charging inlet may be
damaged.
■Using private power genera-
tor
Do not use private power genera-
tors as a power source for
charging.
Doing so may make charging
unstable, the voltage may be
insufficient, and the charging
operation may stop.
■Charging station
Due to the environment in which
the power equipme nt is located,
charging may be unstable due to
noise, the voltage may be insuffi-
cient, and the charging operation
may stop.
After charging
Page 112 of 628
1122-2. Charging
Owners Manual_USA_M42C01_en
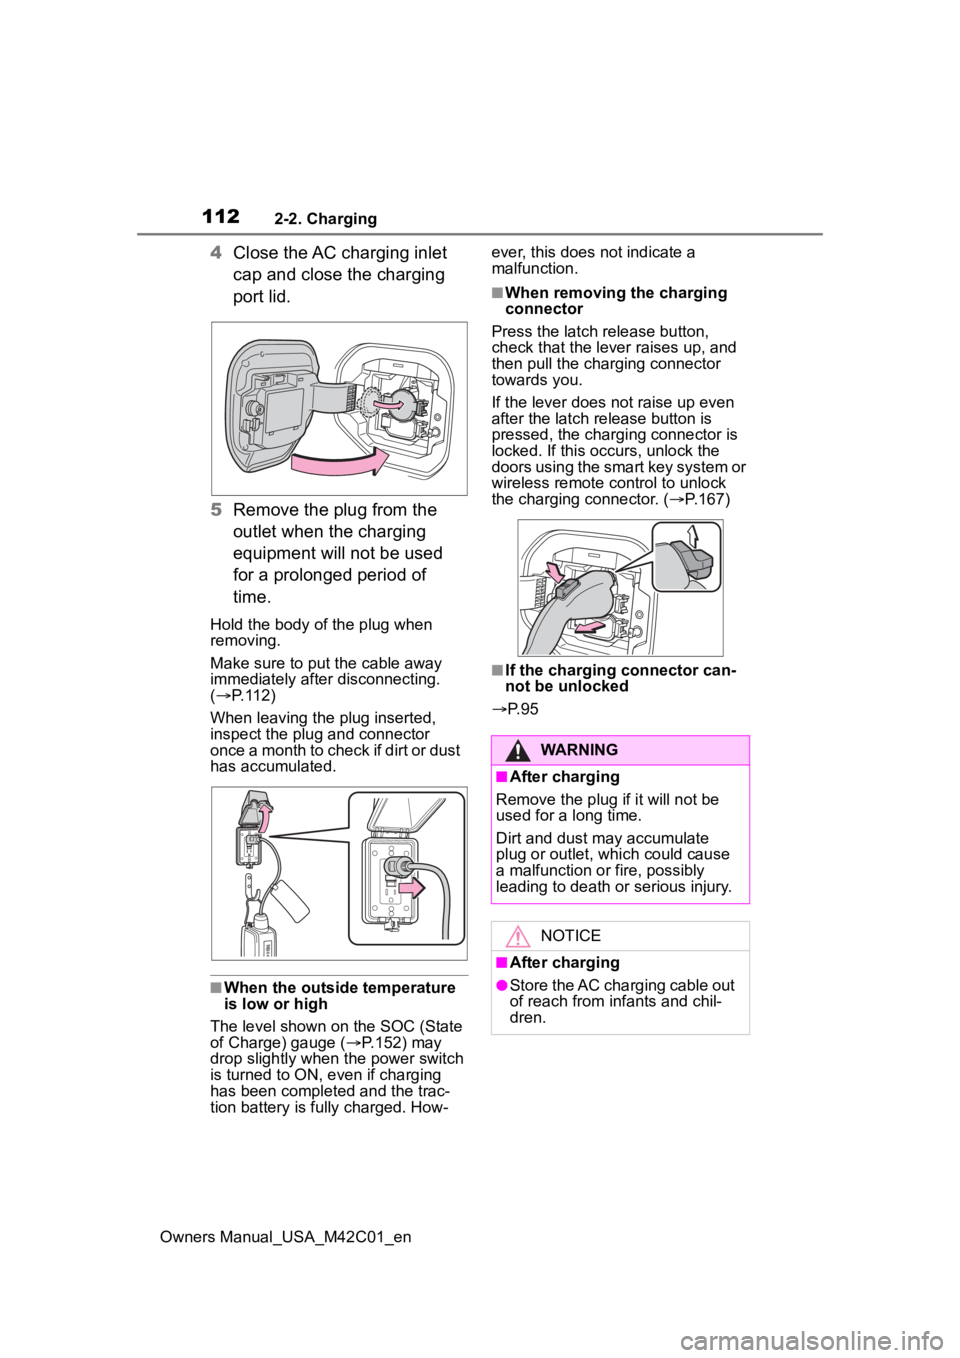
4Close the AC charging inlet
cap and close the charging
port lid.
5 Remove the plug from the
outlet when the charging
equipment will not be used
for a prolonged period of
time.
Hold the body of the plug when
removing.
Make sure to put the cable away
immediately afte r disconnecting.
( P. 1 1 2 )
When leaving the plug inserted,
inspect the plug and connector
once a month to check if dirt or dust
has accumulated.
■When the outside temperature
is low or high
The level shown on the SOC (State
of Charge) gauge ( P.152) may
drop slightly when the power switch
is turned to ON, e ven if charging
has been completed and the trac-
tion battery is fully charged. How- ever, this does not indicate a
malfunction.
■When removing the charging
connector
Press the latch release button,
check that the lever raises up, and
then pull the charging connector
towards you.
If the lever does not raise up even
after the latch release button is
pressed, the charging connector is
locked. If this occurs, unlock the
doors using the smart key system or
wireless remote control to unlock
the charging connector. ( P.167)
■If the charging connector can-
not be unlocked
P. 9 5
WARNING
■After charging
Remove the plug if it will not be
used for a long time.
Dirt and dust may accumulate
plug or outlet, which could cause
a malfunction or fire, possibly
leading to death or serious injury.
NOTICE
■After charging
●Store the AC charging cable out
of reach from infants and chil-
dren.
Page 134 of 628
1342-2. Charging
Owners Manual_USA_M42C01_en
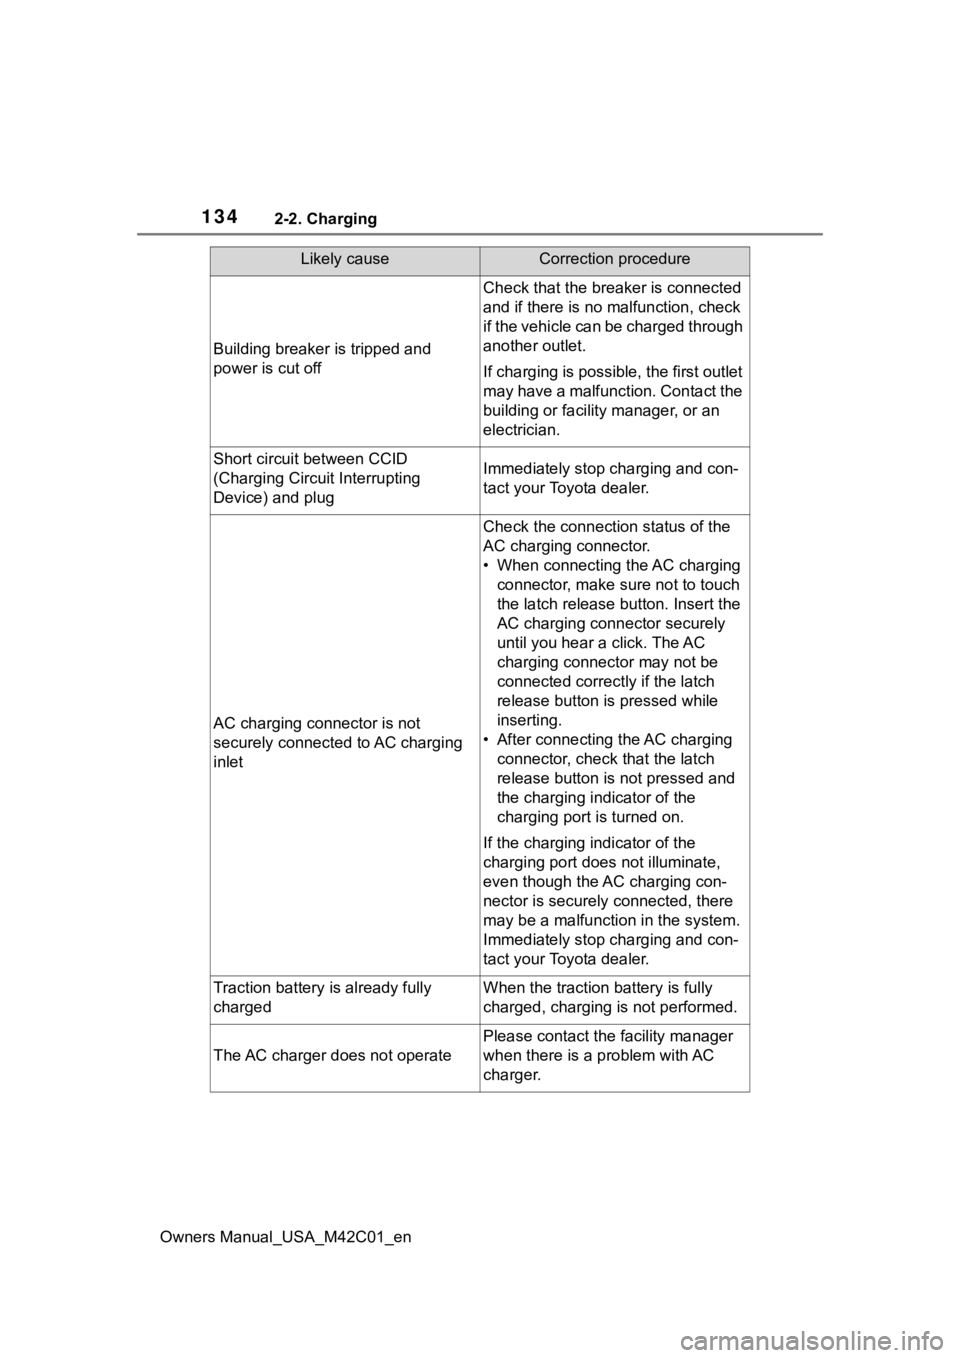
Building breaker is tripped and
power is cut off
Check that the breaker is connected
and if there is no malfunction, check
if the vehicle can be charged through
another outlet.
If charging is possible, the first outlet
may have a malfunction. Contact the
building or facilit y manager, or an
electrician.
Short circuit between CCID
(Charging Circuit Interrupting
Device) and plugImmediately stop charging and con-
tact your Toyota dealer.
AC charging connector is not
securely connected to AC charging
inlet
Check the connection status of the
AC charging connector.
• When connecting the AC charging connector, make sure not to touch
the latch release button. Insert the
AC charging connector securely
until you hear a click. The AC
charging connector may not be
connected correctly if the latch
release button is pressed while
inserting.
• After connecting the AC charging connector, check that the latch
release button is not pressed and
the charging indicator of the
charging port is turned on.
If the charging indicator of the
charging port does not illuminate,
even though the AC charging con-
nector is securely connected, there
may be a malfunction in the system.
Immediately stop charging and con-
tact your Toyota dealer.
Traction battery is already fully
chargedWhen the traction battery is fully
charged, charging is not performed.
The AC charger does not operate
Please contact the facility manager
when there is a problem with AC
charger.
Likely causeCorrection procedure
Page 141 of 628
1412-2. Charging
Owners Manual_USA_M42C01_en
2
Electric Vehicle system
*: Electricity is consumed wh en operating battery heater ( P.99), the
Remote Air Conditioning System ( P.409).
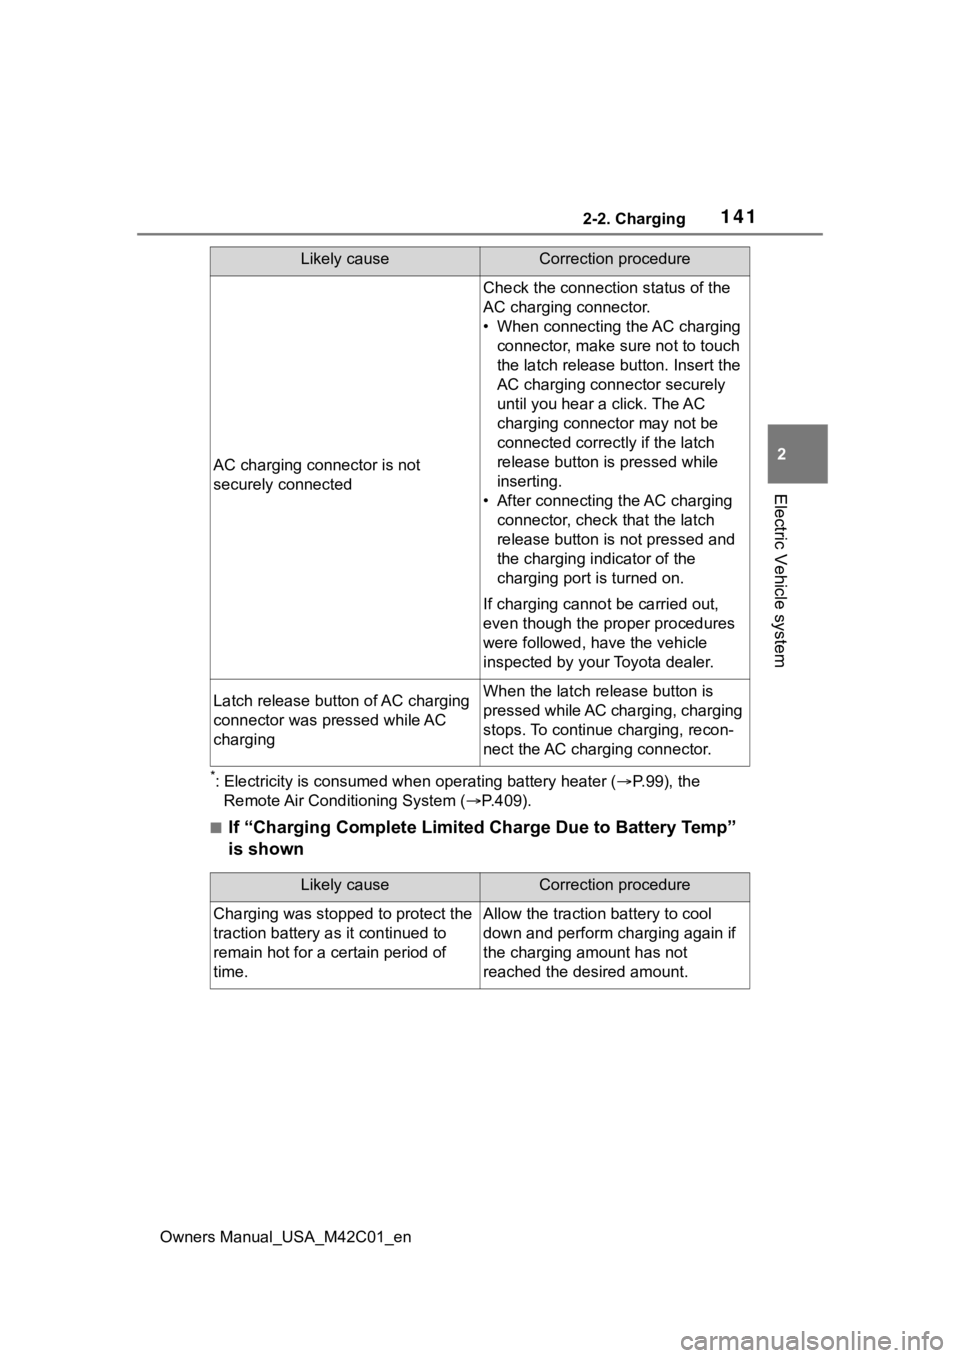
■If “Charging Complete Limited Charge Due to Battery Temp”
is shown
AC charging connector is not
securely connected
Check the connection status of the
AC charging connector.
• When connecting the AC charging
connector, make sure not to touch
the latch release button. Insert the
AC charging connector securely
until you hear a click. The AC
charging connector may not be
connected correctly if the latch
release button is pressed while
inserting.
• After connecting the AC charging connector, check that the latch
release button is not pressed and
the charging indicator of the
charging port is turned on.
If charging cannot be carried out,
even though the proper procedures
were followed, h ave the vehicle
inspected by your Toyota dealer.
Latch release button of AC charging
connector was pressed while AC
chargingWhen the latch release button is
pressed while AC charging, charging
stops. To continue charging, recon-
nect the AC charging connector.
Likely causeCorrection procedure
Likely causeCorrection procedure
Charging was stopped to protect the
traction battery as it continued to
remain hot for a certain period of
time.Allow the traction battery to cool
down and perform ch arging again if
the charging amount has not
reached the desired amount.