Light TOYOTA C-HR 2018 1.G Owners Manual
[x] Cancel search | Manufacturer: TOYOTA, Model Year: 2018, Model line: C-HR, Model: TOYOTA C-HR 2018 1.GPages: 516, PDF Size: 9.32 MB
Page 356 of 516

3566-3. Do-it-yourself maintenance
C-HR_OM_USA_OM10526U
◆Registering ID codes
The tire pressure warning valve and transmitter is equipped with a
unique ID code. When replacing a tire pressure warning valve and
transmitter, it is necessary to register the ID code. Have the ID code
registered by your Toyota dealer.
■When to replace your vehicle’s tires
Tires should be replaced if:
●The treadwear indicators are showing on a tire.
●You have tire damage such as cuts, splits, cracks deep enough to
expose the fabric, and bulges indicating internal damage
●A tire goes flat repeatedly or cannot be properly repaired due to the size
or location of a cut or other damage
If you are not sure, consult with your Toyota dealer.
■Replacing tires and wheels
If the ID code of the tire pressure warning valve and transmitter is not reg-
istered, the tire pressure warning system will not work properly. After driv-
ing for about 20 minutes, the tire pressure warning light blinks for 1
minute and stays on to indicate a system malfunction.
■Tire life
Any tire over 6 years old must be checked by a qualified technician even
if it has seldom or never been use, or damage is not obvious.
■Routine tire inflation pressure checks
The tire pressure warning system does not replace routine tire inflation
pressure checks. Make su re to check tire inflation pressure as part of
your routine of daily vehicle checks.
Page 359 of 516
3596-3. Do-it-yourself maintenance
6
Maintenance and care
C-HR_OM_USA_OM10526U■
The initialization operation
●Make sure to carry out in
itialization after adjusting the tire inflation pres-
sure.
Also, make sure the tires are cold be fore carrying out initialization or tire
inflation pressure adjustment.
●If you have accidentally turned the engine switch off during initialization,
it is not necessary to press the reset switch again as initialization will
restart automatically when the engine switch to the “ON” position (vehi-
cles without a smart key system) or IGNITION ON mode (vehicles with a
smart key system) for the next time.
●If you accidentally press the reset s witch when initialization is not neces-
sary, adjust the tire inflation pressu re to the specified level when the
tires are cold, and conduct initialization again.
■Warning performance of the ti re pressure warning system
The warning of the tire pressure warning system will change in accor-
dance with driving conditions. For th is reason, the system may give a
warning even if the tire pressure does not reach a low enough level, or if
the pressure is higher than the pressure that was adjusted to when the
system was initialized.
■When initialization of the tire pr essure warning system has failed
Initialization can be completed in a few minutes. However, in the following
cases, the settings have not been recorded and the system will not oper-
ate properly. If repeated attempts to record tire inflation pressure settings
are unsuccessful, have the vehicle inspected by your Toyota dealer.
●When operating the initialization of th e system, the tire pressure warning
light does not blink 3 times and the setting message does not appear on
the multi-information display.
●After driving for a certain period of time since the initialization has been
completed, the warning light comes on after blinking for 1 minute.
Page 361 of 516

3616-3. Do-it-yourself maintenance
6
Maintenance and care
C-HR_OM_USA_OM10526U
WARNING
■When inspecting or replacing tires
Observe the following precautions to prevent accidents.
Failure to do so may cause damage to parts of the drive train as well as
dangerous handling characteristics, which may lead to an accident
resulting in death or serious injury.
●Do not mix tires of different makes, models or tread patterns.
Also, do not mix tires of remarkably different treadwear.
●Do not use tire sizes other than those recommended by Toyota.
●Do not mix differently constructed tires (radial, bias-belted or bias-ply
tires).
●Do not mix summer, all season and snow tires.
●Do not use tires that have been used on another vehicle.
Do not use tires if you do not know how they were used previously.
●Do not tow if your vehicle has a compact spare tire installed.
■When initializing the tire pressure warning system
Do not initialize tire pressure warning system without first adjusting the
tire inflation pressure to the specified level. Otherwise, the tire pressure
warning light may not come on even if the tire inflation pressure is low,
or it may come on when the tire inflation pressure is actually normal.
Page 371 of 516

3716-3. Do-it-yourself maintenance
6
Maintenance and care
C-HR_OM_USA_OM10526U
With the glove box fully open,
slightly lift up the glove box and
pull toward the seat to detach
the bottom of the glove box.
Do not use excessive force if the
glove box does not detach when
lightly pulled. Instead, pull toward
the seat while slightly adjusting the
height of the glove box.
Remove the filter cover.
Remove the air conditioning filter
and replace it with a new one.
The “ \bUP” marks shown on the fil-
ter should be pointing up.
4
5
Replacement method
Page 380 of 516

3806-3. Do-it-yourself maintenance
C-HR_OM_USA_OM10526U
■After a fuse is replaced
●If the lights do not turn on even after the fuse has been replaced, a bulb may
need replacement. ( →P. 381)
● If the replaced fuse blows again, have the vehicle inspected by your Toyota
dealer.
■ If there is an overload in a circuit
The fuses are designed to blow, protecting the wiring harness from damage.
■ When replacing light bulbs
Toyota recommends that you use genuine Toyota products designed for this
vehicle. Because certain bulbs are connected to circuits designed to prevent
overload, non-genuine parts or parts not designed for this vehicle may be
unusable.
WARNING
■To prevent system breakdowns and vehicle fire
Observe the following precautions.
Failure to do so may cause damage to the vehicle, and possibly a fire or
injury.
● Never use a fuse of a higher amperage rating than that indicated, or use\
any other object in place of a fuse.
● Always use a genuine Toyota fuse or equivalent.
Never replace a fuse with a wire, even as a temporary fix.
● Do not modify the fuses or fuse boxes.
NOTICE
■Before replacing fuses
Have the cause of electrical overload determined and repaired by your
Toyota dealer as soon as possible.
Page 381 of 516
3816-3. Do-it-yourself maintenance
6
Maintenance and care
C-HR_OM_USA_OM10526U
Light bulbs
Check the wattage of the light bulb to be replaced. (→P. 457)
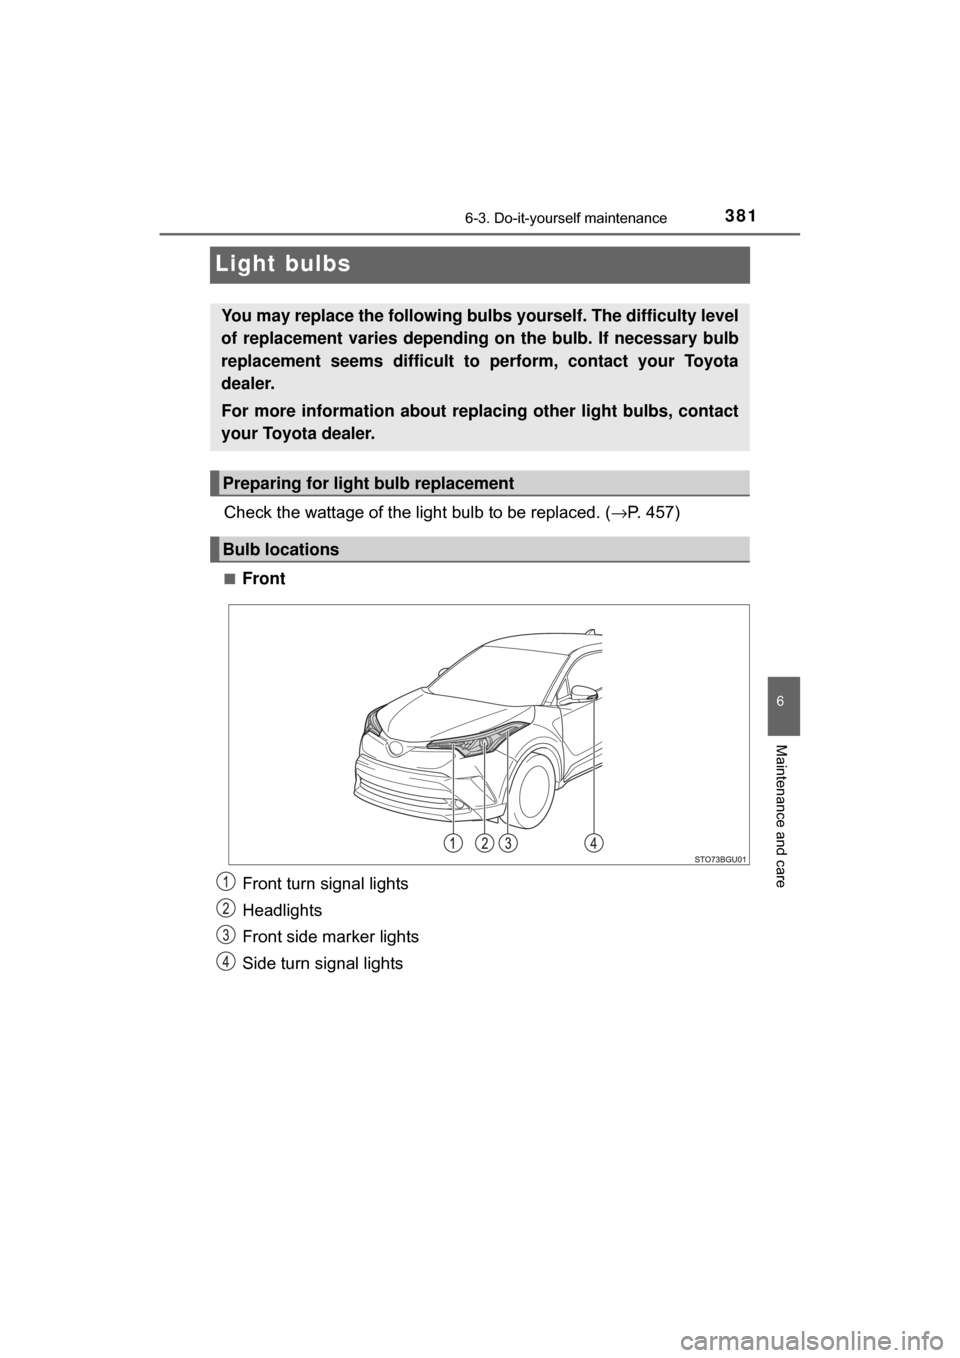
■Front
Front turn signal lights
Headlights
Front side marker lights
Side turn signal lights
You may replace the following bulb s yourself. The difficulty level
of replacement varies depending on the bulb. If necessary bulb
replacement seems difficult to perform, contact your Toyota
dealer.
For more information about replacing other light bulbs, contact
your Toyota dealer.
Preparing for light bulb replacement
Bulb locations
Page 382 of 516

3826-3. Do-it-yourself maintenance
C-HR_OM_USA_OM10526U■
Rear
Rear side marker lights
Rear turn signal lights
Back-up lights
License plate lights
■Headlights
Turn the bulb base counter-
clockwise.
Unplug the connector while
pressing the lock release.
Replacing light bulbs
1
2
Page 383 of 516
3836-3. Do-it-yourself maintenance
6
Maintenance and care
C-HR_OM_USA_OM10526U
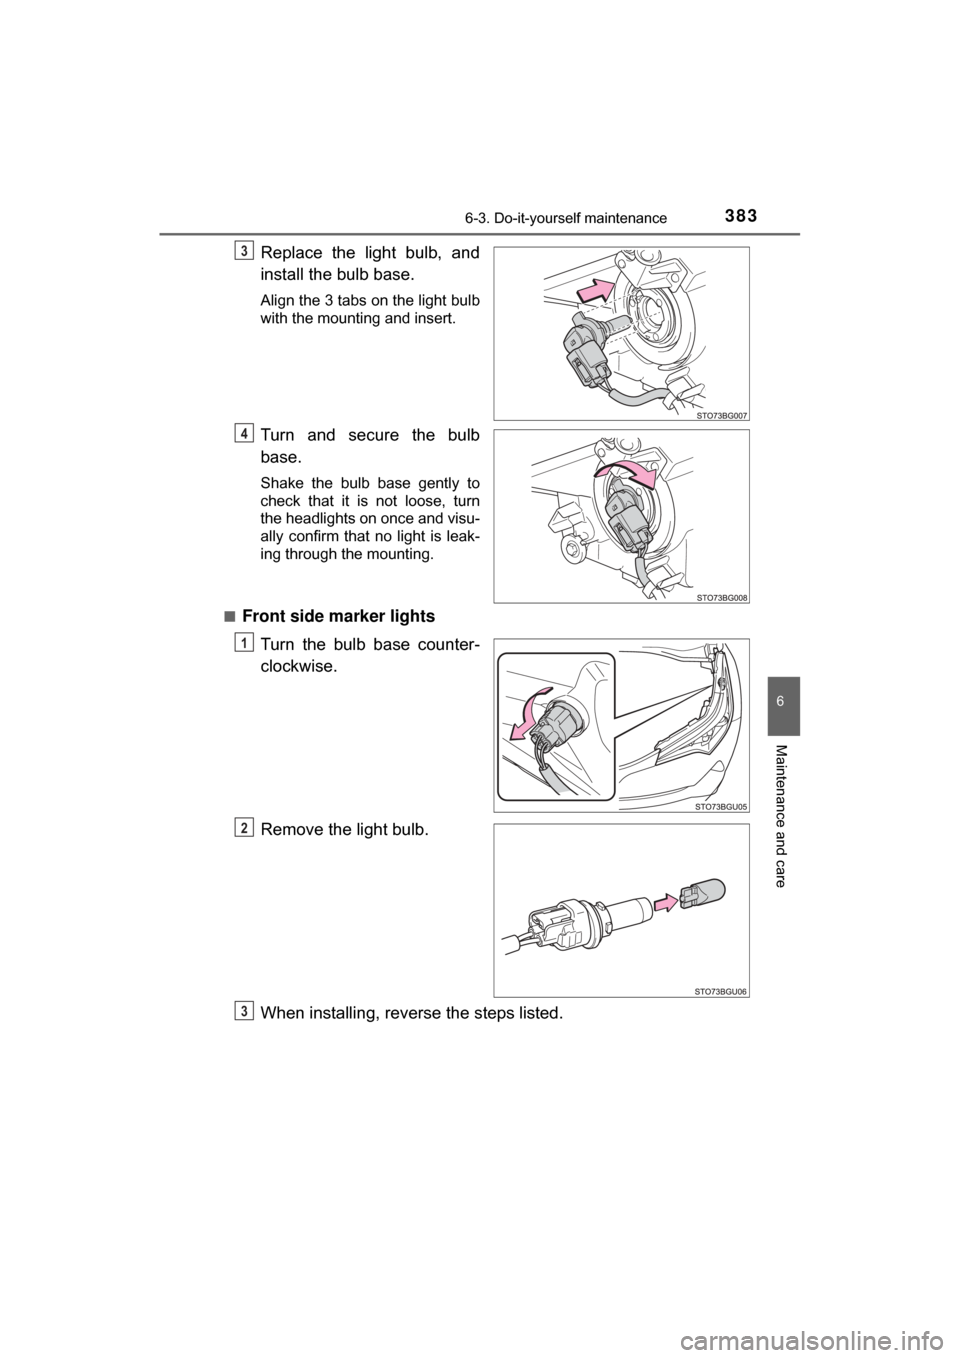
Replace the light bulb, and
install the bulb base.
Align the 3 tabs on the light bulb
with the mounting and insert.
Turn and secure the bulb
base.
Shake the bulb base gently to
check that it is not loose, turn
the headlights on once and visu-
ally confirm that no light is leak-
ing through the mounting.
■
Front side marker lights Turn the bulb base counter-
clockwise.
Remove the light bulb.
When installing, reve rse the steps listed.
3
4
1
2
3
Page 384 of 516

3846-3. Do-it-yourself maintenance
C-HR_OM_USA_OM10526U■
Front turn signal lights
Turn the bulb base counter-
clockwise.
Remove the light bulb.
When installing, reve rse the steps listed.
1
2
3
Page 385 of 516
3856-3. Do-it-yourself maintenance
6
Maintenance and care
C-HR_OM_USA_OM10526U■
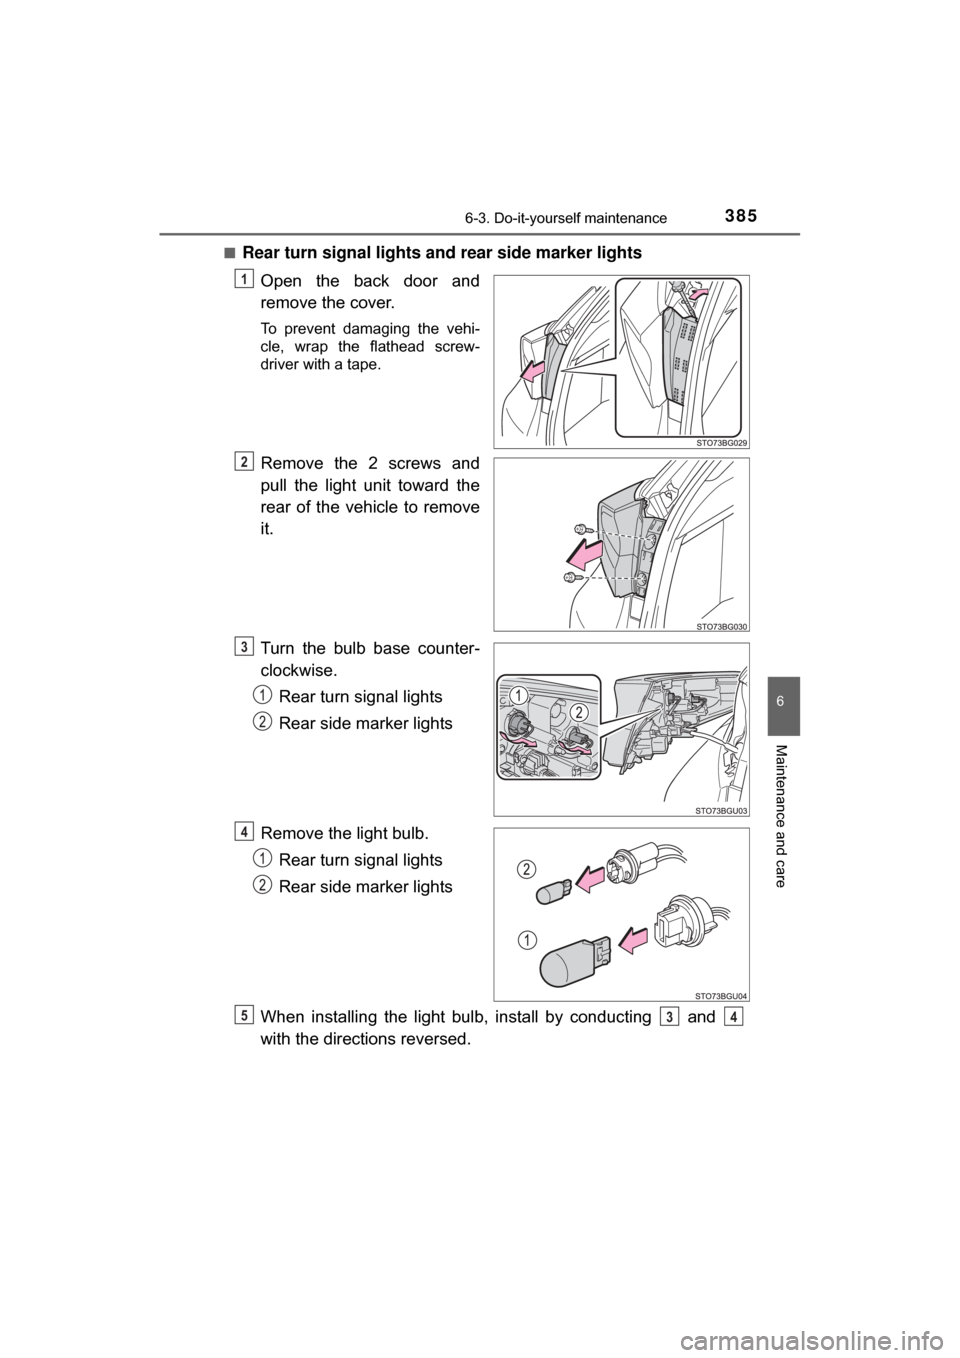
Rear turn signal lights and rear side marker lights
Open the back door and
remove the cover.
To prevent damaging the vehi-
cle, wrap the flathead screw-
driver with a tape.
Remove the 2 screws and
pull the light unit toward the
rear of the vehicle to remove
it.
Turn the bulb base counter-
clockwise.Rear turn signal lights
Rear side marker lights
Remove the light bulb. Rear turn signal lights
Rear side marker lights
When installing the light bulb, install by conducting and
with the directions reversed.
1
2
3
4
534