lock TOYOTA C-HR 2020 (in English) User Guide
[x] Cancel search | Manufacturer: TOYOTA, Model Year: 2020, Model line: C-HR, Model: TOYOTA C-HR 2020Pages: 536, PDF Size: 11.99 MB
Page 54 of 536
541-2. Child safety
C-HR_OM_USA_OM10634U
Riding with children
●It is recommended that children sit in the rear seats to avoid acci-
dental contact with the shift lever, wiper switch, etc.
● Use the rear door child-protector lock or the window lock switc h to
avoid children opening the door while driving or operating the
power window accidentally. ( P. 122, 155)
● Do not let small children operate equipment which may catch or
pinch body parts, such as the power window, hood, back door,
seats, etc.
Observe the following precautions when children are in the vehi -
cle.
Use a child restraint system app ropriate for the child, until the
child becomes large enough to properly wear the vehicle’s seat
belt.
WARNING
Never leave children unattended in the vehicle, and never allow children to
have or use the key.
Children may be able to start the vehicle or shift the vehicle into neutral.
There is also a danger that children may injure themselves by p laying with
the side windows, the moon roof (if equipped) or other features of the vehi-
cle. In addition, heat build-up or extremely cold temperatures inside the
vehicle can be fatal to children.
Page 61 of 536
611-2. Child safety
1
For safety and security
C-HR_OM_USA_OM10634U
A child restraint system for a small child or baby must itself be prop-
erly restrained on the seat with the lap portion of the lap/shoulder belt.
◆Installing child restraint system using a seat belt (child
restraint lock function belt)
Install the child restraint system in accordance to the operati on
manual enclosed with the child restraint system.
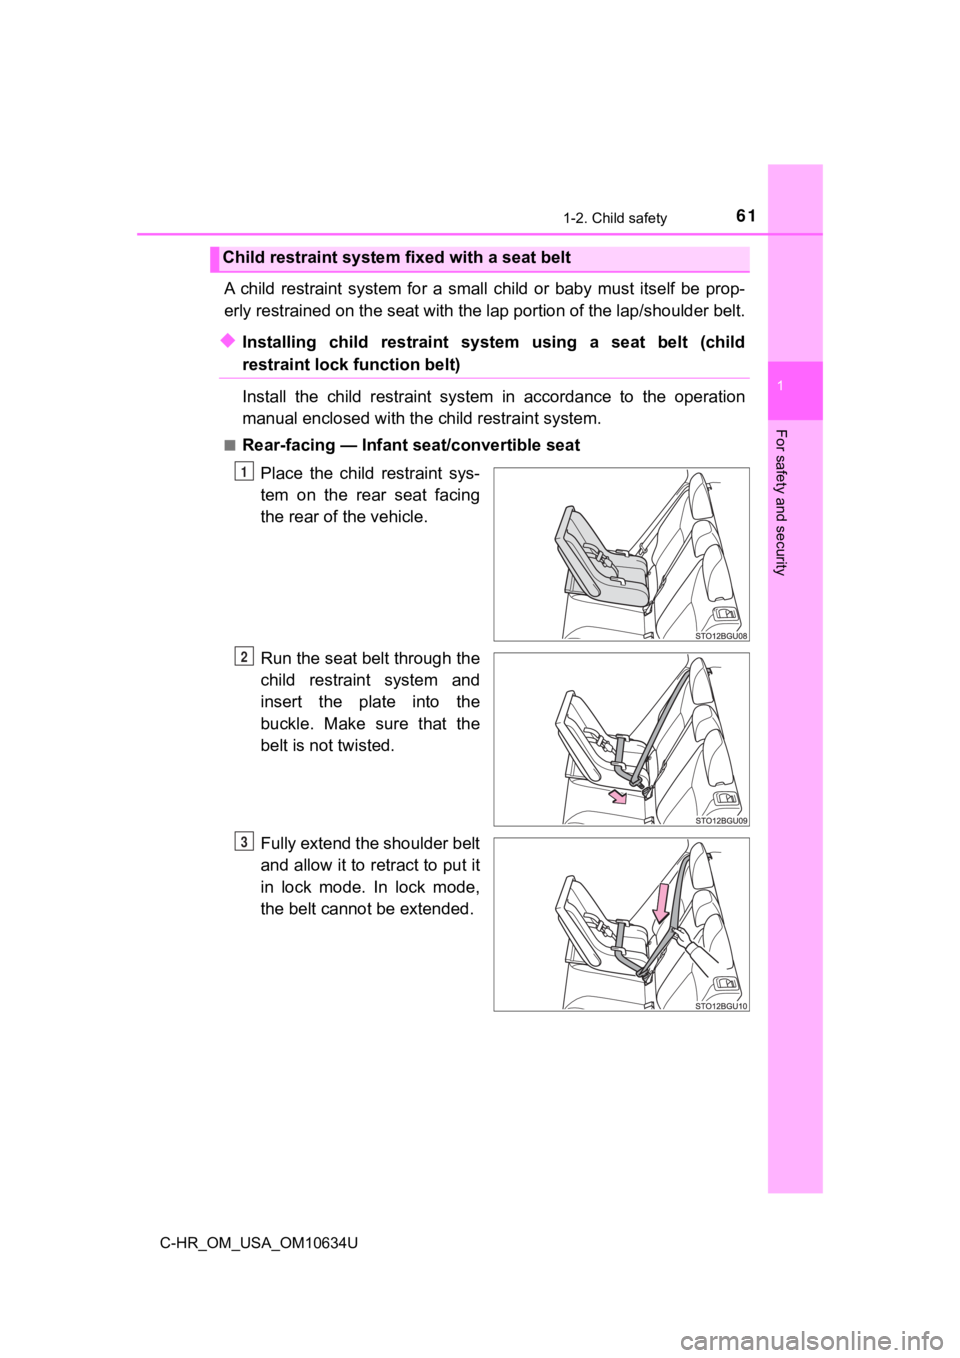
■Rear-facing — Infant seat/convertible seat
Place the child restraint sys-
tem on the rear seat facing
the rear of the vehicle.
Run the seat belt through the
child restraint system and
insert the plate into the
buckle. Make sure that the
belt is not twisted.
Fully extend the shoulder belt
and allow it to retract to put it
in lock mode. In lock mode,
the belt cannot be extended.
Child restraint system fixed with a seat belt
1
2
3
Page 63 of 536
631-2. Child safety
1
For safety and security
C-HR_OM_USA_OM10634U
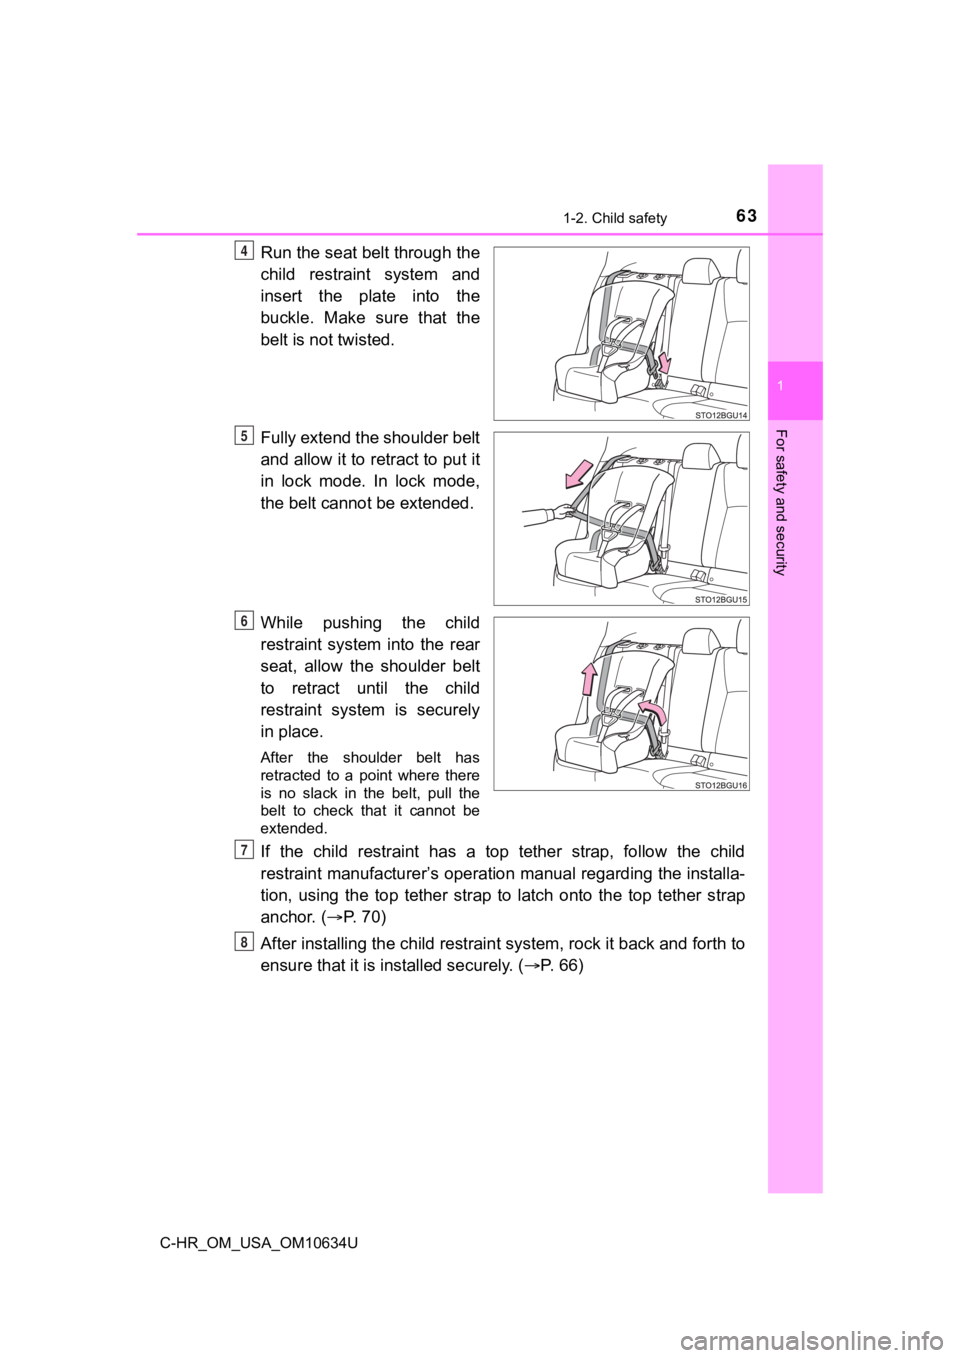
Run the seat belt through the
child restraint system and
insert the plate into the
buckle. Make sure that the
belt is not twisted.
Fully extend the shoulder belt
and allow it to retract to put it
in lock mode. In lock mode,
the belt cannot be extended.
While pushing the child
restraint system into the rear
seat, allow the shoulder belt
to retract until the child
restraint system is securely
in place.
After the shoulder belt has
retracted to a point where there
is no slack in the belt, pull the
belt to check that it cannot be
extended.
If the child restraint has a top tether strap, follow the child
restraint manufacturer’s operation manual regarding the installa-
tion, using the top tether strap to latch onto the top tether s trap
anchor. ( P. 7 0 )
After installing the child restrai nt system, rock it back and forth to
ensure that it is in stalled securely. ( P. 66)
4
5
6
7
8
Page 66 of 536
661-2. Child safety
C-HR_OM_USA_OM10634U
WARNING
■When installing a child restraint system
Observe the following precautions.
Failure to do so may result in death or serious injury.
● Do not allow children to play with the seat belt. If the seat b elt becomes
twisted around a child’s neck, it may lead to choking or other serious inju-
ries that could result in death.
If this occurs and the buckle cannot be unfastened, scissors sh ould be
used to cut the belt.
● Ensure that the belt and plate are securely locked and the seat belt is not
twisted.
● Shake the child restraint system left and right, and forward and backward
to ensure that it has been securely installed.
● After securing a child restraint system, never adjust the seat.
● When a booster seat is installed, always ensure that the should er belt is
positioned across the center of the child’s shoulder. The belt should be
kept away from the child’s neck, but not so that it could fall off the child’s
shoulder.
● Follow all installation instructions provided by the child rest raint system
manufacturer.
● When securing some types of child restraint systems in rear seats, it may
not be possible to properly use the seat belts in positions next to the child
restraint without interfering with it or affecting seat belt ef fectiveness. Be
sure your seat belt fits snugly across your shoulder and low on your hips. If
it does not, or if it interferes with the child restraint, move to a different
position. Failure to do so may result in death or serious injur y.
■ When installing a booster seat
To prevent the belt from going into ALR lock mode, do not fully extend the
shoulder belt. ALR mode causes the belt to tighten only. This c ould cause
injury or discomfort to the child. ( P. 28)
■ Do not use a seat belt extender
If a seat belt extender is used when installing a child restraint system, the
seat belt will not securely hold the child restraint system, which could cause
death or serious injury to the child or other passengers in the event of sud-
den braking, sudden swerving or an accident.
Page 96 of 536
962. Instrument cluster
C-HR_OM_USA_OM10634U
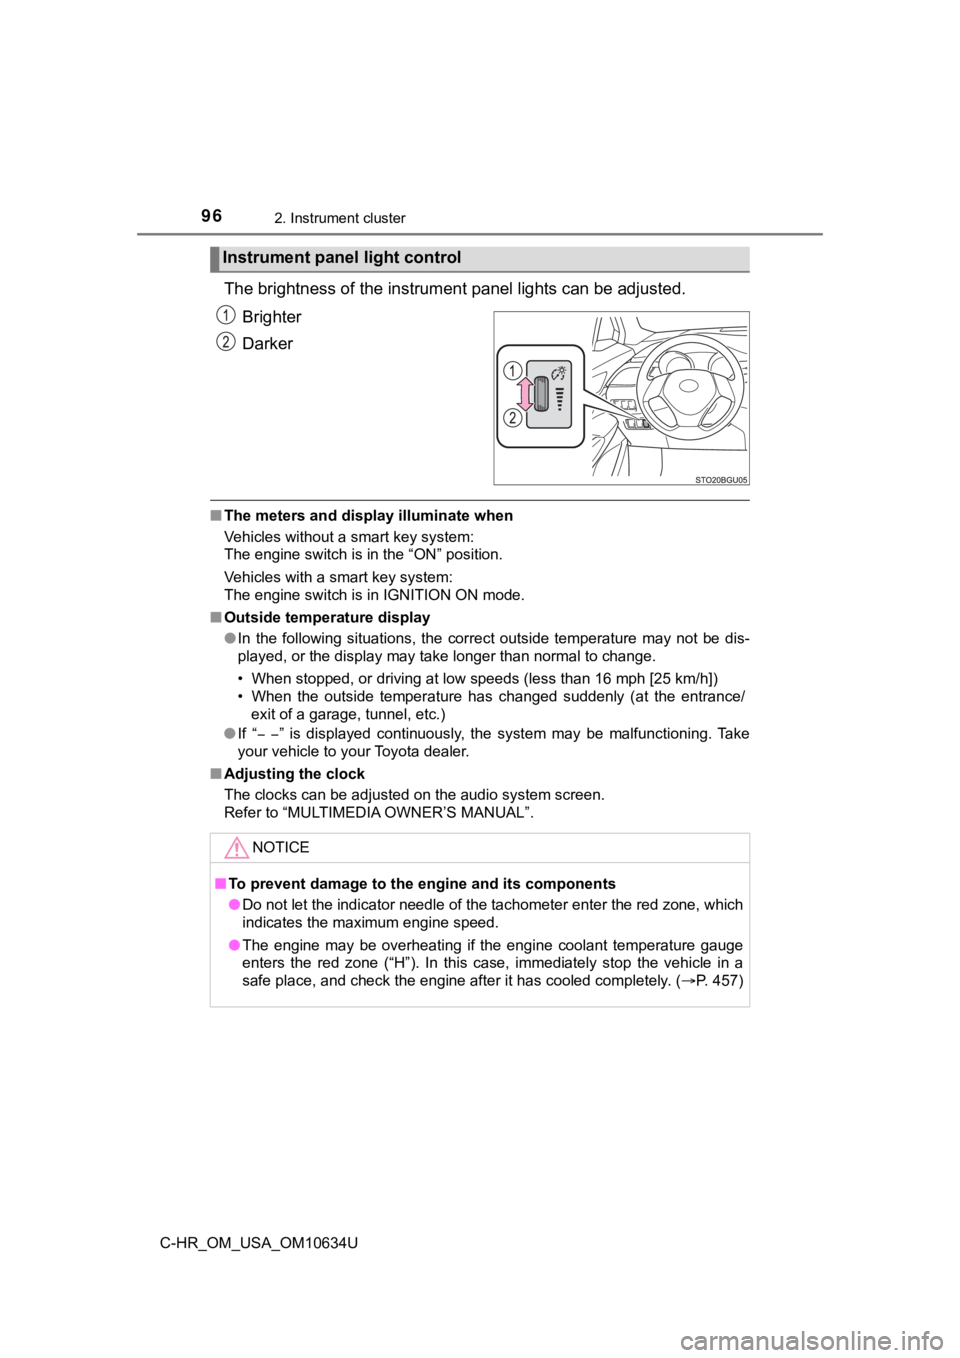
The brightness of the instrument panel lights can be adjusted.
Brighter
Darker
■ The meters and display illuminate when
Vehicles without a smart key system:
The engine switch is in the “ON” position.
Vehicles with a smart key system:
The engine switch is in IGNITION ON mode.
■ Outside temperature display
●In the following situations, the correct outside temperature ma y not be dis-
played, or the display may take longer than normal to change.
• When stopped, or driving at low speeds (less than 16 mph [25 k m/h])
• When the outside temperature has changed suddenly (at the entr ance/
exit of a garage, tunnel, etc.)
● If “ ” is displayed continuously, the system may be malfunctioning. Ta k e
your vehicle to your Toyota dealer.
■ Adjusting the clock
The clocks can be adjusted on the audio system screen.
Refer to “MULTIMEDIA OWNER’S MANUAL”.
Instrument panel light control
NOTICE
■To prevent damage to the engine and its components
● Do not let the indicator needle of the tachometer enter the red zone, which
indicates the maximum engine speed.
● The engine may be overheating if the engine coolant temperature gauge
enters the red zone (“H”). In this case, immediately stop the v ehicle in a
safe place, and check the engine after it has cooled completely . (P. 457)
Page 109 of 536
109
3
Operation of
each component
C-HR_OM_USA_OM10634U 3-1. Key information
Keys .................................. 110
3-2. Opening, closing and locking the doors
Side doors ......................... 118
Back door .......................... 125
Smart key system ............. 131
3-3. Adjusting the seats Front seats ........................ 141
Rear seats......................... 143
Head restraints.................. 145
3-4. Adjusting the steering wheel and mirrors
Steering wheel .................. 149
Inside rear view mirror ...... 151
Outside rear view mirrors ............................. 152
3-5. Opening and closing the windows
Power windows ................. 155
Page 111 of 536
1113-1. Key information
3
Operation of each component
C-HR_OM_USA_OM10634U
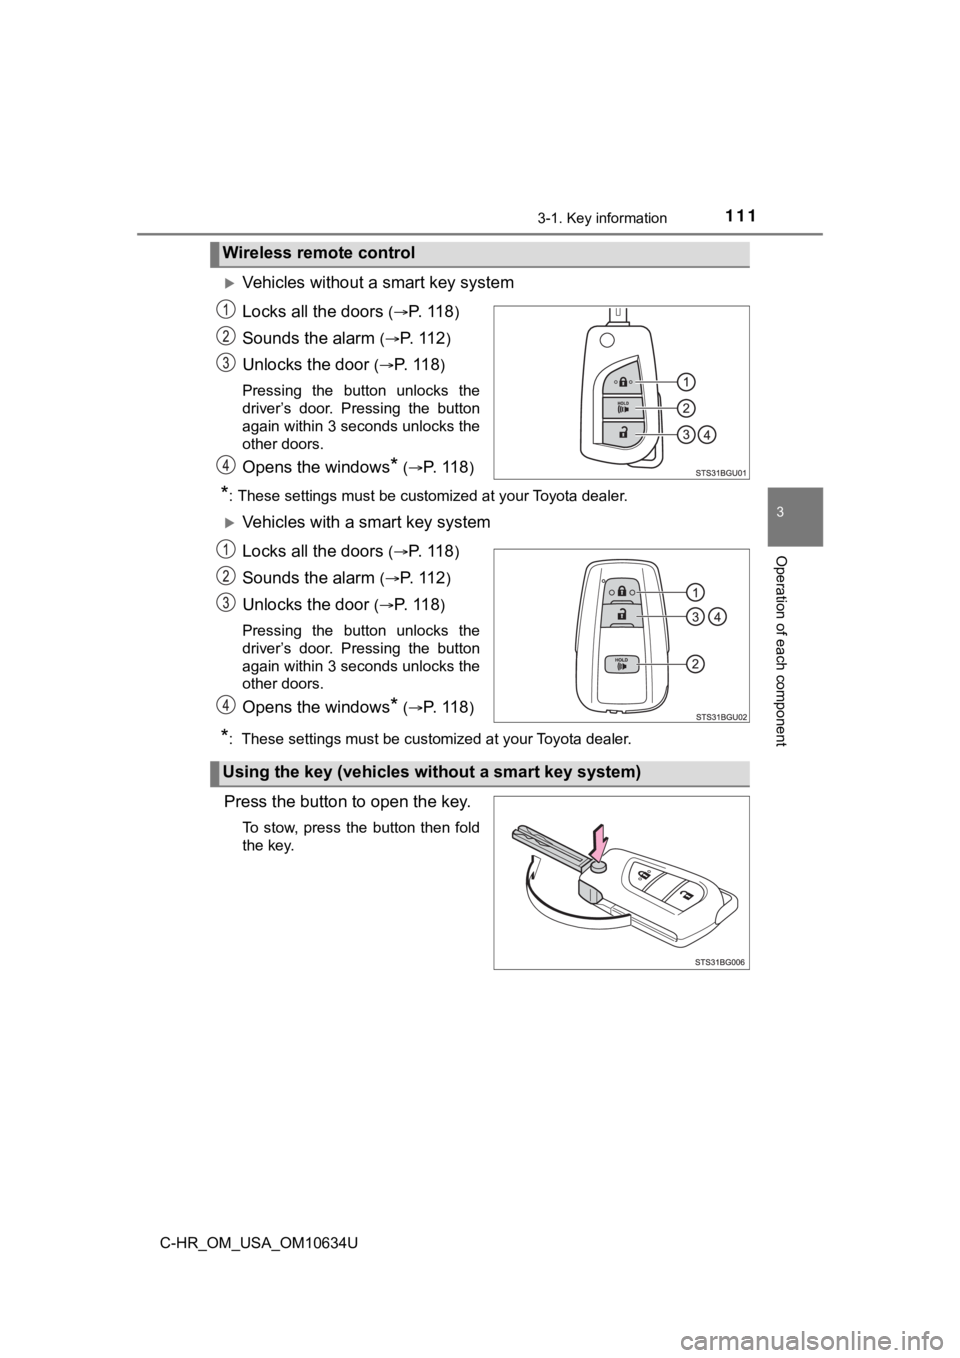
Vehicles without a smart key system
Locks all the doors
(P. 11 8)
Sounds the alarm ( P. 1 1 2)
Unlocks the door (P. 11 8)
Pressing the button unlocks the
driver’s door. Pressing the button
again within 3 seconds unlocks the
other doors.
Opens the windows* ( P. 1 1 8)
*: These settings must be customized at your Toyota dealer.
Vehicles with a smart key system
Locks all the doors
(P. 11 8)
Sounds the alarm ( P. 1 1 2)
Unlocks the door (P. 11 8)
Pressing the button unlocks the
driver’s door. Pressing the button
again within 3 seconds unlocks the
other doors.
Opens the windows* ( P. 1 1 8)
*: These settings must be customized at your Toyota dealer.
Press the button to open the key.
To stow, press the button then fold
the key.
Wireless remote control
Using the key (vehicles without a smart key system)
Page 112 of 536
1123-1. Key information
C-HR_OM_USA_OM10634U
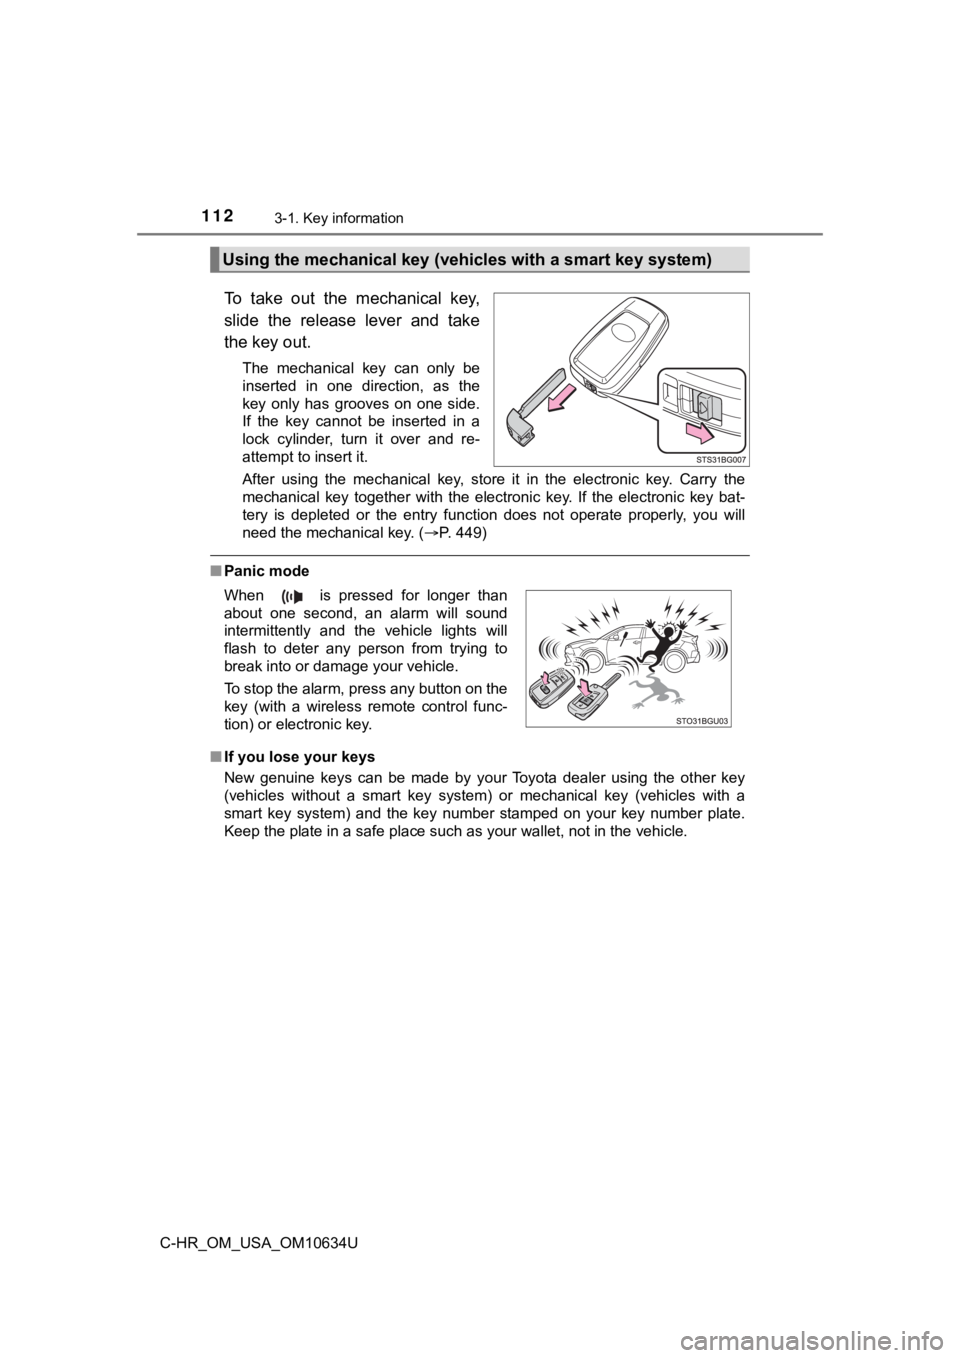
To take out the mechanical key,
slide the release lever and take
the key out.
The mechanical key can only be
inserted in one direction, as the
key only has grooves on one side.
If the key cannot be inserted in a
lock cylinder, turn it over and re-
attempt to insert it.
After using the mechanical key, store it in the electronic key. Carry the
mechanical key together with the electronic key. If the electro nic key bat-
tery is depleted or the entry function does not operate properl y, you will
need the mechanical key. ( P. 449)
■Panic mode
■ If you lose your keys
New genuine keys can be made by your Toyota dealer using the ot her key
(vehicles without a smart key system) or mechanical key (vehicles with a
smart key system) and the key number stamped on your key number plate.
Keep the plate in a safe place such as your wallet, not in the vehicle.
Using the mechanical key (vehicles with a smart key system)
When is pressed for longer than
about one second, an alarm will sound
intermittently and the vehicle lights will
flash to deter any person from trying to
break into or damage your vehicle.
To stop the alarm, press any button on the
key (with a wireless remote control func-
tion) or electronic key.
Page 118 of 536
1183-2. Opening, closing and locking the doors
C-HR_OM_USA_OM10634U
Side doors
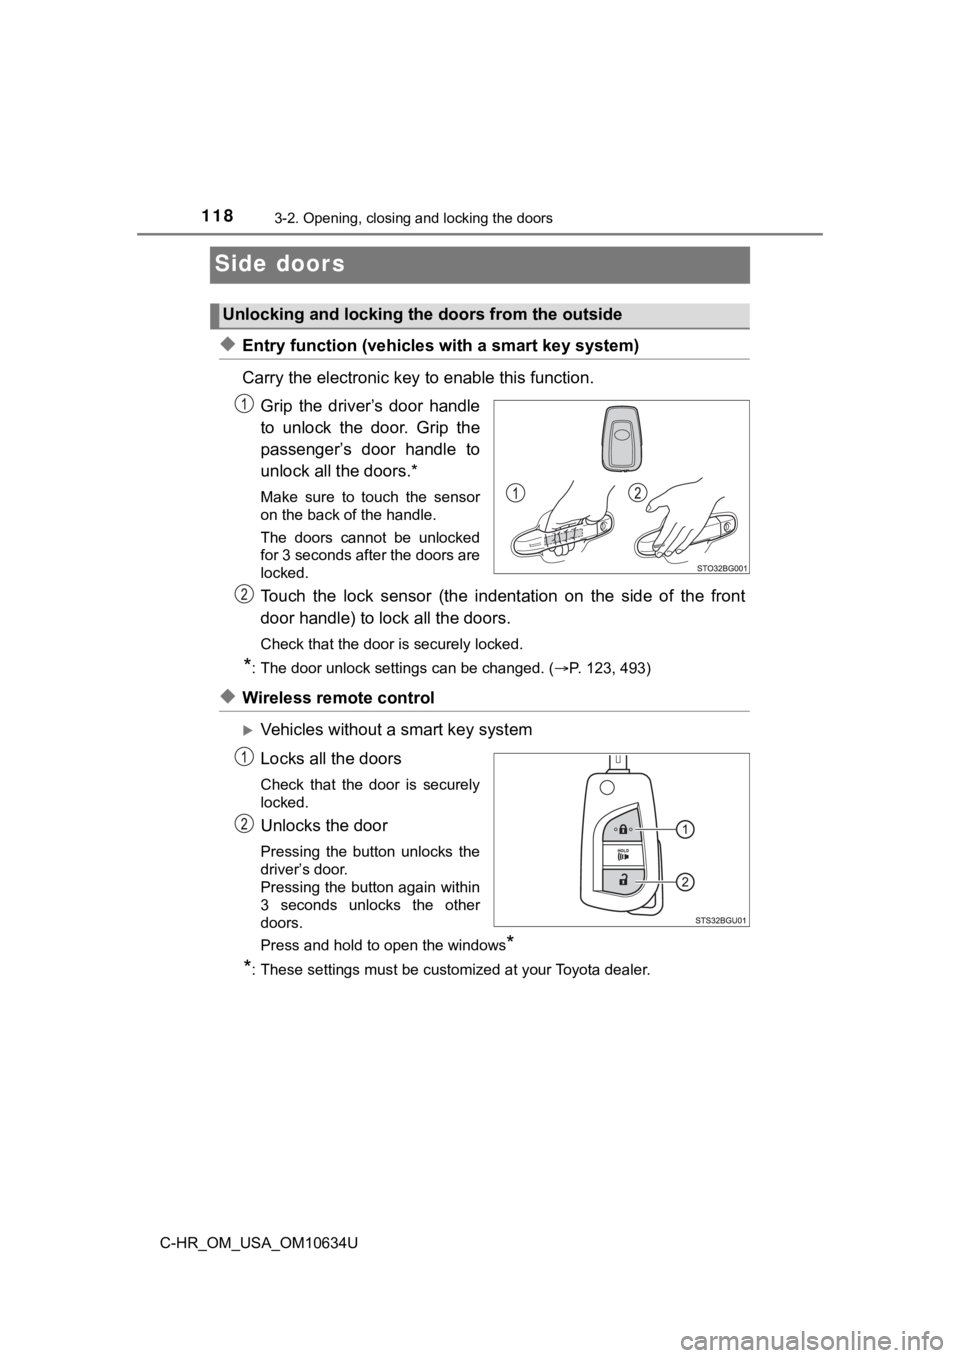
◆Entry function (vehicles with a smart key system)
Carry the electronic key to enable this function.
Grip the driver’s door handle
to unlock the door. Grip the
passenger’s door handle to
unlock all the doors.*
Make sure to touch the sensor
on the back of the handle.
The doors cannot be unlocked
for 3 seconds after the doors are
locked.
Touch the lock sensor (the indent ation on the side of the front
door handle) to lock all the doors.
Check that the door is securely locked.
*: The door unlock settings can be changed. ( P. 123, 493)
◆Wireless remote control
Vehicles without a smart key system
Locks all the doors
Check that the door is securely
locked.
Unlocks the door
Pressing the button unlocks the
driver’s door.
Pressing the button again within
3 seconds unlocks the other
doors.
Press and hold to open the windows
*
*
: These settings must be customized at your Toyota dealer.
Unlocking and locking the doors from the outside
Page 119 of 536
1193-2. Opening, closing and locking the doors
3
Operation of each component
C-HR_OM_USA_OM10634U
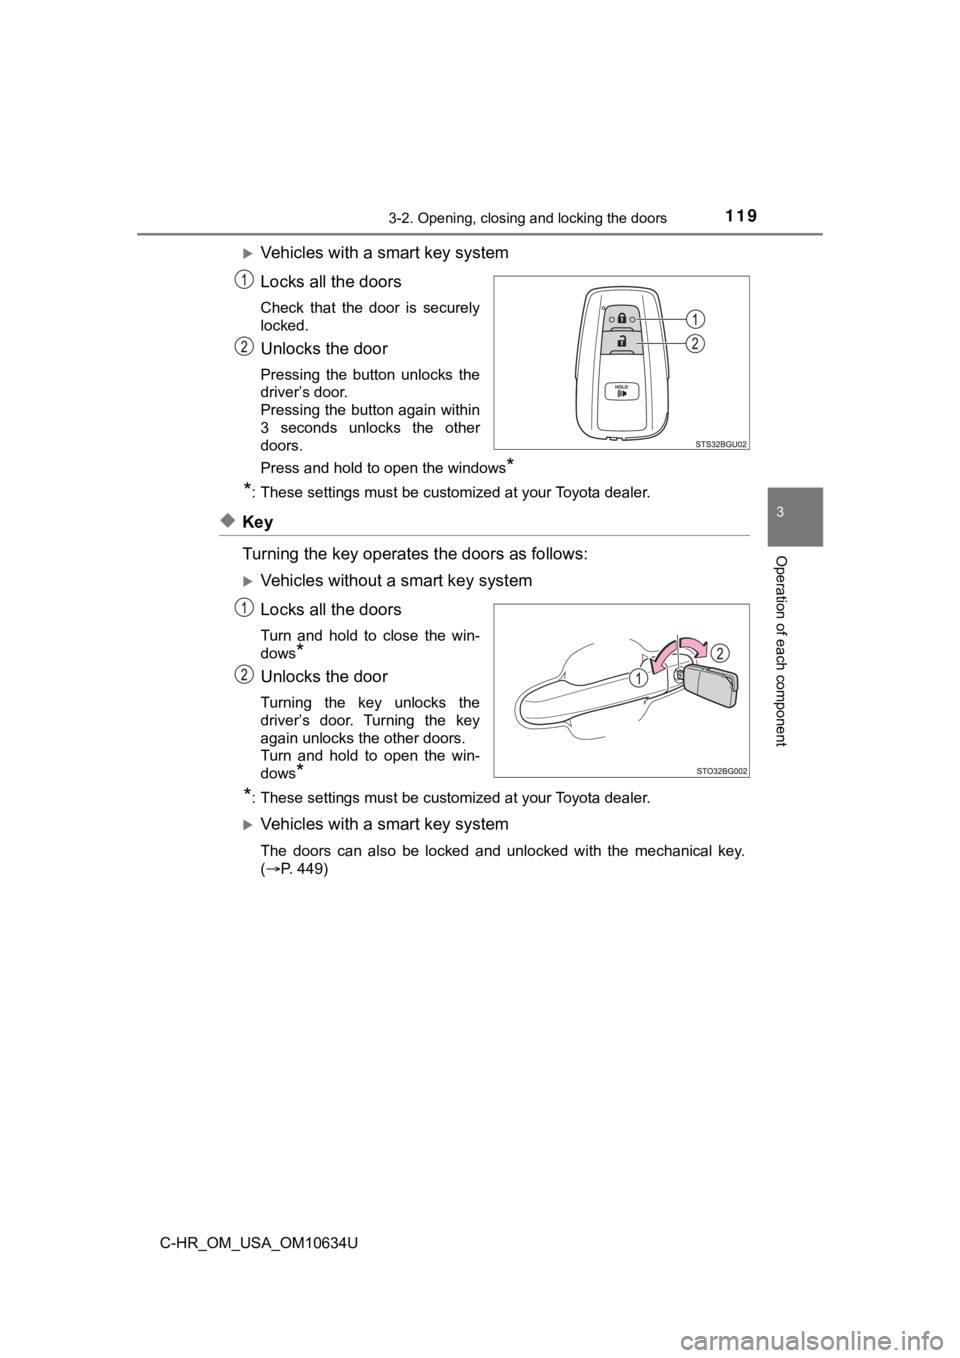
Vehicles with a smart key system
Locks all the doors
Check that the door is securely
locked.
Unlocks the door
Pressing the button unlocks the
driver’s door.
Pressing the button again within
3 seconds unlocks the other
doors.
Press and hold to open the windows
*
*
: These settings must be customized at your Toyota dealer.
◆Key
Turning the key operates the doors as follows:
Vehicles without a smart key system
Locks all the doors
Turn and hold to close the win-
dows
*
Unlocks the door
Turning the key unlocks the
driver’s door. Turning the key
again unlocks the other doors.
Turn and hold to open the win-
dows
*
*
: These settings must be customized at your Toyota dealer.
Vehicles with a smart key system
The doors can also be locked and unlocked with the mechanical k ey.
( P. 449)