TURN SIGNAL TOYOTA C-HR 2023 Owner's Manual
[x] Cancel search | Manufacturer: TOYOTA, Model Year: 2023, Model line: C-HR, Model: TOYOTA C-HR 2023Pages: 814, PDF Size: 112.62 MB
Page 507 of 814
5054-5. Using the driving support systems
4
Driving
C-HR_HEV_OM_Europe_OM10764E
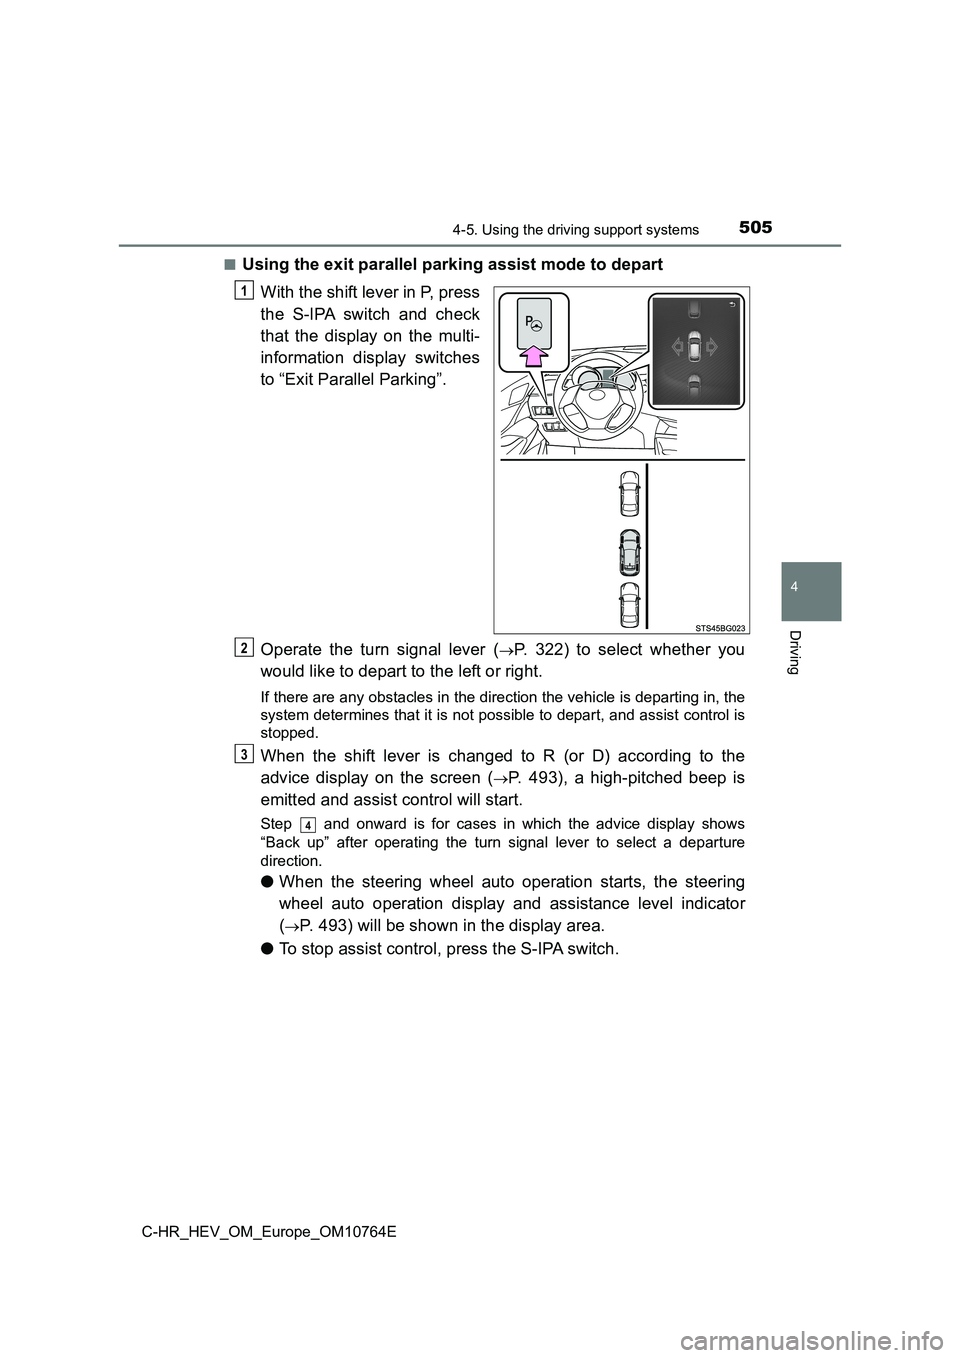
■Using the exit parallel parking assist mode to depart
With the shift lever in P, press
the S-IPA switch and check
that the display on the multi-
information display switches
to “Exit Parallel Parking”.
Operate the turn signal lever (P. 322) to select whether you
would like to depart to the left or right.
If there are any obstacles in the direction the vehicle is depa rting in, the
system determines that it is not possible to depart, and assist control is
stopped.
When the shift lever is changed to R (or D) according to the
advice display on the screen (P. 493), a high-pitched beep is
emitted and assist control will start.
Step and onward is for cases in which the advice display shows
“Back up” after operating the turn signal lever to select a dep arture
direction.
● When the steering wheel auto operation starts, the steering
wheel auto operation display and assistance level indicator
(P. 493) will be shown in the display area.
● To stop assist control, press the S-IPA switch.
1
2
3
4
Page 513 of 814
5114-5. Using the driving support systems
4
Driving
C-HR_HEV_OM_Europe_OM10764E
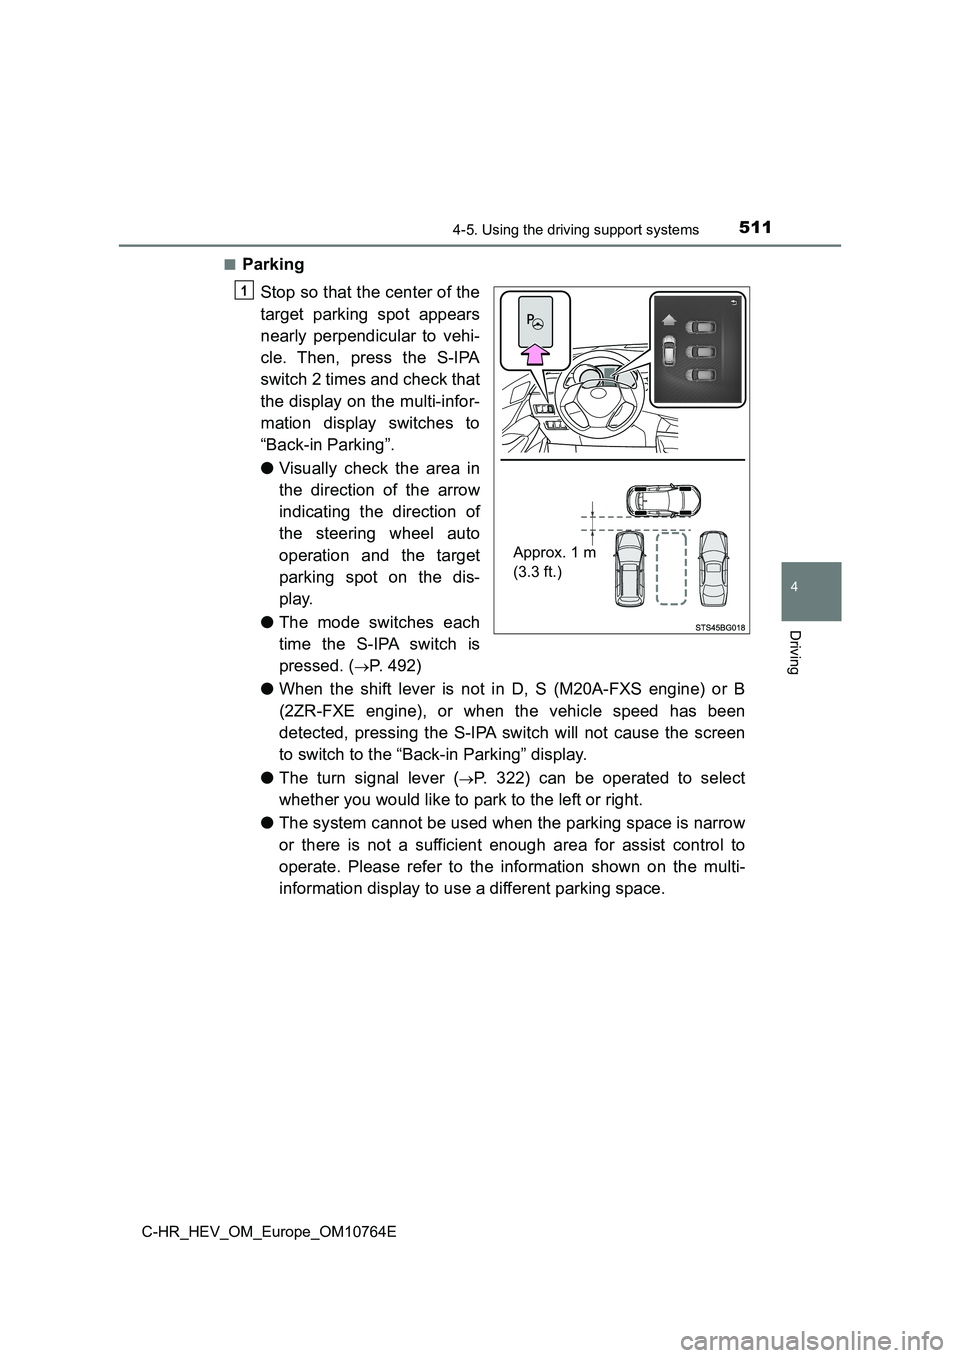
■Parking
Stop so that the center of the
target parking spot appears
nearly perpendicular to vehi-
cle. Then, press the S-IPA
switch 2 times and check that
the display on the multi-infor-
mation display switches to
“Back-in Parking”.
● Visually check the area in
the direction of the arrow
indicating the direction of
the steering wheel auto
operation and the target
parking spot on the dis-
play.
● The mode switches each
time the S-IPA switch is
pressed. (P. 492)
● When the shift lever is not in D, S (M20A-FXS engine) or B
(2ZR-FXE engine), or when the vehicle speed has been
detected, pressing the S-IPA switch will not cause the screen
to switch to the “Back-in Parking” display.
● The turn signal lever (P. 322) can be operated to select
whether you would like to park to the left or right.
● The system cannot be used when the parking space is narrow
or there is not a sufficient enough area for assist control to
operate. Please refer to the information shown on the multi-
information display to use a different parking space.
Approx. 1 m
(3.3 ft.)
1
Page 522 of 814
5204-5. Using the driving support systems
C-HR_HEV_OM_Europe_OM10764E
■When the operation is canceled
MessageSituation/Handling method
“Park Assist Cancelled”
While assist control is operating, the driver
changes the shift lever to P or operates the
S-IPA switch.
“Excessive Speed”
The vehicle speed exceeds 30 km/h (16 mph) when searching for a parallel parking assist
mode space.
“Narrow Space”Assist control is started in an area with nar-
row parking spaces.
“No Exit Direction Speci-
fied”
The shift lever is changed without having
used the turn signal lever to select a depar-
ture direction when using the exit parallel
parking assist mode.
Follow the guidance provided by the
system.
“Wrong Direction”
When assist control starts, the vehicle pro-
ceeds in a direction opposite to the guidance.
Follow the guidance provided by the
system to proceed forward.
“Cannot Reach Desired
Position”
The maximum number of movements for
multi-turn maneuvering is reached during
assist control, or the target parking spot can-
not be reached due to the control being used
on a road with steep grade.
Follow the assist control guidance and
use the system in a wide space that
does not have a steep grade.
Page 653 of 814
6516-3. Do-it-yourself maintenance
C-HR_HEV_OM_Europe_OM10764E
6
Maintenance and care
Light bulbs
Check the wattage of the light bulb to be replaced. (P. 776)
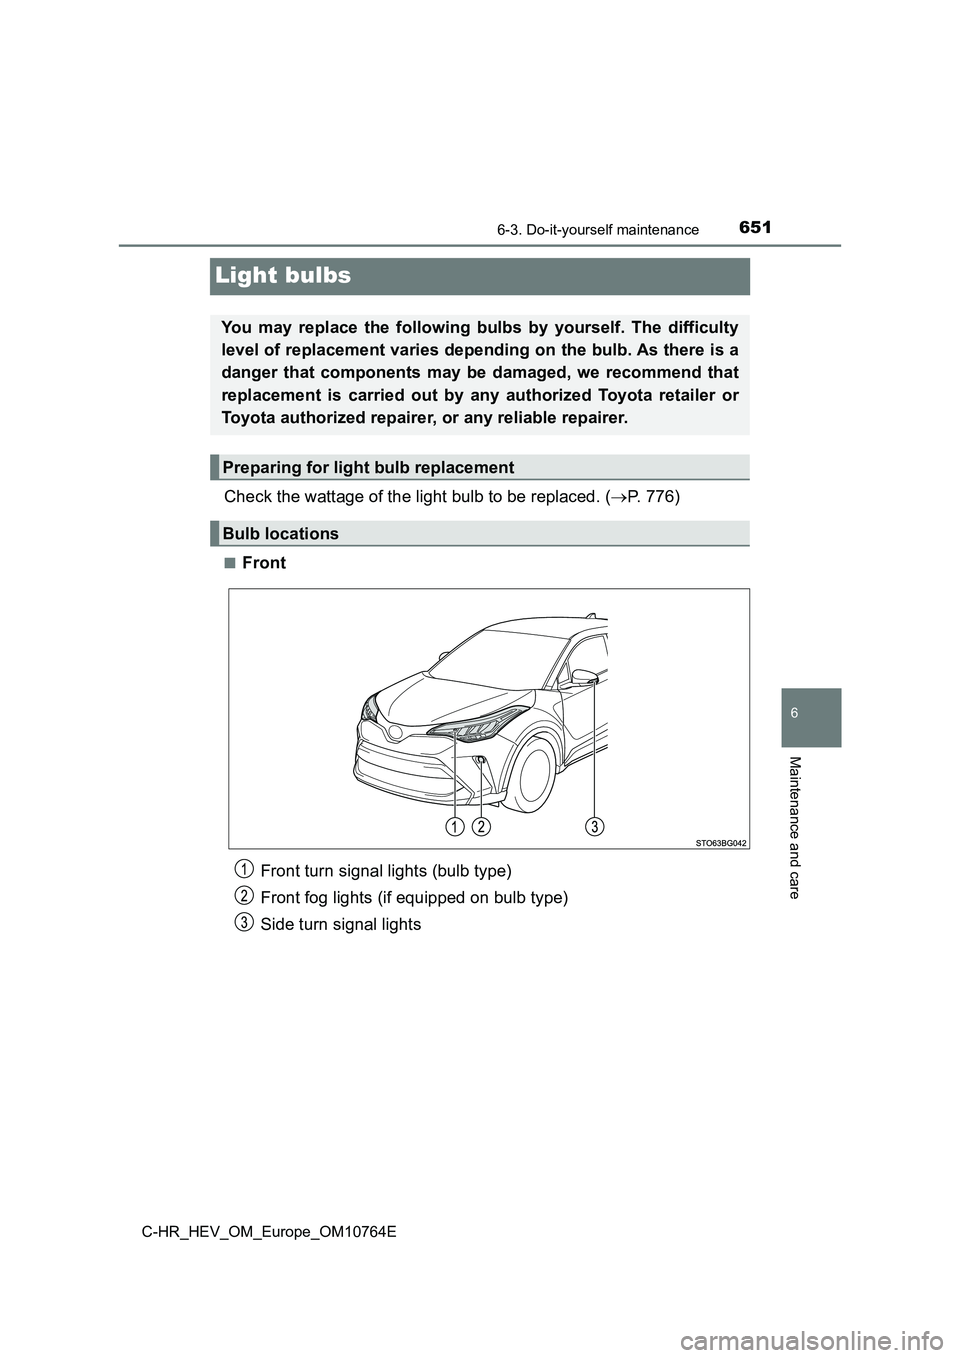
■Front
You may replace the following bulbs by yourself. The difficulty
level of replacement varies depending on the bulb. As there is a
danger that components may be damaged, we recommend that
replacement is carried out by any authorized Toyota retailer or
Toyota authorized repairer, or any reliable repairer.
Preparing for light bulb replacement
Bulb locations
Front turn signal lights (bulb type)
Front fog lights (if equipped on bulb type)
Side turn signal lights
Page 654 of 814
6526-3. Do-it-yourself maintenance
C-HR_HEV_OM_Europe_OM10764E
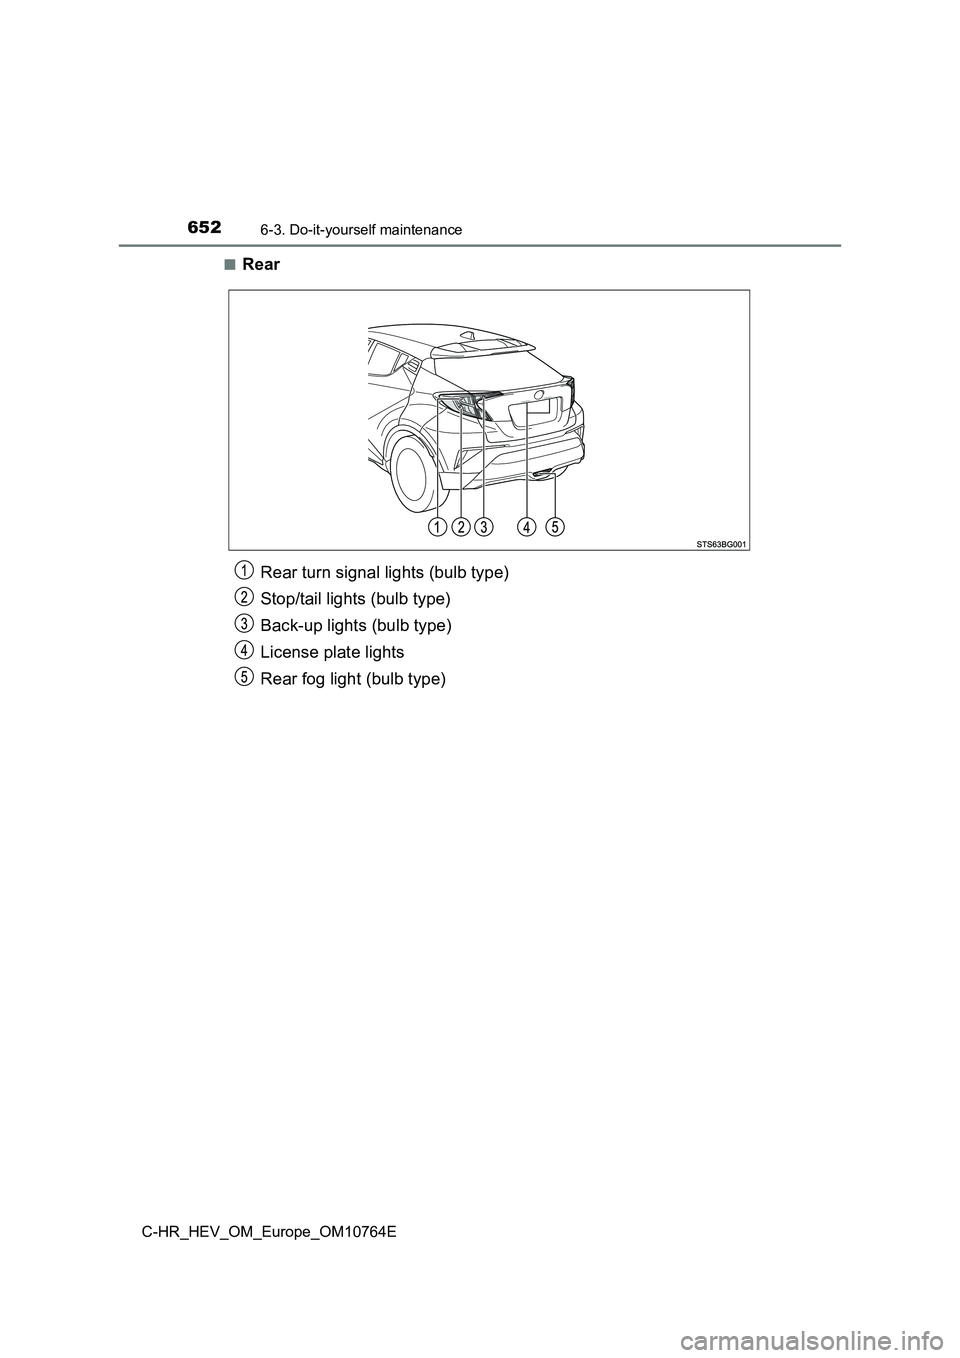
■Rear
Rear turn signal lights (bulb type)
Stop/tail lights (bulb type)
Back-up lights (bulb type)
License plate lights
Rear fog light (bulb type)
Page 657 of 814
6556-3. Do-it-yourself maintenance
C-HR_HEV_OM_Europe_OM10764E
6
Maintenance and care
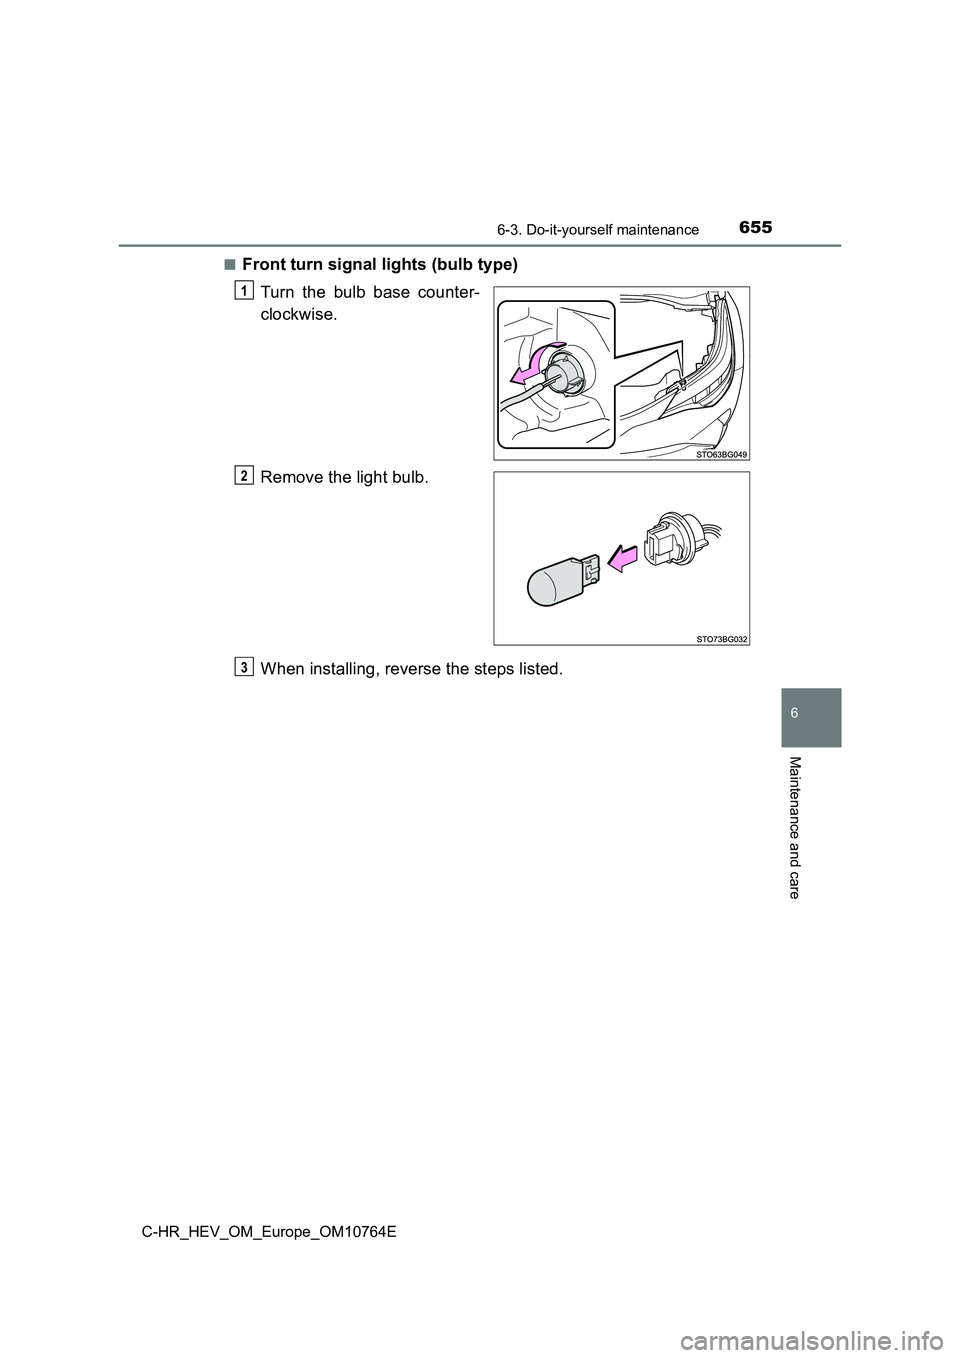
■Front turn signal lights (bulb type)
Turn the bulb base counter-
clockwise.
Remove the light bulb.
When installing, reverse the steps listed.
1
2
3
Page 658 of 814
6566-3. Do-it-yourself maintenance
C-HR_HEV_OM_Europe_OM10764E
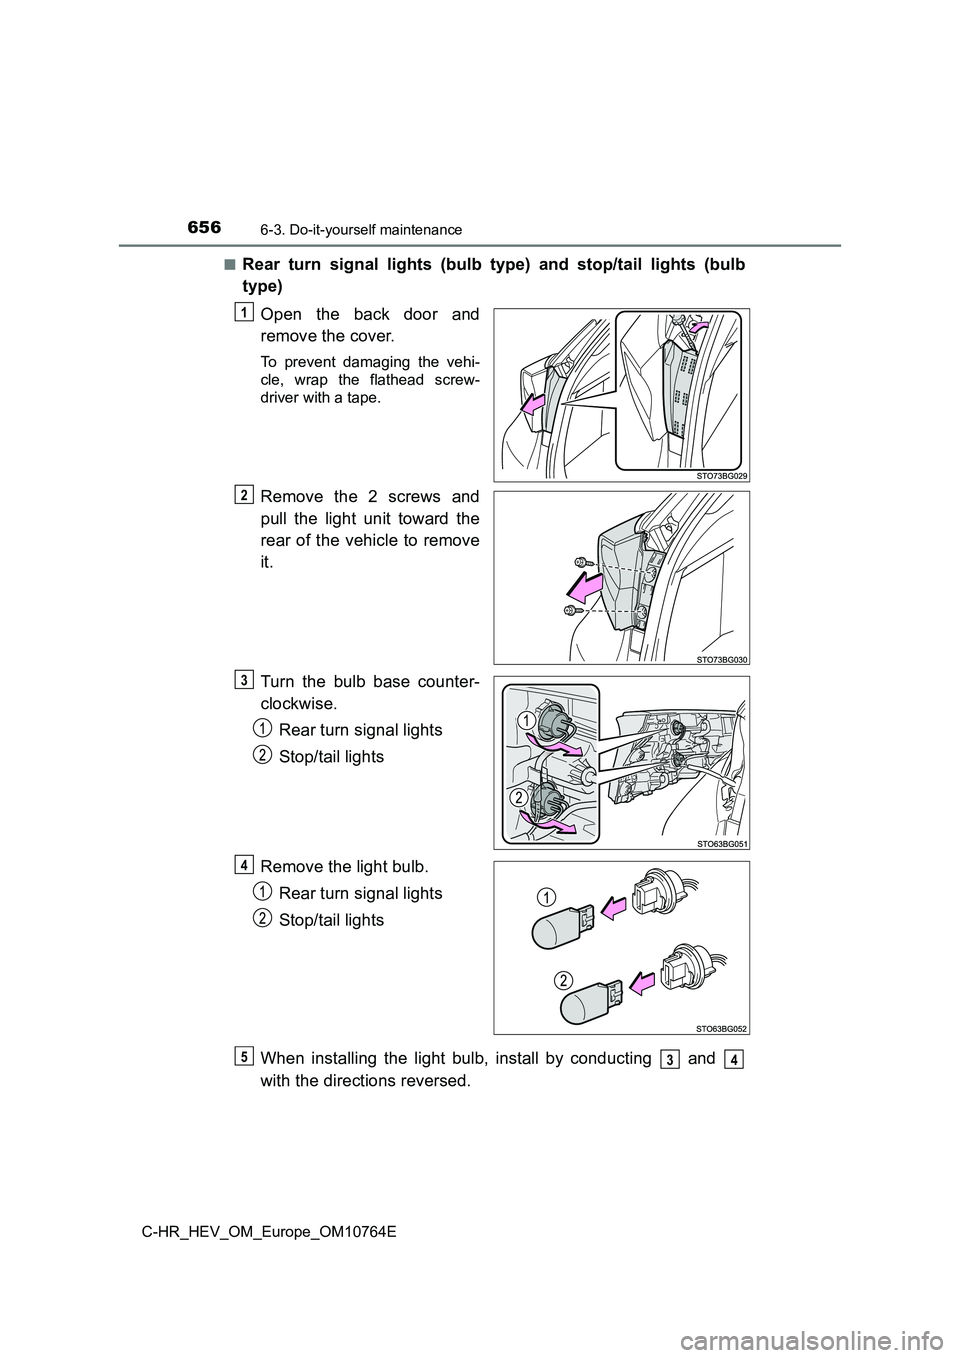
■Rear turn signal lights (bulb type) and stop/tail lights (bulb
type)
Open the back door and
remove the cover.
To prevent damaging the vehi-
cle, wrap the flathead screw-
driver with a tape.
Remove the 2 screws and
pull the light unit toward the
rear of the vehicle to remove
it.
Turn the bulb base counter-
clockwise.
Rear turn signal lights
Stop/tail lights
Remove the light bulb.
Rear turn signal lights
Stop/tail lights
When installing the light bulb, install by conducting and
with the directions reversed.
1
2
3
4
534
Page 663 of 814
6616-3. Do-it-yourself maintenance
C-HR_HEV_OM_Europe_OM10764E
6
Maintenance and care
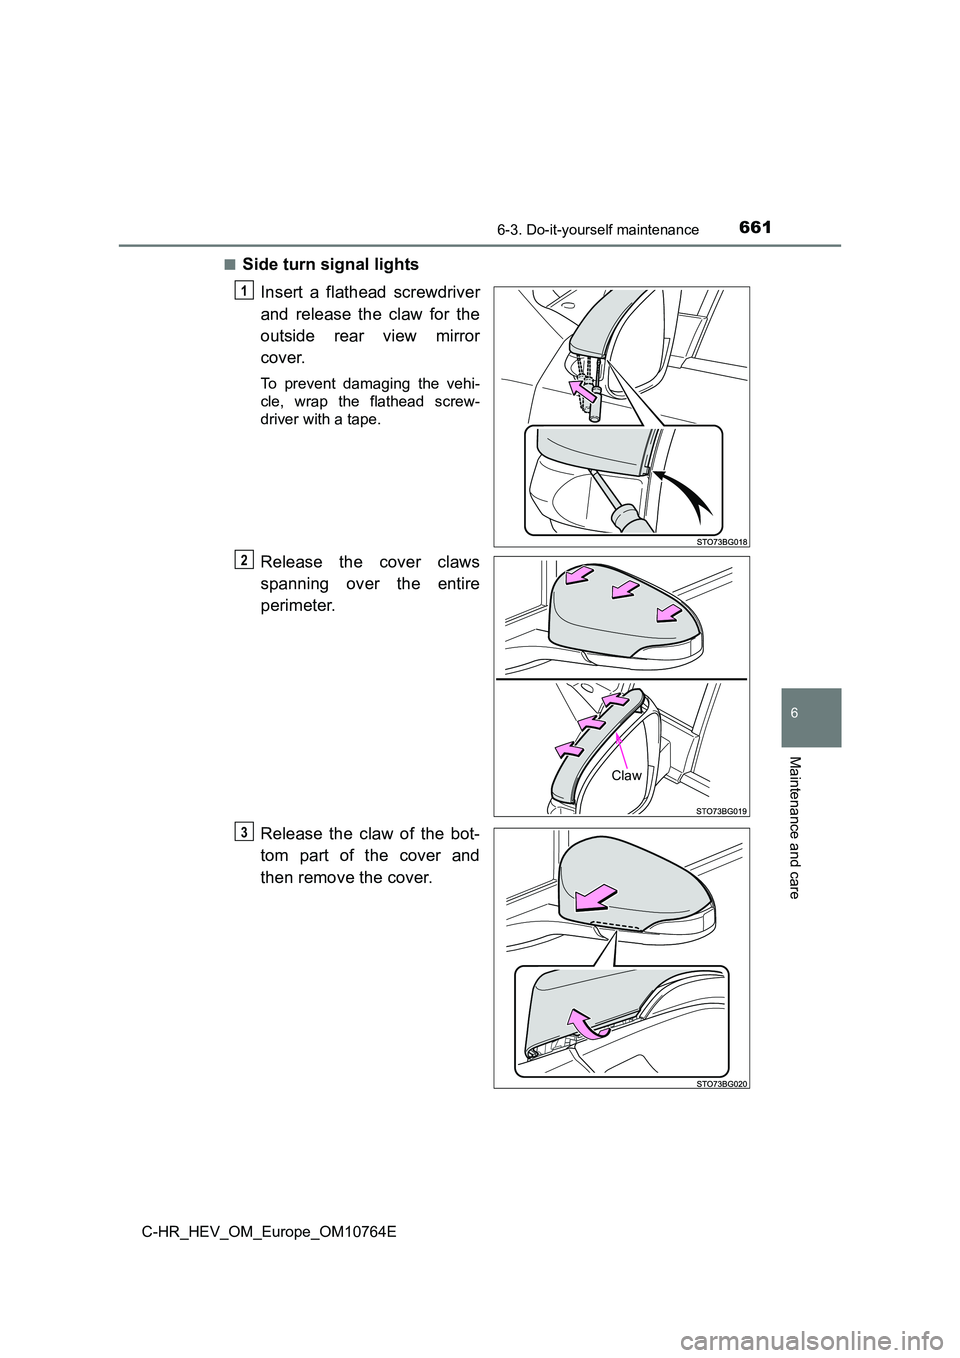
■Side turn signal lights
Insert a flathead screwdriver
and release the claw for the
outside rear view mirror
cover.
To prevent damaging the vehi-
cle, wrap the flathead screw-
driver with a tape.
Release the cover claws
spanning over the entire
perimeter.
Release the claw of the bot-
tom part of the cover and
then remove the cover.
1
Claw
O
P
Page 664 of 814
6626-3. Do-it-yourself maintenance
C-HR_HEV_OM_Europe_OM10764E
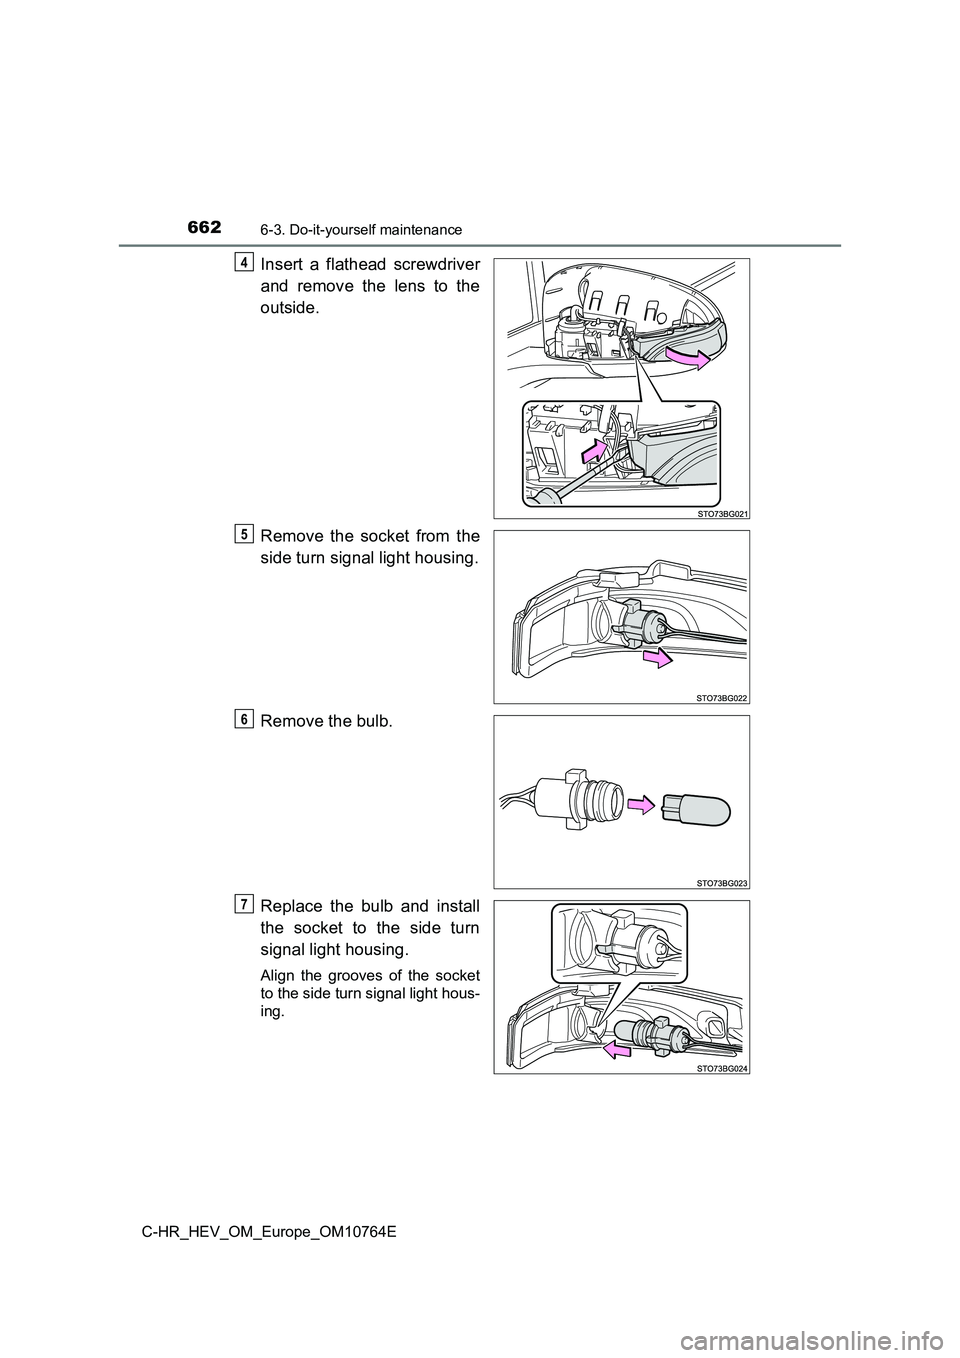
Insert a flathead screwdriver
and remove the lens to the
outside.
Remove the socket from the
side turn signal light housing.
Remove the bulb.
Replace the bulb and install
the socket to the side turn
signal light housing.
Align the grooves of the socket
to the side turn signal light hous-
ing.
4
5
6
7
Page 666 of 814
6646-3. Do-it-yourself maintenance
C-HR_HEV_OM_Europe_OM10764E
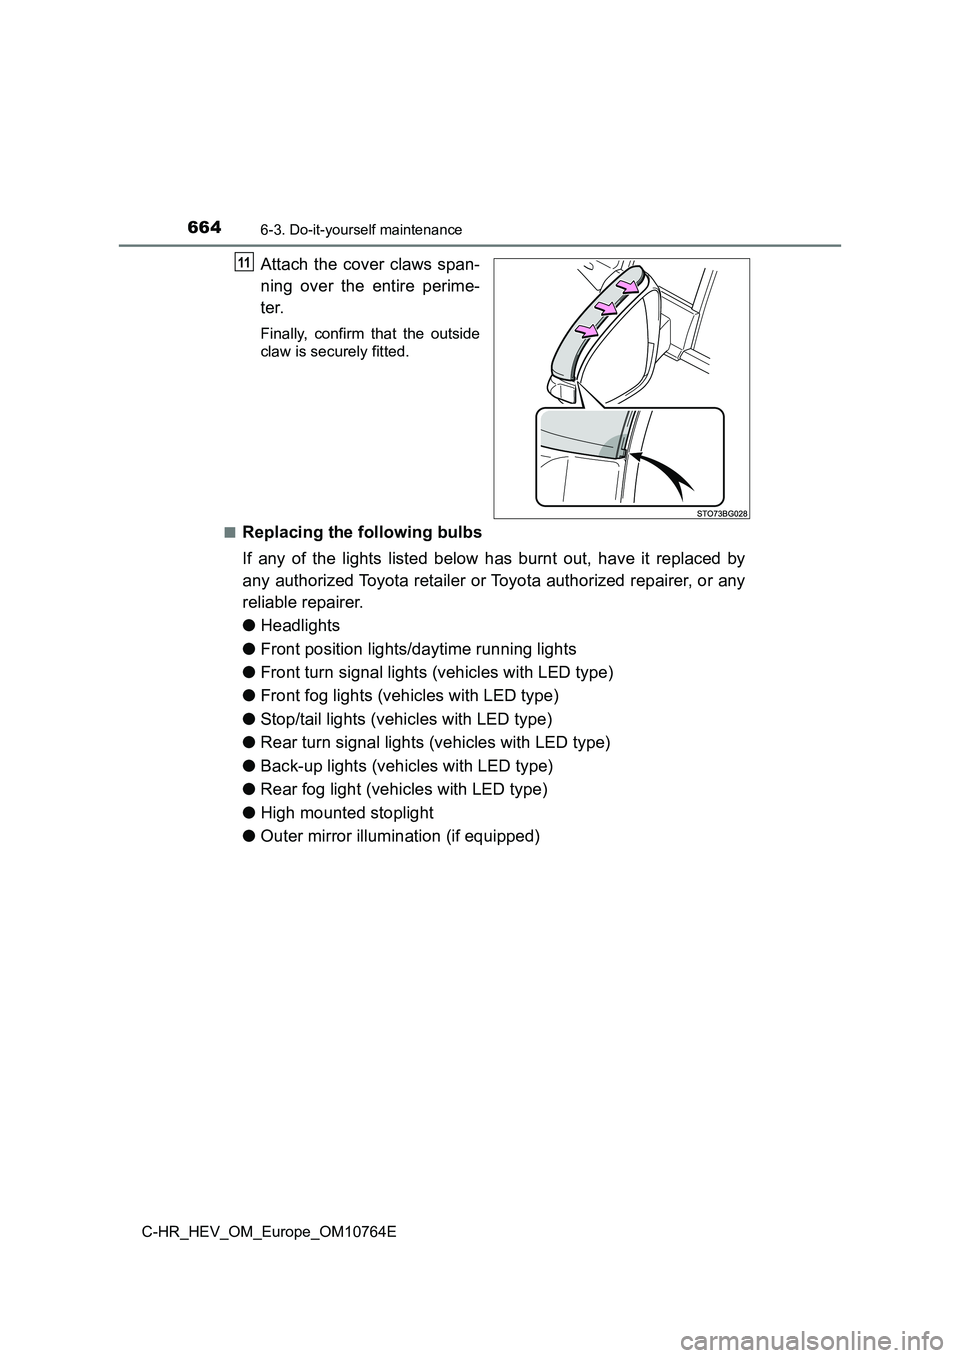
Attach the cover claws span-
ning over the entire perime-
ter.
Finally, confirm that the outside
claw is securely fitted.
■Replacing the following bulbs
If any of the lights listed below has burnt out, have it replac ed by
any authorized Toyota retailer or Toyota authorized repairer, o r any
reliable repairer.
● Headlights
● Front position lights/daytime running lights
● Front turn signal lights (vehicles with LED type)
● Front fog lights (vehicles with LED type)
● Stop/tail lights (vehicles with LED type)
● Rear turn signal lights (vehicles with LED type)
● Back-up lights (vehicles with LED type)
● Rear fog light (vehicles with LED type)
● High mounted stoplight
● Outer mirror illumination (if equipped)
11