inflation pressure TOYOTA C-HR 2023 Owner's Manual
[x] Cancel search | Manufacturer: TOYOTA, Model Year: 2023, Model line: C-HR, Model: TOYOTA C-HR 2023Pages: 814, PDF Size: 112.62 MB
Page 689 of 814
6877-2. Steps to take in an emergency
C-HR_HEV_OM_Europe_OM10764E
7
When trouble arises
■The tire pressure warning light may come on due to natural causes
The tire pressure warning light may come on due to natural caus es such as
natural air leaks or tire inflation pressure changes caused by temperature. In
this case, adjusting the tire inflation pressure will turn off the warning light
(after a few minutes).
■ When a tire is replaced with a spare tire (if equipped)
Vehicles with full-size spare tire: The spare tire is also equi pped with a tire
pressure warning valve and transmitter. The tire pressure warni ng light will
turn on if the tire inflation pressure of the spare tire is low . If a tire goes flat,
the tire pressure warning light will not turn off even though t he flat tire has
been replaced with the spare tire. Replace the spare tire with the repaired tire
and adjust the tire inflation pressure. The tire pressure warni ng light will go off
after a few minutes.
Vehicles with compact spare tire: The compact spare tire is not equipped with
a tire pressure warning valve and transmitter. If a tire goes f lat, the tire pres-
sure warning light will not turn off even though the flat tire has been replaced
with the spare tire. Replace the spare tire with the repaired tire and adjust the
tire inflation pressure. The tire pressure warning light will g o off after a few
minutes.
■ Conditions that the tire pressure warning system may not function prop-
erly
P. 619
■ If the tire pressure warning light frequently comes on after blinking for
1minute
If the tire pressure warning light frequently comes on after bl inking for
1 minute when the power switch is turned to ON mode, have it che cked by
any authorized Toyota retailer or Toyota authorized repairer, o r any reliable
repairer.
■ Warning buzzer
In some cases, the buzzer may not be heard because of noisy pla ce or an
audio sound.
Page 690 of 814
6887-2. Steps to take in an emergency
C-HR_HEV_OM_Europe_OM10764E
WARNING
■If both the ABS and the brake system warning lights remain on
Stop your vehicle in a safe place immediately and contact any a uthorized
Toyota retailer or Toyota authorized repairer, or any reliable repairer. The
vehicle will become extremely unstable during braking, and the ABS system
may fail, which could cause an accident resulting in death or s erious injury.
■ When the electric power steering system warning light comes on
When the light comes on yellow, the assist to the power steerin g is
restricted. When the light comes on red, the assist to the powe r steering is
lost and handling operations of the steering wheel become extre mely
heavy. When steering wheel operations are heavier than usual, g rip the
steering wheel firmly and operate it using more force than usua l.
■ If the tire pressure warning light comes on
Be sure to observe the following precautions. Failure to do so could cause a
loss of vehicle control and result in death or serious injury.
● Stop your vehicle in a safe place as soon as possible. Adjust the tire infla-
tion pressure immediately.
● Vehicles with spare tire: If the tire pressure warning light comes on even
after tire inflation pressure adjustment, it is probable that y ou have a flat
tire. Check the tires. If a tire is flat, change it with the sp are tire and have
the flat tire repaired by the nearest any authorized Toyota ret ailer or Toyota
authorized repairer, or any reliable repairer.
● Vehicles with emergency tire puncture repair kit: If the tire pressure warn-
ing light comes on even after ti re inflation pressure adjustment, it is proba-
ble that you have a flat tire. Check the tires. If a tire is fl at, repair the flat tire
by using emergency tire puncture repair kit. ( P. 697)
● Avoid abrupt maneuvering and braking. If the vehicle tires deteriorate, you
could lose control of the steering wheel or the brakes.
■ If a blowout or sudden air leakage should occur
The tire pressure warning system may not activate immediately.
Page 710 of 814
7087-2. Steps to take in an emergency
C-HR_HEV_OM_Europe_OM10764E
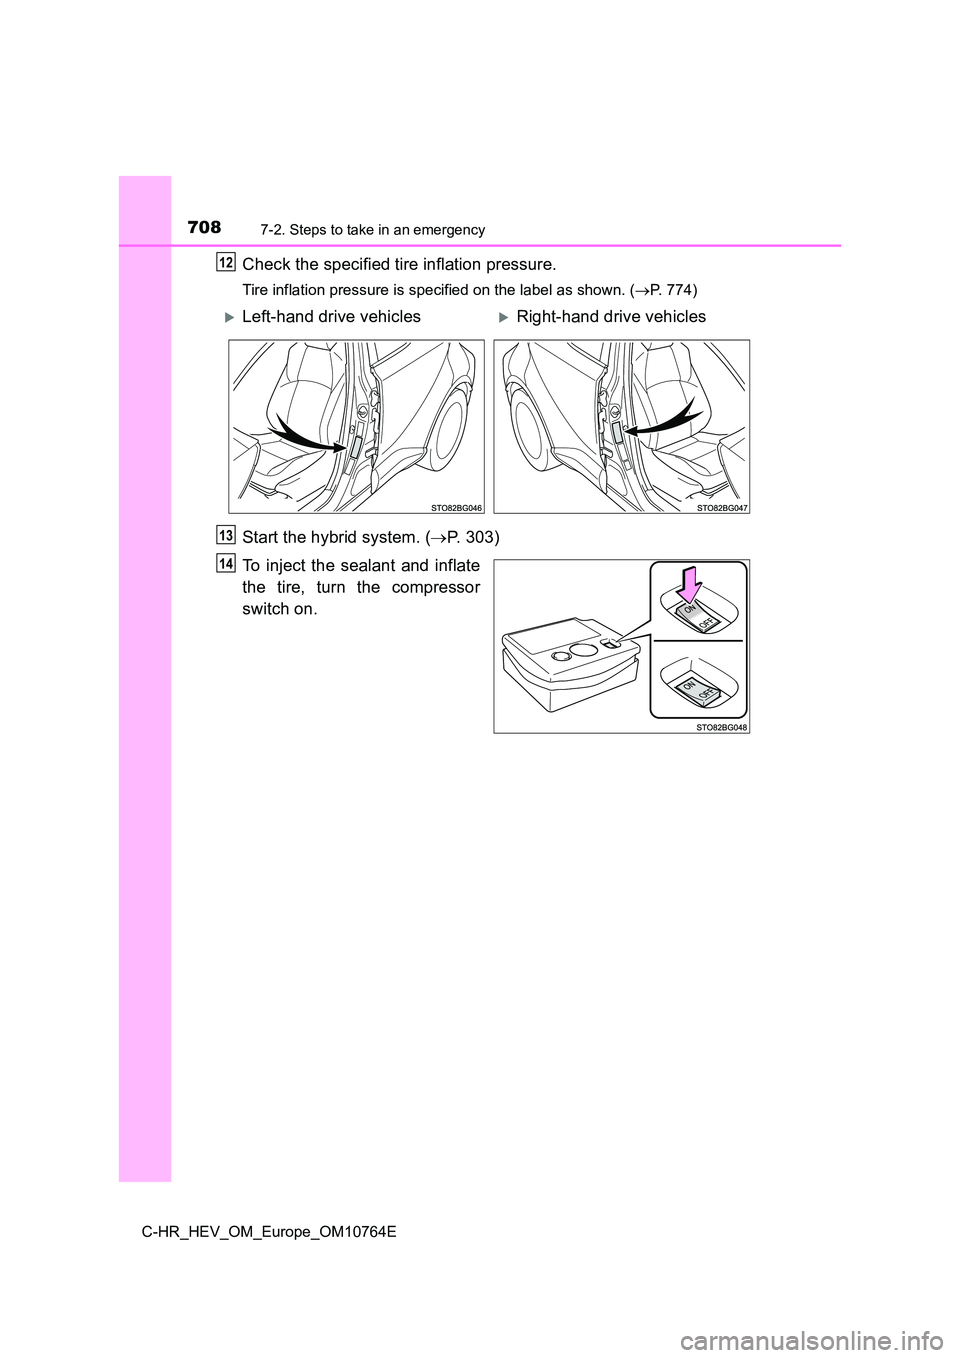
Check the specified tire inflation pressure.
Tire inflation pressure is specified on the label as shown. (P. 774)
Start the hybrid system. (P. 3 0 3 )
To inject the sealant and inflate
the tire, turn the compressor
switch on.
12
Left-hand drive vehiclesRight-hand drive vehicles
13
14
Page 711 of 814
7097-2. Steps to take in an emergency
C-HR_HEV_OM_Europe_OM10764E
7
When trouble arises
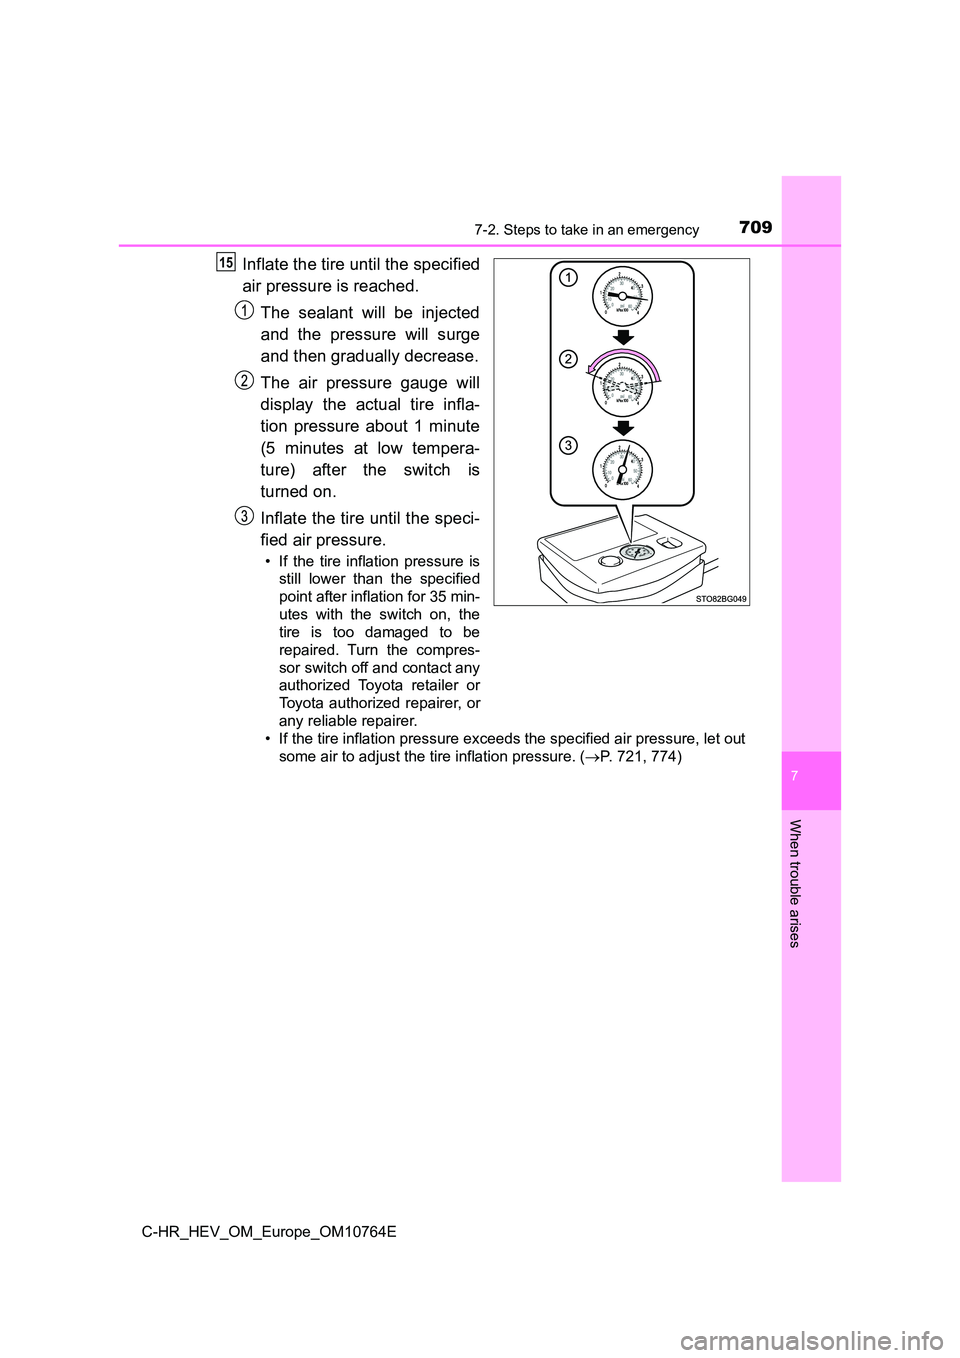
Inflate the tire until the specified
air pressure is reached.
The sealant will be injected
and the pressure will surge
and then gradually decrease.
The air pressure gauge will
display the actual tire infla-
tion pressure about 1 minute
(5 minutes at low tempera-
ture) after the switch is
turned on.
Inflate the tire until the speci-
fied air pressure.
• If the tire inflation pressure is
still lower than the specified
point after inflation for 35 min-
utes with the switch on, the
tire is too damaged to be
repaired. Turn the compres-
sor switch off and contact any
authorized Toyota retailer or
Toyota authorized repairer, or
any reliable repairer.
• If the tire inflation pressure exceeds the specified air press ure, let out
some air to adjust the tire inflation pressure. ( P. 721, 774)
15
Page 714 of 814
7127-2. Steps to take in an emergency
C-HR_HEV_OM_Europe_OM10764E
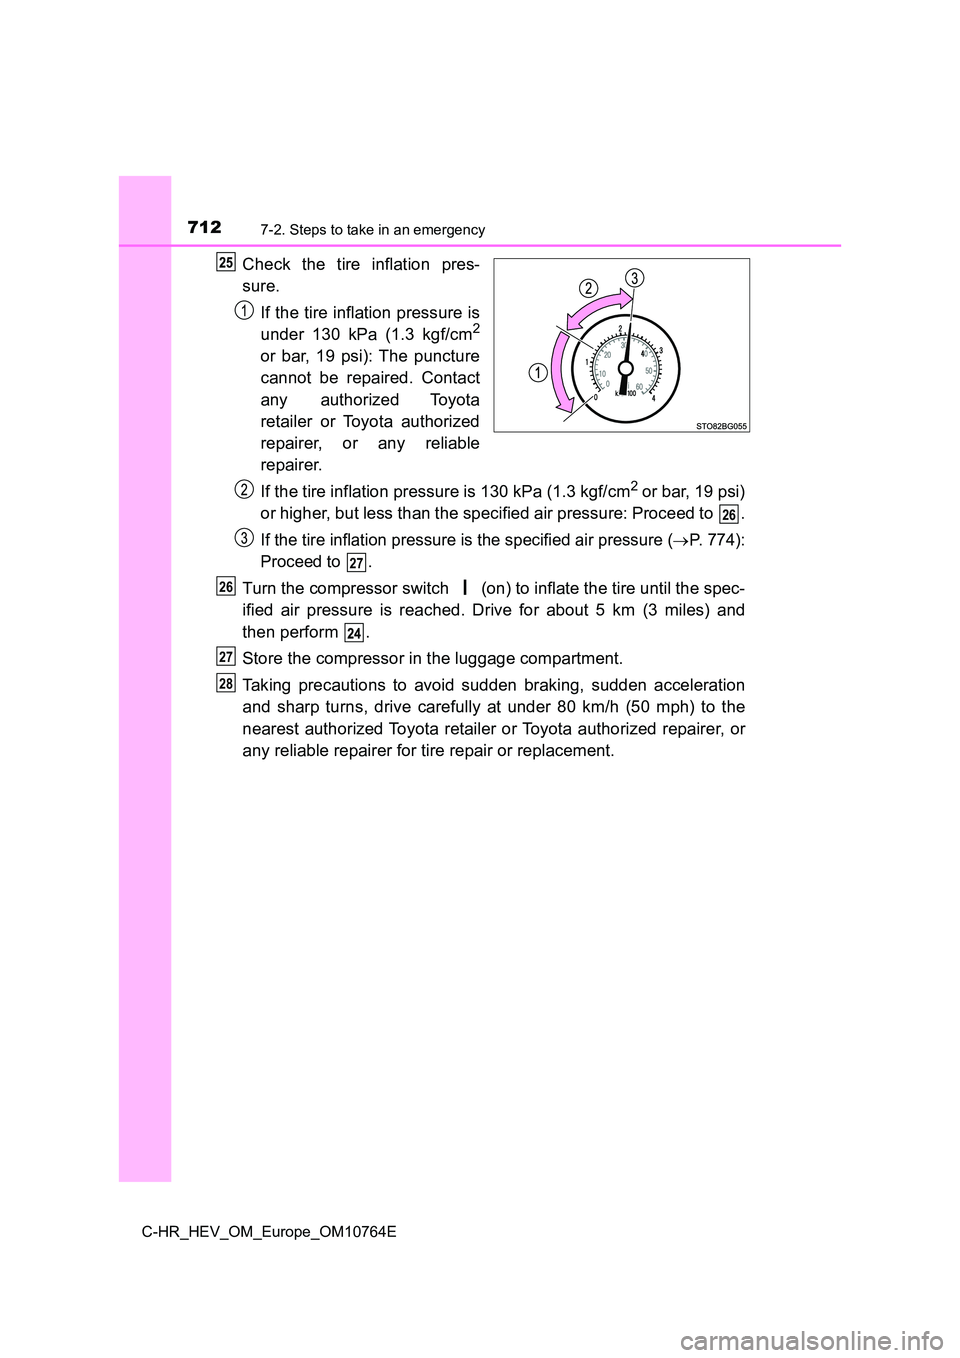
Check the tire inflation pres-
sure.
If the tire inflation pressure is
under 130 kPa (1.3 kgf/cm2
or bar, 19 psi): The puncture
cannot be repaired. Contact
any authorized Toyota
retailer or Toyota authorized
repairer, or any reliable
repairer.
If the tire inflation pressure is 130 kPa (1.3 kgf/cm2 or bar, 19 psi)
or higher, but less than the specified air pressure: Proceed to .
If the tire inflation pressure is the specified air pressure (P. 774):
Proceed to .
Turn the compressor switch (on) to inflate the tire until the spec-
ified air pressure is reached. Drive for about 5 km (3 miles) a nd
then perform .
Store the compressor in the luggage compartment.
Taking precautions to avoid sudden braking, sudden acceleration
and sharp turns, drive carefully at under 80 km/h (50 mph) to t he
nearest authorized Toyota retailer or Toyota authorized repaire r, o r
any reliable repairer for tire repair or replacement.
26
27
26
27
28
Page 718 of 814
7167-2. Steps to take in an emergency
C-HR_HEV_OM_Europe_OM10764E
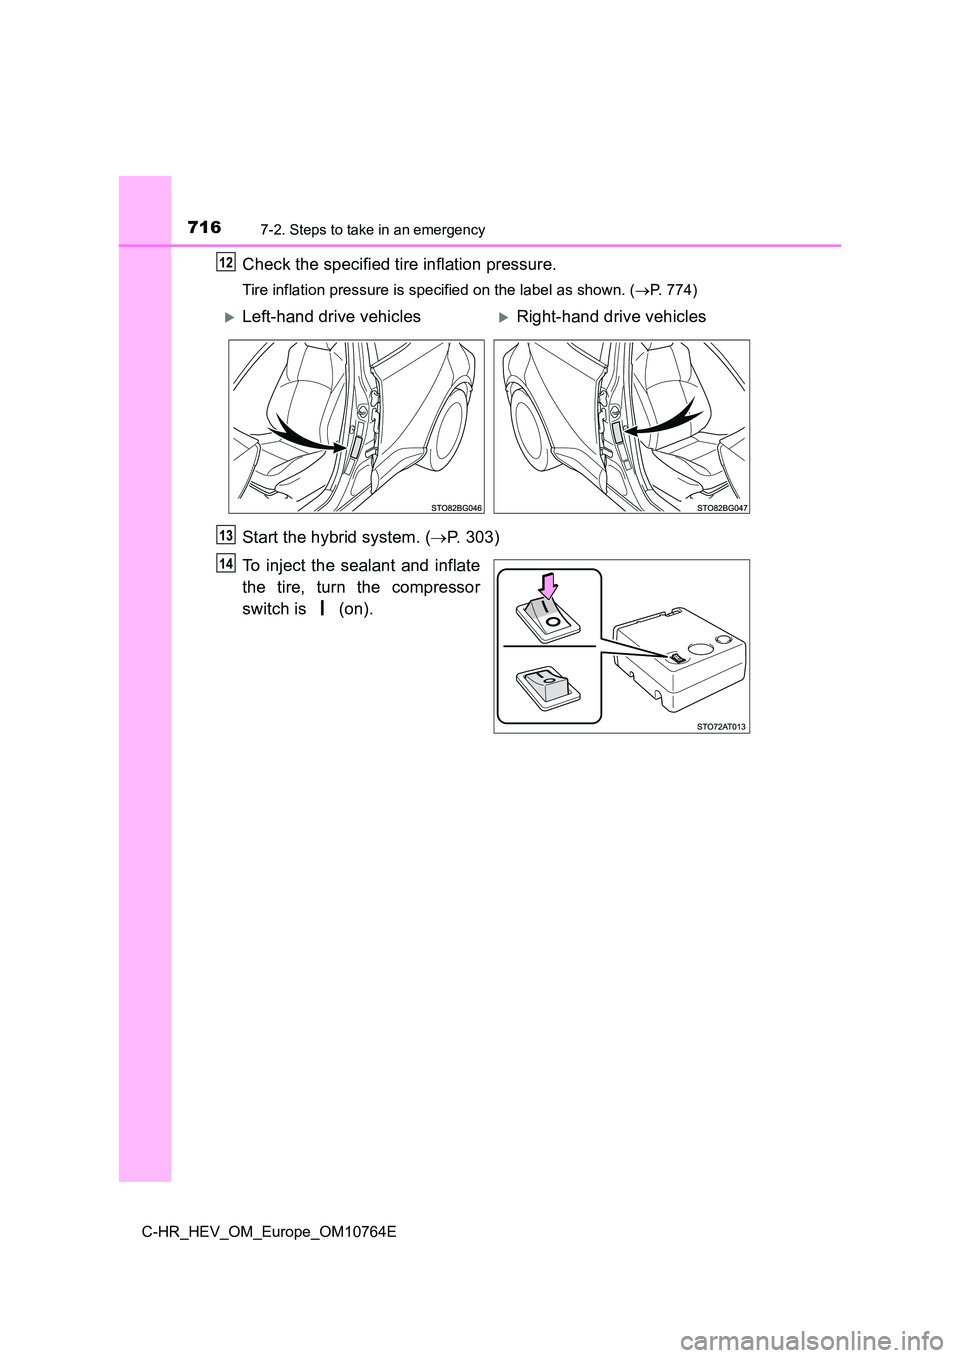
Check the specified tire inflation pressure.
Tire inflation pressure is specified on the label as shown. (P. 774)
Start the hybrid system. (P. 3 0 3 )
To inject the sealant and inflate
the tire, turn the compressor
switch is (on).
12
Left-hand drive vehiclesRight-hand drive vehicles
13
14
Page 719 of 814
7177-2. Steps to take in an emergency
C-HR_HEV_OM_Europe_OM10764E
7
When trouble arises
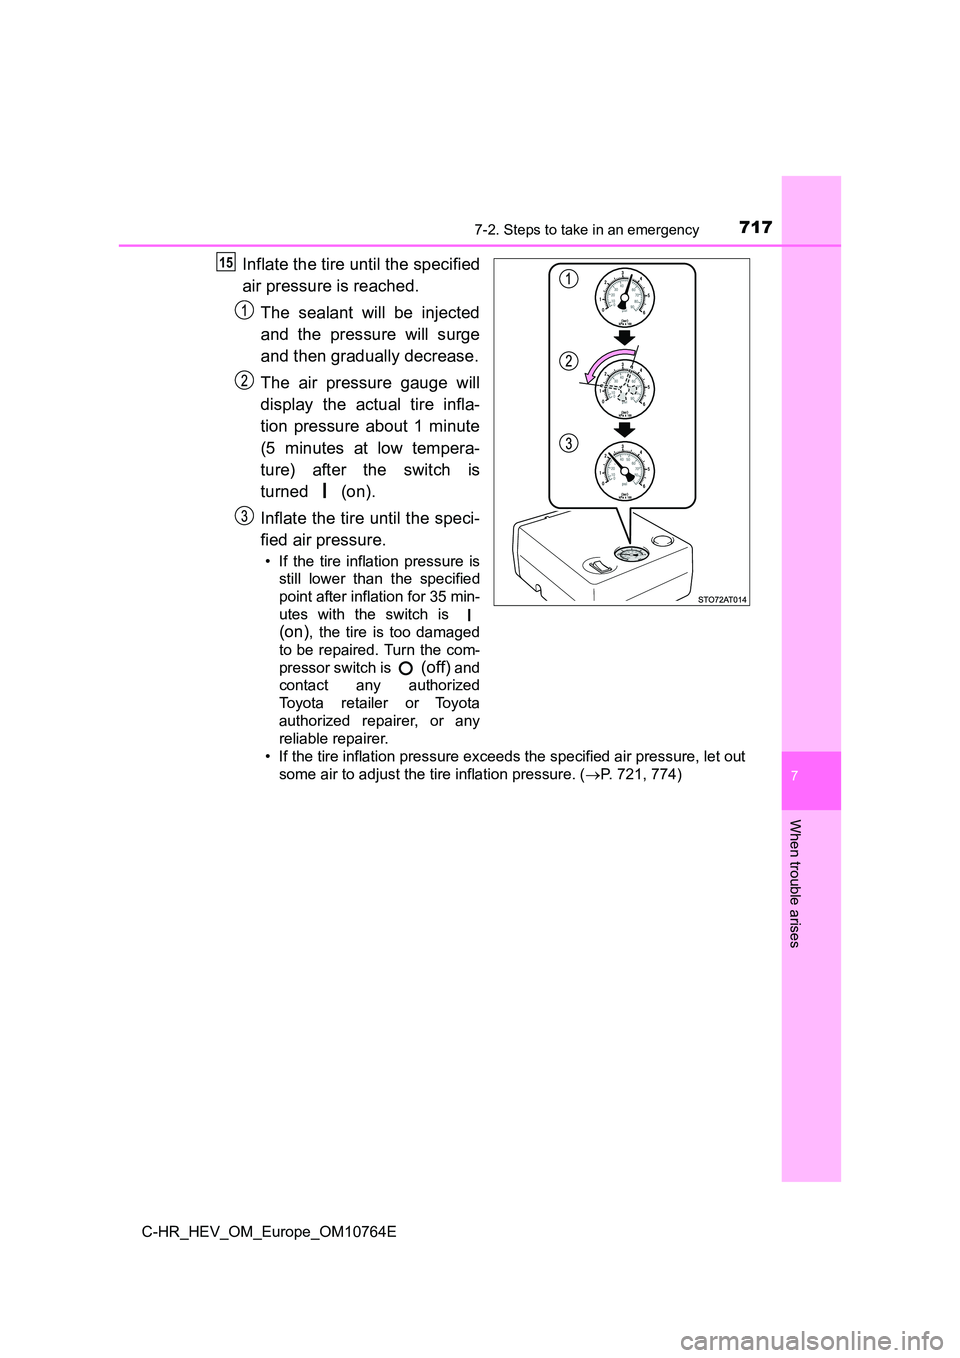
Inflate the tire until the specified
air pressure is reached.
The sealant will be injected
and the pressure will surge
and then gradually decrease.
The air pressure gauge will
display the actual tire infla-
tion pressure about 1 minute
(5 minutes at low tempera-
ture) after the switch is
turned (on).
Inflate the tire until the speci-
fied air pressure.
• If the tire inflation pressure is
still lower than the specified
point after inflation for 35 min-
utes with the switch is
(on), the tire is too damaged
to be repaired. Turn the com-
pressor switch is (off) and
contact any authorized
Toyota retailer or Toyota
authorized repairer, or any
reliable repairer.
• If the tire inflation pressure exceeds the specified air press ure, let out
some air to adjust the tire inflation pressure. ( P. 721, 774)
15
Page 722 of 814
7207-2. Steps to take in an emergency
C-HR_HEV_OM_Europe_OM10764E
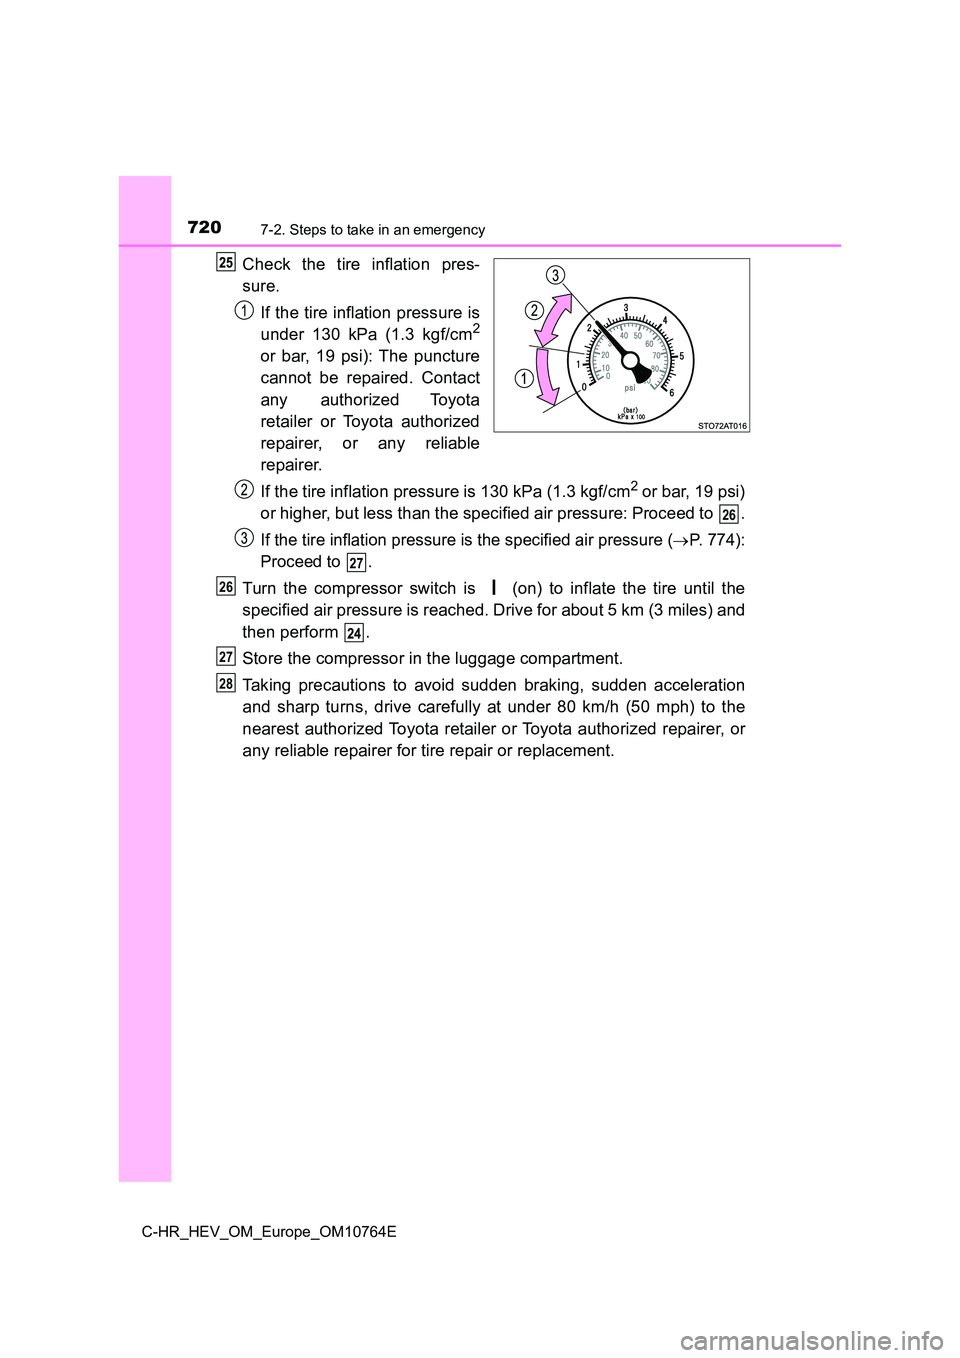
Check the tire inflation pres-
sure.
If the tire inflation pressure is
under 130 kPa (1.3 kgf/cm2
or bar, 19 psi): The puncture
cannot be repaired. Contact
any authorized Toyota
retailer or Toyota authorized
repairer, or any reliable
repairer.
If the tire inflation pressure is 130 kPa (1.3 kgf/cm2 or bar, 19 psi)
or higher, but less than the specified air pressure: Proceed to .
If the tire inflation pressure is the specified air pressure (P. 774):
Proceed to .
Turn the compressor switch is (on) to inflate the tire until t he
specified air pressure is reached. Drive for about 5 km (3 mile s) and
then perform .
Store the compressor in the luggage compartment.
Taking precautions to avoid sudden braking, sudden acceleration
and sharp turns, drive carefully at under 80 km/h (50 mph) to t he
nearest authorized Toyota retailer or Toyota authorized repaire r, o r
any reliable repairer for tire repair or replacement.
26
27
26
27
28
Page 723 of 814
7217-2. Steps to take in an emergency
C-HR_HEV_OM_Europe_OM10764E
7
When trouble arises
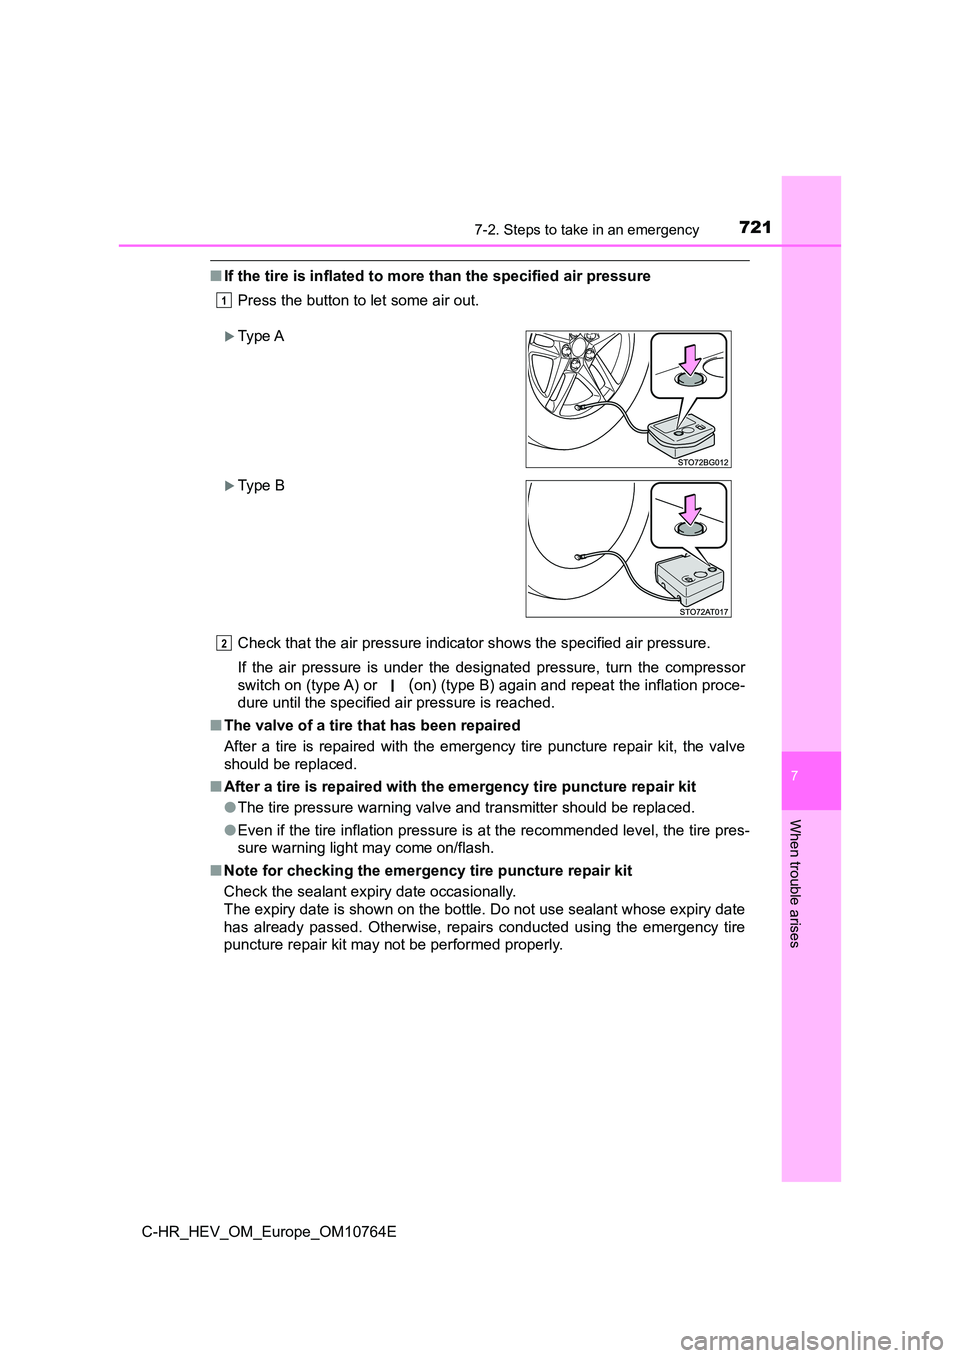
■If the tire is inflated to more than the specified air pressure
Press the button to let some air out.
Check that the air pressure indicator shows the specified air p ressure.
If the air pressure is under the designated pressure, turn the compressor
switch on (type A) or (on) (type B) again and repeat the inflation proce-
dure until the specified air pressure is reached.
■ The valve of a tire that has been repaired
After a tire is repaired with the emergency tire puncture repai r kit, the valve
should be replaced.
■ After a tire is repaired with the emergency tire puncture repair kit
● The tire pressure warning valve and transmitter should be replaced.
● Even if the tire inflation pressure is at the recommended level, the tire pres-
sure warning light may come on/flash.
■ Note for checking the emergency tire puncture repair kit
Check the sealant expiry date occasionally.
The expiry date is shown on the bottle. Do not use sealant whos e expiry date
has already passed. Otherwise, repairs conducted using the emer gency tire
puncture repair kit may not be performed properly.
1
Type A
Type B
2
Page 726 of 814
7247-2. Steps to take in an emergency
C-HR_HEV_OM_Europe_OM10764E
WARNING
■When fixing the flat tire
● Stop your vehicle in a safe and flat area.
● Do not touch the wheels or the area around the brakes immediately after
the vehicle has been driven.
After the vehicle has been driven, the wheels and the area arou nd the
brakes may be extremely hot. Touching these areas with hands, f eet or
other body parts may result in burns.
● To avoid risk of burst or severe leakage, do not drop or damage the bottle.
Visually inspect the bottle before use. Do not use a bottle wit h shock,
crack, scratch, leakage or any other damage. In such case, imme diately
replace.
● Connect the valve and hose securely with the wheel installed to the vehi-
cle. If the hose is not properly connected to the valve, air le akage may
occur and sealant may be sprayed out.
● If the hose comes off the valve while inflating the tire, there is a risk that
the hose will move abruptly due to air pressure.
● After inflation of the tire has completed, the sealant may splatter when the
hose is disconnected or some air is let out of the tire.
● Follow the operation procedure to repair the tire. If the procedures not fol-
lowed, the sealant may spray out.
● Keep back from the tire while it is being repaired, as there is a chance of it
bursting while the repair operation is being performed. If you notice any
cracks or deformation of the tire, turn off (type A) or (off) (type B) the
compressor switch and stop the repair operation immediately.
● The repair kit may overheat if operated for a long period of time. Do not
operate the repair kit continuously for more than 40 minutes.
● Parts of the repair kit become hot during operation. Be careful when han-
dling the repair kit during and after operation. Do not touch t he metal part
around the connecting area between the bottle and the compresso r. I t w il l
be extremely hot.
● Do not attach the vehicle speed warning sticker to an area other than the
one indicated. If the sticker is attached to an area where an S RS airbag is
located, such as the pad of the steering wheel, it may prevent the SRS
airbag from operating properly.