display TOYOTA CAMRY 2012 XV50 / 9.G Navigation Manual
[x] Cancel search | Manufacturer: TOYOTA, Model Year: 2012, Model line: CAMRY, Model: TOYOTA CAMRY 2012 XV50 / 9.GPages: 328, PDF Size: 5.67 MB
Page 227 of 328
227
1. AUDIO/VIDEO SYSTEM OPERATION
5
AUDIO/VIDEO SYSTEM
■ON THE AUDIO TOP SCREEN
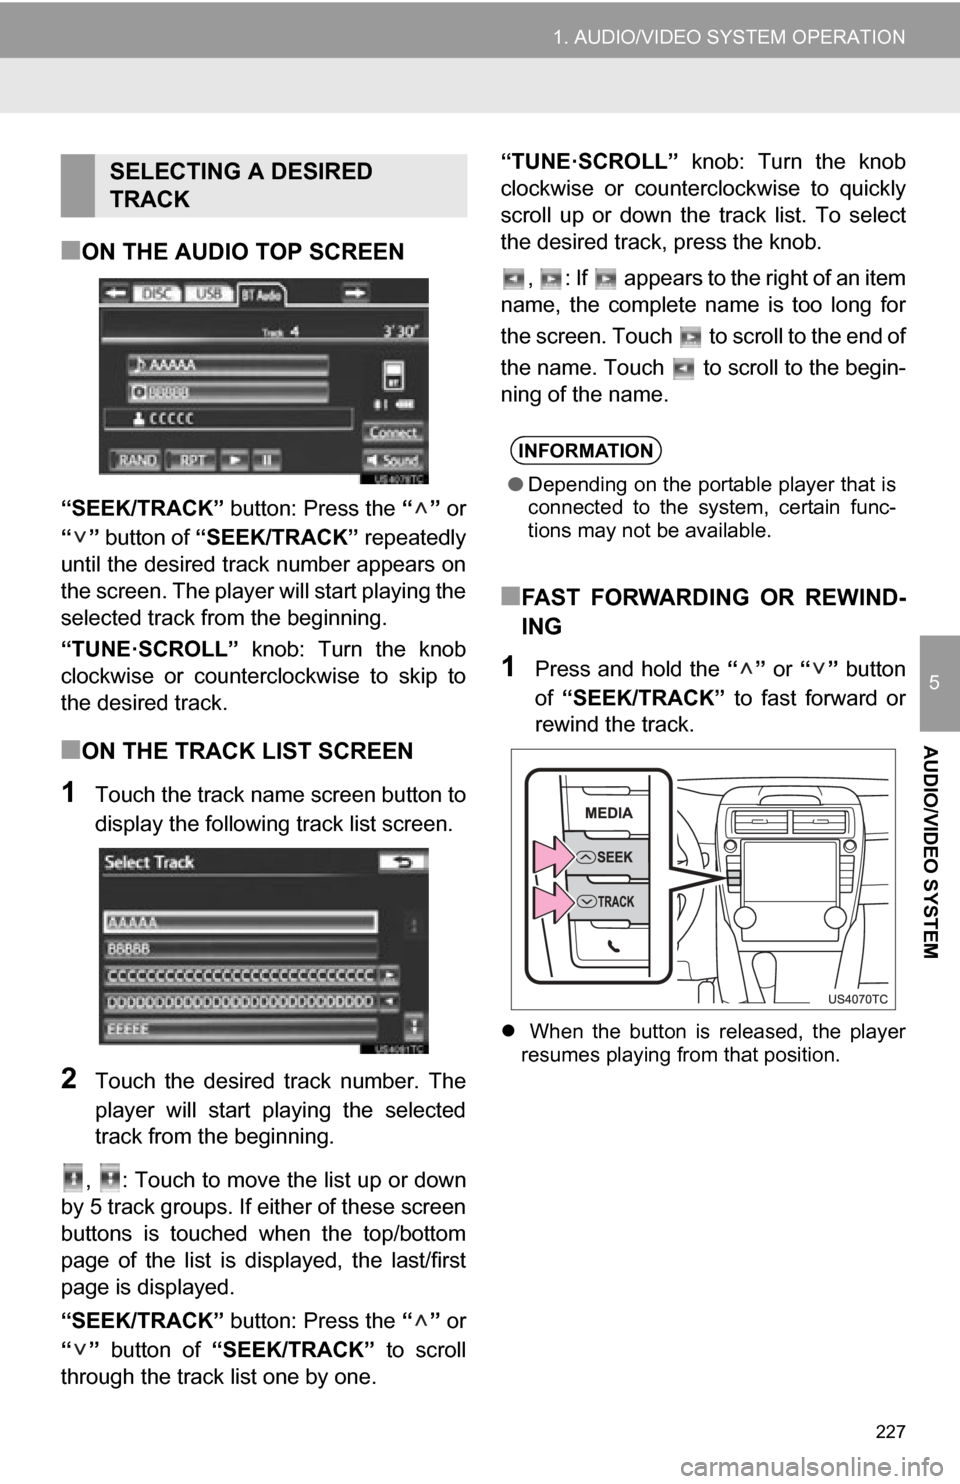
“SEEK/TRACK” button: Press the “” or
“” button of “SEEK/TRACK” repeatedly
until the desired track number appears on
the screen. The player will start playing the
selected track from the beginning.
“TUNE·SCROLL” knob: Turn the knob
clockwise or counterclockwise to skip to
the desired track.
■ON THE TRACK LIST SCREEN
1Touch the track name screen button to
display the following track list screen.
2Touch the desired track number. The
player will start playing the selected
track from the beginning.
, : Touch to move the list up or down
by 5 track groups. If either of these screen
buttons is touched when the top/bottom
page of the list is displayed, the last/first
page is displayed.
“SEEK/TRACK” button: Press the “” or
“” button of “SEEK/TRACK” to scroll
through the track list one by one. “TUNE·SCROLL”
knob: Turn the knob
clockwise or counterclockwise to quickly
scroll up or down the track list. To select
the desired track, press the knob.
, : If appears to the right of an item
name, the complete name is too long for
the screen. Touch to scroll to the end of
the name. Touch to scroll to the begin-
ning of the name.
■FAST FORWARDING OR REWIND-
ING
1Press and hold the “” or “” button
of “SEEK/TRACK” to fast forward or
rewind the track.
When the button is released, the player
resumes playing from that position.
SELECTING A DESIRED
TRACK
INFORMATION
● Depending on the portable player that is
connected to the system, certain func-
tions may not be available.
Page 229 of 328
229
1. AUDIO/VIDEO SYSTEM OPERATION
5
AUDIO/VIDEO SYSTEM
11. AUDIO/VIDEO REMOTE CONTROLS (STEERING SWITCHES)
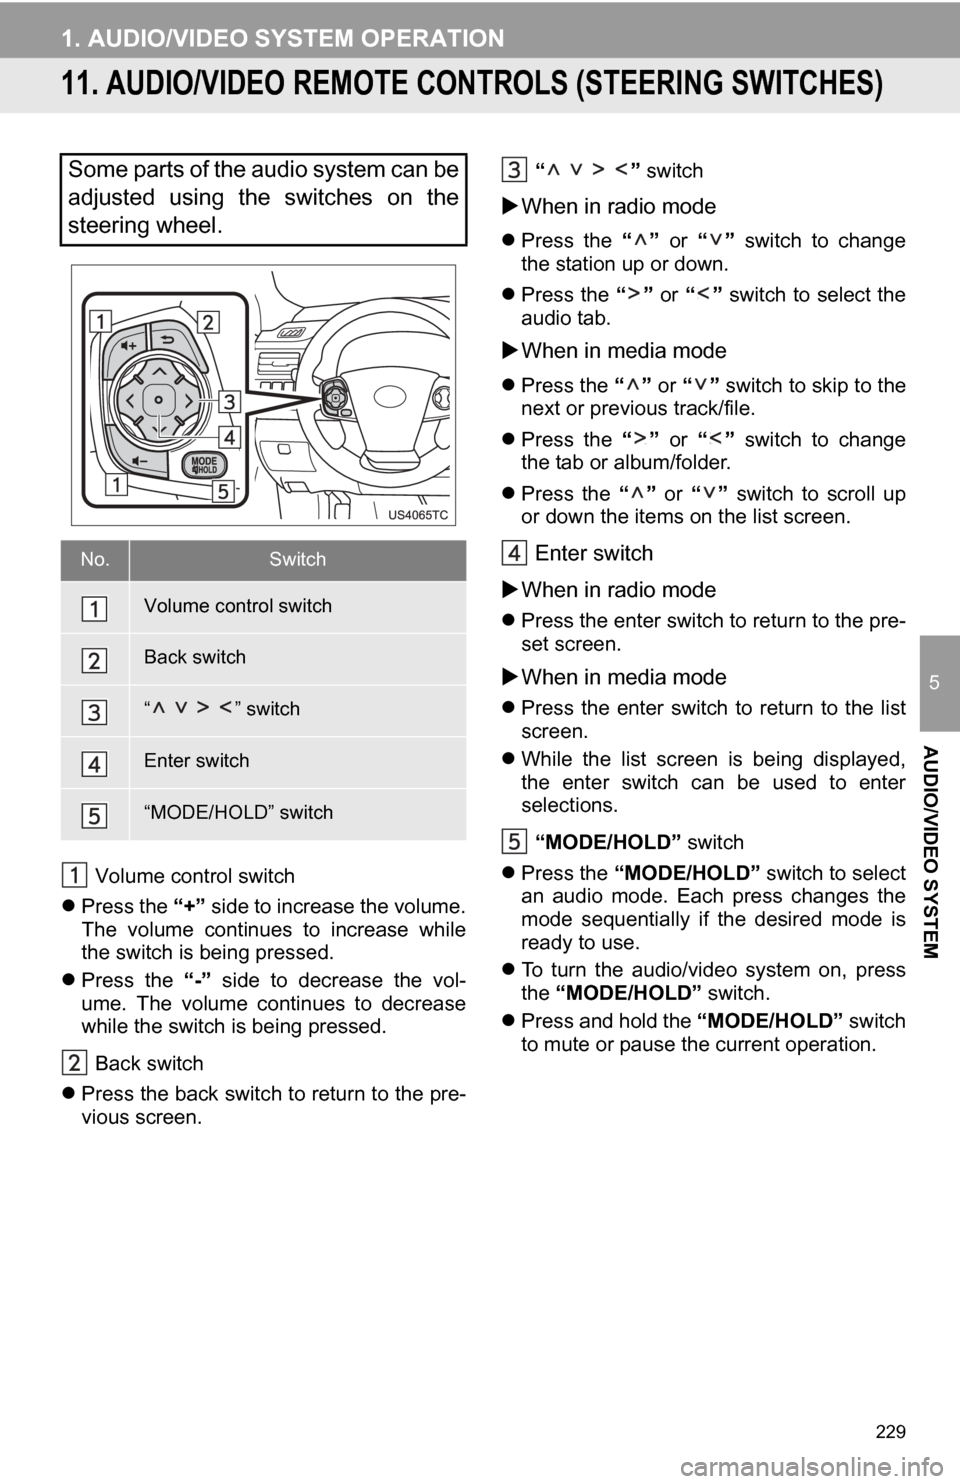
Volume control switch
Press the “+” side to increase the volume.
The volume continues to increase while
the switch is being pressed.
Press the “-” side to decrease the vol-
ume. The volume continues to decrease
while the switch is being pressed.
Back switch
Press the back switch to return to the pre-
vious screen. “ ”
switch
When in radio mode
Press the “” or “” switch to change
the station up or down.
Press the “” or “” switch to select the
audio tab.
When in media mode
Press the “” or “” switch to skip to the
next or previous track/file.
Press the “” or “” switch to change
the tab or album/folder.
Press the “” or “” switch to scroll up
or down the items on the list screen.
Enter switch
When in radio mode
Press the enter switch to return to the pre-
set screen.
When in media mode
Press the enter switch to return to the list
screen.
While the list screen is being displayed,
the enter switch can be used to enter
selections.
“MODE/HOLD” switch
Press the “MODE/HOLD” switch to select
an audio mode. Each press changes the
mode sequentially if the desired mode is
ready to use.
To turn the audio/video system on, press
the “MODE/HOLD” switch.
Press and hold the “MODE/HOLD” switch
to mute or pause the current operation.
Some parts of the audio system can be
adjusted using the switches on the
steering wheel.
No.Switch
Volume control switch
Back switch
“ ” switch
Enter switch
“MODE/HOLD” switch
Page 234 of 328
234
1. AUDIO/VIDEO SYSTEM OPERATION
MP3 (MPEG Audio Layer 3) and WMA
(Windows Media Audio) are audio com-
pression standards.
The MP3/WMA player can play MP3 and
WMA files on CD-ROM, CD-R and CD-
RW discs.
The unit can play disc recordings compati-
ble with ISO 9660 level 1 and level 2 and
with the Romeo and Joliet file system.
When naming an MP3 or WMA file, add
the appropriate file extension (.mp3 or
.wma).
The MP3/WMA player plays back files
with .mp3 or .wma file extensions as MP3
or WMA files. To prevent noise and play-
back errors, use the appropriate file exten-
sions.
The MP3/WMA player can play only the
first session when using multi-session
compatible CDs.
MP3 player: MP3 files are compatible with
the ID3 Tag Ver. 1.0, Ver. 1.1, Ver. 2.2 and
Ver. 2.3 formats. The unit cannot display
disc title, track title and artist name in
other formats.
USB memory: MP3 files are compatible
with the ID3 Tag Ver. 1.0, Ver. 1.1, Ver.
2.2, Ver. 2.3 and Ver. 2.4 formats. The unit
cannot display track title and artist name
in other formats.
WMA files can contain a WMA tag that is
used in the same way as an ID3 tag. WMA
tags carry information such as track title
and artist name.
The emphasis function is available only
when playing MP3/WMA files recorded at
32, 44.1 and 48 kHz.
MP3 files for MP3 player:
MPEG 1 LAYER 3 — 32, 44.1, 48 kHz
MPEG 2 LSF LAYER 3 — 16, 22.05, 24
kHz
MP3 files for USB memory:
MPEG 1 AUDIO LAYER 2, 3 — 32, 44.1,
48 kHz
MPEG 2 AUDIO LAYER 2, 3 — 16, 22.05,
24 kHz
WMA files for WMA player:
Ver. 7, 8, 9 CBR — 32, 44.1, 48 kHz
WMA files for USB memory:
Ver. 9 — HIGH PROFILE 32, 44.1, 48 kHz
The sound quality of MP3/WMA files gen-
erally improves with higher bit rates. In
order to achieve a reasonable level of
sound quality, discs recorded with a bit
rate of at least 128 kbps are recom-
mended.
MP3 files for MP3 player:
MPEG1 LAYER3 — 32 to 320 kbps
MPEG2 LSF LAYER3 — 8 to 160 kbps
MP3 files for USB memory:
MPEG 1 AUDIO LAYER 2, 3 — 32 to 320
kbps
MPEG 2 AUDIO LAYER 2, 3 — 8 to 160
kbps
WMA files for WMA player:
Ver. 7, 8 CBR — 48 to 192 kbps
Ver. 9 CBR — 48 to 320 kbps
WMA files for USB memory:
Ver. 9 HIGH PROFILE 32 to 320 kbps,
VBR (Variable Bit Rate)
The MP3/WMA player does not play back
MP3/WMA files from discs recorded using
packet write data transfer (UDF format).
Discs should be record ed using “pre-mas-
tering” software rather than packet-write
software.
M3u playlists are not compatible with the
audio player.
MP3i (MP3 interactive) and MP3PRO for-
mats are not compatible with the audio
player.
The player is compatible with VBR (Vari-
able Bit Rate).
MP3/WMA FILESSAMPLING FREQUENCY
PLAYABLE BIT RATES
Page 235 of 328
235
1. AUDIO/VIDEO SYSTEM OPERATION
5
AUDIO/VIDEO SYSTEM
When playing back files recorded as VBR
(Variable Bit Rate) files, the play time will
not be correctly displayed if the fastfor-
ward or reverse operations are used.
It is not possible to check folders that do
not include MP3/WMA files.
MP3/WMA files in folders up to 8 levels
deep can be played. However, the start of
playback may be delayed when using
discs containing numerous levels of fold-
ers. For this reason, we recommend creat-
ing discs with no more than two levels of
folders.
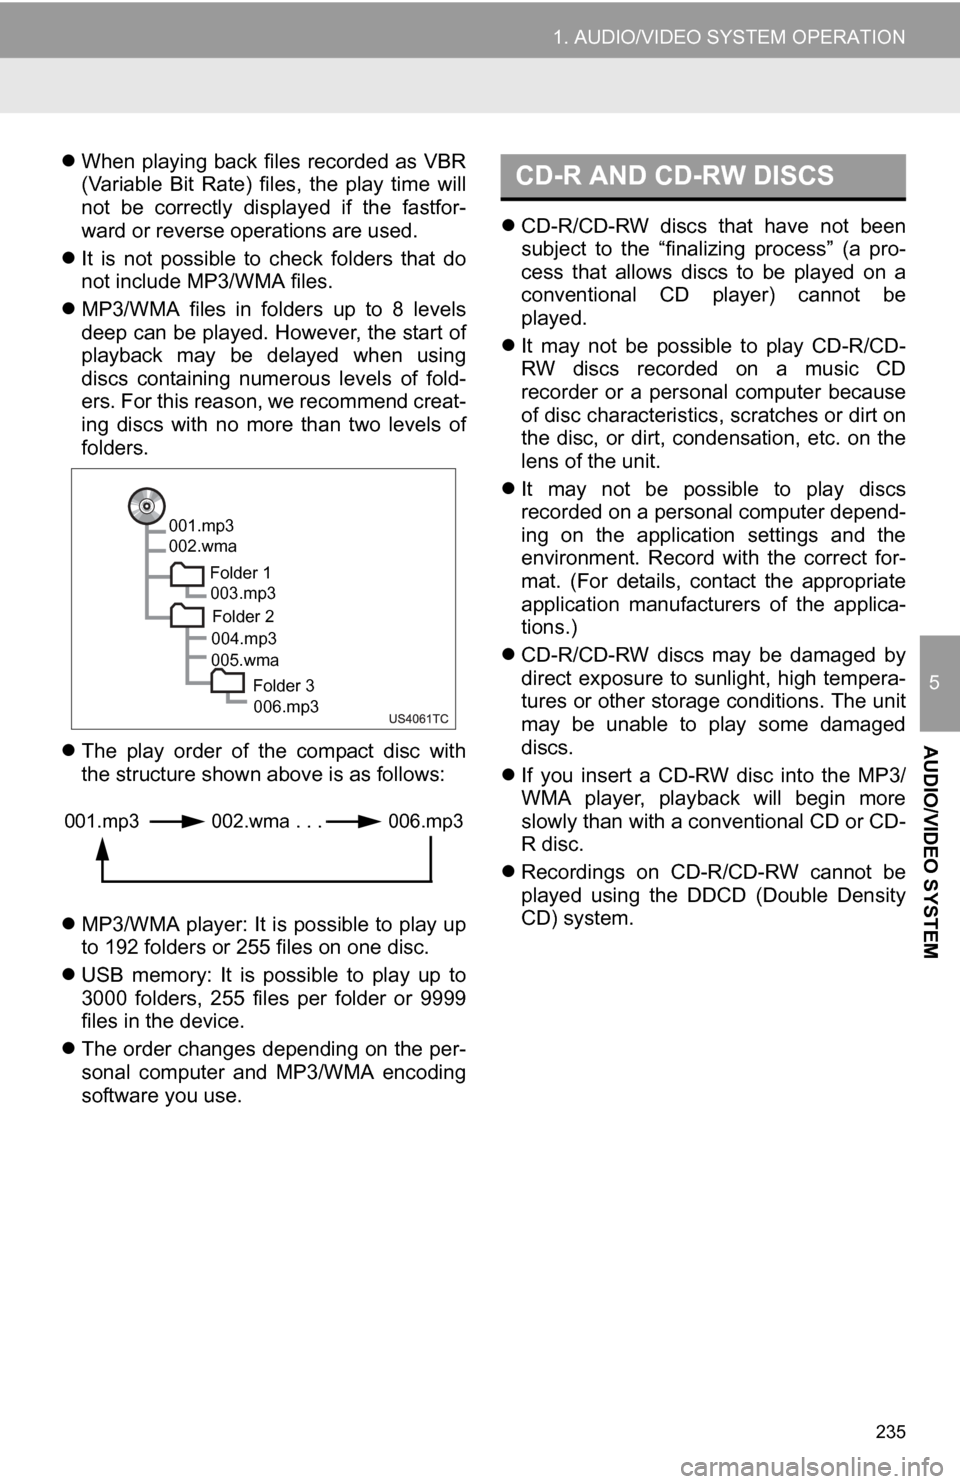
The play order of the compact disc with
the structure shown above is as follows:
MP3/WMA player: It is possible to play up
to 192 folders or 255 files on one disc.
USB memory: It is possible to play up to
3000 folders, 255 files per folder or 9999
files in the device.
The order changes depending on the per-
sonal computer and MP3/WMA encoding
software you use.
CD-R/CD-RW discs that have not been
subject to the “finalizing process” (a pro-
cess that allows discs to be played on a
conventional CD player) cannot be
played.
It may not be possible to play CD-R/CD-
RW discs recorded on a music CD
recorder or a personal computer because
of disc characteristics, scratches or dirt on
the disc, or dirt, condensation, etc. on the
lens of the unit.
It may not be possible to play discs
recorded on a personal computer depend-
ing on the application settings and the
environment. Record with the correct for-
mat. (For details, contact the appropriate
application manufacturers of the applica-
tions.)
CD-R/CD-RW discs may be damaged by
direct exposure to sunlight, high tempera-
tures or other storage conditions. The unit
may be unable to play some damaged
discs.
If you insert a CD-RW disc into the MP3/
WMA player, playback will begin more
slowly than with a conventional CD or CD-
R disc.
Recordings on CD-R/CD-RW cannot be
played using the DDCD (Double Density
CD) system.
001.mp3
002.wma
Folder 1003.mp3
Folder 2
004.mp3
005.wma
Folder 3006.mp3
001.mp3 002.wma . . . 006.mp3
CD-R AND CD-RW DISCS
Page 240 of 328
240
2. SETUP
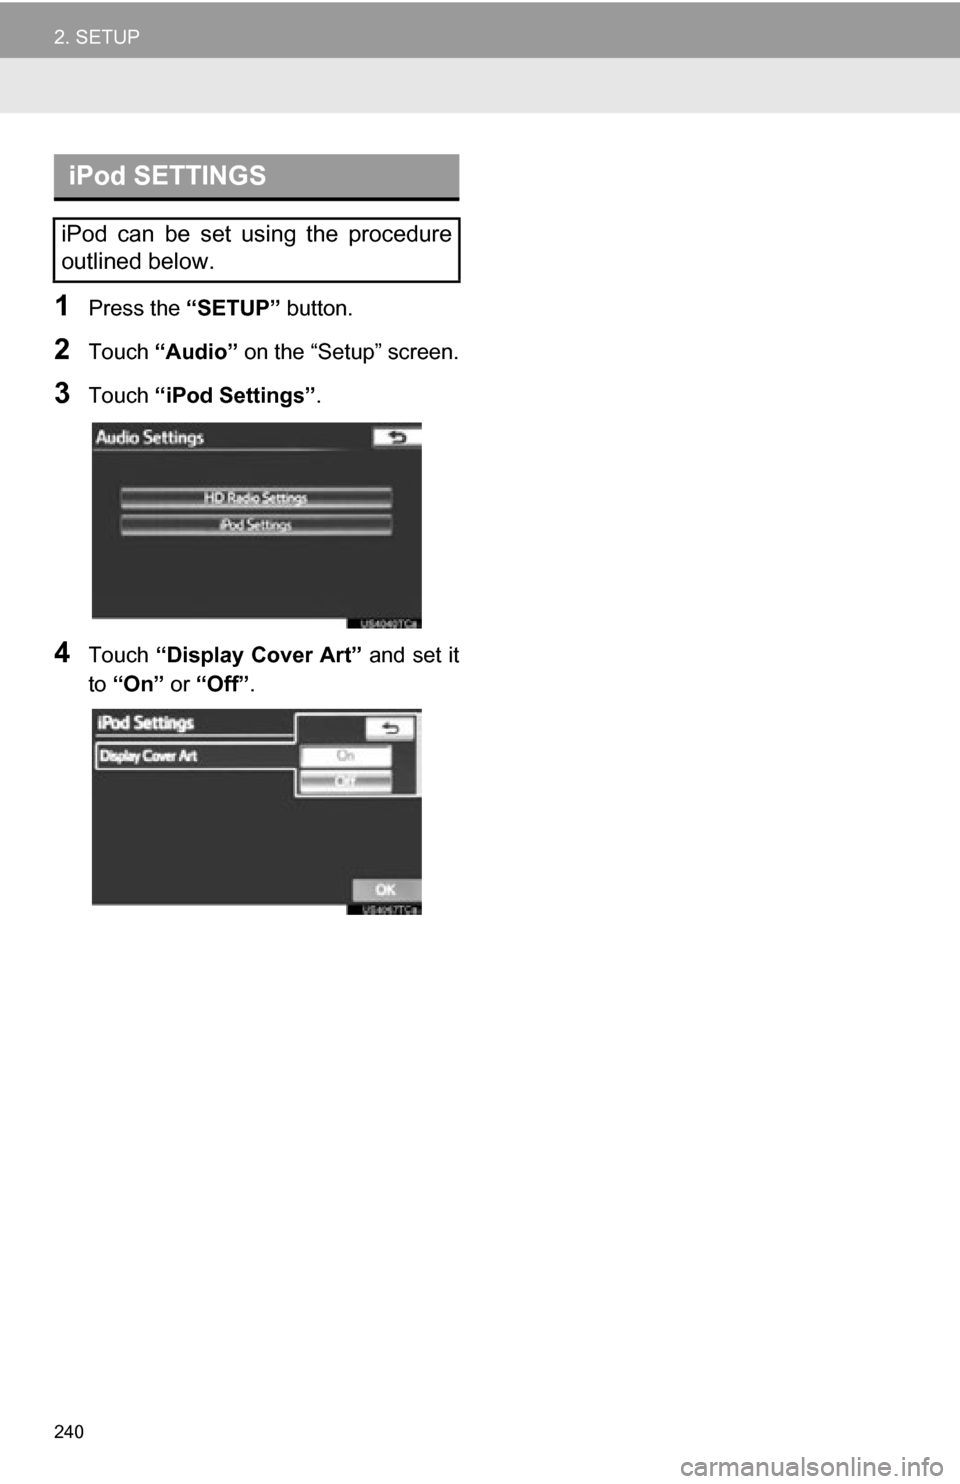
1Press the “SETUP” button.
2Touch “Audio” on the “Setup” screen.
3Touch “iPod Settings” .
4Touch “Display Cover Art” and set it
to “On” or “Off”.
iPod SETTINGS
iPod can be set using the procedure
outlined below.
Page 242 of 328
242
1. VOICE COMMAND SYSTEM OPERATION
1. VOICE COMMAND SYSTEM
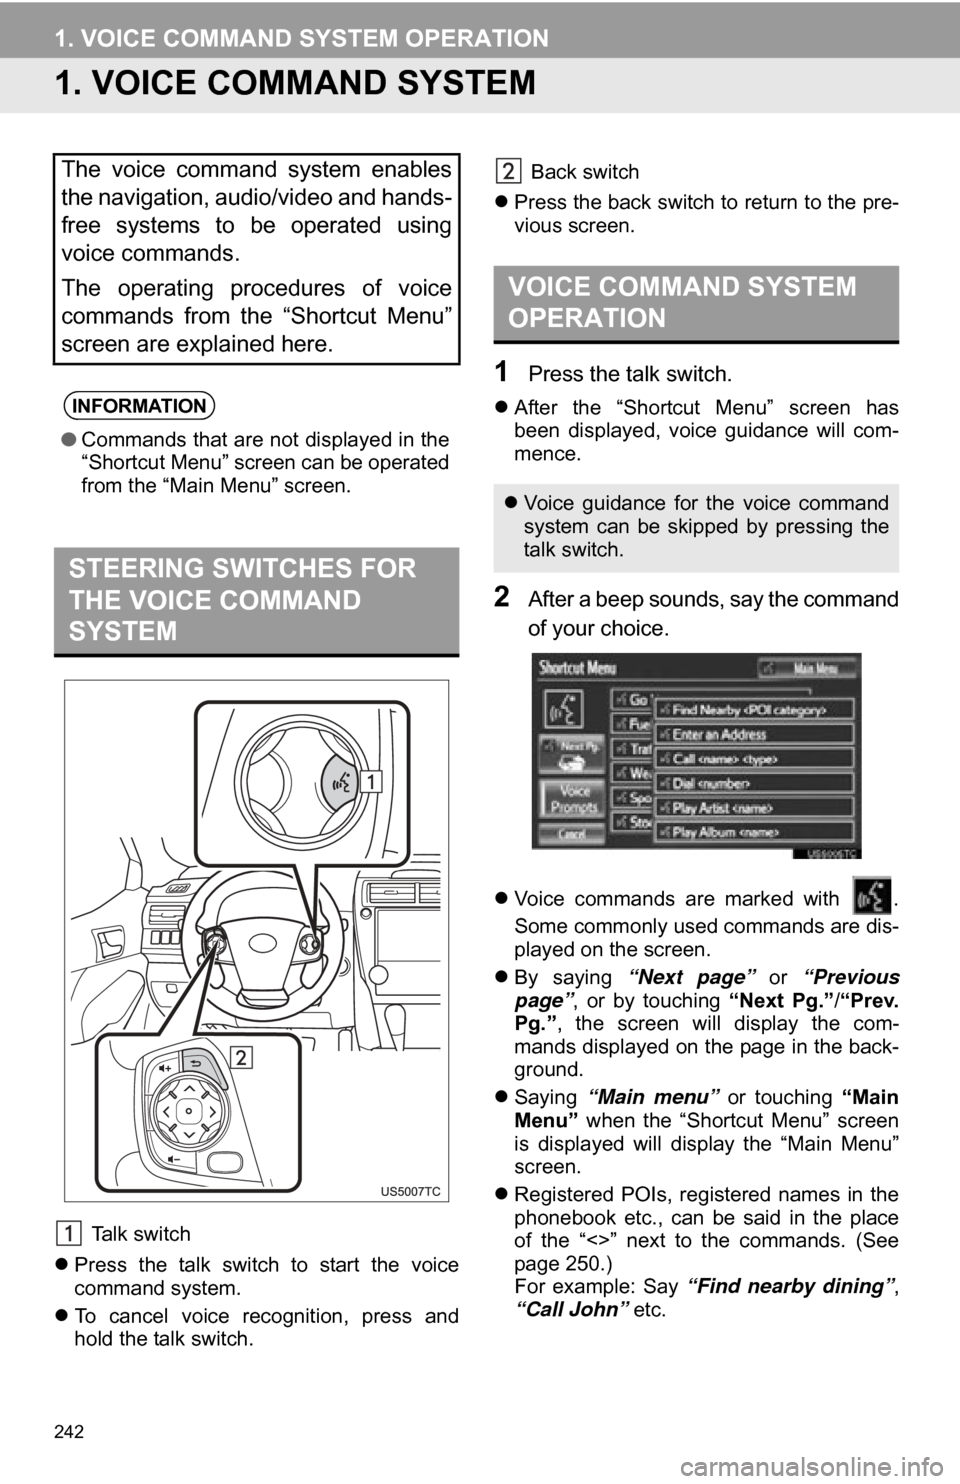
Talk switch
Press the talk switch to start the voice
command system.
To cancel voice recognition, press and
hold the talk switch. Back switch
Press the back switch to return to the pre-
vious screen.
1Press the talk switch.
After the “Shortcut Menu” screen has
been displayed, voice guidance will com-
mence.
2After a beep sounds, say the command
of your choice.
Voice commands are marked with .
Some commonly used commands are dis-
played on the screen.
By saying “Next page” or “Previous
page” , or by touching “Next Pg.”/“Prev.
Pg.” , the screen will display the com-
mands displayed on the page in the back-
ground.
Saying “Main menu” or touching “Main
Menu” when the “Shortcut Menu” screen
is displayed will display the “Main Menu”
screen.
Registered POIs, registered names in the
phonebook etc., can be said in the place
of the “<>” next to the commands. (See
page 250.)
For example: Say “Find nearby dining” ,
“Call John” etc.
The voice command system enables
the navigation, audio/video and hands-
free systems to be operated using
voice commands.
The operating procedures of voice
commands from the “Shortcut Menu”
screen are explained here.
INFORMATION
●Commands that are not displayed in the
“Shortcut Menu” screen can be operated
from the “Main Menu” screen.
STEERING SWITCHES FOR
THE VOICE COMMAND
SYSTEM
VOICE COMMAND SYSTEM
OPERATION
Voice guidance for the voice command
system can be skipped by pressing the
talk switch.
Page 243 of 328
243
1. VOICE COMMAND SYSTEM OPERATION
6
VOICE COMMAND SYSTEM
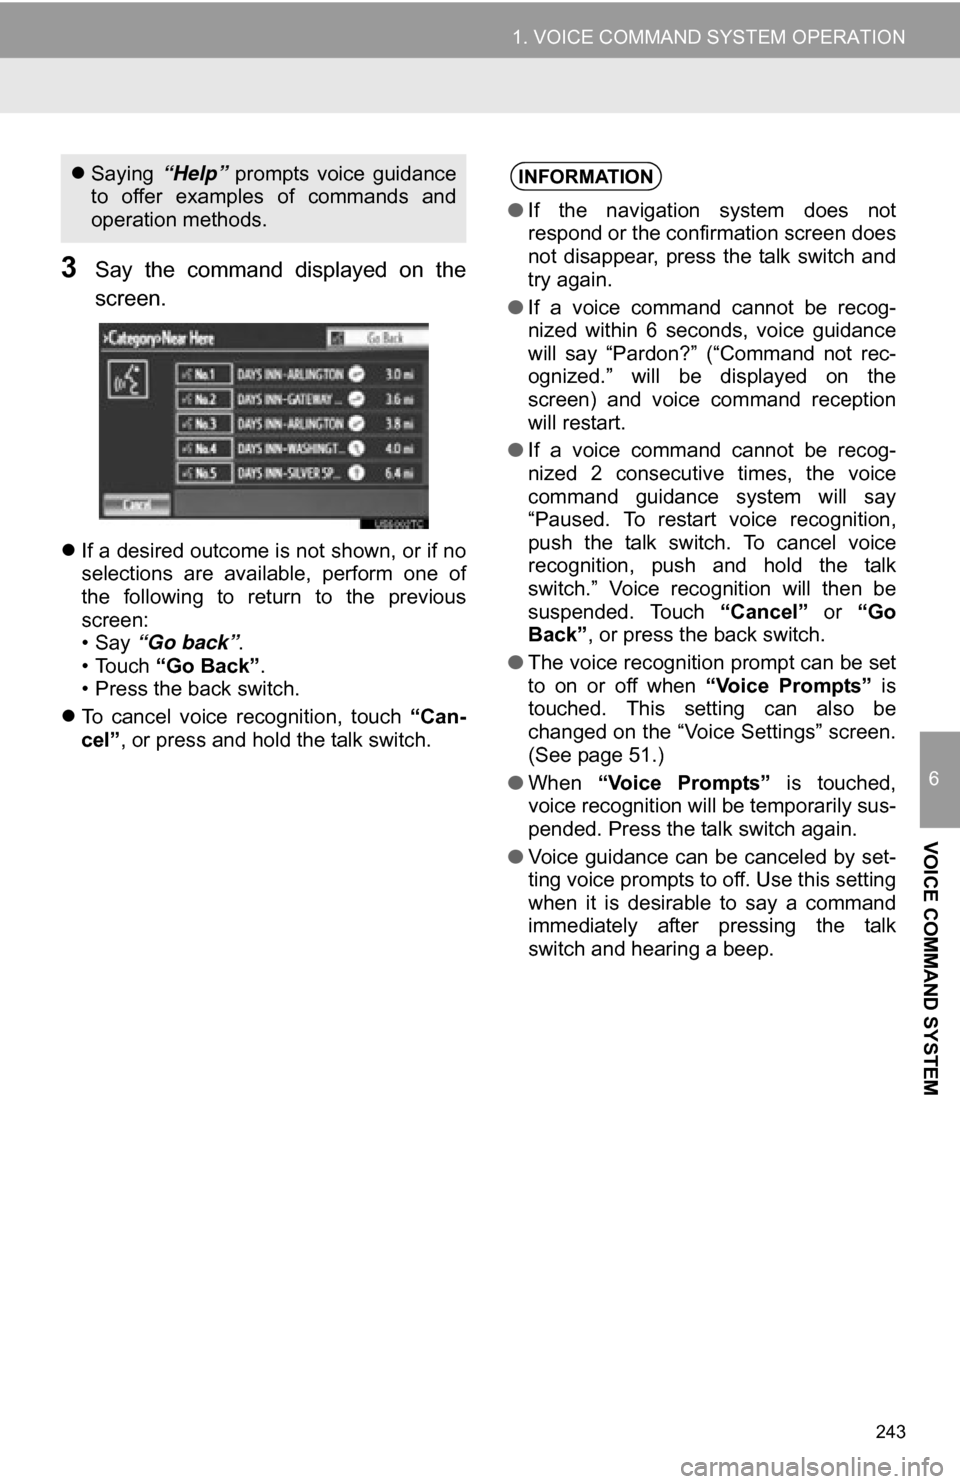
3Say the command displayed on the
screen.
If a desired outcome is not shown, or if no
selections are available, perform one of
the following to return to the previous
screen:
•Say “Go back” .
• Touch “Go Back” .
• Press the back switch.
To cancel voice recognition, touch “Can-
cel”, or press and hold the talk switch.
Saying “Help” prompts voice guidance
to offer examples of commands and
operation methods.INFORMATION
● If the navigation system does not
respond or the confirmation screen does
not disappear, press the talk switch and
try again.
● If a voice command cannot be recog-
nized within 6 seconds, voice guidance
will say “Pardon?” (“Command not rec-
ognized.” will be displayed on the
screen) and voice command reception
will restart.
● If a voice command cannot be recog-
nized 2 consecutive times, the voice
command guidance system will say
“Paused. To restart voice recognition,
push the talk switch. To cancel voice
recognition, push and hold the talk
switch.” Voice recognition will then be
suspended. Touch “Cancel” or “Go
Back” , or press the back switch.
● The voice recognition prompt can be set
to on or off when “Voice Prompts” is
touched. This setting can also be
changed on the “Voice Settings” screen.
(See page 51.)
● When “Voice Prompts” is touched,
voice recognition will be temporarily sus-
pended. Press the talk switch again.
● Voice guidance can be canceled by set-
ting voice prompts to off. Use this setting
when it is desirable to say a command
immediately after pressing the talk
switch and hearing a beep.
Page 244 of 328
244
1. VOICE COMMAND SYSTEM OPERATION
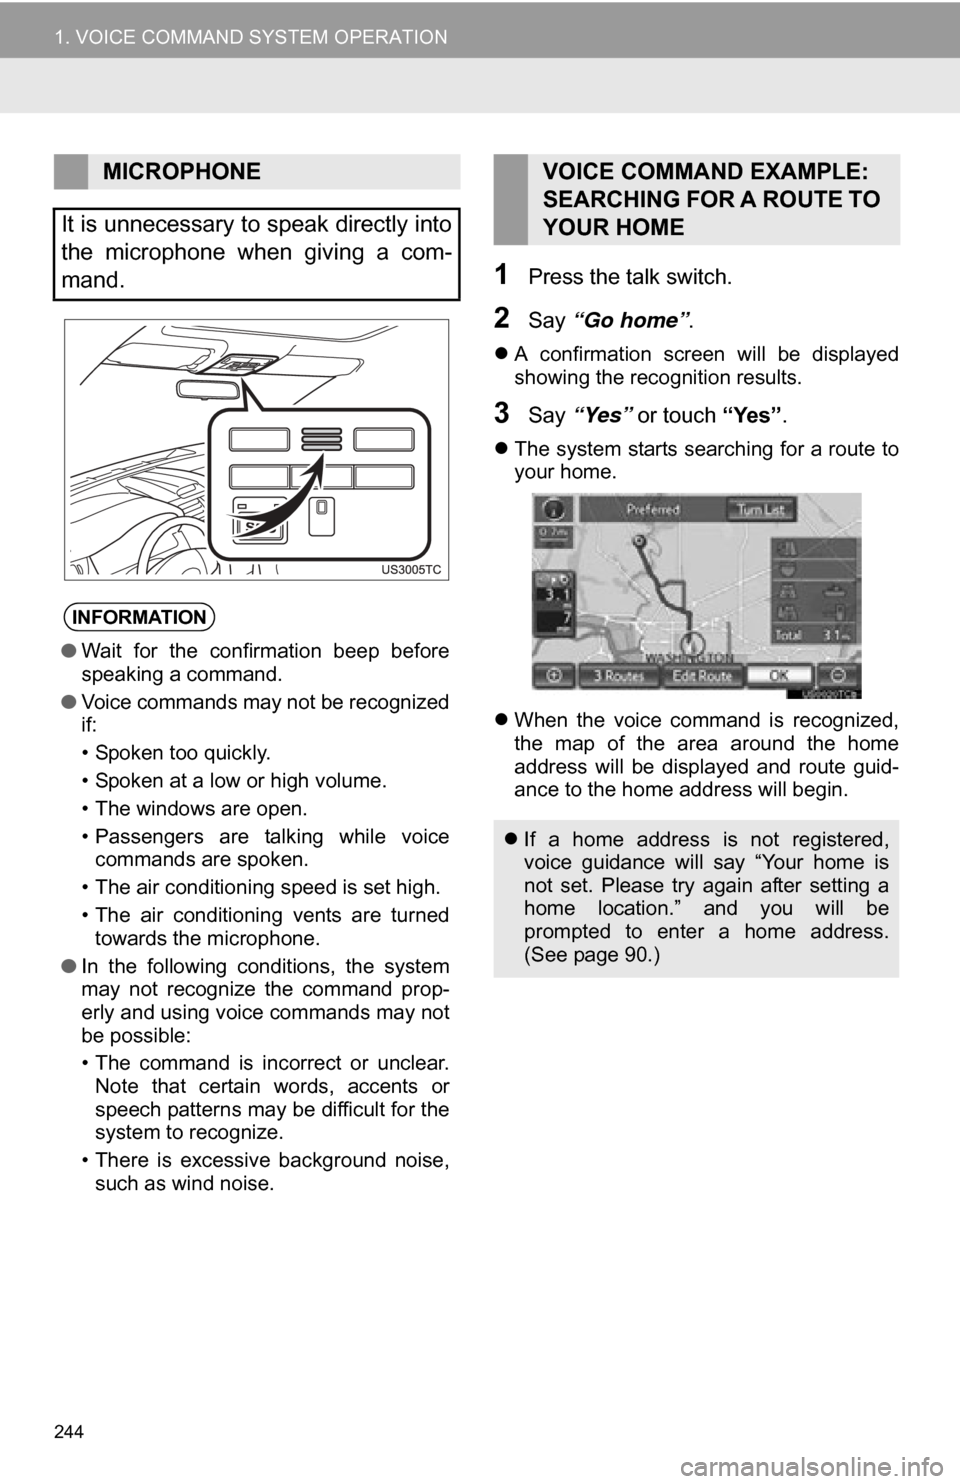
1Press the talk switch.
2Say “Go home” .
A confirmation screen will be displayed
showing the recognition results.
3Say “Yes” or touch “Yes”.
The system starts searching for a route to
your home.
When the voice command is recognized,
the map of the area around the home
address will be displayed and route guid-
ance to the home address will begin.
MICROPHONE
It is unnecessary to speak directly into
the microphone when giving a com-
mand.
INFORMATION
● Wait for the confirmation beep before
speaking a command.
● Voice commands may not be recognized
if:
• Spoken too quickly.
• Spoken at a low or high volume.
• The windows are open.
• Passengers are talking while voice
commands are spoken.
• The air conditioning speed is set high.
• The air conditioning vents are turned towards the microphone.
● In the following conditions, the system
may not recognize the command prop-
erly and using voice commands may not
be possible:
• The command is incorrect or unclear.
Note that certain words, accents or
speech patterns may be difficult for the
system to recognize.
• There is excessive background noise, such as wind noise.
VOICE COMMAND EXAMPLE:
SEARCHING FOR A ROUTE TO
YOUR HOME
If a home address is not registered,
voice guidance will say “Your home is
not set. Please try again after setting a
home location.” and you will be
prompted to enter a home address.
(See page 90.)
Page 245 of 328
245
1. VOICE COMMAND SYSTEM OPERATION
6
VOICE COMMAND SYSTEM
1Press the talk switch.
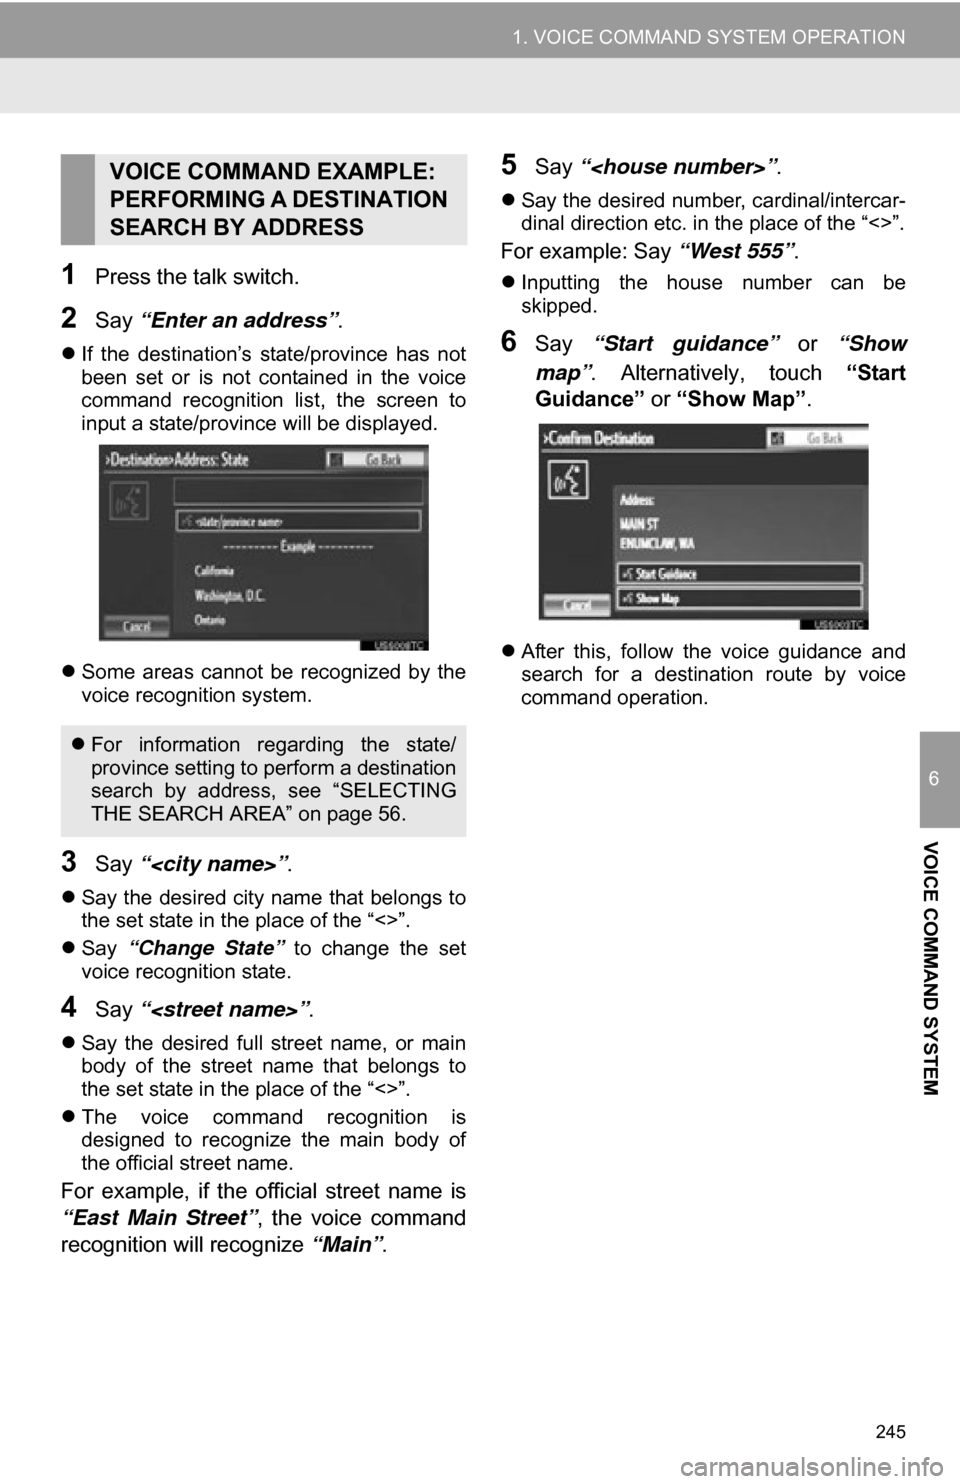
2Say “Enter an address” .
If the destination’s state/province has not
been set or is not contained in the voice
command recognition list, the screen to
input a state/province will be displayed.
Some areas cannot be recognized by the
voice recognition system.
3Say “
Say the desired city name that belongs to
the set state in the place of the “<>”.
Say “Change State” to change the set
voice recognition state.
4Say “
Say the desired full street name, or main
body of the street name that belongs to
the set state in the place of the “<>”.
The voice command recognition is
designed to recognize the main body of
the official street name.
For example, if the official street name is
“East Main Street” , the voice command
recognition will recognize “Main”.
5Say “
Say the desired number, cardinal/intercar-
dinal direction etc. in the place of the “<>”.
For example: Say “West 555”.
Inputting the house number can be
skipped.
6Say “Start guidance” or “Show
map” . Alternatively, touch “Start
Guidance” or “Show Map” .
After this, follow the voice guidance and
search for a destination route by voice
command operation.
VOICE COMMAND EXAMPLE:
PERFORMING A DESTINATION
SEARCH BY ADDRESS
For information regarding the state/
province setting to perform a destination
search by address, see “SELECTING
THE SEARCH AREA” on page 56.
Page 246 of 328
246
1. VOICE COMMAND SYSTEM OPERATION
1Press the talk switch.
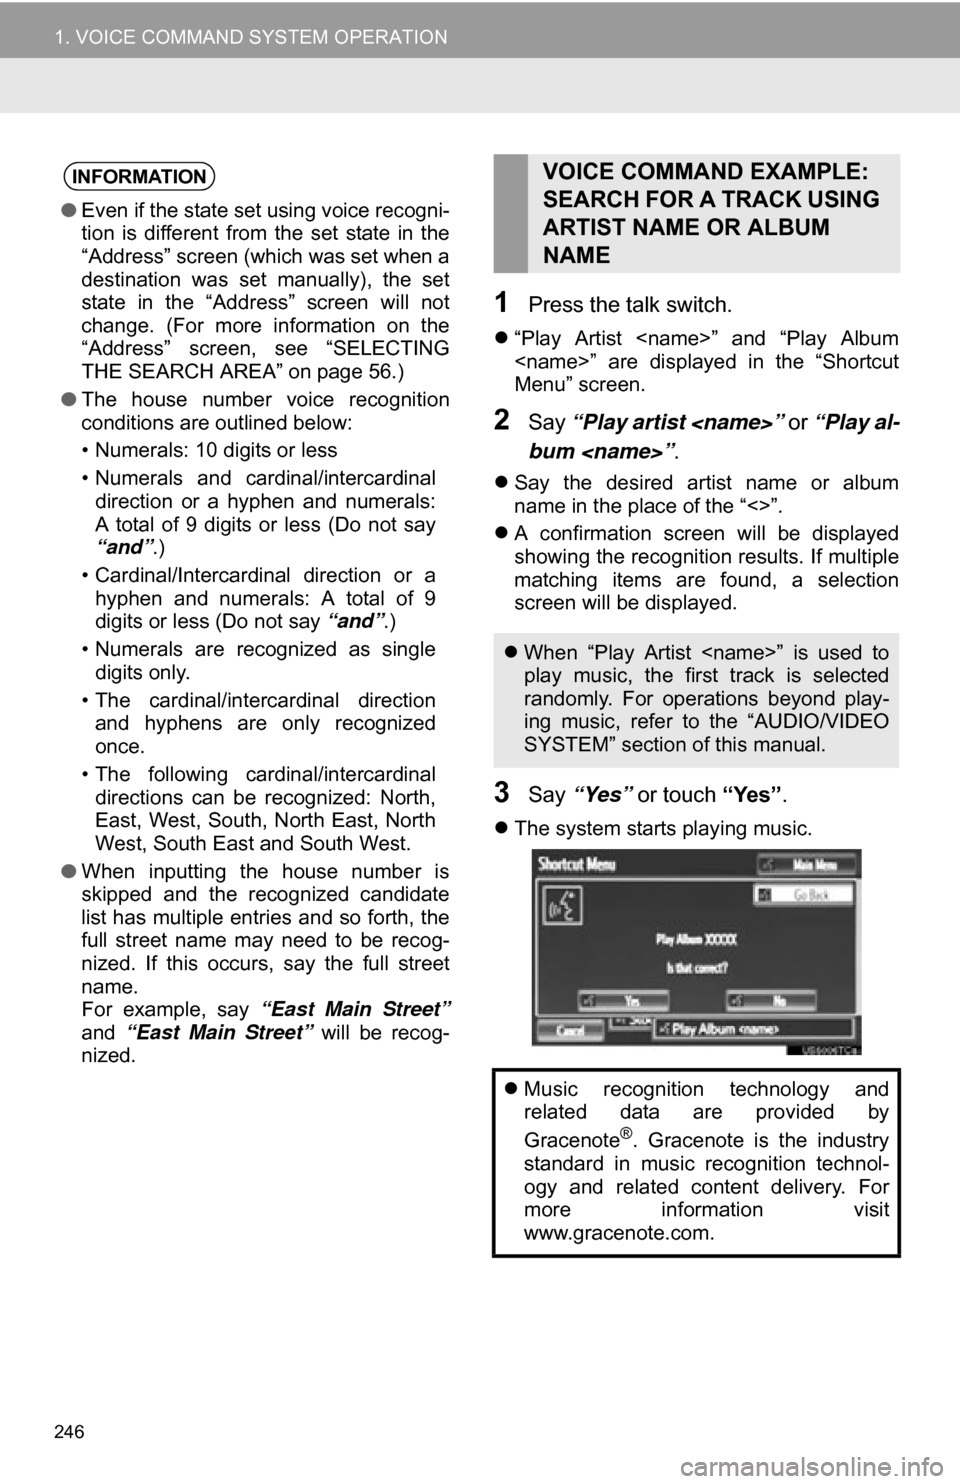
“Play Artist
Menu” screen.
2Say “Play artist
bum
Say the desired artist name or album
name in the place of the “<>”.
A confirmation screen will be displayed
showing the recognition results. If multiple
matching items are found, a selection
screen will be displayed.
3Say “Yes” or touch “Yes”.
The system starts playing music.
INFORMATION
●Even if the state set using voice recogni-
tion is different from the set state in the
“Address” screen (which was set when a
destination was set manually), the set
state in the “Address” screen will not
change. (For more information on the
“Address” screen, see “SELECTING
THE SEARCH AREA” on page 56.)
● The house number voice recognition
conditions are outlined below:
• Numerals: 10 digits or less
• Numerals and cardinal/intercardinal
direction or a hyphen and numerals:
A total of 9 digits or less (Do not say
“and”.)
• Cardinal/Intercardinal direction or a hyphen and numerals: A total of 9
digits or less (Do not say “and”.)
• Numerals are recognized as single digits only.
• The cardinal/intercardinal direction and hyphens are only recognized
once.
• The following cardinal/intercardinal directions can be recognized: North,
East, West, South, North East, North
West, South East and South West.
● When inputting the house number is
skipped and the recognized candidate
list has multiple entries and so forth, the
full street name may need to be recog-
nized. If this occurs, say the full street
name.
For example, say “East Main Street”
and “East Main Street” will be recog-
nized.
VOICE COMMAND EXAMPLE:
SEARCH FOR A TRACK USING
ARTIST NAME OR ALBUM
NAME
When “Play Artist
play music, the first track is selected
randomly. For operations beyond play-
ing music, refer to the “AUDIO/VIDEO
SYSTEM” section of this manual.
Music recognition technology and
related data are provided by
Gracenote
®. Gracenote is the industry
standard in music recognition technol-
ogy and related content delivery. For
more information visit
www.gracenote.com.