reset TOYOTA CAMRY 2012 XV50 / 9.G Navigation Manual
[x] Cancel search | Manufacturer: TOYOTA, Model Year: 2012, Model line: CAMRY, Model: TOYOTA CAMRY 2012 XV50 / 9.GPages: 328, PDF Size: 5.67 MB
Page 92 of 328
92
3. ADDRESS BOOK
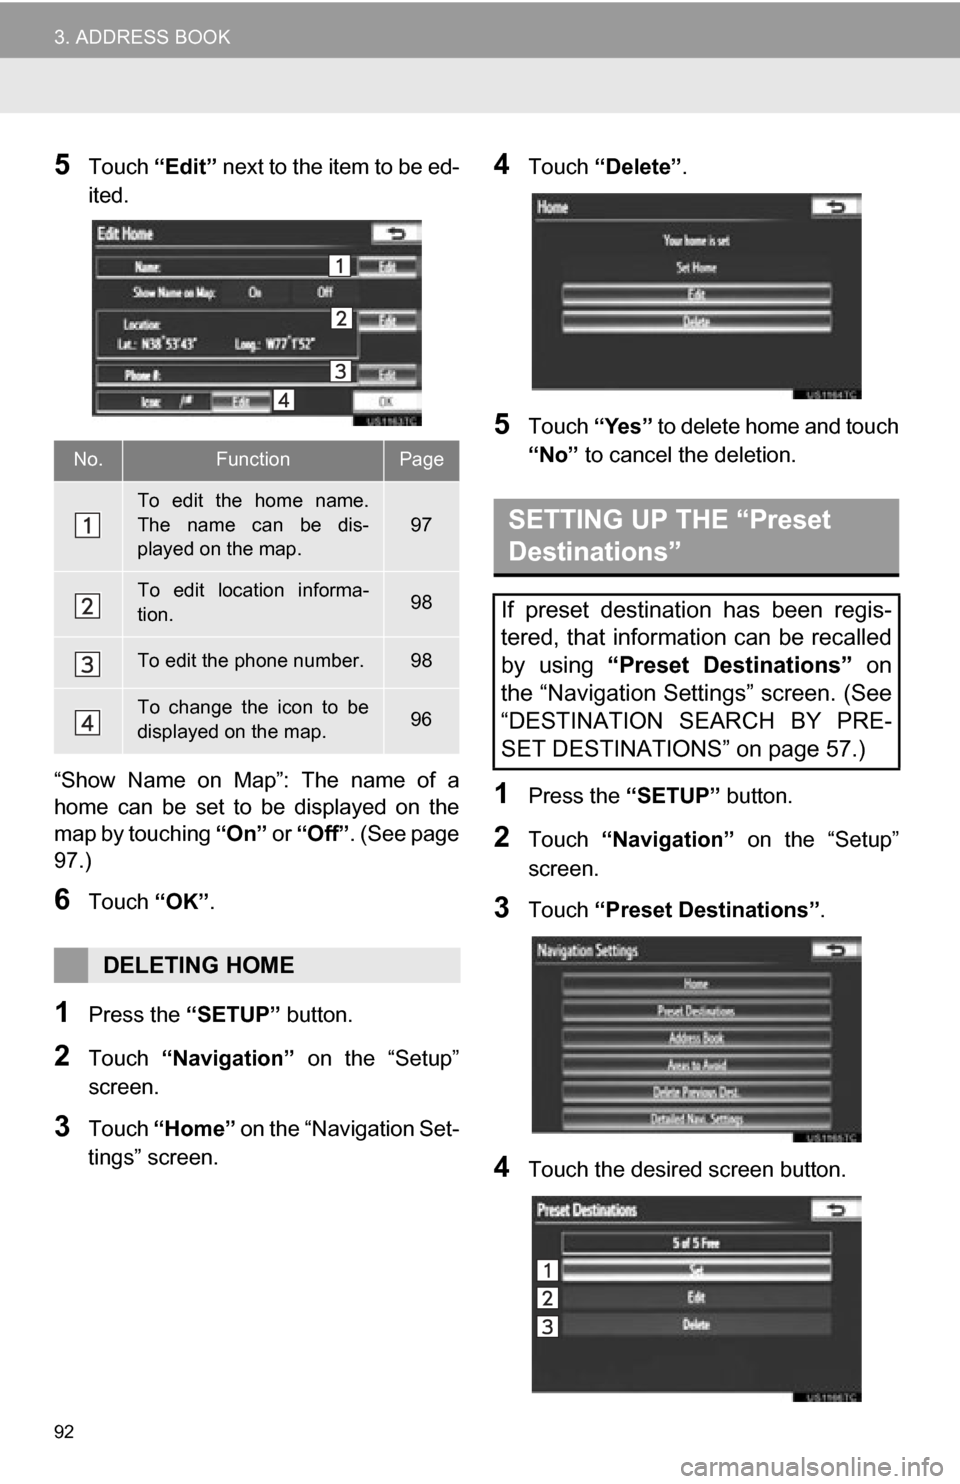
5Touch “Edit” next to the item to be ed-
ited.
“Show Name on Map”: The name of a
home can be set to be displayed on the
map by touching “On” or “Off” . (See page
97.)
6Touch “OK”.
1Press the “SETUP” button.
2Touch “Navigation” on the “Setup”
screen.
3Touch “Home” on the “Navigation Set-
tings” screen.
4Touch “Delete” .
5Touch “Yes” to delete home and touch
“No” to cancel the deletion.
1Press the “SETUP” button.
2Touch “Navigation” on the “Setup”
screen.
3Touch “Preset Destinations” .
4Touch the desired screen button.
No.FunctionPage
To edit the home name.
The name can be dis-
played on the map.
97
To edit location informa-
tion.98
To edit the phone number.98
To change the icon to be
displayed on the map.96
DELETING HOME
SETTING UP THE “Preset
Destinations”
If preset destination has been regis-
tered, that information can be recalled
by using “Preset Destinations” on
the “Navigation Settings” screen. (See
“DESTINATION SEARCH BY PRE-
SET DESTINATIONS” on page 57.)
Page 93 of 328
93
3. ADDRESS BOOK
3
NAVIGATION SYSTEM
1Press the “SETUP” button.
2Touch “Navigation” on the “Setup”
screen.
3Touch “Preset Destinations” on the
“Navigation Settings” screen.
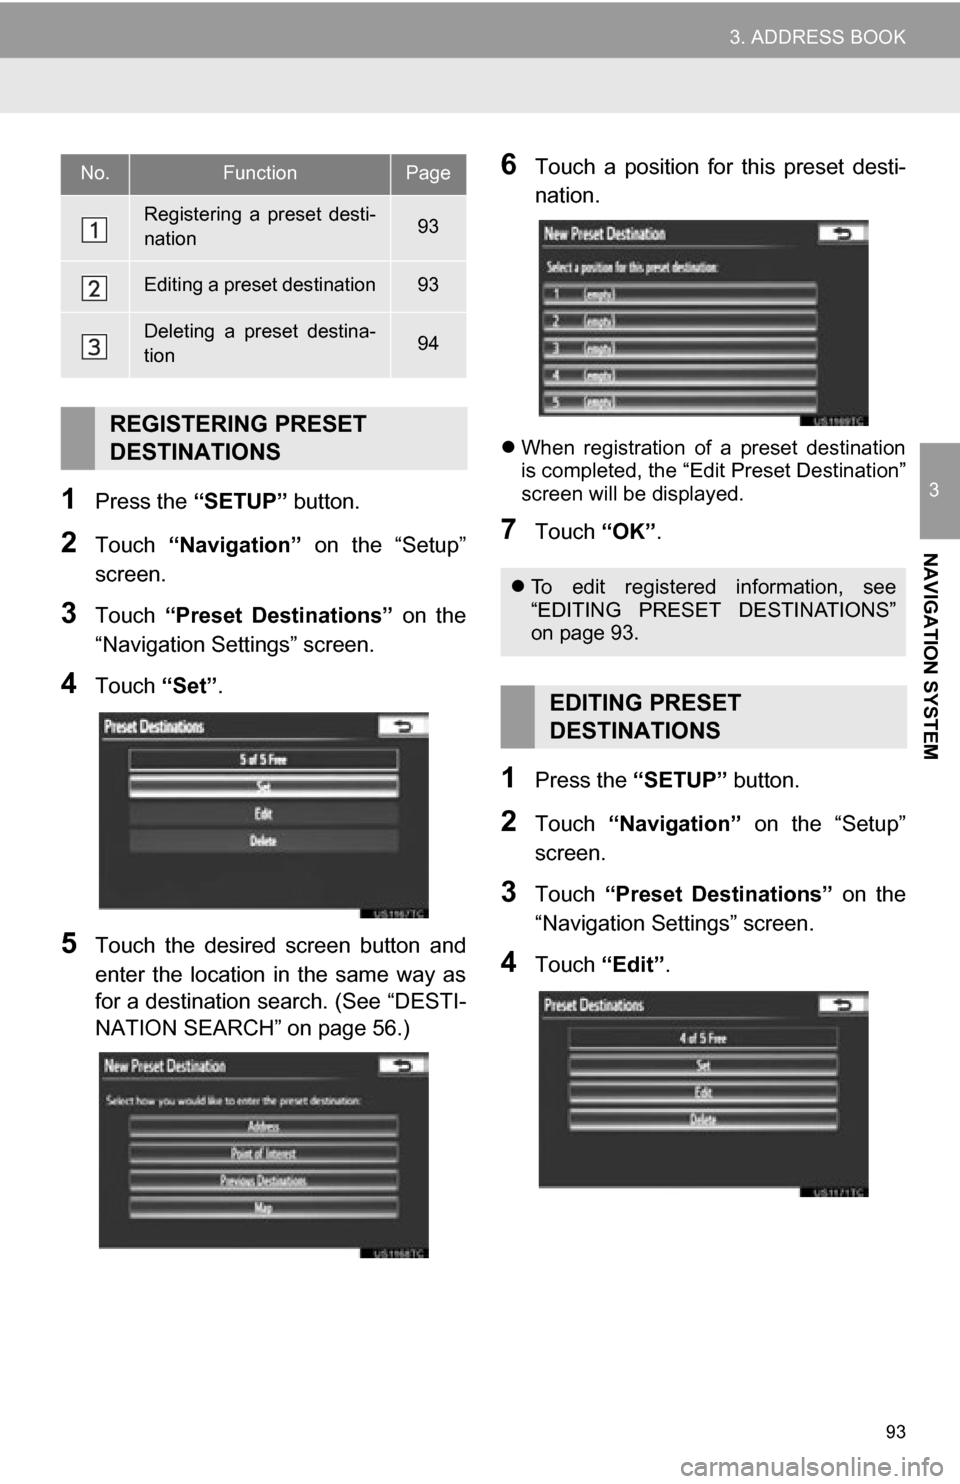
4Touch “Set”.
5Touch the desired screen button and
enter the location in the same way as
for a destination search. (See “DESTI-
NATION SEARCH” on page 56.)
6Touch a position for this preset desti-
nation.
When registration of a preset destination
is completed, the “Edit Preset Destination”
screen will be displayed.
7Touch “OK”.
1Press the “SETUP” button.
2Touch “Navigation” on the “Setup”
screen.
3Touch “Preset Destinations” on the
“Navigation Settings” screen.
4Touch “Edit”.
No.FunctionPage
Registering a preset desti-
nation93
Editing a preset destination93
Deleting a preset destina-
tion94
REGISTERING PRESET
DESTINATIONS
To edit registered information, see
“EDITING PRESET DESTINATIONS”
on page 93.
EDITING PRESET
DESTINATIONS
Page 94 of 328
94
3. ADDRESS BOOK
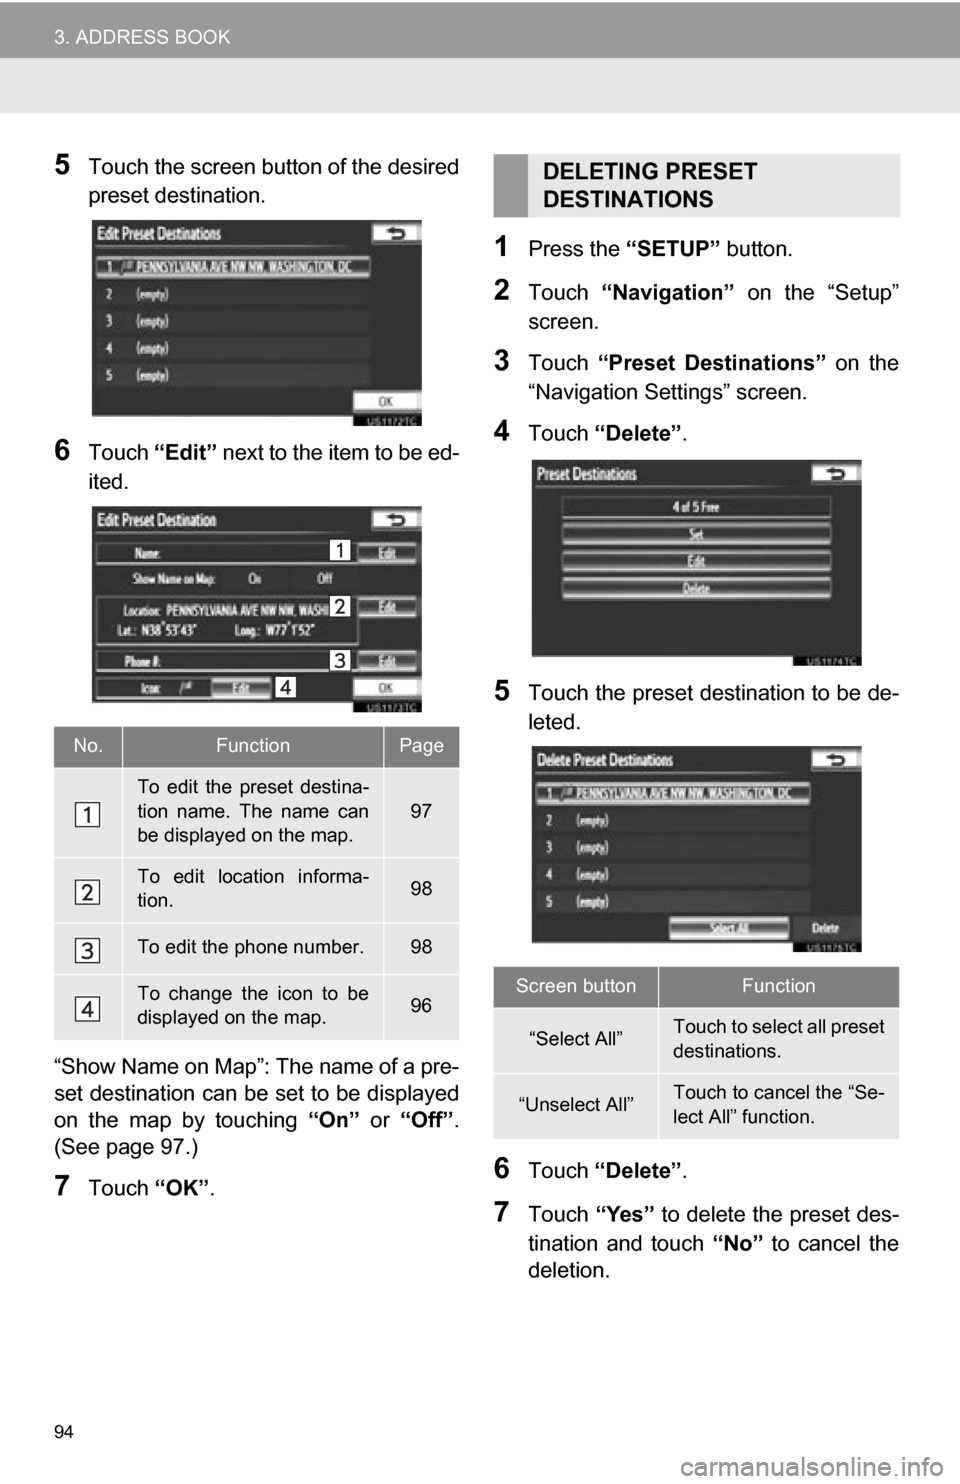
5Touch the screen button of the desired
preset destination.
6Touch “Edit” next to the item to be ed-
ited.
“Show Name on Map”: The name of a pre-
set destination can be set to be displayed
on the map by touching “On” or “Off” .
(See page 97.)
7Touch “OK”.
1Press the “SETUP” button.
2Touch “Navigation” on the “Setup”
screen.
3Touch “Preset Destinations” on the
“Navigation Settings” screen.
4Touch “Delete” .
5Touch the preset destination to be de-
leted.
6Touch “Delete” .
7Touch “Yes” to delete the preset des-
tination and touch “No” to cancel the
deletion.
No.FunctionPage
To edit the preset destina-
tion name. The name can
be displayed on the map.
97
To edit location informa-
tion.98
To edit the phone number.98
To change the icon to be
displayed on the map.96
DELETING PRESET
DESTINATIONS
Screen buttonFunction
“Select All”Touch to select all preset
destinations.
“Unselect All”Touch to cancel the “Se-
lect All” function.
Page 105 of 328
105
4. SETUP
3
NAVIGATION SYSTEM
To reset all setup items, touch “Default”.
1Press the “SETUP” button.
2Touch “Navigation” on the “Setup”
screen.
3Touch “Detailed Navi. Settings” on
the “Navigation Settings” screen.
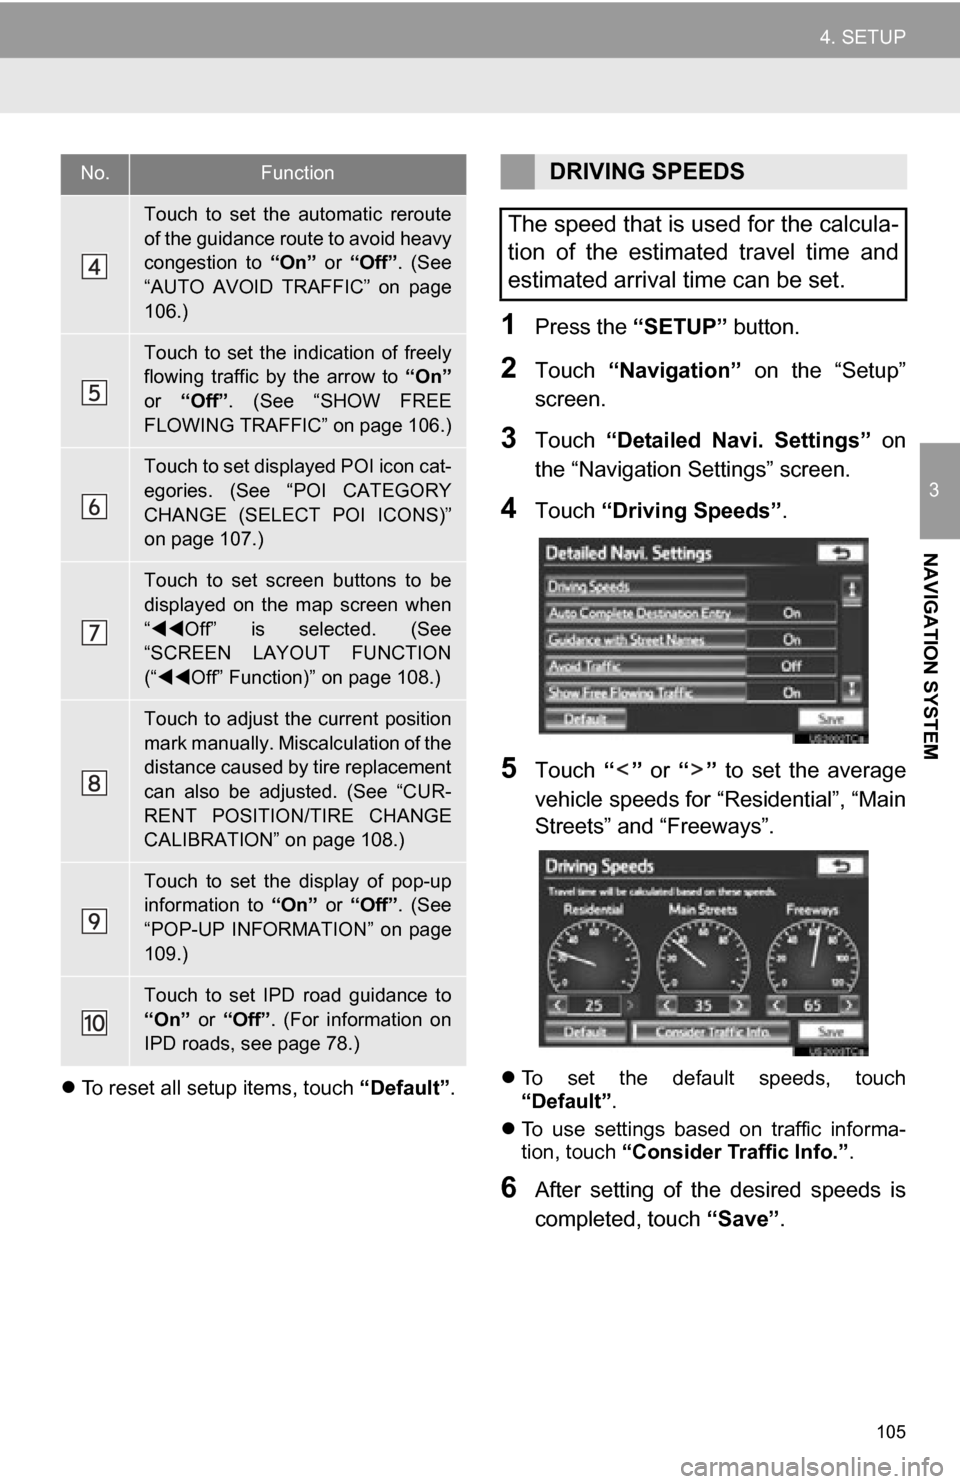
4Touch “Driving Speeds” .
5Touch “” or “” to set the average
vehicle speeds for “Residential”, “Main
Streets” and “Freeways”.
To set the default speeds, touch
“Default”.
To use settings based on traffic informa-
tion, touch “Consider Traffic Info.” .
6After setting of the desired speeds is
completed, touch “Save”.
Touch to set the automatic reroute
of the guidance route to avoid heavy
congestion to “On” or “Off”. (See
“AUTO AVOID TRAFFIC” on page
106.)
Touch to set the indication of freely
flowing traffic by the arrow to “On”
or “Off” . (See “SHOW FREE
FLOWING TRAFFIC” on page 106.)
Touch to set displayed POI icon cat-
egories. (See “POI CATEGORY
CHANGE (SELECT POI ICONS)”
on page 107.)
Touch to set screen buttons to be
displayed on the map screen when
“ Off” is selected. (See
“SCREEN LAYOUT FUNCTION
(“ Off” Function)” on page 108.)
Touch to adjust the current position
mark manually. Miscalculation of the
distance caused by tire replacement
can also be adjusted. (See “CUR-
RENT POSITION/TIRE CHANGE
CALIBRATION” on page 108.)
Touch to set the display of pop-up
information to “On” or “Off”. (See
“POP-UP INFORMATION” on page
109.)
Touch to set IPD road guidance to
“On” or “Off”. (For information on
IPD roads, see page 78.)
No.FunctionDRIVING SPEEDS
The speed that is used for the calcula-
tion of the estimated travel time and
estimated arrival time can be set.
Page 112 of 328
112
4. SETUP
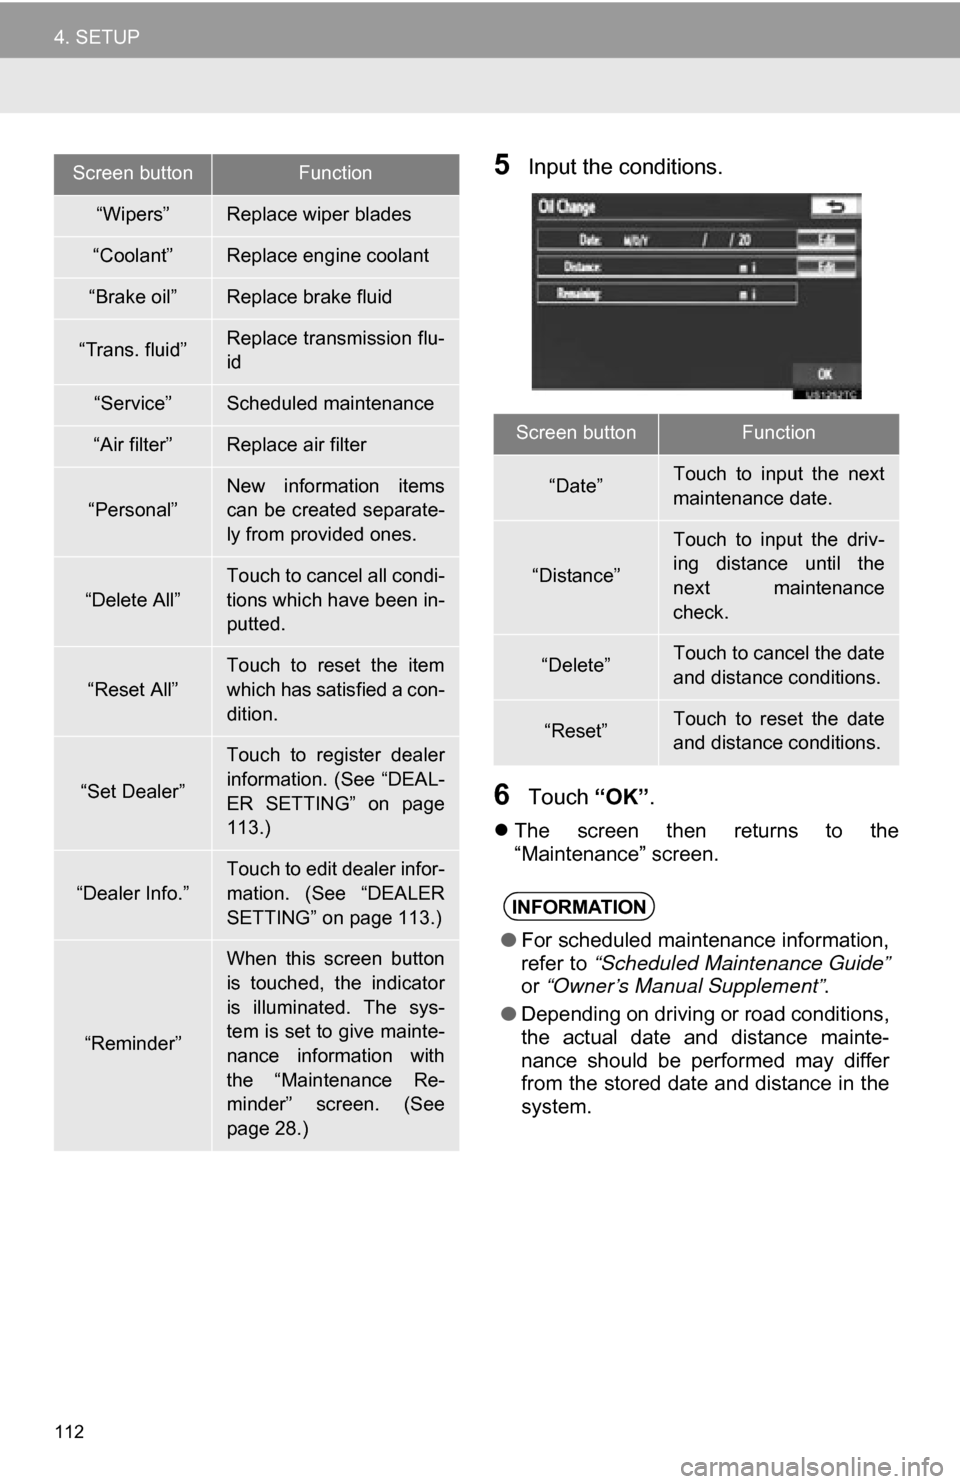
5Input the conditions.
6Touch “OK”.
The screen then returns to the
“Maintenance” screen.
“Wipers”Replace wiper blades
“Coolant”Replace engine coolant
“Brake oil”Replace brake fluid
“Trans. fluid”Replace transmission flu-
id
“Service”Scheduled maintenance
“Air filter”Replace air filter
“Personal”New information items
can be created separate-
ly from provided ones.
“Delete All”
Touch to cancel all condi-
tions which have been in-
putted.
“Reset All”
Touch to reset the item
which has satisfied a con-
dition.
“Set Dealer”
Touch to register dealer
information. (See “DEAL-
ER SETTING” on page
113.)
“Dealer Info.”
Touch to edit dealer infor-
mation. (See “DEALER
SETTING” on page 113.)
“Reminder”
When this screen button
is touched, the indicator
is illuminated. The sys-
tem is set to give mainte-
nance information with
the “Maintenance Re-
minder” screen. (See
page 28.)
Screen buttonFunction
Screen buttonFunction
“Date”Touch to input the next
maintenance date.
“Distance”
Touch to input the driv-
ing distance until the
next maintenance
check.
“Delete”Touch to cancel the date
and distance conditions.
“Reset”Touch to reset the date
and distance conditions.
INFORMATION
●For scheduled maintenance information,
refer to “Scheduled Maintenance Guide”
or “Owner’s Manual Supplement” .
● Depending on driving or road conditions,
the actual date and distance mainte-
nance should be performed may differ
from the stored date and distance in the
system.
Page 156 of 328
156
2. SETUP
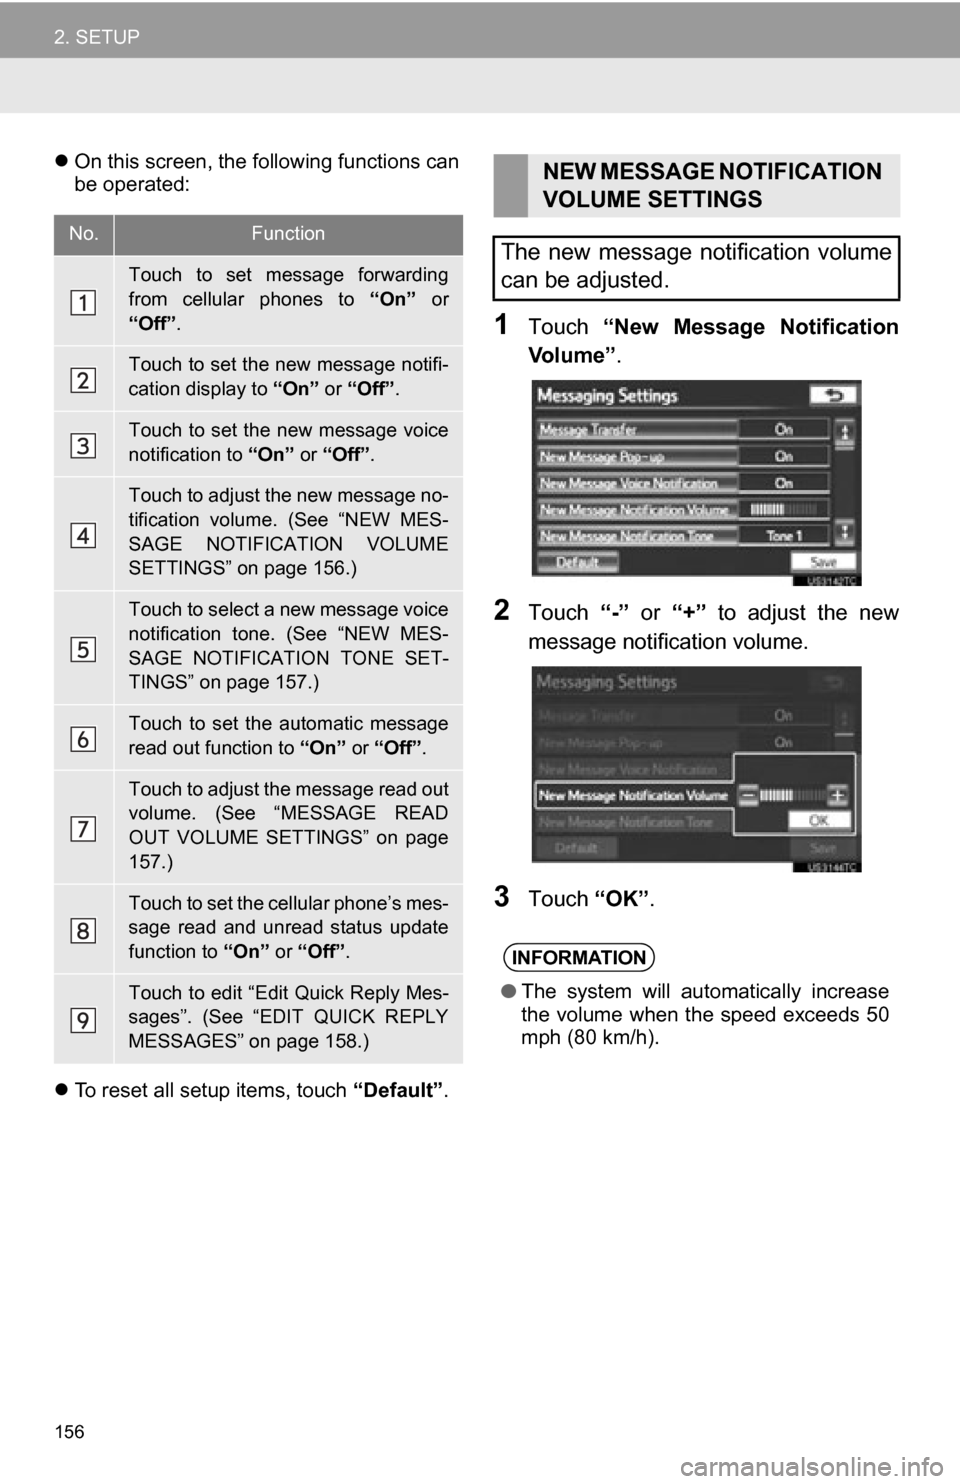
On this screen, the following functions can
be operated:
To reset all setup items, touch “Default”.
1Touch “New Message Notification
Vo l u m e ” .
2Touch “-” or “+” to adjust the new
message notification volume.
3Touch “OK”.
No.Function
Touch to set message forwarding
from cellular phones to “On” or
“Off” .
Touch to set the new message notifi-
cation display to “On” or “Off” .
Touch to set the new message voice
notification to “On” or “Off”.
Touch to adjust the new message no-
tification volume. (See “NEW MES-
SAGE NOTIFICATION VOLUME
SETTINGS” on page 156.)
Touch to select a new message voice
notification tone. (See “NEW MES-
SAGE NOTIFICATION TONE SET-
TINGS” on page 157.)
Touch to set the automatic message
read out function to “On” or “Off”.
Touch to adjust the message read out
volume. (See “MESSAGE READ
OUT VOLUME SETTINGS” on page
157.)
Touch to set the cellular phone’s mes-
sage read and unread status update
function to “On” or “Off” .
Touch to edit “Edit Quick Reply Mes-
sages”. (See “EDIT QUICK REPLY
MESSAGES” on page 158.)
NEW MESSAGE NOTIFICATION
VOLUME SETTINGS
The new message notification volume
can be adjusted.
INFORMATION
● The system will automatically increase
the volume when the speed exceeds 50
mph (80 km/h).
Page 159 of 328
159
2. SETUP
4
PHONE
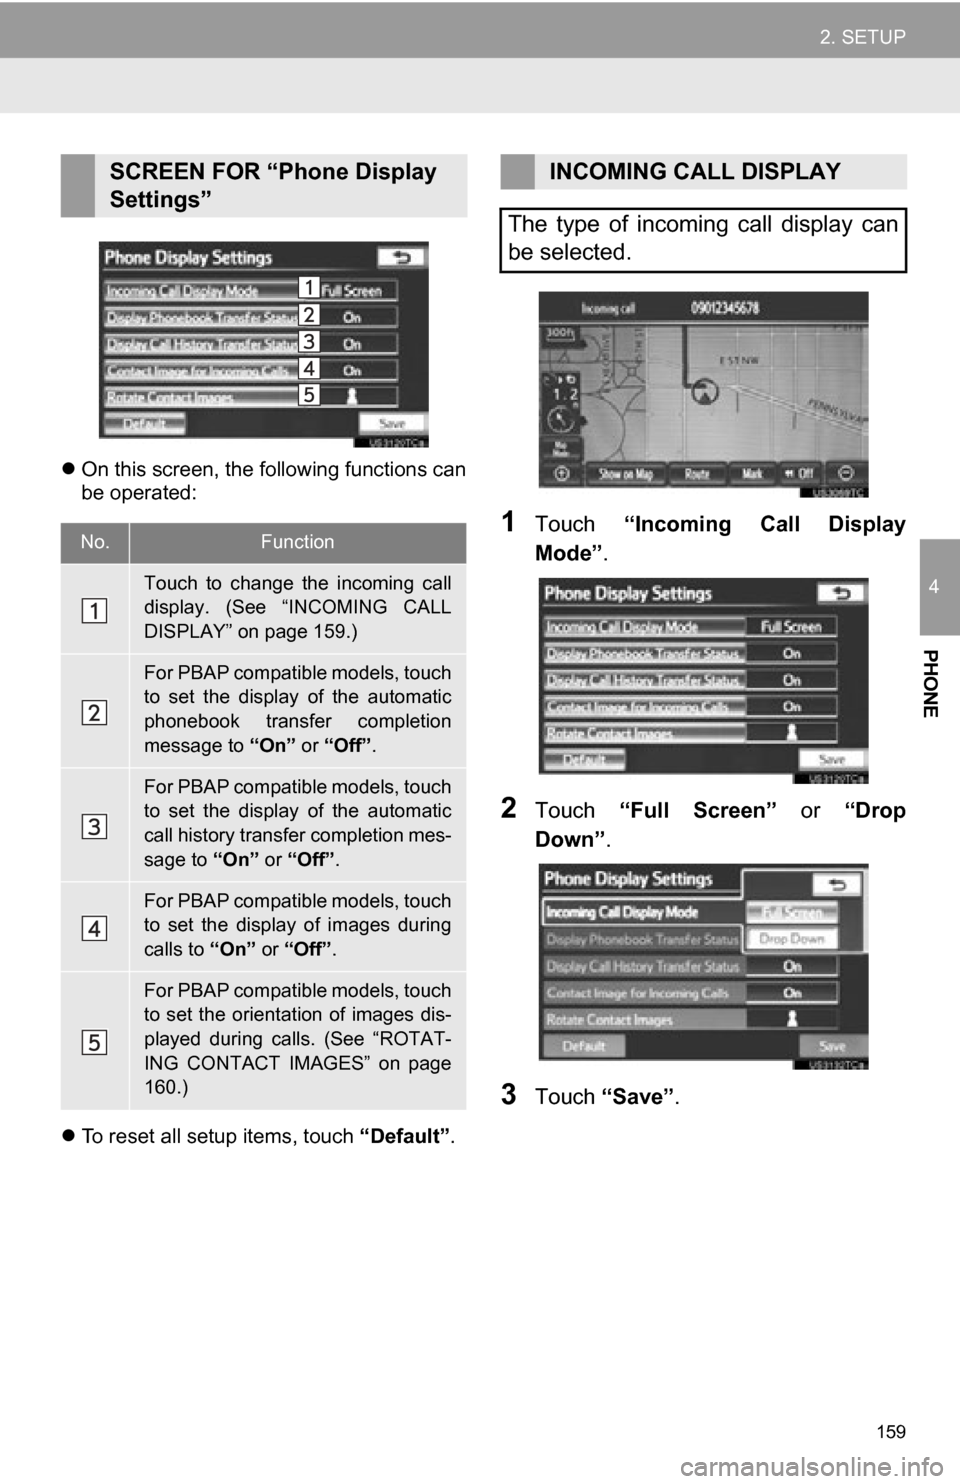
On this screen, the following functions can
be operated:
To reset all setup items, touch “Default”.
1Touch “Incoming Call Display
Mode” .
2Touch “Full Screen” or “Drop
Down”.
3Touch “Save” .
SCREEN FOR “Phone Display
Settings”
No.Function
Touch to change the incoming call
display. (See “INCOMING CALL
DISPLAY” on page 159.)
For PBAP compatible models, touch
to set the display of the automatic
phonebook transfer completion
message to “On” or “Off” .
For PBAP compatible models, touch
to set the display of the automatic
call history transfer completion mes-
sage to “On” or “Off”.
For PBAP compatible models, touch
to set the display of images during
calls to “On” or “Off” .
For PBAP compatible models, touch
to set the orientation of images dis-
played during calls. (See “ROTAT-
ING CONTACT IMAGES” on page
160.)
INCOMING CALL DISPLAY
The type of incoming call display can
be selected.
Page 172 of 328
172
1. QUICK REFERENCE .................. 174
2. SOME BASICS ............................ 176
VOICE COMMAND SYSTEM .............. 176
AUDIO SPLIT SCREEN DISPLAY ....... 176
TURNING THE SYSTEM ON AND OFF..................................... 177
SWITCHING BETWEEN FUNCTIONS ...................................... 177
DSP CONTROL ................................... 177
TONE AND BALANCE ......................... 178
SELECTING SCREEN SIZE ................ 179
DVD PLAYER....................................... 179
AUX PORT ........................................... 180
USB PORT ........................................... 180
3. RADIO OPERATION ... ................ 181
LISTENING TO THE RADIO ................ 181
PRESETTING A STATION .................. 181
SELECTING A STATION ..................... 182
RADIO BROADCAST
DATA SYSTEM ................................. 182
TRAFFIC ANNOUNCEMENT .............. 183
4. HD Radio™ TECHNOLOGY INFORMATION ......................... 184
USING HD Radio™ TECHNOLOGY.... 184
AVAILABLE HD Radio™
TECHNOLOGY.................................. 185
TROUBLESHOOTING GUIDE ............. 186
1AUDIO/VIDEO SYSTEM
OPERATION
5
AUDIO/VIDEO SYSTEM
Page 173 of 328
5
173
1
2
3
4
5
6
7
8
9
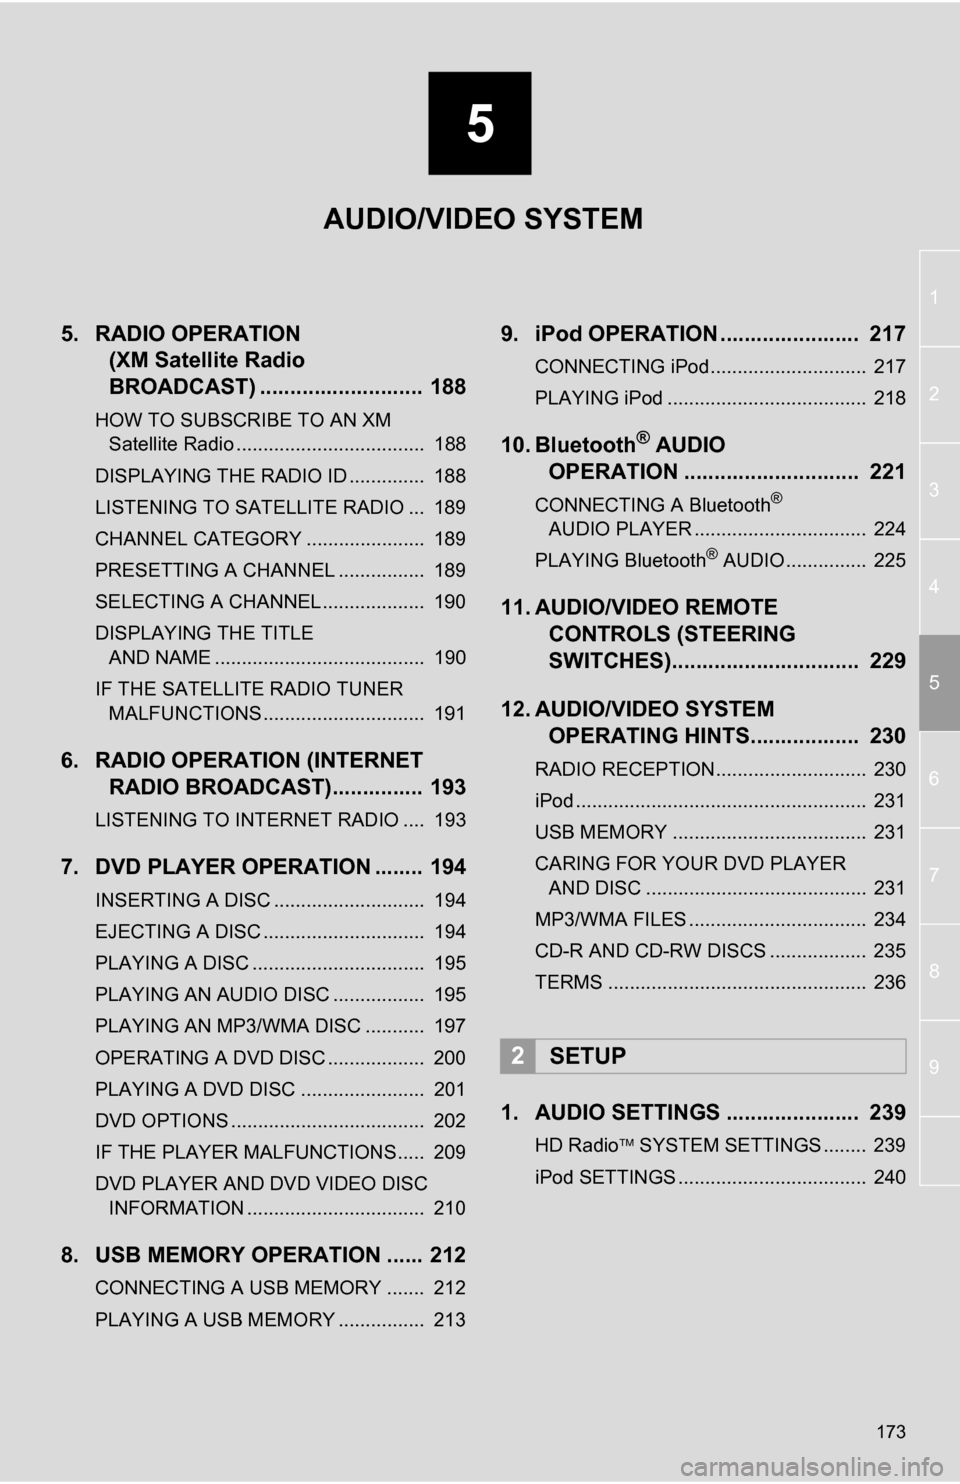
5. RADIO OPERATION(XM Satellite Radio
BROADCAST) ........... ................ 188
HOW TO SUBSCRIBE TO AN XM
Satellite Radio ................................... 188
DISPLAYING THE RADIO ID .............. 188
LISTENING TO SATELLITE RADIO ... 189
CHANNEL CATEGORY ...................... 189
PRESETTING A CHANNEL ................ 189
SELECTING A CHANNEL ................... 190
DISPLAYING THE TITLE AND NAME ....................................... 190
IF THE SATELLITE RADIO TUNER MALFUNCTIONS .............................. 191
6. RADIO OPERATION (INTERNET RADIO BROADCAST)............... 193
LISTENING TO INTERNET RADIO .... 193
7. DVD PLAYER OPERATION ........ 194
INSERTING A DISC ............................ 194
EJECTING A DISC .............................. 194
PLAYING A DISC ................................ 195
PLAYING AN AUDIO DISC ................. 195
PLAYING AN MP3/WMA DISC ........... 197
OPERATING A DVD DISC .................. 200
PLAYING A DVD DISC ....................... 201
DVD OPTIONS .................................... 202
IF THE PLAYER MALFUNCTIONS..... 209
DVD PLAYER AND DVD VIDEO DISC
INFORMATION ................................. 210
8. USB MEMORY OPERATION ...... 212
CONNECTING A USB MEMORY ....... 212
PLAYING A USB MEMORY ................ 213
9. iPod OPERATION ....................... 217
CONNECTING iPod............................. 217
PLAYING iPod ..................................... 218
10. Bluetooth® AUDIO
OPERATION ............................. 221
CONNECTING A Bluetooth®
AUDIO PLAYER ................................ 224
PLAYING Bluetooth
® AUDIO ............... 225
11. AUDIO/VIDEO REMOTE CONTROLS (STEERING
SWITCHES)............................... 229
12. AUDIO/VIDEO SYSTEM OPERATING HINTS.................. 230
RADIO RECEPTION............................ 230
iPod ...................................................... 231
USB MEMORY .................................... 231
CARING FOR YOUR DVD PLAYER
AND DISC ......................................... 231
MP3/WMA FILES ................................. 234
CD-R AND CD-RW DISCS .................. 235
TERMS ................................................ 236
1. AUDIO SETTINGS ...................... 239
HD Radio SYSTEM SETTINGS ........ 239
iPod SETTINGS ................................... 240
2SETUP
AUDIO/VIDEO SYSTEM
Page 174 of 328
174
1. AUDIO/VIDEO SYSTEM OPERATION
1. QUICK REFERENCE
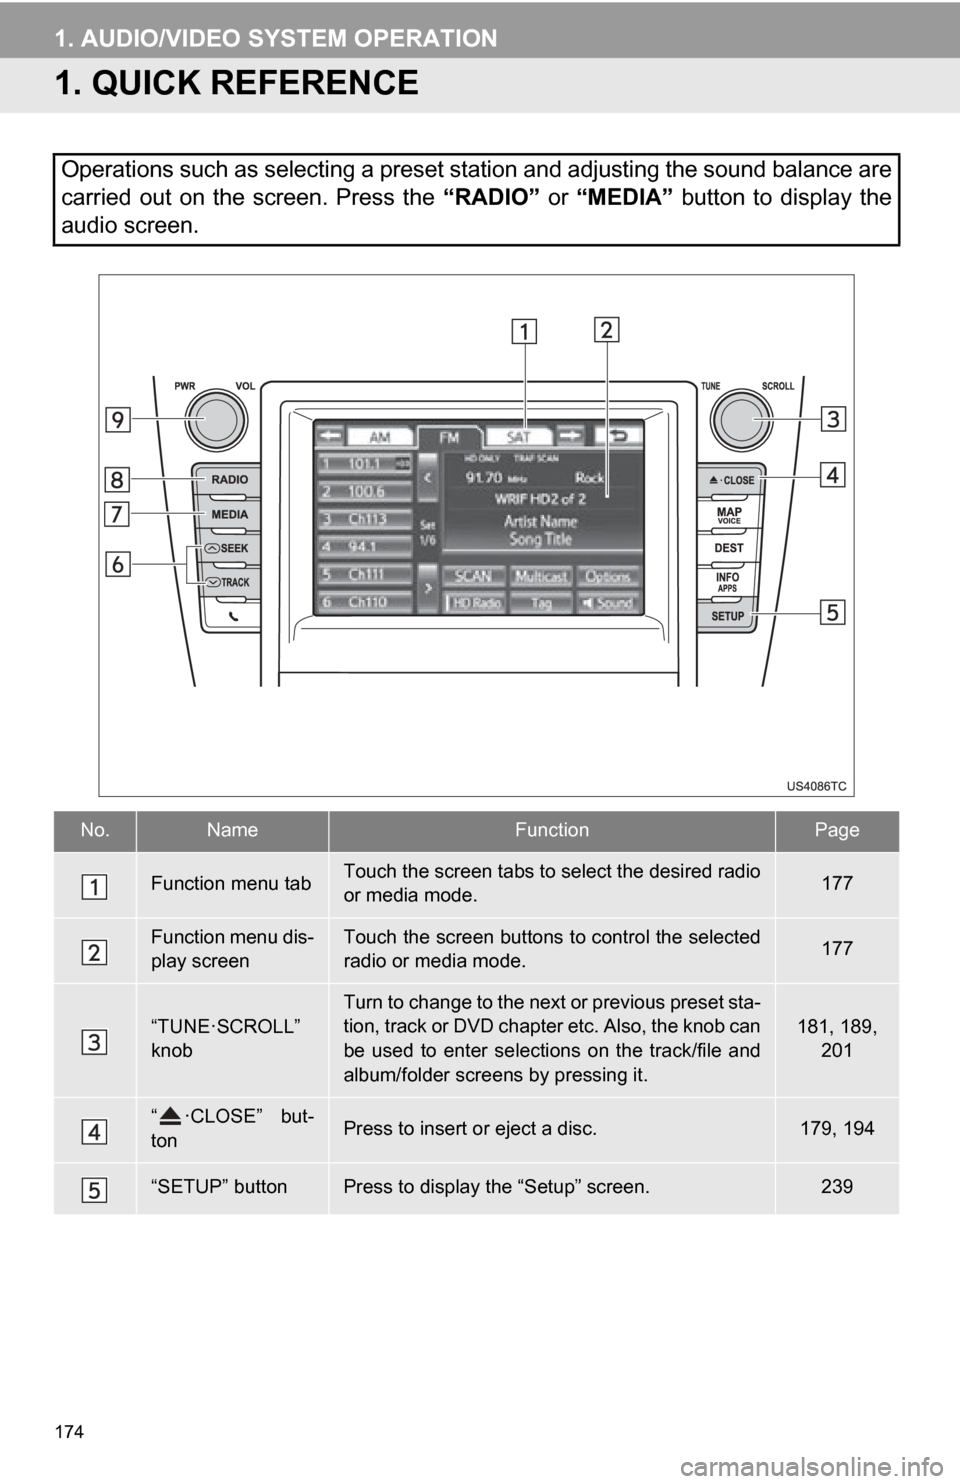
Operations such as selecting a preset station and adjusting the sound balance are
carried out on the screen. Press the “RADIO” or “MEDIA” button to display the
audio screen.
No.NameFunctionPage
Function menu tabTouch the screen tabs to select the desired radio
or media mode.177
Function menu dis-
play screenTouch the screen buttons to control the selected
radio or media mode.177
“TUNE·SCROLL”
knobTurn to change to the next or previous preset sta-
tion, track or DVD chapter etc. Also, the knob can
be used to enter selections on the track/file and
album/folder screens by pressing it.181, 189,
201
“ ·CLOSE” but-
tonPress to insert or eject a disc.179, 194
“SETUP” buttonPress to display the “Setup” screen.239