key TOYOTA CAMRY 2012 XV50 / 9.G Navigation Manual
[x] Cancel search | Manufacturer: TOYOTA, Model Year: 2012, Model line: CAMRY, Model: TOYOTA CAMRY 2012 XV50 / 9.GPages: 328, PDF Size: 5.67 MB
Page 176 of 328
176
1. AUDIO/VIDEO SYSTEM OPERATION
2. SOME BASICS
This section describes some of the ba-
sic features of the audio/video system.
Some information may not pertain to
your system.
Vehicles with a smart key system
Your audio/video system works when
the “POWER” <“ENGINE START
STOP”> switch is turned to ACCES-
SORY or ON
Vehicles without a smart key system
Your audio/video system works when
the engine switch is turned to the
“ACC” or “ON” position.
CAUTION
●For vehicles sold in U.S.A. and Canada:
Part 15 of the FCC Rules
FCC Warning: Changes or modifications
in construction not expressly approved
by the party responsible for compliance
could void the user’s authority to operate
the equipment. Radio frequency expo-
sure. This device is approved for Mobile
Application only and, to comply with
applicable FCC radio frequency expo-
sure regulations, must be used with a
distance of at least 7.9 in. (20 cm)
between the antenna and the body of
any person at all time during use.
● Laser products
• Do not take this unit apart or attempt to
make any changes yourself. This is an
intricate unit that uses a laser pickup to
retrieve information from the surface of
compact discs. The laser is carefully
shielded so that its rays remain inside
the cabinet. Therefore, never try to dis-
assemble the player or alter any of its
parts since you may be exposed to
laser rays and dangerous voltages.
• This product utilizes a laser. Use of controls or adjustments or perfor-
mance of procedures other than those
specified herein may result in hazard-
ous radiation exposure.
NOTICE
● To prevent the 12-volt battery from being
discharged, do not leave the audio/video
system on longer than necessary when
the hybrid system is off
VOICE COMMAND SYSTEM
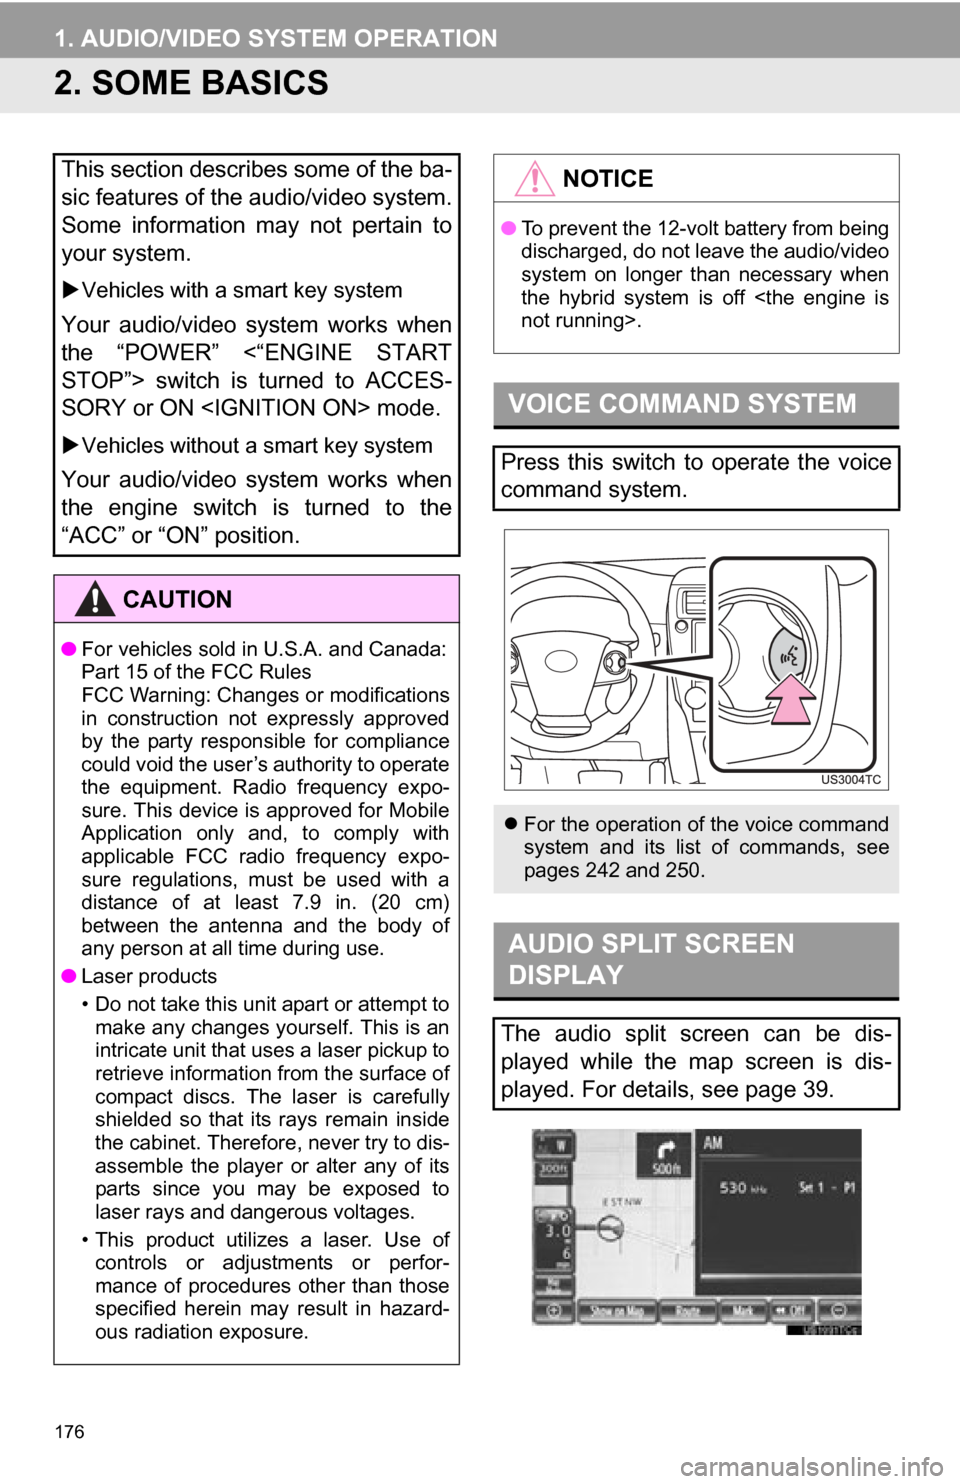
Press this switch to operate the voice
command system.
For the operation of the voice command
system and its list of commands, see
pages 242 and 250.
AUDIO SPLIT SCREEN
DISPLAY
The audio split screen can be dis-
played while the map screen is dis-
played. For details, see page 39.
Page 194 of 328
194
1. AUDIO/VIDEO SYSTEM OPERATION
7. DVD PLAYER OPERATION
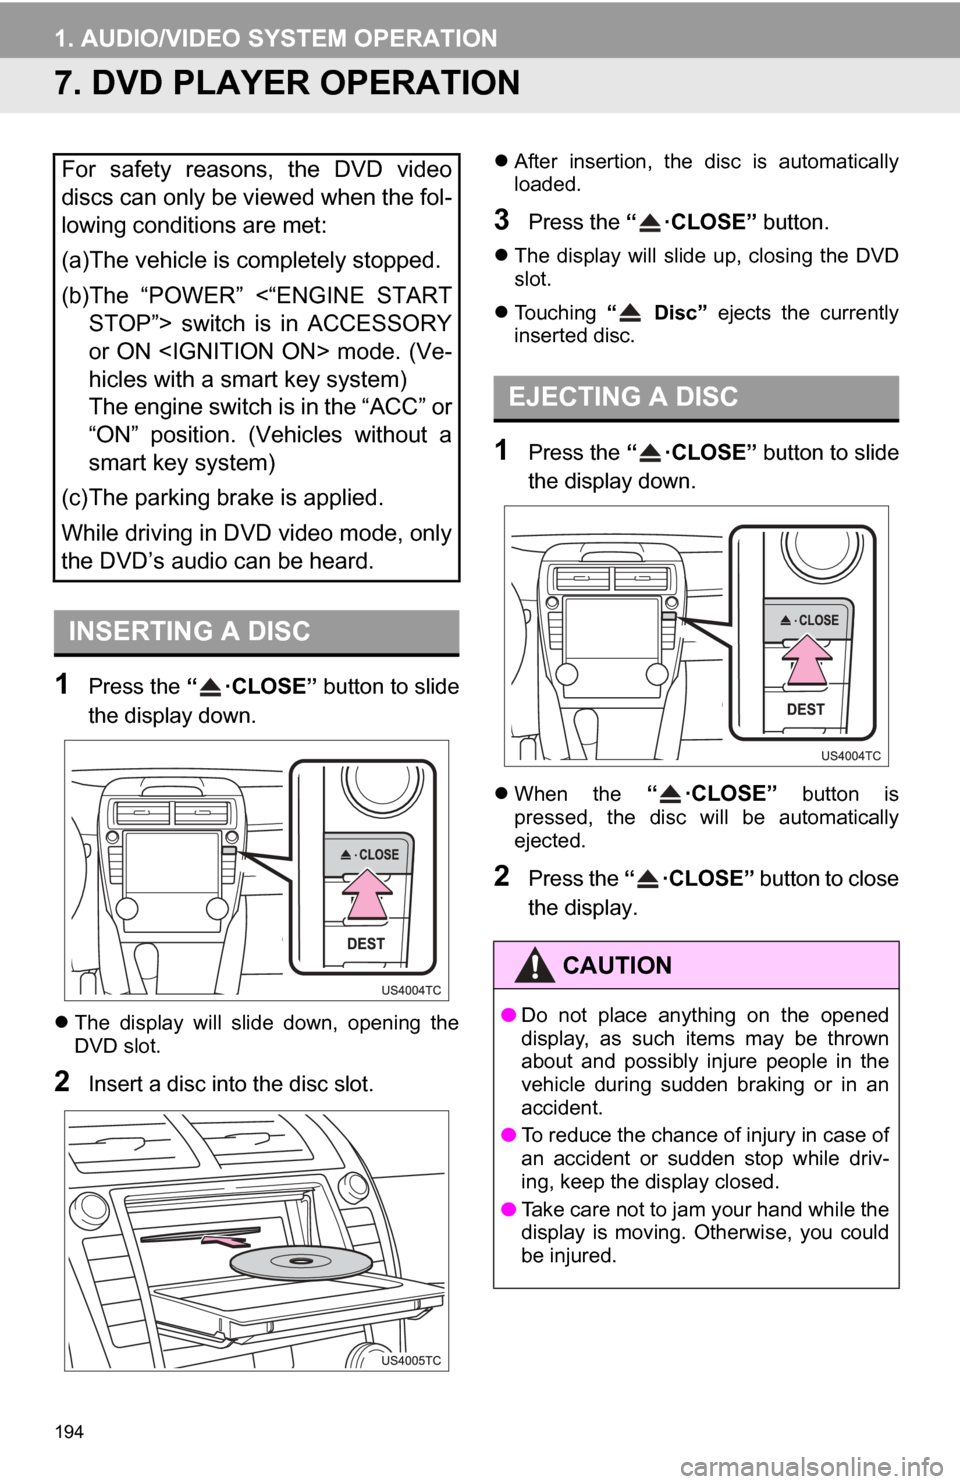
1Press the “ ·CLOSE” button to slide
the display down.
The display will slide down, opening the
DVD slot.
2Insert a disc into the disc slot.
After insertion, the disc is automatically
loaded.
3Press the “ ·CLOSE” button.
The display will slide up, closing the DVD
slot.
Touching “ Disc” ejects the currently
inserted disc.
1Press the “ ·CLOSE” button to slide
the display down.
When the “ ·CLOSE” button is
pressed, the disc will be automatically
ejected.
2Press the “ ·CLOSE” button to close
the display.
For safety reasons, the DVD video
discs can only be viewed when the fol-
lowing conditions are met:
(a)The vehicle is completely stopped.
(b)The “POWER” <“ENGINE START STOP”> switch is in ACCESSORY
or ON
hicles with a smart key system)
The engine switch is in the “ACC” or
“ON” position. (Vehicles without a
smart key system)
(c)The parking brake is applied.
While driving in DVD video mode, only
the DVD’s audio can be heard.
INSERTING A DISC
EJECTING A DISC
CAUTION
● Do not place anything on the opened
display, as such items may be thrown
about and possibly injure people in the
vehicle during sudden braking or in an
accident.
● To reduce the chance of injury in case of
an accident or sudden stop while driv-
ing, keep the display closed.
● Take care not to jam your hand while the
display is moving. Otherwise, you could
be injured.
Page 201 of 328
201
1. AUDIO/VIDEO SYSTEM OPERATION
5
AUDIO/VIDEO SYSTEM
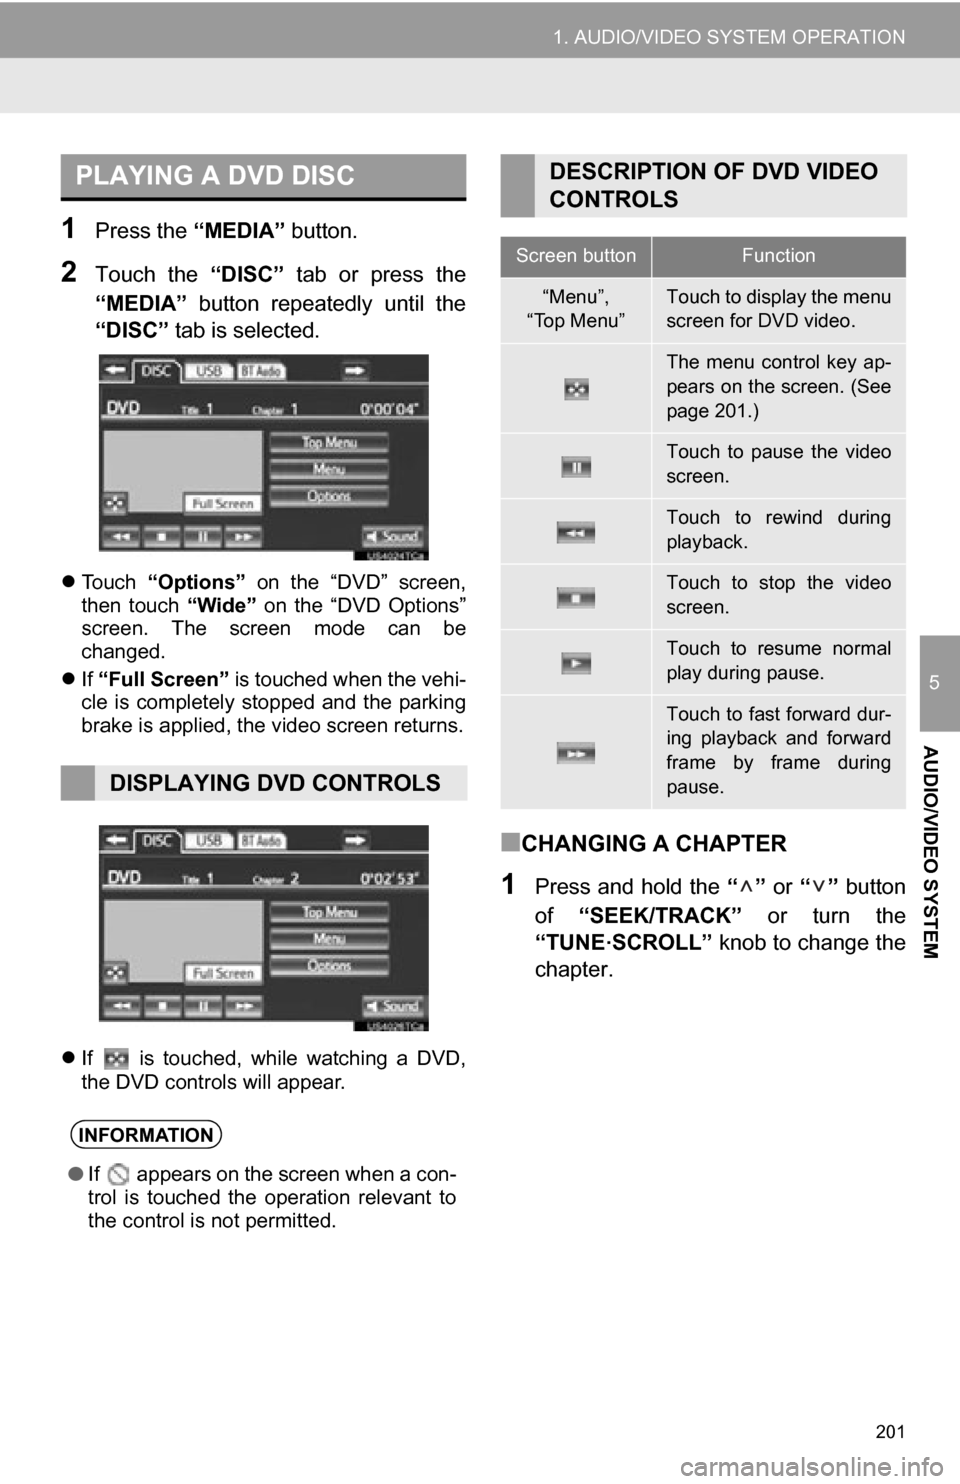
1Press the “MEDIA” button.
2Touch the “DISC” tab or press the
“MEDIA” button repeatedly until the
“DISC” tab is selected.
Touch “Options” on the “DVD” screen,
then touch “Wide” on the “DVD Options”
screen. The screen mode can be
changed.
If “Full Screen” is touched when the vehi-
cle is completely stopped and the parking
brake is applied, the video screen returns.
If is touched, while watching a DVD,
the DVD controls will appear.
■CHANGING A CHAPTER
1Press and hold the “” or “” button
of “SEEK/TRACK” or turn the
“TUNE
·SCROLL” knob to change the
chapter.
PLAYING A DVD DISC
DISPLAYING DVD CONTROLS
INFORMATION
● If appears on the screen when a con-
trol is touched the operation relevant to
the control is not permitted.
DESCRIPTION OF DVD VIDEO
CONTROLS
Screen buttonFunction
“Menu”,
“Top Menu”Touch to display the menu
screen for DVD video.
The menu control key ap-
pears on the screen. (See
page 201.)
Touch to pause the video
screen.
Touch to rewind during
playback.
Touch to stop the video
screen.
Touch to resume normal
play during pause.
Touch to fast forward dur-
ing playback and forward
frame by frame during
pause.
Page 205 of 328
205
1. AUDIO/VIDEO SYSTEM OPERATION
5
AUDIO/VIDEO SYSTEM
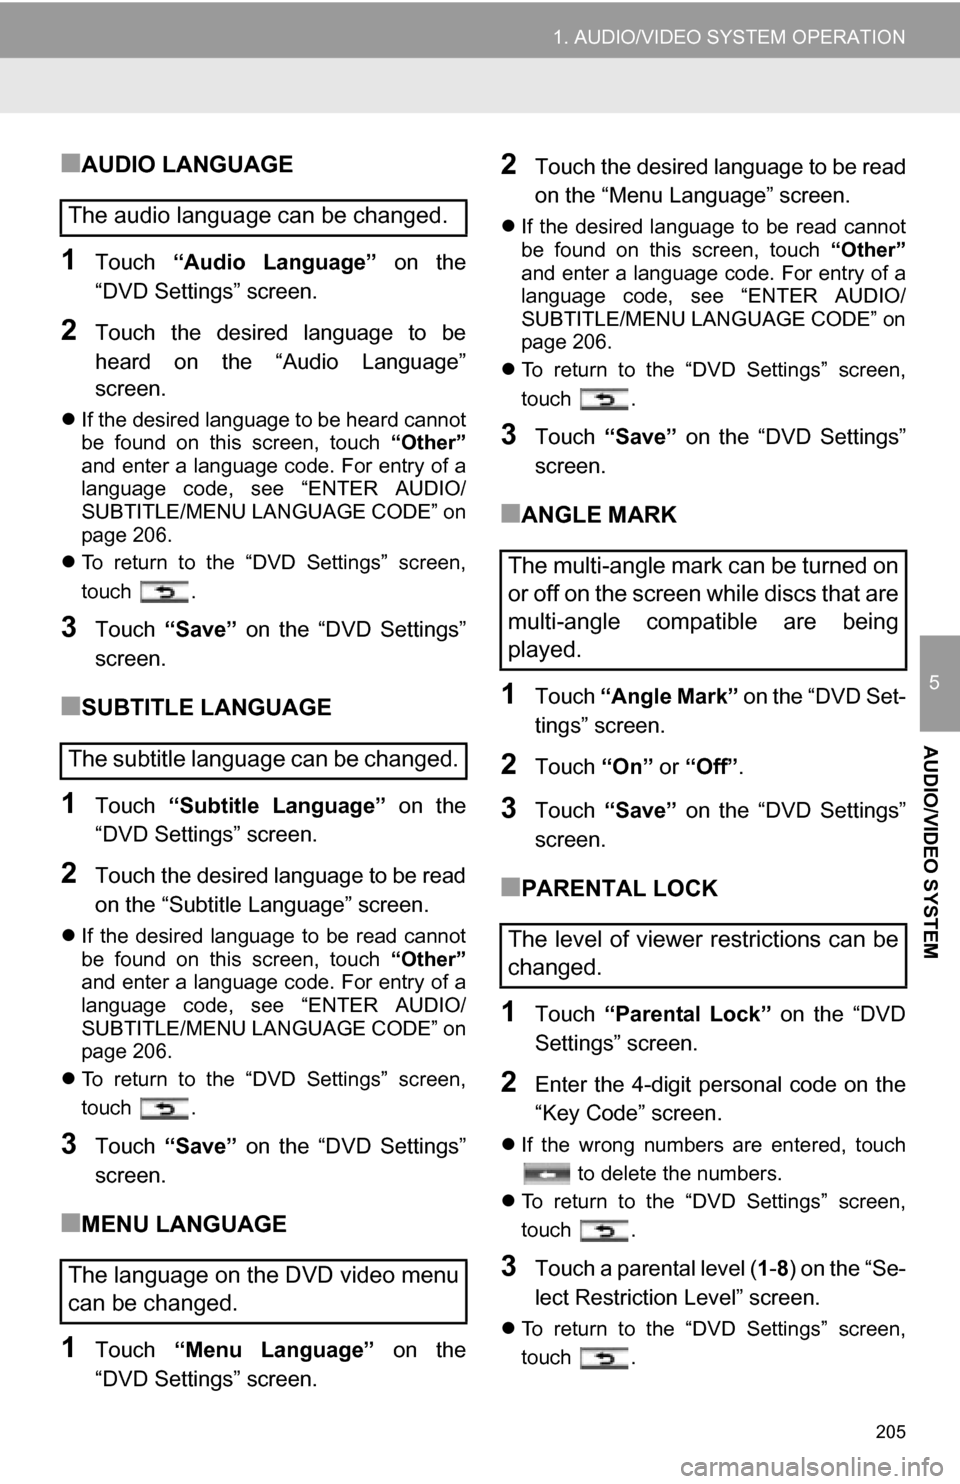
■AUDIO LANGUAGE
1Touch “Audio Language” on the
“DVD Settings” screen.
2Touch the desired language to be
heard on the “Audio Language”
screen.
If the desired language to be heard cannot
be found on this screen, touch “Other”
and enter a language code. For entry of a
language code, see “ENTER AUDIO/
SUBTITLE/MENU LANGUAGE CODE” on
page 206.
To return to the “DVD Settings” screen,
touch .
3Touch “Save” on the “DVD Settings”
screen.
■SUBTITLE LANGUAGE
1Touch “Subtitle Language” on the
“DVD Settings” screen.
2Touch the desired language to be read
on the “Subtitle Language” screen.
If the desired language to be read cannot
be found on this screen, touch “Other”
and enter a language code. For entry of a
language code, see “ENTER AUDIO/
SUBTITLE/MENU LANGUAGE CODE” on
page 206.
To return to the “DVD Settings” screen,
touch .
3Touch “Save” on the “DVD Settings”
screen.
■MENU LANGUAGE
1Touch “Menu Language” on the
“DVD Settings” screen.
2Touch the desired language to be read
on the “Menu Language” screen.
If the desired language to be read cannot
be found on this screen, touch “Other”
and enter a language code. For entry of a
language code, see “ENTER AUDIO/
SUBTITLE/MENU LANGUAGE CODE” on
page 206.
To return to the “DVD Settings” screen,
touch .
3Touch “Save” on the “DVD Settings”
screen.
■ANGLE MARK
1Touch “Angle Mark” on the “DVD Set-
tings” screen.
2Touch “On” or “Off” .
3Touch “Save” on the “DVD Settings”
screen.
■PARENTAL LOCK
1Touch “Parental Lock” on the “DVD
Settings” screen.
2Enter the 4-digit personal code on the
“Key Code” screen.
If the wrong numbers are entered, touch
to delete the numbers.
To return to the “DVD Settings” screen,
touch .
3Touch a parental level ( 1-8 ) on the “Se-
lect Restriction Level” screen.
To return to the “DVD Settings” screen,
touch .
The audio language can be changed.
The subtitle language can be changed.
The language on the DVD video menu
can be changed.
The multi-angle mark can be turned on
or off on the screen while discs that are
multi-angle compatible are being
played.
The level of viewer restrictions can be
changed.
Page 224 of 328
224
1. AUDIO/VIDEO SYSTEM OPERATION
The portable player will be automatically
connected under the following conditions:
Vehicles with a smart key system
• The “POWER” <“ENGINE START
STOP”> switch is in either ACCESSORY
or ON
• When “Bluetooth* Power” is switched
from off to on.
• When the portable player is discon- nected for some reason.
Vehicles without a smart key system
• The engine switch is in either the “ACC”
or “ON” position.
• When “Bluetooth* Power” is switched
from off to on.
• When the portable player is discon- nected for some reason.
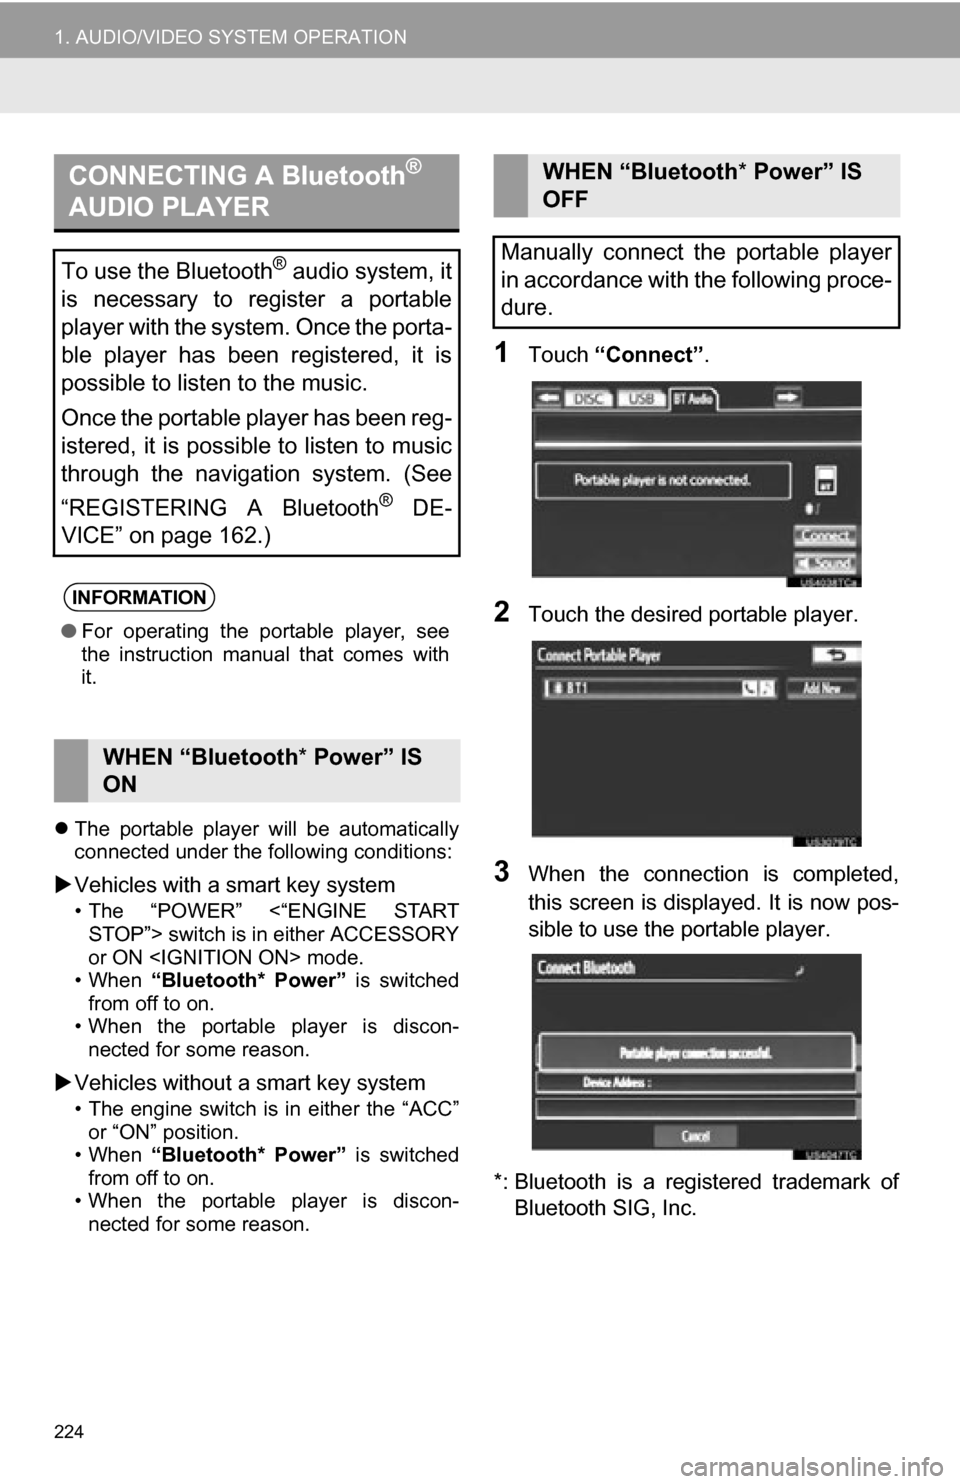
1Touch “Connect” .
2Touch the desired portable player.
3When the connection is completed,
this screen is displayed. It is now pos-
sible to use the portable player.
*: Bluetooth is a registered trademark of Bluetooth SIG, Inc.
CONNECTING A Bluetooth®
AUDIO PLAYER
To use the Bluetooth® audio system, it
is necessary to register a portable
player with the system. Once the porta-
ble player has been registered, it is
possible to listen to the music.
Once the portable player has been reg-
istered, it is possible to listen to music
through the navigation system. (See
“REGISTERING A Bluetooth
® DE-
VICE” on page 162.)
INFORMATION
● For operating the portable player, see
the instruction manual that comes with
it.
WHEN “Bluetooth * Power” IS
ON
WHEN “Bluetooth * Power” IS
OFF
Manually connect the portable player
in accordance with the following proce-
dure.
Page 225 of 328
225
1. AUDIO/VIDEO SYSTEM OPERATION
5
AUDIO/VIDEO SYSTEM
If the Bluetooth® device is disconnected
on purpose, such as it was turned off, this
does not happen. Reconnect the portable
player manually.
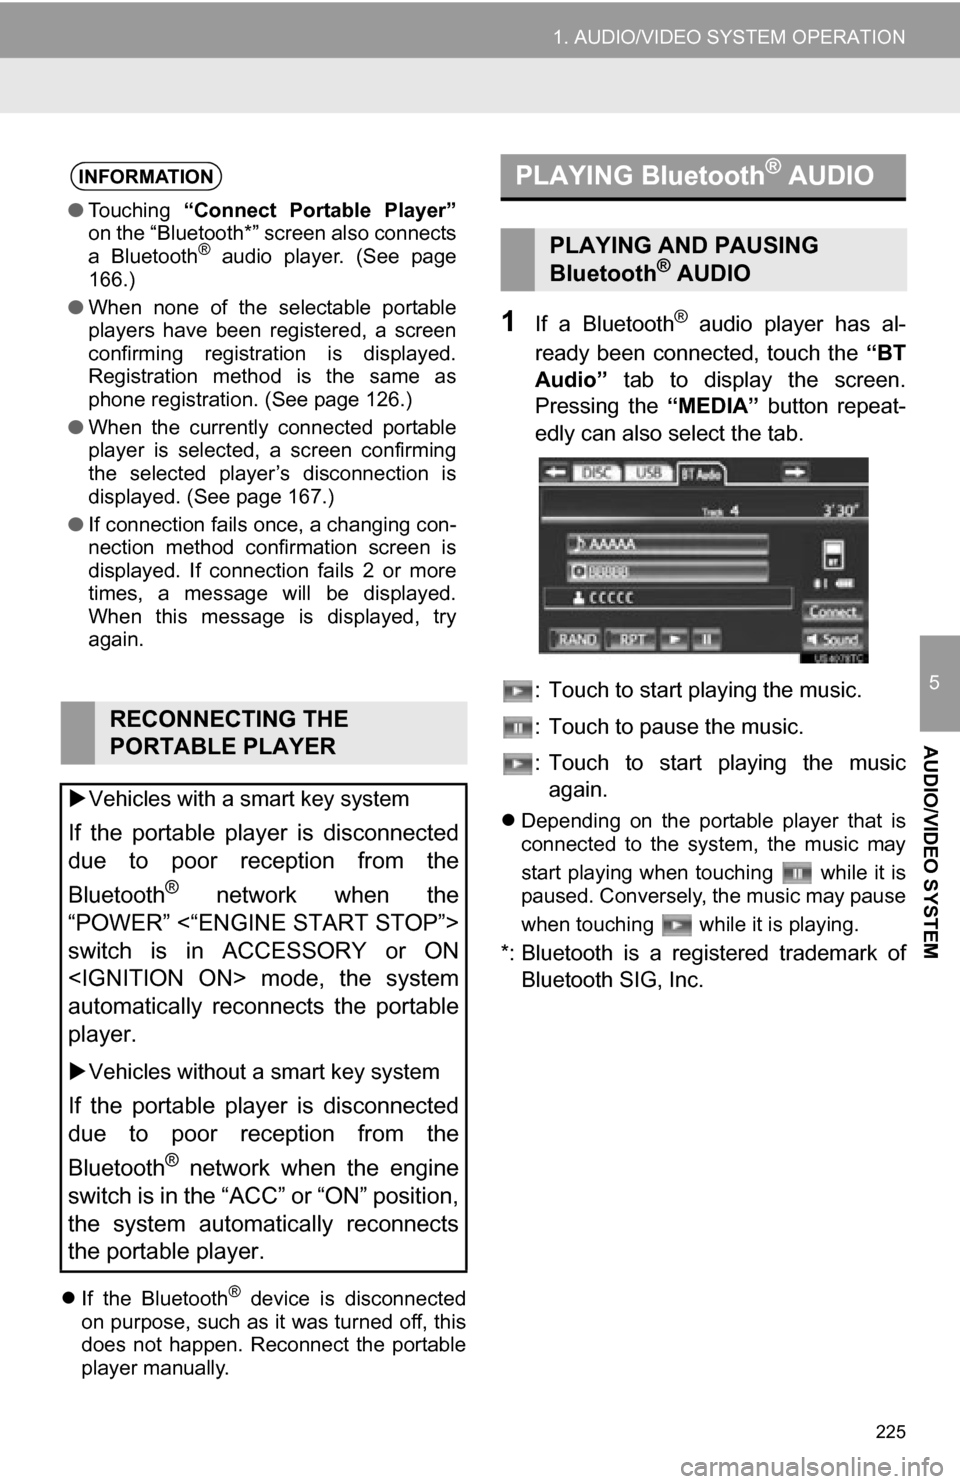
1If a Bluetooth® audio player has al-
ready been connected, touch the “BT
Audio” tab to display the screen.
Pressing the “MEDIA” button repeat-
edly can also select the tab.
: Touch to start playing the music.
: Touch to pause the music.
: Touch to start playing the music again.
Depending on the portable player that is
connected to the system, the music may
start playing when touching while it is
paused. Conversely, the music may pause
when touching while it is playing.
*: Bluetooth is a regi stered trademark of
Bluetooth SIG, Inc.
INFORMATION
● Touching “Connect Portable Player”
on the “Bluetooth*” screen also connects
a Bluetooth
® audio player. (See page
166.)
● When none of the selectable portable
players have been registered, a screen
confirming registration is displayed.
Registration method is the same as
phone registration. (See page 126.)
● When the currently connected portable
player is selected, a screen confirming
the selected player’s disconnection is
displayed. (See page 167.)
● If connection fails once, a changing con-
nection method confirmation screen is
displayed. If connection fails 2 or more
times, a message will be displayed.
When this message is displayed, try
again.
RECONNECTING THE
PORTABLE PLAYER
Vehicles with a smart key system
If the portable player is disconnected
due to poor reception from the
Bluetooth
® network when the
“POWER” <“ENGINE START STOP”>
switch is in ACCESSORY or ON
automatically reconnects the portable
player.
Vehicles without a smart key system
If the portable player is disconnected
due to poor reception from the
Bluetooth
® network when the engine
switch is in the “ACC” or “ON” position,
the system automatically reconnects
the portable player.
PLAYING Bluetooth® AUDIO
PLAYING AND PAUSING
Bluetooth® AUDIO
Page 255 of 328
255
1. INFORMATION DISPLAY
7
INFORMATION
1Press the “INFO/APPS” button.
2Touch “Fuel Consumption” on the
“Information” screen.
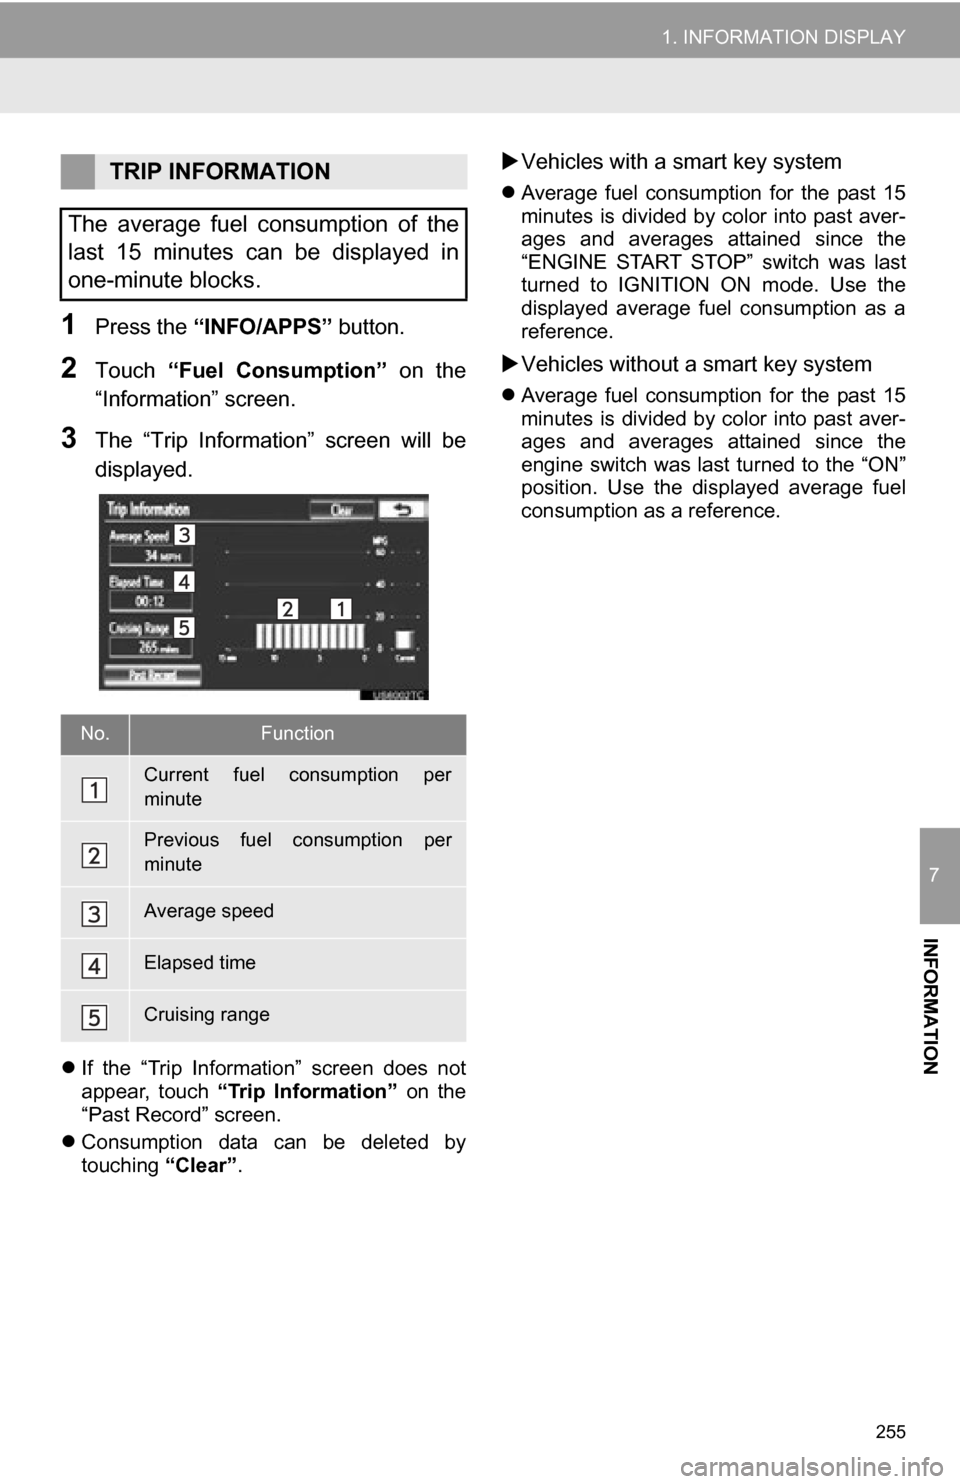
3The “Trip Information” screen will be
displayed.
If the “Trip Information” screen does not
appear, touch “Trip Information” on the
“Past Record” screen.
Consumption data can be deleted by
touching “Clear”.
Vehicles with a smart key system
Average fuel consumption for the past 15
minutes is divided by color into past aver-
ages and averages attained since the
“ENGINE START STOP” switch was last
turned to IGNITION ON mode. Use the
displayed average fuel consumption as a
reference.
Vehicles without a smart key system
Average fuel consumption for the past 15
minutes is divided by color into past aver-
ages and averages attained since the
engine switch was last turned to the “ON”
position. Use the displayed average fuel
consumption as a reference.
TRIP INFORMATION
The average fuel consumption of the
last 15 minutes can be displayed in
one-minute blocks.
No.Function
Current fuel consumption per
minute
Previous fuel consumption per
minute
Average speed
Elapsed time
Cruising range
Page 275 of 328
8
275
1
2
3
4
5
6
7
8
9
1. ENTUNE SERVICE ..................... 276
SUBSCRIPTION .................................. 277
AVAILABILITY OF SERVICE............... 277
INITIALIZING PERSONAL DATA ........ 277
2. BEFORE USING ENTUNE .......... 278
SETTINGS REQUIRED TO USE ENTUNE ............................................ 278
USER REGISTRATION ....................... 278
REGISTERING THE ENTUNE APPLICATION ................................... 278
1. ACTIVATING “APPS”.. ............... 279
ACTIVATING “APPS” .......................... 279
IF A MESSAGE APPEARS ON THE
SCREEN ........................................... 281
2. LINKING “APPS” AND NAVIGATION LOCAL
FUNCTION ...... ....................... ... 282
SETTING A DESTINATION USING
“APPS” .............................................. 283
MAKING A PHONE CALL USING “APPS” .............................................. 283
3. INPUTTING KEYWORD OPERATION ............................. 284
INPUTTING A KEYWORD USING
THE SOFTWARE KEYBOARD ......... 284
INPUTTING A KEYWORD USING THE VOICE RECOGNITION
FUNCTION ........................................ 284
1ENTUNE-OVERVIEW
2ENTUNE OPERATION
APPS
Page 284 of 328
284
2. ENTUNE OPERATION
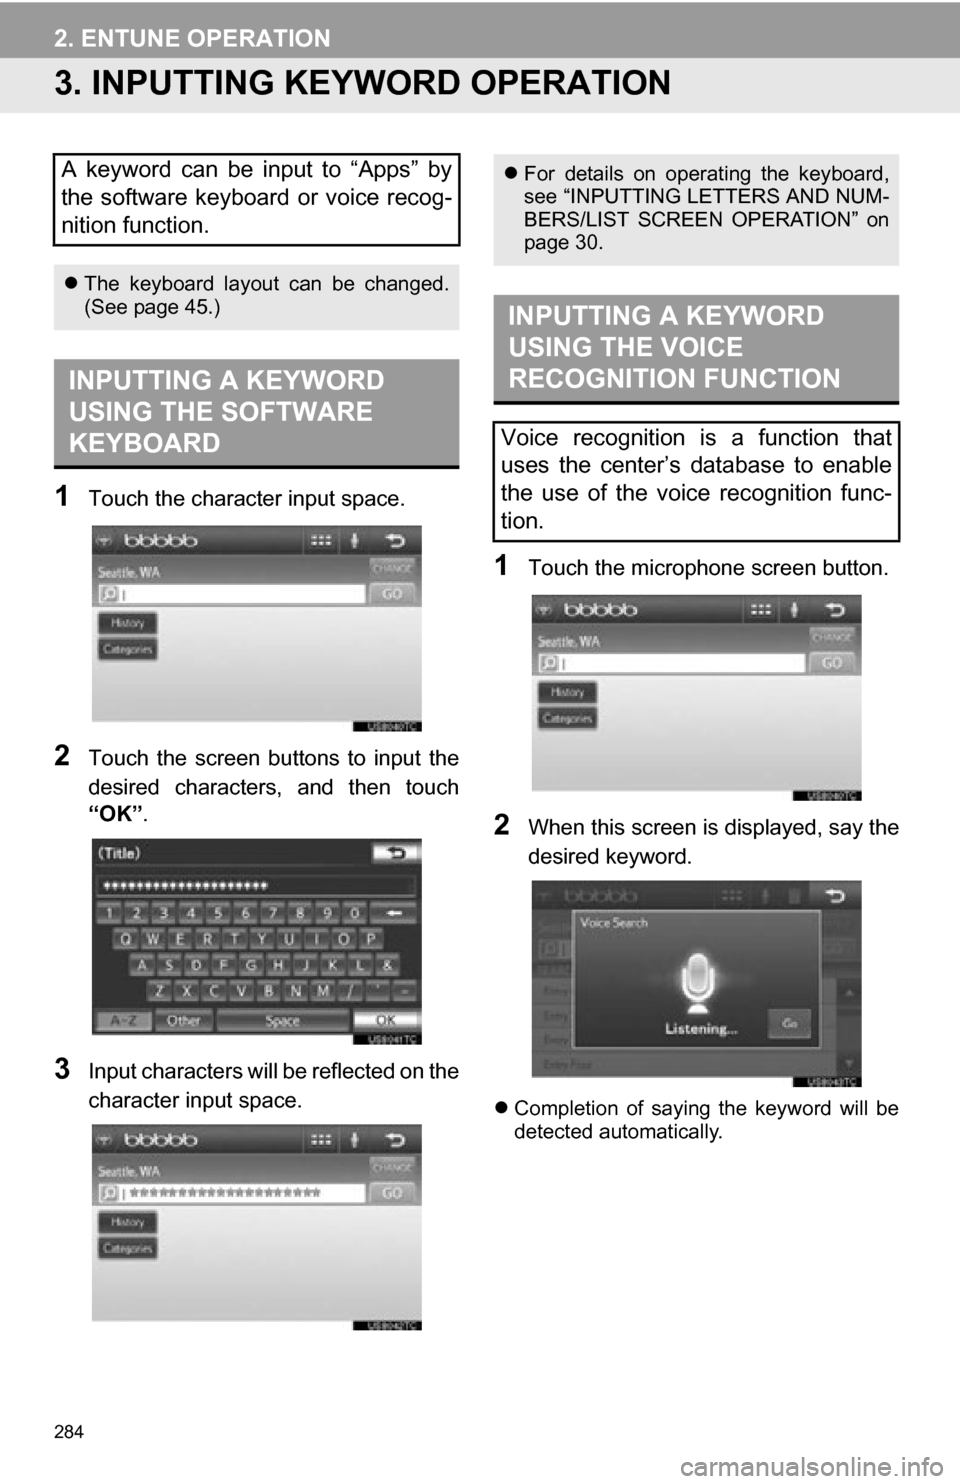
3. INPUTTING KEYWORD OPERATION
1Touch the character input space.
2Touch the screen buttons to input the
desired characters, and then touch
“OK”.
3Input characters will be reflected on the
character input space.
1Touch the microphone screen button.
2When this screen is displayed, say the
desired keyword.
Completion of saying the keyword will be
detected automatically.
A keyword can be input to “Apps” by
the software keyboard or voice recog-
nition function.
The keyboard layout can be changed.
(See page 45.)
INPUTTING A KEYWORD
USING THE SOFTWARE
KEYBOARD
For details on operating the keyboard,
see “INPUTTING LETTERS AND NUM-
BERS/LIST SCREEN OPERATION” on
page 30.
INPUTTING A KEYWORD
USING THE VOICE
RECOGNITION FUNCTION
Voice recognition is a function that
uses the center’s database to enable
the use of the voice recognition func-
tion.
Page 288 of 328
288
1. REAR VIEW MONITOR SYSTEM
1. REAR VIEW MONITOR SYSTEM OPERATION
1To display the rear view image on the
screen, place the shift lever in the “R”
position when the “POWER” <“EN-
GINE START STOP”> switch is in ON
a smart key system)
To display the rear view image on the
screen, place the shift lever in the “R”
position when the engine switch is in
the “ON” position. (Vehicles without a
smart key system)
The rear view monitor system assists
the driver by displaying an image of the
view behind the vehicle while backing
up. The image is displayed in reverse
on the screen. This reversed image is
a similar image to the one on the inside
rear view mirror.
If you move the shift lever out of the “R”
position, the screen returns to the previ-
ous screen. Operating another function
of the navigation system will display
another screen.
CAUTION
●Never depend on the rear view monitor
system entirely when backing up.
Always make sure your intended path is
clear.
Use caution, just as you would when
backing up any vehicle.
● Never back up while looking only at the
screen. The image on the screen is dif-
ferent from actual conditions. Depicted
distances between objects and flat sur-
faces will differ from actual distance. If
you back up while looking only at the
screen, you may hit a vehicle, a person
or an object. When backing up, be sure
to check behind and all around the vehi-
cle visually and with mirrors before pro-
ceeding.
● Always check the vehicle surrounding
area, because the guide lines are ancil-
lary lines.
● The guide lines are ancillary lines and
do not change even if the steering wheel
is turned.
● Do not use the system when the trunk is
not completely closed.
● Use your own eyes to confirm the vehi-
cle’s surroundings, as the displayed
image may become faint or dark, and
moving images will be distorted, or not
entirely visible when the outside temper-
ature is low. When backing up, be sure
to check behind and all around the vehi-
cle visually and with mirror before pro-
ceeding.
● Do not use the system in the following
cases:
• On icy or slick road surfaces, or in
snow.
• When using tire chains or emergency tires.
• On an uneven road, such as a slope.