change language TOYOTA CAMRY 2012 XV50 / 9.G Navigation Manual
[x] Cancel search | Manufacturer: TOYOTA, Model Year: 2012, Model line: CAMRY, Model: TOYOTA CAMRY 2012 XV50 / 9.GPages: 328, PDF Size: 5.67 MB
Page 22 of 328
22
3. QUICK REFERENCE
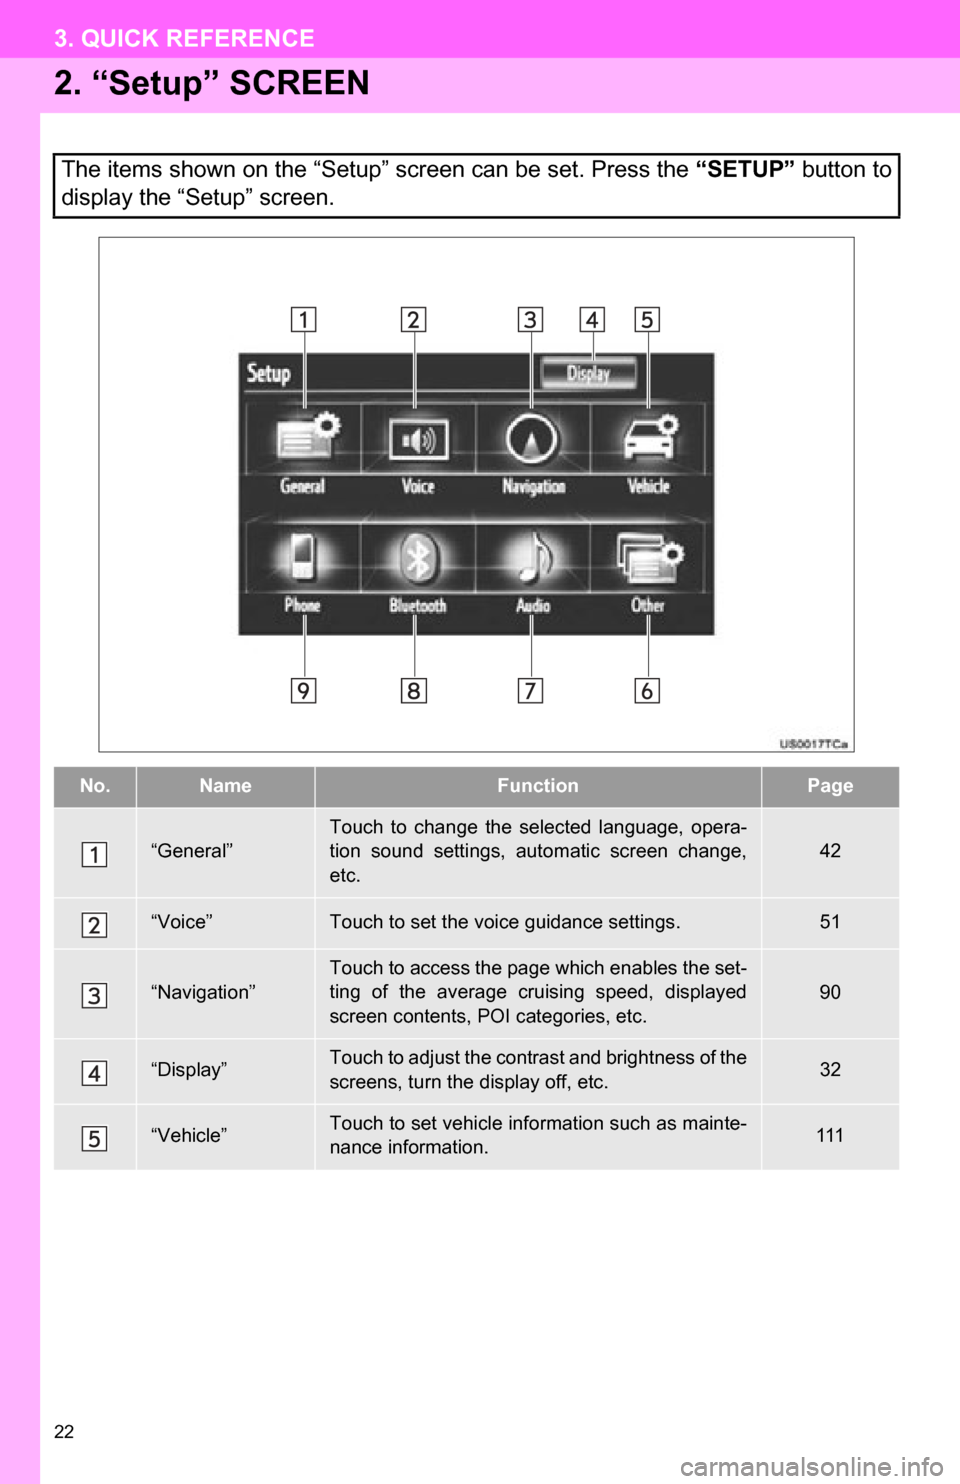
2. “Setup” SCREEN
The items shown on the “Setup” screen can be set. Press the “SETUP” button to
display the “Setup” screen.
No.NameFunctionPage
“General”
Touch to change the selected language, opera-
tion sound settings, automatic screen change,
etc.
42
“Voice”Touch to set the voice guidance settings.51
“Navigation”Touch to access the page which enables the set-
ting of the average cruising speed, displayed
screen contents, POI categories, etc.90
“Display”Touch to adjust the contrast and brightness of the
screens, turn the display off, etc.32
“Vehicle”Touch to set vehicle information such as mainte-
nance information.111
Page 42 of 328
42
2. SETUP
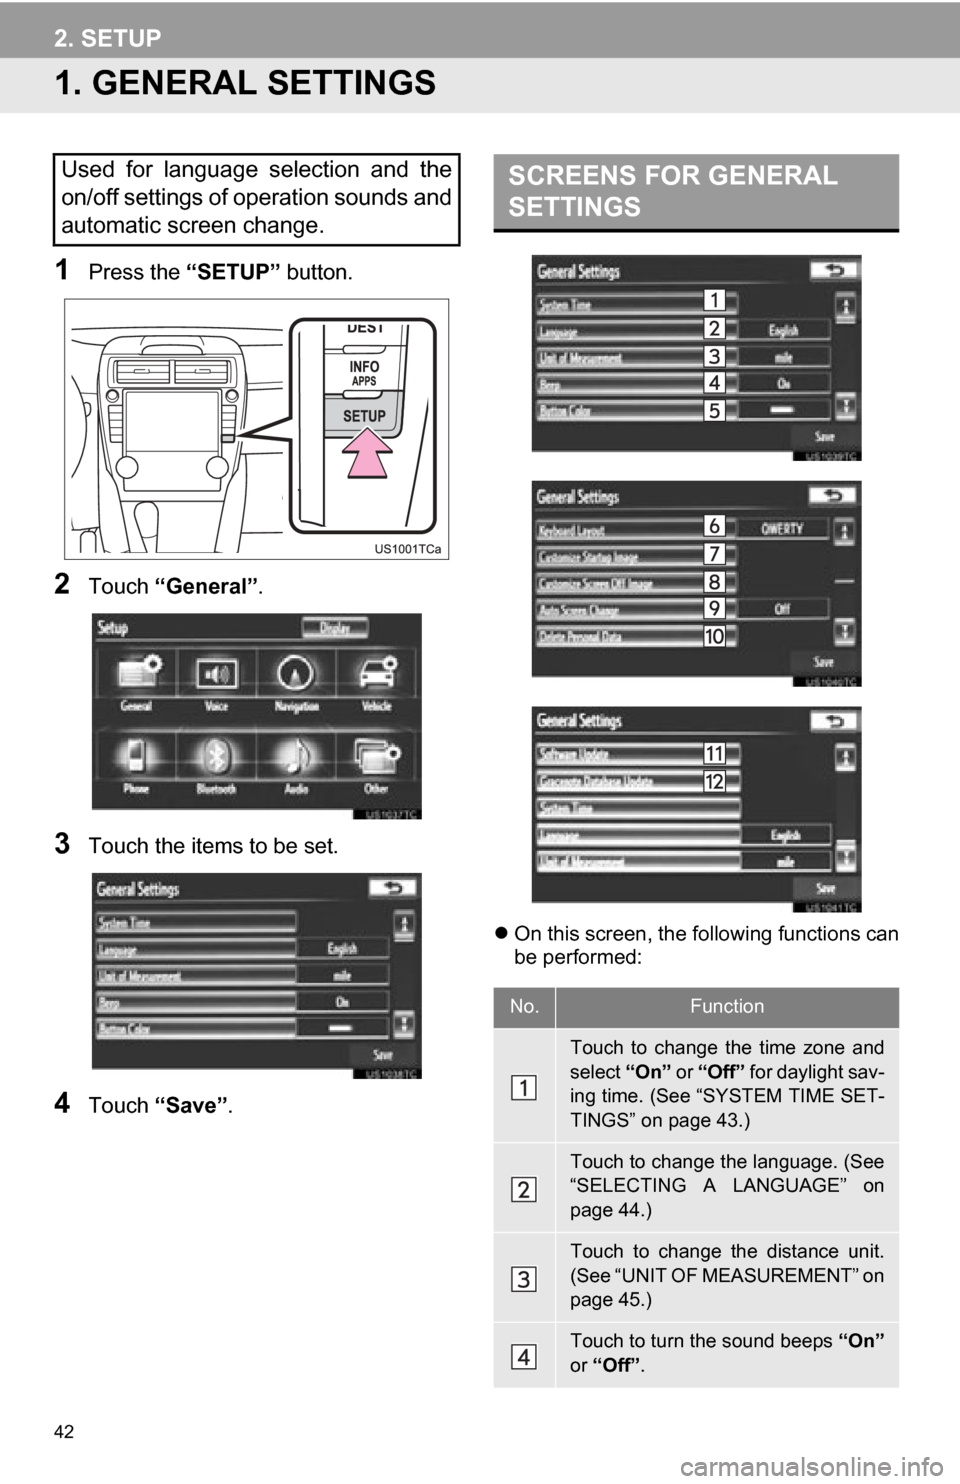
1. GENERAL SETTINGS
1Press the “SETUP” button.
2Touch “General” .
3Touch the items to be set.
4Touch “Save” .
On this screen, the following functions can
be performed:
Used for language selection and the
on/off settings of operation sounds and
automatic screen change.SCREENS FOR GENERAL
SETTINGS
No.Function
Touch to change the time zone and
select “On” or “Off” for daylight sav-
ing time. (See “SYSTEM TIME SET-
TINGS” on page 43.)
Touch to change the language. (See
“SELECTING A LANGUAGE” on
page 44.)
Touch to change the distance unit.
(See “UNIT OF MEASUREMENT” on
page 45.)
Touch to turn the sound beeps “On”
or “Off” .
Page 44 of 328
44
2. SETUP
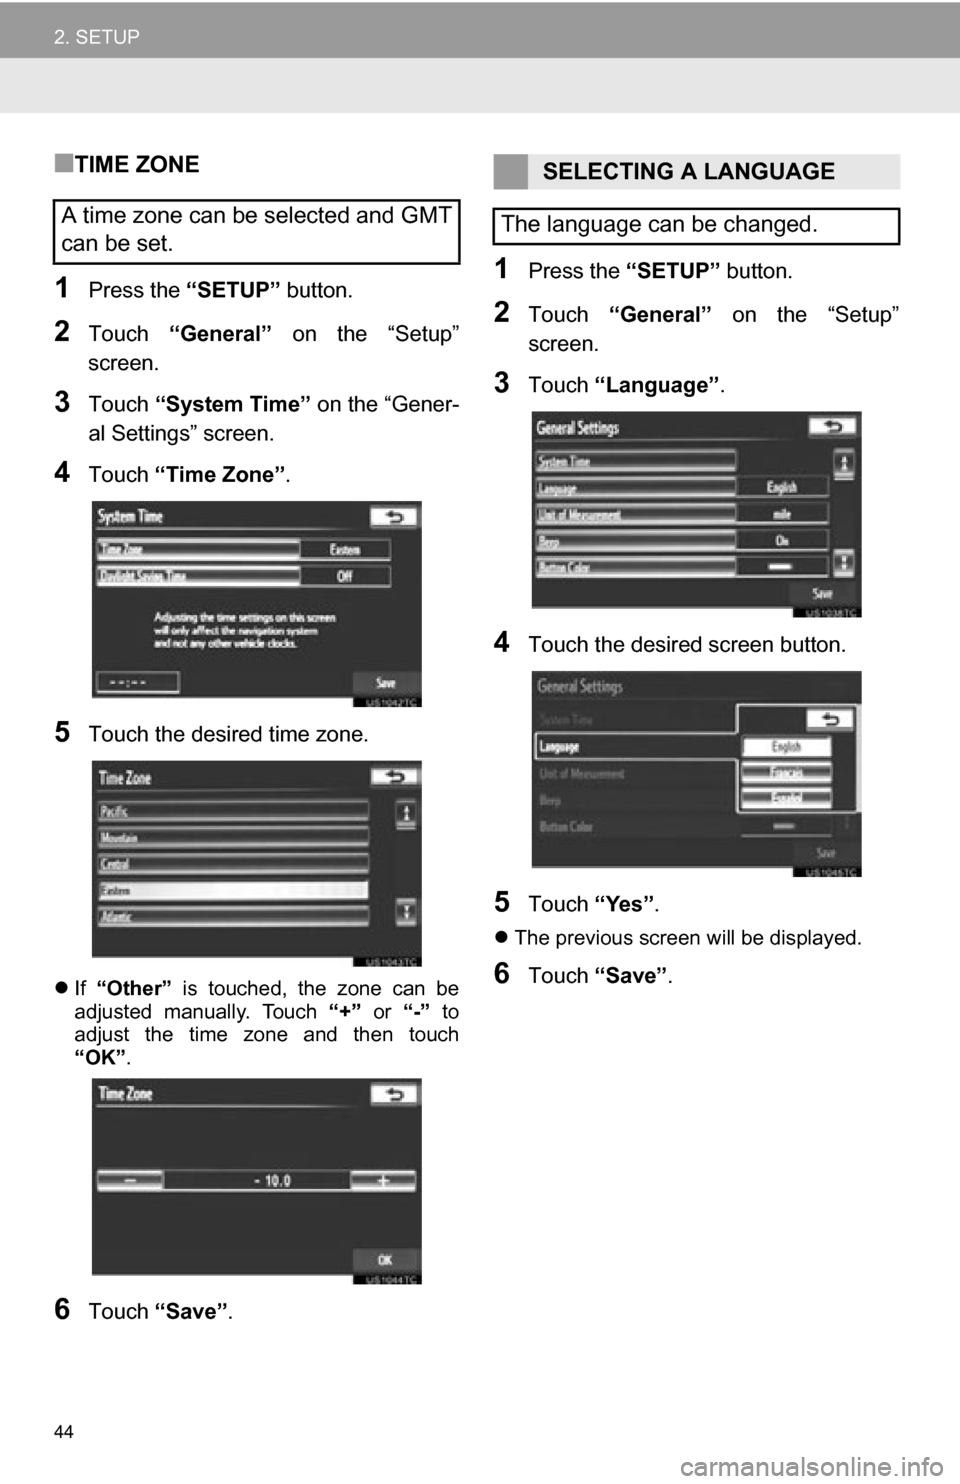
■TIME ZONE
1Press the “SETUP” button.
2Touch “General” on the “Setup”
screen.
3Touch “System Time” on the “Gener-
al Settings” screen.
4Touch “Time Zone” .
5Touch the desired time zone.
If “Other” is touched, the zone can be
adjusted manually. Touch “+” or “-” to
adjust the time zone and then touch
“OK” .
6Touch “Save” .
1Press the “SETUP” button.
2Touch “General” on the “Setup”
screen.
3Touch “Language” .
4Touch the desired screen button.
5Touch “Yes”.
The previous screen will be displayed.
6Touch “Save” .
A time zone can be selected and GMT
can be set.
SELECTING A LANGUAGE
The language can be changed.
Page 45 of 328
45
2. SETUP
2
BASIC FUNCTION
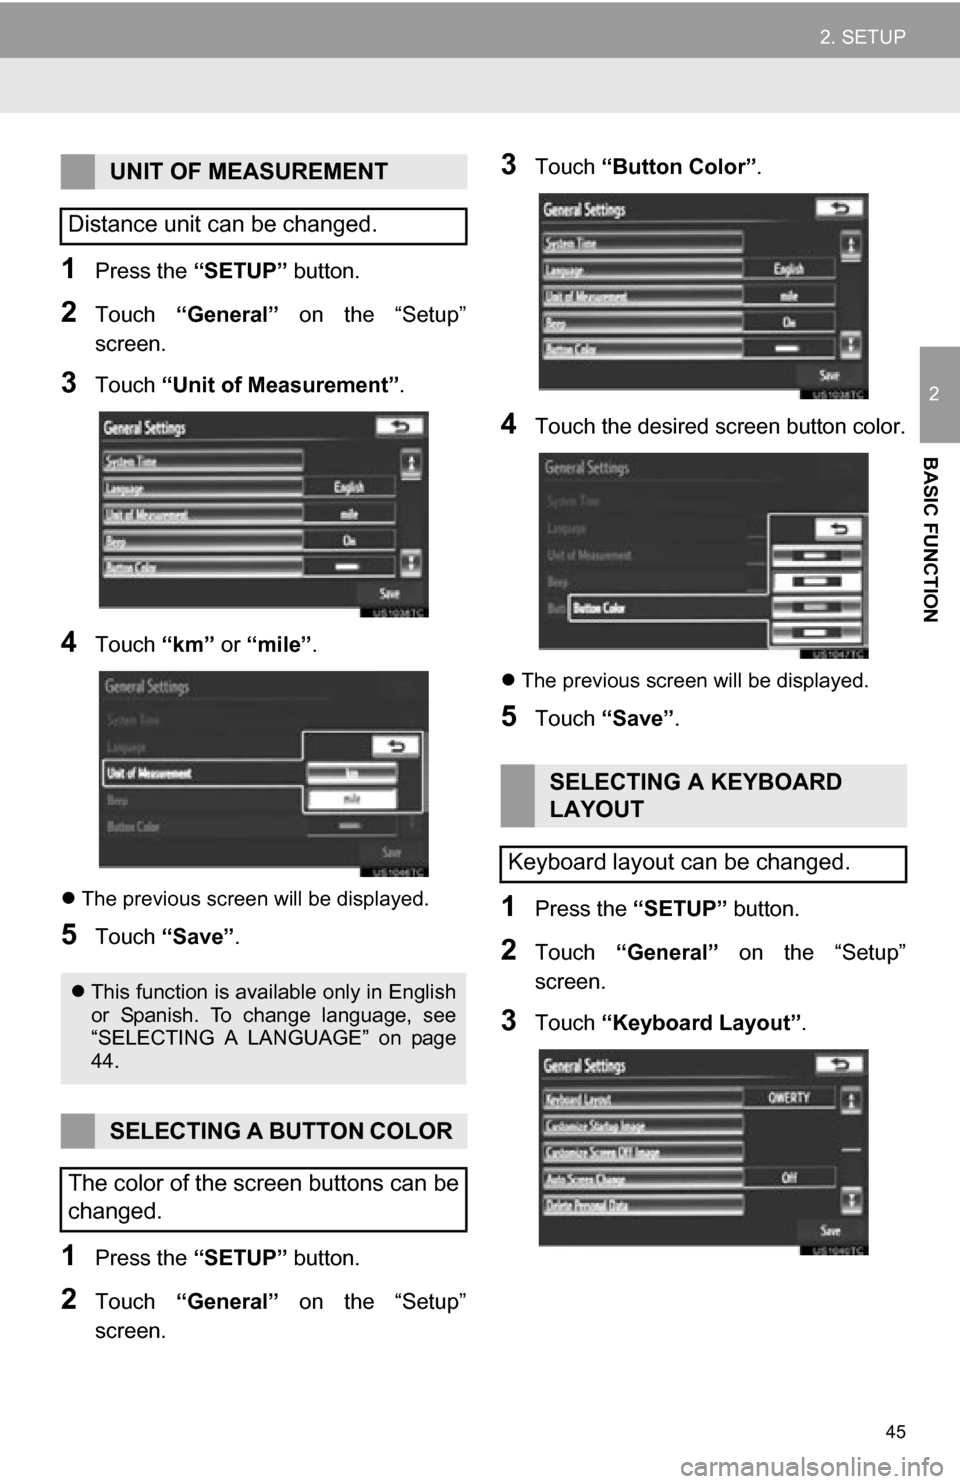
1Press the “SETUP” button.
2Touch “General” on the “Setup”
screen.
3Touch “Unit of Measurement” .
4Touch “km” or “mile” .
The previous screen will be displayed.
5Touch “Save” .
1Press the “SETUP” button.
2Touch “General” on the “Setup”
screen.
3Touch “Button Color” .
4Touch the desired screen button color.
The previous screen will be displayed.
5Touch “Save” .
1Press the “SETUP” button.
2Touch “General” on the “Setup”
screen.
3Touch “Keyboard Layout” .
UNIT OF MEASUREMENT
Distance unit can be changed.
This function is available only in English
or Spanish. To change language, see
“SELECTING A LANGUAGE” on page
44.
SELECTING A BUTTON COLOR
The color of the screen buttons can be
changed.
SELECTING A KEYBOARD
LAYOUT
Keyboard layout can be changed.
Page 203 of 328
203
1. AUDIO/VIDEO SYSTEM OPERATION
5
AUDIO/VIDEO SYSTEM
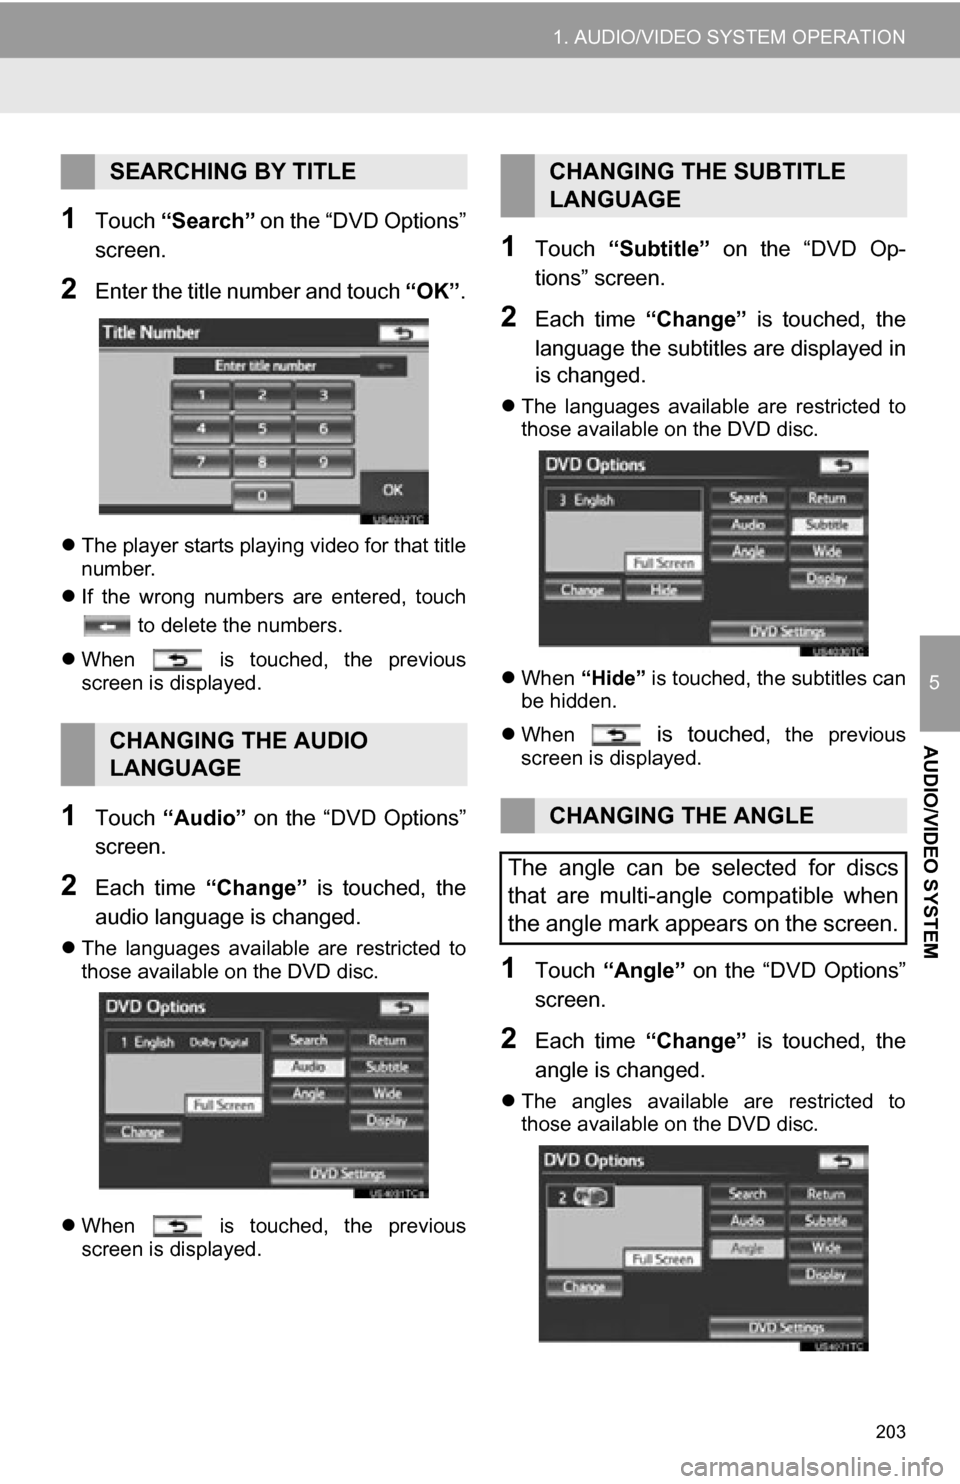
1Touch “Search” on the “DVD Options”
screen.
2Enter the title number and touch “OK”.
The player starts playing video for that title
number.
If the wrong numbers are entered, touch
to delete the numbers.
When is touched, the previous
screen is displayed.
1Touch “Audio” on the “DVD Options”
screen.
2Each time “Change” is touched, the
audio language is changed.
The languages available are restricted to
those available on the DVD disc.
When is touched, the previous
screen is displayed.
1Touch “Subtitle” on the “DVD Op-
tions” screen.
2Each time “Change” is touched, the
language the subtitles are displayed in
is changed.
The languages available are restricted to
those available on the DVD disc.
When “Hide” is touched, the subtitles can
be hidden.
When
is touched, the previous
screen is displayed.
1Touch “Angle” on the “DVD Options”
screen.
2Each time “Change” is touched, the
angle is changed.
The angles available are restricted to
those available on the DVD disc.
SEARCHING BY TITLE
CHANGING THE AUDIO
LANGUAGE
CHANGING THE SUBTITLE
LANGUAGE
CHANGING THE ANGLE
The angle can be selected for discs
that are multi-angle compatible when
the angle mark appears on the screen.
Page 205 of 328
205
1. AUDIO/VIDEO SYSTEM OPERATION
5
AUDIO/VIDEO SYSTEM
■AUDIO LANGUAGE
1Touch “Audio Language” on the
“DVD Settings” screen.
2Touch the desired language to be
heard on the “Audio Language”
screen.
If the desired language to be heard cannot
be found on this screen, touch “Other”
and enter a language code. For entry of a
language code, see “ENTER AUDIO/
SUBTITLE/MENU LANGUAGE CODE” on
page 206.
To return to the “DVD Settings” screen,
touch .
3Touch “Save” on the “DVD Settings”
screen.
■SUBTITLE LANGUAGE
1Touch “Subtitle Language” on the
“DVD Settings” screen.
2Touch the desired language to be read
on the “Subtitle Language” screen.
If the desired language to be read cannot
be found on this screen, touch “Other”
and enter a language code. For entry of a
language code, see “ENTER AUDIO/
SUBTITLE/MENU LANGUAGE CODE” on
page 206.
To return to the “DVD Settings” screen,
touch .
3Touch “Save” on the “DVD Settings”
screen.
■MENU LANGUAGE
1Touch “Menu Language” on the
“DVD Settings” screen.
2Touch the desired language to be read
on the “Menu Language” screen.
If the desired language to be read cannot
be found on this screen, touch “Other”
and enter a language code. For entry of a
language code, see “ENTER AUDIO/
SUBTITLE/MENU LANGUAGE CODE” on
page 206.
To return to the “DVD Settings” screen,
touch .
3Touch “Save” on the “DVD Settings”
screen.
■ANGLE MARK
1Touch “Angle Mark” on the “DVD Set-
tings” screen.
2Touch “On” or “Off” .
3Touch “Save” on the “DVD Settings”
screen.
■PARENTAL LOCK
1Touch “Parental Lock” on the “DVD
Settings” screen.
2Enter the 4-digit personal code on the
“Key Code” screen.
If the wrong numbers are entered, touch
to delete the numbers.
To return to the “DVD Settings” screen,
touch .
3Touch a parental level ( 1-8 ) on the “Se-
lect Restriction Level” screen.
To return to the “DVD Settings” screen,
touch .
The audio language can be changed.
The subtitle language can be changed.
The language on the DVD video menu
can be changed.
The multi-angle mark can be turned on
or off on the screen while discs that are
multi-angle compatible are being
played.
The level of viewer restrictions can be
changed.
Page 210 of 328
210
1. AUDIO/VIDEO SYSTEM OPERATION
Region codes: Some DVD video discs
have a region code indicating which coun-
tries the DVD video disc can be played in
on this DVD player. If the DVD video disc
is not labeled as “ALL” or “1”, you cannot
use it on this DVD player. If you attempt to
play an inappropriate DVD video disc on
this player, “Region code error” appears
on the screen. Even if the DVD video disc
does not have a region code, there are
cases when it cannot be used.
■MARKS SHOWN ON DVD VIDEO
DISCS
DVD video discs : Digital Versatile Disc
that holds video. DVD video discs have
adopted “MPEG2”, one of the world stan-
dards of digital compression technologies.
The picture data is compressed by 1/40 on
average and stored. Variable rate encoded
technology in which the volume of data as-
signed to the picture is changed depend-
ing on the picture format has also been
adopted. Audio data is stored using PCM
and Dolby Digital, which enables higher
quality of sound. Furthermore, multi-angle
and multi-language features will also help
users enjoy the more advanced technolo-
gy of DVD video.
Viewer restrictions: This feature limits
what can be viewed in conformity with a
level of restrictions of the country. The lev-
el of restrictions varies depending on the
DVD video disc. Some DVD video discs
cannot be played at all, or violent scenes
are skipped or replaced with other scenes.
• Level 1: DVD video discs for children can be played.
• Level 2 - 7: DVD video discs for children and G-rated movie can be played.
• Level 8: All types of the DVD video discs can be played.
Multi-angle feature : The same scene can
be enjoyed from different angles.
Multi-language feature : The subtitle and
audio language can be selected.
Region codes : The region codes are pro-
vided on DVD players and DVD discs. If
the DVD video disc does not have the
same region code as the DVD player, you
cannot play the disc on the DVD player.
For region codes, see page 210.
DVD PLAYER AND DVD
VIDEO DISC INFORMATION
DVD VIDEO DISCS
This DVD player conforms to NTSC/
PAL color TV formats. DVD video discs
conforming to another format such as
SECAM cannot be used.
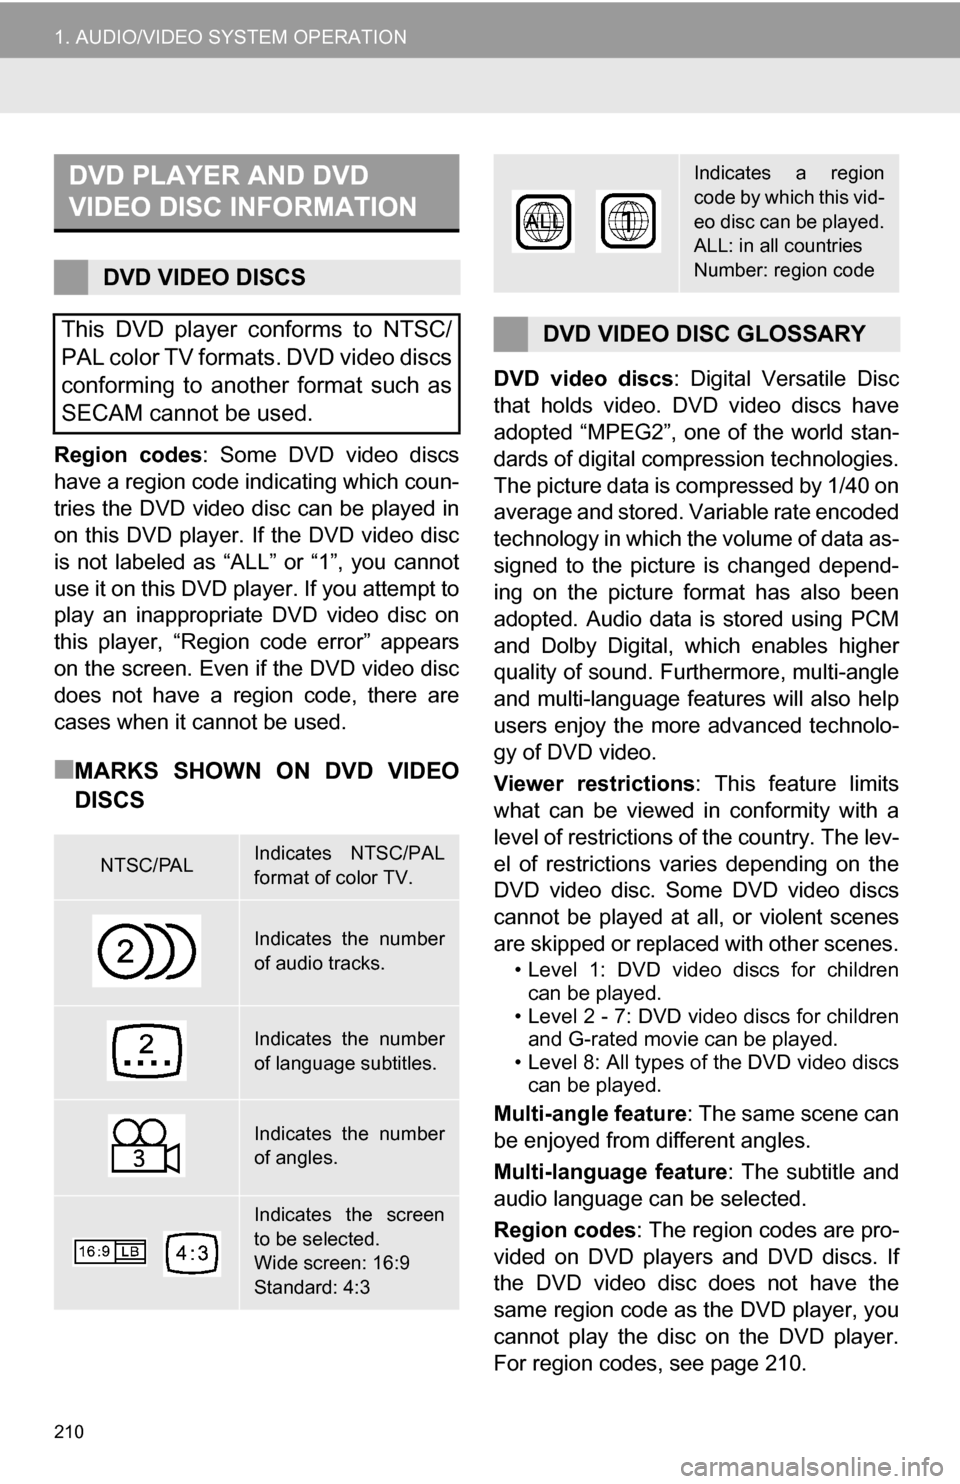
NTSC/PALIndicates NTSC/PAL
format of color TV.
Indicates the number
of audio tracks.
Indicates the number
of language subtitles.
Indicates the number
of angles.
Indicates the screen
to be selected.
Wide screen: 16:9
Standard: 4:3
Indicates a region
code by which this vid-
eo disc can be played.
ALL: in all countries
Number: region code
DVD VIDEO DISC GLOSSARY
Page 247 of 328
247
1. VOICE COMMAND SYSTEM OPERATION
6
VOICE COMMAND SYSTEM
INFORMATION
●A USB memory or iPod must be con-
nected to enable track searching and
playback. (See “USB MEMORY OPER-
ATION” on page 212 and “iPod OPERA-
TION” on page 217.)
● When a USB memory or iPod is con-
nected, recognition data is created so
tracks can be searched using voice
commands.
● Recognition data is updated under the
following conditions:
• When the USB memory or iPod data
has changed.
• When the voice recognition language is changed. (See page 44.)
● While the recognition data is being cre-
ated or being updated, a track search
cannot be performed using a voice com-
mand.
● While “Play Music” is displayed in the
“Shortcut menu” screen, say “Play
music” to display the music screen from
which searching for a track using a voice
command can be performed.
● When “Play Music” is dimmed in the
“Shortcut Menu” screen, it is not possi-
ble to search for a track using a voice
command. In this situation, reduce the
amount of music data in the USB mem-
ory or iPod and update the recognition
data to enable searching by voice com-
mand.
Page 250 of 328
250
1. VOICE COMMAND SYSTEM OPERATION
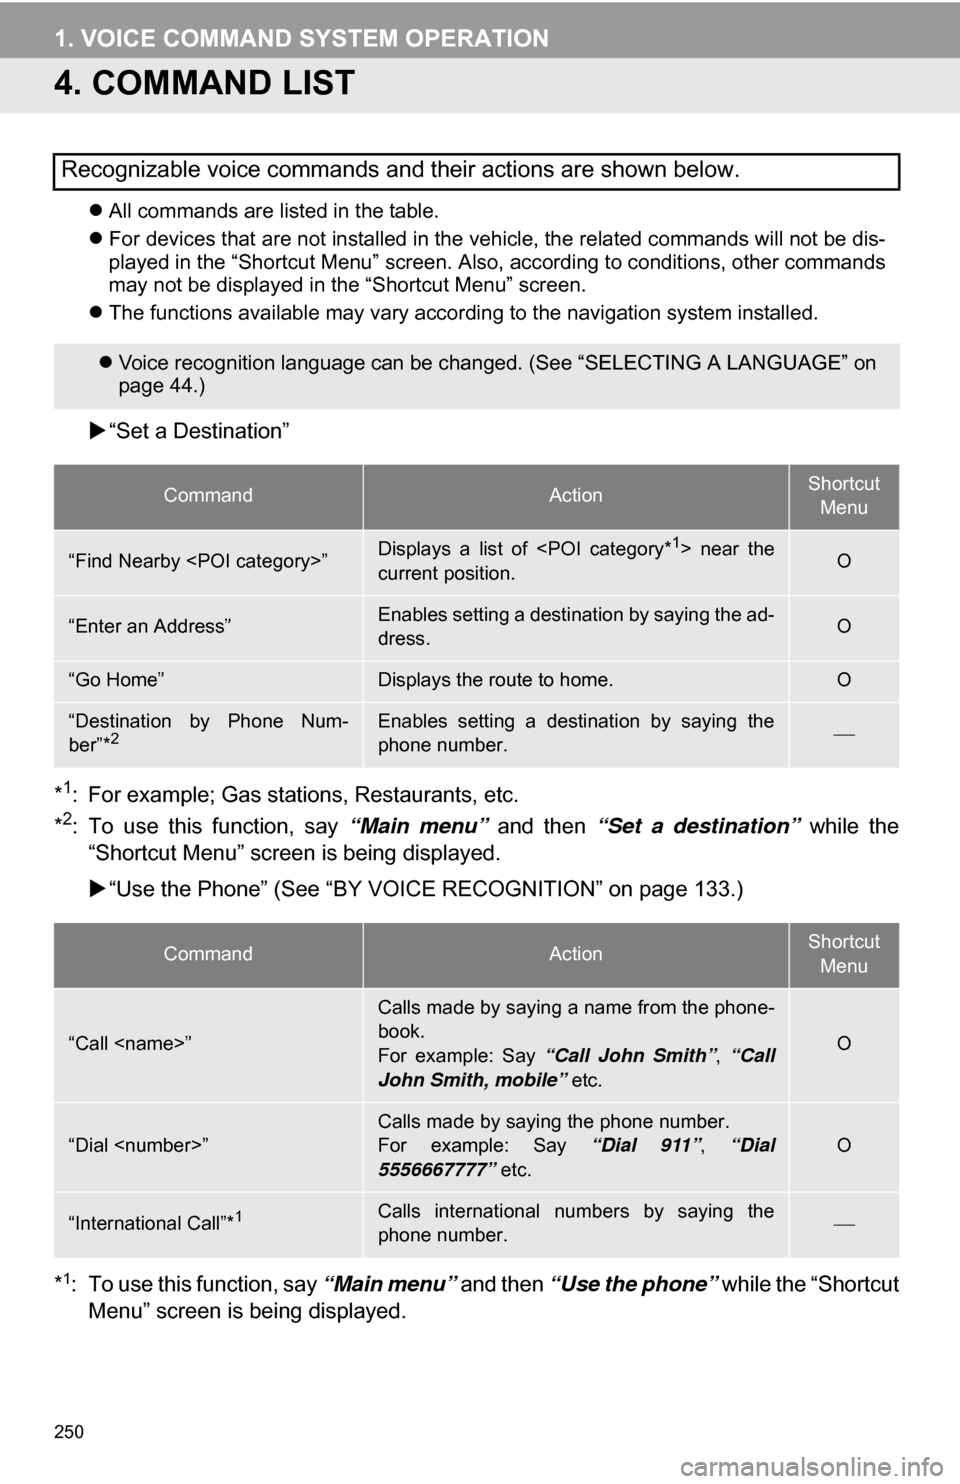
4. COMMAND LIST
All commands are listed in the table.
For devices that are not installed in the vehicle, the related commands will not be dis-
played in the “Shortcut Menu” screen. Also, according to conditions, other commands
may not be displayed in the “Shortcut Menu” screen.
The functions available may vary according to the navigation system installed.
“Set a Destination”
*
1: For example; Gas stations, Restaurants, etc.
*2: To use this function, say “Main menu” and then “Set a destination” while the
“Shortcut Menu” screen is being displayed.
“Use the Phone” (See “BY VOIC E RECOGNITION” on page 133.)
*
1: To use this function, say “Main menu” and then “Use the phone” while the “Shortcut
Menu” screen is being displayed.
Recognizable voice commands and their actions are shown below.
Voice recognition language can be changed. (See “SELECTING A LANGUAGE” on
page 44.)
CommandActionShortcut
Menu
“Find Nearby
current position.O
“Enter an Address”Enables setting a destination by saying the ad-
dress.O
“Go Home”Displays the route to home.O
“Destination by Phone Num-
ber”*2Enables setting a destination by saying the
phone number.
CommandActionShortcut Menu
“Call
Calls made by saying a name from the phone-
book.
For example: Say “Call John Smith” , “Call
John Smith, mobile” etc.
O
“Dial
For example: Say “Dial 911”, “Dial
5556667777” etc.O
“International Call”*1Calls international numbers by saying the
phone number.