TOYOTA CAMRY 2013 XV50 / 9.G Navigation Manual
Manufacturer: TOYOTA, Model Year: 2013, Model line: CAMRY, Model: TOYOTA CAMRY 2013 XV50 / 9.GPages: 336, PDF Size: 7.37 MB
Page 91 of 336
91
3
NAVIGATION SYSTEM
3. ADDRESS BOOK
1. NAVIGATION SETTINGS
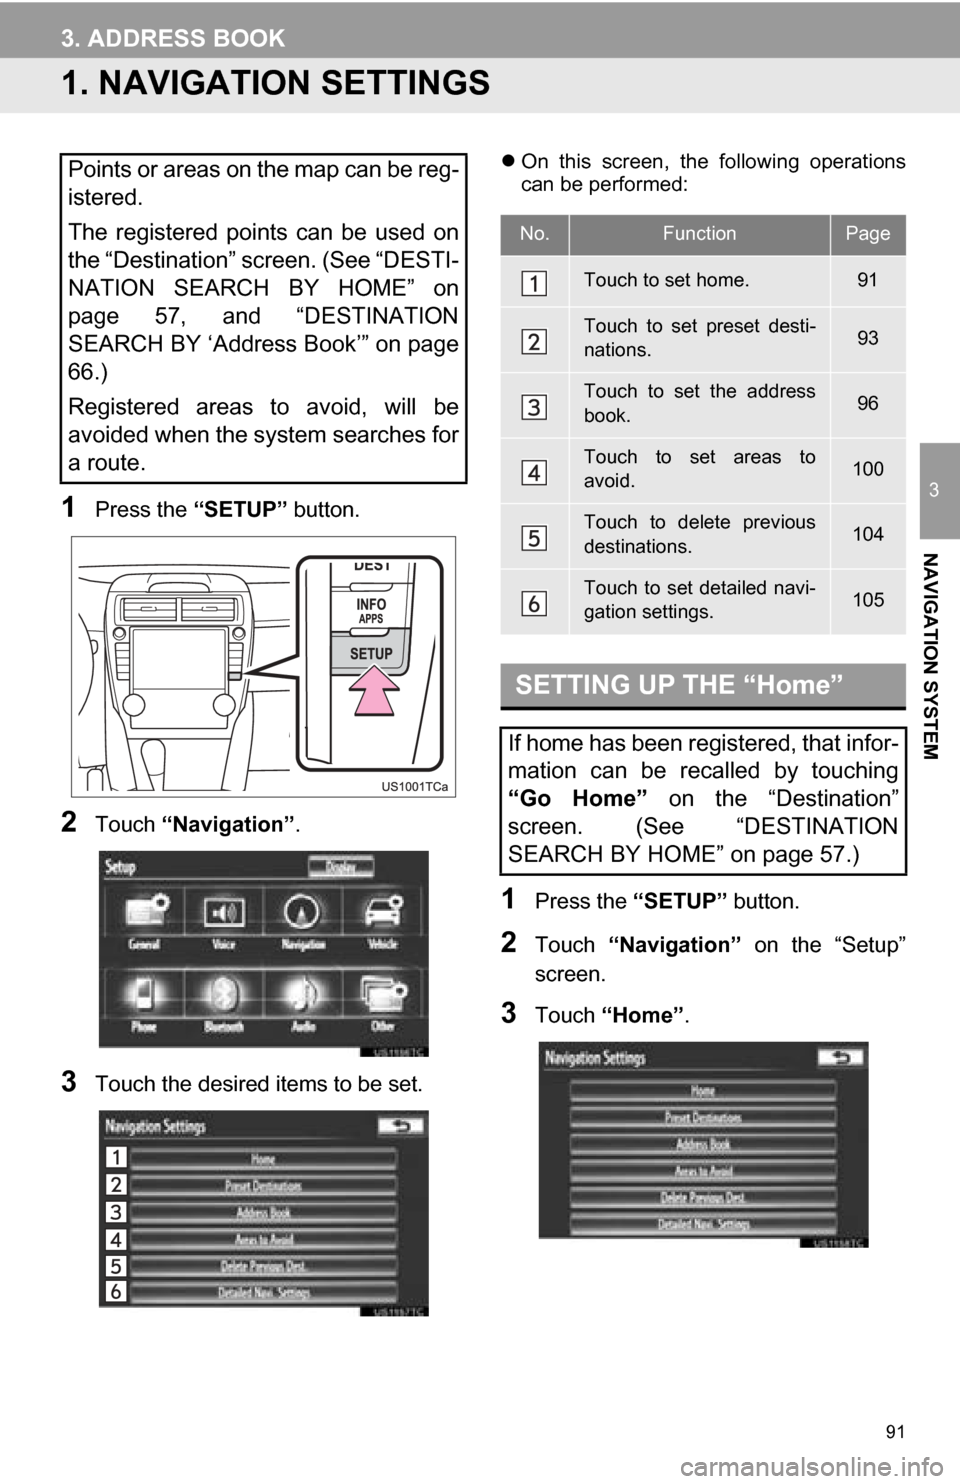
1Press the “SETUP” button.
2Touch “Navigation” .
3Touch the desired items to be set.
On this screen, the following operations
can be performed:
1Press the “SETUP” button.
2Touch “Navigation” on the “Setup”
screen.
3Touch “Home” .
Points or areas on the map can be reg-
istered.
The registered points can be used on
the “Destination” screen. (See “DESTI-
NATION SEARCH BY HOME” on
page 57, and “DESTINATION
SEARCH BY ‘Address Book’” on page
66.)
Registered areas to avoid, will be
avoided when the system searches for
a route.
No.FunctionPage
Touch to set home.91
Touch to set preset desti-
nations.93
Touch to set the address
book.96
Touch to set areas to
avoid.100
Touch to delete previous
destinations.104
Touch to set detailed navi-
gation settings.105
SETTING UP THE “Home”
If home has been registered, that infor-
mation can be recalled by touching
“Go Home” on the “Destination”
screen. (See “DESTINATION
SEARCH BY HOME” on page 57.)
Page 92 of 336
92
3. ADDRESS BOOK
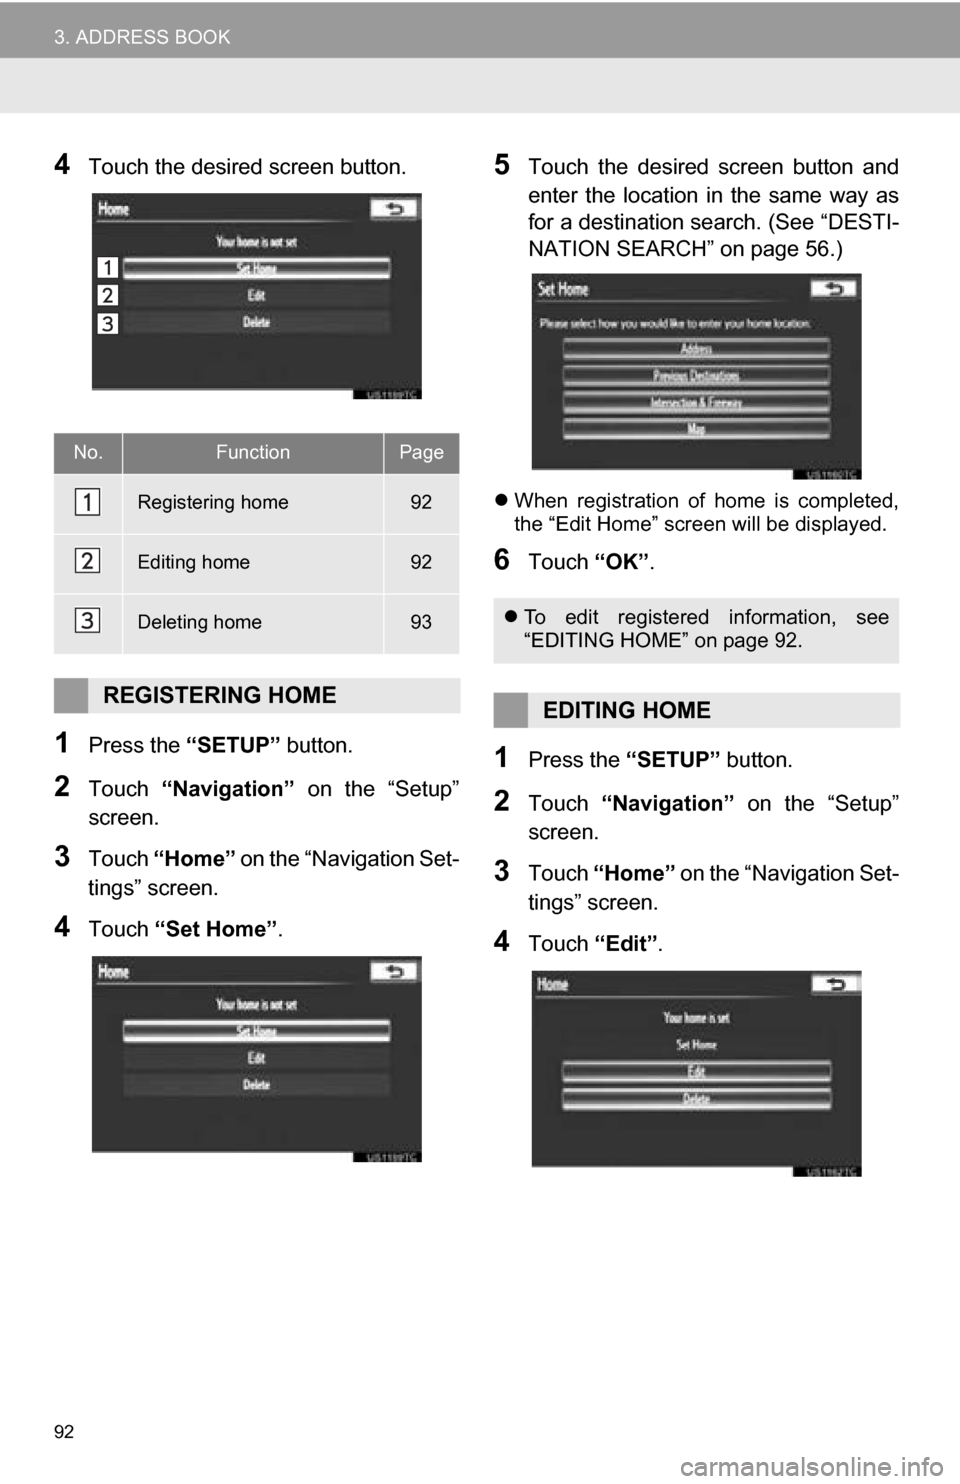
4Touch the desired screen button.
1Press the “SETUP” button.
2Touch “Navigation” on the “Setup”
screen.
3Touch “Home” on the “Navigation Set-
tings” screen.
4Touch “Set Home” .
5Touch the desired screen button and
enter the location in the same way as
for a destination search. (See “DESTI-
NATION SEARCH” on page 56.)
When registration of home is completed,
the “Edit Home” screen will be displayed.
6Touch “OK”.
1Press the “SETUP” button.
2Touch “Navigation” on the “Setup”
screen.
3Touch “Home” on the “Navigation Set-
tings” screen.
4Touch “Edit”.
No.FunctionPage
Registering home92
Editing home92
Deleting home93
REGISTERING HOME
To edit registered information, see
“EDITING HOME” on page 92.
EDITING HOME
Page 93 of 336
93
3. ADDRESS BOOK
3
NAVIGATION SYSTEM
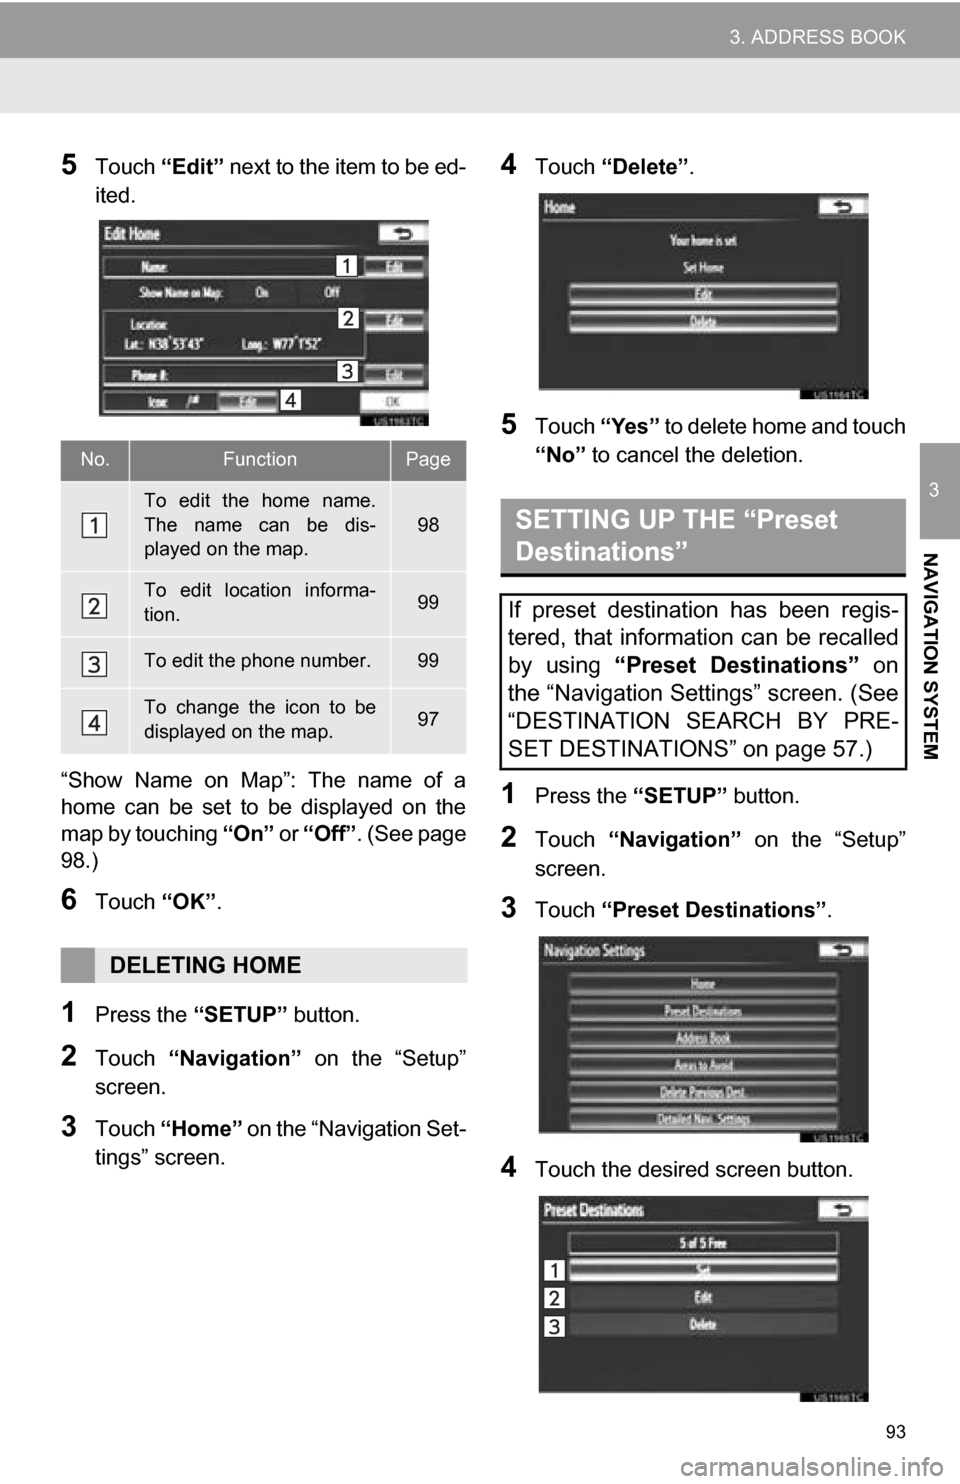
5Touch “Edit” next to the item to be ed-
ited.
“Show Name on Map”: The name of a
home can be set to be displayed on the
map by touching “On” or “Off”. (See page
98.)
6Touch “OK”.
1Press the “SETUP” button.
2Touch “Navigation” on the “Setup”
screen.
3Touch “Home” on the “Navigation Set-
tings” screen.
4Touch “Delete” .
5Touch “Yes” to delete home and touch
“No” to cancel the deletion.
1Press the “SETUP” button.
2Touch “Navigation” on the “Setup”
screen.
3Touch “Preset Destinations” .
4Touch the desired screen button.
No.FunctionPage
To edit the home name.
The name can be dis-
played on the map.
98
To edit location informa-
tion.99
To edit the phone number.99
To change the icon to be
displayed on the map.97
DELETING HOME
SETTING UP THE “Preset
Destinations”
If preset destination has been regis-
tered, that information can be recalled
by using “Preset Destinations” on
the “Navigation Settings” screen. (See
“DESTINATION SEARCH BY PRE-
SET DESTINATIONS” on page 57.)
Page 94 of 336
94
3. ADDRESS BOOK
1Press the “SETUP” button.
2Touch “Navigation” on the “Setup”
screen.
3Touch “Preset Destinations” on the
“Navigation Settings” screen.
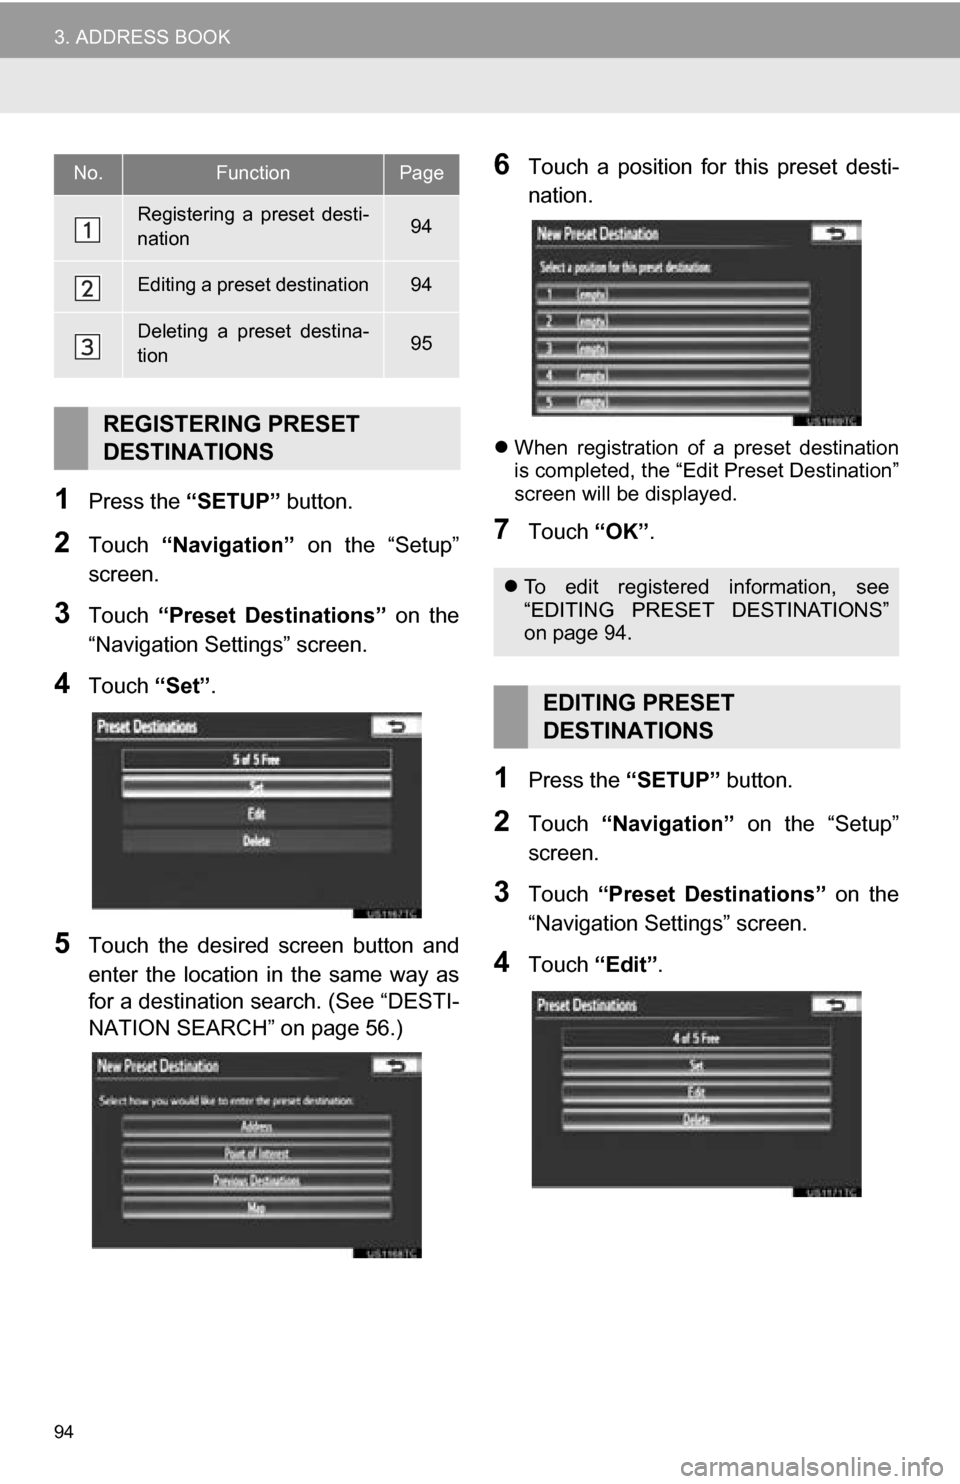
4Touch “Set”.
5Touch the desired screen button and
enter the location in the same way as
for a destination search. (See “DESTI-
NATION SEARCH” on page 56.)
6Touch a position for this preset desti-
nation.
When registration of a preset destination
is completed, the “Edit Preset Destination”
screen will be displayed.
7Touch “OK”.
1Press the “SETUP” button.
2Touch “Navigation” on the “Setup”
screen.
3Touch “Preset Destinations” on the
“Navigation Settings” screen.
4Touch “Edit”.
No.FunctionPage
Registering a preset desti-
nation94
Editing a preset destination94
Deleting a preset destina-
tion95
REGISTERING PRESET
DESTINATIONS
To edit registered information, see
“EDITING PRESET DESTINATIONS”
on page 94.
EDITING PRESET
DESTINATIONS
Page 95 of 336
95
3. ADDRESS BOOK
3
NAVIGATION SYSTEM
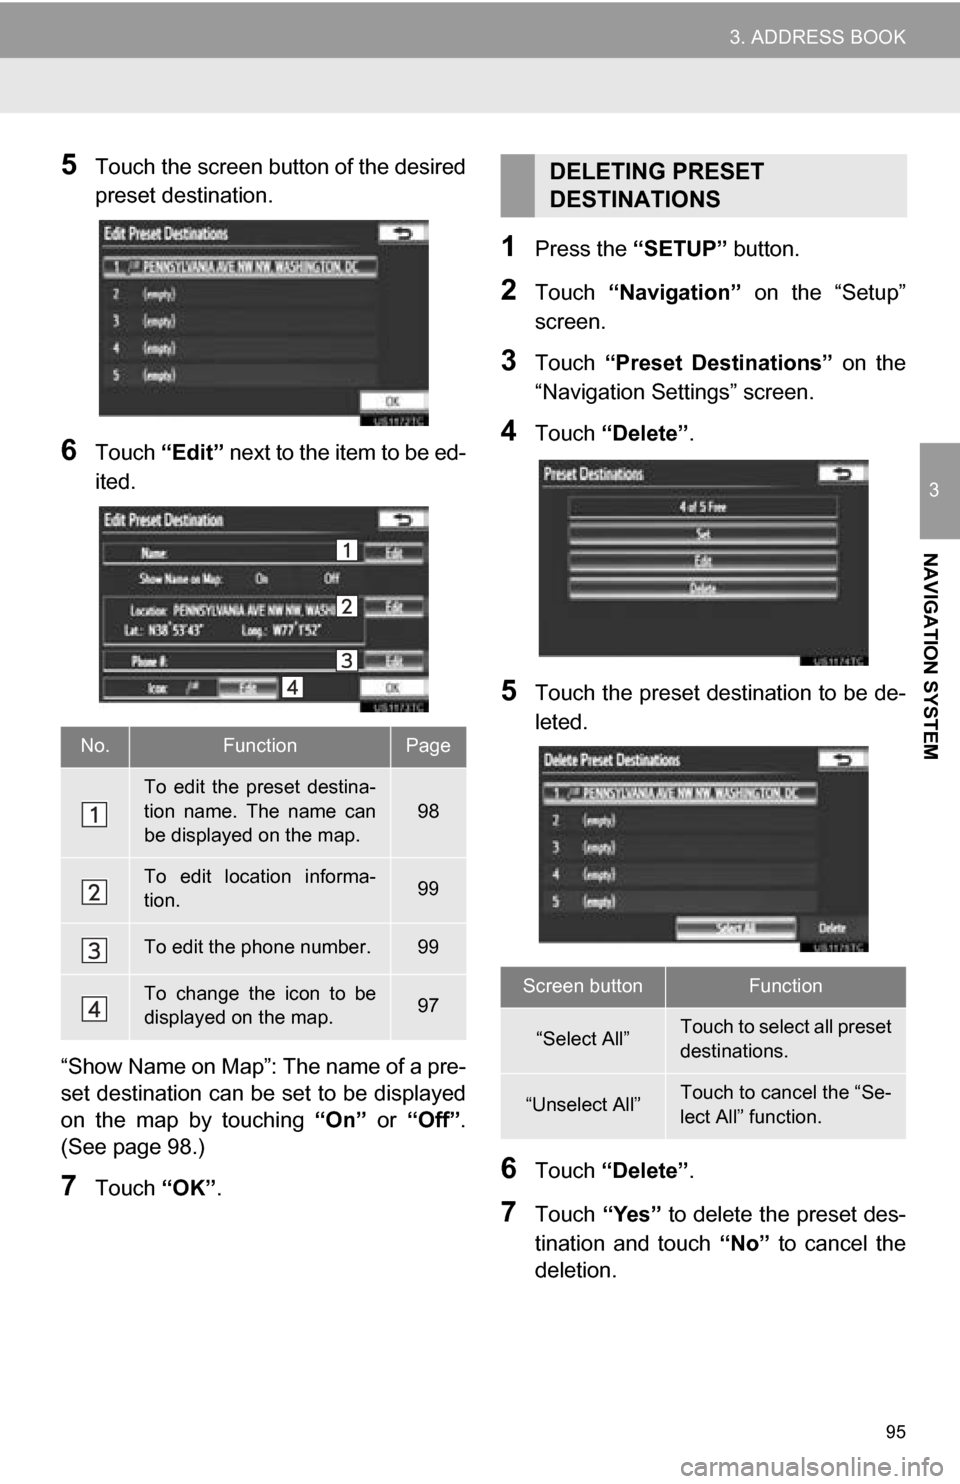
5Touch the screen button of the desired
preset destination.
6Touch “Edit” next to the item to be ed-
ited.
“Show Name on Map”: The name of a pre-
set destination can be set to be displayed
on the map by touching “On” or “Off” .
(See page 98.)
7Touch “OK”.
1Press the “SETUP” button.
2Touch “Navigation” on the “Setup”
screen.
3Touch “Preset Destinations” on the
“Navigation Settings” screen.
4Touch “Delete” .
5Touch the preset destination to be de-
leted.
6Touch “Delete” .
7Touch “Yes” to delete the preset des-
tination and touch “No” to cancel the
deletion.
No.FunctionPage
To edit the preset destina-
tion name. The name can
be displayed on the map.
98
To edit location informa-
tion.99
To edit the phone number.99
To change the icon to be
displayed on the map.97
DELETING PRESET
DESTINATIONS
Screen buttonFunction
“Select All”Touch to select all preset
destinations.
“Unselect All”Touch to cancel the “Se-
lect All” function.
Page 96 of 336
96
3. ADDRESS BOOK
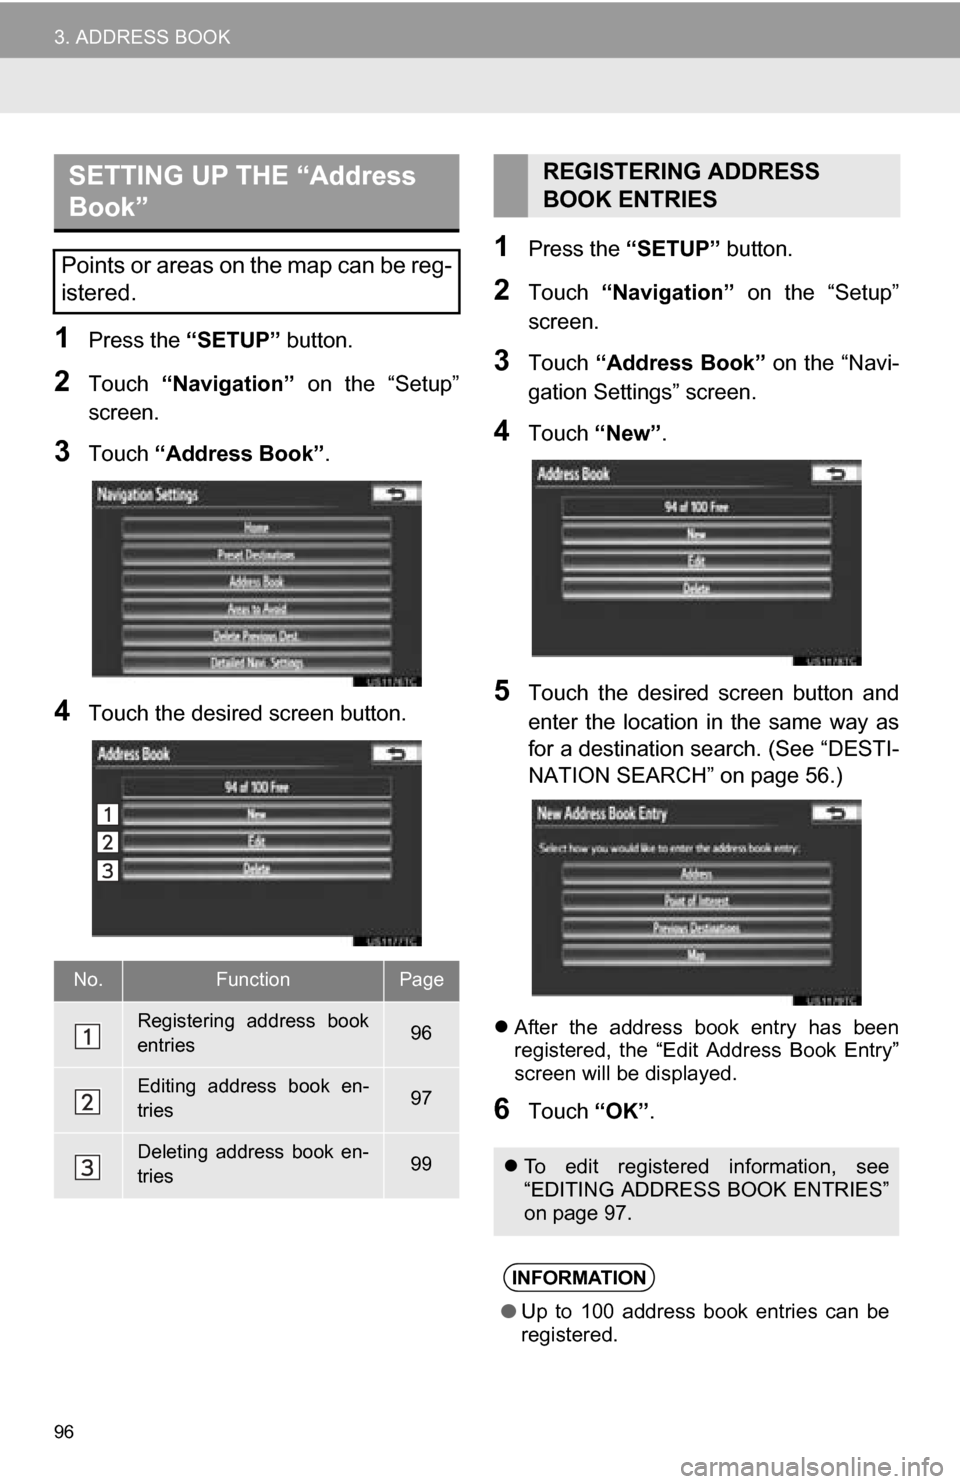
1Press the “SETUP” button.
2Touch “Navigation” on the “Setup”
screen.
3Touch “Address Book” .
4Touch the desired screen button.
1Press the “SETUP” button.
2Touch “Navigation” on the “Setup”
screen.
3Touch “Address Book” on the “Navi-
gation Settings” screen.
4Touch “New”.
5Touch the desired screen button and
enter the location in the same way as
for a destination search. (See “DESTI-
NATION SEARCH” on page 56.)
After the address book entry has been
registered, the “Edit Address Book Entry”
screen will be displayed.
6Touch “OK”.
SETTING UP THE “Address
Book”
Points or areas on the map can be reg-
istered.
No.FunctionPage
Registering address book
entries96
Editing address book en-
tries97
Deleting address book en-
tries99
REGISTERING ADDRESS
BOOK ENTRIES
To edit registered information, see
“EDITING ADDRESS BOOK ENTRIES”
on page 97.
INFORMATION
●Up to 100 address book entries can be
registered.
Page 97 of 336
97
3. ADDRESS BOOK
3
NAVIGATION SYSTEM
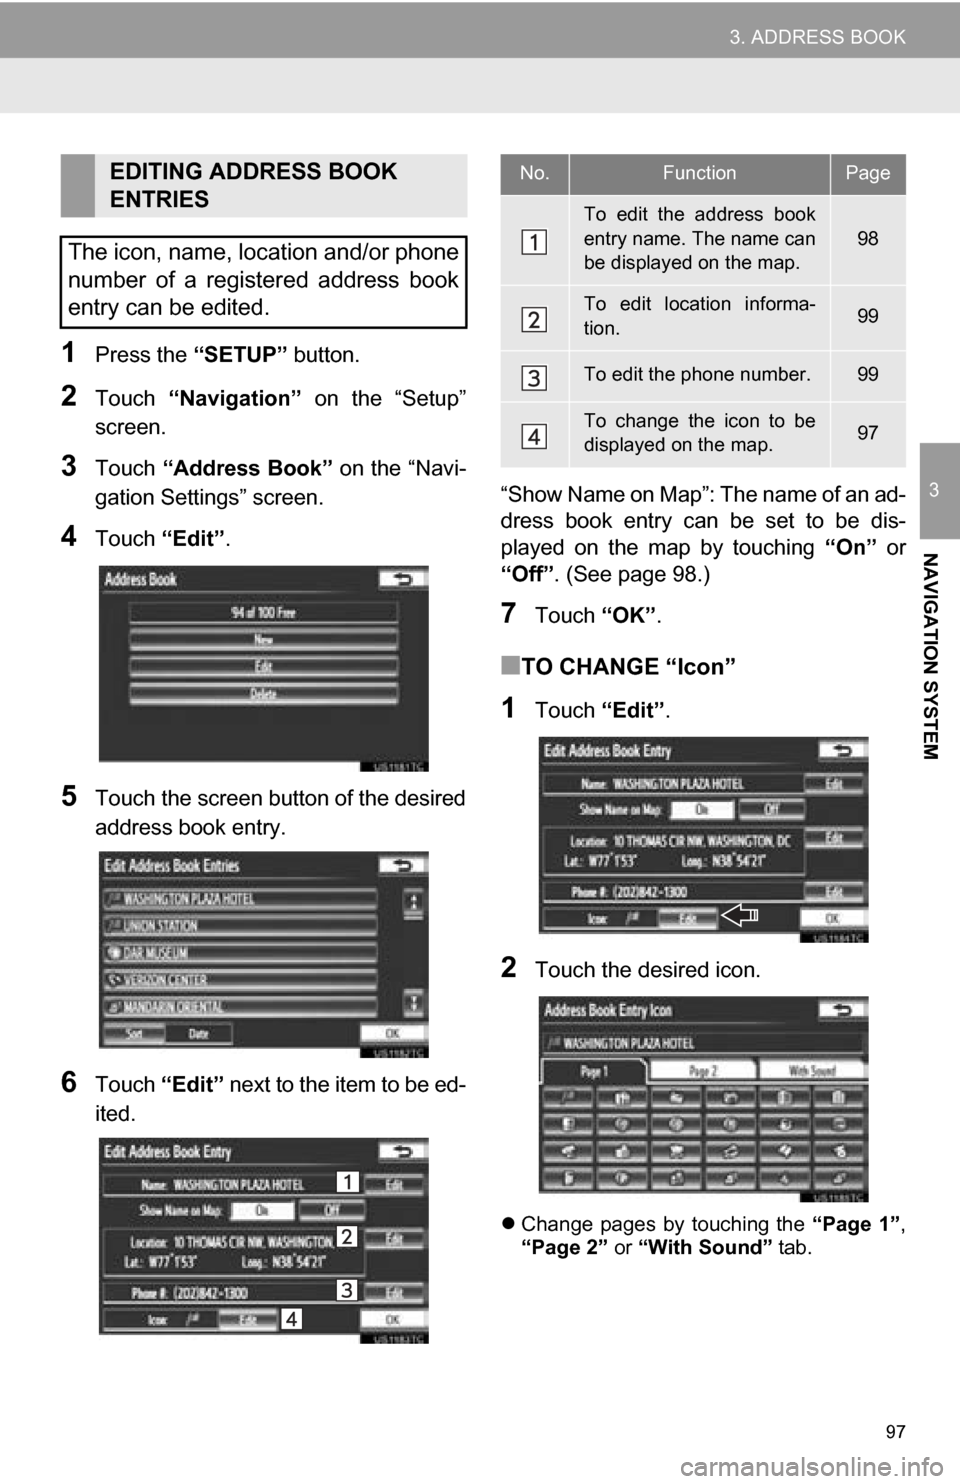
1Press the “SETUP” button.
2Touch “Navigation” on the “Setup”
screen.
3Touch “Address Book” on the “Navi-
gation Settings” screen.
4Touch “Edit”.
5Touch the screen button of the desired
address book entry.
6Touch “Edit” next to the item to be ed-
ited. “Show Name on Map”: The name of an ad-
dress book entry can be set to be dis-
played on the map by touching
“On” or
“Off” . (See page 98.)
7Touch “OK”.
■TO CHANGE “Icon”
1Touch “Edit”.
2Touch the desired icon.
Change pages by touching the “Page 1”,
“Page 2” or “With Sound” tab.
EDITING ADDRESS BOOK
ENTRIES
The icon, name, location and/or phone
number of a registered address book
entry can be edited.No.FunctionPage
To edit the address book
entry name. The name can
be displayed on the map.
98
To edit location informa-
tion.99
To edit the phone number.99
To change the icon to be
displayed on the map.97
Page 98 of 336
98
3. ADDRESS BOOK
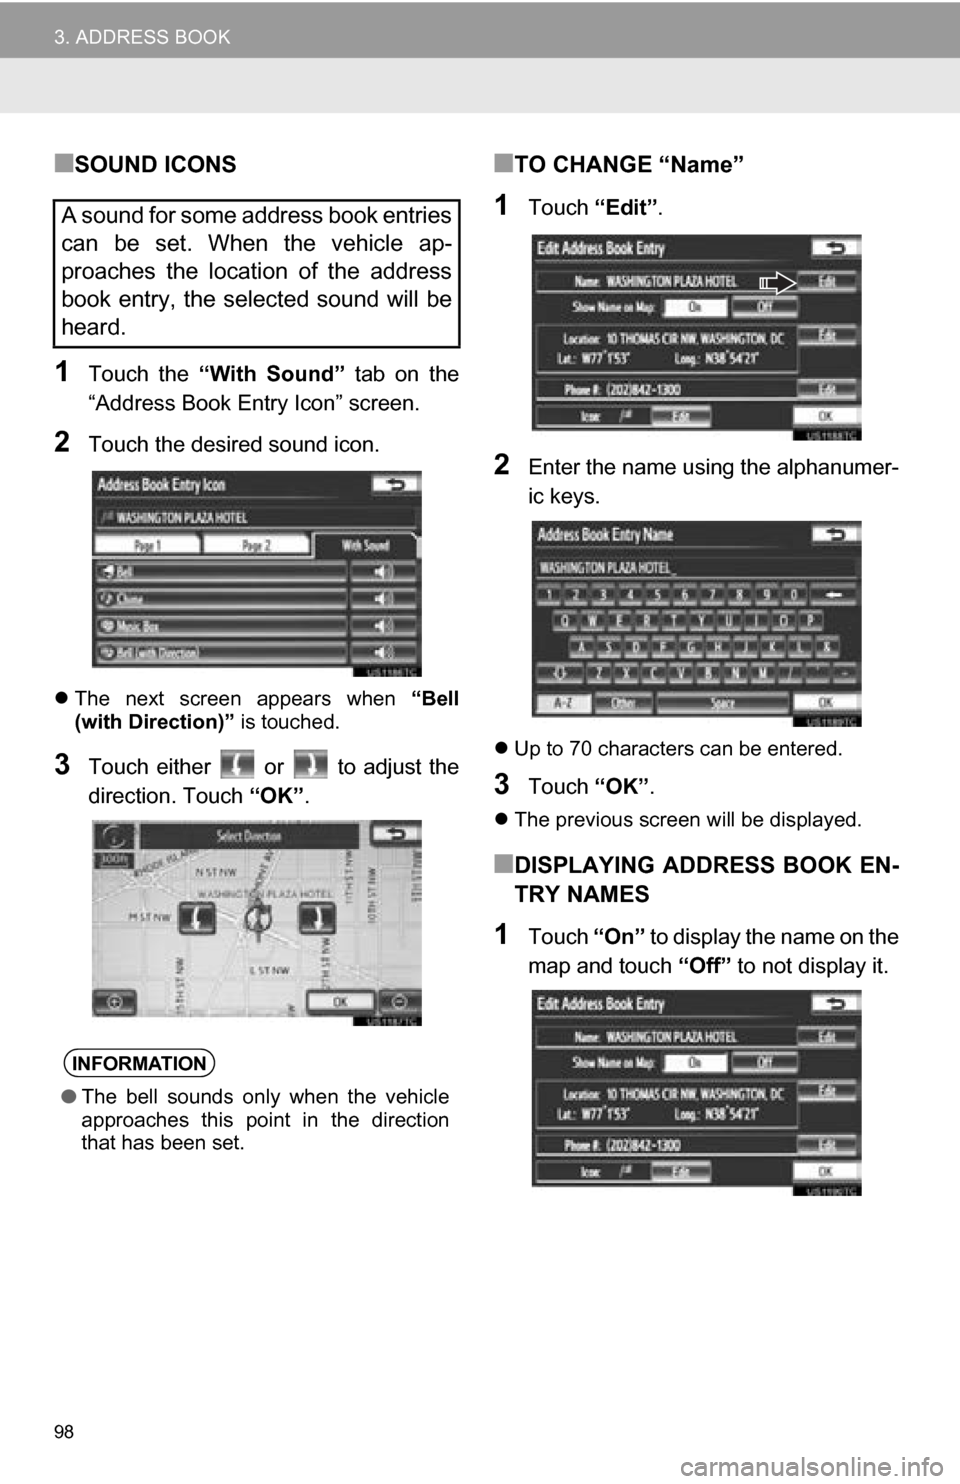
■SOUND ICONS
1Touch the “With Sound” tab on the
“Address Book Entry Icon” screen.
2Touch the desired sound icon.
The next screen appears when “Bell
(with Direction)” is touched.
3Touch either or to adjust the
direction. Touch “OK”.
■TO CHANGE “Name”
1Touch “Edit”.
2Enter the name using the alphanumer-
ic keys.
Up to 70 characters can be entered.
3Touch “OK”.
The previous screen will be displayed.
■DISPLAYING ADDRESS BOOK EN-
TRY NAMES
1Touch “On” to display the name on the
map and touch “Off” to not display it.
A sound for some address book entries
can be set. When the vehicle ap-
proaches the location of the address
book entry, the selected sound will be
heard.
INFORMATION
●The bell sounds only when the vehicle
approaches this point in the direction
that has been set.
Page 99 of 336
99
3. ADDRESS BOOK
3
NAVIGATION SYSTEM
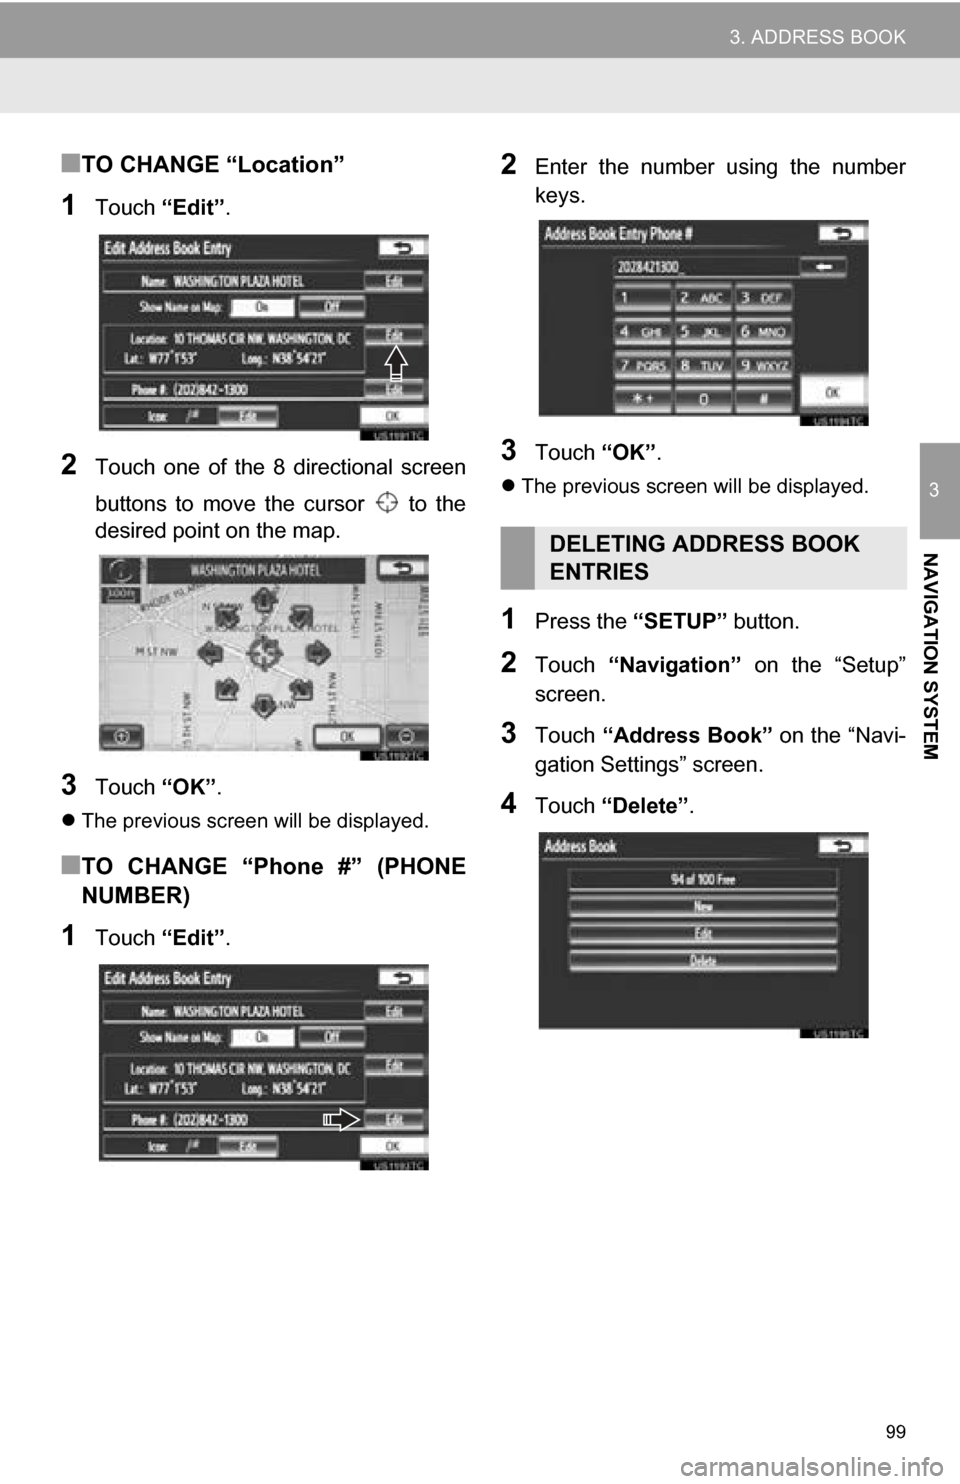
■TO CHANGE “Location”
1Touch “Edit”.
2Touch one of the 8 directional screen
buttons to move the cursor to the
desired point on the map.
3Touch “OK”.
The previous screen will be displayed.
■TO CHANGE “Phone #” (PHONE
NUMBER)
1Touch “Edit”.
2Enter the number using the number
keys.
3Touch “OK”.
The previous screen will be displayed.
1Press the “SETUP” button.
2Touch “Navigation” on the “Setup”
screen.
3Touch “Address Book” on the “Navi-
gation Settings” screen.
4Touch “Delete” .
DELETING ADDRESS BOOK
ENTRIES
Page 100 of 336
100
3. ADDRESS BOOK
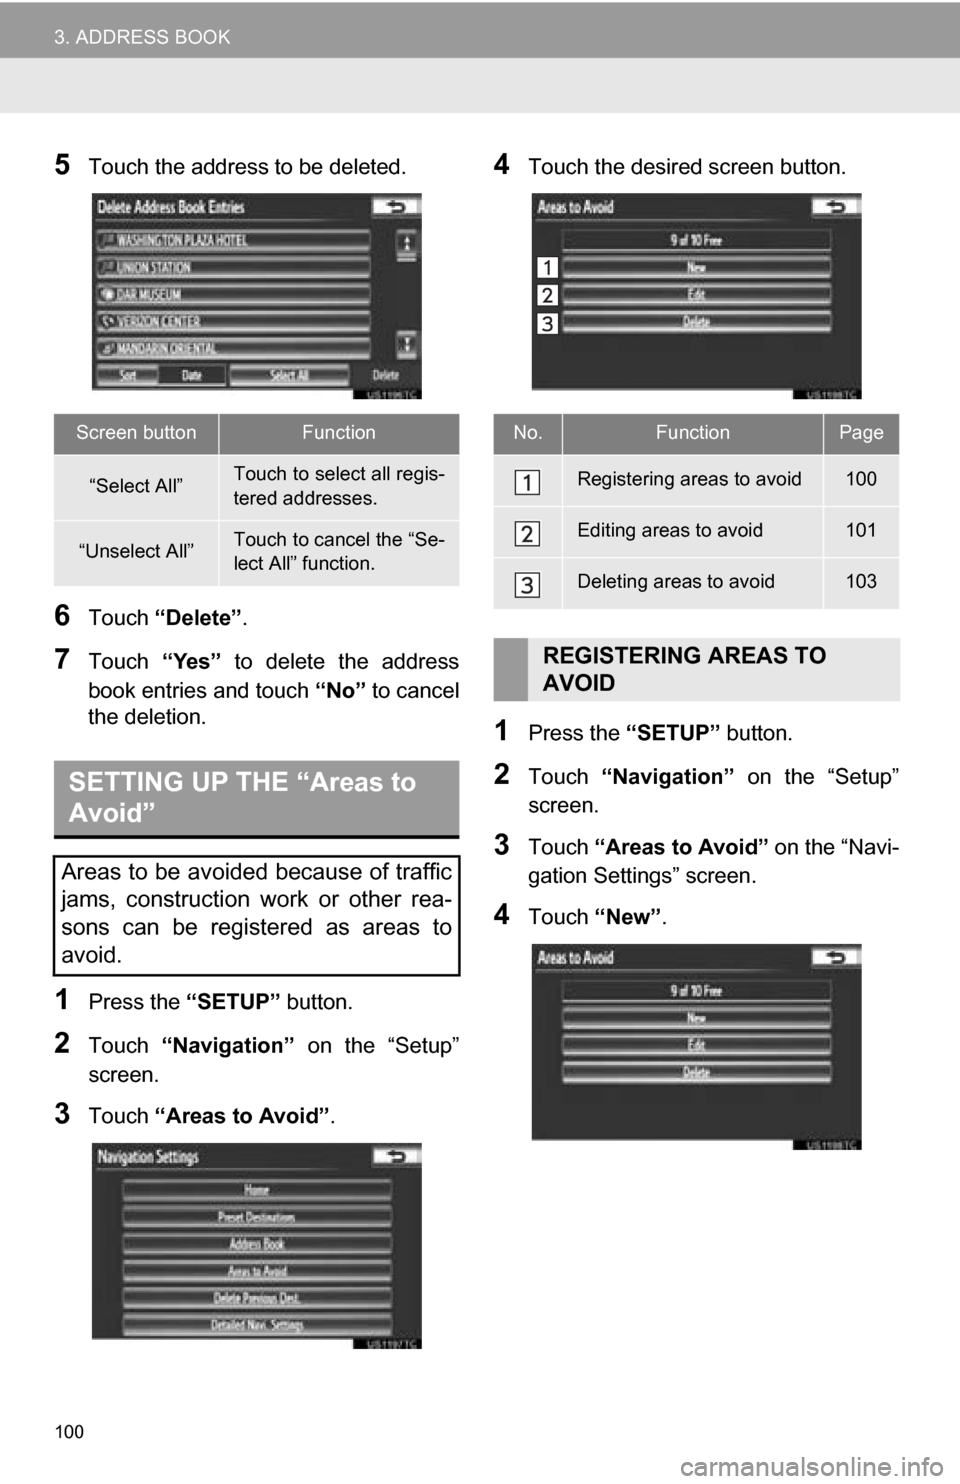
5Touch the address to be deleted.
6Touch “Delete” .
7Touch “Yes” to delete the address
book entries and touch “No” to cancel
the deletion.
1Press the “SETUP” button.
2Touch “Navigation” on the “Setup”
screen.
3Touch “Areas to Avoid” .
4Touch the desired screen button.
1Press the “SETUP” button.
2Touch “Navigation” on the “Setup”
screen.
3Touch “Areas to Avoid” on the “Navi-
gation Settings” screen.
4Touch “New”.
Screen buttonFunction
“Select All”Touch to select all regis-
tered addresses.
“Unselect All”Touch to cancel the “Se-
lect All” function.
SETTING UP THE “Areas to
Avoid”
Areas to be avoided because of traffic
jams, construction work or other rea-
sons can be registered as areas to
avoid.
No.FunctionPage
Registering areas to avoid100
Editing areas to avoid101
Deleting areas to avoid103
REGISTERING AREAS TO
AVOID