TOYOTA CAMRY 2013 XV50 / 9.G Navigation Manual
Manufacturer: TOYOTA, Model Year: 2013, Model line: CAMRY, Model: TOYOTA CAMRY 2013 XV50 / 9.GPages: 336, PDF Size: 7.37 MB
Page 31 of 336
31
1. BASIC INFORMATION BEFORE OPERATION
2
BASIC FUNCTION
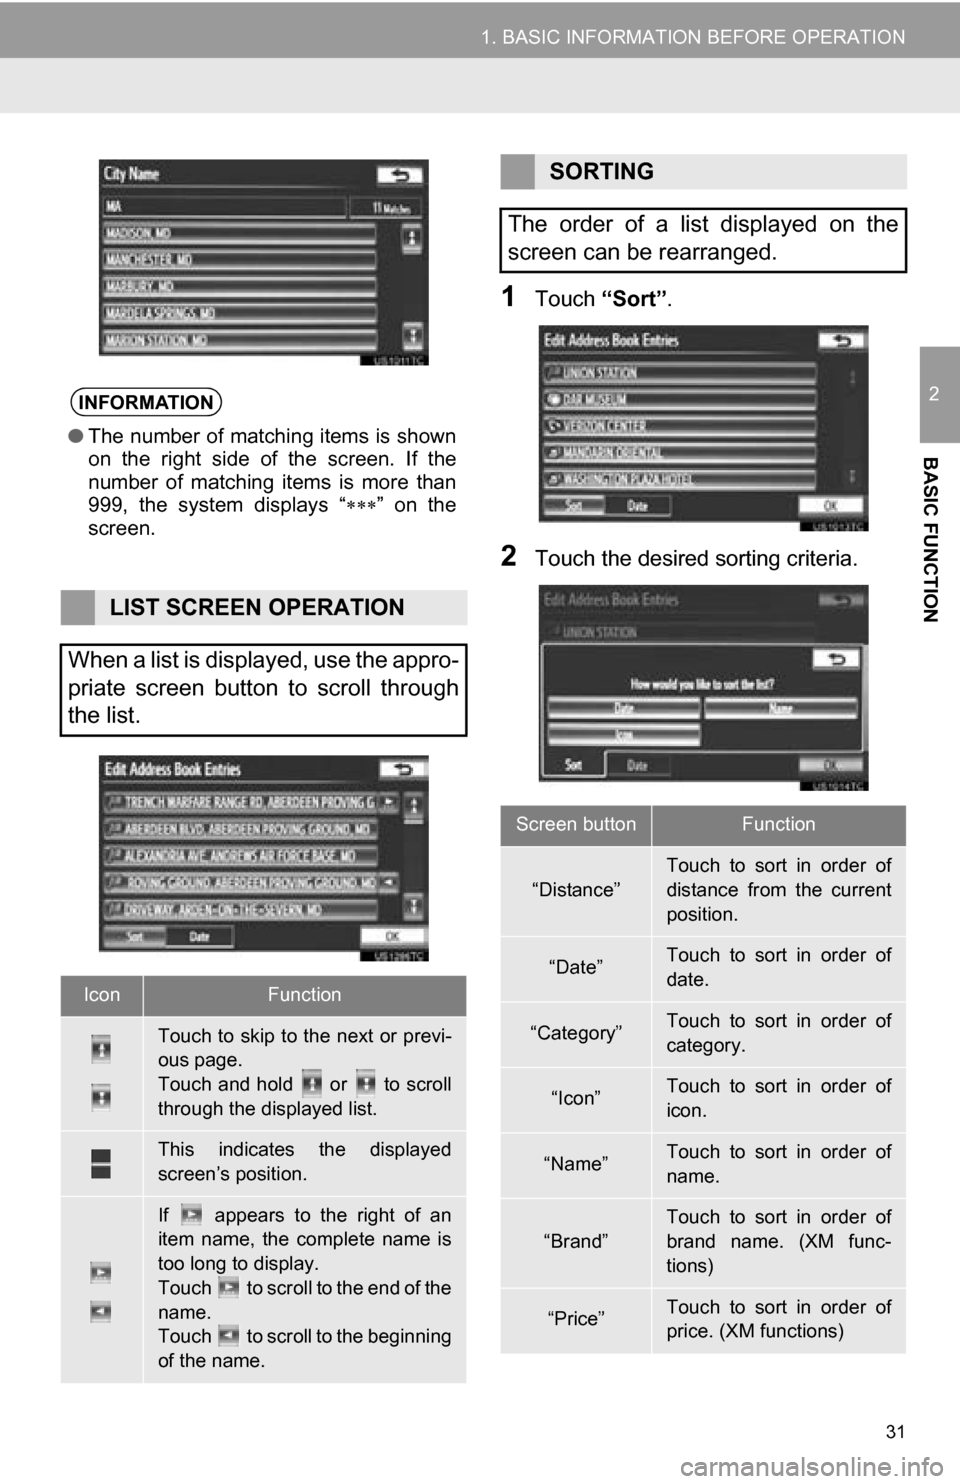
1Touch “Sort”.
2Touch the desired sorting criteria.
INFORMATION
●The number of matching items is shown
on the right side of the screen. If the
number of matching items is more than
999, the system displays “ ” on the
screen.
LIST SCREEN OPERATION
When a list is displayed, use the appro-
priate screen button to scroll through
the list.
IconFunction
Touch to skip to the next or previ-
ous page.
Touch and hold or to scroll
through the displayed list.
This indicates the displayed
screen’s position.
If appears to the right of an
item name, the complete name is
too long to display.
Touch to scroll to the end of the
name.
Touch to scroll to the beginning
of the name.
SORTING
The order of a list displayed on the
screen can be rearranged.
Screen buttonFunction
“Distance”Touch to sort in order of
distance from the current
position.
“Date”Touch to sort in order of
date.
“Category”Touch to sort in order of
category.
“Icon”Touch to sort in order of
icon.
“Name”Touch to sort in order of
name.
“Brand”
Touch to sort in order of
brand name. (XM func-
tions)
“Price”Touch to sort in order of
price. (XM functions)
Page 32 of 336
32
1. BASIC INFORMATION BEFORE OPERATION
4. SCREEN ADJUSTMENT
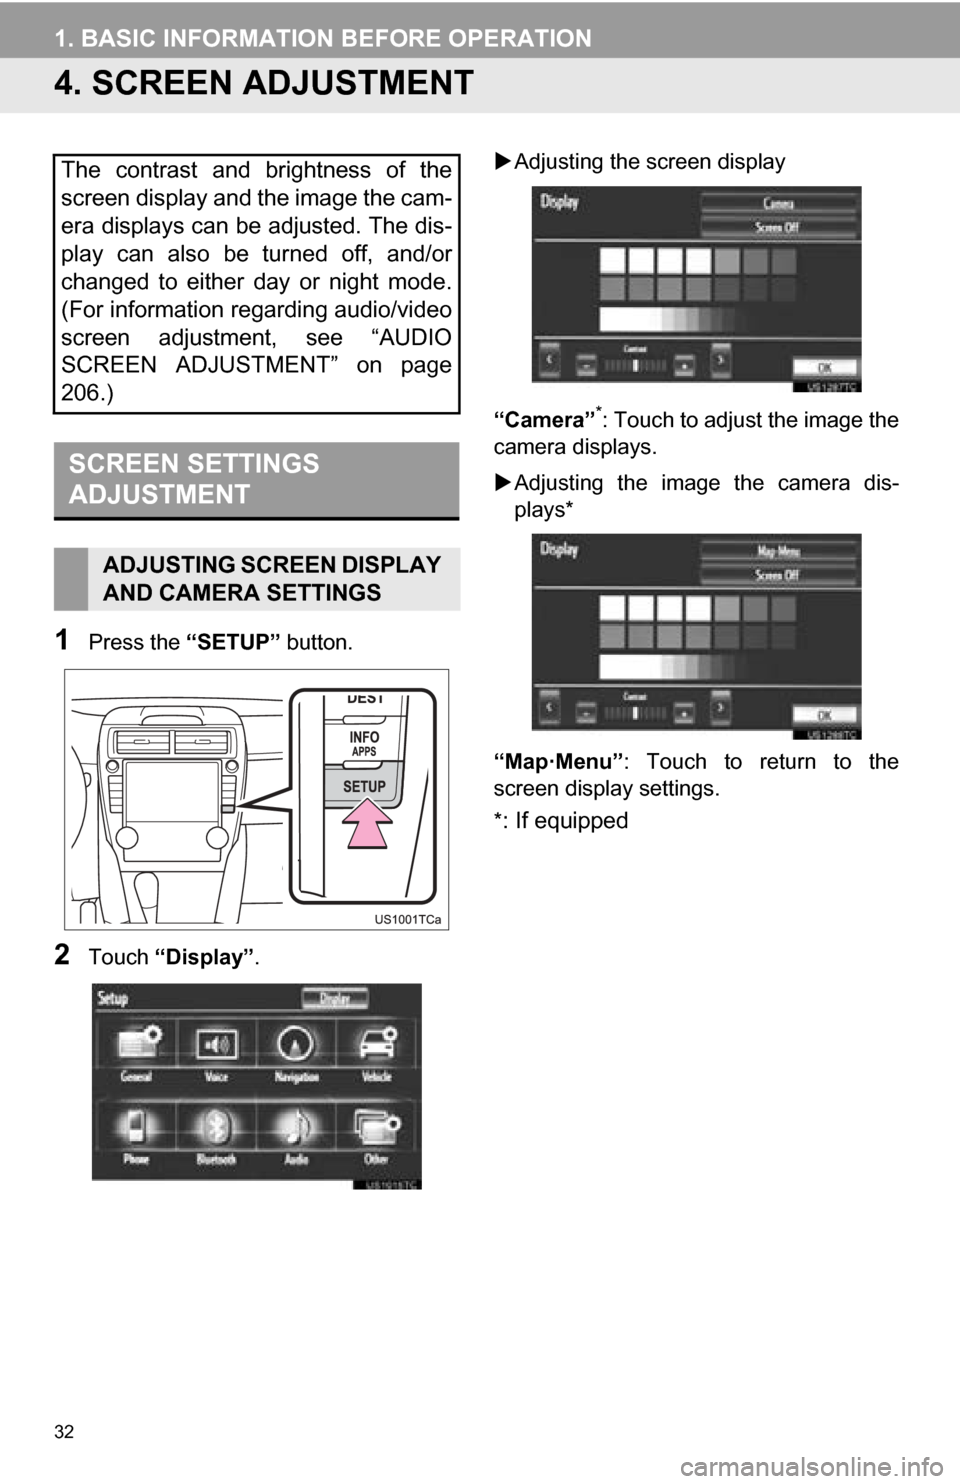
1Press the “SETUP” button.
2Touch “Display”.
Adjusting the screen display
“Camera”
*: Touch to adjust the image the
camera displays.
Adjusting the image the camera dis-
plays*
“Map·Menu”: Touch to return to the
screen display settings.
*
: If equipped
The contrast and brightness of the
screen display and the image the cam-
era displays can be adjusted. The dis-
play can also be turned off, and/or
changed to either day or night mode.
(For information regarding audio/video
screen adjustment, see “AUDIO
SCREEN ADJUSTMENT” on page
206.)
SCREEN SETTINGS
ADJUSTMENT
ADJUSTING SCREEN DISPLAY
AND CAMERA SETTINGS
Page 33 of 336
33
1. BASIC INFORMATION BEFORE OPERATION
2
BASIC FUNCTION
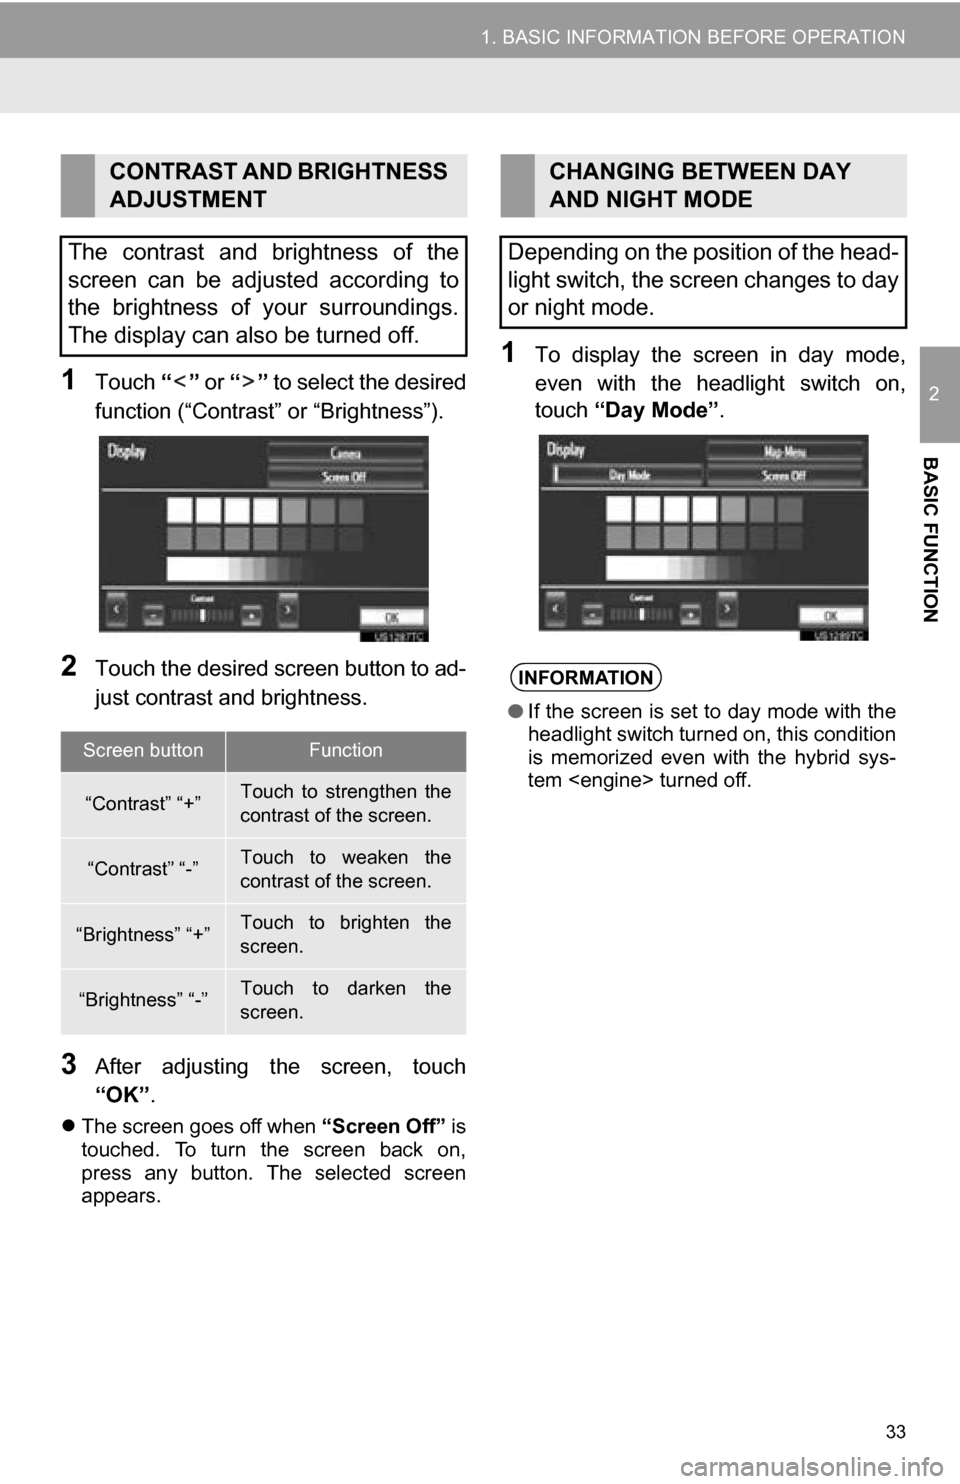
1Touch “” or “” to select the desired
function (“Contrast” or “Brightness”).
2Touch the desired screen button to ad-
just contrast and brightness.
3After adjusting t he screen, touch
“OK” .
The screen goes off when “Screen Off” is
touched. To turn the screen back on,
press any button. The selected screen
appears.
1To display the screen in day mode,
even with the headlight switch on,
touch “Day Mode” .
CONTRAST AND BRIGHTNESS
ADJUSTMENT
The contrast and brightness of the
screen can be adjusted according to
the brightness of your surroundings.
The display can also be turned off.
Screen buttonFunction
“Contrast” “+”Touch to strengthen the
contrast of the screen.
“Contrast” “-”Touch to weaken the
contrast of the screen.
“Brightness” “+”Touch to brighten the
screen.
“Brightness” “-”Touch to darken the
screen.
CHANGING BETWEEN DAY
AND NIGHT MODE
Depending on the position of the head-
light switch, the screen changes to day
or night mode.
INFORMATION
● If the screen is set to day mode with the
headlight switch turned on, this condition
is memorized even with the hybrid sys-
tem
Page 34 of 336
34
1. BASIC INFORMATION BEFORE OPERATION
5. MAP SCREEN OPERATION
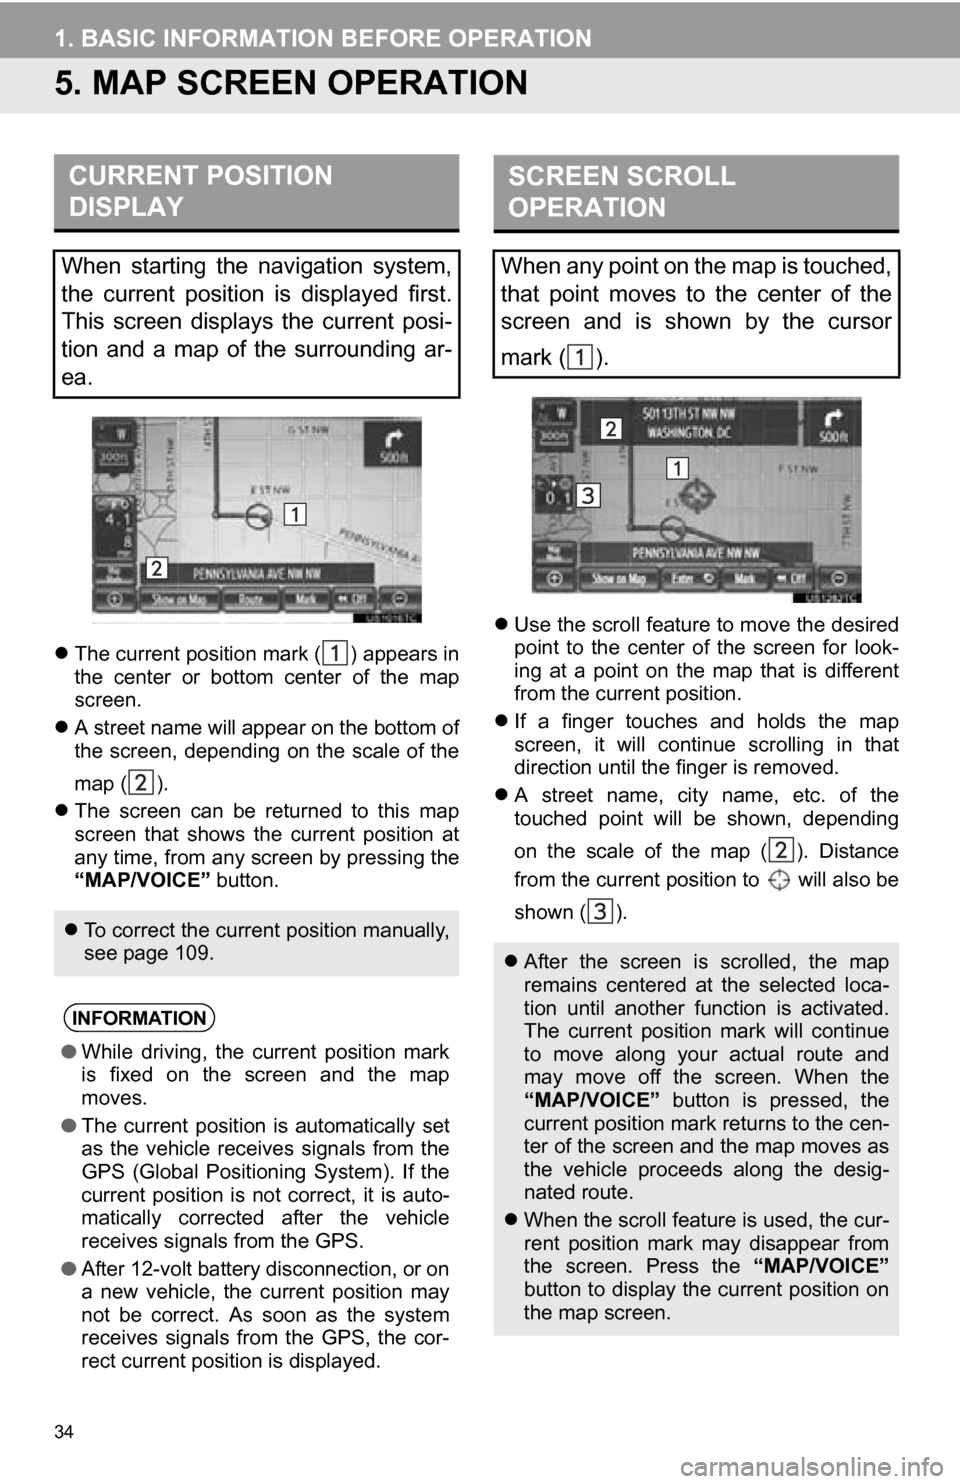
The current position mark ( ) appears in
the center or bottom center of the map
screen.
A street name will appear on the bottom of
the screen, depending on the scale of the
map ( ).
The screen can be returned to this map
screen that shows the current position at
any time, from any screen by pressing the
“MAP/VOICE” button.
Use the scroll feature to move the desired
point to the center of the screen for look-
ing at a point on the map that is different
from the current position.
If a finger touches and holds the map
screen, it will continue scrolling in that
direction until the finger is removed.
A street name, city name, etc. of the
touched point will be shown, depending
on the scale of the map ( ). Distance
from the current position to will also be
shown ( ).
CURRENT POSITION
DISPLAY
When starting the navigation system,
the current position is displayed first.
This screen displays the current posi-
tion and a map of the surrounding ar-
ea.
To correct the current position manually,
see page 109.
INFORMATION
●While driving, the current position mark
is fixed on the screen and the map
moves.
● The current position is automatically set
as the vehicle receives signals from the
GPS (Global Positioning System). If the
current position is not correct, it is auto-
matically corrected after the vehicle
receives signals from the GPS.
● After 12-volt battery disconnection, or on
a new vehicle, the current position may
not be correct. As soon as the system
receives signals from the GPS, the cor-
rect current position is displayed.
SCREEN SCROLL
OPERATION
When any point on the map is touched,
that point moves to the center of the
screen and is shown by the cursor
mark ( ).
After the screen is scrolled, the map
remains centered at the selected loca-
tion until another function is activated.
The current position mark will continue
to move along your actual route and
may move off the screen. When the
“MAP/VOICE” button is pressed, the
current position mark returns to the cen-
ter of the screen and the map moves as
the vehicle proceeds along the desig-
nated route.
When the scroll feature is used, the cur-
rent position mark may disappear from
the screen. Press the “MAP/VOICE”
button to display the current position on
the map screen.
Page 35 of 336
35
1. BASIC INFORMATION BEFORE OPERATION
2
BASIC FUNCTION
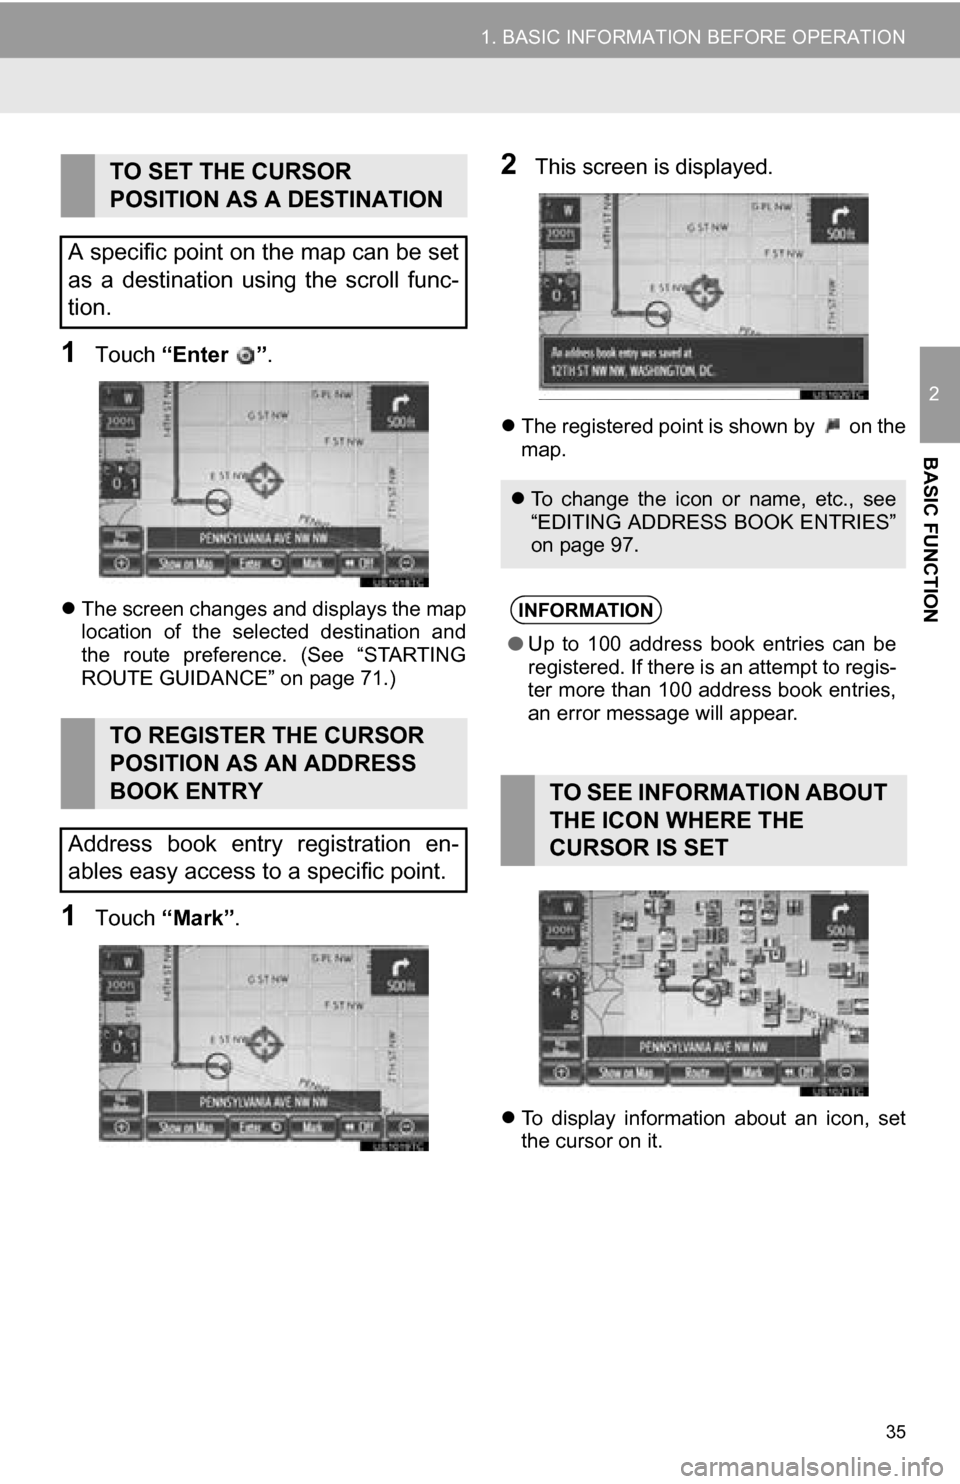
1Touch “Enter ” .
The screen changes and displays the map
location of the selected destination and
the route preference. (See “STARTING
ROUTE GUIDANCE” on page 71.)
1Touch “Mark” .
2This screen is displayed.
The registered point is shown by on the
map.
To display information about an icon, set
the cursor on it.
TO SET THE CURSOR
POSITION AS A DESTINATION
A specific point on the map can be set
as a destination using the scroll func-
tion.
TO REGISTER THE CURSOR
POSITION AS AN ADDRESS
BOOK ENTRY
Address book entry registration en-
ables easy access to a specific point.
To change the icon or name, etc., see
“EDITING ADDRESS BOOK ENTRIES”
on page 97.
INFORMATION
●Up to 100 address book entries can be
registered. If there is an attempt to regis-
ter more than 100 address book entries,
an error message will appear.
TO SEE INFORMATION ABOUT
THE ICON WHERE THE
CURSOR IS SET
Page 36 of 336
36
1. BASIC INFORMATION BEFORE OPERATION
■POI INFORMATION
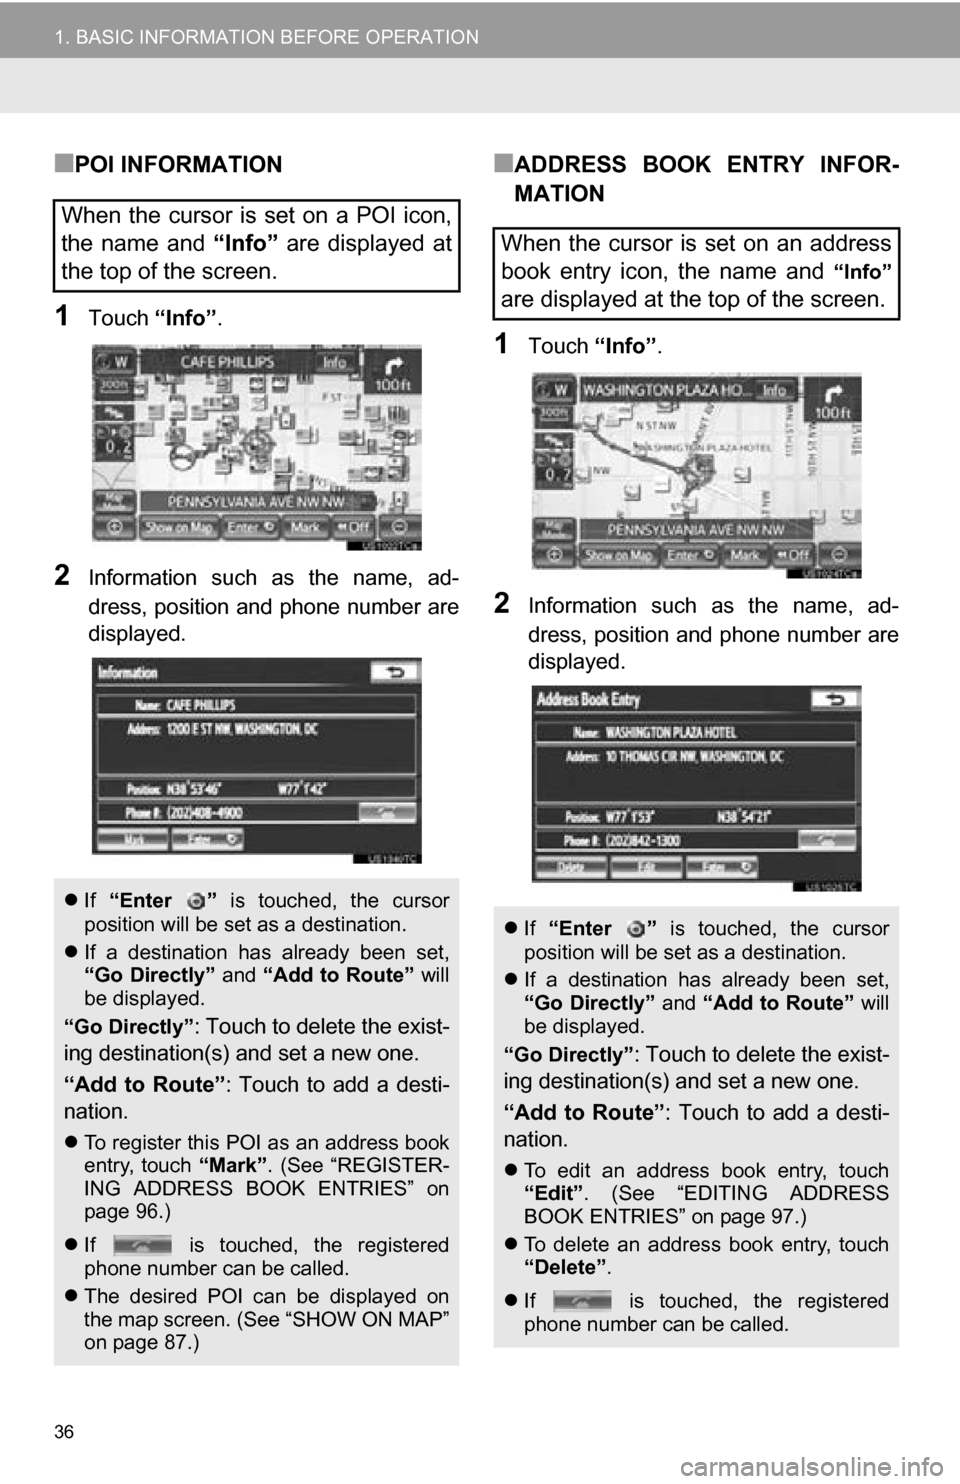
1Touch “Info”.
2Information such as the name, ad-
dress, position and phone number are
displayed.
■ADDRESS BOOK ENTRY INFOR-
MATION
1Touch “Info”.
2Information such as the name, ad-
dress, position and phone number are
displayed.
When the cursor is set on a POI icon,
the name and “Info” are displayed at
the top of the screen.
If “Enter ” is touched, the cursor
position will be set as a destination.
If a destination has already been set,
“Go Directly” and “Add to Route” will
be displayed.
“Go Directly”
: Touch to delete the exist-
ing destination(s) and set a new one.
“Add to Route” : Touch to add a desti-
nation.
To register this POI as an address book
entry, touch “Mark”. (See “REGISTER-
ING ADDRESS BOOK ENTRIES” on
page 96.)
If is touched, the registered
phone number can be called.
The desired POI can be displayed on
the map screen. (See “SHOW ON MAP”
on page 87.)
When the cursor is set on an address
book entry icon, the name and
“Info”
are displayed at the top of the screen.
If “Enter ” is touched, the cursor
position will be set as a destination.
If a destination has already been set,
“Go Directly” and “Add to Route” will
be displayed.
“Go Directly”
: Touch to delete the exist-
ing destination(s) and set a new one.
“Add to Route” : Touch to add a desti-
nation.
To edit an address book entry, touch
“Edit” . (See “EDITING ADDRESS
BOOK ENTRIES” on page 97.)
To delete an address book entry, touch
“Delete” .
If is touched, the registered
phone number can be called.
Page 37 of 336
37
1. BASIC INFORMATION BEFORE OPERATION
2
BASIC FUNCTION
■DESTINATION INFORMATION
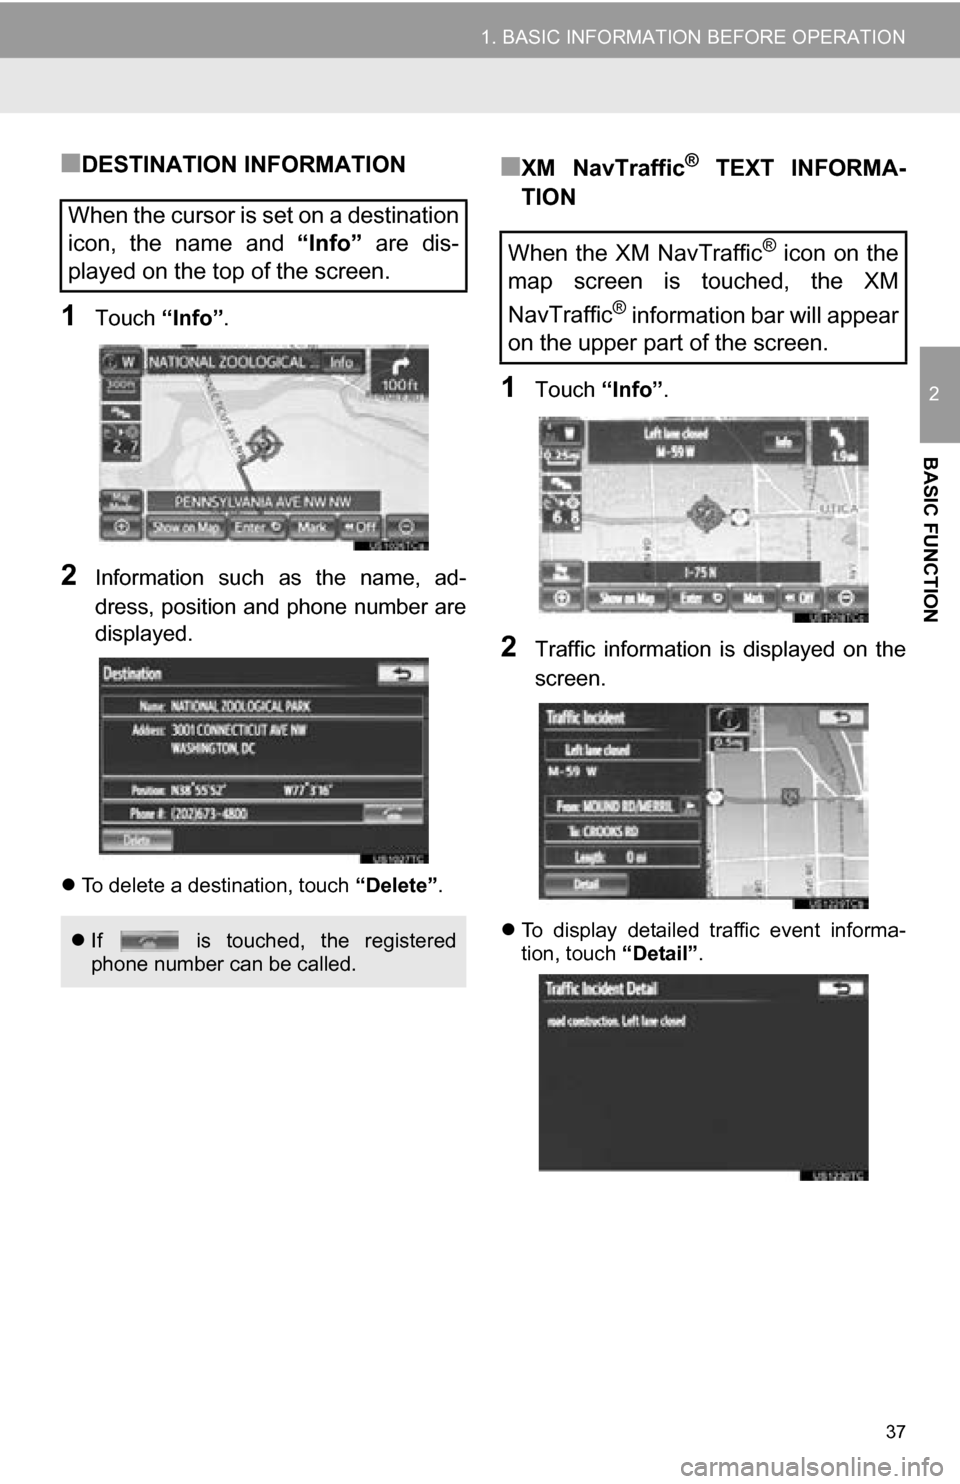
1Touch “Info”.
2Information such as the name, ad-
dress, position and phone number are
displayed.
To delete a destination, touch “Delete”.
■XM NavTraffic® TEXT INFORMA-
TION
1Touch “Info”.
2Traffic information is displayed on the
screen.
To display detailed traffic event informa-
tion, touch “Detail”.
When the cursor is set on a destination
icon, the name and “Info” are dis-
played on the top of the screen.
If is touched, the registered
phone number can be called.
When the XM NavTraffic® icon on the
map screen is touched, the XM
NavTraffic
® information bar will appear
on the upper part of the screen.
Page 38 of 336
38
1. BASIC INFORMATION BEFORE OPERATION
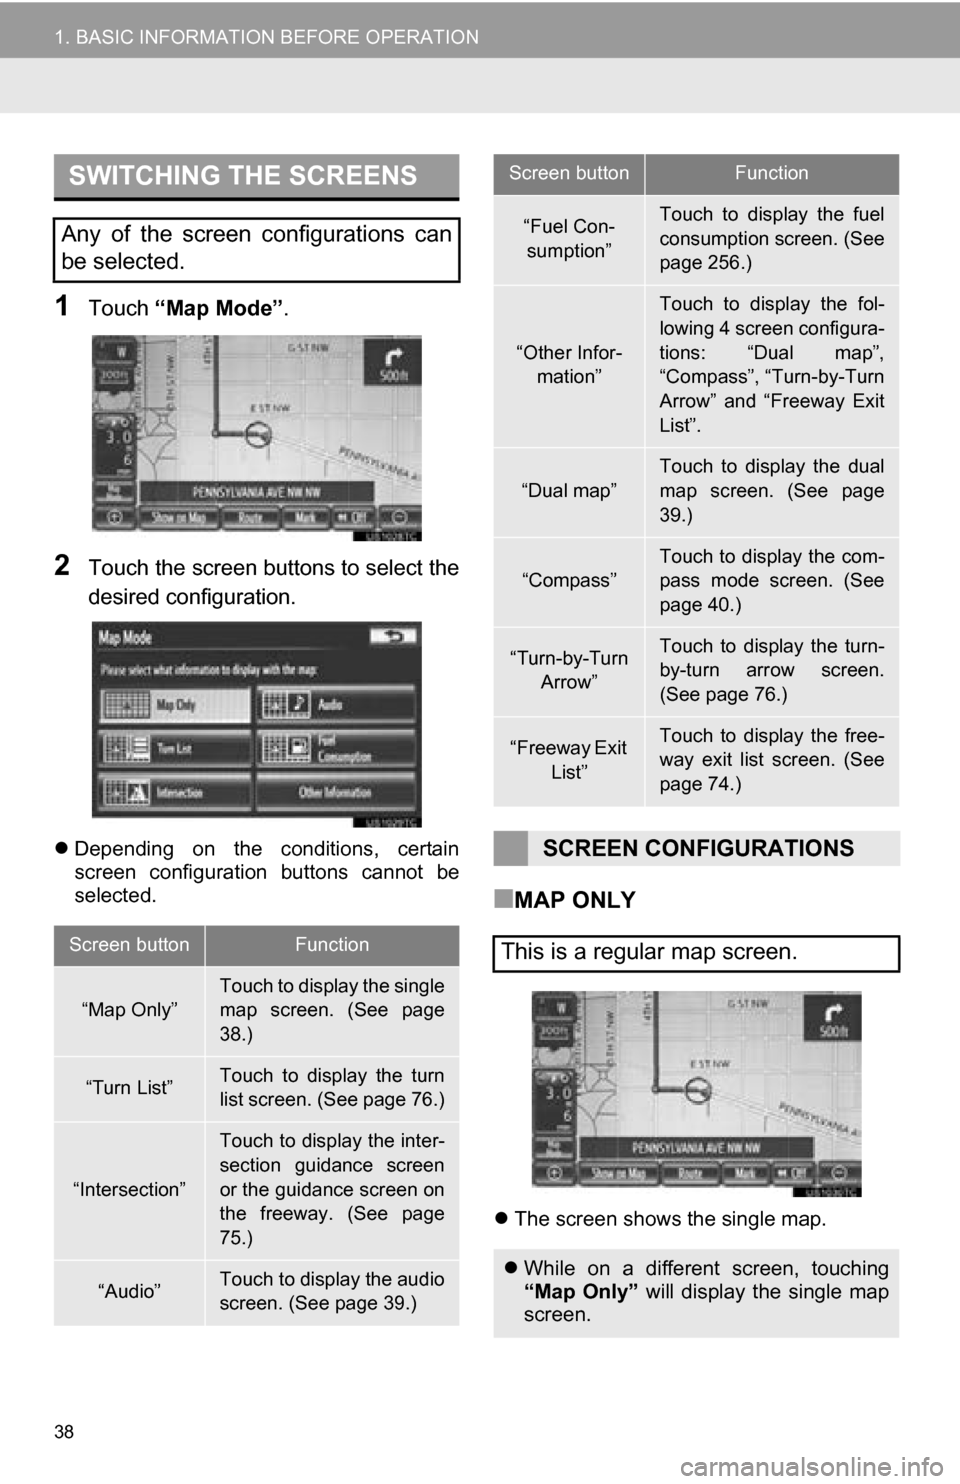
1Touch “Map Mode” .
2Touch the screen buttons to select the
desired configuration.
Depending on the conditions, certain
screen configuration buttons cannot be
selected.
■MAP ONLY
The screen shows the single map.
SWITCHING THE SCREENS
Any of the screen configurations can
be selected.
Screen buttonFunction
“Map Only”Touch to display the single
map screen. (See page
38.)
“Turn List”Touch to display the turn
list screen. (See page 76.)
“Intersection”
Touch to display the inter-
section guidance screen
or the guidance screen on
the freeway. (See page
75.)
“Audio”Touch to display the audio
screen. (See page 39.)
“Fuel Con-
sumption”Touch to display the fuel
consumption screen. (See
page 256.)
“Other Infor- mation”
Touch to display the fol-
lowing 4 screen configura-
tions: “Dual map”,
“Compass”, “Turn-by-Turn
Arrow” and “Freeway Exit
List”.
“Dual map”
Touch to display the dual
map screen. (See page
39.)
“Compass”
Touch to display the com-
pass mode screen. (See
page 40.)
“Turn-by-Turn Arrow”Touch to display the turn-
by-turn arrow screen.
(See page 76.)
“Freeway Exit List”Touch to display the free-
way exit list screen. (See
page 74.)
SCREEN CONFIGURATIONS
This is a regular map screen.
While on a different screen, touching
“Map Only” will display the single map
screen.
Screen buttonFunction
Page 39 of 336
39
1. BASIC INFORMATION BEFORE OPERATION
2
BASIC FUNCTION
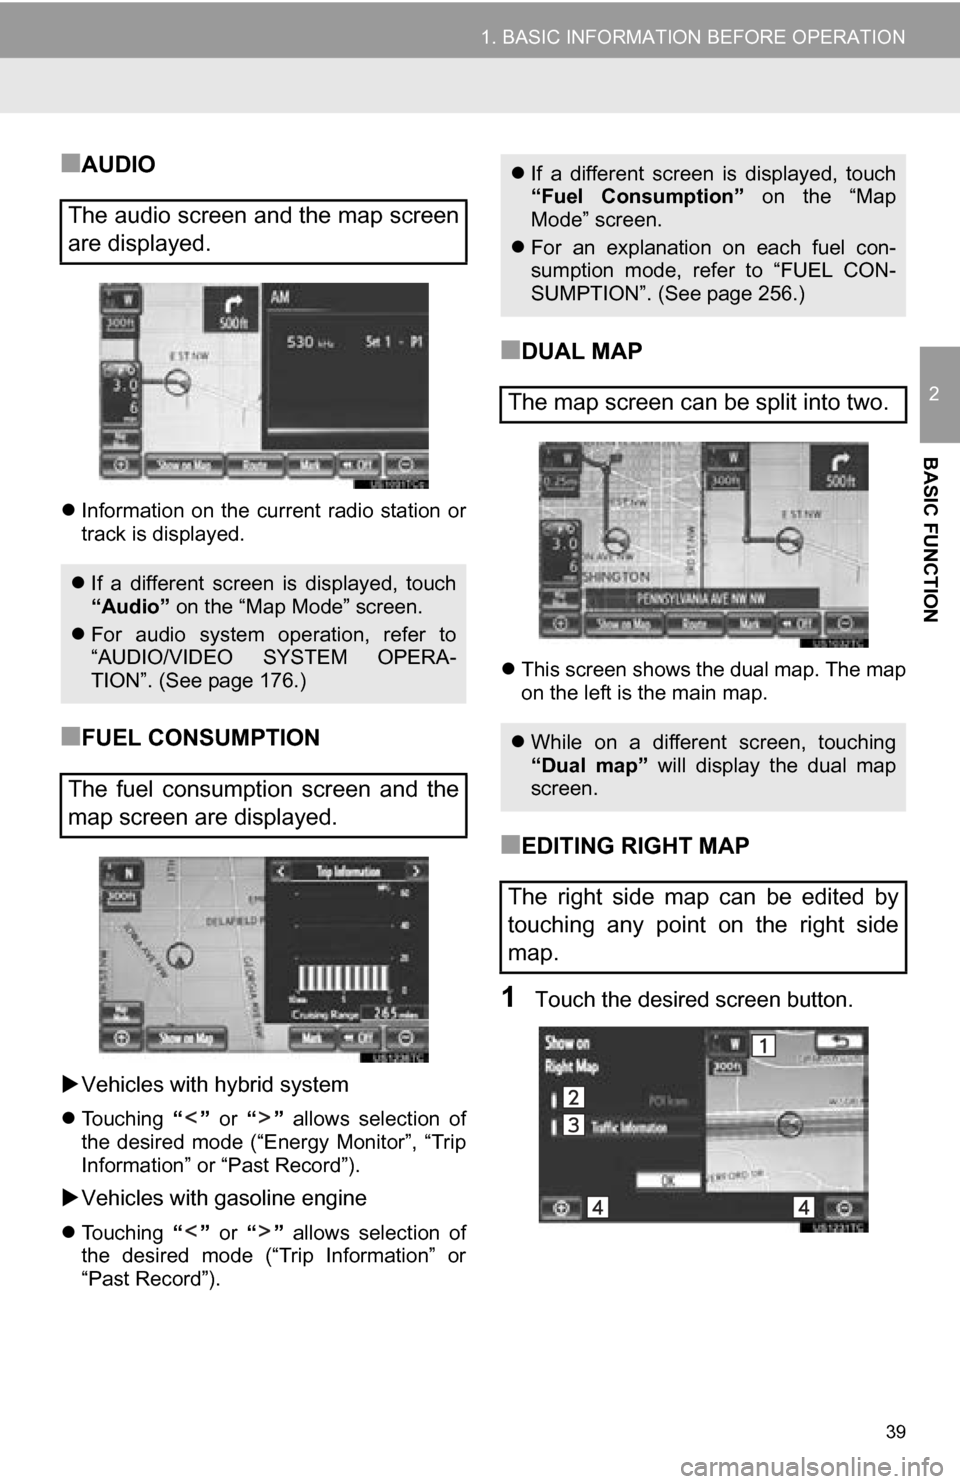
■AUDIO
Information on the current radio station or
track is displayed.
■FUEL CONSUMPTION
Vehicles with hybrid system
Touching “” or “” allows selection of
the desired mode (“Energy Monitor”, “Trip
Information” or “Past Record”).
Vehicles with gasoline engine
Touching “” or “” allows selection of
the desired mode (“Trip Information” or
“Past Record”).
■DUAL MAP
This screen shows the dual map. The map
on the left is the main map.
■EDITING RIGHT MAP
1Touch the desired screen button.
The audio screen and the map screen
are displayed.
If a different screen is displayed, touch
“Audio” on the “Map Mode” screen.
For audio system operation, refer to
“AUDIO/VIDEO SYSTEM OPERA-
TION”. (See page 176.)
The fuel consumption screen and the
map screen are displayed.
If a different screen is displayed, touch
“Fuel Consumption” on the “Map
Mode” screen.
For an explanation on each fuel con-
sumption mode, refer to “FUEL CON-
SUMPTION”. (See page 256.)
The map screen can be split into two.
While on a different screen, touching
“Dual map” will display the dual map
screen.
The right side map can be edited by
touching any point on the right side
map.
Page 40 of 336
40
1. BASIC INFORMATION BEFORE OPERATION
The following procedures can be per-
formed on this screen:
2Touch “OK” when editing is complet-
ed.
The screen returns to the dual map
screen.
■COMPASS
Information about the destination, current
position and a compass is displayed on
the screen.
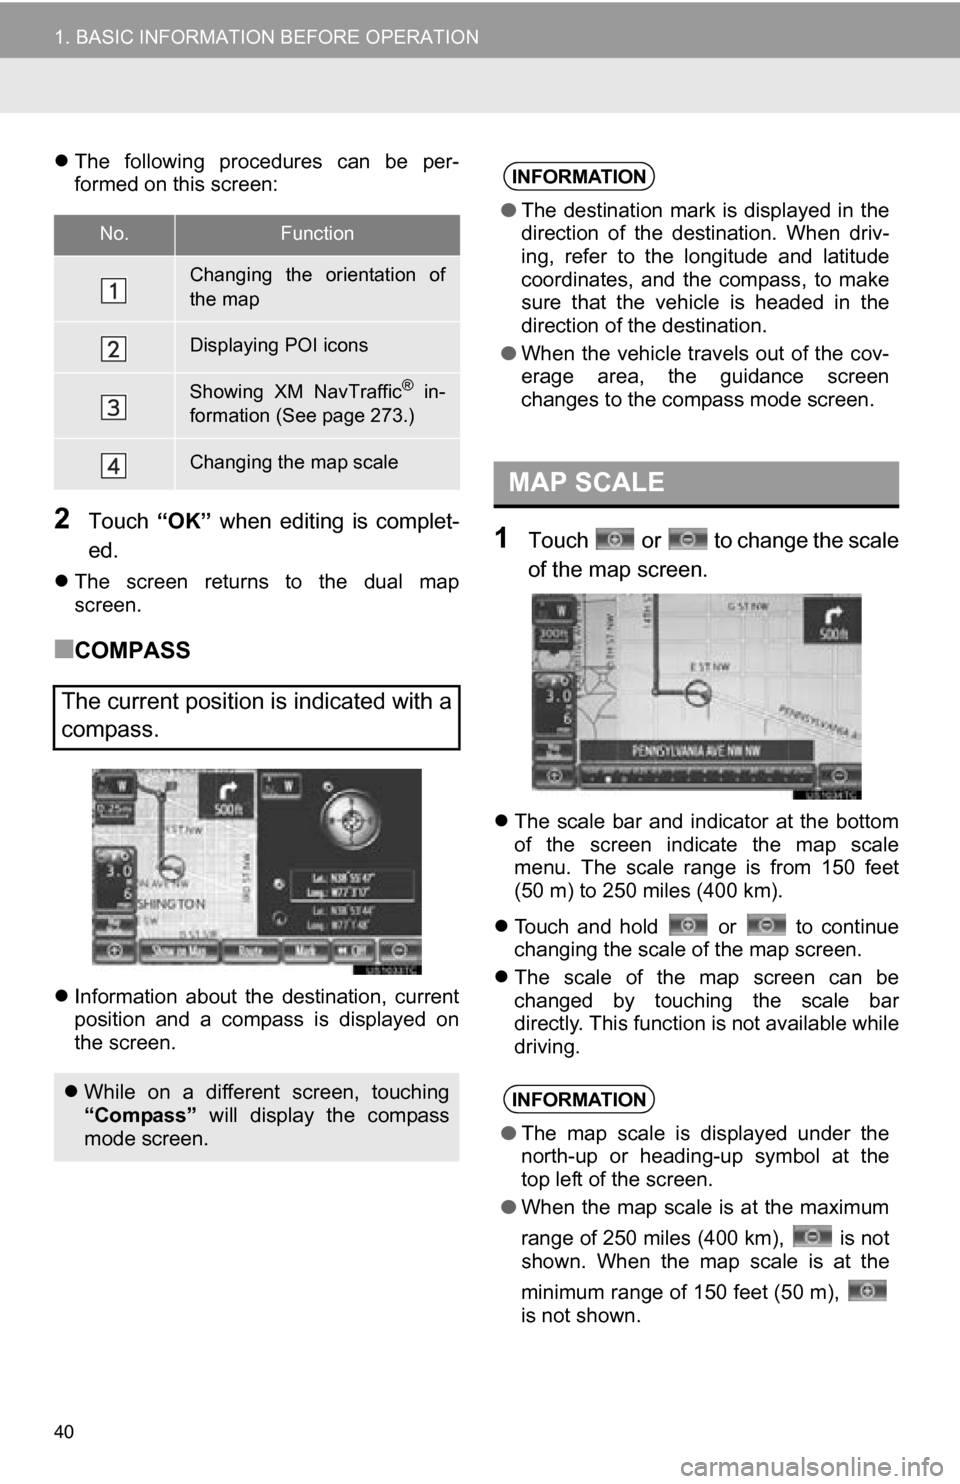
1Touch or to change the scale
of the map screen.
The scale bar and indicator at the bottom
of the screen indicate the map scale
menu. The scale range is from 150 feet
(50 m) to 250 miles (400 km).
Touch and hold or to continue
changing the scale of the map screen.
The scale of the map screen can be
changed by touching the scale bar
directly. This function is not available while
driving.
No.Function
Changing the orientation of
the map
Displaying POI icons
Showing XM NavTraffic® in-
formation (See page 273.)
Changing the map scale
The current position is indicated with a
compass.
While on a different screen, touching
“Compass” will display the compass
mode screen.
INFORMATION
● The destination mark is displayed in the
direction of the destination. When driv-
ing, refer to the longitude and latitude
coordinates, and the compass, to make
sure that the vehicle is headed in the
direction of the destination.
● When the vehicle travels out of the cov-
erage area, the guidance screen
changes to the compass mode screen.
MAP SCALE
INFORMATION
●The map scale is displayed under the
north-up or heading-up symbol at the
top left of the screen.
● When the map scale is at the maximum
range of 250 miles (400 km), is not
shown. When the map scale is at the
minimum range of 150 feet (50 m),
is not shown.