navigation TOYOTA CAMRY 2014 XV50 / 9.G Navigation Manual
[x] Cancel search | Manufacturer: TOYOTA, Model Year: 2014, Model line: CAMRY, Model: TOYOTA CAMRY 2014 XV50 / 9.GPages: 294, PDF Size: 19.75 MB
Page 142 of 294

142
1. USEFUL INFORMATION
2. RECEIVING TRAFFIC MAP INFORMATION*
1Press the “APPS” button.
2Select “Traffic”.
3Check that the “Traffic Map” screen is
displayed.Traffic map information can be re-
ceived via HD Radio broadcast.
DISPLAYING TRAFFIC MAP
INFORMATION
*: Without navigation function
No.Function
Current position of your car
Traffic information line
The line color means the following:
Red: Heavy congestion
Yellow: Moderate traffic
Green: Freely flowing traffic
INFORMATION
●Traffic map information is available in
the 48 states, D.C. and Alaska of the
United States.
Page 143 of 294
143
1. USEFUL INFORMATION
5
INFORMATION
3. DATA SERVICES SETTINGS*
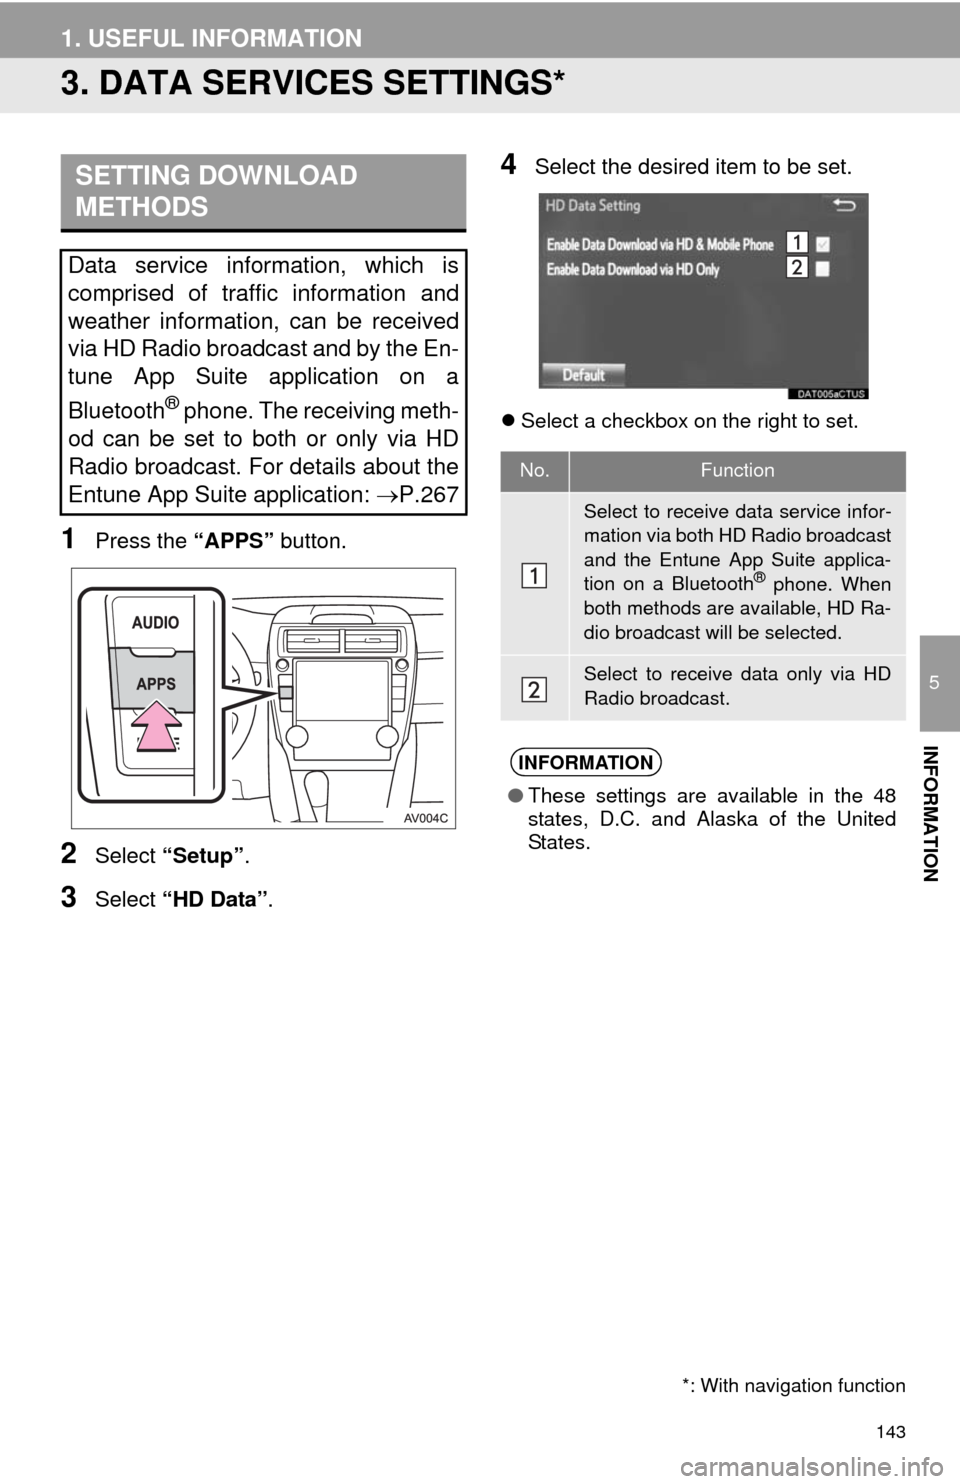
1Press the “APPS” button.
2Select “Setup”.
3Select “HD Data”.
4Select the desired item to be set.
Select a checkbox on the right to set.
SETTING DOWNLOAD
METHODS
Data service information, which is
comprised of traffic information and
weather information, can be received
via HD Radio broadcast and by the En-
tune App Suite application on a
Bluetooth
® phone. The receiving meth-
od can be set to both or only via HD
Radio broadcast. For details about the
Entune App Suite application: P.267
*: With navigation function
No.Function
Select to receive data service infor-
mation via both HD Radio broadcast
and the Entune App Suite applica-
tion on a Bluetooth
® phone. When
both methods are available, HD Ra-
dio broadcast will be selected.
Select to receive data only via HD
Radio broadcast.
INFORMATION
●These settings are available in the 48
states, D.C. and Alaska of the United
States.
Page 160 of 294
160
1. PHONE OPERATION (HANDS-FREE SYSTEM FOR CELLULAR PHONES)
3. CALLING ON THE Bluetooth® PHONE
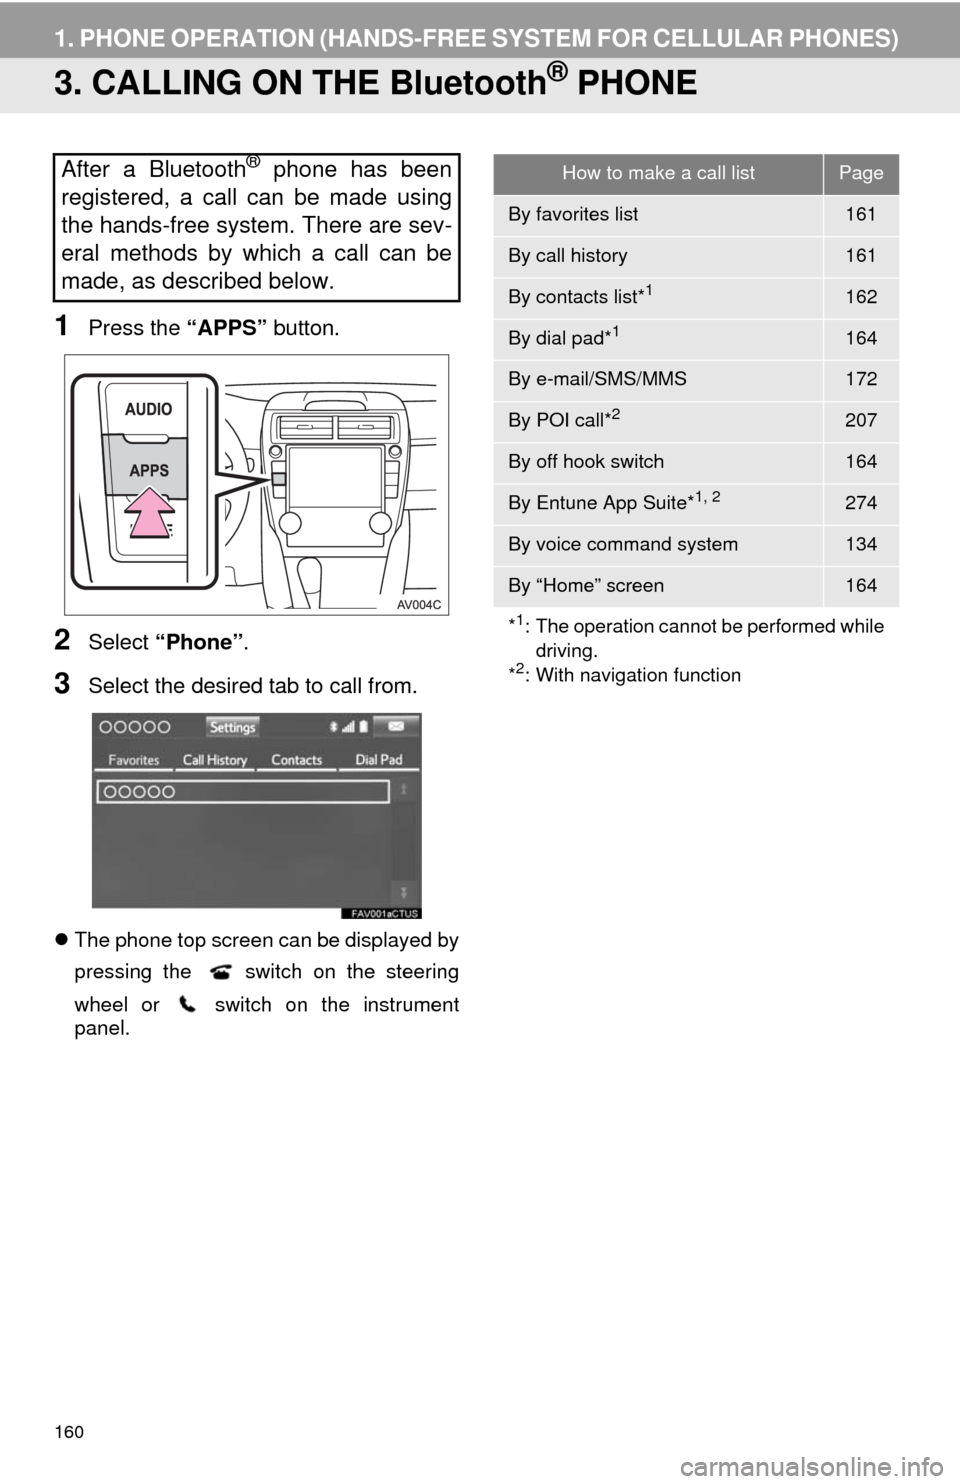
1Press the “APPS” button.
2Select “Phone”.
3Select the desired tab to call from.
The phone top screen can be displayed by
pressing the
switch on the steering
wheel or switch on the instrument
panel.
After a Bluetooth® phone has been
registered, a call can be made using
the hands-free system. There are sev-
eral methods by which a call can be
made, as described below.How to make a call listPage
By favorites list161
By call history161
By contacts list*1162
By dial pad*1164
By e-mail/SMS/MMS172
By POI call*2207
By off hook switch164
By Entune App Suite*1, 2274
By voice command system134
By “Home” screen164
*
1: The operation cannot be performed while
driving.
*
2: With navigation function
Page 172 of 294
172
1. PHONE OPERATION (HANDS-FREE SYSTEM FOR CELLULAR PHONES)
■EDITING QUICK REPLY MESSAG-
ES
1Select “Quick Message”.
2Select corresponding to the de-
sired message to edit.
3Select “OK” when editing is complet-
ed.
*: With navigation function
■CALLING FROM E-MAIL/SMS/MMS
MESSAGE DISPLAY
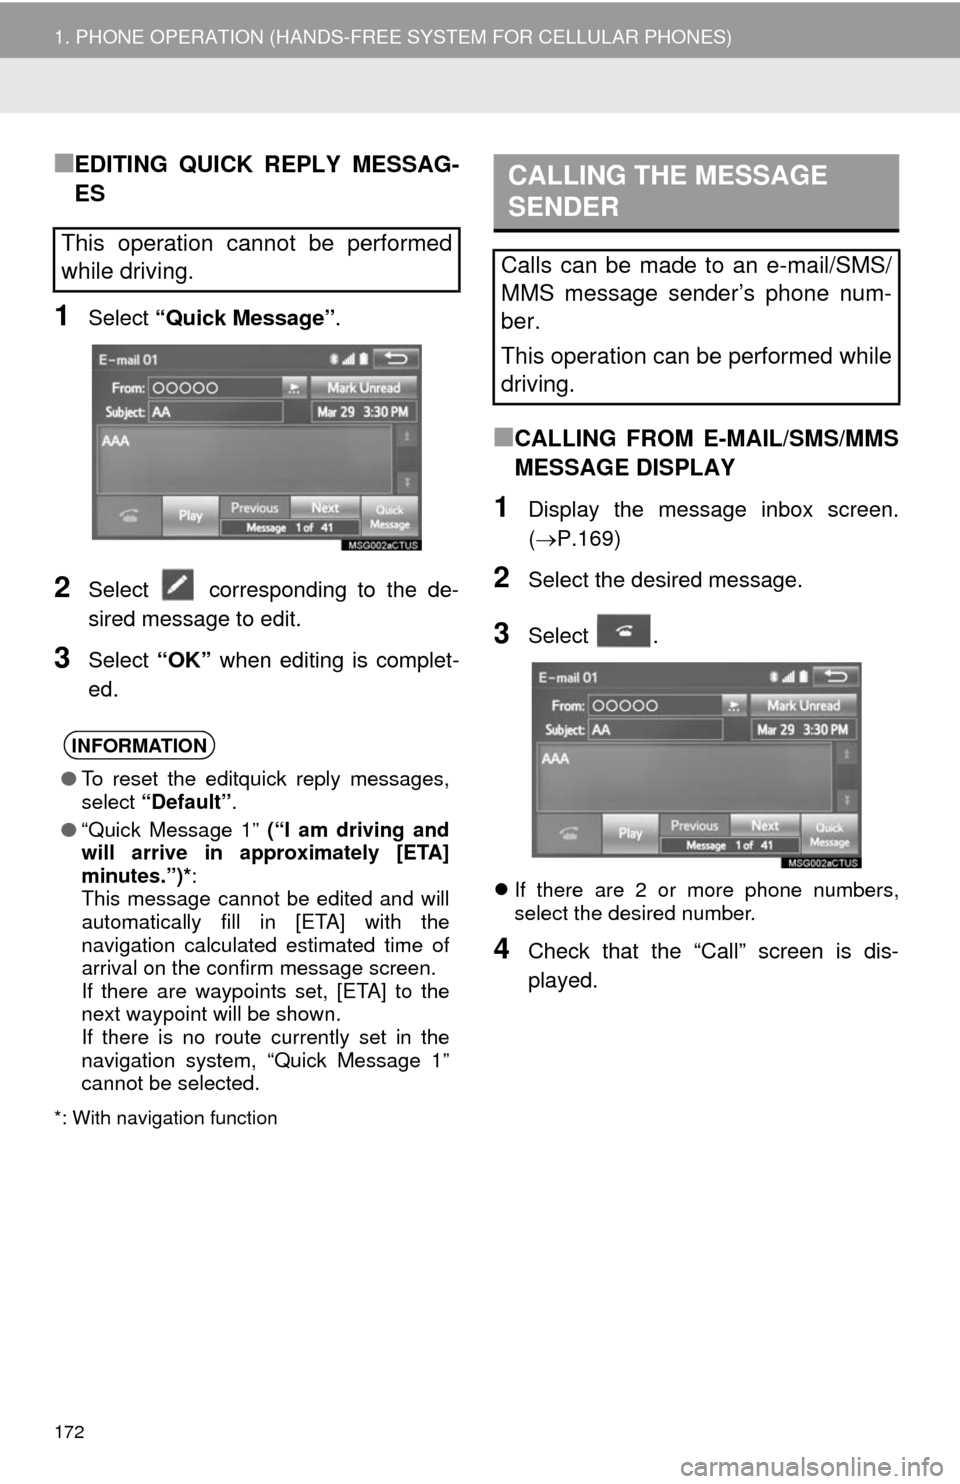
1Display the message inbox screen.
(P.169)
2Select the desired message.
3Select .
If there are 2 or more phone numbers,
select the desired number.
4Check that the “Call” screen is dis-
played.
This operation cannot be performed
while driving.
INFORMATION
●To reset the editquick reply messages,
select “Default”.
●“Quick Message 1” (“I am driving and
will arrive in approximately [ETA]
minutes.”)*:
This message cannot be edited and will
automatically fill in [ETA] with the
navigation calculated estimated time of
arrival on the confirm message screen.
If there are waypoints set, [ETA] to the
next waypoint will be shown.
If there is no route currently set in the
navigation system, “Quick Message 1”
cannot be selected.
CALLING THE MESSAGE
SENDER
Calls can be made to an e-mail/SMS/
MMS message sender’s phone num-
ber.
This operation can be performed while
driving.
Page 194 of 294
194
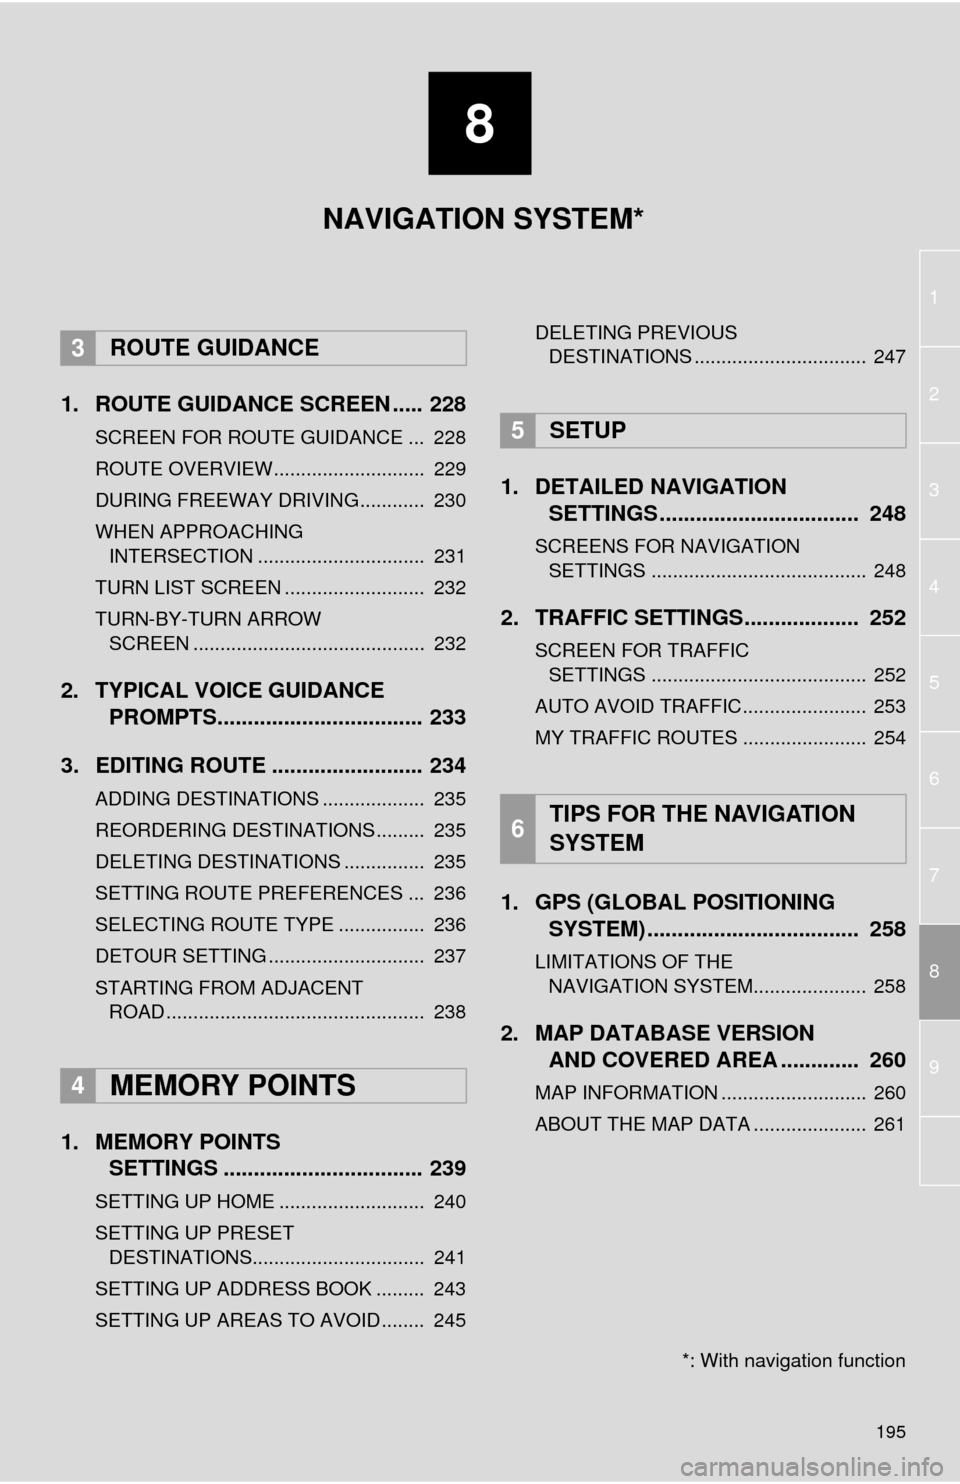
1. QUICK REFERENCE ................... 196
MAP SCREEN ..................................... 196
NAVIGATION OPTIONS SCREEN...... 198
2. MAP SCREEN OPERATION ....... 199
CURRENT POSITION DISPLAY ......... 199
MAP SCALE ........................................ 199
ORIENTATION OF THE MAP ............. 200
SWITCHING THE MAP MODE............ 201
SCREEN SCROLL OPERATION ........ 203
ADJUSTING LOCATION IN SMALL INCREMENTS................................... 204
3. MAP SCREEN INFORMATION .......................... 205
DISPLAYING MAP INFORMATION .... 205
DISPLAYING INFORMATION
ABOUT THE ICON WHERE
THE CURSOR IS SET ...................... 207
STANDARD MAP ICONS .................... 208
4. TRAFFIC INFORMATION ............ 209
DISPLAYING TRAFFIC INFORMATION ON THE MAP .......... 211
1. DESTINATION SEARCH SCREEN .................................... 212
2. SEARCH OPERATION.. .............. 214
SELECTING SEARCH AREA .............. 215
SETTING HOME AS
DESTINATION................................... 215
SETTING PRESET DESTINATIONS AS DESTINATION ............................. 215
SEARCHING BY ADDRESS ................ 216
SEARCHING BY POINT OF INTEREST ......................................... 217
SEARCHING FROM PREVIOUS DESTINATIONS ................................ 220
SEARCHING BY ADDRESS BOOK .... 220
SEARCHING BY EMERGENCY .......... 221
SEARCHING BY INTERSECTION AND FREEWAY ................................ 221
SEARCHING BY MAP ......................... 223
SEARCHING BY COORDINATES ....... 223
3. STARTING ROUTE GUIDANCE ....... ......................... 224
STARTING ROUTE GUIDANCE.......... 224
PAUSING GUIDANCE ......................... 227
1BASIC OPERATION2DESTINATION SEARCH
8
NAVIGATION SYSTEM*
Page 195 of 294
8
195
1
2
8
4
5
6
7
3
9
1. ROUTE GUIDANCE SCREEN ..... 228
SCREEN FOR ROUTE GUIDANCE ... 228
ROUTE OVERVIEW............................ 229
DURING FREEWAY DRIVING............ 230
WHEN APPROACHING INTERSECTION ............................... 231
TURN LIST SCREEN .......................... 232
TURN-BY-TURN ARROW SCREEN ........................................... 232
2. TYPICAL VOICE GUIDANCE PROMPTS.................................. 233
3. EDITING ROUTE ......................... 234
ADDING DESTINATIONS ................... 235
REORDERING DESTINATIONS ......... 235
DELETING DESTINATIONS ............... 235
SETTING ROUTE PREFERENCES ... 236
SELECTING ROUTE TYPE ................ 236
DETOUR SETTING ............................. 237
STARTING FROM ADJACENT ROAD ................................................ 238
1. MEMORY POINTS SETTINGS ................................. 239
SETTING UP HOME ........................... 240
SETTING UP PRESET
DESTINATIONS................................ 241
SETTING UP ADDRESS BOOK ......... 243
SETTING UP AREAS TO AVOID ........ 245 DELETING PREVIOUS
DESTINATIONS ................................ 247
1. DETAILED NAVIGATION SETTINGS ................................. 248
SCREENS FOR NAVIGATION
SETTINGS ........................................ 248
2. TRAFFIC SETTINGS................... 252
SCREEN FOR TRAFFIC SETTINGS ........................................ 252
AUTO AVOID TRAFFIC....................... 253
MY TRAFFIC ROUTES ....................... 254
1. GPS (GLOBAL POSITIONING SYSTEM) .................... ............... 258
LIMITATIONS OF THE
NAVIGATION SYSTEM..................... 258
2. MAP DATABASE VERSION AND COVERED AREA ............. 260
MAP INFORMATION ........................... 260
ABOUT THE MAP DATA ..................... 261
3ROUTE GUIDANCE
4MEMORY POINTS
5SETUP
6TIPS FOR THE NAVIGATION
SYSTEM
NAVIGATION SYSTEM*
*: With navigation function
Page 196 of 294
196
1. BASIC OPERATION
1. QUICK REFERENCE
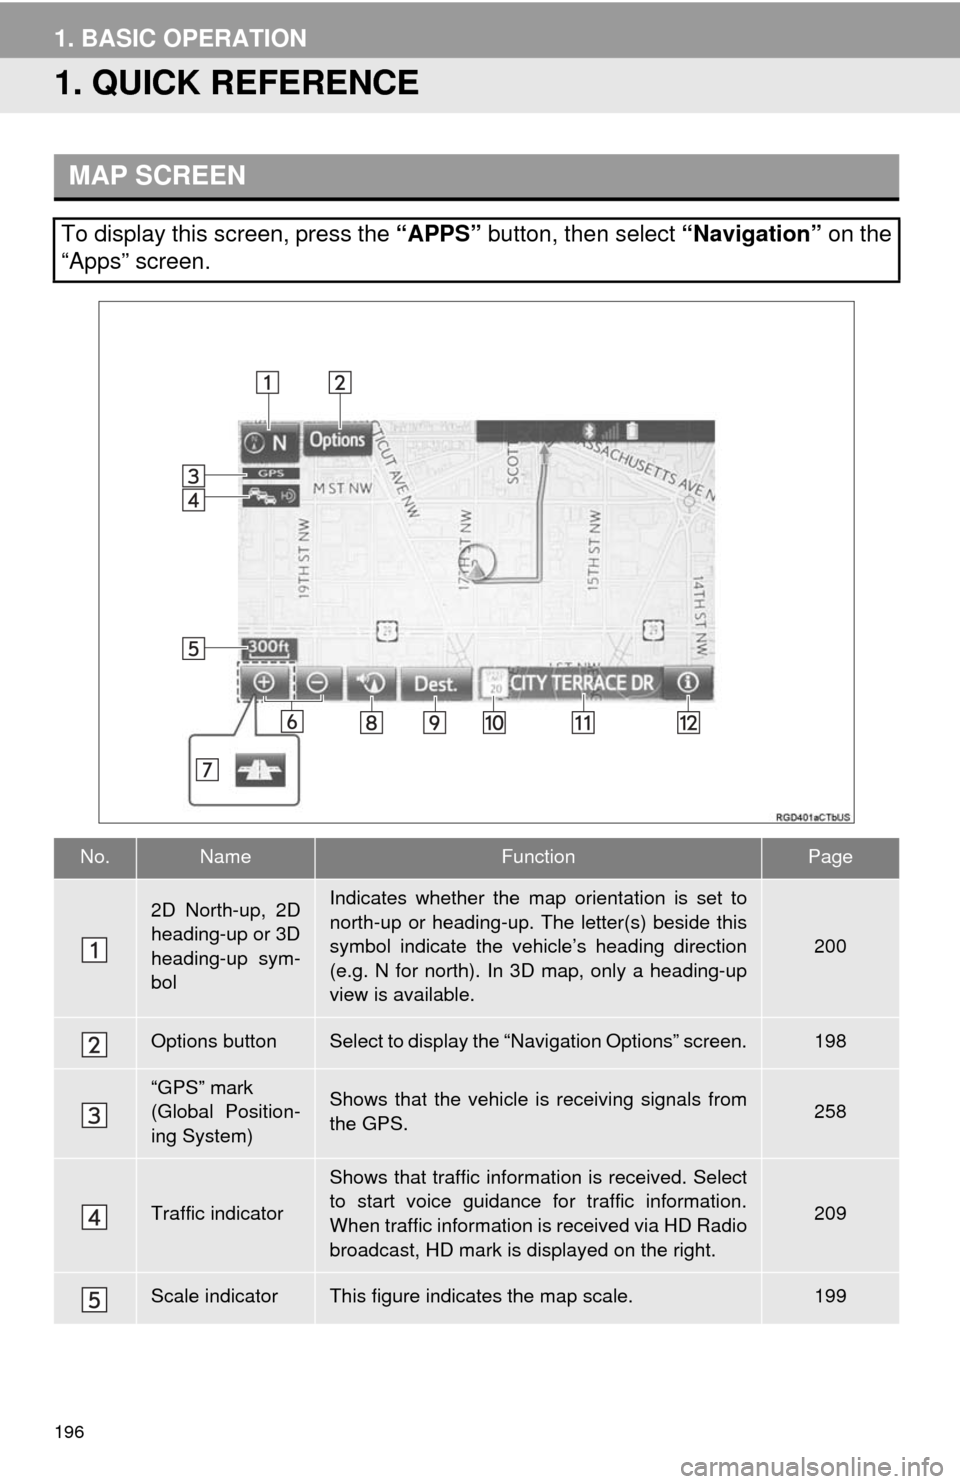
MAP SCREEN
To display this screen, press the “APPS” button, then select “Navigation” on the
“Apps” screen.
No.NameFunctionPage
2D North-up, 2D
heading-up or 3D
heading-up sym-
bolIndicates whether the map orientation is set to
north-up or heading-up. The letter(s) beside this
symbol indicate the vehicle’s heading direction
(e.g. N for north). In 3D map, only a heading-up
view is available.
200
Options buttonSelect to display the “Navigation Options” screen.198
“GPS” mark
(Global Position-
ing System)Shows that the vehicle is receiving signals from
the GPS.258
Traffic indicator
Shows that traffic information is received. Select
to start voice guidance for traffic information.
When traffic information is received via HD Radio
broadcast, HD mark is displayed on the right.
209
Scale indicatorThis figure indicates the map scale.199
Page 197 of 294
197
1. BASIC OPERATION
8
NAVIGATION SYSTEM
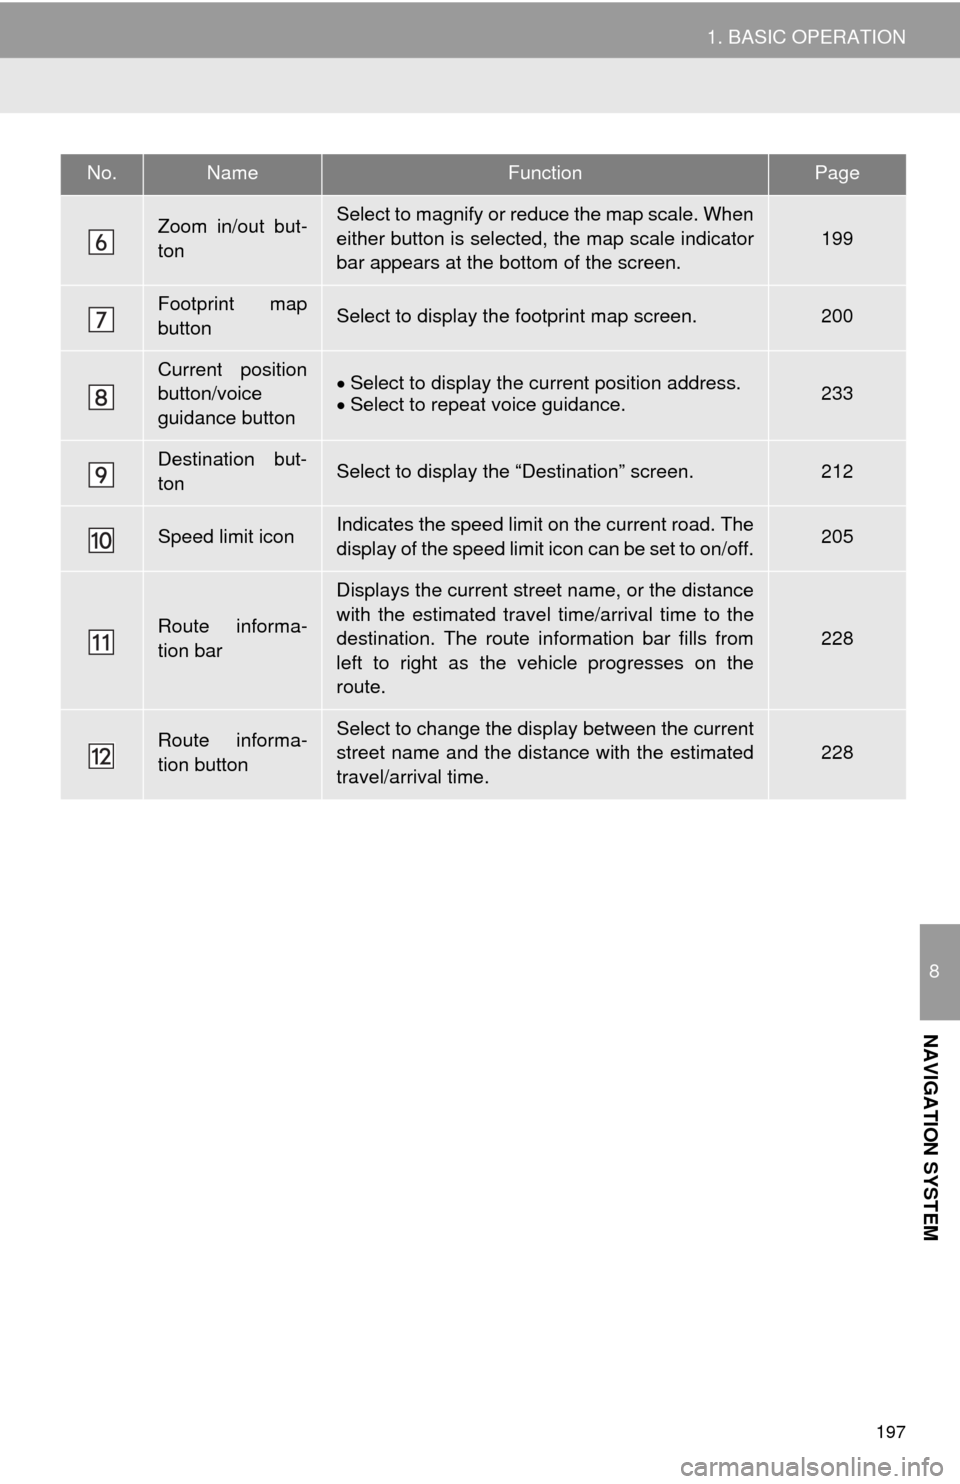
Zoom in/out but-
tonSelect to magnify or reduce the map scale. When
either button is selected, the map scale indicator
bar appears at the bottom of the screen.
199
Footprint map
buttonSelect to display the footprint map screen.200
Current position
button/voice
guidance buttonSelect to display the current position address.
Select to repeat voice guidance.233
Destination but-
tonSelect to display the “Destination” screen.212
Speed limit iconIndicates the speed limit on the current road. The
display of the speed limit icon can be set to on/off.205
Route informa-
tion bar
Displays the current street name, or the distance
with the estimated travel time/arrival time to the
destination. The route information bar fills from
left to right as the vehicle progresses on the
route.
228
Route informa-
tion buttonSelect to change the display between the current
street name and the distance with the estimated
travel/arrival time.228
No.NameFunctionPage
Page 198 of 294
198
1. BASIC OPERATION
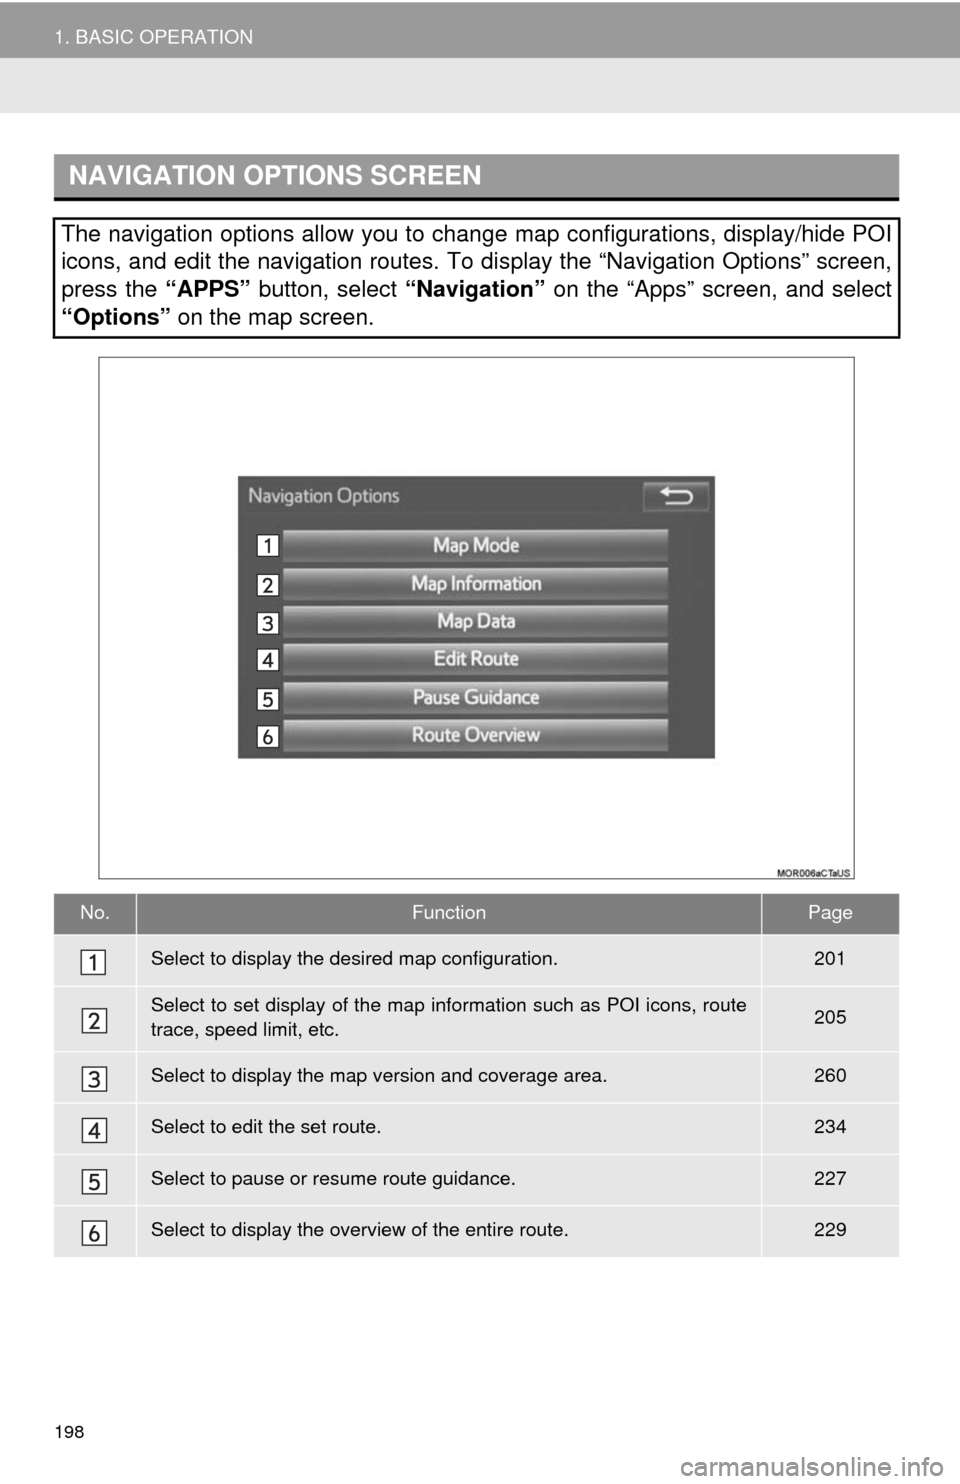
NAVIGATION OPTIONS SCREEN
The navigation options allow you to change map configurations, display/hide POI
icons, and edit the navigation routes. To display the “Navigation Options” screen,
press the “APPS” button, select “Navigation” on the “Apps” screen, and select
“Options” on the map screen.
No.FunctionPage
Select to display the desired map configuration.201
Select to set display of the map information such as POI icons, route
trace, speed limit, etc.205
Select to display the map version and coverage area.260
Select to edit the set route.234
Select to pause or resume route guidance.227
Select to display the overview of the entire route.229
Page 199 of 294
199
1. BASIC OPERATION
8
NAVIGATION SYSTEM
2. MAP SCREEN OPERATION
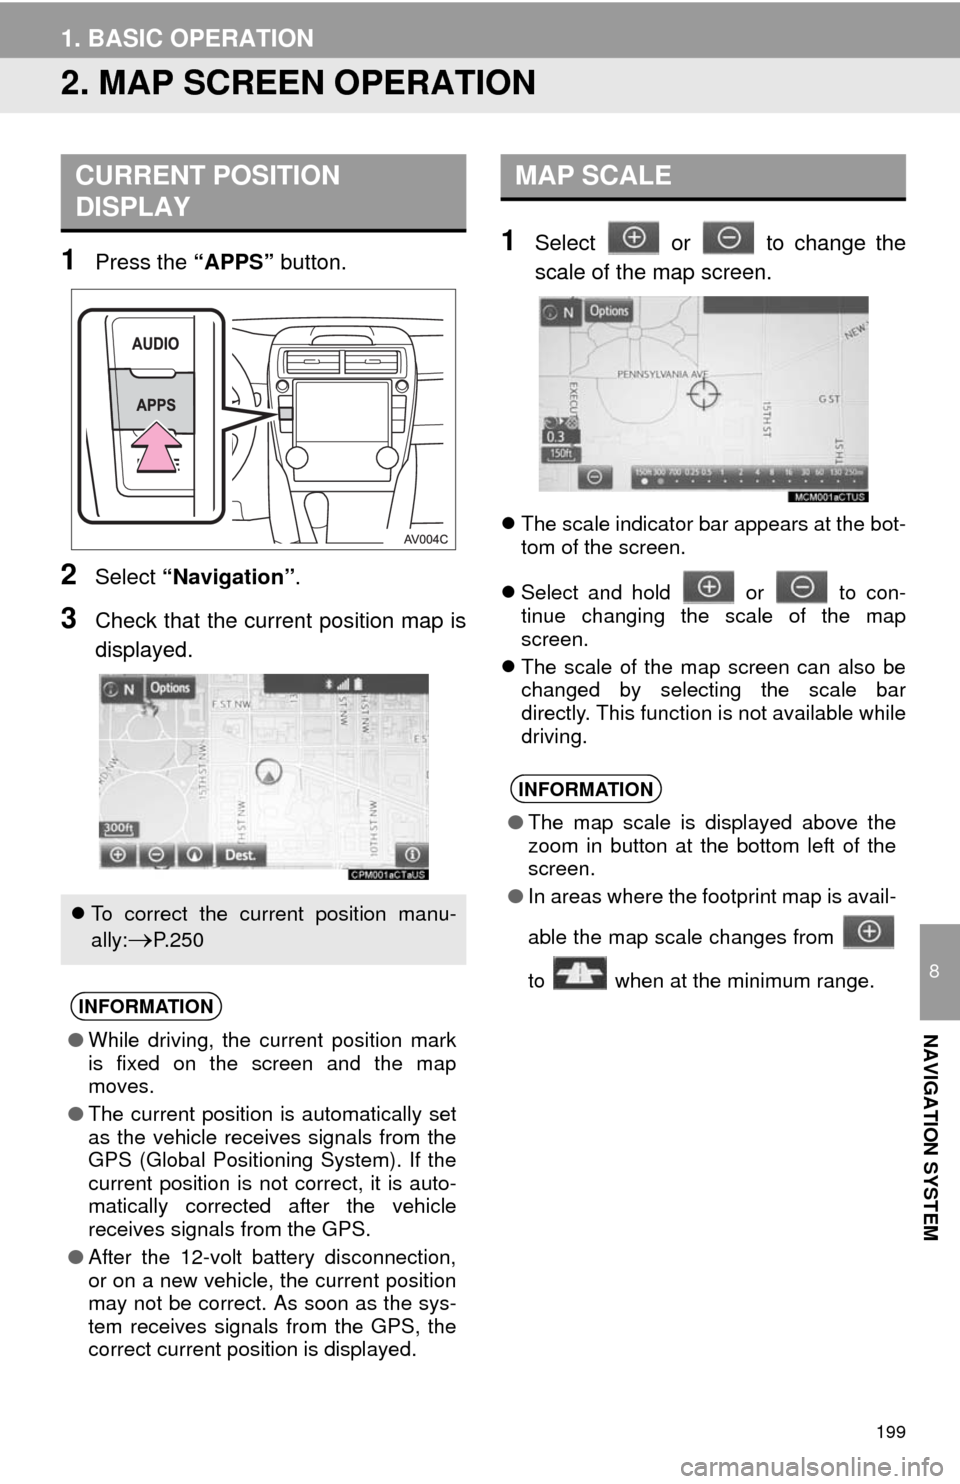
1Press the “APPS” button.
2Select “Navigation”.
3Check that the current position map is
displayed.
1Select or to change the
scale of the map screen.
The scale indicator bar appears at the bot-
tom of the screen.
Select and hold or to con-
tinue changing the scale of the map
screen.
The scale of the map screen can also be
changed by selecting the scale bar
directly. This function is not available while
driving.
CURRENT POSITION
DISPLAY
To correct the current position manu-
ally:
P. 2 5 0
INFORMATION
●While driving, the current position mark
is fixed on the screen and the map
moves.
●The current position is automatically set
as the vehicle receives signals from the
GPS (Global Positioning System). If the
current position is not correct, it is auto-
matically corrected after the vehicle
receives signals from the GPS.
●After the 12-volt battery disconnection,
or on a new vehicle, the current position
may not be correct. As soon as the sys-
tem receives signals from the GPS, the
correct current position is displayed.
MAP SCALE
INFORMATION
●The map scale is displayed above the
zoom in button at the bottom left of the
screen.
●In areas where the footprint map is avail-
able the map scale changes from
to when at the minimum range.