USB TOYOTA CAMRY 2019 Accessories, Audio & Navigation (in English)
[x] Cancel search | Manufacturer: TOYOTA, Model Year: 2019, Model line: CAMRY, Model: TOYOTA CAMRY 2019Pages: 354, PDF Size: 8.08 MB
Page 9 of 354

9
1
2
3
4
5
6
7
9
8
1. BASIC OPERATION ........................ 78
QUICK REFERENCE ............................ 78
SOME BASICS ...................................... 80
2. RADIO OPERATION ....................... 86
AM/FM/SiriusXM (SXM) RADIO ............ 86
INTERNET RADIO ................................ 98
3. MEDIA OPERATION ....................... 99
CD ......................................................... 99
USB MEMORY .................................... 102
iPod/iPhone ......................................... 105
Bluetooth
® AUDIO ............................... 109
AUX ..................................................... 114
4. AUDIO/VISUAL REMOTE CONTROLS ................................. 116
STEERING SWITCHES ...................... 116
5. SETUP ........................................... 119
AUDIO SETTINGS .............................. 119
6. TIPS FOR OPERATING THE AUDIO/VISUAL SYSTEM ............ 121
OPERATING INFORMATION ............. 121
1. VOICE COMMAND SYSTEM OPERATION................................ 134
VOICE COMMAND SYSTEM .............. 134
NATURAL LANGUAGE
UNDERSTANDING ........................... 138
COMMAND LIST ................................. 139
2. MOBILE ASSISTANT OPERATION................................ 144
MOBILE ASSISTANT .......................... 144
1. USEFUL INFORMATION .............. 148
INFORMATION SCREEN .................... 148
RECEIVING WEATHER
INFORMATION ................................. 149
DATA SERVICES SETTINGS ............. 152
3AUDIO/VISUAL SYSTEM4VOICE COMMAND SYSTEM
5INFORMATION
Page 61 of 354
61
2. CONNECTIVITY SETTINGS
BASIC FUNCTION
2
4. Apple CarPlay*
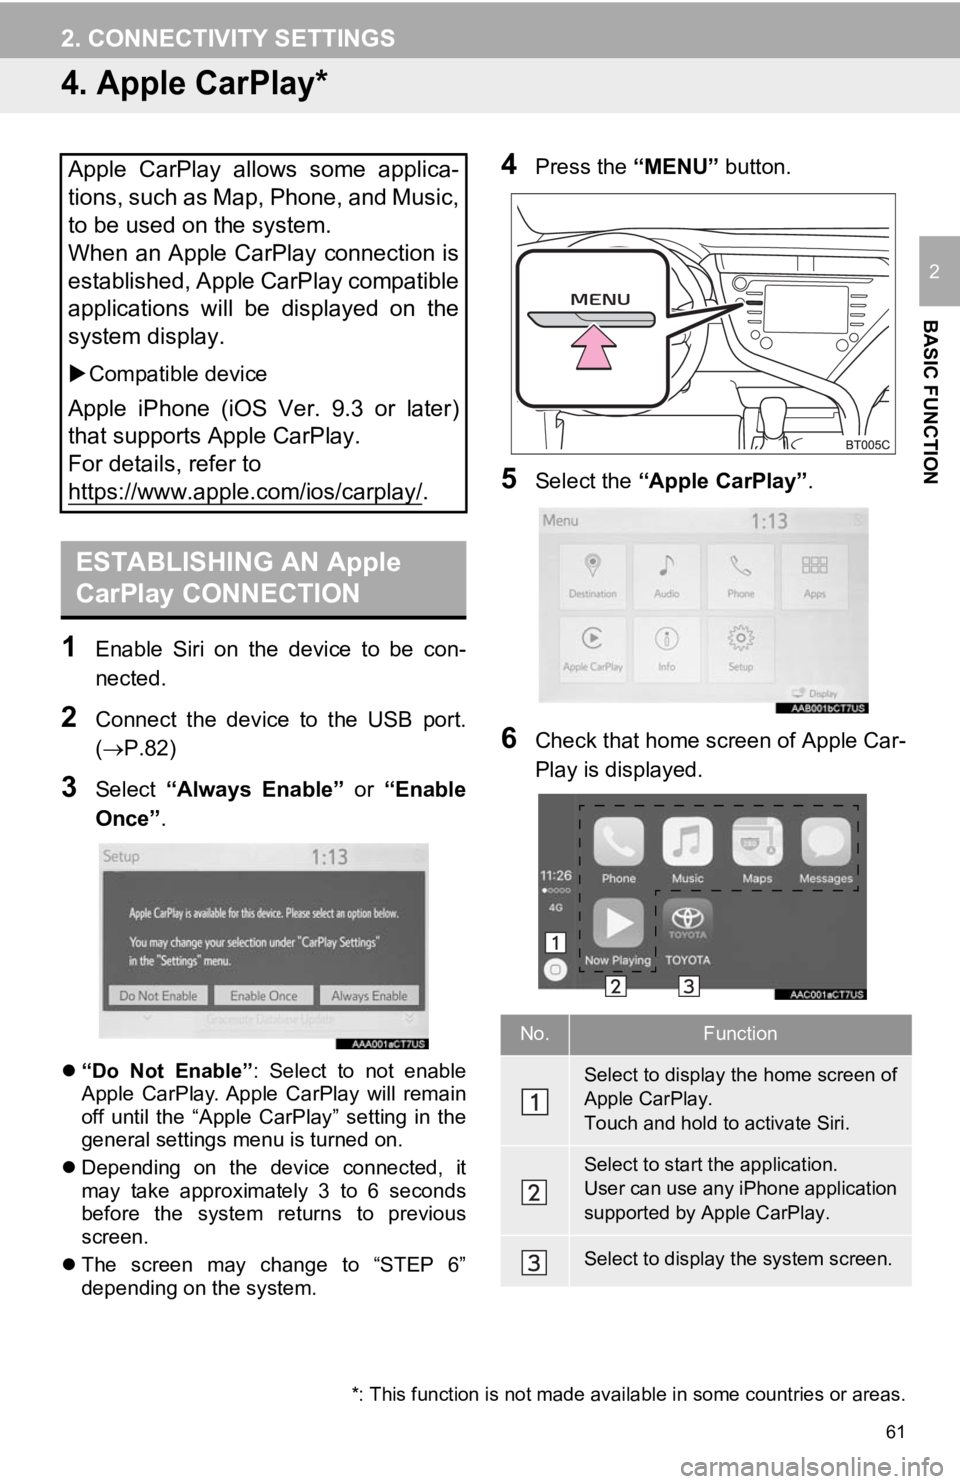
1Enable Siri on the device to be con-
nected.
2Connect the device to the USB port.
(P.82)
3Select “Always Enable” or “Enable
Once” .
“Do Not Enable” : Select to not enable
Apple CarPlay. Apple CarPlay will remain
off until the “Apple CarPlay” setting in the
general settings menu is turned on.
Depending on the device connected, it
may take approximately 3 to 6 seconds
before the system returns to previous
screen.
The screen may change to “STEP 6”
depending on the system.
4Press the “MENU” button.
5Select the “Apple CarPlay” .
6Check that home screen of Apple Car-
Play is displayed.
Apple CarPlay allows some applica-
tions, such as Map, Phone, and Music,
to be used on the system.
When an Apple CarPlay connection is
established, Apple CarPlay compatible
applications will be displayed on the
system display.
Compatible device
Apple iPhone (iOS Ver. 9.3 or later)
that supports Apple CarPlay.
For details, refer to
https://www.apple.com/ios/carplay/
.
ESTABLISHING AN Apple
CarPlay CONNECTION
*: This function is not made avai lable in some countries or areas.
No.Function
Select to display the home screen of
Apple CarPlay.
Touch and hold to activate Siri.
Select to start the application.
User can use any iPhone application
supported by Apple CarPlay.
Select to display the system screen.
Page 62 of 354
62
2. CONNECTIVITY SETTINGS
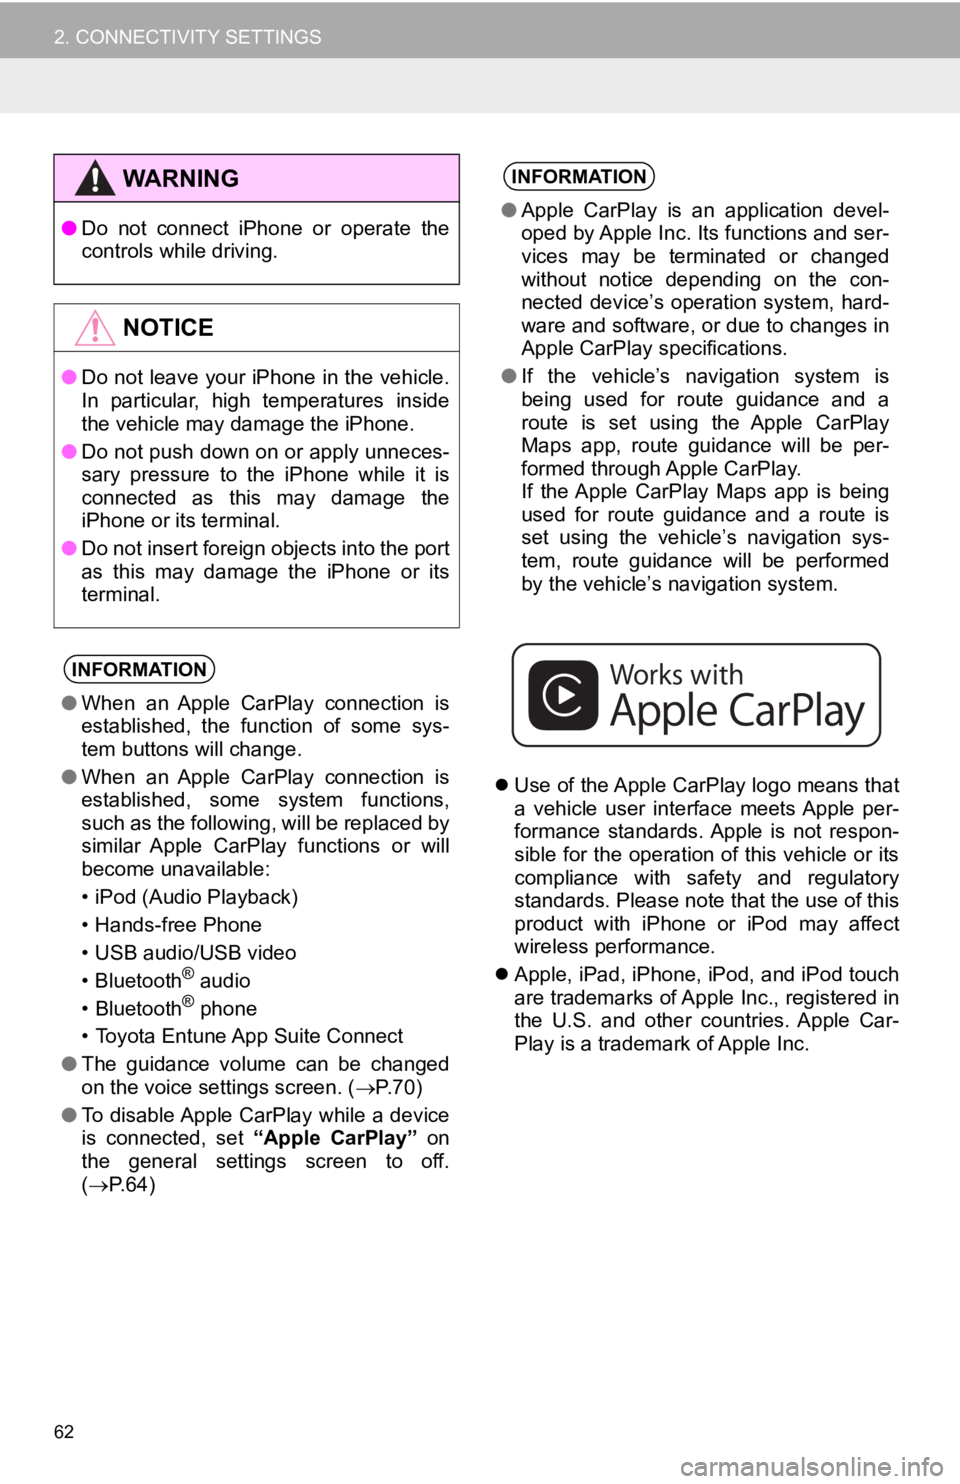
Use of the Apple CarPlay logo means that
a vehicle user interface meets Apple per-
formance standards. Apple is not respon-
sible for the operation of this vehicle or its
compliance with safety and regulatory
standards. Please note that the use of this
product with iPhone or iPod may affect
wireless performance.
Apple, iPad, iPhone, iPod, and iPod touch
are trademarks of Apple Inc., registered in
the U.S. and other countries. Apple Car-
Play is a trademark of Apple Inc.
WA R N I N G
●Do not connect iPhone or operate the
controls while driving.
NOTICE
●Do not leave your iPhone in the vehicle.
In particular, high temperatures inside
the vehicle may damage the iPhone.
● Do not push down on or apply unneces-
sary pressure to the iPhone while it is
connected as this may damage the
iPhone or its terminal.
● Do not insert foreign objects into the port
as this may damage the iPhone or its
terminal.
INFORMATION
●When an Apple CarPlay connection is
established, the function of some sys-
tem buttons will change.
● When an Apple CarPlay connection is
established, some system functions,
such as the following, will be replaced by
similar Apple CarPlay functions or will
become unavailable:
• iPod (Audio Playback)
• Hands-free Phone
• USB audio/USB video
• Bluetooth
® audio
• Bluetooth® phone
• Toyota Entune App Suite Connect
● The guidance volume can be changed
on the voice settings screen. ( P. 7 0 )
● To disable Apple CarPlay while a device
is connected, set “Apple CarPlay” on
the general settings screen to off.
( P.64)
INFORMATION
●Apple CarPlay is an application devel-
oped by Apple Inc. Its functions and ser-
vices may be terminated or changed
without notice depending on the con-
nected device’s operation system, hard-
ware and software, or due to changes in
Apple CarPlay specifications.
● If the vehicle’s navigation system is
being used for route guidance and a
route is set using the Apple CarPlay
Maps app, route guidance will be per-
formed through Apple CarPlay.
If the Apple CarPlay Maps app is being
used for route guidance and a route is
set using the vehicle’s navigation sys-
tem, route guidance will be performed
by the vehicle’s navigation system.
Page 63 of 354
63
2. CONNECTIVITY SETTINGS
BASIC FUNCTION
2
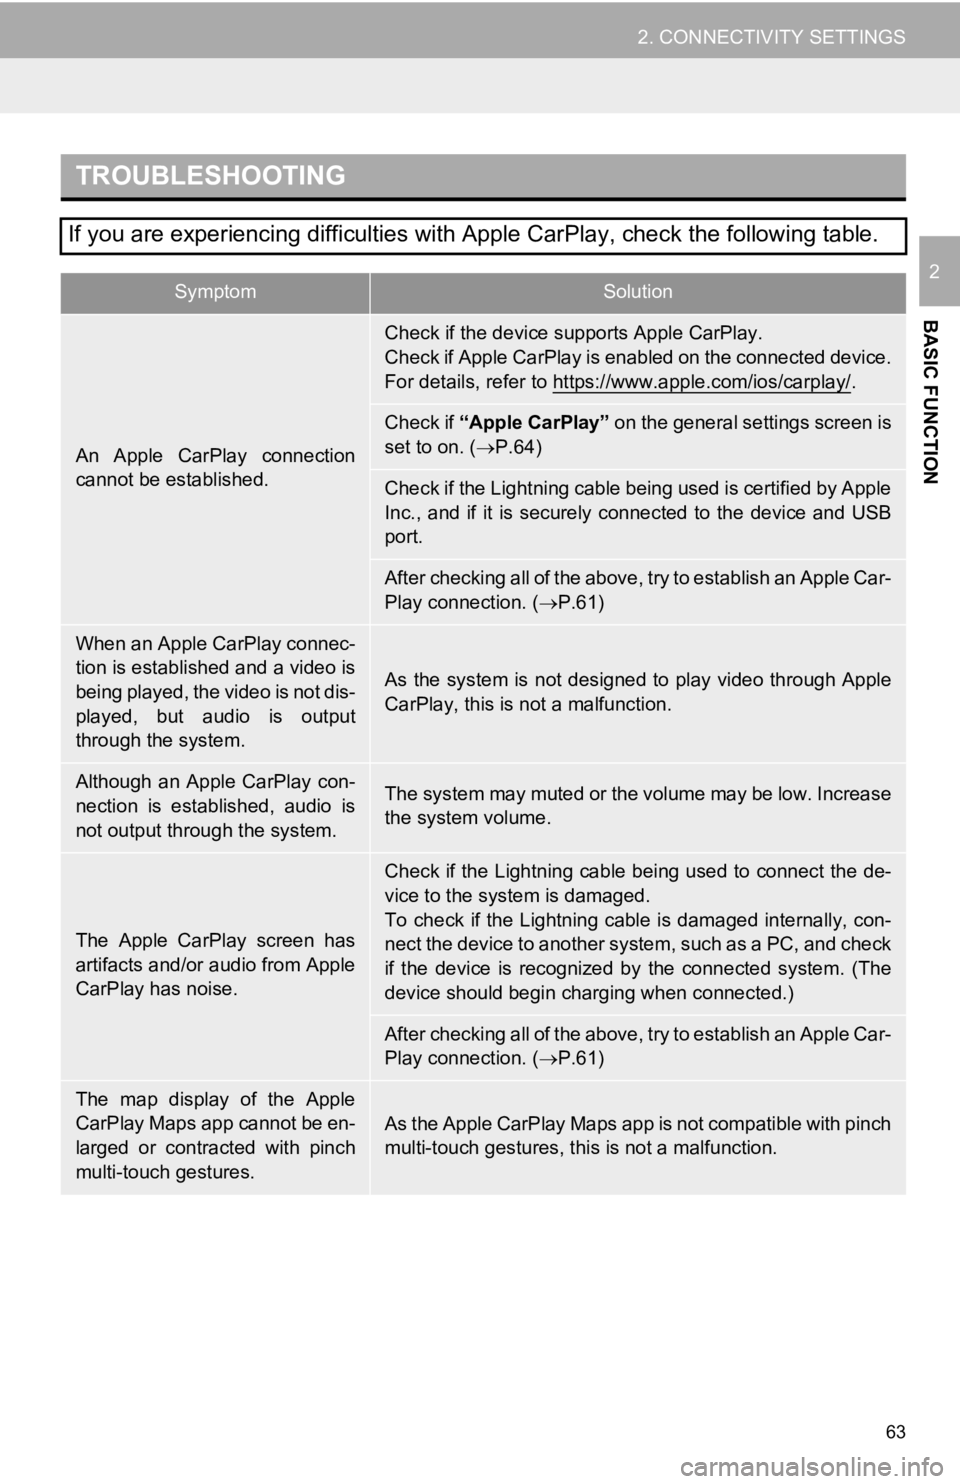
TROUBLESHOOTING
If you are experiencing difficulties with Apple CarPlay, check the following table.
SymptomSolution
An Apple CarPlay connection
cannot be established.
Check if the device supports Apple CarPlay.
Check if Apple CarPlay is enabled on the connected device.
For details, refer to https://www.apple.com/ios/carplay/
.
Check if “Apple CarPlay” on the general settings screen is
set to on. ( P.64)
Check if the Lightning cable being used is certified by Apple
Inc., and if it is securely connected to the device and USB
port.
After checking all of the above, try to establish an Apple Car-
Play connection. ( P.61)
When an Apple CarPlay connec-
tion is established and a video is
being played, the video is not dis-
played, but audio is output
through the system.
As the system is not designed to play video through Apple
CarPlay, this is not a malfunction.
Although an Apple CarPlay con-
nection is established, audio is
not output through the system.The system may muted or the volume may be low. Increase
the system volume.
The Apple CarPlay screen has
artifacts and/or audio from Apple
CarPlay has noise.
Check if the Lightning cable being used to connect the de-
vice to the system is damaged.
To check if the Lightning cable is damaged internally, con-
nect the device to another system, such as a PC, and check
if the device is recognized by the connected system. (The
device should begin charging when connected.)
After checking all of the above, try to establish an Apple Car-
Play connection. ( P.61)
The map display of the Apple
CarPlay Maps app cannot be en-
larged or contracted with pinch
multi-touch gestures.As the Apple CarPlay Maps app is not compatible with pinch
multi-touch gestures, th is is not a malfunction.
Page 65 of 354
65
3. OTHER SETTINGS
BASIC FUNCTION
2
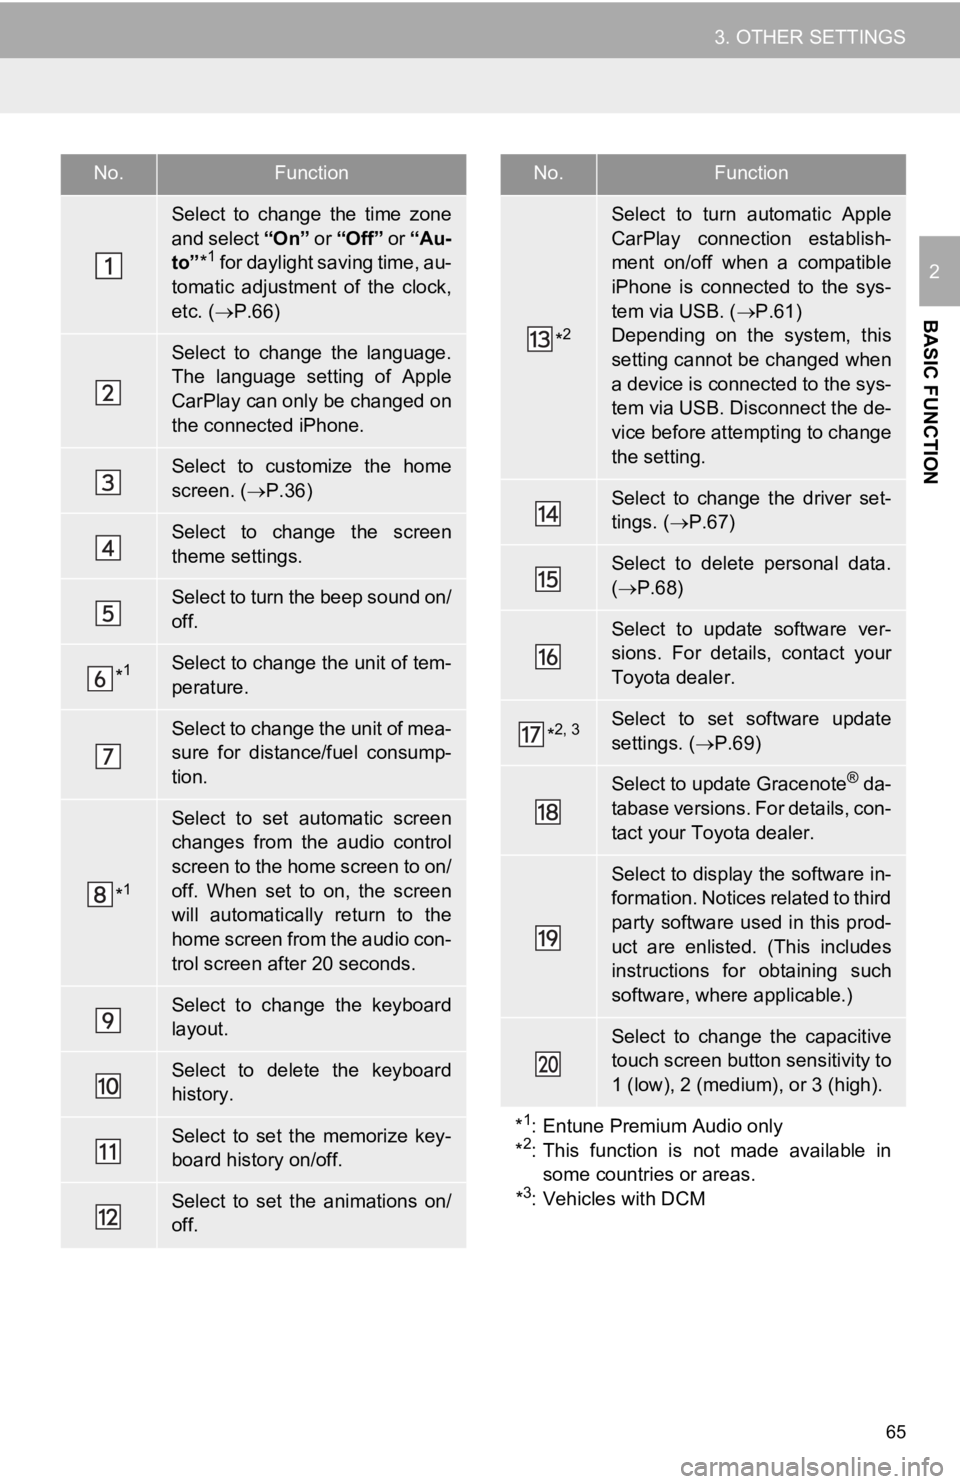
No.Function
Select to change the time zone
and select “On ” or “Off” or “Au-
to” *
1 for daylight saving time, au-
tomatic adjustment of the clock,
etc. ( P.66)
Select to change the language.
The language setting of Apple
CarPlay can only be changed on
the connected iPhone.
Select to customize the home
screen. ( P.36)
Select to change the screen
theme settings.
Select to turn the beep sound on/
off.
*1Select to change the unit of tem-
perature.
Select to change the unit of mea-
sure for distance/fuel consump-
tion.
*1
Select to set automatic screen
changes from the audio control
screen to the home screen to on/
off. When set to on, the screen
will automatically return to the
home screen from the audio con-
trol screen after 20 seconds.
Select to change the keyboard
layout.
Select to delete the keyboard
history.
Select to set the memorize key-
board history on/off.
Select to set the animations on/
off.
*2
Select to turn automatic Apple
CarPlay connection establish-
ment on/off when a compatible
iPhone is connected to the sys-
tem via USB. ( P.61)
Depending on the system, this
setting cannot be changed when
a device is connected to the sys-
tem via USB. Disconnect the de-
vice before attempting to change
the setting.
Select to change the driver set-
tings. ( P.67)
Select to delete personal data.
( P.68)
Select to update software ver-
sions. For details, contact your
Toyota dealer.
*2, 3Select to set software update
settings. ( P.69)
Select to update Gracenote® da-
tabase versions. For details, con-
tact your Toyota dealer.
Select to display the software in-
formation. Notices related to third
party software used in this prod-
uct are enlisted. (This includes
instructions for obtaining such
software, where applicable.)
Select to change the capacitive
touch screen button sensitivity to
1 (low), 2 (medium), or 3 (high).
*
1: Entune Premium Audio only
*2: This function is not made available in
some countries or areas.
*
3: Vehicles with DCM
No.Function
Page 76 of 354
76
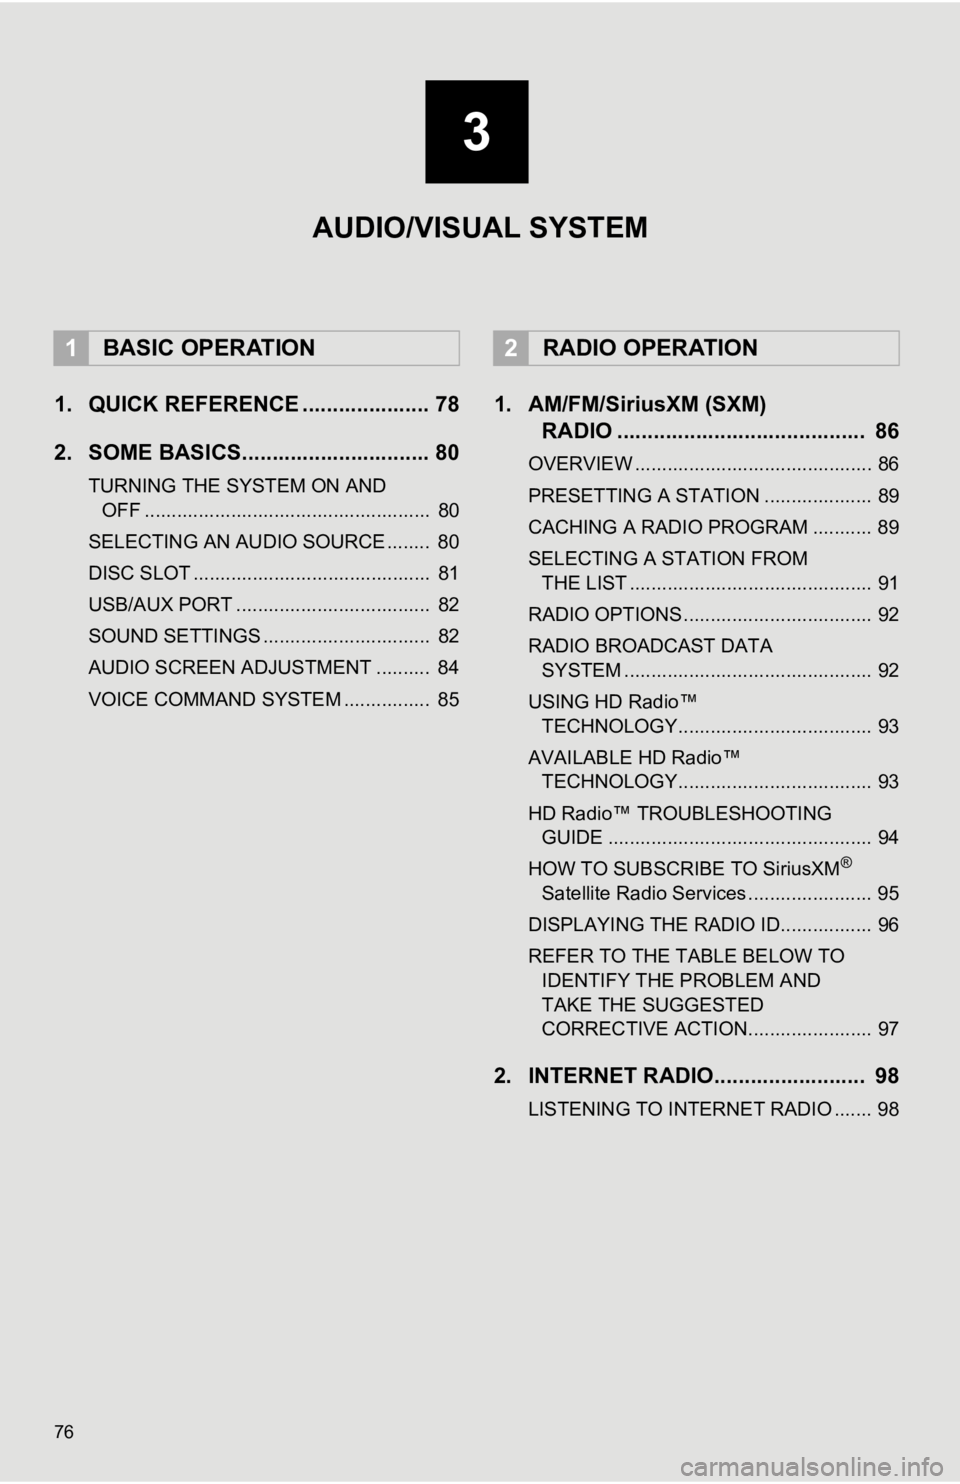
1. QUICK REFERENCE ..................... 78
2. SOME BASICS............................... 80
TURNING THE SYSTEM ON AND OFF ..................................................... 80
SELECTING AN AUDIO SOURCE ........ 80
DISC SLOT ............................................ 81
USB/AUX PORT .................................... 82
SOUND SETTINGS ............................... 82
AUDIO SCREEN ADJUSTMENT .......... 84
VOICE COMMAND SYSTEM ................ 85
1. AM/FM/SiriusXM (SXM) RADIO ......................................... 86
OVERVIEW ............................................ 86
PRESETTING A STATION .................... 89
CACHING A RADIO PROGRAM ........... 89
SELECTING A STATION FROM
THE LIST ............................................. 91
RADIO OPTIONS ................................... 92
RADIO BROADCAST DATA SYSTEM .............................................. 92
USING HD Radio™ TECHNOLOGY.................................... 93
AVAILABLE HD Radio™ TECHNOLOGY.................................... 93
HD Radio™ TROUBLESHOOTING GUIDE ................................................. 94
HOW TO SUBSCRIBE TO SiriusXM
®
Satellite Radio Services ....................... 95
DISPLAYING THE RADIO ID................. 96
REFER TO THE TABLE BELOW TO IDENTIFY THE PROBLEM AND
TAKE THE SUGGESTED
CORRECTIVE ACTION....................... 97
2. INTERNET RADIO......................... 98
LISTENING TO INTERNET RADIO ....... 98
1BASIC OPERATION2RADIO OPERATION
3
AUDIO/VISUAL SYSTEM
Page 77 of 354
3
77
4
5
6
7
8
9
1
2
3
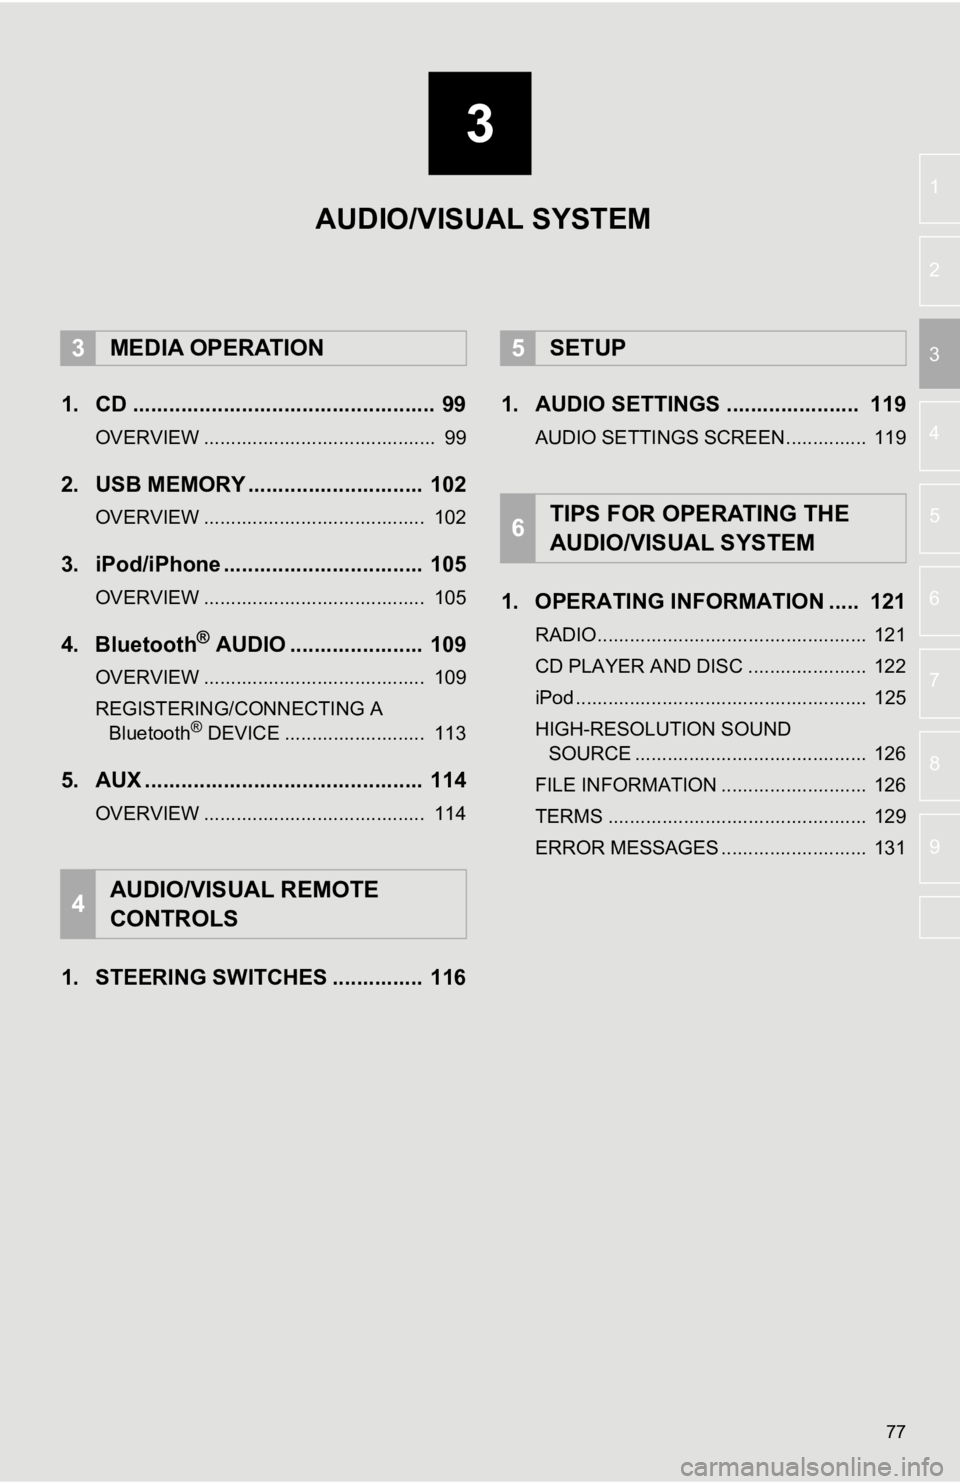
1. CD .................................................. 99
OVERVIEW ........................................... 99
2. USB MEMORY ............................. 102
OVERVIEW ......................................... 102
3. iPod/iPhone ................................. 105
OVERVIEW ......................................... 105
4. Bluetooth® AUDIO ...................... 109
OVERVIEW ......................................... 109
REGISTERING/CONNECTING A Bluetooth
® DEVICE .......................... 113
5. AUX .............................................. 114
OVERVIEW ......................................... 114
1. STEERING SWITCHES ............... 116 1. AUDIO SETTINGS ...................... 119
AUDIO SETTINGS SCREEN............... 119
1. OPERATING INFORMATION ..... 121
RADIO.................................................. 121
CD PLAYER AND DISC ...................... 122
iPod ...................................................... 125
HIGH-RESOLUTION SOUND
SOURCE ........................................... 126
FILE INFORMATION ........................... 126
TERMS ................................................ 129
ERROR MESSAGES ........................... 131
3MEDIA OPERATION
4AUDIO/VISUAL REMOTE
CONTROLS
5SETUP
6TIPS FOR OPERATING THE
AUDIO/VISUAL SYSTEM
AUDIO/VISUAL SYSTEM
Page 79 of 354
79
1. BASIC OPERATION
AUDIO/VISUAL SYSTEM
3
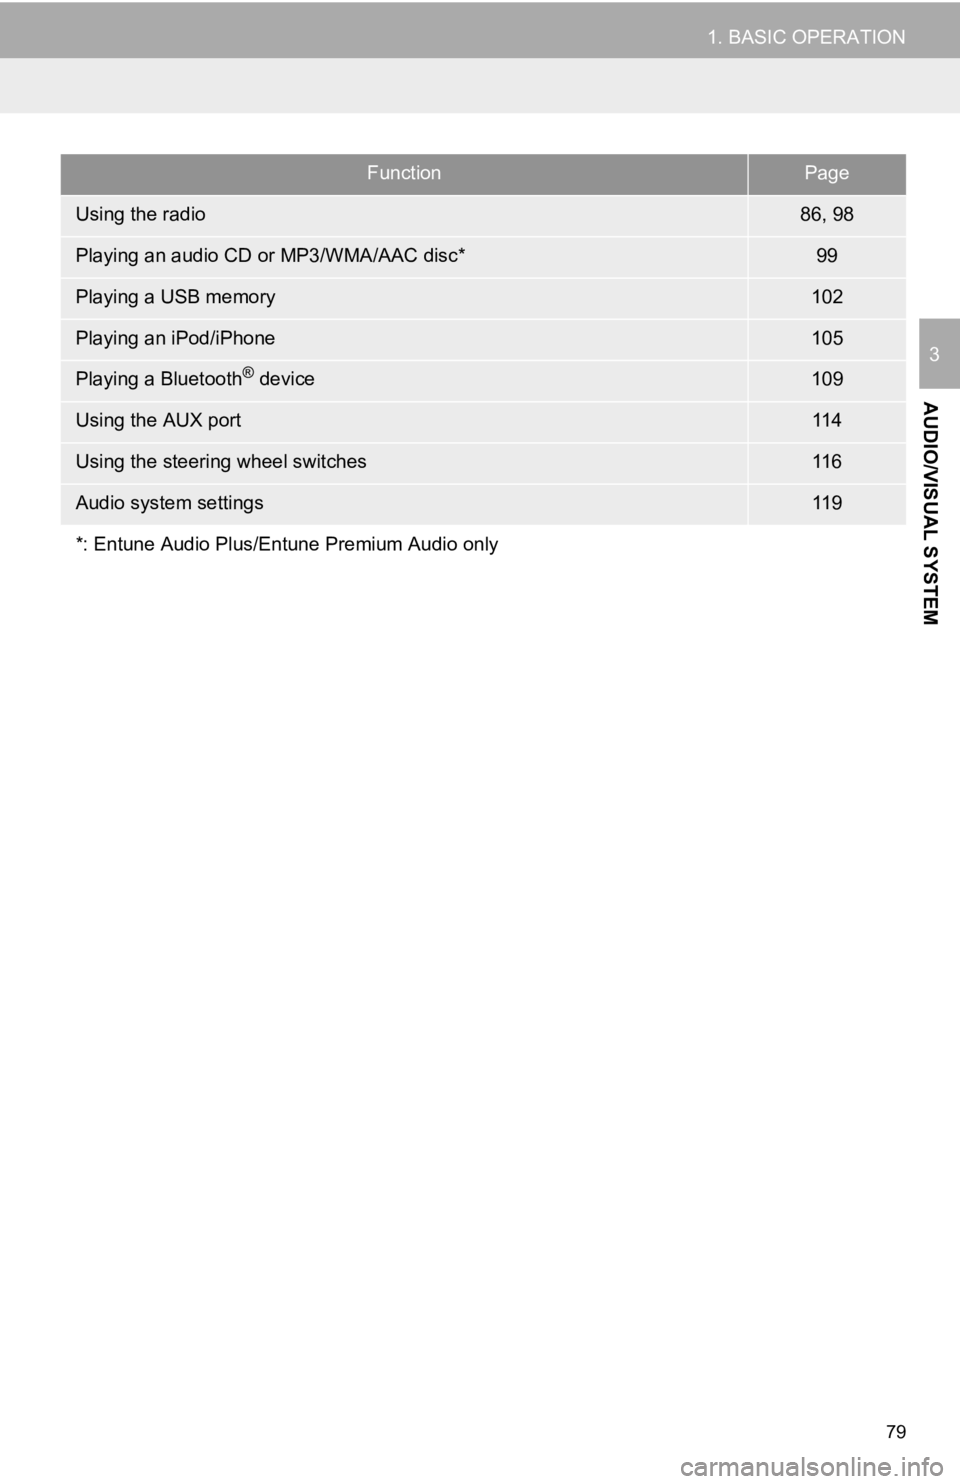
FunctionPage
Using the radio86, 98
Playing an audio CD or MP3/WMA/AAC disc*99
Playing a USB memory102
Playing an iPod/iPhone105
Playing a Bluetooth® device109
Using the AUX port11 4
Using the steering wheel switches11 6
Audio system settings11 9
*: Entune Audio Plus/Entune Premium Audio only
Page 81 of 354
81
1. BASIC OPERATION
AUDIO/VISUAL SYSTEM
3
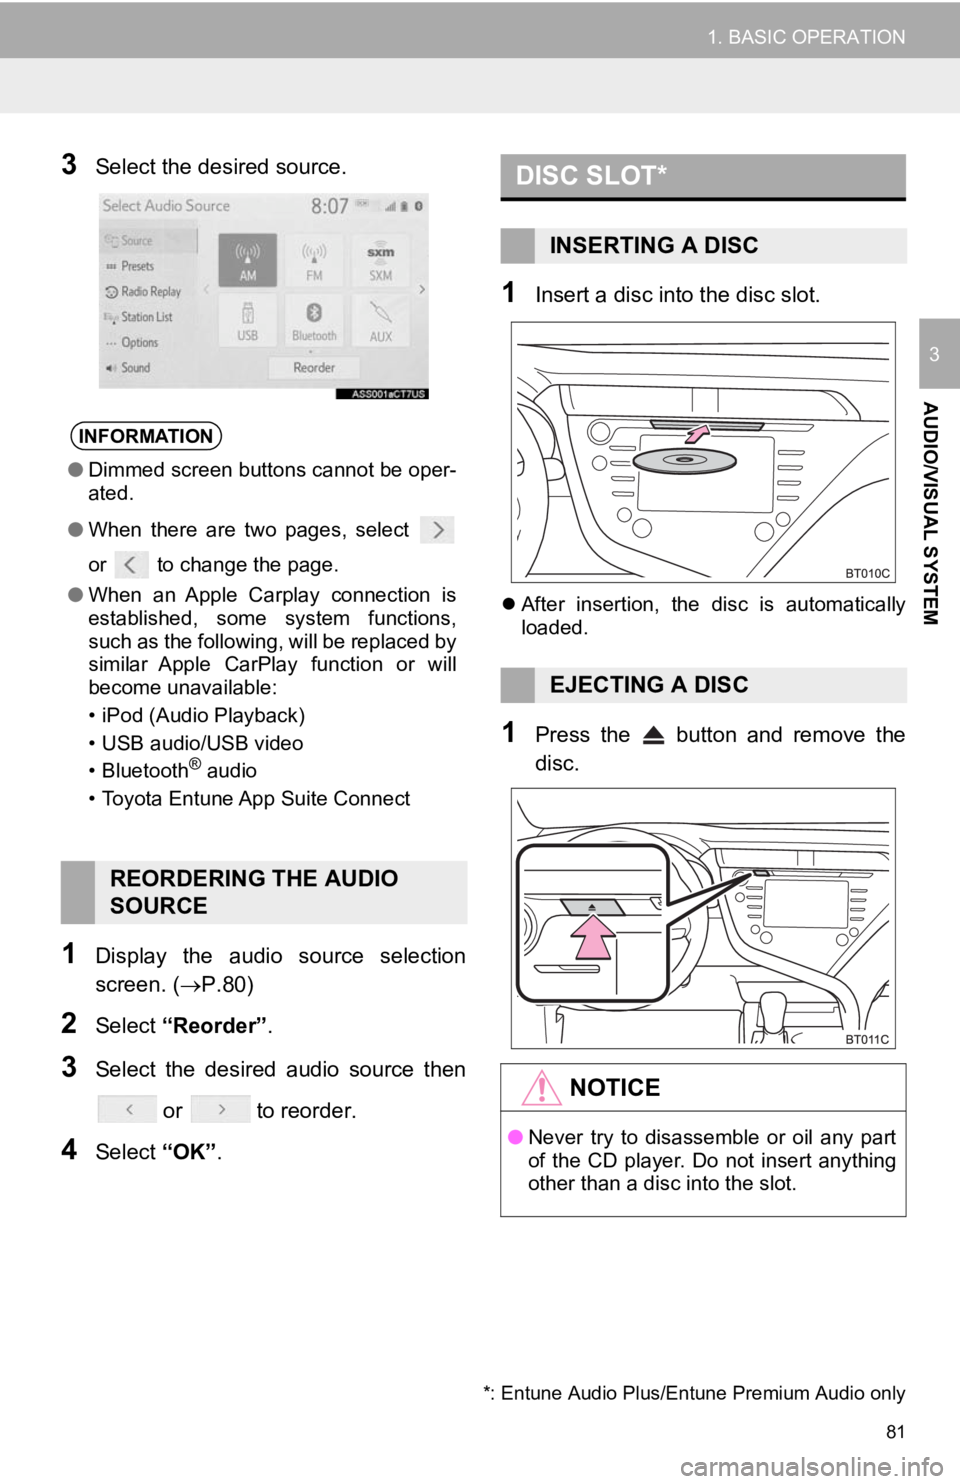
3Select the desired source.
1Display the audio source selection
screen. (P.80)
2Select “Reorder” .
3Select the desired audio source then
or to reorder.
4Select “OK”.
1Insert a disc into the disc slot.
After insertion, the disc is automatically
loaded.
1Press the button and remove the
disc.
INFORMATION
● Dimmed screen buttons cannot be oper-
ated.
● When there are two pages, select
or to change the page.
● When an Apple Carplay connection is
established, some system functions,
such as the following, will be replaced by
similar Apple CarPlay function or will
become unavailable:
• iPod (Audio Playback)
• USB audio/USB video
• Bluetooth
® audio
• Toyota Entune App Suite Connect
REORDERING THE AUDIO
SOURCE
DISC SLOT*
INSERTING A DISC
EJECTING A DISC
NOTICE
● Never try to disassemble or oil any part
of the CD player. Do not insert anything
other than a disc into the slot.
*: Entune Audio Plus/Entune Premium Audio only
Page 82 of 354
82
1. BASIC OPERATION
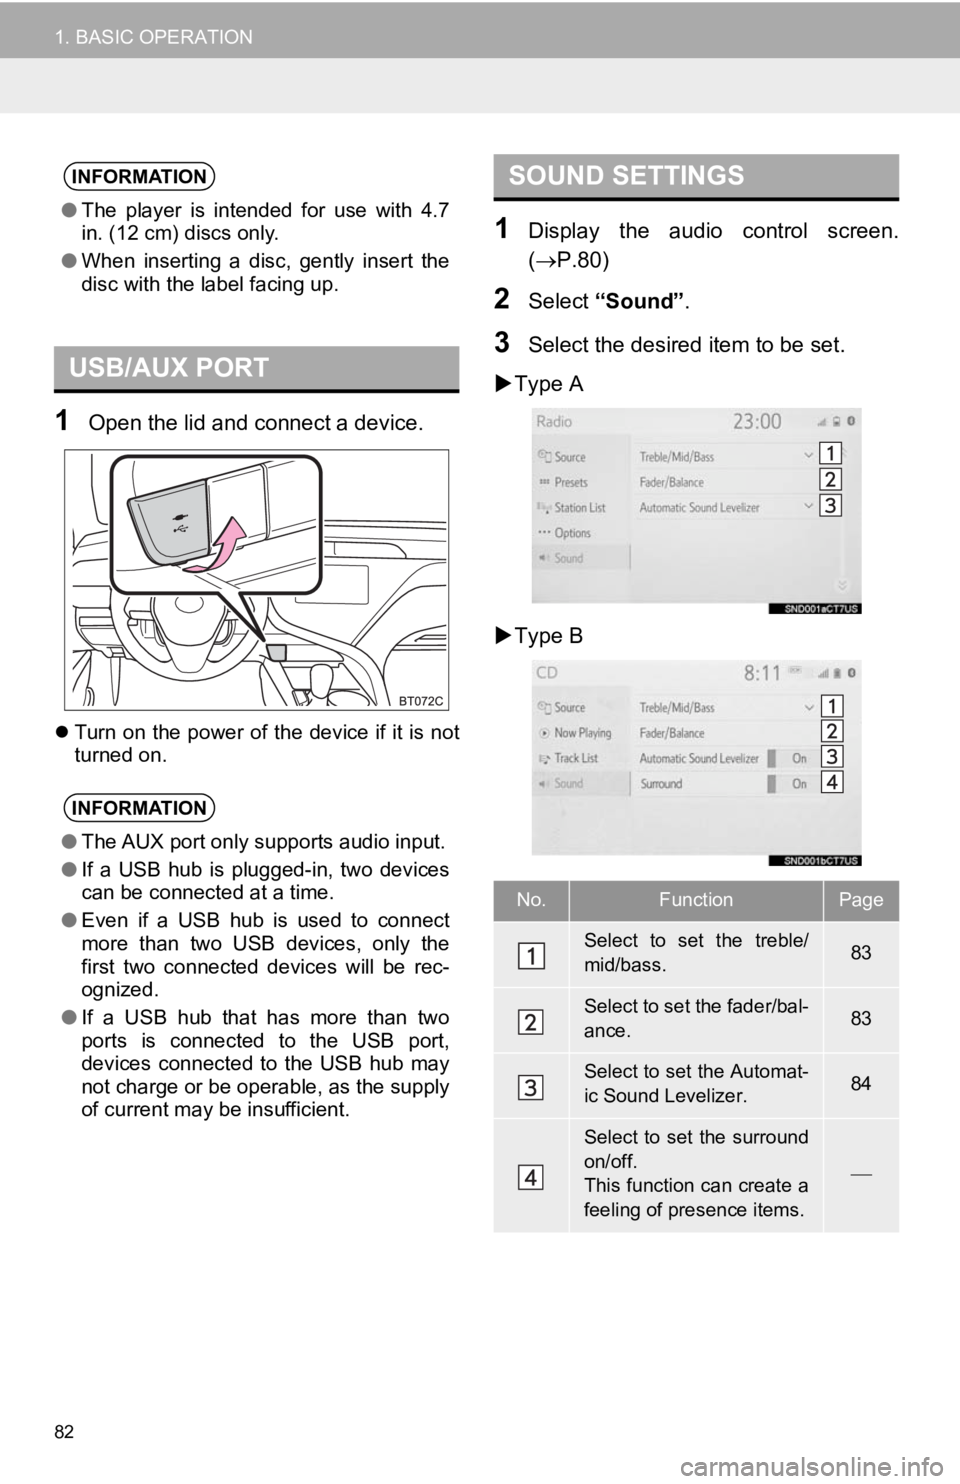
1Open the lid and connect a device.
Turn on the power of the device if it is not
turned on.
1Display the audio control screen.
( P.80)
2Select “Sound” .
3Select the desired item to be set.
Type A
Type B
INFORMATION
● The player is intended for use with 4.7
in. (12 cm) discs only.
● When inserting a disc, gently insert the
disc with the label facing up.
USB/AUX PORT
INFORMATION
●The AUX port only supports audio input.
● If a USB hub is plugged-in, two devices
can be connected at a time.
● Even if a USB hub is used to connect
more than two USB devices, only the
first two connected devices will be rec-
ognized.
● If a USB hub that has more than two
ports is connected to the USB port,
devices connected to the USB hub may
not charge or be operable, as the supply
of current may be insufficient.
SOUND SETTINGS
No.FunctionPage
Select to set the treble/
mid/bass.83
Select to set the fader/bal-
ance.83
Select to set the Automat-
ic Sound Levelizer.84
Select to set the surround
on/off.
This function can create a
feeling of presence items.