change time TOYOTA CAMRY 2020 Accessories, Audio & Navigation (in English)
[x] Cancel search | Manufacturer: TOYOTA, Model Year: 2020, Model line: CAMRY, Model: TOYOTA CAMRY 2020Pages: 350, PDF Size: 8.63 MB
Page 167 of 350
167
2. TOYOTA PARKING ASSIST MONITOR
PERIPHERAL MONITORING SYSTEM
6
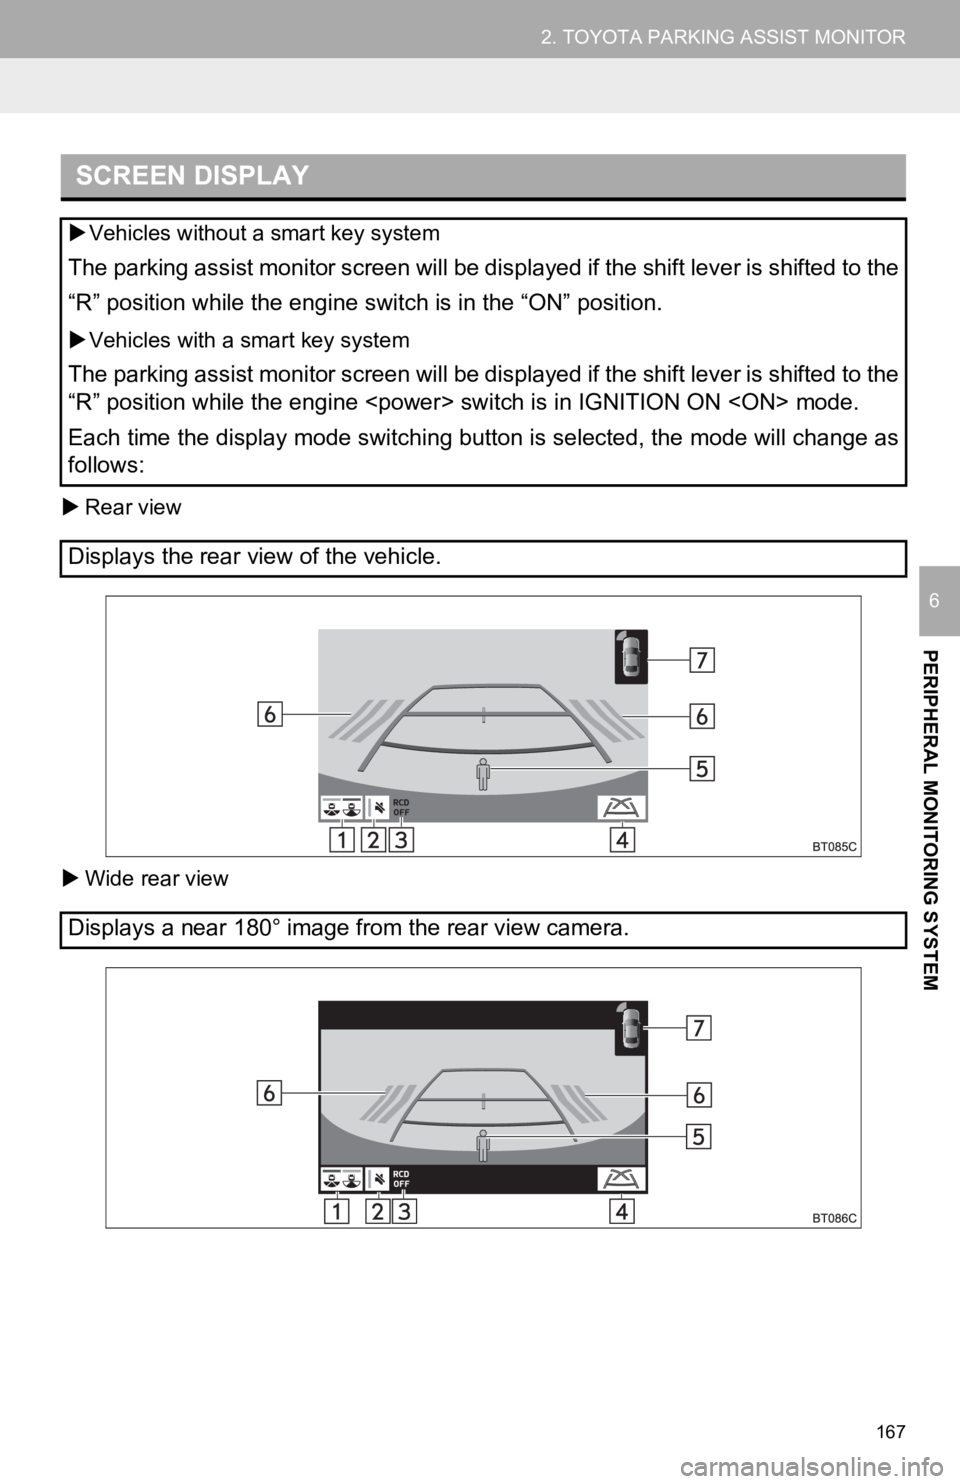
Rear view
Wide rear view
SCREEN DISPLAY
Vehicles without a smart key system
The parking assist monitor screen will be displayed if the shif t lever is shifted to the
“R” position while the engine switch is in the “ON” position.
Vehicles with a smart key system
The parking assist monitor screen will be displayed if the shif t lever is shifted to the
“R” position while the engine
Each time the display mode switching button is selected, the mo de will change as
follows:
Displays the rear view of the vehicle.
Displays a near 180° image from the rear view camera.
Page 168 of 350
168
2. TOYOTA PARKING ASSIST MONITOR
No.DisplayFunction
Display mode switching
button
Each time the display mode switching button is selected,
the mode will change as follows:
From the rear view mode to the wide rear view mode
From the wide rear view mode to the rear view mode
Rear camera detection
buzzer mute switchSelect to mute the rear camera detection buzzer. The
buzzer will be re-enabled when the shift lever is shifted to
a position other than R.
Rear camera detection
function off indicatorDisplayed or flashes when the rear camera detection
function is disabled, such as when it is malfunctioning.
Guide line switching but-
tonSelect to switch the guide line mode. ( P.169)
Rear Camera DetectionDisplayed automatically when a pedestrian is detected.
Rear Cross Traffic AlertWhen a sensor detects an obstacle, the direction of ob-
stacle is displayed and the buzzer sounds.
Intuitive parking assist
When a sensor detects an obstacle, the direction of and
the approximate distance to the obstacle are displayed
and the buzzer sounds.
INFORMATION
● For details about the Rear Cross Traffic Alert function, rear c amera detection function and
intuitive parking assist, refer to the “OWNER’S MANUAL”.
WA R N I N G
● As the Rear Cross Traffic Alert display is displayed over the c amera view, it may be diffi-
cult to see the Rear Cross Traffic Alert display depending on t he color and brightness of
the surrounding area.
CANCELING TOYOTA PARKING ASSIST MONITOR
The parking assist monitor is canceled when the shift lever is shifted into any posi-
tion other than the “R” position.
Page 190 of 350
190
3. PANORAMIC VIEW MONITOR
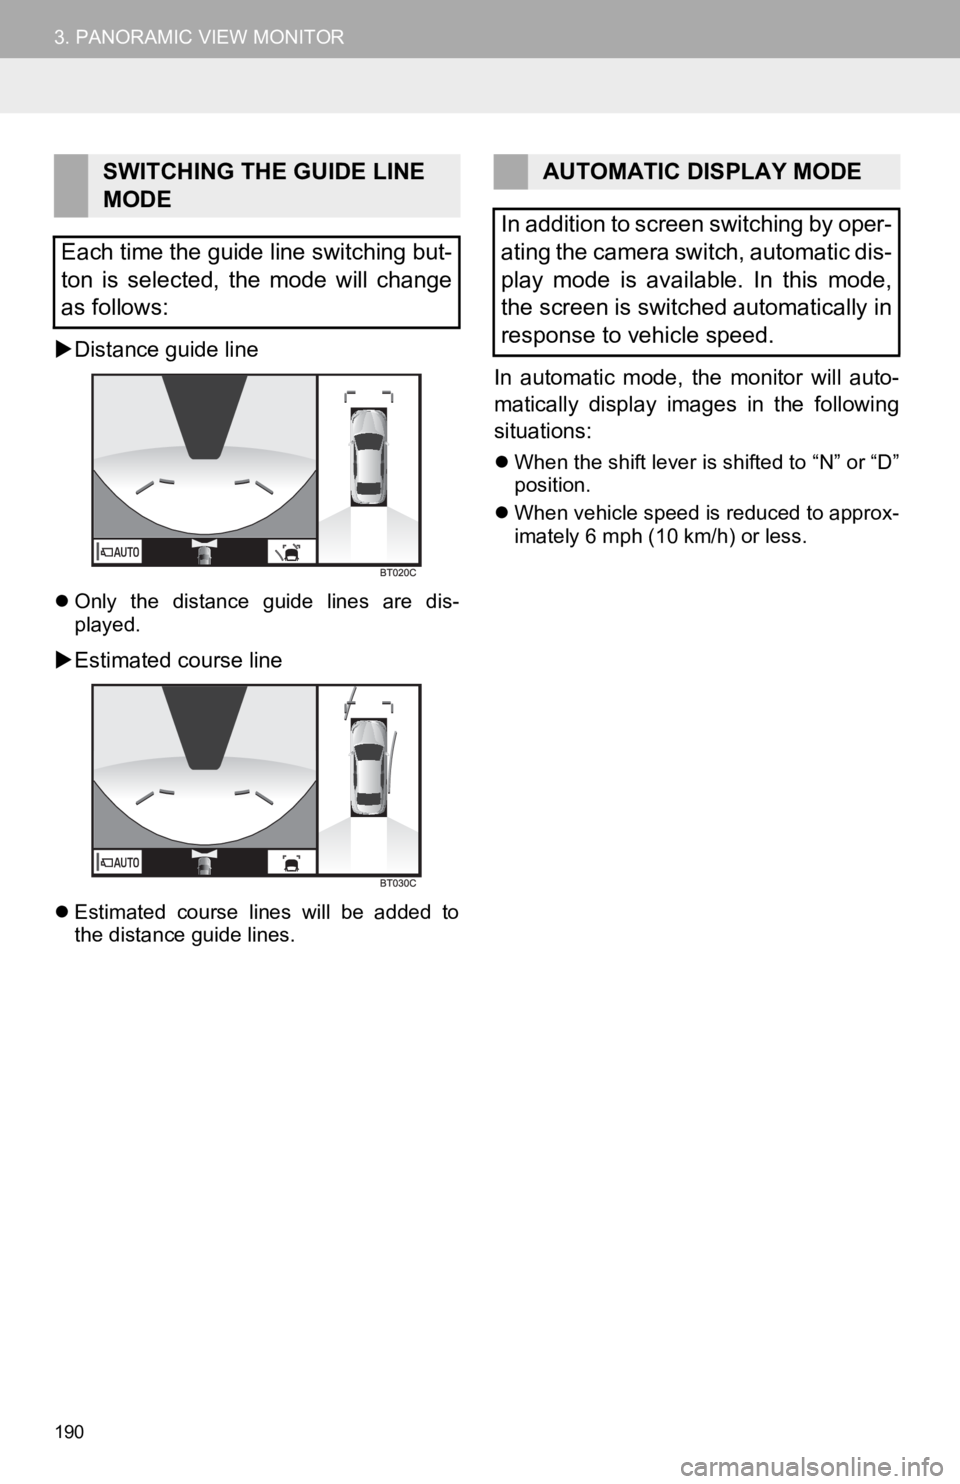
Distance guide line
Only the distance guide lines are dis-
played.
Estimated course line
Estimated course lines will be added to
the distance guide lines.
In automatic mode, the monitor will auto-
matically display images in the following
situations:
When the shift lever is shifted to “N” or “D”
position.
When vehicle speed is reduced to approx-
imately 6 mph (10 km/h) or less.
SWITCHING THE GUIDE LINE
MODE
Each time the guide line switching but-
ton is selected, the mode will change
as follows:AUTOMATIC DISPLAY MODE
In addition to screen switching by oper-
ating the camera switch, automatic dis-
play mode is available. In this mode,
the screen is switched automatically in
response to vehicle speed.
Page 193 of 350
193
3. PANORAMIC VIEW MONITOR
PERIPHERAL MONITORING SYSTEM
6
5. CHECKING THE REAR AND AROUND THE VEHICLE
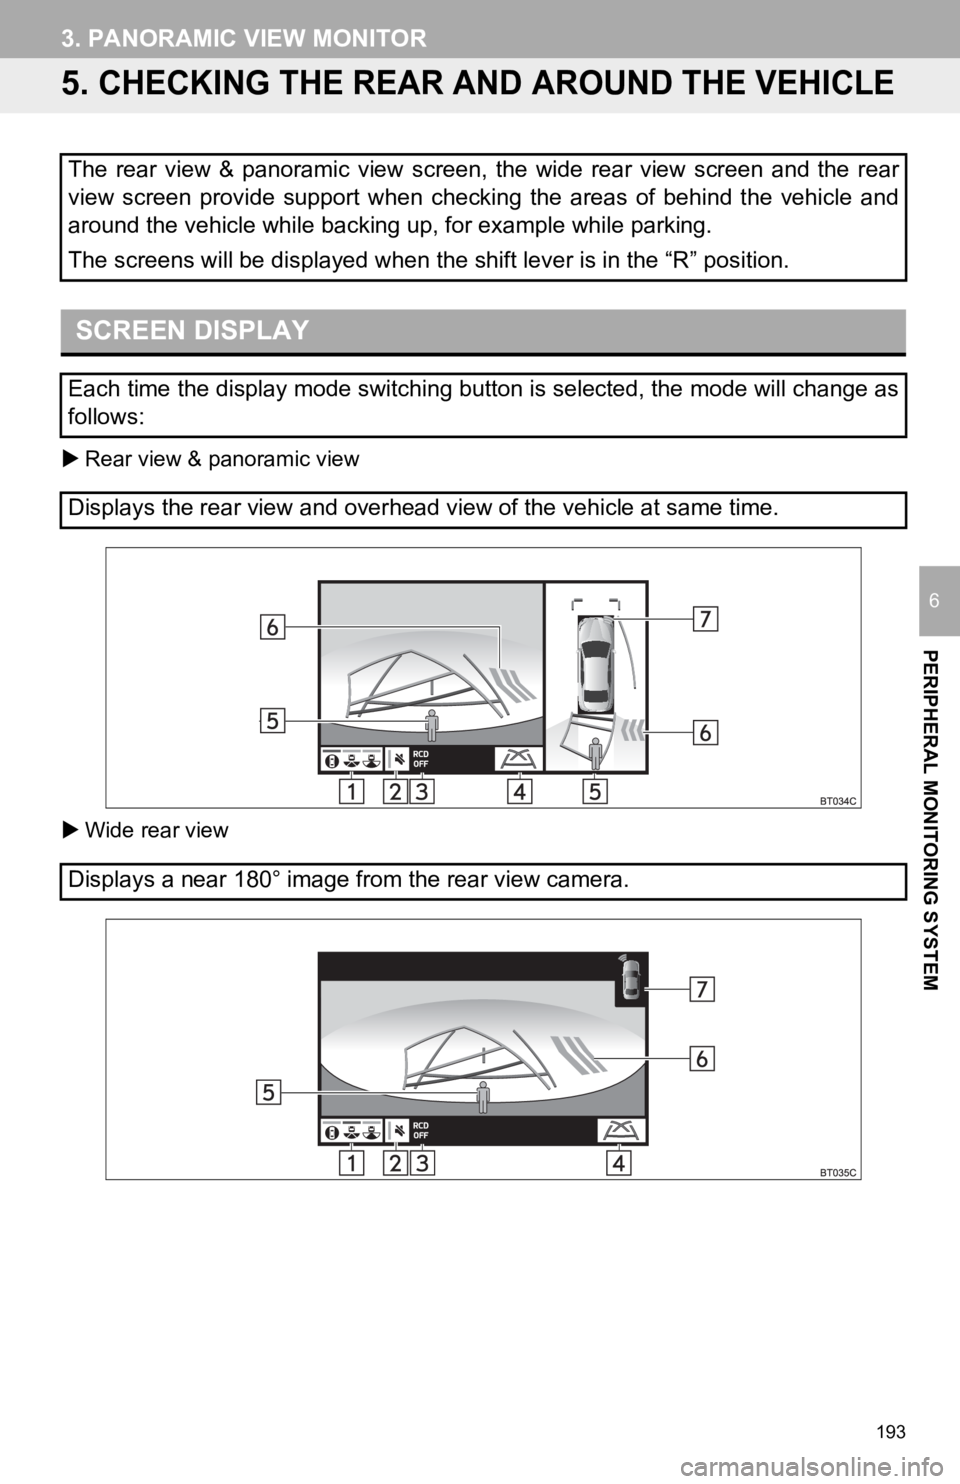
Rear view & panoramic view
Wide rear view
The rear view & panoramic view screen, the wide rear view screen and the rear
view screen provide support when checking the areas of behind the vehicle and
around the vehicle while backing up, for example while parking.
The screens will be displayed when the shift lever is in the “R ” position.
SCREEN DISPLAY
Each time the display mode switching button is selected, the mo de will change as
follows:
Displays the rear view and overhead view of the vehicle at same time.
Displays a near 180° image from the rear view camera.
Page 194 of 350
194
3. PANORAMIC VIEW MONITOR
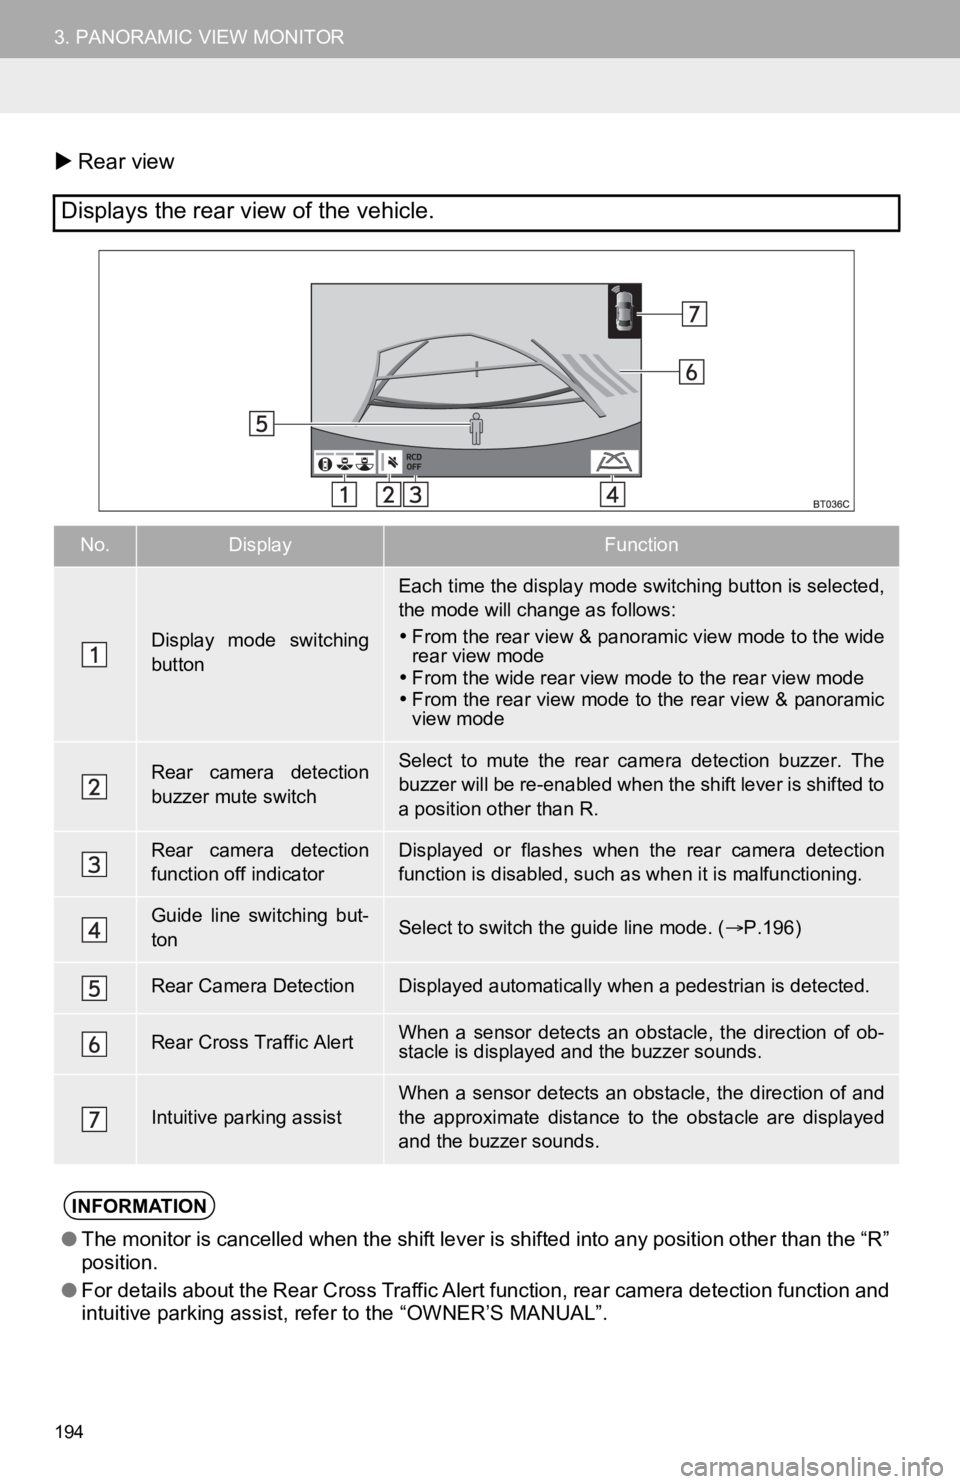
Rear view
Displays the rear view of the vehicle.
No.DisplayFunction
Display mode switching
button
Each time the display mode switching button is selected,
the mode will change as follows:
From the rear view & panoramic view mode to the wide
rear view mode
From the wide rear view mode to the rear view mode
From the rear view mode to the rear view & panoramic
view mode
Rear camera detection
buzzer mute switchSelect to mute the rear camera detection buzzer. The
buzzer will be re-enabled when the shift lever is shifted to
a position other than R.
Rear camera detection
function off indicatorDisplayed or flashes when the rear camera detection
function is disabled, such as when it is malfunctioning.
Guide line switching but-
tonSelect to switch the guide line mode. ( P.196)
Rear Camera DetectionDisplayed automatically when a pedestrian is detected.
Rear Cross Traffic AlertWhen a sensor detects an obstacle, the direction of ob-
stacle is displayed and the buzzer sounds.
Intuitive parking assist
When a sensor detects an obstacle, the direction of and
the approximate distance to the obstacle are displayed
and the buzzer sounds.
INFORMATION
● The monitor is cancelled when the shift lever is shifted into a ny position other than the “R”
position.
● For details about the Rear Cross Traffic Alert function, rear c amera detection function and
intuitive parking assist, refer to the “OWNER’S MANUAL”.
Page 196 of 350
196
3. PANORAMIC VIEW MONITOR
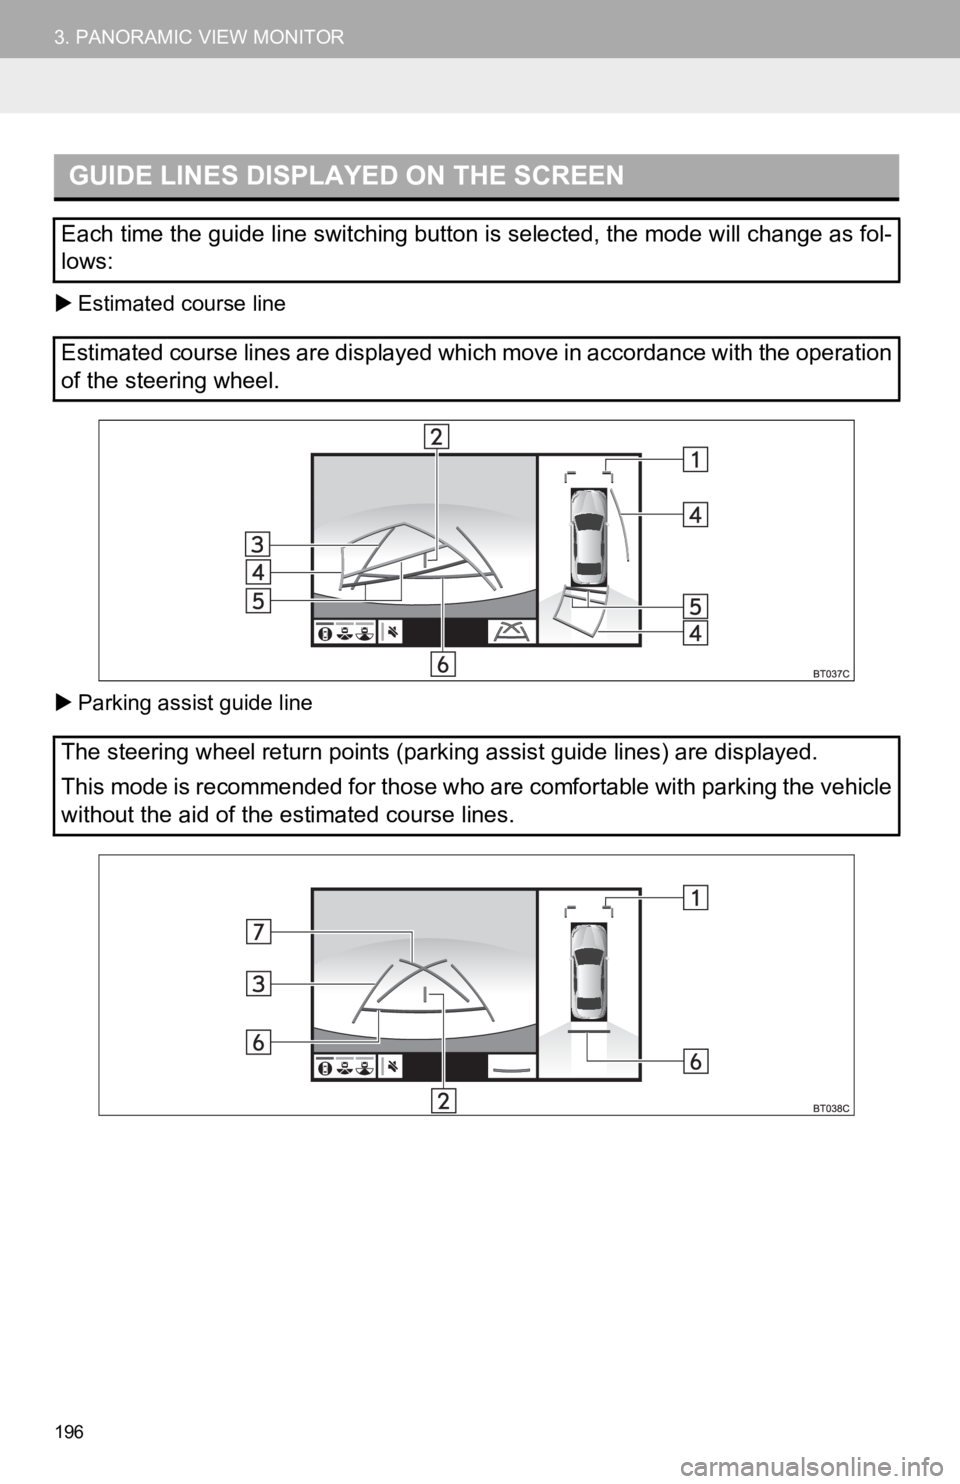
Estimated course line
Parking assist guide line
GUIDE LINES DISPLAYED ON THE SCREEN
Each time the guide line switching button is selected, the mode will change as fol-
lows:
Estimated course lines are displayed which move in accordance w ith the operation
of the steering wheel.
The steering wheel return points (parking assist guide lines) a re displayed.
This mode is recommended for those who are comfortable with par king the vehicle
without the aid of the estimated course lines.
Page 243 of 350
243
2. SETUP
PHONE
7
■DELETING FAVORITES FROM THE
FAVORITES LIST IN A DIFFERENT
WAY (FROM THE CONTACT DE-
TAILS SCREEN)
1Display the phone top screen.
(P.216)
2Select “Favorites” or “Contacts” and
then select the favorite you wish to de-
lete.
3Select “Remove Favorite” .
4Select “Yes” when the confirmation
screen appears.
5Check that a confirmation screen is
displayed when the operation is com-
plete.
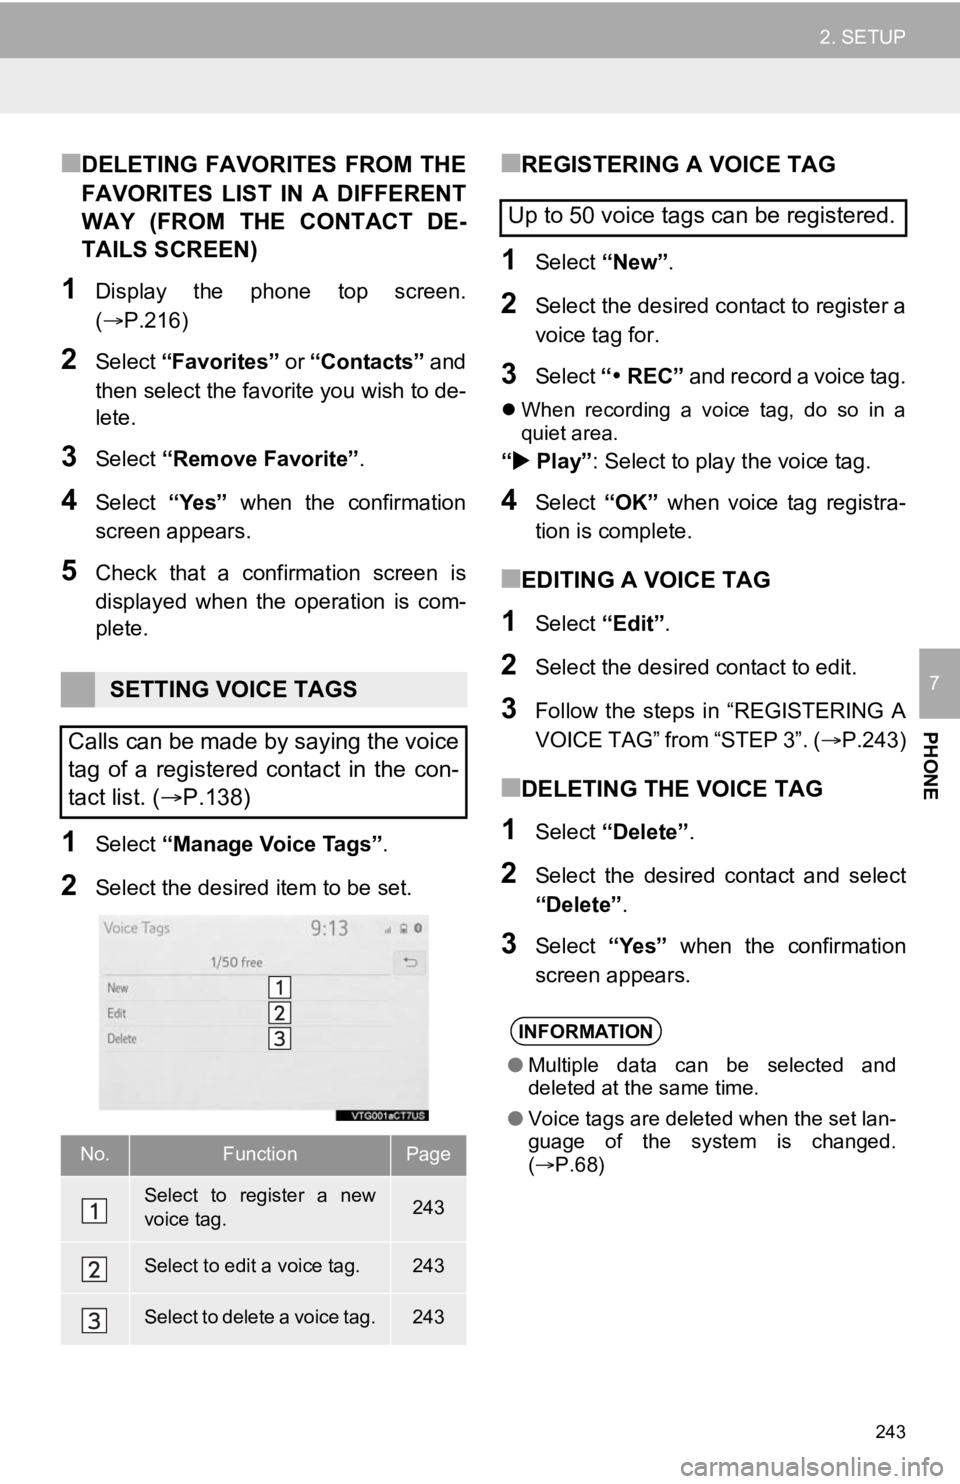
1Select “Manage Voice Tags” .
2Select the desired item to be set.
■REGISTERING A VOICE TAG
1Select “New”.
2Select the desired contact to register a
voice tag for.
3Select “REC” and record a voice tag.
When recording a voice tag, do so in a
quiet area.
“ Play” : Select to play the voice tag.
4Select “OK” when voice tag registra-
tion is complete.
■EDITING A VOICE TAG
1Select “Edit”.
2Select the desired contact to edit.
3Follow the steps in “REGISTERING A
VOICE TAG” from “STEP 3”. ( P.243)
■DELETING THE VOICE TAG
1Select “Delete”.
2Select the desired contact and select
“Delete” .
3Select “Yes” when the confirmation
screen appears.
SETTING VOICE TAGS
Calls can be made by saying the voice
tag of a registered contact in the con-
tact list. ( P.138)
No.FunctionPage
Select to register a new
voice tag.243
Select to edit a voice tag.243
Select to delete a voice tag.243
Up to 50 voice tags can be registered.
INFORMATION
●Multiple data can be selected and
deleted at the same time.
● Voice tags are deleted when the set lan-
guage of the system is changed.
( P.68)
Page 265 of 350
265
1. BASIC OPERATION
NAVIGATION SYSTEM
8
1Display the traffic incidents screen.
(P.264)
2Select “Traffic Events on Current
Road”, “Traffic Events on Current
Route” or “Traffic Events Nearby” .
3Select the desired traffic information.
When “Traffic Events Nearby” is se-
lected, depending on whether the traffic
flow information is enabled/disabled, the
following will be displayed:
When enabled: Traffic event and conges-
tion information
When disabled: Traffic event information
only
4Check that the traffic information is dis-
played.
“Detail” : Select to display detailed traffic
information.
1Display the traffic incidents screen.
(P.264)
2Select “Predictive Traffic Map” .
3Scroll the map to the desired point and
set the time of predictive traffic infor-
mation.
The time of the predictive traffic informa-
tion can be changed in 15-minute intervals
up to +45 minutes.
“<”: Moves the time forward 15 minutes.
“
>”: Moves the time back 15 minutes.
DISPLAYING TRAFFIC
INFORMATION
A list of current traffic information can
be displayed along with information on
the location of each incident.DISPLAYING PREDICTIVE
TRAFFIC INFORMATION
A map with predictive traffic data can
be displayed.
Page 275 of 350
275
2. DESTINATION SEARCH
NAVIGATION SYSTEM
8
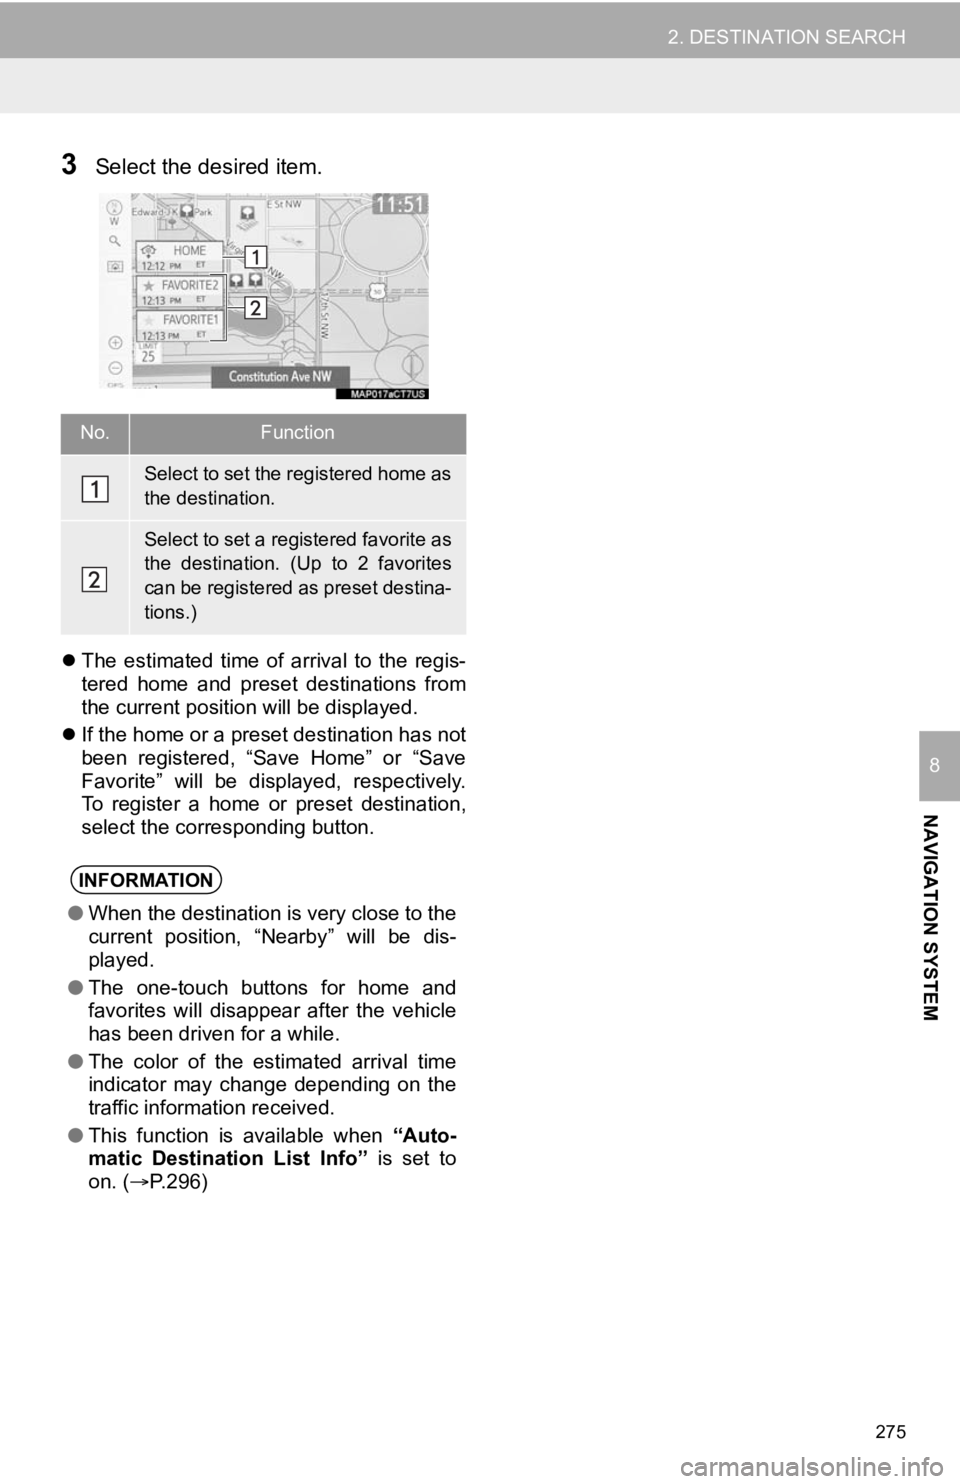
3Select the desired item.
The estimated time of arrival to the regis-
tered home and preset destinations from
the current position will be displayed.
If the home or a preset destination has not
been registered, “Save Home” or “Save
Favorite” will be displayed, respectively.
To register a home or preset destination,
select the corresponding button.
No.Function
Select to set the registered home as
the destination.
Select to set a registered favorite as
the destination. (Up to 2 favorites
can be registered as preset destina-
tions.)
INFORMATION
●When the destination is very close to the
current position, “Nearby” will be dis-
played.
● The one-touch buttons for home and
favorites will disappear after the vehicle
has been driven for a while.
● The color of the estimated arrival time
indicator may change depending on the
traffic information received.
● This function is available when “Auto-
matic Destination List Info” is set to
on. ( P.296)
Page 293 of 350
293
4. MEMORY POINTS
NAVIGATION SYSTEM
8
1Display the navigation settings screen.
(P.291)
2Select “Favorites” .
3Select the desired item.
“Add New/Sort/Delete All” : Select to edit
the favorites list.
“Add New” : Select to register favorites
list entries. ( P.293)
“Sort” : Select to sort (date, name, icon)
favorite list entries.
“Delete All” : Select to delete all favorite
list entries.
1Select “Add New”.
2Select the desired item to search for
the location. (P.267)
3Select “OK” when the edit favorites
entry screen appears. ( P.293)
1Display the navigation settings screen.
(P.291)
2Select “Favorites” .
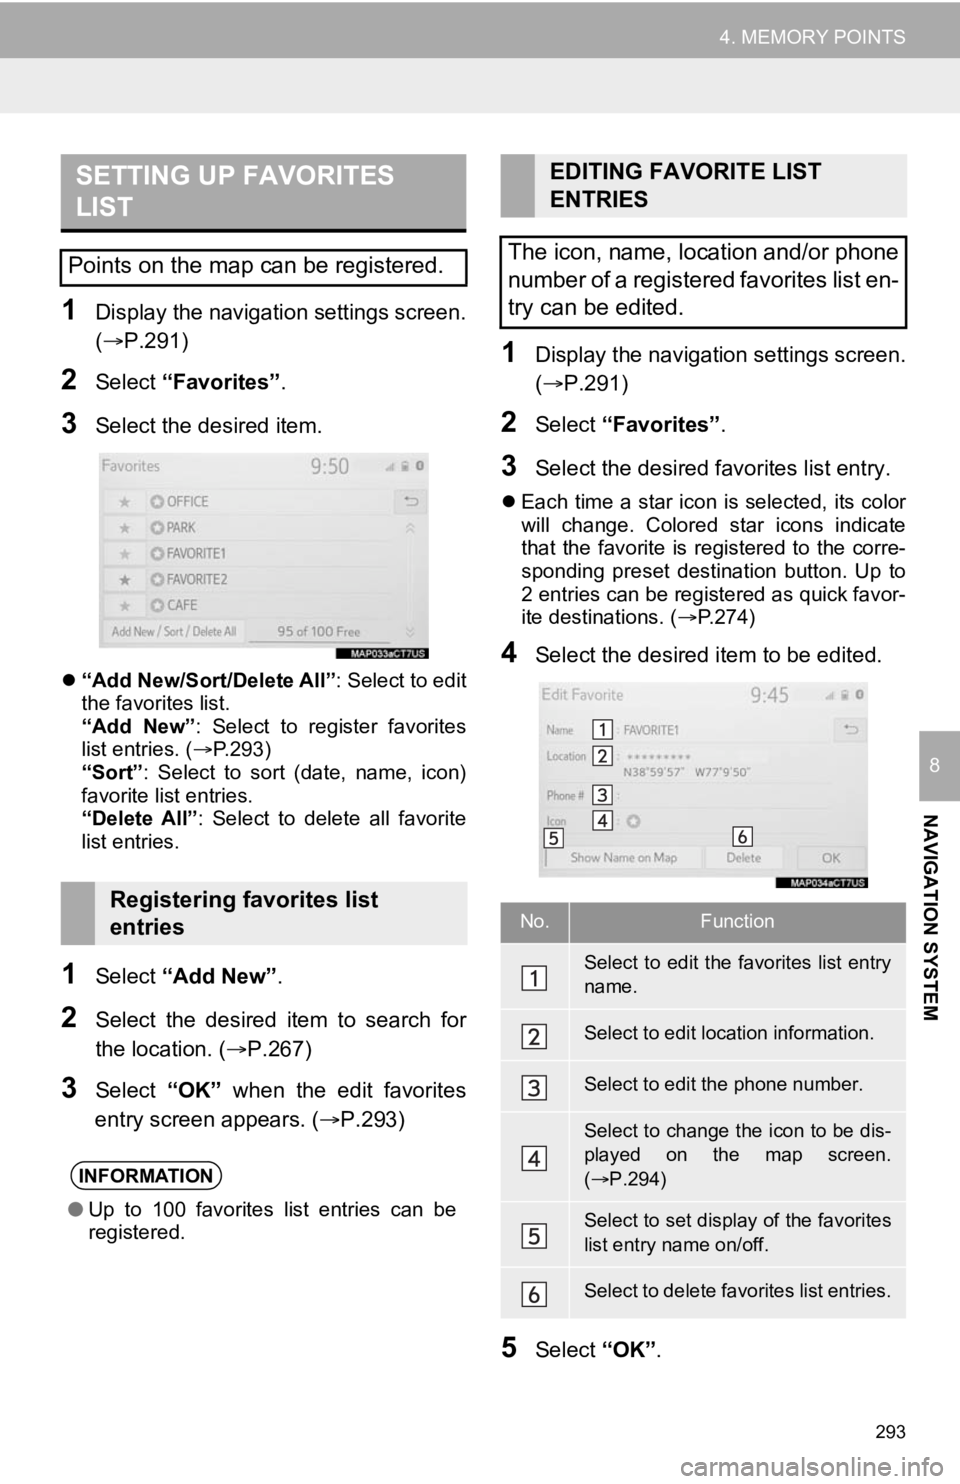
3Select the desired favorites list entry.
Each time a star icon is selected, its color
will change. Colored star icons indicate
that the favorite is registered to the corre-
sponding preset destination button. Up to
2 entries can be registered as quick favor-
ite destinations. ( P.274)
4Select the desired item to be edited.
5Select “OK”.
SETTING UP FAVORITES
LIST
Points on the map can be registered.
Registering favorites list
entries
INFORMATION
●Up to 100 favorites list entries can be
registered.
EDITING FAVORITE LIST
ENTRIES
The icon, name, location and/or phone
number of a registered favorites list en-
try can be edited.
No.Function
Select to edit the favorites list entry
name.
Select to edit location information.
Select to edit the phone number.
Select to change the icon to be dis-
played on the map screen.
( P.294)
Select to set display of the favorites
list entry name on/off.
Select to delete favorites list entries.