navigation TOYOTA CAMRY 2020 Owners Manual (in English)
[x] Cancel search | Manufacturer: TOYOTA, Model Year: 2020, Model line: CAMRY, Model: TOYOTA CAMRY 2020Pages: 56, PDF Size: 4.29 MB
Page 5 of 56
3
OVERVIEW
FEATURES & OPERATIONS
TOYOTA SAFETY SENSE
SAFETY & EMERGENCY FEATURES
1
If equipped.2 For details, refer to the “Navigation and Multimedia System Owner’\�s Manual” or visit
www.toyota.com/audio-multimedia for additional resources.
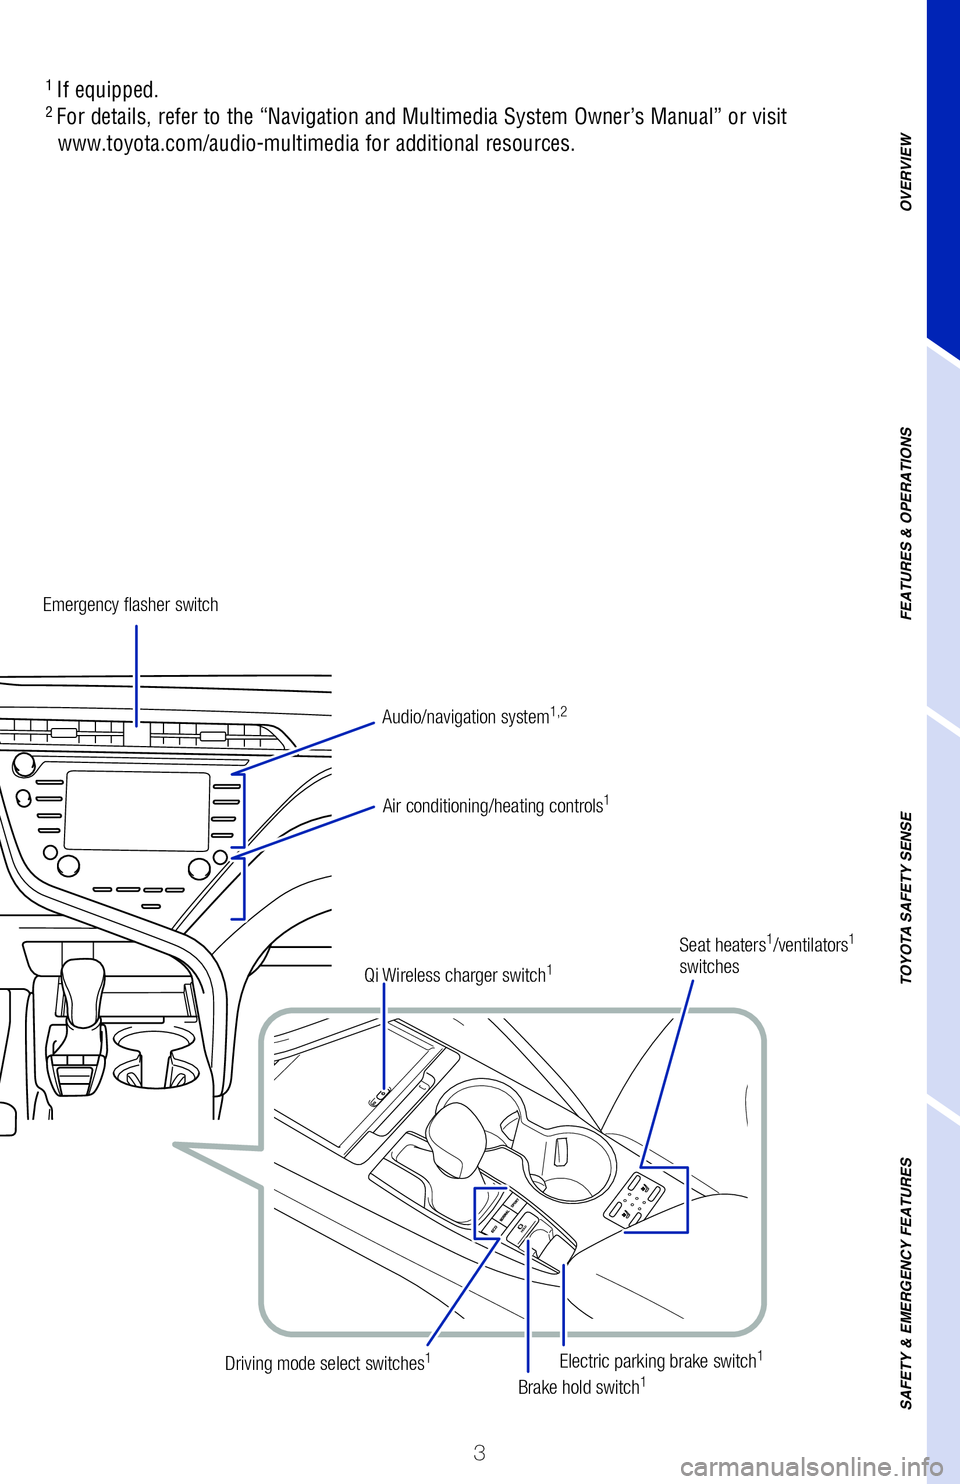
Emergency flasher switch
Air conditioning/heating controls
1
Electric parking brake switch1
Brake hold switch1Driving mode select switches1
Seat heaters1/ventilators1
switches
Audio/navigation system
1,2
Qi Wireless charger switch1
Page 21 of 56
19
OVERVIEW
FEATURES & OPERATIONS
TOYOTA SAFETY SENSE
SAFETY & EMERGENCY FEATURES
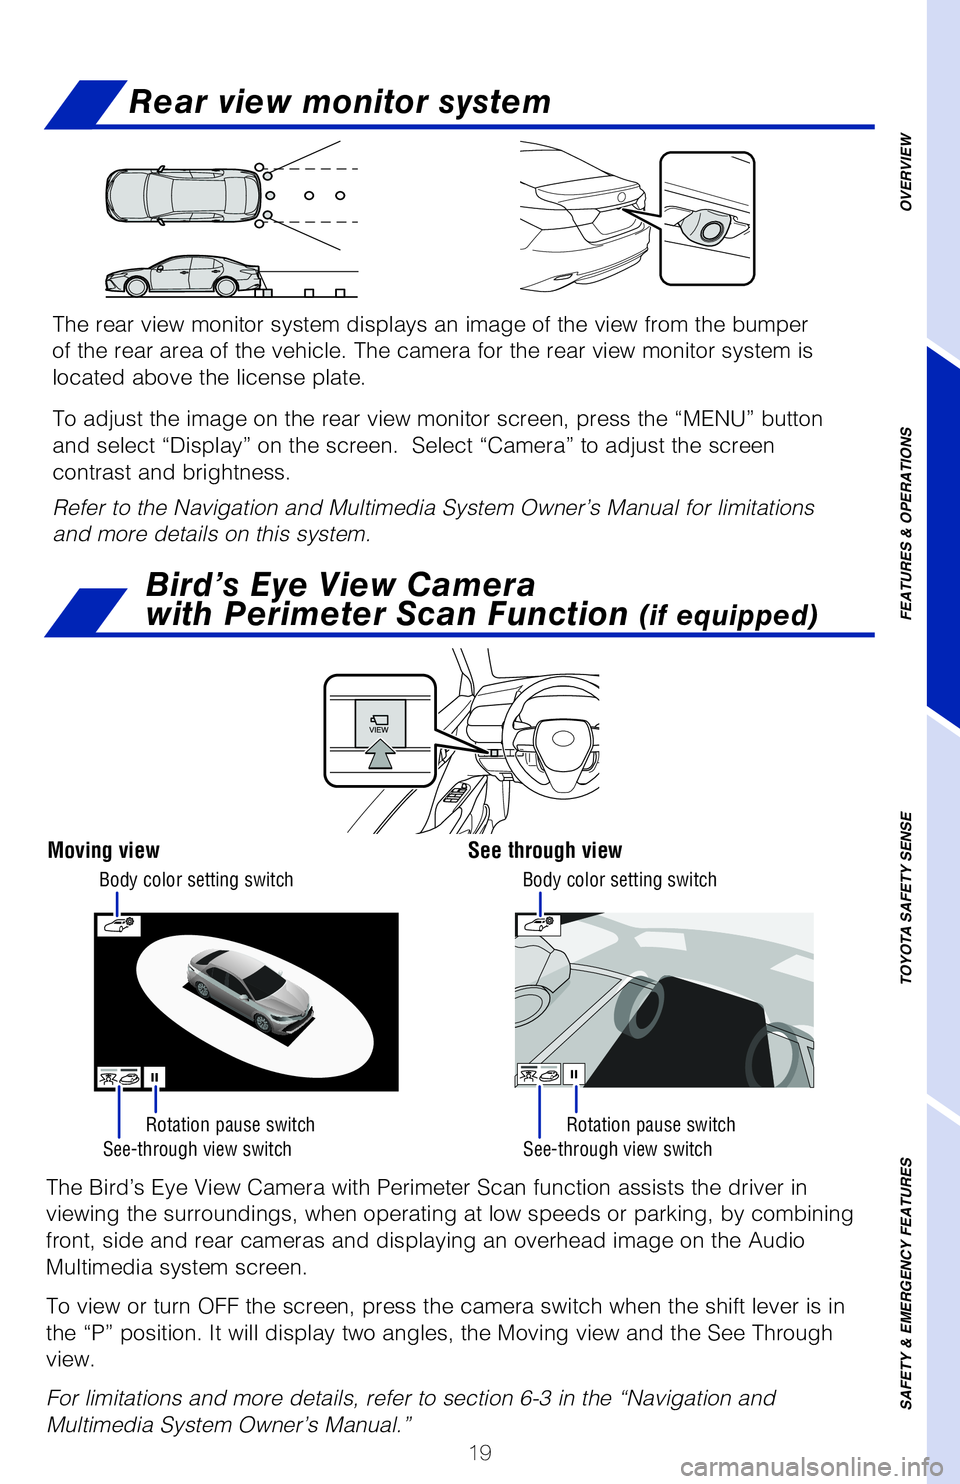
Rear view monitor system
See-through view switch See-through view switch
Rotation pause switch
Rotation pause switch
The Bird’s Eye View Camera with Perimeter Scan function assists the d\�river in
viewing the surroundings, when operating at low speeds or parking, by co\�mbining
front, side and rear cameras and displaying an overhead image on the Aud\�io
Multimedia system screen.
To view or turn OFF the screen, press the camera switch when the shift l\�ever is in
the “P” position. It will display two angles, the Moving view and \�the See Through
view.
For limitations and more details, refer to section 6-3 in the “Navigation and
Multimedia System Owner’s Manual.”
Moving viewSee through view
Bird’s Eye View Camera
with Perimeter Scan Function
(if equipped)
Body color setting switch Body color setting switch
The rear view monitor system displays an image of the view from the bump\�er
of the rear area of the vehicle. The camera for the rear view monitor sy\�stem is
located above the license plate.
To adjust the image on the rear view monitor screen, press the “MENU”\� button
and select “Display” on the screen. Select “Camera” to adju\�st the screen
contrast and brightness.
Refer to the Navigation and Multimedia System Owner’s Manual for limitations
and more details on this system.
Page 22 of 56
20
FEATURES & OPERATIONS
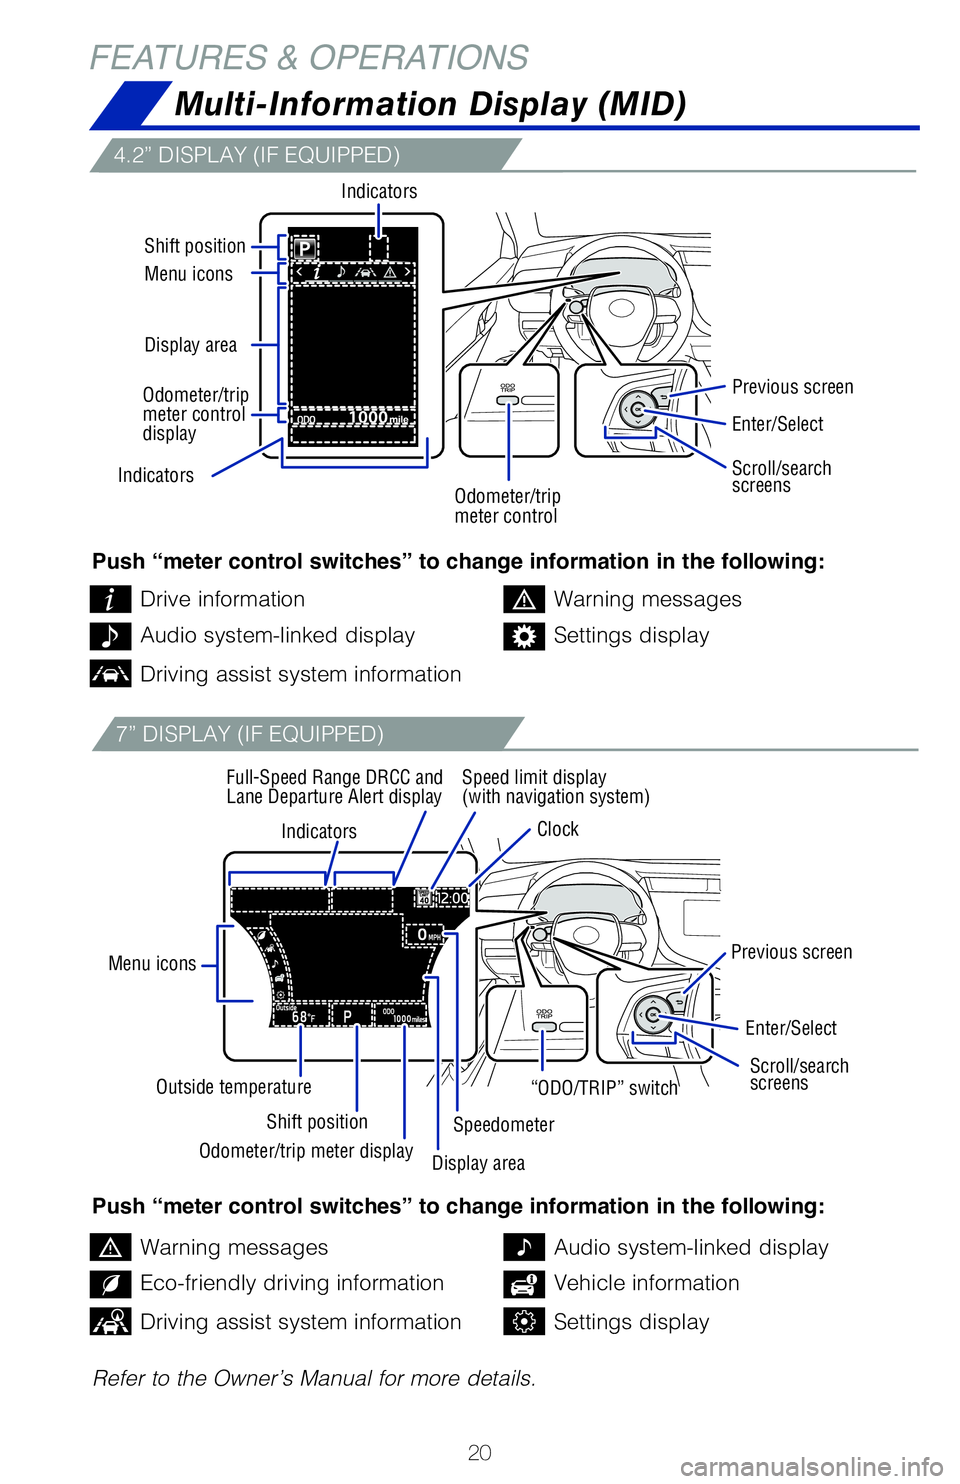
Multi-Information Display (MID)
4.2” DISPLAY (IF EQUIPPED)
7” DISPLAY (IF EQUIPPED)
Push “meter control switches” to change information in the following:
Push “meter control switches” to change information in the following:
Refer to the Owner’s Manual for more details.Drive information
Warning messages
Warning messages
Audio system-linked display
Audio system-linked display
Eco-friendly driving information
Settings display
Vehicle information
Driving assist system information
Driving assist system informationSettings display
Indicators
Menu icons
Shift position
Outside temperature Speed limit display
(with navigation system)
Clock
Full-Speed Range DRCC and
Lane Departure Alert display
Previous screen
Previous screen
Speedometer
Indicators
Display area Menu icons Shift position
Indicators
Enter/Select
Enter/Select
Scroll/search
screens Scroll/search
screens
Odometer/trip
meter control “ODO/TRIP” switch
Odometer/trip meter display Display area
Odometer/trip
meter control
display
Page 23 of 56
21
OVERVIEW
FEATURES & OPERATIONS
TOYOTA SAFETY SENSE
SAFETY & EMERGENCY FEATURES
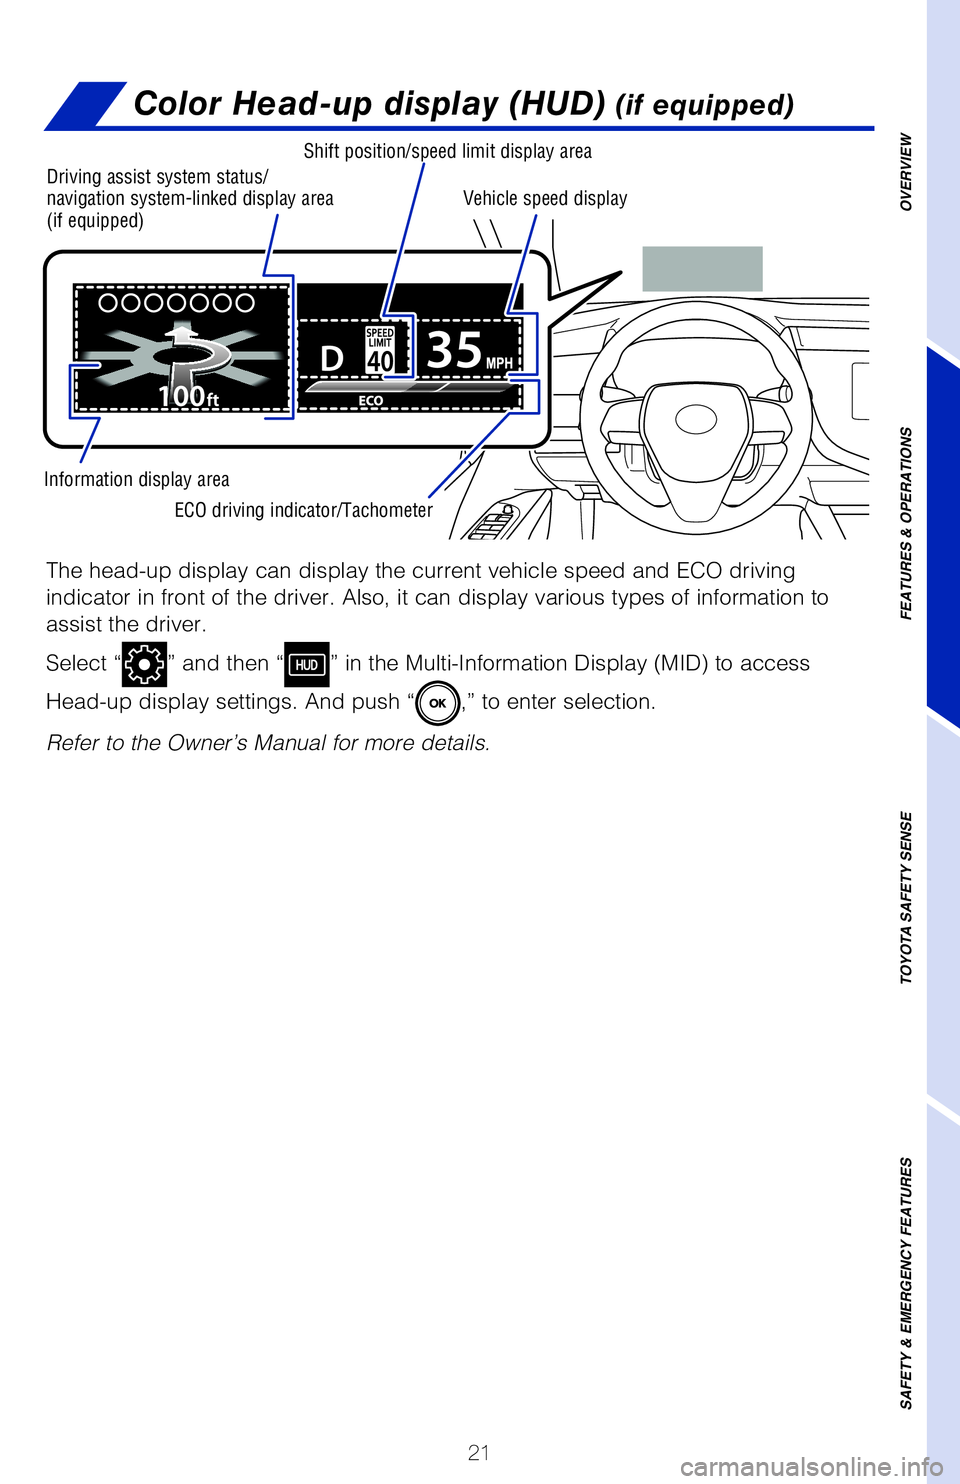
Color Head-up display (HUD) (if equipped)
The head-up display can display the current vehicle speed and ECO drivin\�g
indicator in front of the driver. Also, it can display various types of \�information to
assist the driver.
Select “
” and then “” in the Multi-Information Display (MID) to access
Head-up display settings. And push “
,” to enter selection.
Refer to the Owner’s Manual for more details.
Driving assist system status/
navigation system-linked display area
(if equipped)
Shift position/speed limit display area
ECO driving indicator/Tachometer
Information display area Vehicle speed display
Page 28 of 56
26
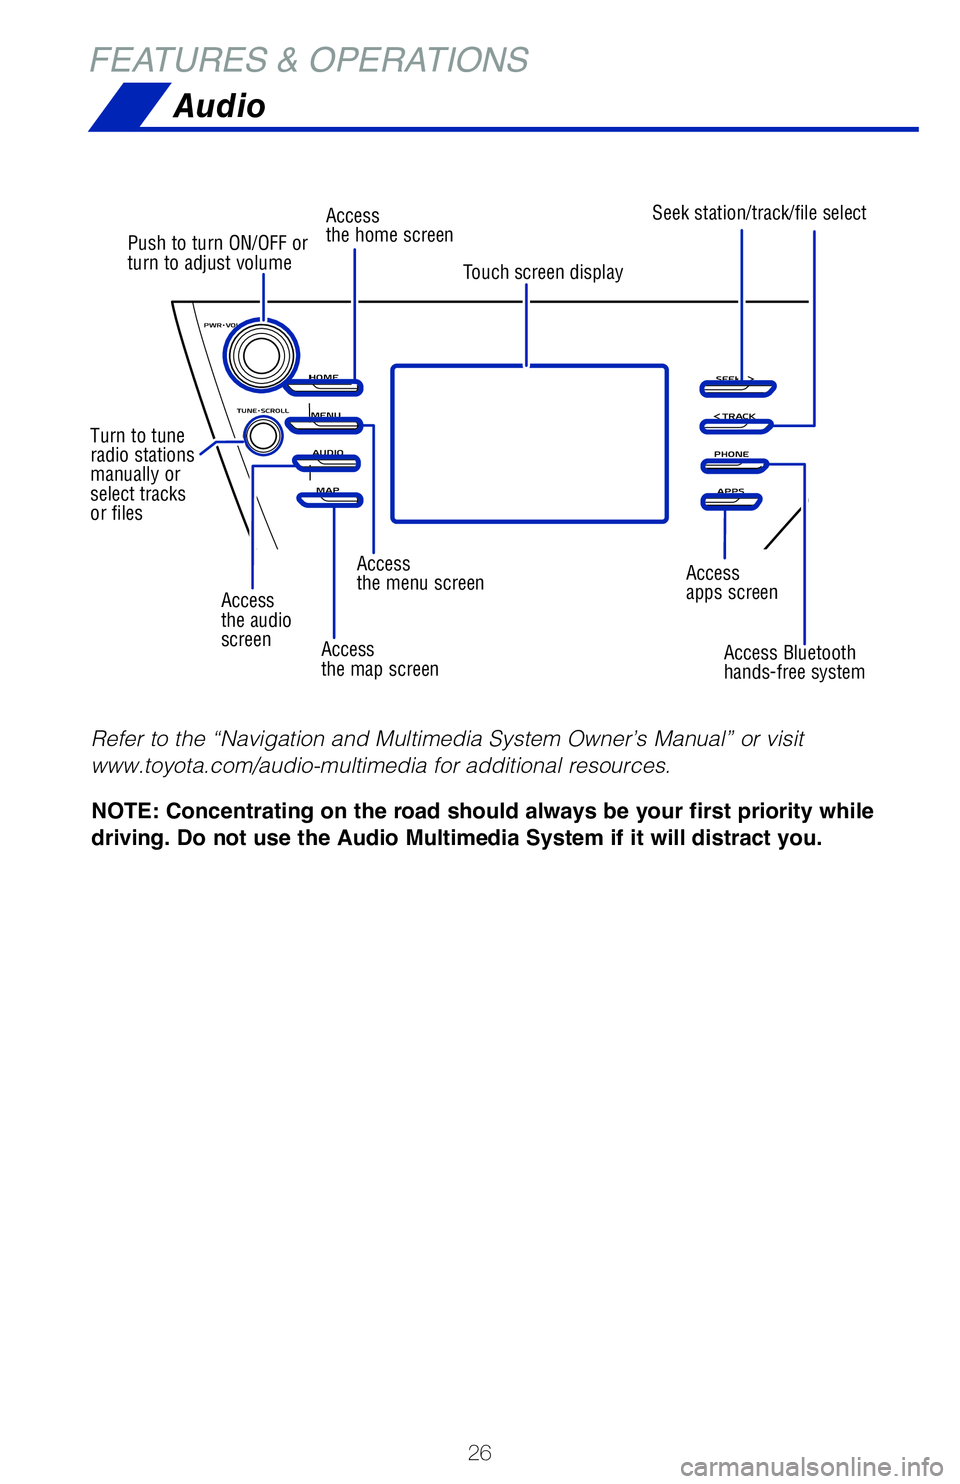
Access
the audio
screen
Push to turn ON/OFF or
turn to adjust volume
Turn to tune
radio stations
manually or
select tracks
or files Access
the home screen
Access
the menu screen Access
apps screen
Access
the map screen Access Bluetooth
hands-free system
Seek station/track/file select
Touch screen display
FEATURES & OPERATIONS
Audio
NOTE: Concentrating on the road should always be your first priority while
driving. Do not use the Audio Multimedia System if it will distract you.
Refer to the “Navigation and Multimedia System Owner’s Manual” or visit
www.toyota.com/audio-multimedia for additional resources.
Page 29 of 56
27
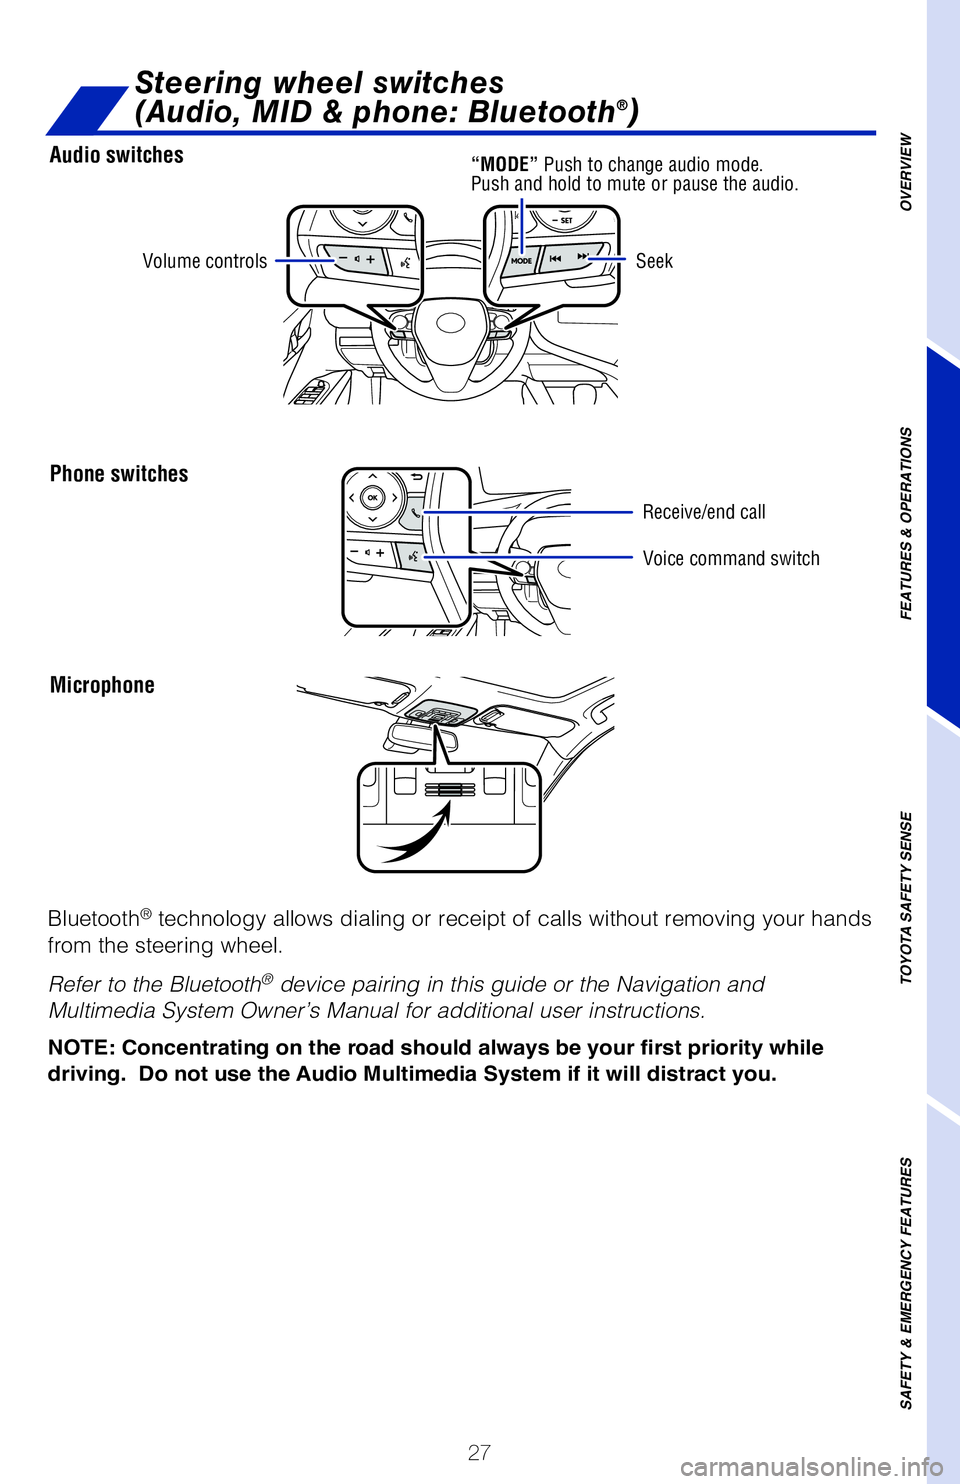
Audio switches
Phone switches
Microphone
Steering wheel switches
(Audio, MID & phone: Bluetooth®)
OVERVIEW
FEATURES & OPERATIONS
TOYOTA SAFETY SENSE
SAFETY & EMERGENCY FEATURES
Volume controls
Voice command switch
Seek
Bluetooth® technology allows dialing or receipt of calls without removing your han\�ds
from the steering wheel.
Refer to the Bluetooth
® device pairing in this guide or the Navigation and
Multimedia System Owner’s Manual for additional user instructions.
“MODE” Push to change audio mode.
Push and hold to mute or pause the audio.
Receive/end call
NOTE: Concentrating on the road should always be your first priority whi\
le
driving. Do not use the Audio Multimedia System if it will distract you.
Page 31 of 56
29
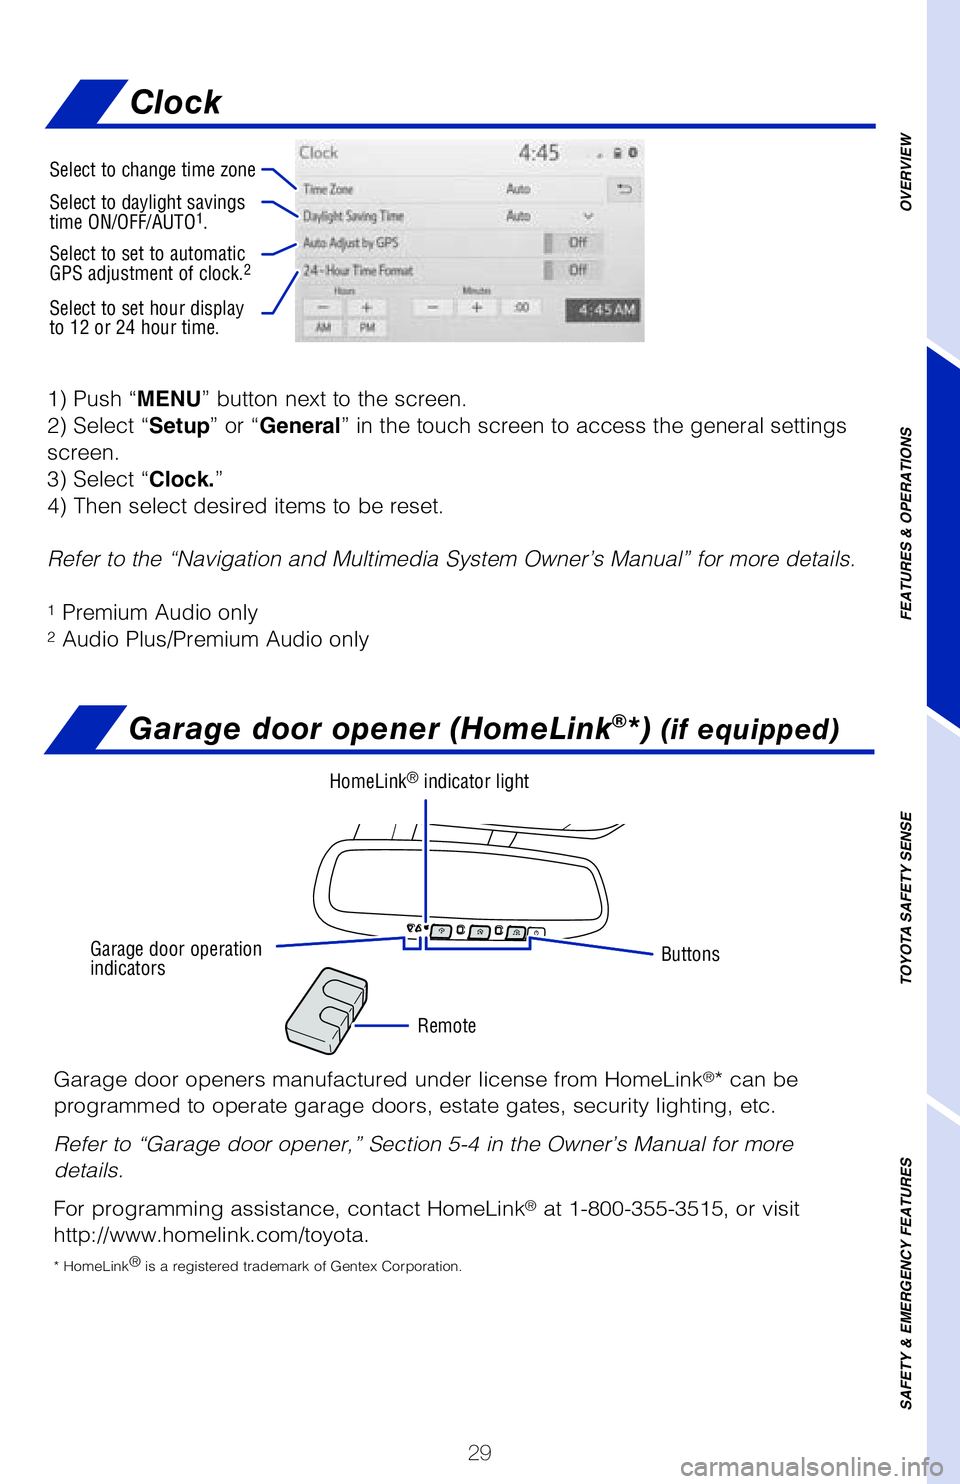
1) Push “MENU” button next to the screen.
2) Select “Setup” or “General” in the touch screen to access the general settings
screen.
3) Select “Clock.”
4) Then select desired items to be reset.
Refer to the “Navigation and Multimedia System Owner’s Manual” \�for more details.
1 Premium Audio only2 Audio Plus/Premium Audio only
OVERVIEW
FEATURES & OPERATIONS
TOYOTA SAFETY SENSE
SAFETY & EMERGENCY FEATURES
Garage door opener (HomeLink®*) (if equipped)
Garage door openers manufactured under license from HomeLink®* can be
programmed to operate garage doors, estate gates, security lighting, etc\�.
Refer to “Garage door opener,” Section 5-4 in the Owner’s Manua\�l for more
details.
For programming assistance, contact HomeLink
® at 1-800-355-3515, or visit
http://www.homelink.com/toyota.
* HomeLink ®
is a registered trademark of Gentex Corporation.
Buttons
Remote
HomeLink® indicator light
Garage door operation
indicators
Select to change time zone
Select to daylight savings
time ON/OFF/AUTO1.
Select to set to automatic
GPS adjustment of clock.2
Select to set hour display
to 12 or 24 hour time.
Clock