reset TOYOTA CAMRY HYBRID 2019 Accessories, Audio & Navigation (in English)
[x] Cancel search | Manufacturer: TOYOTA, Model Year: 2019, Model line: CAMRY HYBRID, Model: TOYOTA CAMRY HYBRID 2019Pages: 354, PDF Size: 8.08 MB
Page 89 of 354
89
2. RADIO OPERATION
AUDIO/VISUAL SYSTEM
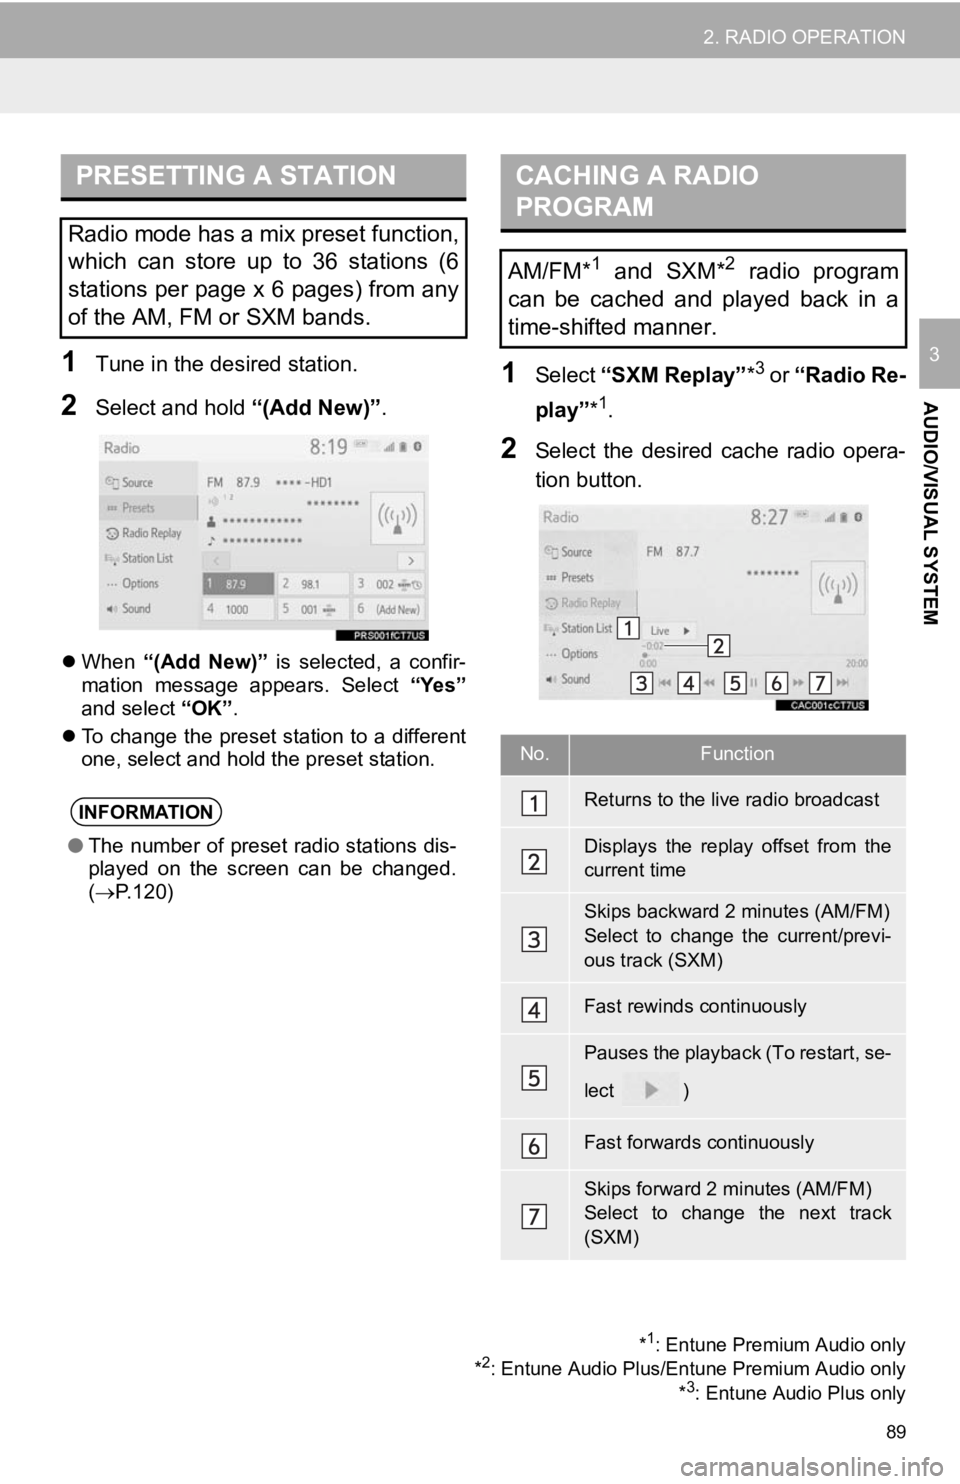
31Tune in the desired station.
2Select and hold “(Add New)”.
When “(Add New)” is selected, a confir-
mation message appears. Select “Yes”
and select “OK”.
To change the preset station to a different
one, select and hold the preset station.
1Select “SXM Replay” *3 or “Radio Re-
play” *
1.
2Select the desired cache radio opera-
tion button.
PRESETTING A STATION
Radio mode has a mix preset function,
which can store up to 36 stations (6
stations per page x 6 pages) from any
of the AM, FM or SXM bands.
INFORMATION
●The number of preset radio stations dis-
played on the screen can be changed.
( P.120)
*1: Entune Premium Audio only
*2: Entune Audio Plus/Entune Premium Audio only *3: Entune Audio Plus only
CACHING A RADIO
PROGRAM
AM/FM*1 and SXM*2 radio program
can be cached and played back in a
time-shifted manner.
No.Function
Returns to the live radio broadcast
Displays the replay offset from the
current time
Skips backward 2 minutes (AM/FM)
Select to change the current/previ-
ous track (SXM)
Fast rewinds continuously
Pauses the playback (To restart, se-
lect
)
Fast forwards continuously
Skips forward 2 minutes (AM/FM)
Select to change the next track
(SXM)
Page 90 of 354
90
2. RADIO OPERATION
1Select channels registered to smart fa-
vorites.
2Select “SXM Replay” *2 or “Radio Re-
play” *
3.
INFORMATION
●The system can stor e up to 20 minutes
of AM/FM and less than 60 minutes of
SXM. Cached data will be erased when
the radio mode or station is changed or
when the audio/visual system is turned
off.
● AM/FM: If noise or silence occurs during
the caching process, cache writing will
continue, with the noise or silence
recorded as is. In this case, the cached
broadcast will contain the noise or
silence when played back.
AUTOMATIC PLAYBACK OF
THE CACHE
If the radio broadcast is interrupted by
another audio output, such as an
incoming phone call, the system will
automatically cache the interrupted
portion and perform time-shift
playback when the interruption ends.
This function is available when “Auto
Pause” is set to on. ( P.92)
SMART FAVORITES (SXM)*1
Up to 20 channels can be registered as
presets in the cache. Caches the latest
less than 30 minutes for each channel.
For channel registration: P.120
INFORMATION
● When “SXM Tune Start” is turned on
( P.92), the current song is played from
the beginning when you select the chan-
nel.
● is displayed on the channels regis-
tered to smart favorites. ( P.86)
*1: Entune Audio Plus/Entune Premium Audio only
*2: Entune Audio Plus only
*3: Entune Premium Audio only
Page 94 of 354
94
2. RADIO OPERATION
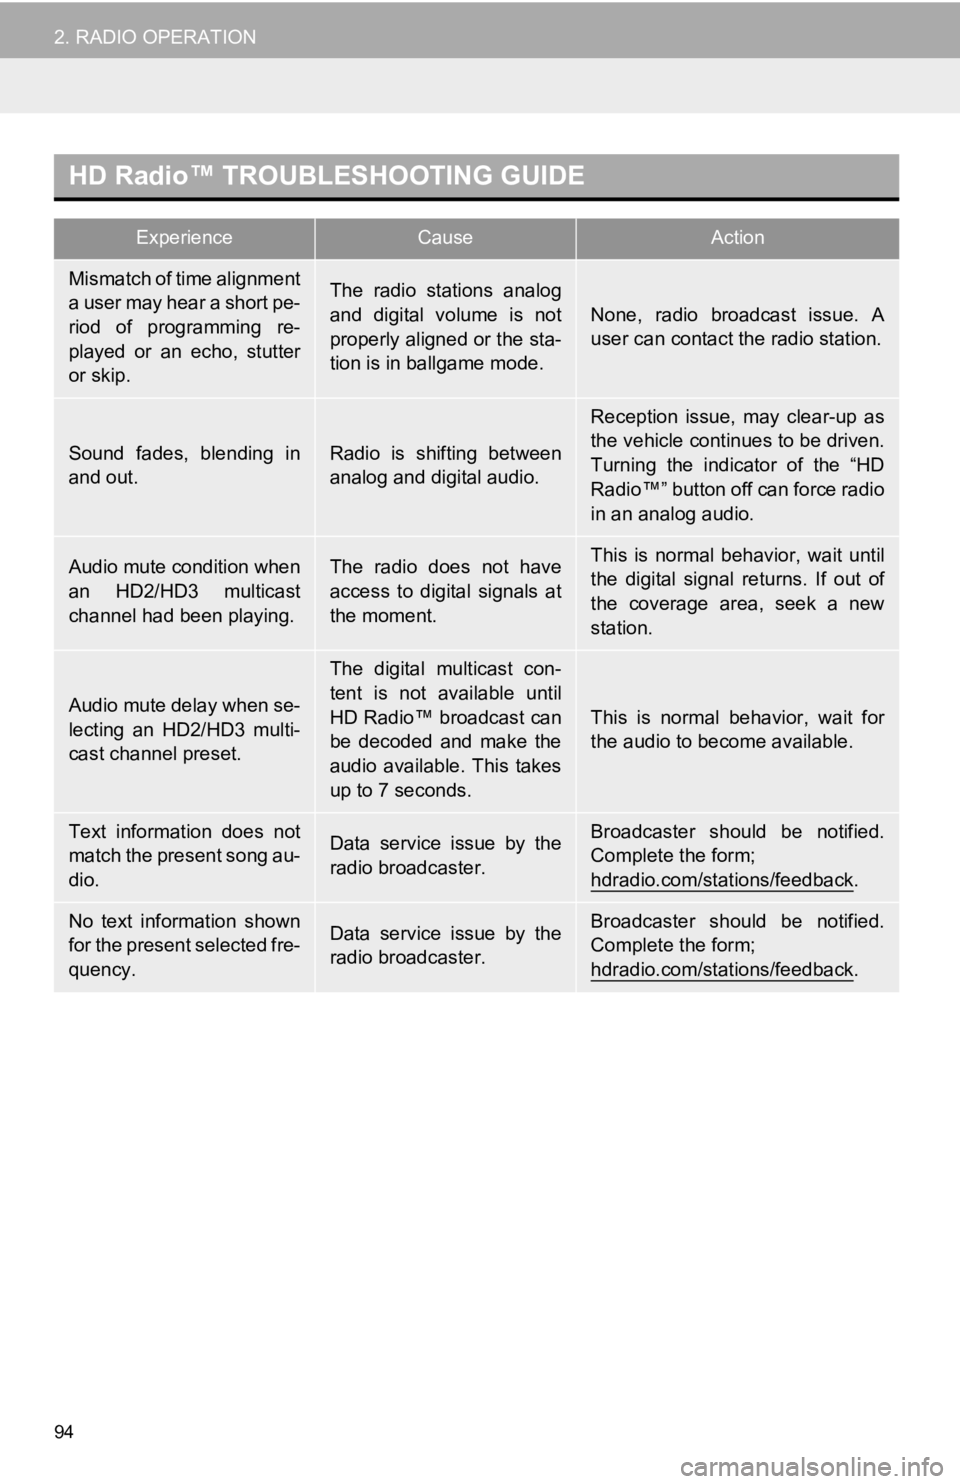
HD Radio™ TROUBLESHOOTING GUIDE
ExperienceCauseAction
Mismatch of time alignment
a user may hear a short pe-
riod of programming re-
played or an echo, stutter
or skip.The radio stations analog
and digital volume is not
properly aligned or the sta-
tion is in ballgame mode.
None, radio broadcast issue. A
user can contact the radio station.
Sound fades, blending in
and out.Radio is shifting between
analog and digital audio.
Reception issue, may clear-up as
the vehicle continues to be driven.
Turning the indicator of the “HD
Radio™” button off can force radio
in an analog audio.
Audio mute condition when
an HD2/HD3 multicast
channel had been playing.The radio does not have
access to digital signals at
the moment.This is normal behavior, wait until
the digital signal returns. If out of
the coverage area, seek a new
station.
Audio mute delay when se-
lecting an HD2/HD3 multi-
cast channel preset.
The digital multicast con-
tent is not available until
HD Radio™ broadcast can
be decoded and make the
audio available. This takes
up to 7 seconds.
This is normal behavior, wait for
the audio to become available.
Text information does not
match the present song au-
dio.Data service issue by the
radio broadcaster.Broadcaster should be notified.
Complete the form;
hdradio.com/stations/feedback
.
No text information shown
for the present selected fre-
quency.Data service issue by the
radio broadcaster.Broadcaster should be notified.
Complete the form;
hdradio.com/stations/feedback
.
Page 118 of 354
118
4. AUDIO/VISUAL REMOTE CONTROLS
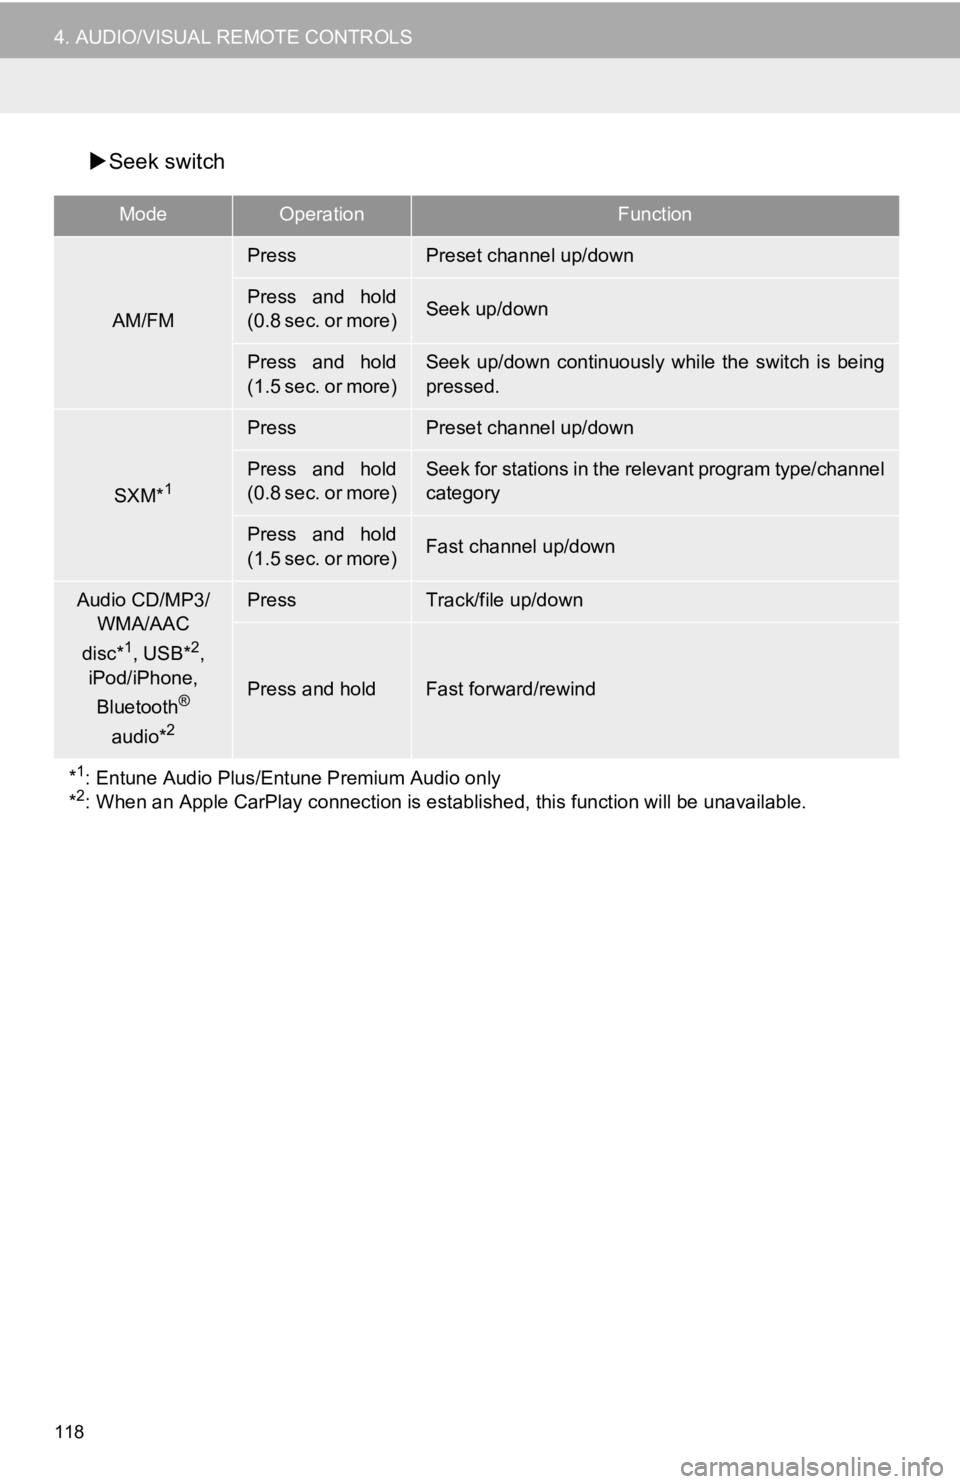
Seek switch
ModeOperationFunction
AM/FM
PressPreset channel up/down
Press and hold
(0.8 sec. or more)Seek up/down
Press and hold
(1.5 sec. or more)Seek up/down continuously while the switch is being
pressed.
SXM*1
PressPreset channel up/down
Press and hold
(0.8 sec. or more)Seek for stations in the relevant program type/channel
category
Press and hold
(1.5 sec. or more)Fast channel up/down
Audio CD/MP3/
WMA/AAC
disc*
1, USB*2,
iPod/iPhone,
Bluetooth
®
audio*2
PressTrack/file up/down
Press and holdFast forward/rewind
*
1: Entune Audio Plus/Entune Premium Audio only
*2: When an Apple CarPlay connection is established, this function will be unavailable.
Page 120 of 354
120
5. SETUP
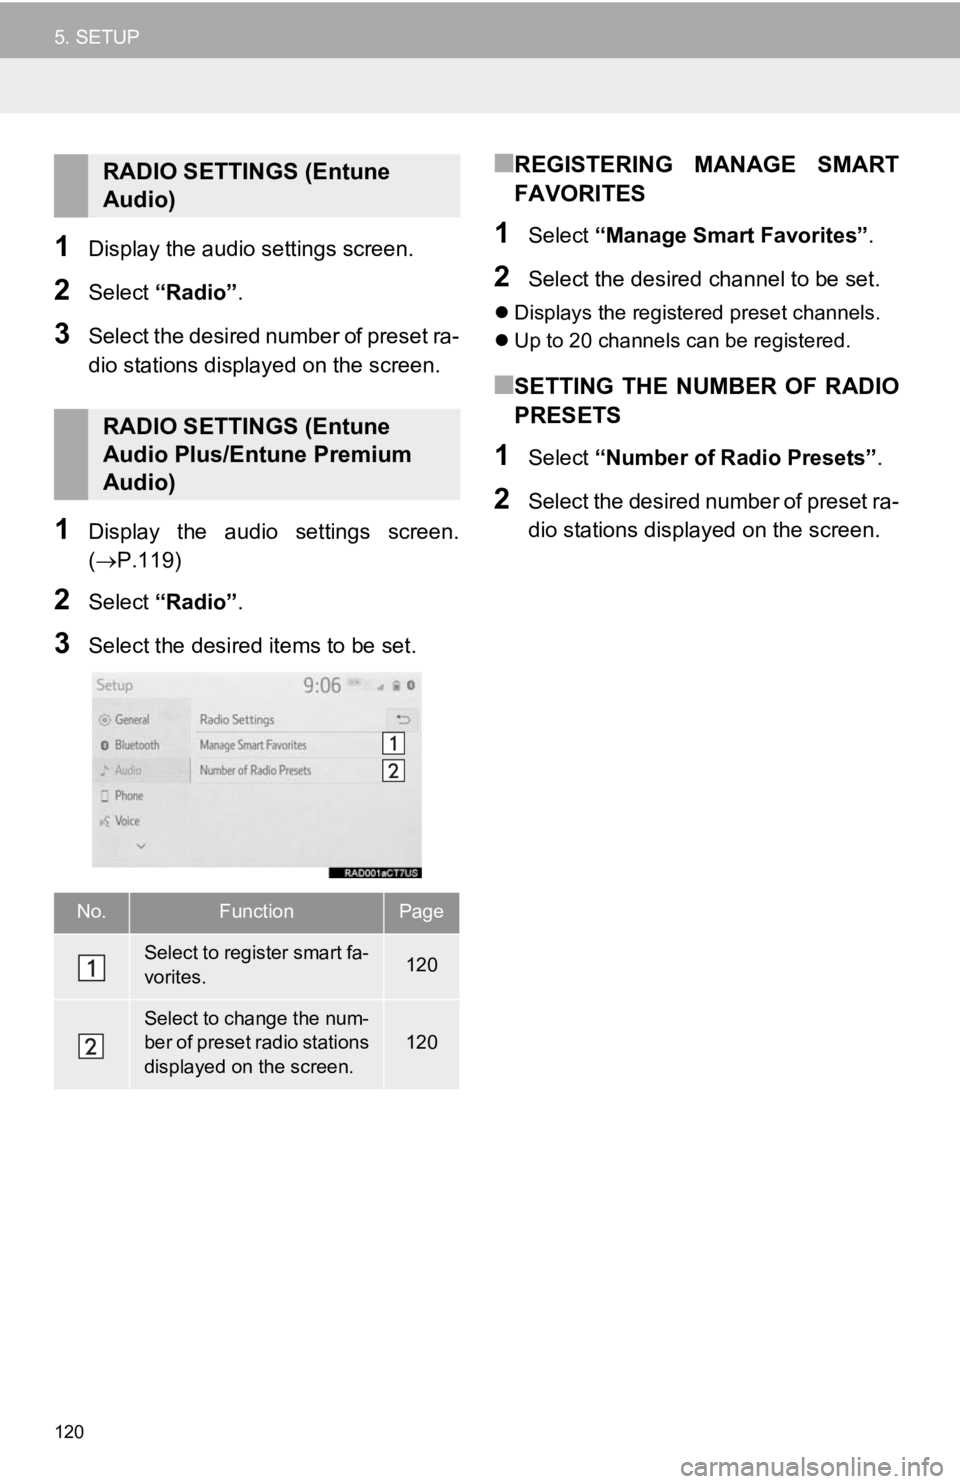
1Display the audio settings screen.
2Select “Radio” .
3Select the desired number of preset ra-
dio stations displayed on the screen.
1Display the audio settings screen.
(P.119)
2Select “Radio” .
3Select the desired items to be set.
■REGISTERING MANAGE SMART
FAVORITES
1Select “Manage Smart Favorites” .
2Select the desired channel to be set.
Displays the registered preset channels.
Up to 20 channels can be registered.
■SETTING THE NUMBER OF RADIO
PRESETS
1Select “Number of Radio Presets” .
2Select the desired number of preset ra-
dio stations displayed on the screen.
RADIO SETTINGS (Entune
Audio)
RADIO SETTINGS (Entune
Audio Plus/Entune Premium
Audio)
No.FunctionPage
Select to register smart fa-
vorites.120
Select to change the num-
ber of preset radio stations
displayed on the screen.
120
Page 142 of 354
142
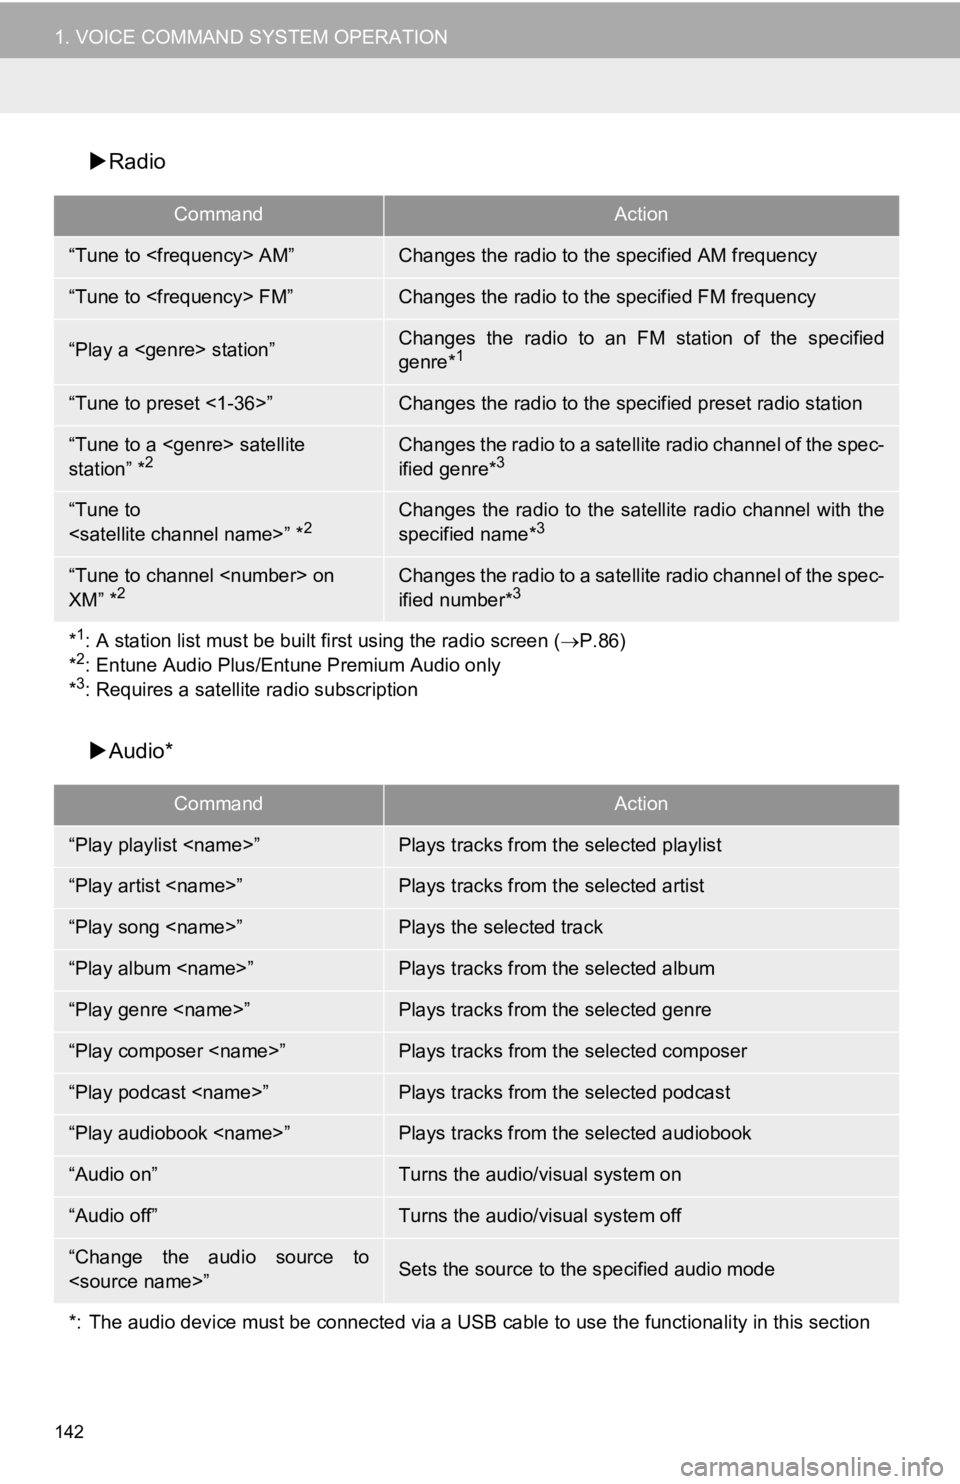
1. VOICE COMMAND SYSTEM OPERATION
Radio
Audio*
CommandAction
“Tune to
“Tune to
“Play a
genre*1
“Tune to preset <1-36>”Changes the radio to the specified preset radio station
“Tune to a
station” *2Changes the radio to a satellite radio channel of the spec-
ified genre*3
“Tune to
specified name*3
“Tune to channel
XM” *2Changes the radio to a satellite radio channel of the spec-
ified number*3
*1: A station list must be built fi rst using the radio screen (P.86)
*2: Entune Audio Plus/Entune Premium Audio only
*3: Requires a satellite radio subscription
CommandAction
“Play playlist
“Play artist
“Play song
“Play album
“Play genre
“Play composer
“Play podcast
“Play audiobook
“Audio on”Turns the audio/visual system on
“Audio off”Turns the audio/visual system off
“Change the audio source to
*: The audio device must be connected via a USB cable to use the functionality in this section
Page 230 of 354
230
1. PHONE OPERATION (HANDS-FREE SYSTEM FOR CELLULAR PHONES)
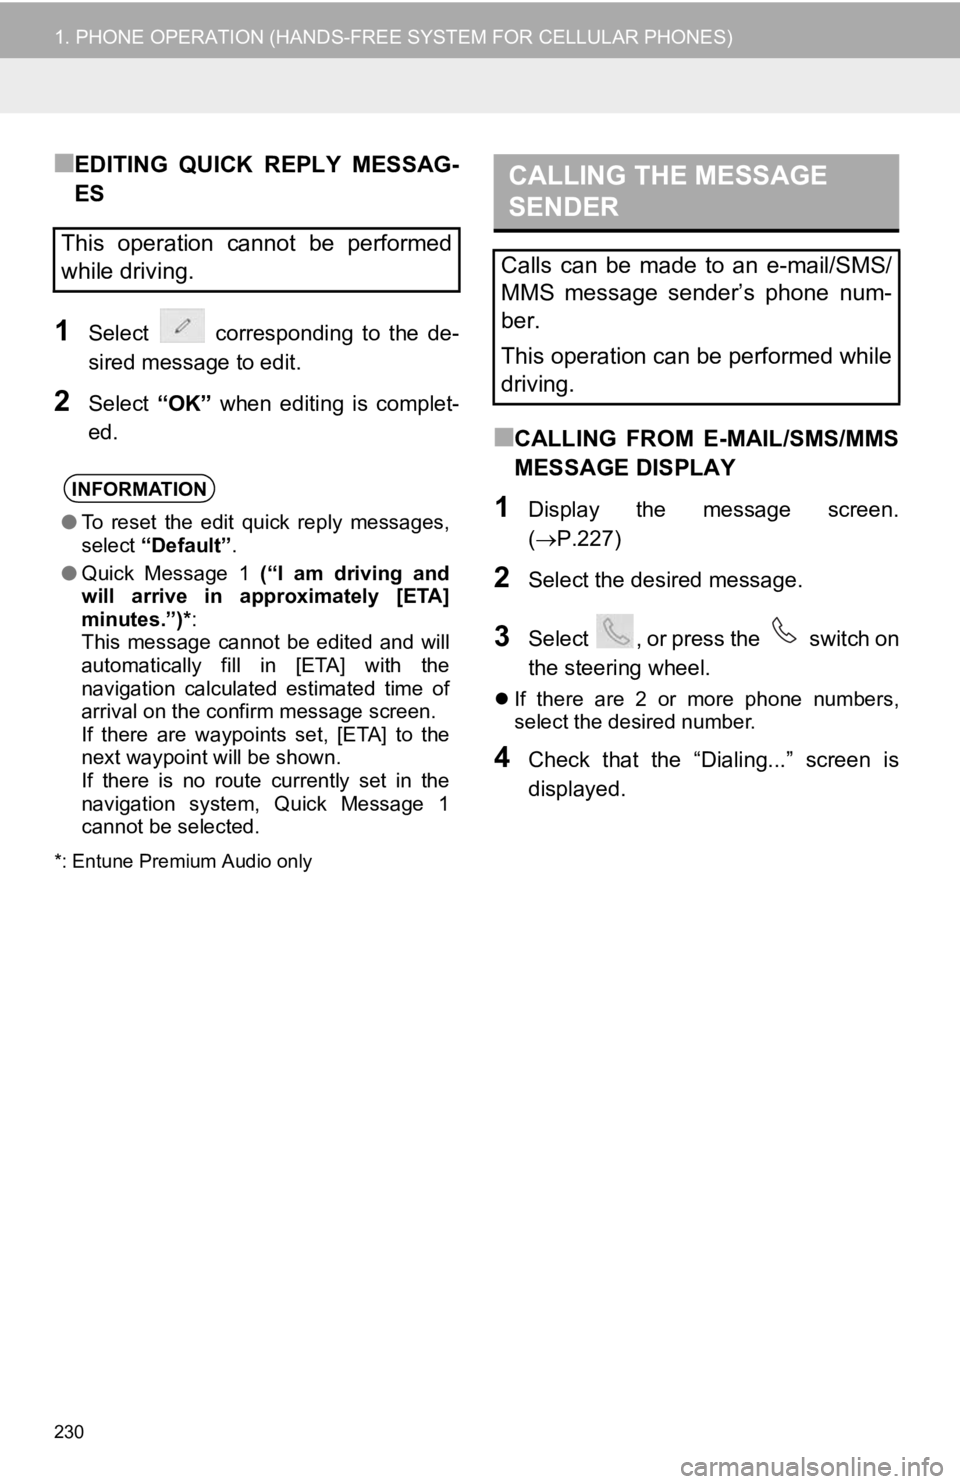
■EDITING QUICK REPLY MESSAG-
ES
1Select corresponding to the de-
sired message to edit.
2Select “OK” when editing is complet-
ed.
*: Entune Premium Audio only
■CALLING FROM E-MAIL/SMS/MMS
MESSAGE DISPLAY
1Display the message screen.
( P.227)
2Select the desired message.
3Select , or press the switch on
the steering wheel.
If there are 2 or more phone numbers,
select the desired number.
4Check that the “Dialing...” screen is
displayed.
This operation cannot be performed
while driving.
INFORMATION
●To reset the edit quick reply messages,
select “Default” .
● Quick Message 1 (“I am driving and
will arrive in approximately [ETA]
minutes.”)* :
This message cannot be edited and will
automatically fill in [ETA] with the
navigation calculated estimated time of
arrival on the confirm message screen.
If there are waypoints set, [ETA] to the
next waypoint will be shown.
If there is no route currently set in the
navigation system, Quick Message 1
cannot be selected.
CALLING THE MESSAGE
SENDER
Calls can be made to an e-mail/SMS/
MMS message sender’s phone num-
ber.
This operation can be performed while
driving.
Page 233 of 354
233
2. SETUP
PHONE
7
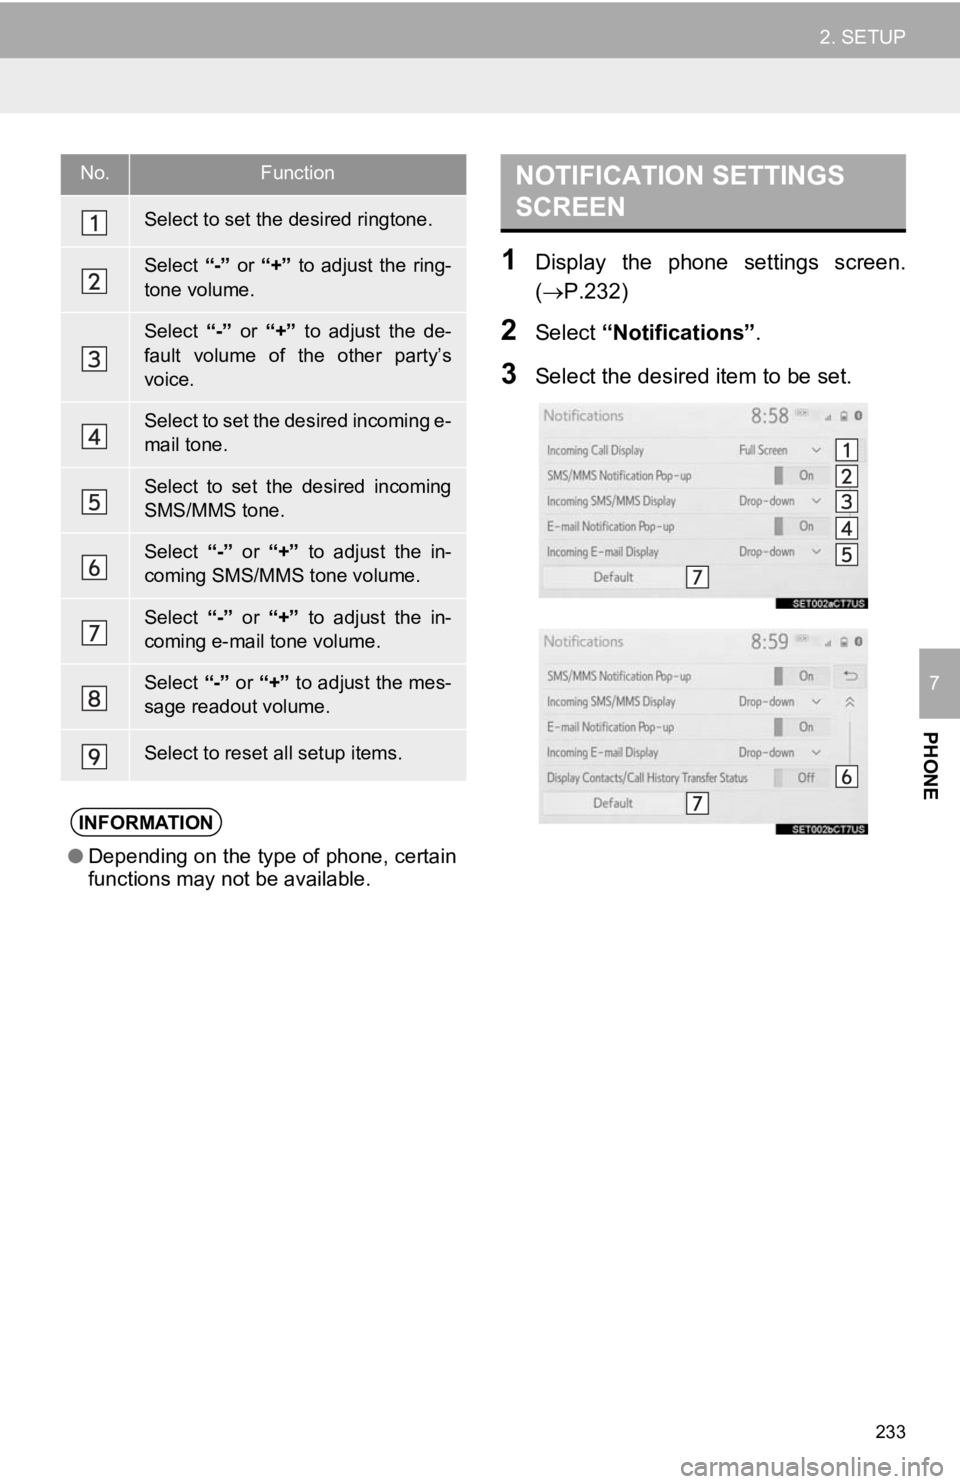
1Display the phone settings screen.
(P.232)
2Select “Notifications” .
3Select the desired item to be set.
No.Function
Select to set the desired ringtone.
Select “-” or “+” to adjust the ring-
tone volume.
Select “-” or “+” to adjust the de-
fault volume of the other party’s
voice.
Select to set the desired incoming e-
mail tone.
Select to set the desired incoming
SMS/MMS tone.
Select “-” or “+” to adjust the in-
coming SMS/MMS tone volume.
Select “-” or “+” to adjust the in-
coming e-mail tone volume.
Select “-” or “+” to adjust the mes-
sage readout volume.
Select to reset all setup items.
INFORMATION
● Depending on the type of phone, certain
functions may not be available.
NOTIFICATION SETTINGS
SCREEN
Page 234 of 354
234
2. SETUP
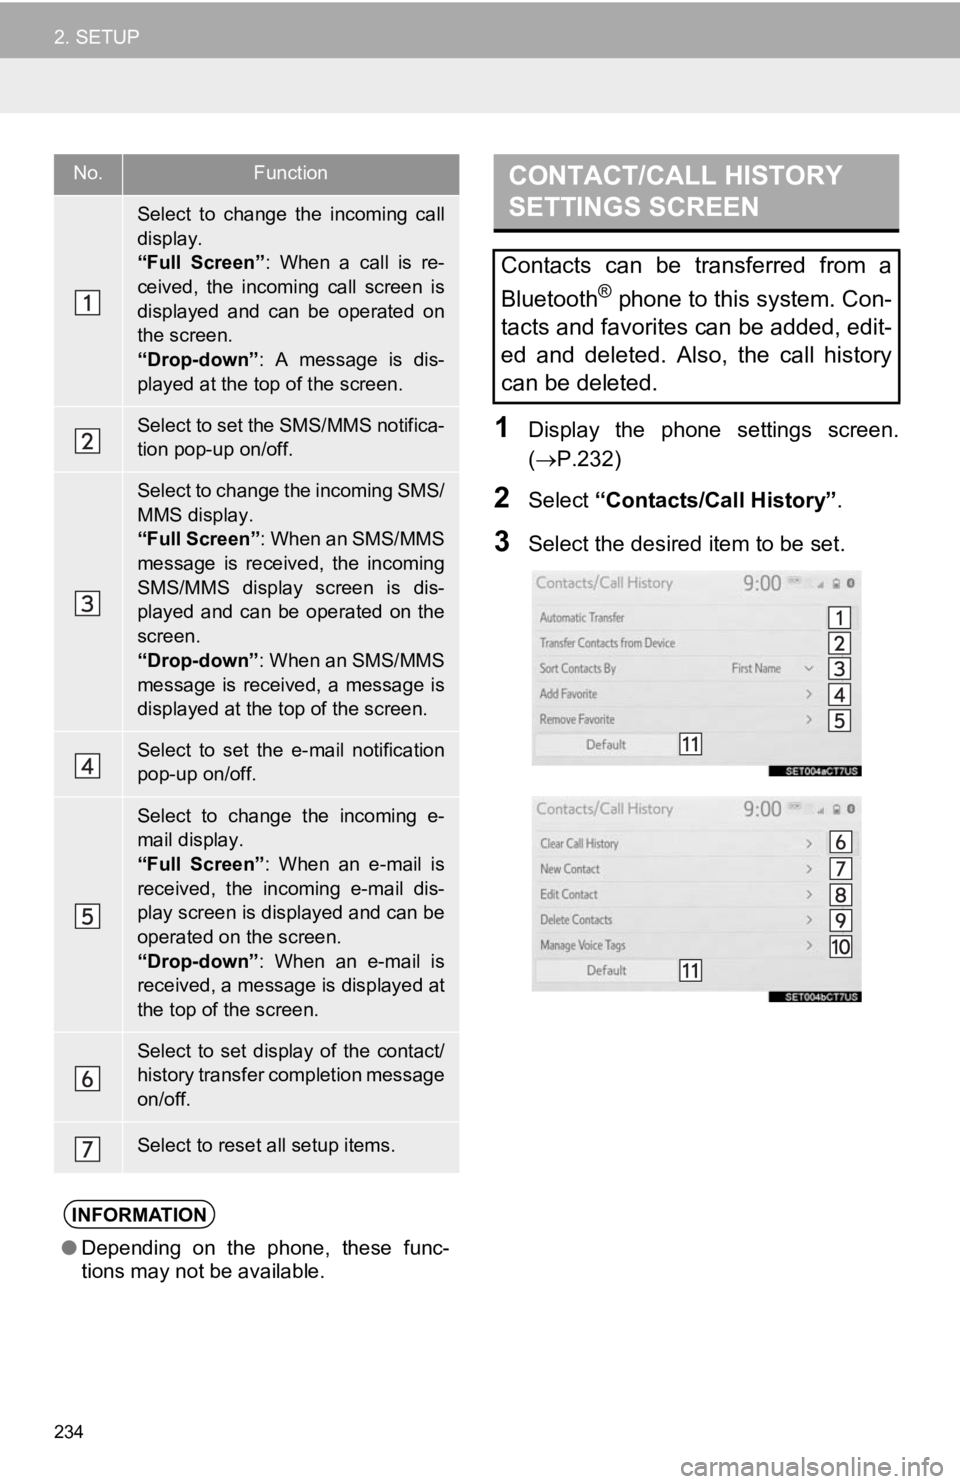
1Display the phone settings screen.
(P.232)
2Select “Contacts/Call History” .
3Select the desired item to be set.
No.Function
Select to change the incoming call
display.
“Full Screen”: When a call is re-
ceived, the incoming call screen is
displayed and can be operated on
the screen.
“Drop-down” : A message is dis-
played at the top of the screen.
Select to set the SMS/MMS notifica-
tion pop-up on/off.
Select to change the incoming SMS/
MMS display.
“Full Screen” : When an SMS/MMS
message is received, the incoming
SMS/MMS display screen is dis-
played and can be operated on the
screen.
“Drop-down” : When an SMS/MMS
message is received, a message is
displayed at the top of the screen.
Select to set the e-mail notification
pop-up on/off.
Select to change the incoming e-
mail display.
“Full Screen” : When an e-mail is
received, the incoming e-mail dis-
play screen is displayed and can be
operated on the screen.
“Drop-down” : When an e-mail is
received, a message is displayed at
the top of the screen.
Select to set display of the contact/
history transfer completion message
on/off.
Select to reset all setup items.
INFORMATION
● Depending on the phone, these func-
tions may not be available.
CONTACT/CALL HISTORY
SETTINGS SCREEN
Contacts can be transferred from a
Bluetooth
® phone to this system. Con-
tacts and favorites can be added, edit-
ed and deleted. Also, the call history
can be deleted.
Page 235 of 354
235
2. SETUP
PHONE
7
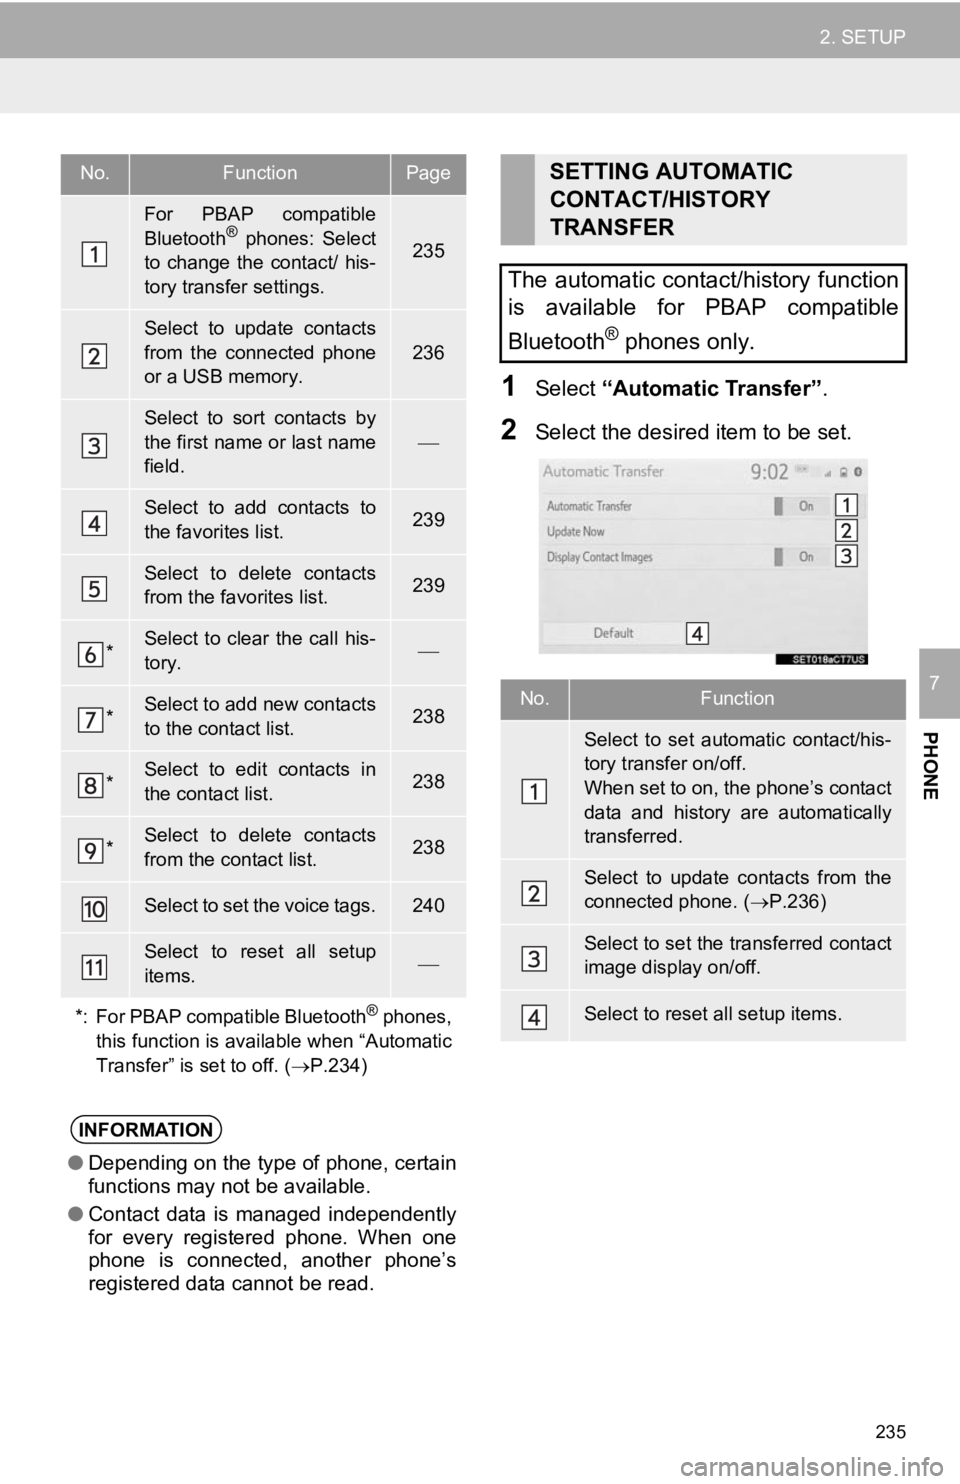
1Select “Automatic Transfer”.
2Select the desired item to be set.
No.FunctionPage
For PBAP compatible
Bluetooth® phones: Select
to change the contact/ his-
tory transfer settings.235
Select to update contacts
from the connected phone
or a USB memory.
236
Select to sort contacts by
the first name or last name
field.
Select to add contacts to
the favorites list. 239
Select to delete contacts
from the favorites list. 239
*Select to clear the call his-
tory.
*Select to add new contacts
to the contact list.238
*Select to edit contacts in
the contact list.238
*Select to delete contacts
from the contact list.238
Select to set the voice tags.240
Select to reset all setup
items.
*: For PBAP compatible Bluetooth
® phones,
this function is available when “Automatic
Transfer” is set to off. ( P.234)
INFORMATION
●Depending on the type of phone, certain
functions may not be available.
● Contact data is managed independently
for every registered phone. When one
phone is connected, another phone’s
registered data cannot be read.
SETTING AUTOMATIC
CONTACT/HISTORY
TRANSFER
The automatic contact/history function
is available for PBAP compatible
Bluetooth
® phones only.
No.Function
Select to set automatic contact/his-
tory transfer on/off.
When set to on, the phone’s contact
data and history are automatically
transferred.
Select to update contacts from the
connected phone. ( P.236)
Select to set the transferred contact
image display on/off.
Select to reset all setup items.