engine TOYOTA CELICA 1987 Service Repair Manual
[x] Cancel search | Manufacturer: TOYOTA, Model Year: 1987, Model line: CELICA, Model: TOYOTA CELICA 1987Pages: 346, PDF Size: 35.13 MB
Page 231 of 346
ENGINE MECHANICAL L- ,Cylinder -Block . . . /
., .
. . ,. ~.,, ;-.^ j, _,. @&#J~
. .
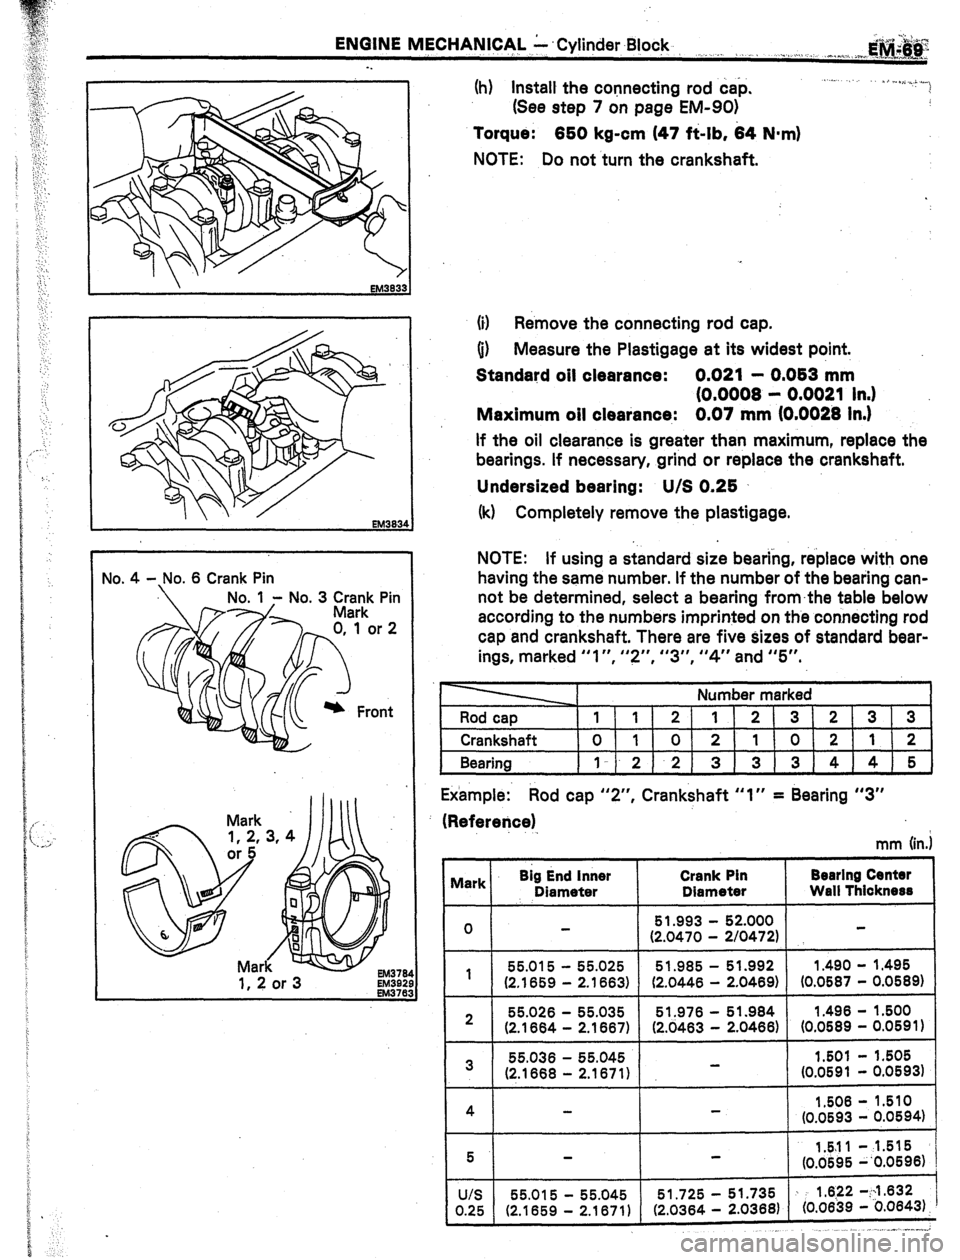
(h) Install the connecting rod cap.
(See step 7 on page EM-901
EM33
Torque: 650 kg-cm (47 f&lb, 64 N-m)
NOTE: Do not turn the crankshaft.
(iI Remove the connecting rod cap.
(i) Measure the Plastigage at its widest point.
Standard oil clearance: 0.021 - 0,063 mm
(0.0008 - 0.0021 In.)
Maximum oil clearance: 0.07 mm (0.0028 In.)
If the oil clearance is greater than maximum, replace the
bearings. If necessary, grind or replace the crankshaft.
Undersized bearing: U/S 0,25
(k) Completely remove the plastigage.
NOTE: If using a standard size bearing, replace with one
having the same number. If the number of the bearing can-
not be determined, select a bearing fromthe table below
according to the numbers imprinted on the connecting rod
cap and crankshaft. There are five sizes of standard bear-
ings, marked “I”, I’?“, “3”, “4” and “5”.
Number marked
Rod cap
lI1/2111213/21313
1 Crankshaft l0l1I01211101211121
Bearing )I-l-212) 3)313)4)415)
Example: Rod cap “Z”, Crankshaft “1” = Bearing “3”
(Refererjce)
mm (in.1
I vlark Big End inner
Diameter Crank Pin
Diameter Bearlng Centsr
Wall Thicknese
-
0 51.993 52.000 2/0472) - (2.0470 -
55.015
- 55.025 51.985
- 51.992
1.490 - 1
1.495
(2.1859 - 2.1663) (2.0446 - 2.0469) (0.0587 - 0.0589)
- 2 55.026
- 55.035 51.976
- 51.984
1.496 1.500
(2.1664 - 2.1667) (2.0463 - 2.0466)
(0.0589 - 0.0591)
55.036
- 3 55.045
I.501 - 1.505 -
(2.1668 - 2.1671) (0.0591 - 0.05931
1
I
1.506 - 1.510
(0.0593 - 0.0594)
I
,. ..__ 1” -..-.*
Page 232 of 346
EM-70 ENGINE MECHANICAL - Cylinder Block
c Front
1 2 3 4 5 6
EM147: 3
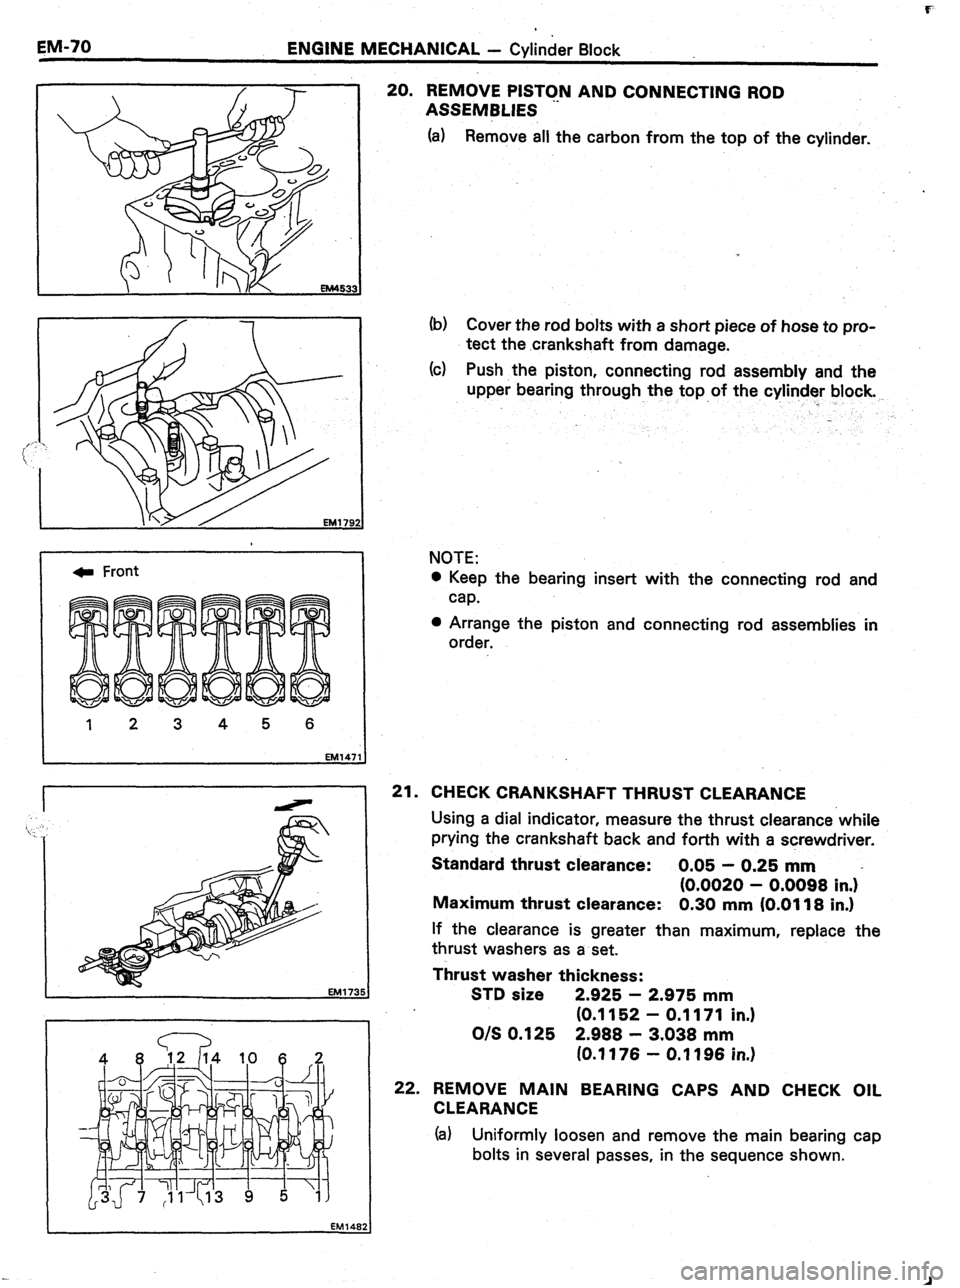
20. REMOVE PISTON AND CONNECTING ROD
ASSEMBLIES
(a) Remove all the carbon from the top of the cylinder.
(b) Cover the rod bolts with a short piece of hose to pro-
tect the crankshaft from damage.
(c) Push the piston, connecting rod assembly and the
upper bearing through the top of the cylinder block.
NOTE:
0 Keep the bearing insert with the connecting rod and
cap.
l Arrange the piston and connecting rod assemblies in
order.
21. CHECK CRANKSHAFT THRUST CLEARANCE
Using a dial indicator, measure the thrust clearance while
prying the crankshaft back and forth with a screwdriver.
Standard thrust clearance: 0.05 - 0.25 mm
(0.0020 - 0.0098 in.)*
Maximum thrust clearance: 0.30 mm (0.0118 in.)
If the clearance is greater than maximum, replace the
thrust washers as a set.
Thrust washer thickness:
STD size 2.925 - 2.975 mm
(0.1152 - 0.1171 in.)
O/S 0.125 2.988 - 3.038 mm
(0.1176 - 0.1196 in.)
22. REMOVE MAIN BEARING CAPS AND CHECK OIL
CLEARANCE
(a) Uniformly loosen and remove the main bearing cap
bolts in several passes, in the sequence shown.
Page 233 of 346
ENGINE MECHANICAL Y Cylinder Block-
. . ,., ,,
..“./.. E”Q+‘J.g
. . . “h,. ,<_ .,., aa* _
. . . . . . . ..I. C/~ a....,,.?._.h, j
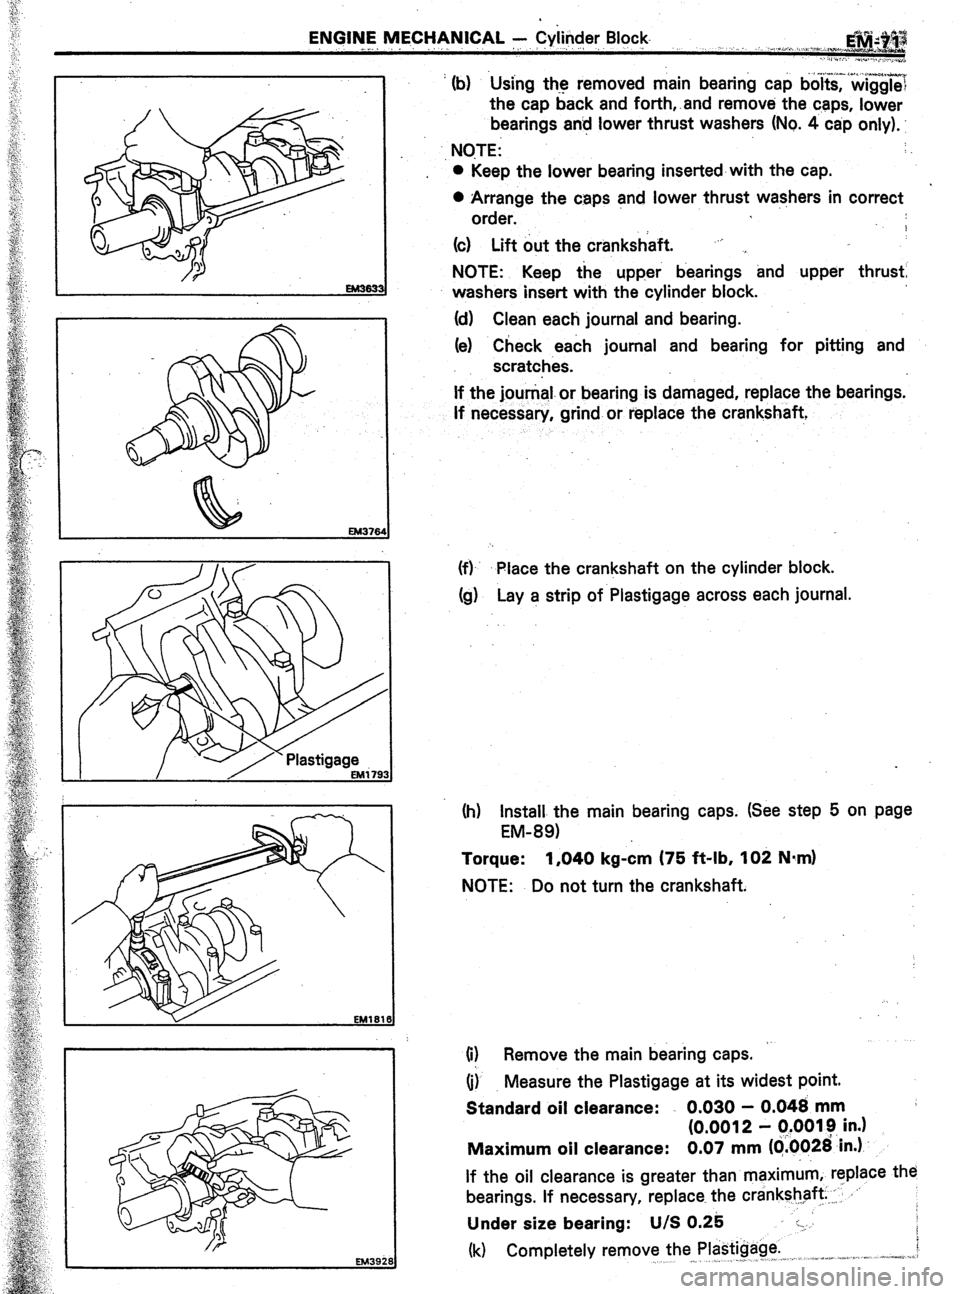
’ (b) Using the removed main bearing cap bo~t&?&gg~~
the cap back and forth,.and remove the caps, lower
bearings an! lower thrust washers (No. 4 cap only).
., NOTE: :
0 Keep the lower bearing inserted-with the cap.
0 Arrange the caps and lower thrust washers in correct
order.
9
(c) Lift out the crankshaft. “j ,
NOTE: Keep the upper bearings and upper thrust
washers insert with the cylinder block.
(d) Clean each journal and bearing.
(e) Check each journal and bearing for pitting and
scratches.
If the jounial.or bearing is damaged, replace the bearings.
If necessary, grind or replace the crankshaft,
(f)- Place the crankshaft on the cylinder block.
Cg) Lay a strip of Plastigage across each journal.
(h) Install the main bearing caps. (See step 5 on page
EM-891
Torque: 1,040 kg-&n (75 ft-lb, 102 N*m)
NOTE: Do not turn the crankshaft.
(i) Remove the main bearing caps.
(i) Measure the Plastigage at its widest point.
Standard oil clearance: . 0.030 - 0.048 mm
(0.0012 - q.0019 in.)
Maximum oil clearance: 0.07 mm ((i.0026’in.)
If the oil clearance is greater than maximum, replace the
bearings. If necessary, replace the crankshaft ,: .‘-
Under size bearing: U/S 0.25 :-.
(k) Completely remove the Plastigage. i
,^ -_ _ . j” ,,I, ,. .a”*+% -,..: :,.-__, ,-,--se. .j.z,.
Page 234 of 346
EM-72 ENGINE MECHANICAL - Cylinder-Block
No.
0, 1 or 2
No. 1, No. 2 Journal
Mark
1,2,3,4or5
NO. 5 - N,o. 7 Journal Mark
1, 2, or 3
Journal
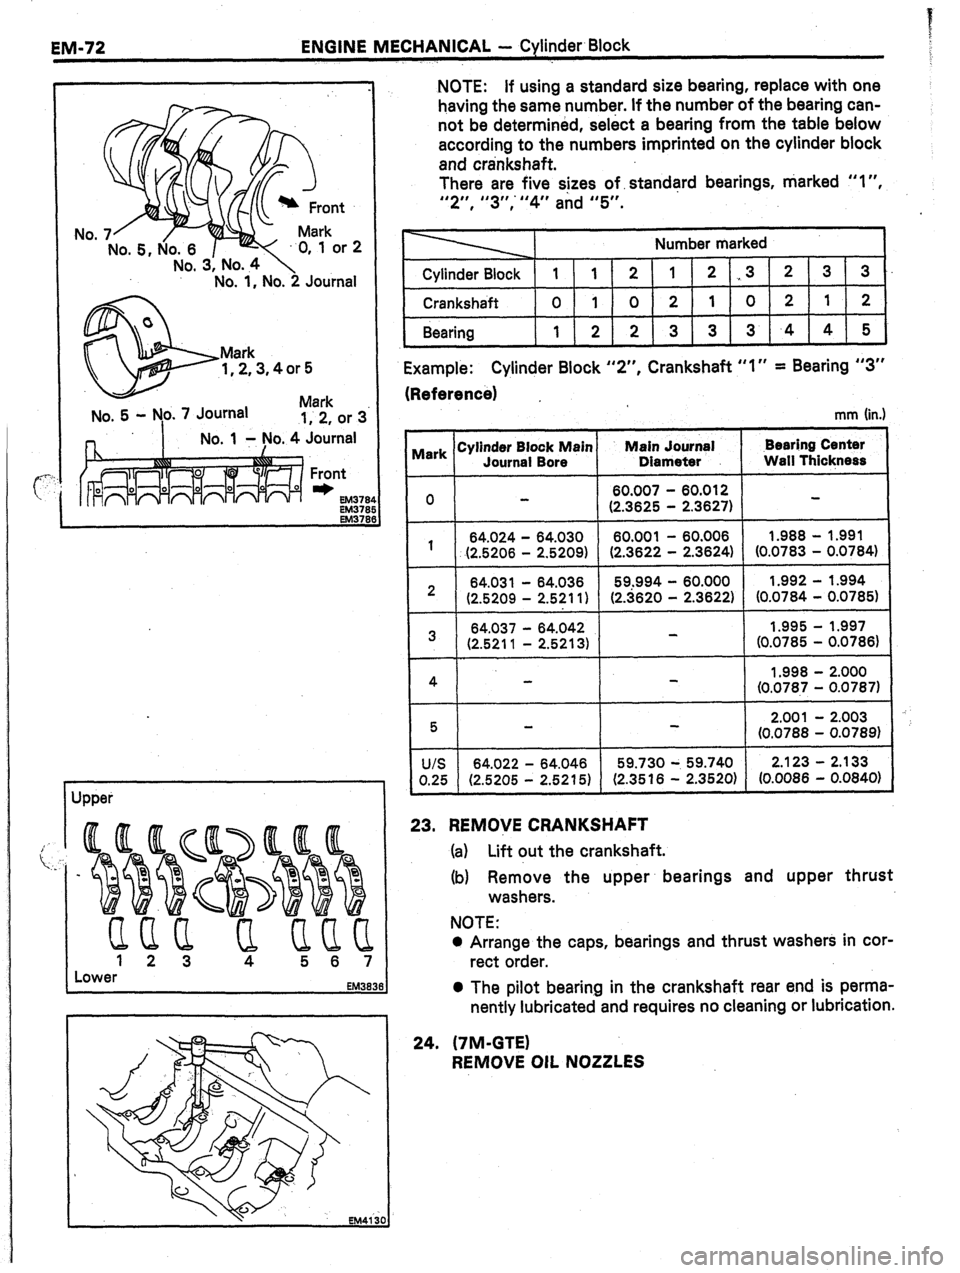
-I NOTE:
If using a standard size bearing, replace with one
having the same number. If the number of the bearing can-
not be determined, select a bearing from the table below
according to the numbers imprinted on the cylinder block
and crankshaft.
There are five sizes of, standard bearings, marked “I”,
“2”s “3 It,‘“4” and “5”.
Example:
Cylinder Block “2”, Crankshaft “I” = Bearing “3”
(Reference) ,
mm (in.)
Lower EM3831
EM41 3
I I
Mark Cylinder Block Main
I Main Journal Bearing Center
Journal Bore Diameter Wall Thickness
I I 0 60.007 - 60.012
(2.3625 - 2.3627)
I
-
- - 1 64.024 64.030 60.001 60.006 1.988 1.991
(2.5206 - 2.5209) (2.3622 - 2.3624) (0.0783
- 0.0784)
f
I 2 I (2.5209 64.031 - - 84.036 2.5211)
(2.3620 59,994 - - 60.000 2.3822) (0.0784 1.992 - - 0.0785) 1.994
-
- 3 64.037 64.042
1.995 1.997
(2.5211 - 2.5213)
(0.0785 - 0.0786)
4
‘- 1.998 - 2.000
(0.0787 - 0.0787)
t
I
I I 5 I
2.001 - 2.003
(0.0788 - 0.0789)
u/s 64.022
- 64.046 59.730 - 59.740 2.123
- 2.133
0.25 (2.5205 - 2.5215) (2.3516 -
2.3520) (0.0086 - 0.0840)
23. REMOVE CRANKSHAFT
(a) Lift out the crankshaft.
(b) Remove the upper bearings and upper thrust
washers.
NOTE:
0 Arrange the caps, bearings and thrust washers in cor-
rect order.
0 The pilot bearing in the crankshaft rear end is perma-
nently lubricated and requires no cleaning or lubrication.
24. (7M-GTE)
REMOVE OIL NOZZLES
Page 235 of 346
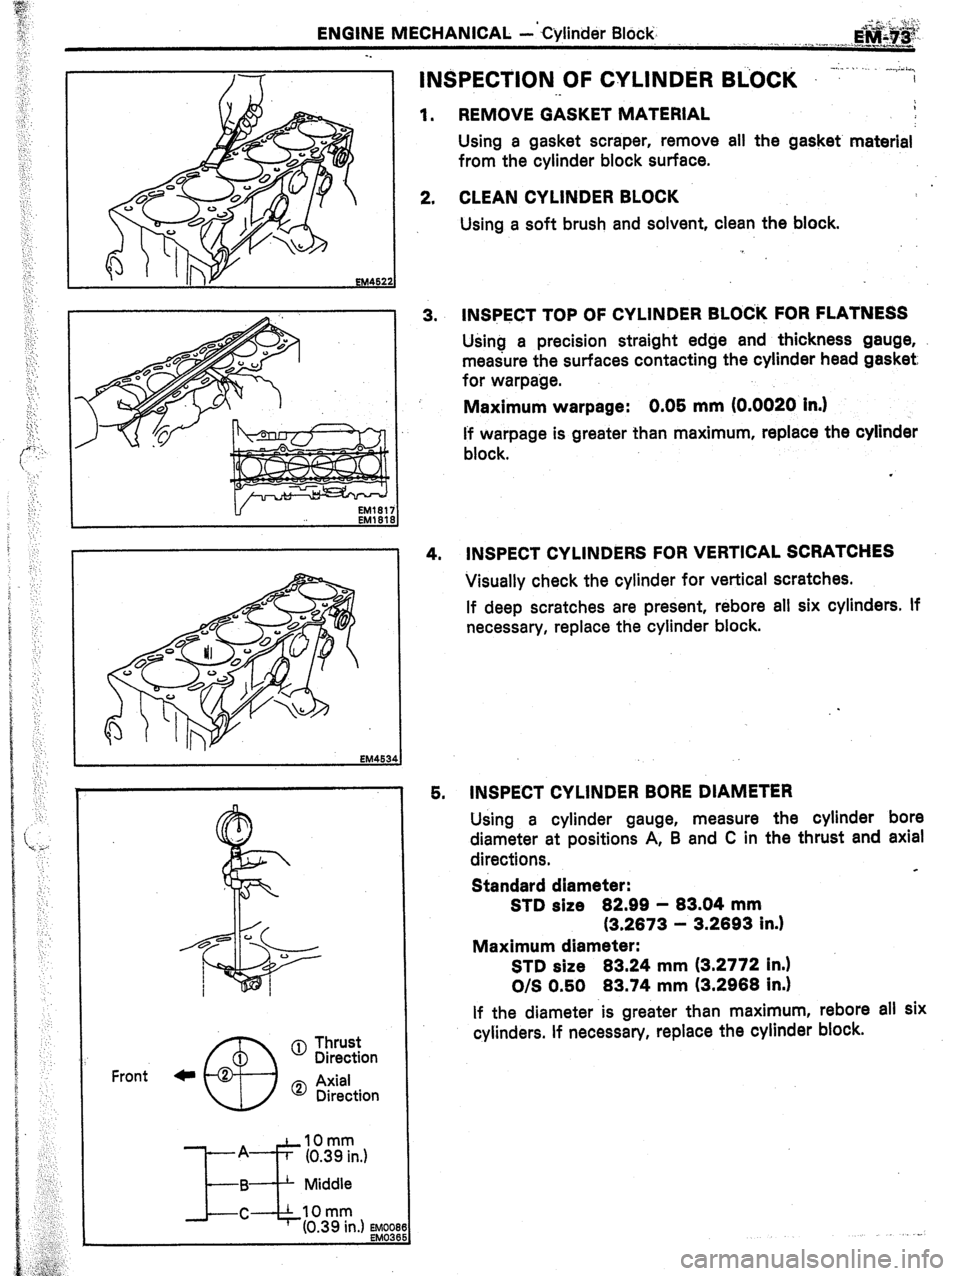
ENGINE MECHANICAL --‘Cylinder Block.
. &#.&
./ 1 .,_. . . .,~..“._~__,_Y_
._
INSPECTION OF CYLINDER BiOCk ~. -.,. ;;.. i*
I
.
Front 0 Thrust
Direction
0 Axial
Direction
IOmm
(0.39 in.)
Middle 1. REMOVE GASKET MATERIAL
Using a gasket scraper, remove ail the gasket material
from the cylinder block surface.
2. CLEAN CYLINDER BLOCK
Using a soft brush and solvent, clean the block.
3. INWCT TOP OF CYLINDER BLOC’K FOR FLATNESS
Using a precision straight edge and thickness gauge,
measure the surfaces contacting the cylinder head gasket,
for warpage.
Maximum warpage: 0.05 mm (0.0020 in.)
I’f warpage is greater than maximum, replace the cylinder
block.
4. INSPECT CYLINDERS FOR VERTICAL SCRATCHES
Visually check the cylinder for vertical scratches.
If deep scratches are present, rebore all six cylinders. If
necessary, replace the cylinder block.
5. INSPECT CYLINDER BORE DIAMETER
Using a cylinder gauge, measure the cylinder bore
diameter at positions A, B and C in the thrust and axial
directions.
c
Standard diameter:
STD size 82.99 - 83.04 mm
(3.2873 - 3.2893 in.)
Maximum diameter:
STD size 83.24 mm (3.2772 in.)
O/S 0.50 83.74 mm (3.2988 in.)
If the diameter is greater than maximum, rebore ali six
cylinders. If necessary, replace the cylinder block.
Page 238 of 346
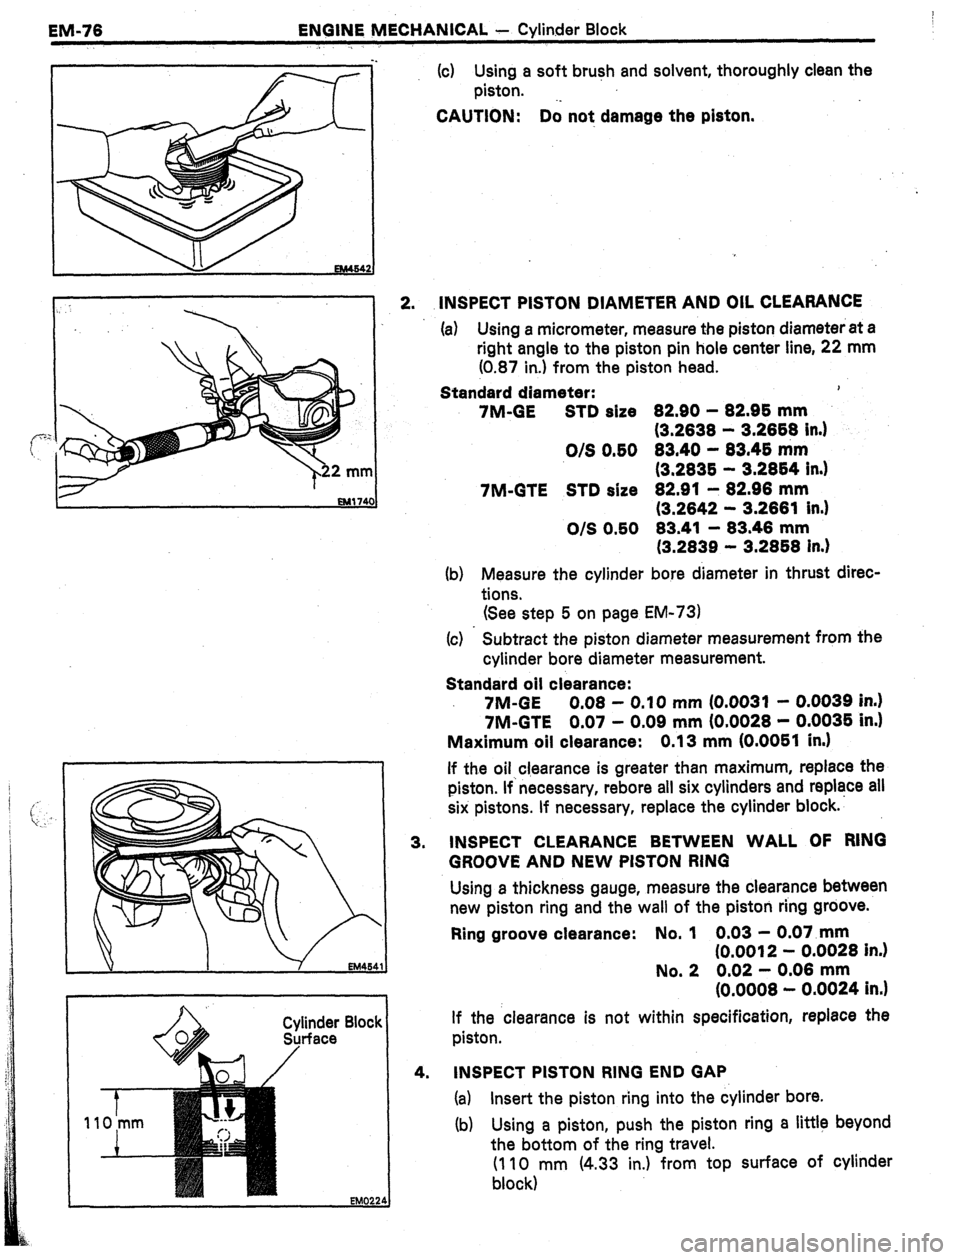
EM-76
ENGINE MECHANICAL - Cylinder Block
(c) Using a soft brush and solvent, thoroughly clean the
piston. -_
CAUTION:
Do not damage the piston.
linder
rface 3. INSPECT PISTON DIAMETER AND OIL CLEARANCE
(a) Using a micrometer, measure the piston diameter at a
right angle to the piston pin hole center line, 22 mm
(0.87 in.) from the piston head.
Standard diameter:
,
7M-GE STD size 62.00 -
62.96 mm
(3.2636
- 3.2666 in.)
O/S O.SO 63.40 - 63.4s mm
(3.263S - 3.2664 in.)
7M-GTE STD size 62.91 - 62.96 mm
(3.2642 - 3.2661 in.)
O/S 0.50 83.41 - 63.46 mm
(3.2639 - 3.2658 in.)
(b) Measure the cylinder bore diameter in thrust direc-
tions.
(See step 5 on page EM-731
(c) Subtract the piston diameter measurement from the
cylinder bore diameter measurement.
Standard oil clearance:
7M-GE 0.08 - 0.10 mm (0.0031 - 0.0039 in.)
7M-GTE 0.07 - 0.09 mm (0.0026 - 0.0035 in.)
Maximum oil clearance: 0.13 mm (0.0051 in.)
If the oil clearance is greater than maximum, replace the
piston. If’necessary, rebore all six cylinders and replace all
six pistons. If necessary, replace the cylinder block.
INSPECT CLEARANCE BETWEEN WALL OF RING
GROOVE AND NEW PISTON RING
Using a thickness gauge, measure the clearance between
new piston ring and the wall of the piston ring groove.
Ring groove clearance: No. 1
0.03 - 0.07 mm
(0.0012 - 0.0026 in.)
No. 2 0.02 - 0.06 mm
(0.0006 - 0.0024 in.)
If the clearance is not within specification, replace the
piston.
4. INSPECT PISTON RING END GAP
(a) Insert the piston ring into the cylinder bore.
(b)
Using a piston, push the piston ring a little beyond
the bottom of the ring travel.
(I 10 mm (4.33 in.) from top surface of cylinder
block)
Page 239 of 346
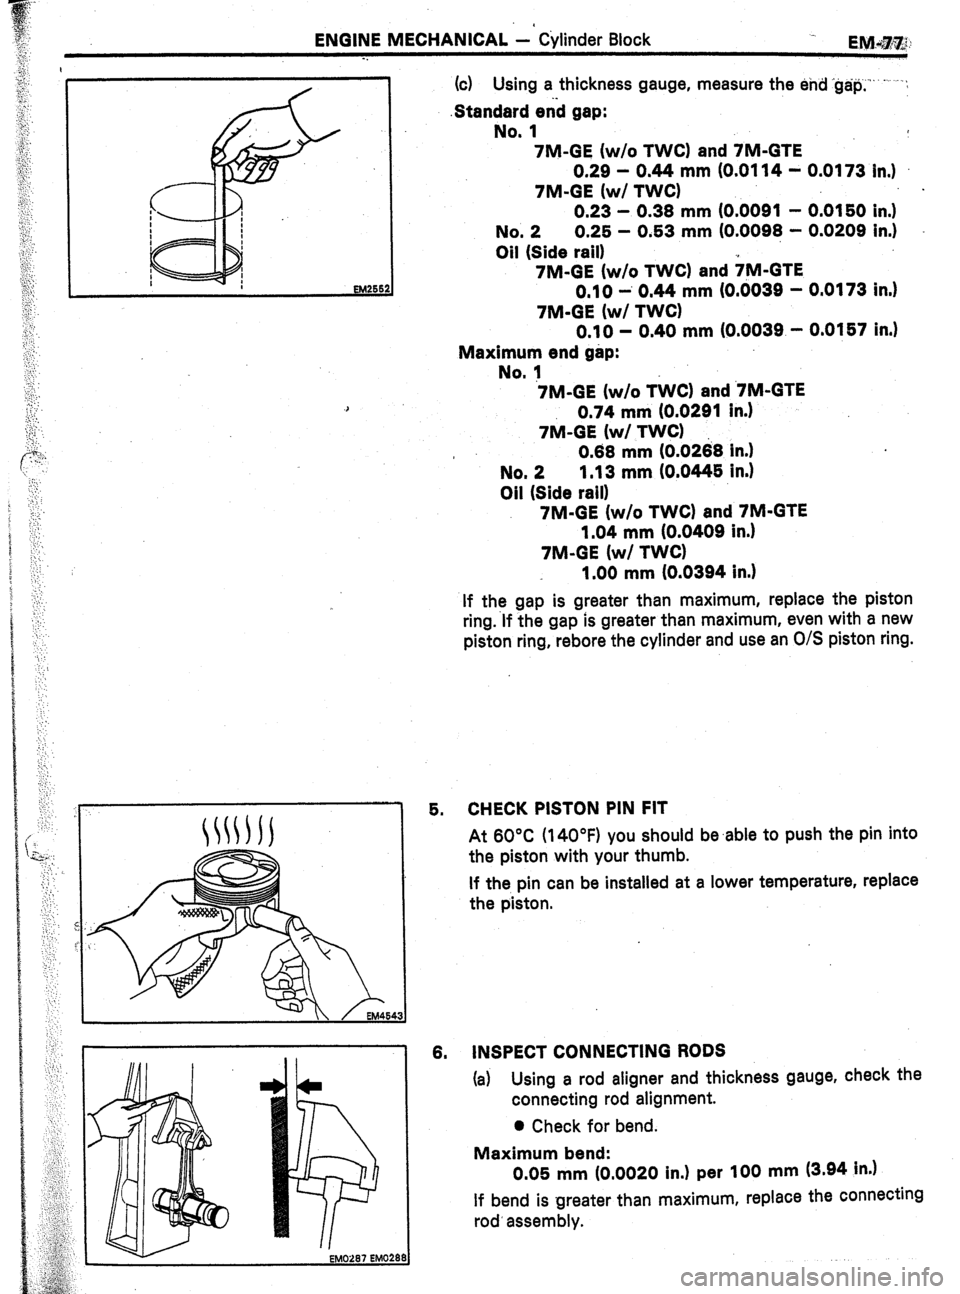
ENGINE MECHANICAL -. Cylinder Block
E,M.+$ i
-.
:
:
. . .
. .
‘,’
‘.
:
t‘,
::
,c ;
‘:
:‘
::
;
. .
:
,i
(c) Using a thickness gauge, measure the end ‘g&p,‘“--’ .‘:
.Standerd enb gap:
No. 1
7M-GE (w/o TWC) and 7M-GTE
0.29 - 0.44 mm (0.0114 - 0.0173 in.)
7M-GE (w/ TWC) .
0.23 - 0.38 mm (0.0091 - 0.0150 in.)
No. 2 0.25 - 0.53 mm (0.0098 - 0.0209 in.)
Oil (Side rail)
7M-GE (w/o TWC) and +M-GTE
0.10 -’ 0.44 mm (O.dO3g - 0.0173 in.)
7M-GE (w/ TWC)
0.10 - 0.40 mm (0.0039 - 0.0157 in.)
Maximum end gap:
No. 1
7M-GE (w/o T&Z) and ‘7M-GTE
0.74 mm (0.0291 in.)
7&l-GE (w/ TWC)
* 0.88 mm IO.0268 in.)
No. 2 1.13 mm (0.0445 in.)
Oil (Side rail)
7M-GE (w/o TWC) and 7M-GTE
1.04 mm (0.0409 in.)
7M-GE (w/ TWC)
1.00 mm (0.0394 in.)
If the gap is greater than maximum, replace the piston
ring.‘lf the gap is greater than maximum, even with a new
piston ring, rebore the cylinder and use an O/S piston ring.
5. CHECK PISTON PIN FIT
At 60°C (14OOF) you should be.able to push the pin into
the piston with your thumb.
If the pin can be installed at a lower temperature, replace
the piston.
8. INSPECT CONNECTING RODS
(a)
Using a rod aligner and thickness gauge, check the
connecting rod alignment.
0 Check for bend.
Maximum bend:
0.05 mm (0.0020 in.) per 100 mm (3.94 in.)
If bend is greater than maximum, replace the connecting
rod’ assembly.
Page 240 of 346
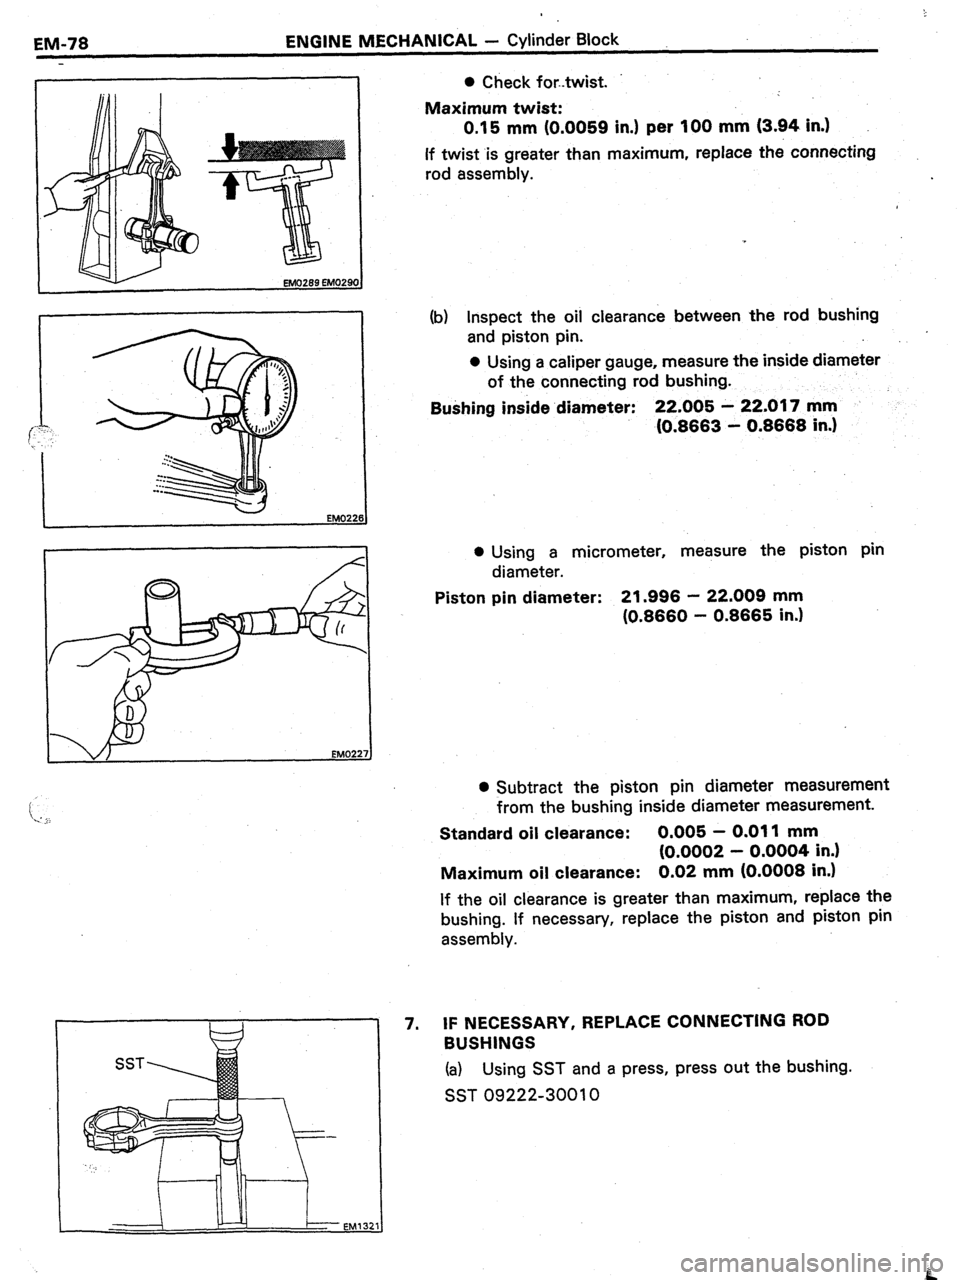
EM-78 ENGINE MECHANICAL - Cylinder Block
ml0269 EM029 OJ
EM0226
SST 0 Check fortwist.
Maximum twist:
0.15 mm (0.0059 in.) per 100 mm (3.94 in.)
If twist is greater than maximum, replace the connecting
rod assembly.
(b) Inspect the oil clearance between the rod bushing
and piston pin.
0 Using a caliper gauge, measure the inside diameter
of the connecting rod bushing.
BuShing inside diameter: 22.005 - 22.017 mm
IO.8663 - 0.8668 in.)
l Using a micrometer, measure the piston pin
diameter.
Piston pin diameter: 21.996 - 22.009 mm
(0.8660 - 0.8665 in.)
l Subtract the piston pin diameter measurement
from the bushing inside diameter measurement.
Standard oil clearance: 0.005 - 0.011 mm
(0.0002 - 0.0004 in.)
Maximum oil clearance: 0.02 mm (0.0008 in.)
If the oil clearance is greater than maximum, replace the
bushing. If necessary, replace the piston and piston pin
assembly.
7. IF NECESSARY, REPLACE CONNECTING ROD
BUSHINGS
(a) Using SST and a press, press out the bushing.
SST 09222-30010
.B
Page 241 of 346
.
ENGINE MECHANICAL - Cylinder Block
EM-79
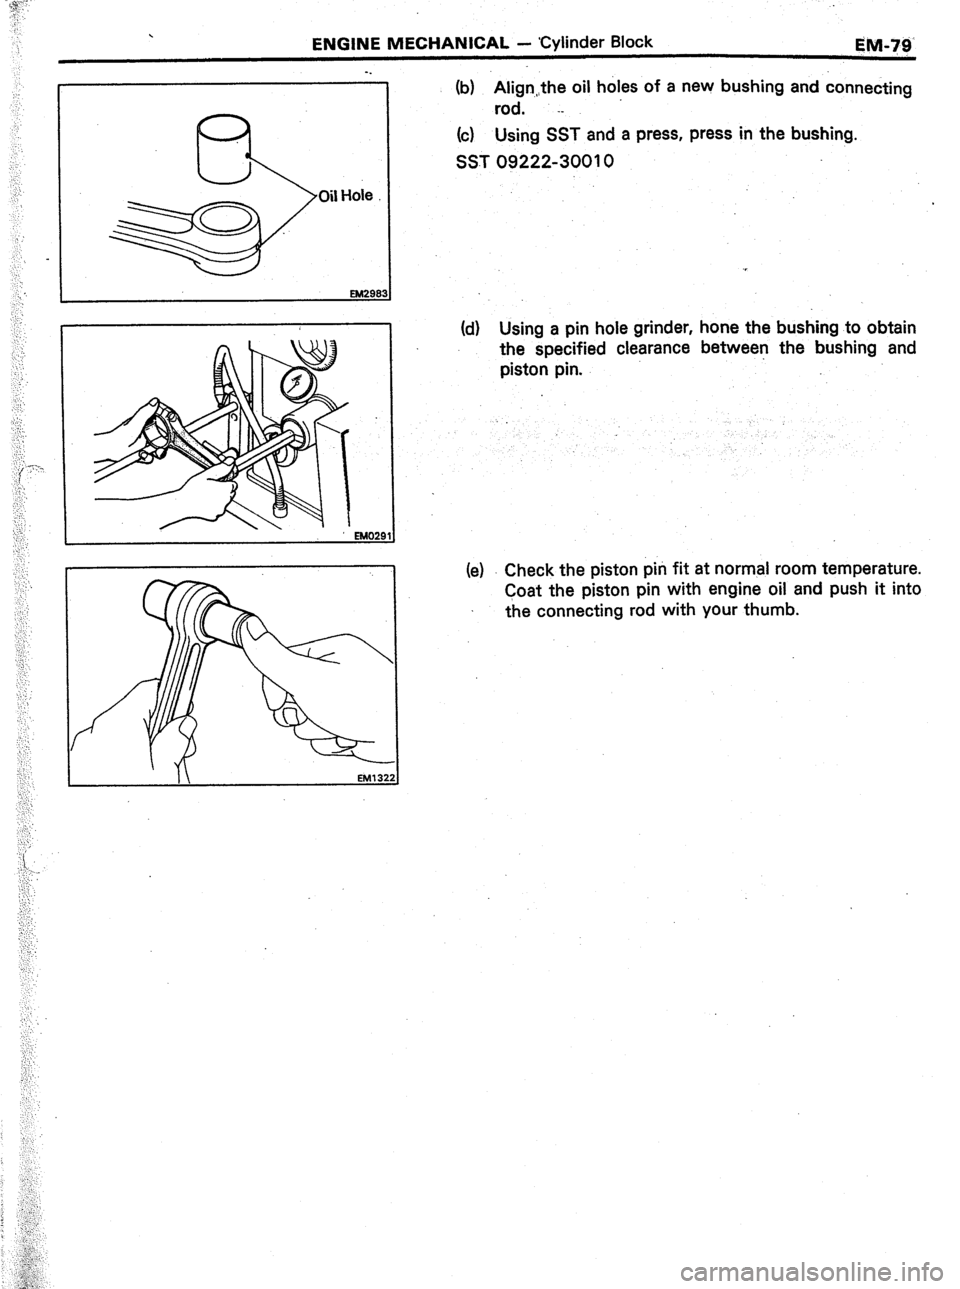
Oil Hole (b) Alignthe oil holes of a new bushing and connecting
rod. .-
(c) Using SST and a press, press in the bushing.
SST 09222-30010
(d) Using a pin hole grinder, hone the bushing to obtain
the specified clearance between the bushing and
piston pin.
(e) Check the piston pin fit at normal room temperature.
Coat the piston pin with engine oil and push it into
the connecting rod with your thumb.
Page 242 of 346
EM-80 ’ ENGINE MECHANICAL .- Cylinder. Block
BORING OF CYLINDERS
NOTE; .-
l Bore all six cylinders for the oversized piston. outside
diameter.
l Replace the piston rings with ones to match, the over-
sized pistons.
1.
2.
3. SELECT OVERSIZED PISTON
Oversized piston diameter:
O/S, 0.50 7M-GE 83.40 - 83.45 mm
(3.2835 - 3.2854 in.)
7M-GTE 8341.. - 83.46.mm
(3.2839 - 3.2858 in.)
CALCULATE AMOUNT TO BORE CYLINDER
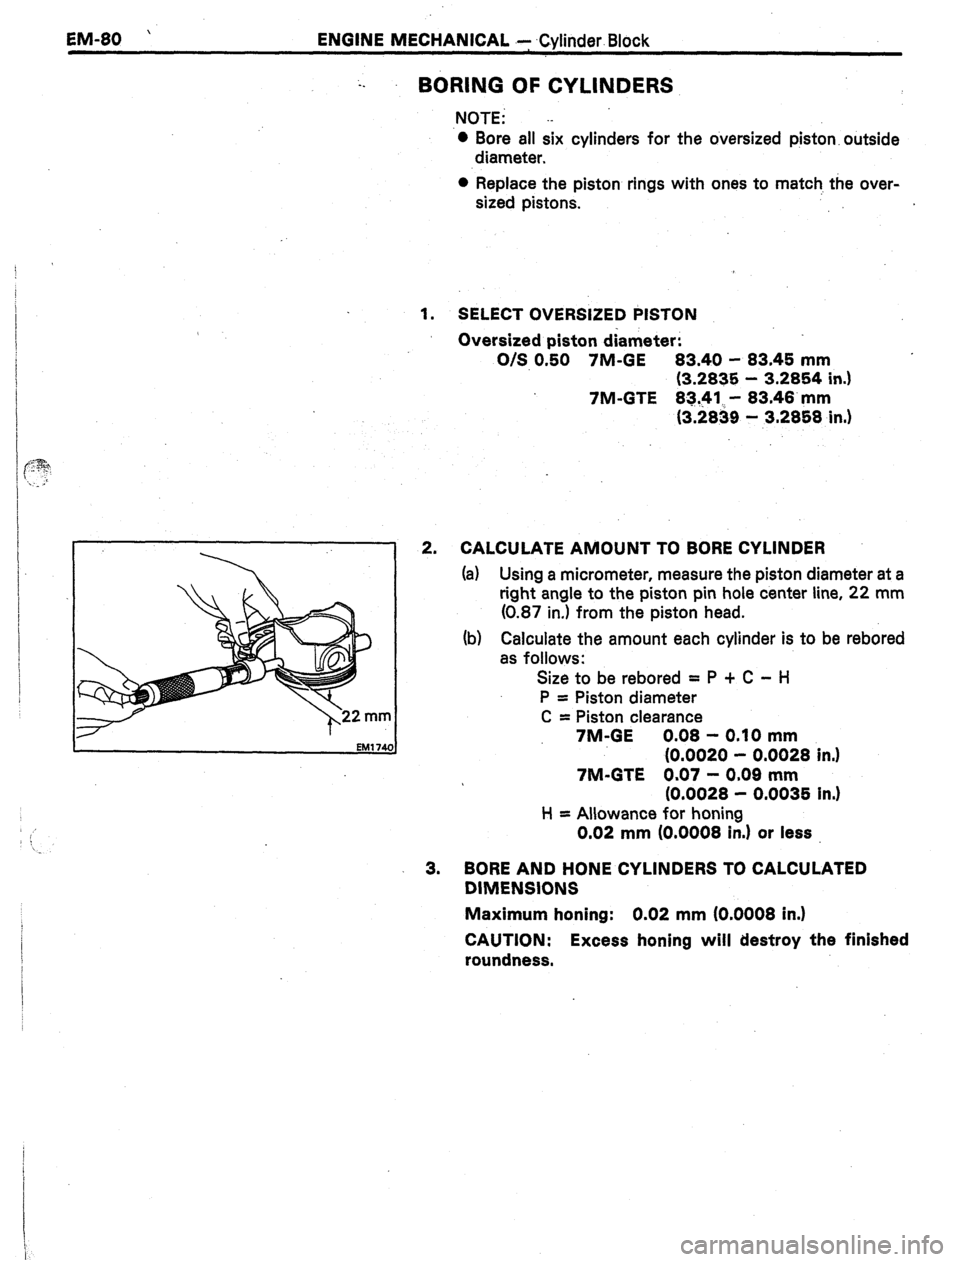
(a) Using a micrometer, measure the piston diameter at a
right angle to the piston pin hole center line, 22 mm
(0.87 in.) from the piston head.
(b) Calculate the amount each cylinder is to be rebored
as follows:
Size to be rebored = P + C - H
P = Piston diameter
C = Piston clearance
7M-GE 0.08 - 0.10 mm
(0.0020 - 0.0028 in.1
7M-GTE 0.07 - 0.09 mm
(0.0028 - 0.0035 in.)
H = Allowance for honing
0.02 mm (0.0008 in.) or less
BORE AND HONE CYLINDERS TO CALCULATED
DIMENSIONS
Maximum honing: 0.02 mm (0.0008 in.)
CAUTION: Excess honing will destroy the finished
roundness.