key TOYOTA COROLLA 2010 10.G Service Manual
[x] Cancel search | Manufacturer: TOYOTA, Model Year: 2010, Model line: COROLLA, Model: TOYOTA COROLLA 2010 10.GPages: 476, PDF Size: 9.5 MB
Page 131 of 476
131
2-1. Driving procedures
2
When driving
■
Turning the engine switch from “ACC” to “LOCK”
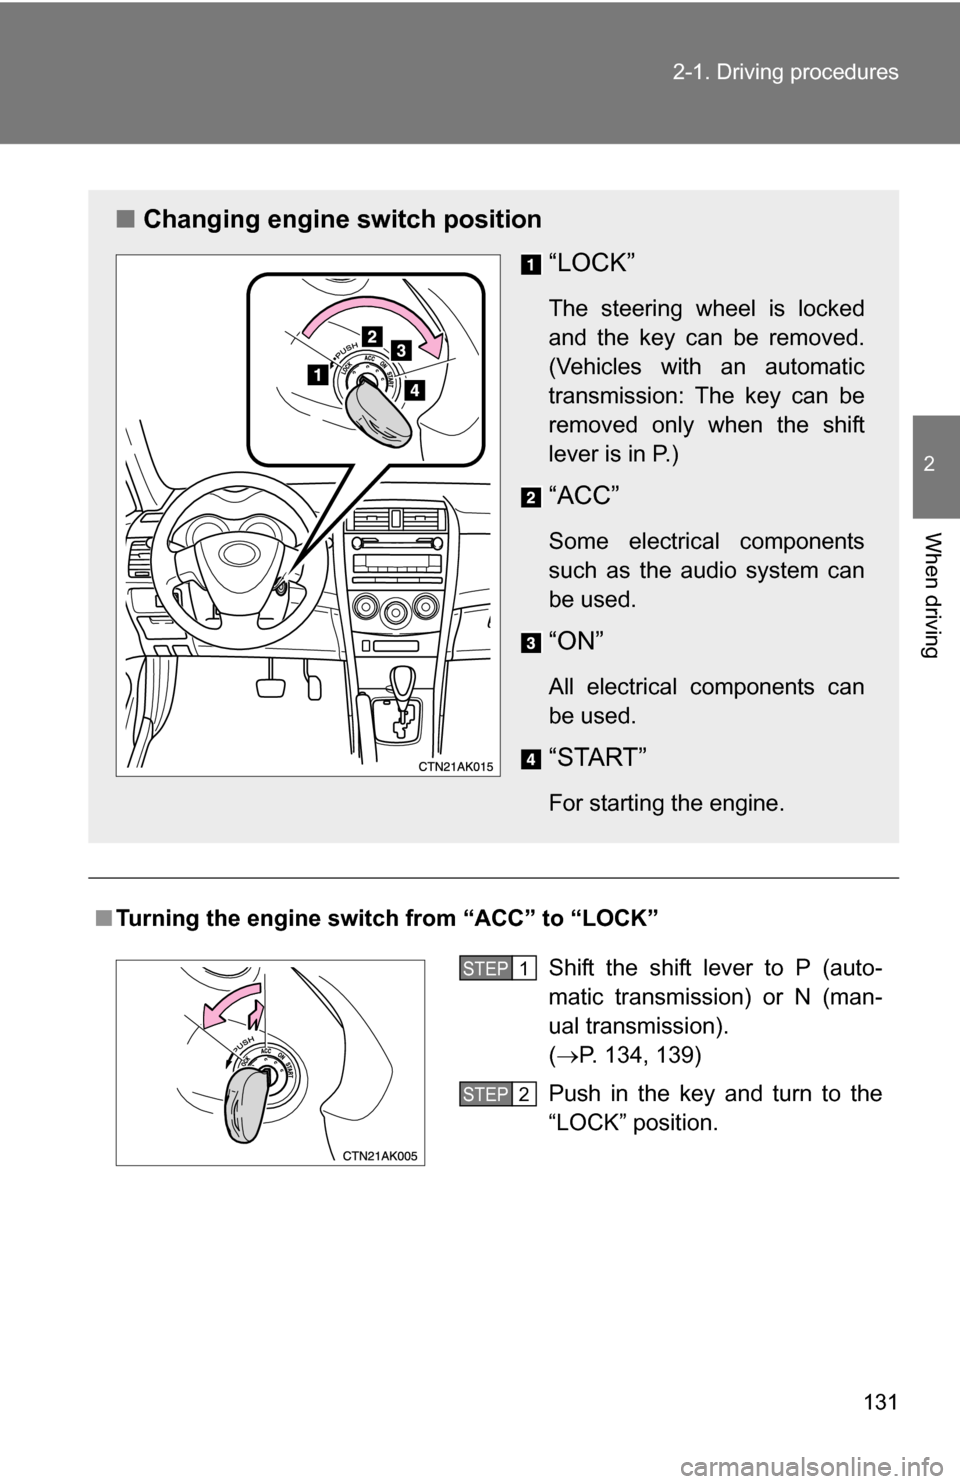
■ Changing engine switch position
“LOCK”
The steering wheel is locked
and the key can be removed.
(Vehicles with an automatic
transmission: The key can be
removed only when the shift
lever is in P.)
“ACC”
Some electrical components
such as the audio system can
be used.
“ON”
All electrical components can
be used.
“START”
For starting the engine.
Shift the shift lever to P (auto-
matic transmission) or N (man-
ual transmission).
(P. 134, 139)
Push in the key and turn to the
“LOCK” position.STEP 1
STEP 2
Page 132 of 476
132 2-1. Driving procedures
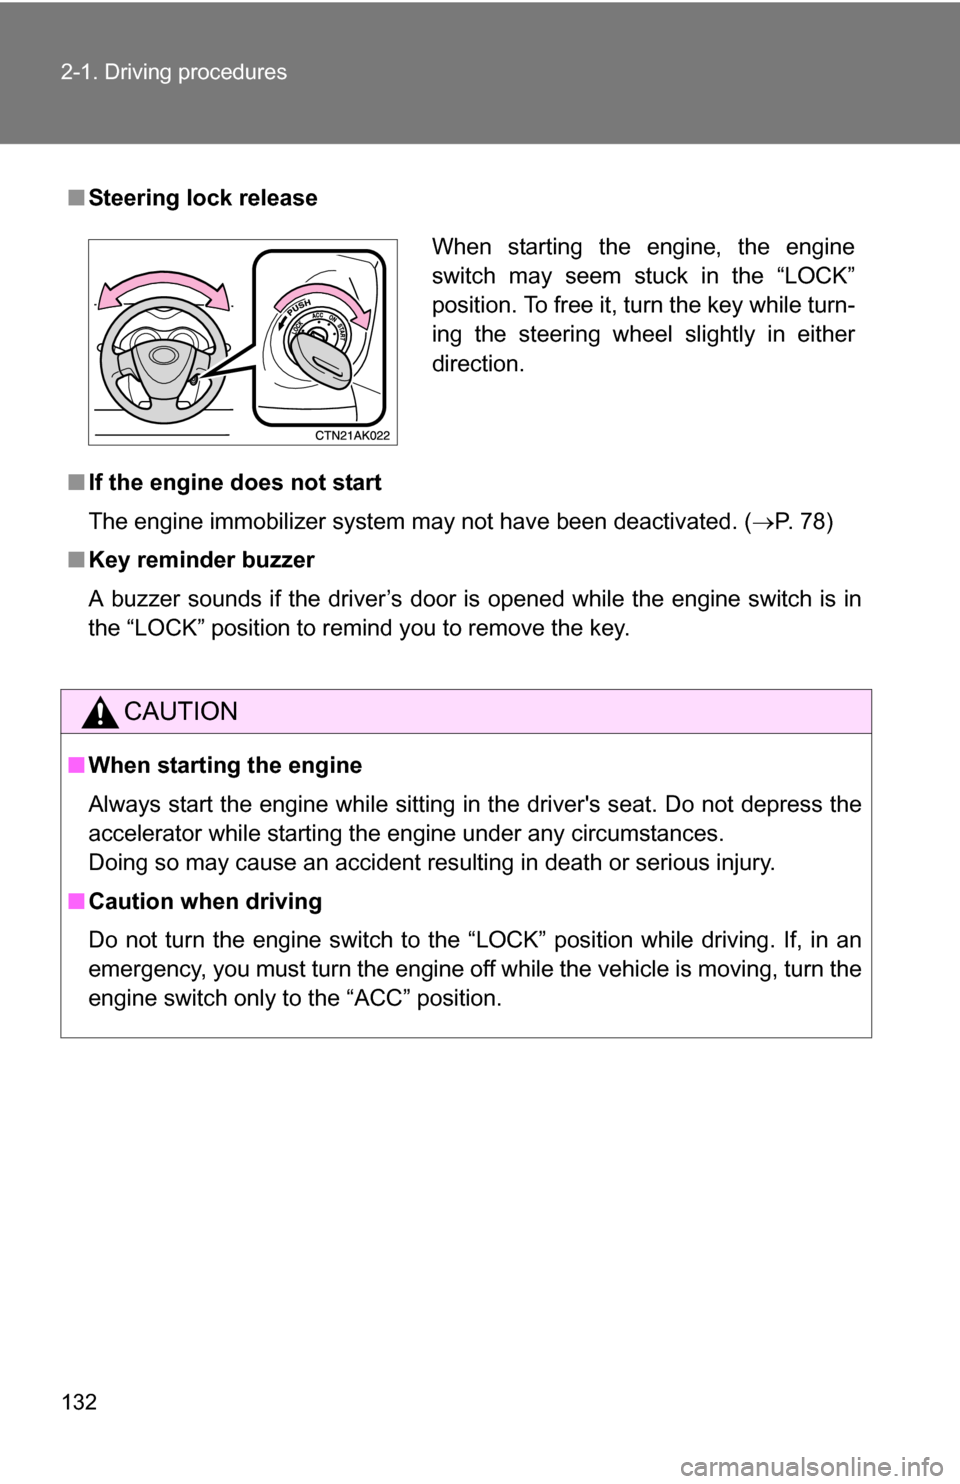
■Steering lock release
■ If the engine does not start
The engine immobilizer system may not have been deactivated. ( P. 78)
■ Key reminder buzzer
A buzzer sounds if the driver’s door is opened while the engine switch is in
the “LOCK” position to remind you to remove the key.
CAUTION
■When starting the engine
Always start the engine while sitting in the driver's seat. Do not depress the
accelerator while starting the engine under any circumstances.
Doing so may cause an accident resulting in death or serious injury.
■ Caution when driving
Do not turn the engine switch to the “LOCK” position while driving. If, in an
emergency, you must turn the engine off while the vehicle is moving, turn the
engine switch only to the “ACC” position.
When starting the engine, the engine
switch may seem stuck in the “LOCK”
position. To free it, turn the key while turn-
ing the steering wheel slightly in either
direction.
Page 133 of 476
133
2-1. Driving procedures
2
When driving
NOTICE
■
To prevent battery discharge
Do not leave the key in the “ACC” or “ON” position for long periods if the
engine is not running.
■ When starting the engine
●2.4 L 4-cylinder (2AZ-FE) engine: Do not crank for more than 30 seconds
at a time. This may overheat the starter and wiring systems.
● Do not race a cold engine.
● If the engine becomes difficult to start or stalls frequently, have the engine
checked immediately.
Page 134 of 476
134
2-1. Driving procedures
Automatic transmission
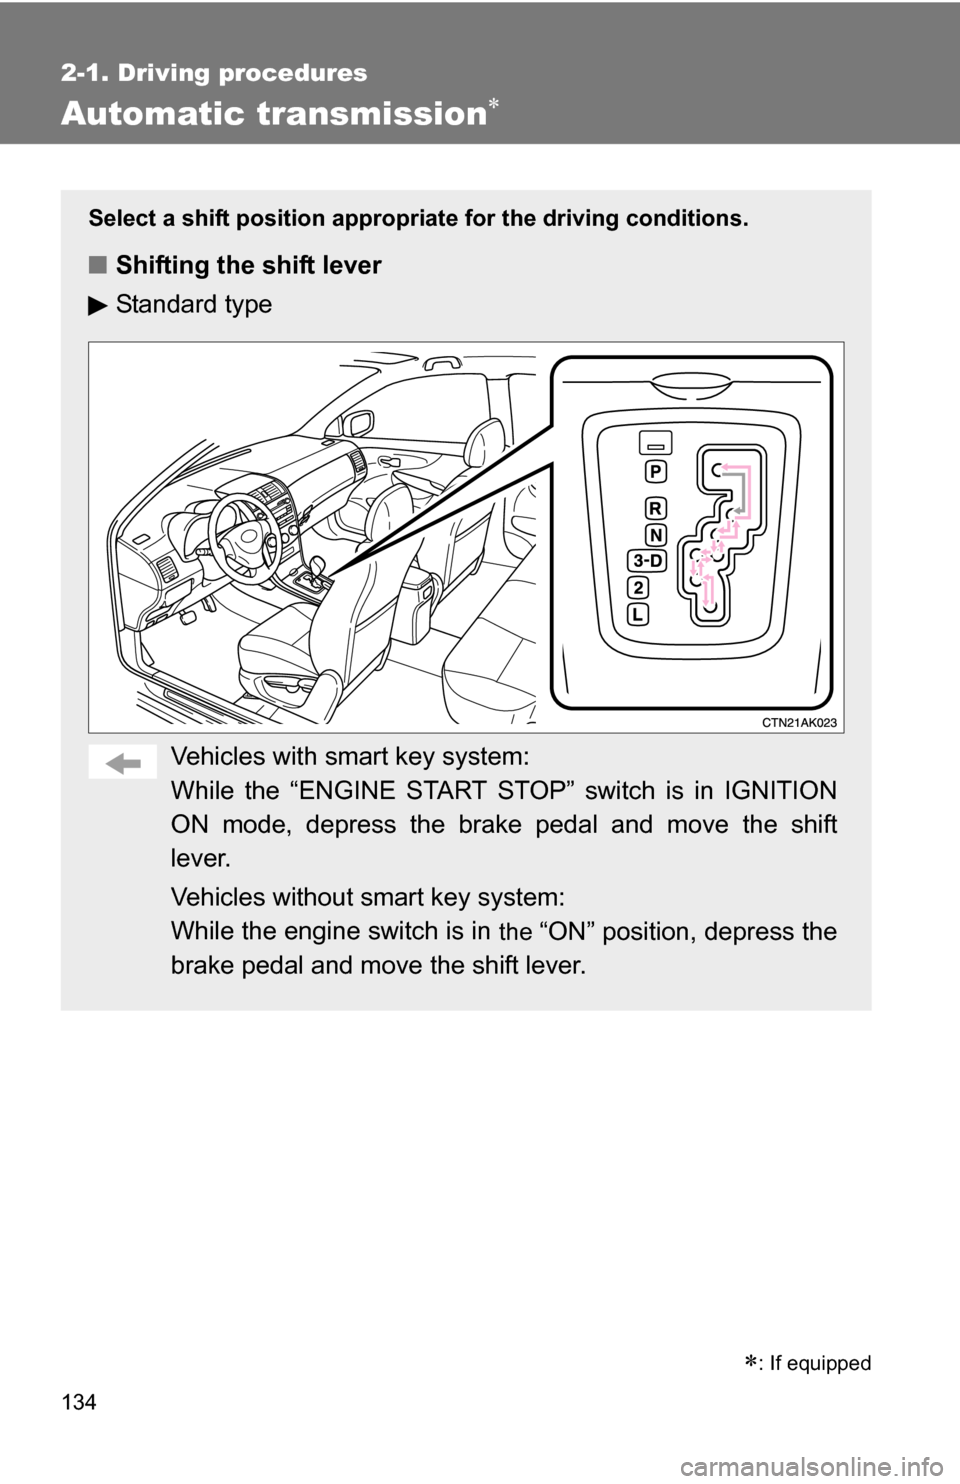
Select a shift position appropriate for the driving conditions.
■Shifting the shift lever
Standard type
Vehicles with smart key system:
While the “ENGINE START STOP” switch is in IGNITION
ON mode, depress the brake pedal and move the shift
lever.
Vehicles without smart key system:
While the engine switch is in
the “ON” position, depress the
brake pedal and move the shift lever.
�
: If equipped
Page 140 of 476
140
2-1. Driving procedures
Tur n signal lever
■Turn signals can be operated when
Vehicles with smart key system
The “ENGINE START STOP” switch is in IGNITION ON mode.
Vehicles without smart key system
The engine switch is in
the “ON” position.
■ If the indicators flash faster than usual
Check that a light bulb in the front or rear turn signal lights has not burned
out.
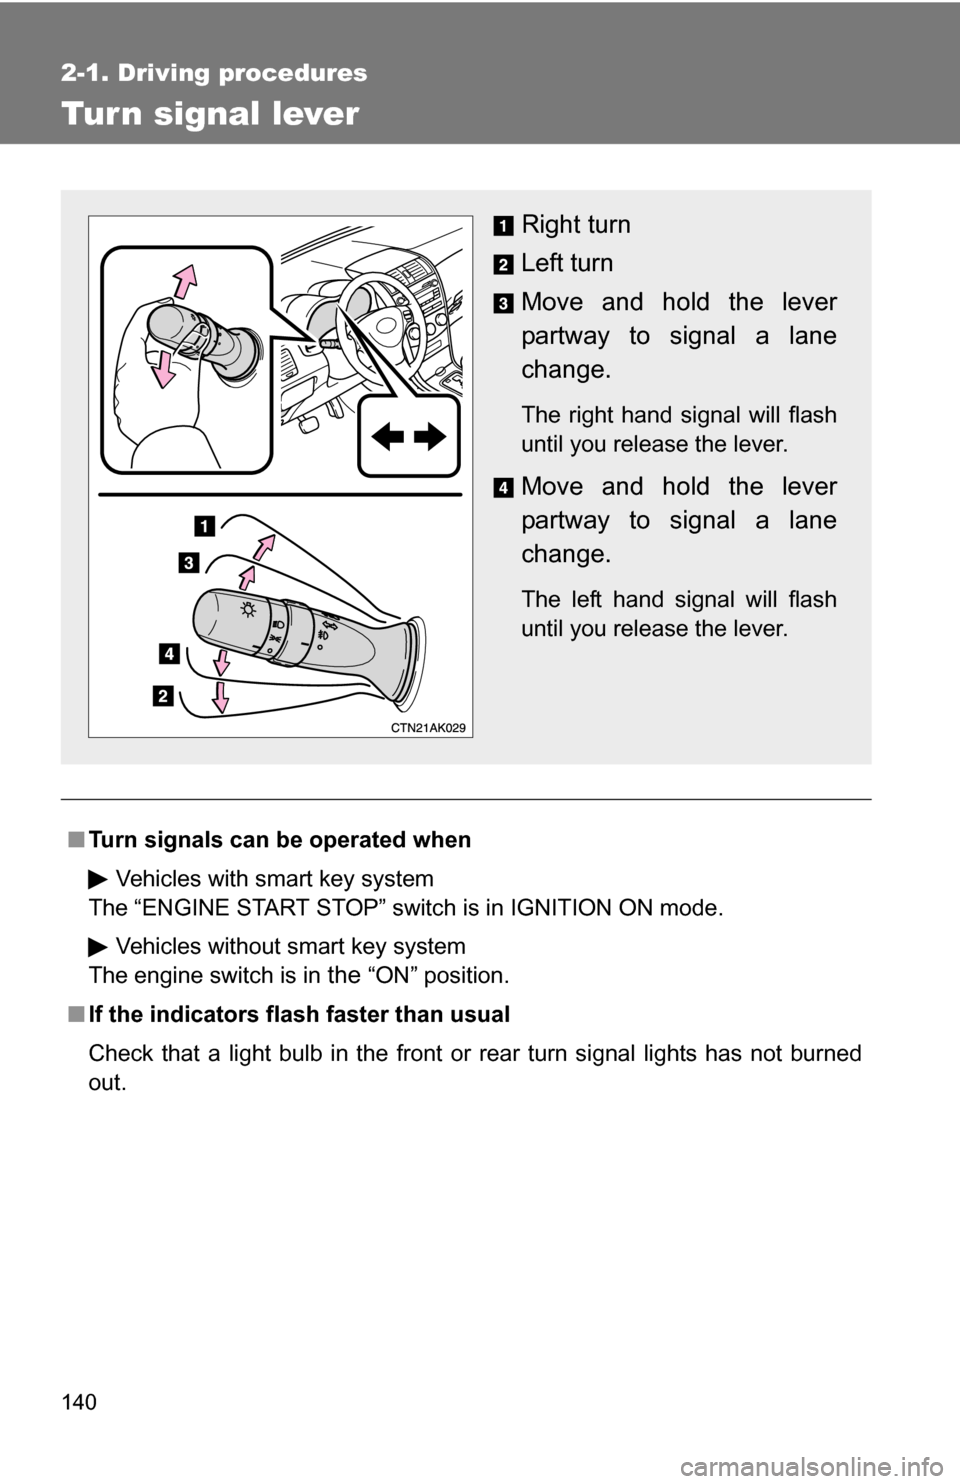
Right turn
Left turn
Move and hold the lever
partway to signal a lane
change.
The right hand signal will flash
until you release the lever.
Move and hold the lever
partway to signal a lane
change.
The left hand signal will flash
until you release the lever.
Page 143 of 476
143
2
When driving
2-2. Instrument cluster
Gauges and meters
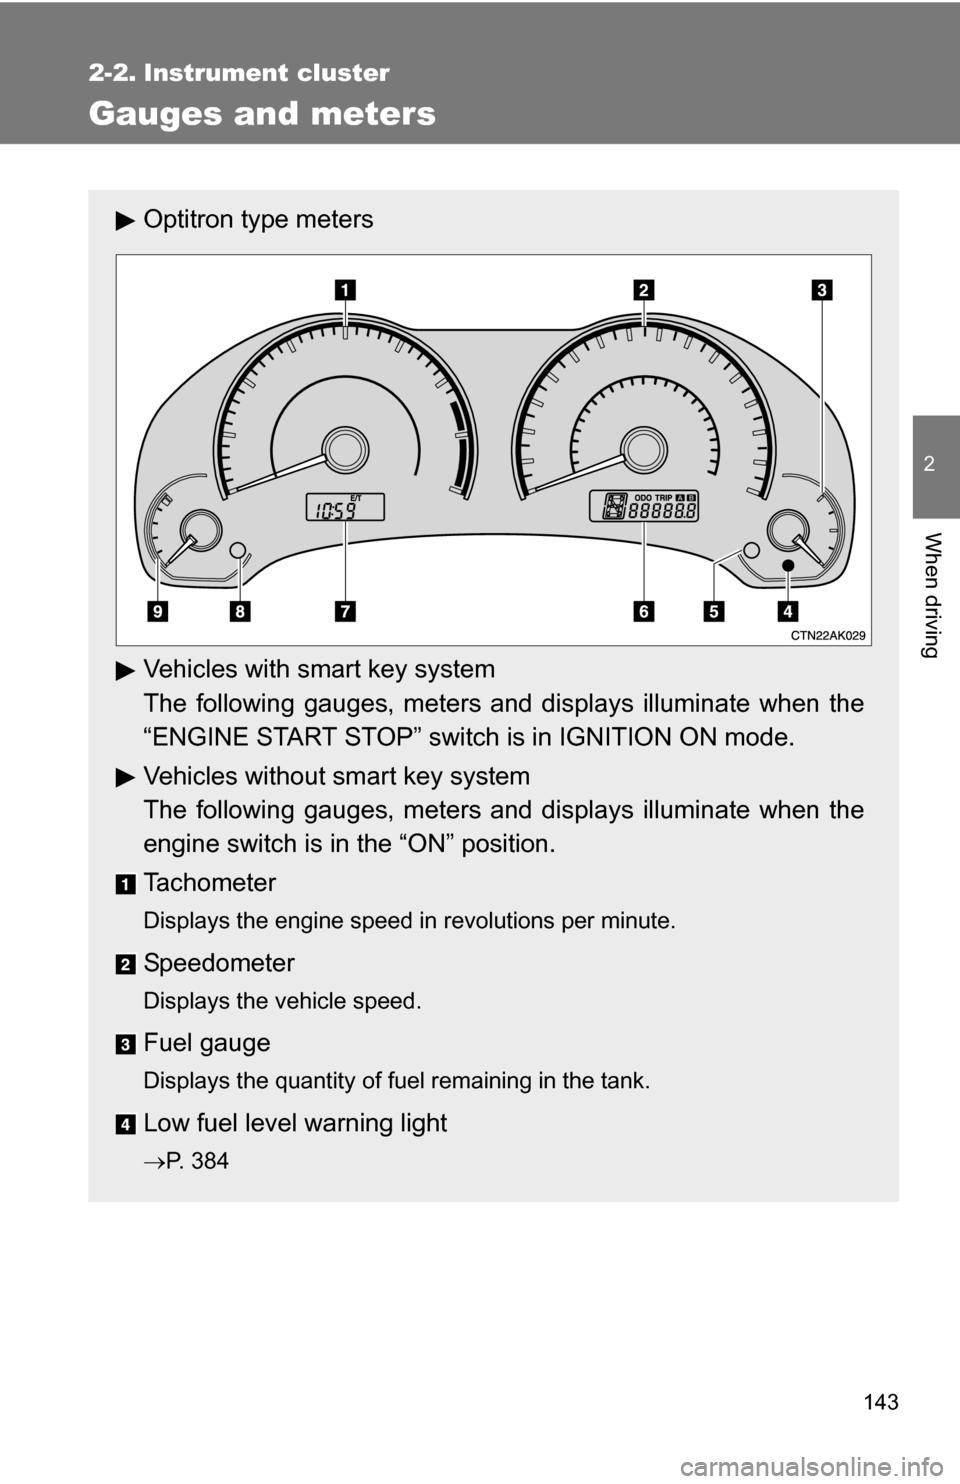
Optitron type meters
Vehicles with smart key system
The following gauges, meters and displays illuminate when the
“ENGINE START STOP” switch is in IGNITION ON mode.
Vehicles without smart key system
The following gauges, meters and displays illuminate when the
engine switch is in the “ON” position.
Tachometer
Displays the engine speed in revolutions per minute.
Speedometer
Displays the vehicle speed.
Fuel gauge
Displays the quantity of fuel remaining in the tank.
Low fuel level warning light
P. 384
Page 150 of 476
150 2-2. Instrument cluster
CAUTION
■If a safety system warning light does not come on
Should a safety system light such as the ABS or the SRS airbag warning
light not come on when you start the engine, this could mean that these sys-
tems are not available to help protect you in an accident, which could result
in death or serious injury. Have the vehicle inspected by your Toyota dealer
immediately if this occurs.
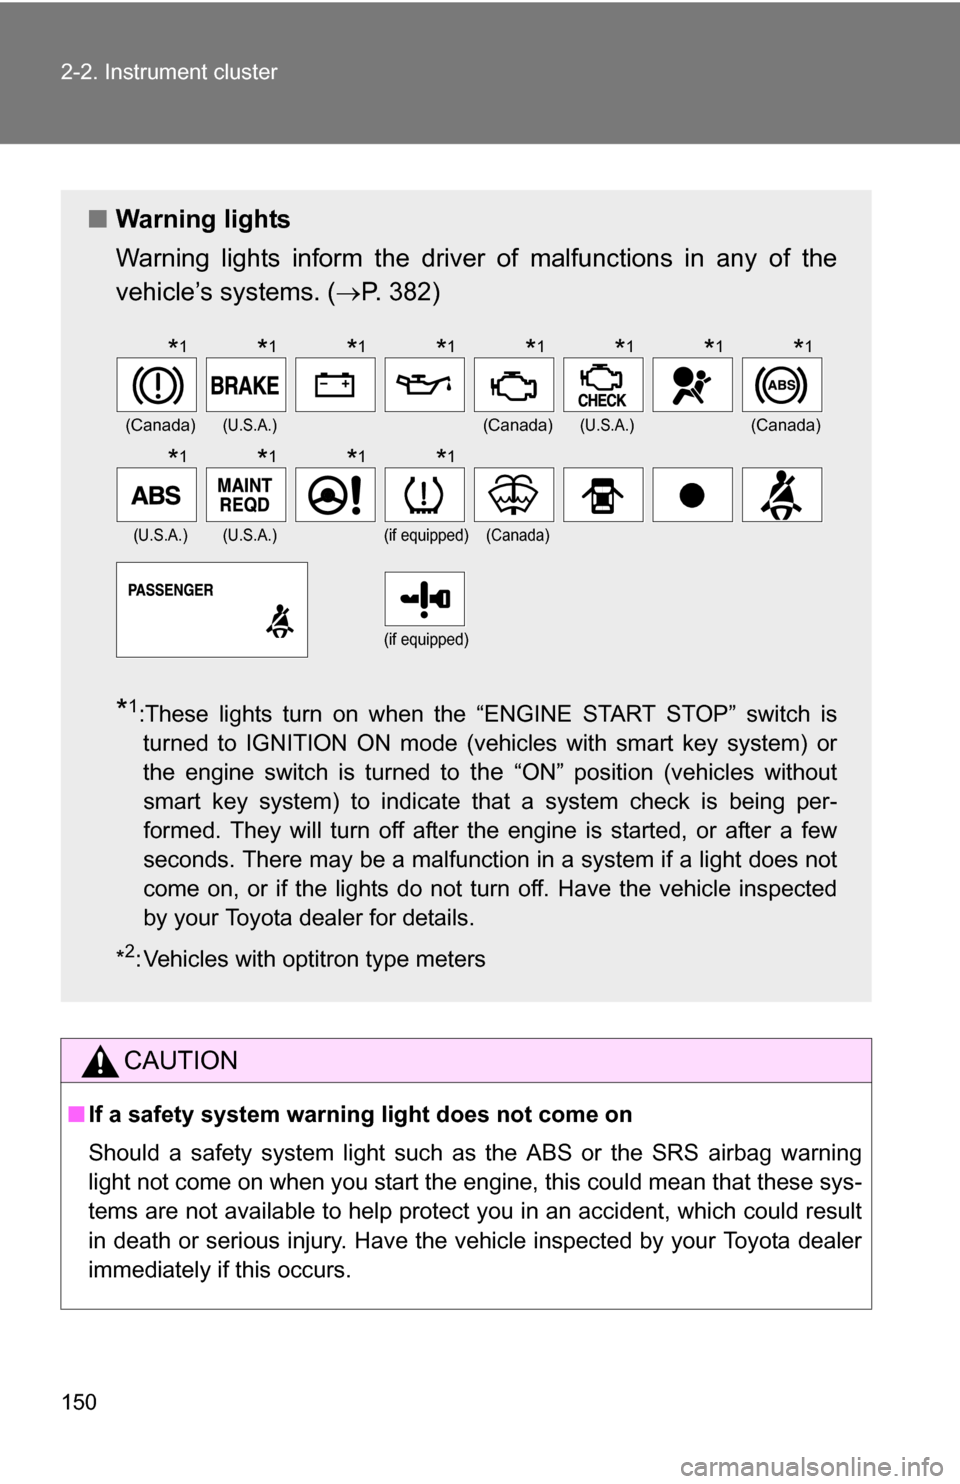
■ Warning lights
Warning lights inform the driver of malfunctions in any of the
vehicle’s systems. ( P. 382)
*1:These lights turn on when the “ENGINE START STOP” switch is
turned to IGNITION ON mode (vehicles with smart key system) or
the engine switch is turned to
the “ON” position (vehicles without
smart key system) to indicate that a system check is being per-
formed. They will turn off after the engine is started, or after a few
seconds. There may be a malfunction in a system if a light does not
come on, or if the lights do not turn off. Have the vehicle inspected
by your Toyota dealer for details.
*
2: Vehicles with optitron type meters
(Canada)(U.S.A.)(Canada)(U.S.A.)(Canada)
(U.S.A.)(U.S.A.)(if equipped)(Canada)
(if equipped)
*1*1*1*1*1*1*1*1
*1*1*1*1
Page 156 of 476
156 2-3. Operating the lights and wipers
■Daytime running light system
To make your vehicle more visible to other drivers, the headlights turn on
automatically whenever the engine is started and the parking brake is
released.
The brightness of headlights will automatically change depending on the
darkness of the surroundings. The other exterior lights and instrument panel
lights automatically turn on or off.
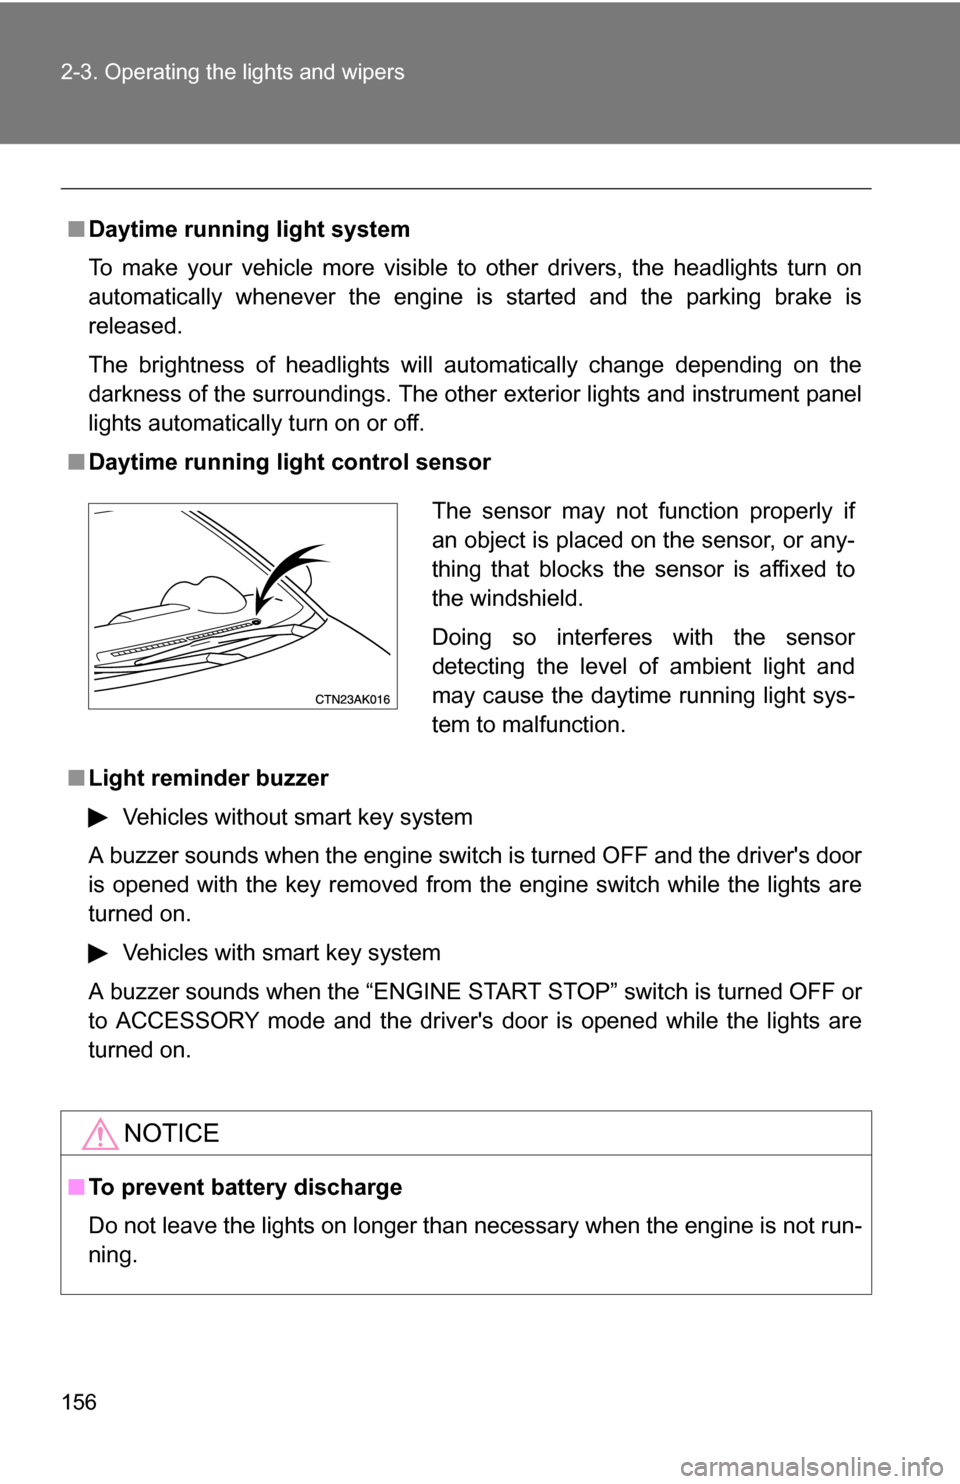
■ Daytime running light control sensor
■ Light reminder buzzer
Vehicles without smart key system
A buzzer sounds when the engine switch is turned OFF and the driver's door
is opened with the key removed from the engine switch while the lights are
turned on. Vehicles with smart key system
A buzzer sounds when the “ENGINE START STOP” switch is turned OFF or
to ACCESSORY mode and the driver's door is opened while the lights are
turned on.
NOTICE
■ To prevent battery discharge
Do not leave the lights on longer than necessary when the engine is not run-
ning.
The sensor may not function properly if
an object is placed on the sensor, or any-
thing that blocks the sensor is affixed to
the windshield.
Doing so interferes with the sensor
detecting the level of ambient light and
may cause the daytime running light sys-
tem to malfunction.
Page 159 of 476
159
2-3. Operating the lights and wipers
2
When driving
■
The windshield wipers and w ashers can be operated when
Vehicles with smart key system
The “ENGINE START STOP” switch is in IGNITION ON mode.
Vehicles without smart key system
The engine switch is in the “ON” position.
■ If no windshield washer fluid sprays
Check that the washer nozzles are not blocked and if there is washer fluid in
the windshield washer fluid reservoir.
NOTICE
■When the windshield is dry
Do not use the wipers, as they may damage the windshield.
■ When there is no washer fluid spray from the nozzle
Damage to the washer fluid pump may be caused if the lever is pulled
toward you and held continually.
■ When a nozzle becomes blocked
Do not try to clear it with a pin or other object. The nozzle will be damaged.
Page 239 of 476
239
3-3. Using the hand
s-free phone system (for cellular phone)
3
Interior features
Using the hands-free phone system for the first time
Before using the hands-free phone system, it is necessary to register
a cellular phone in the system. Th e phone registration mode will be
entered automatically when starting the system with no cellular
phone registered. Follow the procedure below to register a cellular
phone:
Press the off-hook switch or the talk switch.
The introductory guidance and phone name registration instructions
are heard.
Register a phone name by either of the following methods.
a. Select “Record Name” by using , and say a name to
be registered.
b. Press the talk switch and say a name to be registered.
A voice guidance instruction to confirm the input is heard.
Select “Confirm” by using a voice command or .
A passkey is displayed and heard, and a voice guidance instruction
for inputting the passkey into the cellular phone is heard. Input the passkey into the cellular phone.
Refer to the manual that comes with the cellular phone for the oper-
ation of the phone.
Guidance for registration completion is heard.
STEP 1
STEP 2
STEP 3
STEP 4