Switch set TOYOTA COROLLA 2016 11.G Service Manual
[x] Cancel search | Manufacturer: TOYOTA, Model Year: 2016, Model line: COROLLA, Model: TOYOTA COROLLA 2016 11.GPages: 620, PDF Size: 9.12 MB
Page 284 of 620
2845-9. Bluetooth® Phone
COROLLA_TMMMS_TMMC_U (OM12J84U)
Select “All calls”, “Missed calls”, “Incoming calls” or “Outgoing calls”
using .
Select the desired number using and press the off-hook
switch.
The following operations can be performed:
l Registering a number as a speed dial
Press (Add S. Dial) and then press and hold the desired pre-
set button (from to ).
l Deleting the selected number
Press (DELETE) and press (YES).
Dialing from call histories
1
2
Page 292 of 620
2925-11. Basic Operations (Multimedia system)
COROLLA_TMMMS_TMMC_U (OM12J84U)
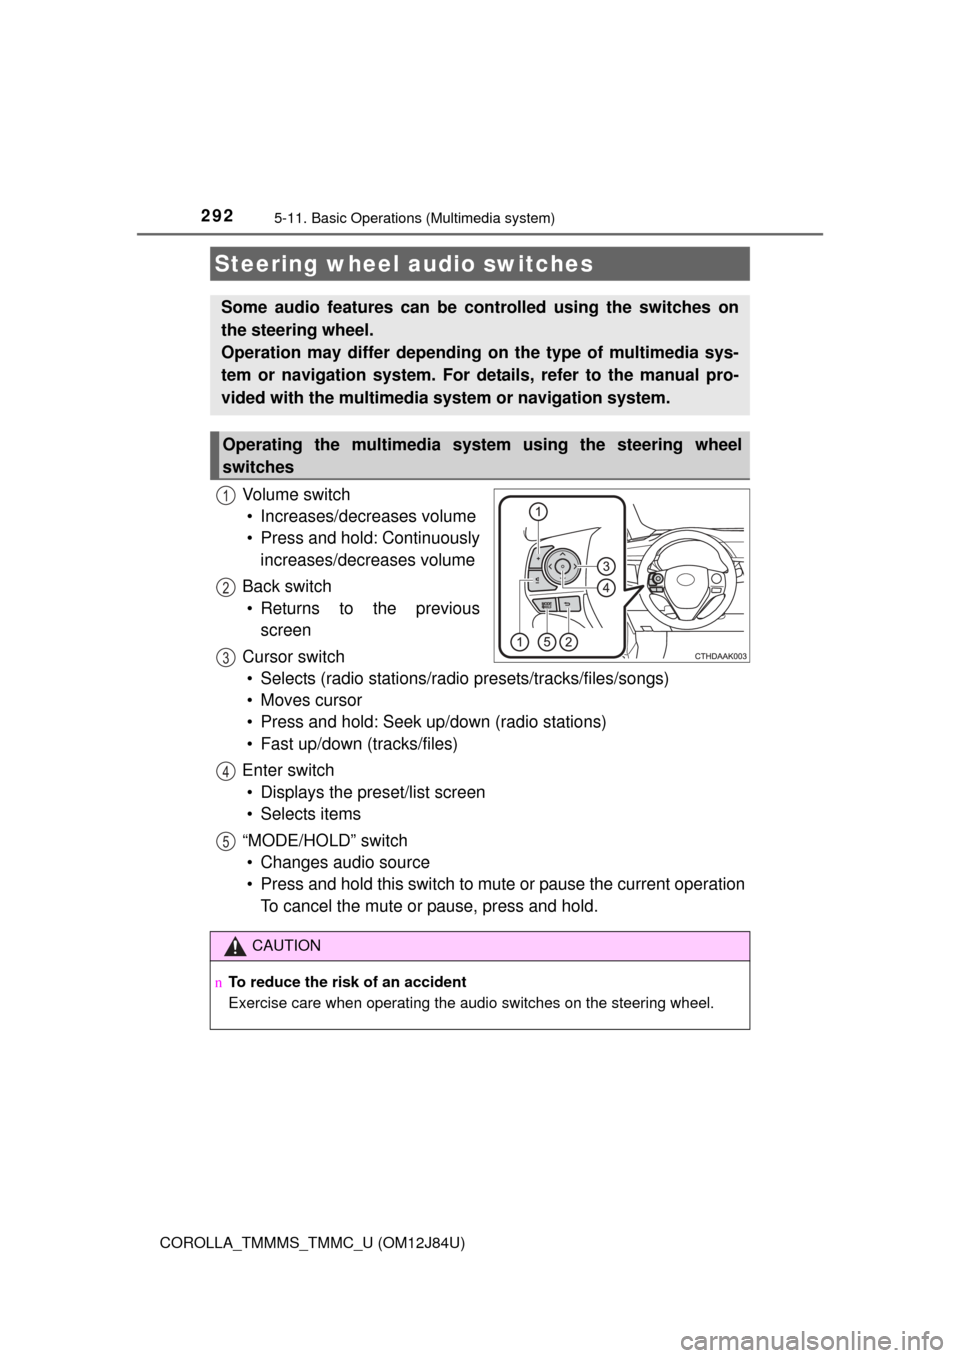
Vo l u m e s w i t c h• Increases/decreases volume
• Press and hold: Continuously increases/decreases volume
Back switch • Returns to the previous screen
Cursor switch • Selects (radio stations/radio presets/tracks/files/songs)
• Moves cursor
• Press and hold: Seek up/down (radio stations)
• Fast up/down (tracks/files)
Enter switch • Displays the preset/list screen
• Selects items
“MODE/HOLD” switch • Changes audio source
• Press and hold this switch to mute or pause the current operation To cancel the mute or pause, press and hold.
Steering wheel audio switches
Some audio features can be c ontrolled using the switches on
the steering wheel.
Operation may differ depending on the type of multimedia sys-
tem or navigation system. For de tails, refer to the manual pro-
vided with the multimedia system or navigation system.
Operating the multimedia system using the steering wheel
switches
1
12
3
4
5
CAUTION
n To reduce the risk of an accident
Exercise care when operating the audio switches on the steering wheel.
Page 301 of 620
3015-12. Setup (Multimedia system)
5
Audio system
COROLLA_TMMMS_TMMC_U (OM12J84U)
Press the “SETUP” button.
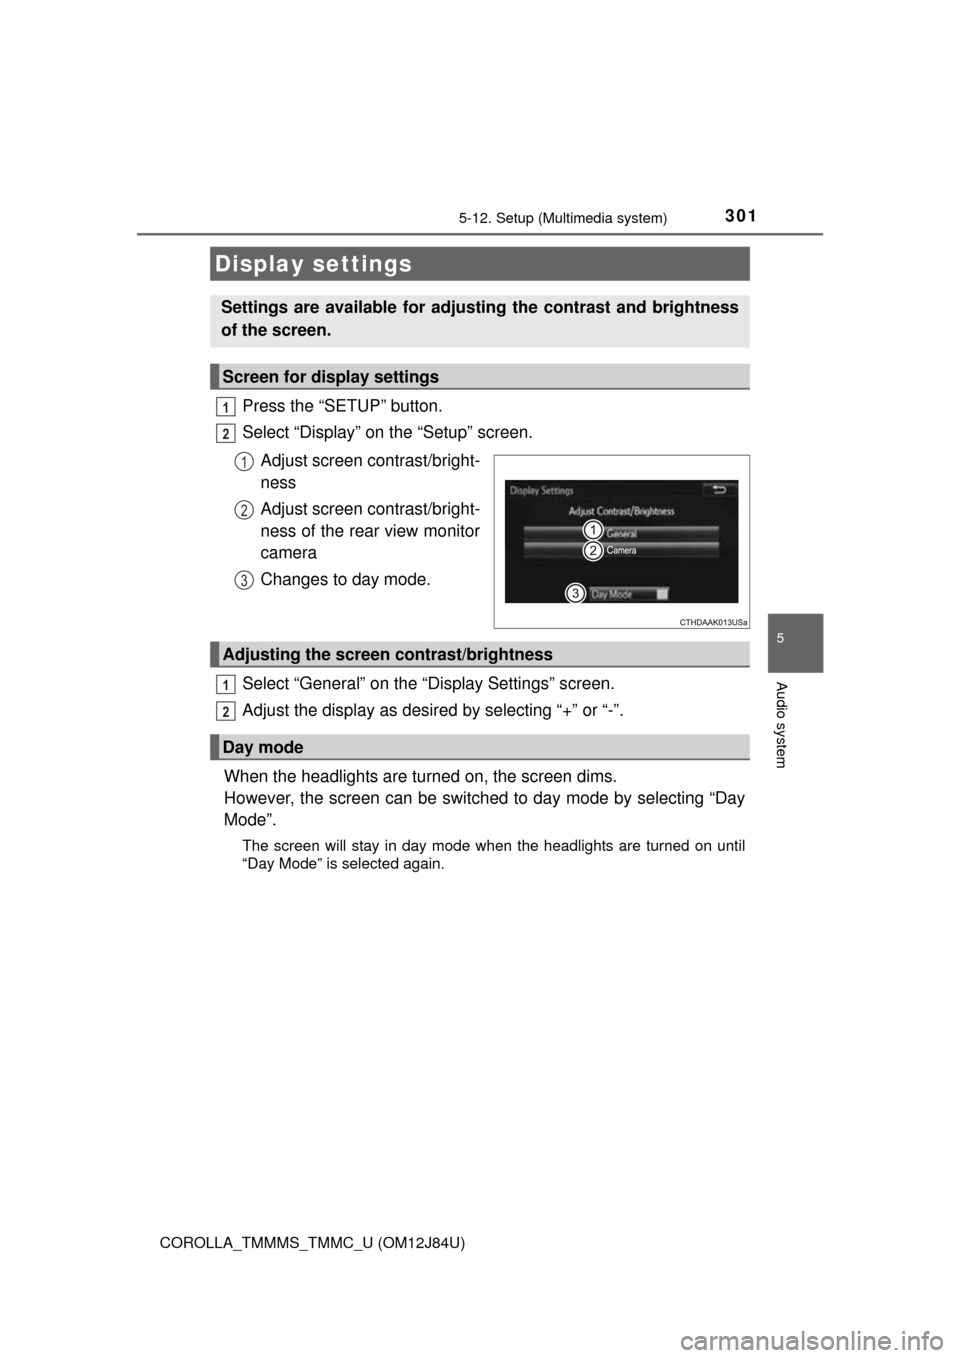
Select “Display” on the “Setup” screen.Adjust screen contrast/bright-
ness
Adjust screen contrast/bright-
ness of the rear view monitor
camera
Changes to day mode.
Select “General” on the “Display Settings” screen.
Adjust the display as desired by selecting “+” or “-”.
When the headlights are turned on, the screen dims.
However, the screen can be switch ed to day mode by selecting “Day
Mode”.
The screen will stay in day mode when the headlights are turned on until
“Day Mode” is selected again.
Display settings
Settings are available for adjusting the contrast and brightness
of the screen.
Screen for display settings
1
2
1
2
3
Adjusting the screen contrast/brightness
Day mode
1
2
Page 335 of 620
3355-17. Connecting Bluetooth® (Multimedia system)
5
Audio system
COROLLA_TMMMS_TMMC_U (OM12J84U)
To turn auto connection mode on, set “Bluetooth* Power” to on.
( P. 339)
When you register a phone, auto co nnection will be activated. Always
set it to this mode and leave the Bluetooth
® phone in a place where a
connection can be established.
When the engine switch is turned to ACCESSORY or ON (IGNITION ON)
mode, the system will search for a nearby cellular phone you have regis-
tered.
Next, the system automatically connects with the most recent of the
phones connected to in the past. Then, the connection result is displayed.
*: Bluetooth is a registered trademark of Bluetooth SIG, Inc.
When auto connection has failed or “Bluetooth* Power” is turned off,
you must connec t the Bluetooth® device manually.
Follow the steps in “Connecting a Bluetooth
® device” from step .
( P. 334)
*: Bluetooth is a registered trademark of Bluetooth SIG, Inc.
Registering an additional device
Select “Select Device” on the Bluetooth
® audio control screen.
For more information: P. 3 3 1
Selecting a registered device
Select “Select Device” on the Bluetooth
® audio control screen.
For more information: P. 3 3 4
Auto connection
Manual connection
Connecting a Bluetooth® audio player
11
1
2
1
2
Page 352 of 620
3525-19. Bluetooth® phone (Multimedia system)
COROLLA_TMMMS_TMMC_U (OM12J84U)
Select “Handset Mode” to on from a hands-free call to a cellular
phone call.
Select “Handset Mode” to off from a cellular phone call to a hands-free
call.Select “Transmit Volume”.
Select the desired level for the transmit volume.
Select “OK”.
Press the switch on the steering wheel or select .
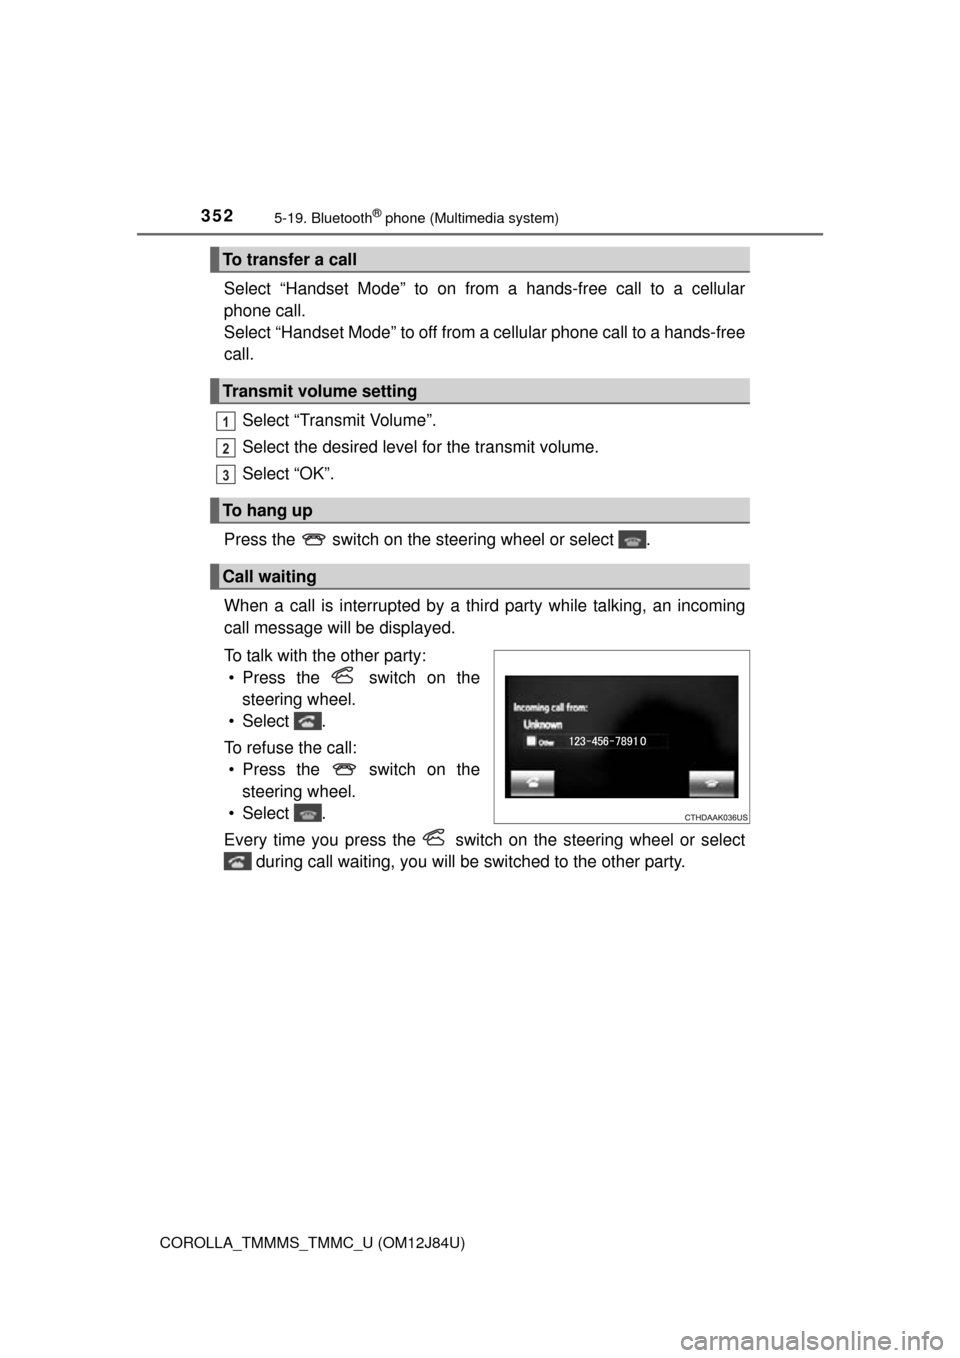
When a call is interrupted by a third party while talking, an incoming
call message will be displayed.
To talk with the other party: • Press the switch on the steering wheel.
• Select .
To refuse the call: • Press the switch on the steering wheel.
• Select .
Every time you press the switch on the steering wheel or select during call waiting, you will be switched to the other party.
To transfer a call
Transmit volume setting
To hang up
Call waiting
1
2
3
Page 357 of 620
3575-19. Bluetooth® phone (Multimedia system)
5
Audio system
COROLLA_TMMMS_TMMC_U (OM12J84U)
nCheck the messages
lDepending on the type of Bluetooth® phone being connected, it may be nec-
essary to perform additional steps on the phone.
l Messages are displayed in the appropriate connected Bluetooth
® phone’s
registered mail address folder.
Select the tab of the desired folder to be displayed.
l Only received messages on the connected Bluetooth
® phone can be dis-
played.
l The text of the message is not displayed while driving.
l When “Automatic Message Readout” is set to on, messages will be auto-
matically read out. ( P. 370)
l Turn the “PWR/VOL” knob, or use the volume switch on the steering wheel
to adjust the message read out volume.
l The message read out function is available even while driving.
Display the message inbox screen. ( P. 354)
Select the desired message from the list.
Select “Quick Message”.
Select the desired message.
Select “Send”.
nEditing quick reply message Select “Quick Message”.
Select corresponding to the desired message to edit.
Select “OK” when editing is completed.
Replying to a message
1
2
3
4
5
1
2
3
Page 379 of 620
3795-20. Bluetooth® (Multimedia system)
5
Audio system
COROLLA_TMMMS_TMMC_U (OM12J84U)n
Certification
NOTE:
This device complies with part 15 of the FCC Rules. Operation is subject to
the following two conditions: (1) This device may not cause harmful interfer-
ence, and (2) this device must accept any interference received, including
interference that may cause undesired operation.
FCC WARNING:
Changes or modifications not expressly approved by the party responsible for
compliance could void the user's authority to operate the equipment.
CAUTION:
Radio Frequency Radiation Exposure
This equipment complies with FCC radiation exposure limits set forth for
uncontrolled equipment and meets the FCC radio frequency (RF) Exposure
Guidelines. This equipment has very lo w levels of RF energy that it deemed
to comply without maximum permissive exposure evaluation (MPE). But it is
desirable that it should be installed and operated with at least 20 cm and
more between the radiator and person’s body in normal use position.
Co-location:
This transmitter must not be co-located or operated in conjunction with any
other antenna or transmitter.
n Reconnecting the portable audio player
If the portable audio player is disconnected due to poor reception when the
engine switch is in ACCESSORY or IGNITION ON mode, the system auto-
matically reconnects the portable audio player.
If you have switched off the portable audio player yourself, follow the instruc-
tions below to reconnect:
lSelect the portable audio player again
l Enter the portable audio player
n When you sell your car
Be sure to delete your personal data. ( P. 298)
Page 381 of 620
381
5
Audio system
COROLLA_TMMMS_TMMC_U (OM12J84U)
5-21.Using the voice command system (Multimedia system)
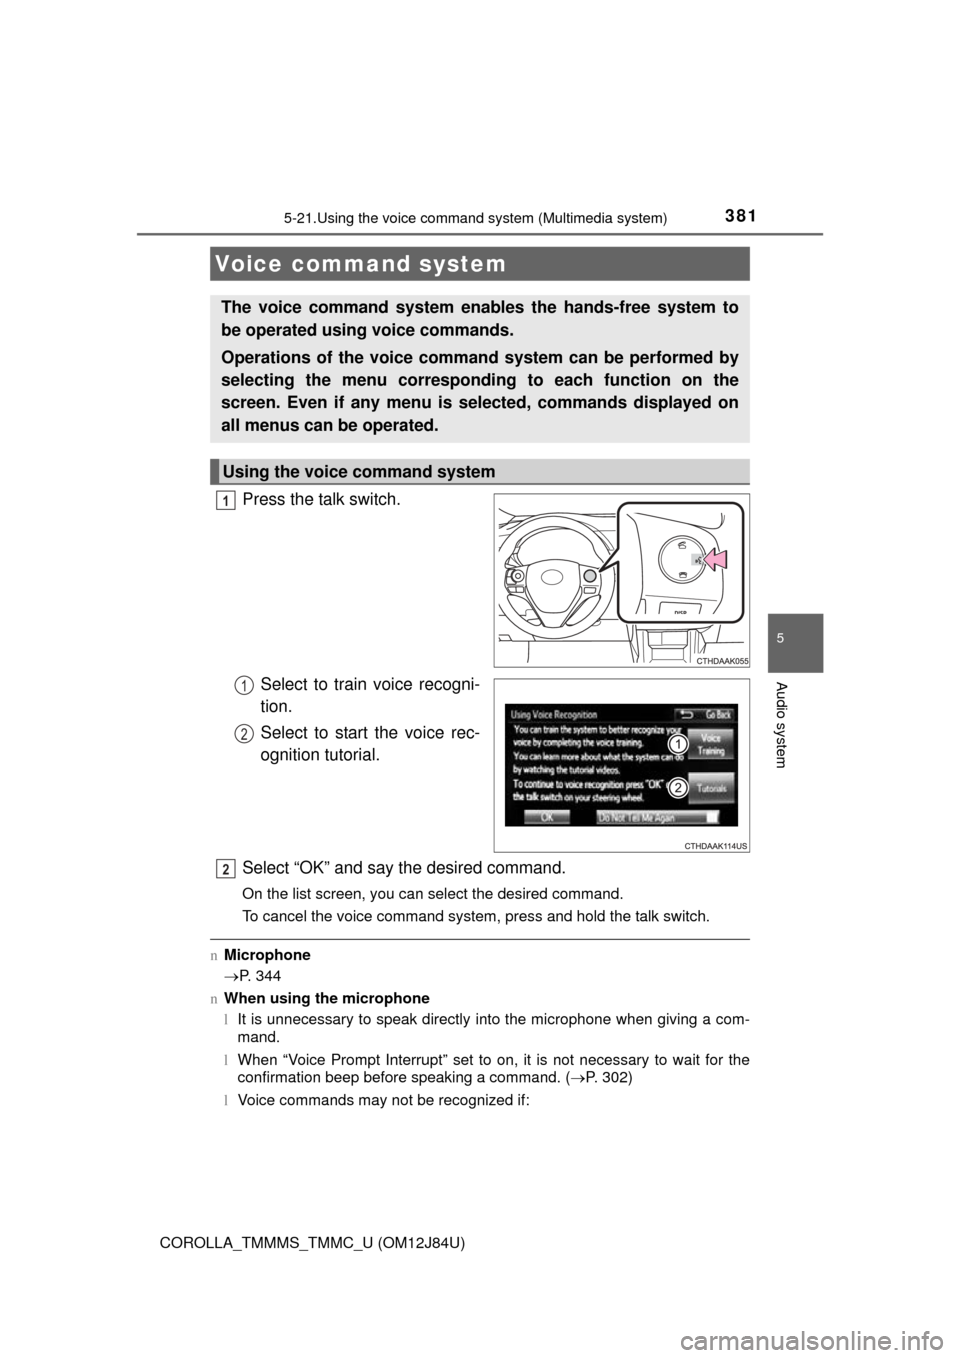
Press the talk switch.Select to train voice recogni-
tion.
Select to start the voice rec-
ognition tutorial.
Select “OK” and say the desired command.
On the list screen, you can select the desired command.
To cancel the voice command system, press and hold the talk switch.
n Microphone
P. 344
n When using the microphone
lIt is unnecessary to speak directly into the microphone when giving a com-
mand.
l When “Voice Prompt Interrupt” set to on, it is not necessary to wait for the
confirmation beep before speaking a command. ( P. 302)
l Voice commands may not be recognized if:
Voice command system
The voice command system enables the hands-free system to
be operated using voice commands.
Operations of the voice comm and system can be performed by
selecting the menu corresponding to each function on the
screen. Even if any menu is selected, commands displayed on
all menus can be operated.
Using the voice command system
1
1
2
2
Page 387 of 620
3876-1. Using the air conditioning system and defogger
6
Interior features
COROLLA_TMMMS_TMMC_U (OM12J84U)n
Switching between outside air and recirculated air modes
Press .
The mode switches between outside air mode (indicator off) and recir-
culated air mode (indicator on) each time is pressed.
n
Defogging the windshield
Defoggers are used to defog the windshield and front side win-
dows.
Set the air outlet selector dial to the position.
Set the outside/recirculated air mode button to outside air mode if the
recirculated air mode is used. (It may switch automatically.)
To defog the windshield and the side windows early, turn the air flow and
temperature up.
Vehicles with the air conditioning system: If the dehumidification
function is not operating, pres s to operate the dehumidifica-
tion function.
nDefogging the rear window and outside rear view mirrors
Vehicles without outside rear view mirror defoggers
Defoggers are used to defog the rear window.
Press .
The defoggers will automatically turn off after a period of time.
Vehicles with outside rear view mirror defoggers
Defoggers are used to defog the rear window, and to remove rain-
drops, dew and frost from the outside rear view mirrors.
Press .
The defoggers will automatically turn off after a period of time.
Other functions
Page 393 of 620
3936-1. Using the air conditioning system and defogger
6
Interior features
COROLLA_TMMMS_TMMC_U (OM12J84U)n
Fan speed setting
Press “
” on to increase the fan speed.
Press “ ” on to decrease the fan speed.
nChange the airflow mode
To change the airflow, press “ ” or “” on .
The air outlets used are switched each time either side of the button is
pressed.
n
Other functions
l Switching between outside air and recirculated air modes
( P. 387)
l Defogging the windshield ( P. 387)
l Defogging the rear window and outside rear view mirrors
( P. 387)