trunk release TOYOTA COROLLA 2020 Owners Manual (in English)
[x] Cancel search | Manufacturer: TOYOTA, Model Year: 2020, Model line: COROLLA, Model: TOYOTA COROLLA 2020Pages: 588, PDF Size: 13.49 MB
Page 109 of 588
1093-2. Opening, closing and locking the doors
COROLLA_U
3
Before driving
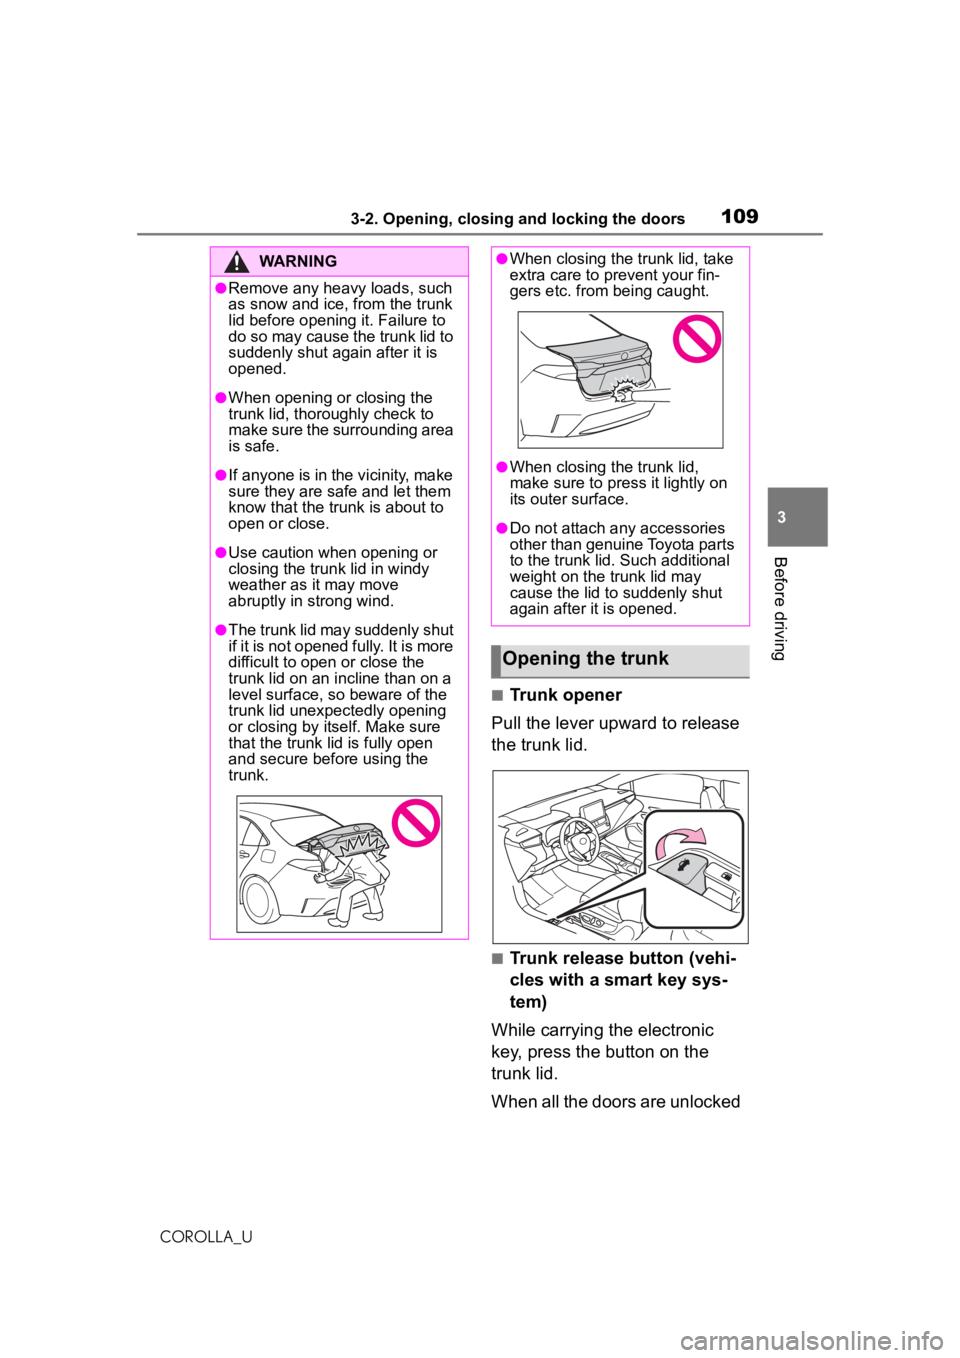
■Trunk opener
Pull the lever upward to release
the trunk lid.
■Trunk release button (vehi-
cles with a smart key sys-
tem)
While carrying the electronic
key, press the button on the
trunk lid.
When all the doors are unlocked
WARNING
●Remove any heavy loads, such
as snow and ice, from the trunk
lid before opening it. Failure to
do so may cause the trunk lid to
suddenly shut again after it is
opened.
●When opening or closing the
trunk lid, thoroughly check to
make sure the surrounding area
is safe.
●If anyone is in the vicinity, make
sure they are safe and let them
know that the trunk is about to
open or close.
●Use caution when opening or
closing the trunk lid in windy
weather as it may move
abruptly in strong wind.
●The trunk lid may suddenly shut
if it is not opened fully. It is more
difficult to open or close the
trunk lid on an incline than on a
level surface, so beware of the
trunk lid unexpectedly opening
or closing by itself. Make sure
that the trunk lid is fully open
and secure before using the
trunk.
●When closing the trunk lid, take
extra care to prevent your fin-
gers etc. from being caught.
●When closing the trunk lid,
make sure to press it lightly on
its outer surface.
●Do not attach any accessories
other than genuine Toyota parts
to the trunk lid. Such additional
weight on the trunk lid may
cause the lid to suddenly shut
again after it is opened.
Opening the trunk
Page 110 of 588
1103-2. Opening, closing and locking the doors
COROLLA_U
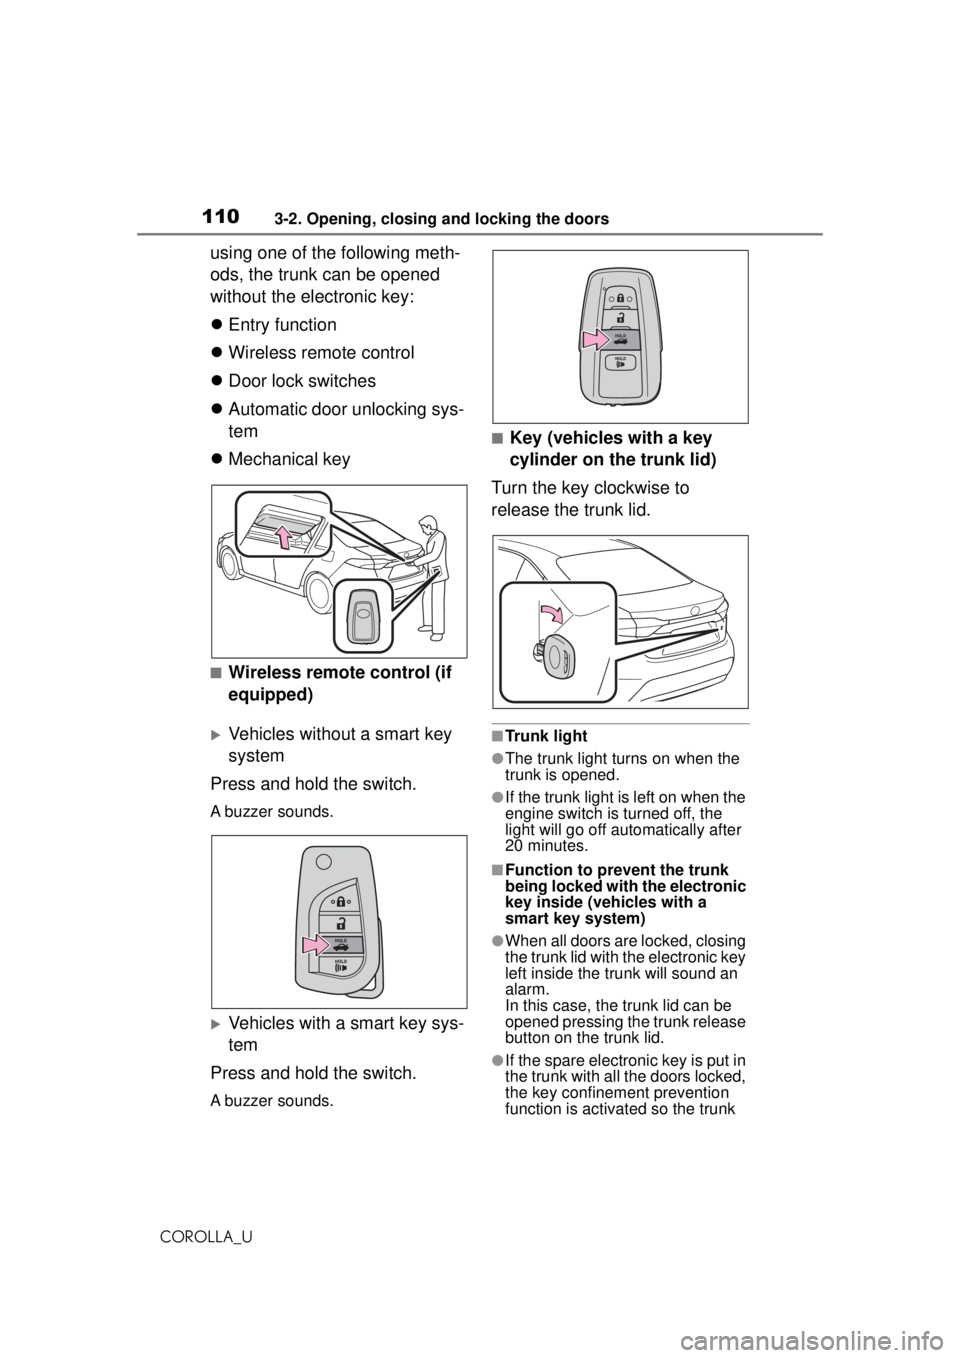
using one of the following meth-
ods, the trunk can be opened
without the electronic key:
Entry function
Wireless remote control
Door lock switches
Automatic door unlocking sys-
tem
Mechanical key
■Wireless remote control (if
equipped)
Vehicles without a smart key
system
Press and hold the switch.
A buzzer sounds.
Vehicles with a smart key sys-
tem
Press and hold the switch.
A buzzer sounds.
■Key (vehicles with a key
cylinder on the trunk lid)
Turn the key clockwise to
release the trunk lid.
■Trunk light
●The trunk light turns on when the
trunk is opened.
●If the trunk light is left on when the
engine switch is turned off, the
light will go off automatically after
20 minutes.
■Function to prevent the trunk
being locked with the electronic
key inside (vehicles with a
smart key system)
●When all doors are locked, closing
the trunk lid with the electronic key
left inside the trunk will sound an
alarm.
In this case, the trunk lid can be
opened pressing the trunk release
button on the trunk lid.
●If the spare electronic key is put in
the trunk with all the doors locked,
the key confinement prevention
function is activated so the trunk
Page 111 of 588
1113-2. Opening, closing and locking the doors
COROLLA_U
3
Before driving
can be opened. In order to pre-
vent theft, take all electronic keys
with you when leaving the vehicle.
●If the electronic key is put in the
trunk with all the doors locked, the
key may not be detected depend-
ing on the location of the key and
the surrounding radio wave condi-
tions. In this case, the key con-
finement prevention function
cannot be activated, causing the
doors to lock when the trunk is
closed. Make sure to check where
the key is before closing the trunk.
●The key confinement prevention
function cannot be activated if any
one of the doors is unlocked. In
this case, open the trunk using the
trunk opener.
■Internal trunk release lever
The trunk lid can be opened by pull-
ing up the glow-in-the-dark lever
located on the inside of the trunk lid.
The lever will continue to glow for
some time after the trunk lid is
closed.
■If the smart key system or the
wireless remote control does
not operate properly (if
equipped)
Replace the key battery with a new
one if it is depleted. ( P.458)
■Open door warning buzzer
P. 1 0 7
■Customization
Some functions can be customized.
( P.548)
*: If equipped
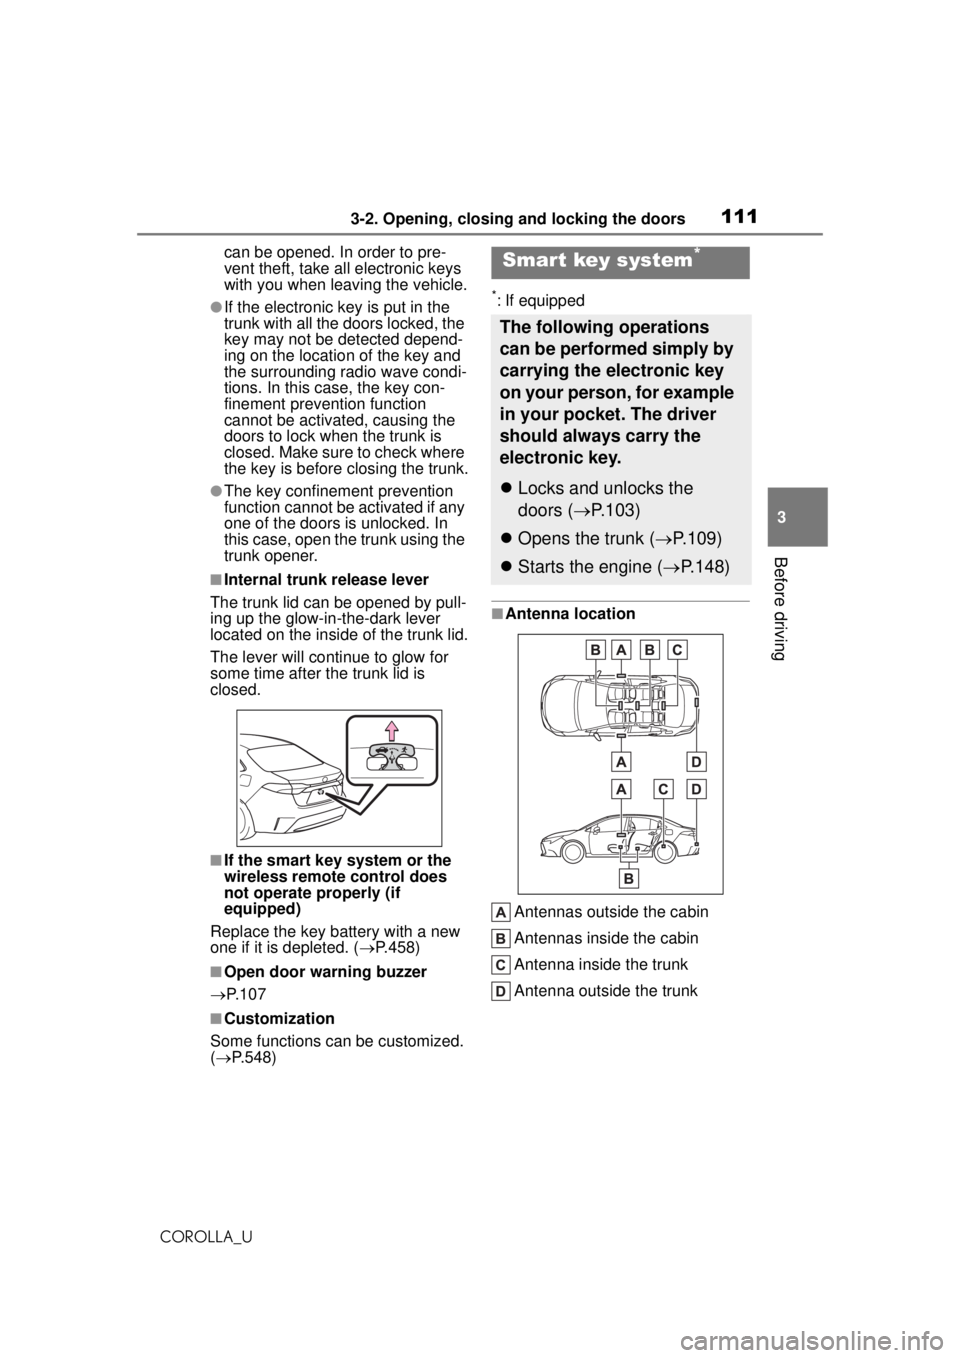
■Antenna location
Antennas outside the cabin
Antennas inside the cabin
Antenna inside the trunk
Antenna outside the trunk
Smart key system*
The following operations
can be performed simply by
carrying the electronic key
on your person, for example
in your pocket. The driver
should always carry the
electronic key.
Locks and unlocks the
doors ( P.103)
Opens the trunk ( P.109)
Starts the engine ( P.148)
Page 112 of 588
1123-2. Opening, closing and locking the doors
COROLLA_U
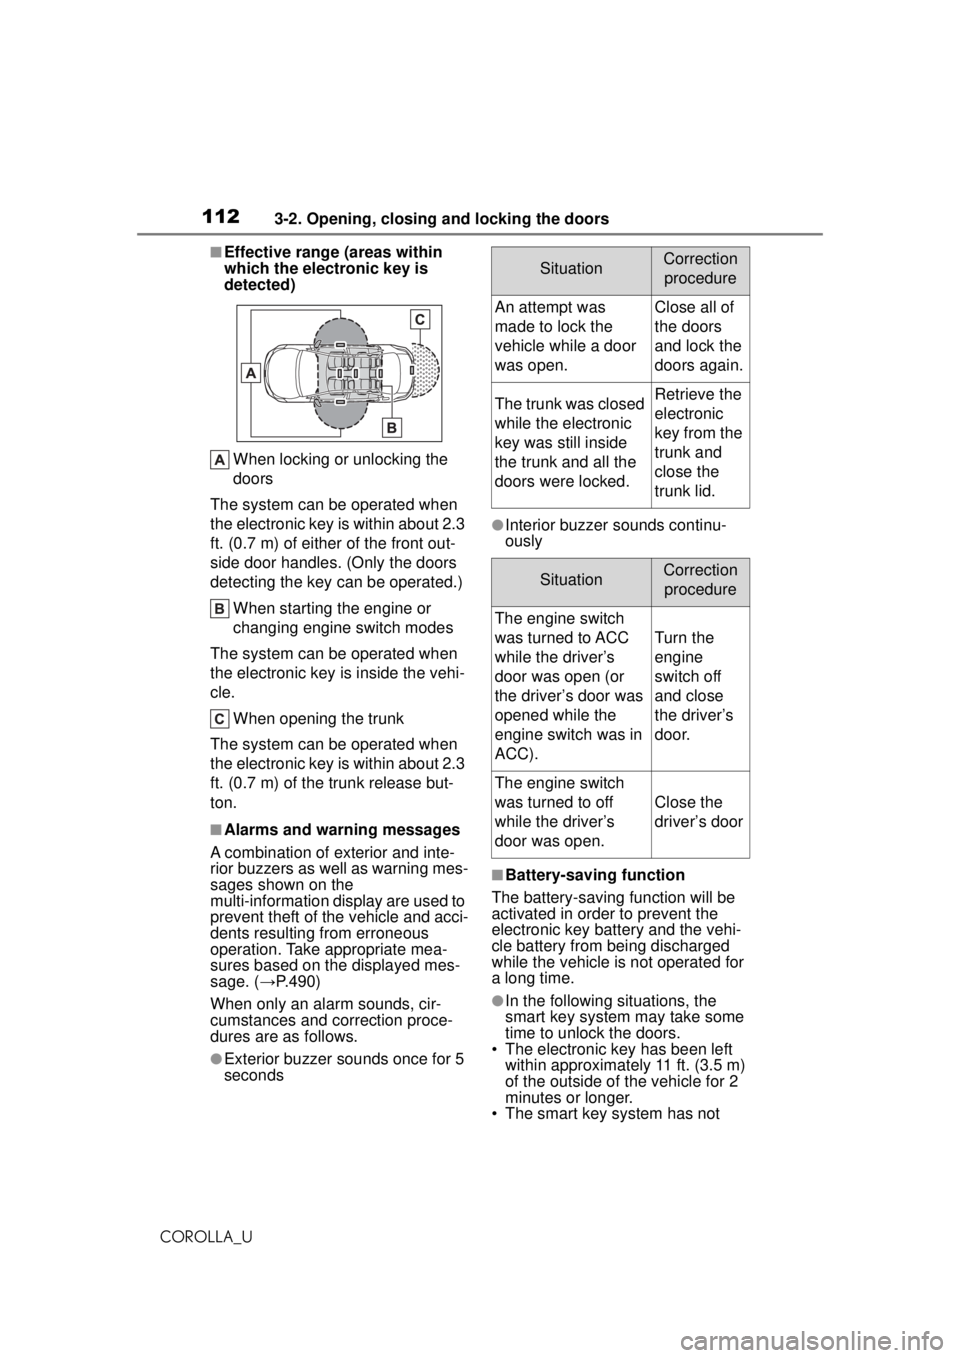
■Effective range (areas within
which the electronic key is
detected)When locking or unlocking the
doors
The system can be operated when
the electronic key is within about 2.3
ft. (0.7 m) of either of the front out-
side door handles. (Only the doors
detecting the key can be operated.)
When starting the engine or
changing engine switch modes
The system can be operated when
the electronic key is inside the vehi-
cle.
When opening the trunk
The system can be operated when
the electronic key is within about 2.3
ft. (0.7 m) of the trunk release but-
ton.
■Alarms and warning messages
A combination of exterior and inte-
rior buzzers as well as warning mes-
sages shown on the
multi-information di splay are used to
prevent theft of the vehicle and acci-
dents resulting from erroneous
operation. Take appropriate mea-
sures based on the displayed mes-
sage. ( →P.490)
When only an alarm sounds, cir-
cumstances and correction proce-
dures are as follows.
●Exterior buzzer sounds once for 5
seconds
●Interior buzzer sounds continu-
ously
■Battery-saving function
The battery-saving function will be
activated in order to prevent the
electronic key battery and the vehi-
cle battery from being discharged
while the vehicle is not operated for
a long time.
●In the following situations, the
smart key system may take some
time to unlock the doors.
• The electronic key has been left within approximately 11 ft. (3.5 m)
of the outside of the vehicle for 2
minutes or longer.
• The smart key system has not
SituationCorrection
procedure
An attempt was
made to lock the
vehicle while a door
was open.Close all of
the doors
and lock the
doors again.
The trunk was closed
while the electronic
key was still inside
the trunk and all the
doors were locked.Retrieve the
electronic
key from the
trunk and
close the
trunk lid.
SituationCorrection procedure
The engine switch
was turned to ACC
while the driver’s
door was open (or
the driver’s door was
opened while the
engine switch was in
ACC).
Turn the
engine
switch off
and close
the driver’s
door.
The engine switch
was turned to off
while the driver’s
door was open.
Close the
driver’s door
Page 120 of 588
1203-3. Adjusting the seats
COROLLA_U
WARNING
●Stop the vehicle on level
ground, set the parking brake
and shift the shift lever to P
(continuously variable transmis-
sion) or N (manual transmis-
sion).
●Do not allow anyone to sit on a
folded seatback or in the trunk
while driving.
●Do not allow children to enter
the trunk.
●Be careful not to get your hand
caught when folding the rear
seatbacks.
●Adjust the position of the front
seats before folding down the
rear seatbacks so that the front
seats do not interfere with the
rear seatbacks when folding
down the rear seatbacks.
■After returning the rear seat-
back to the upright position
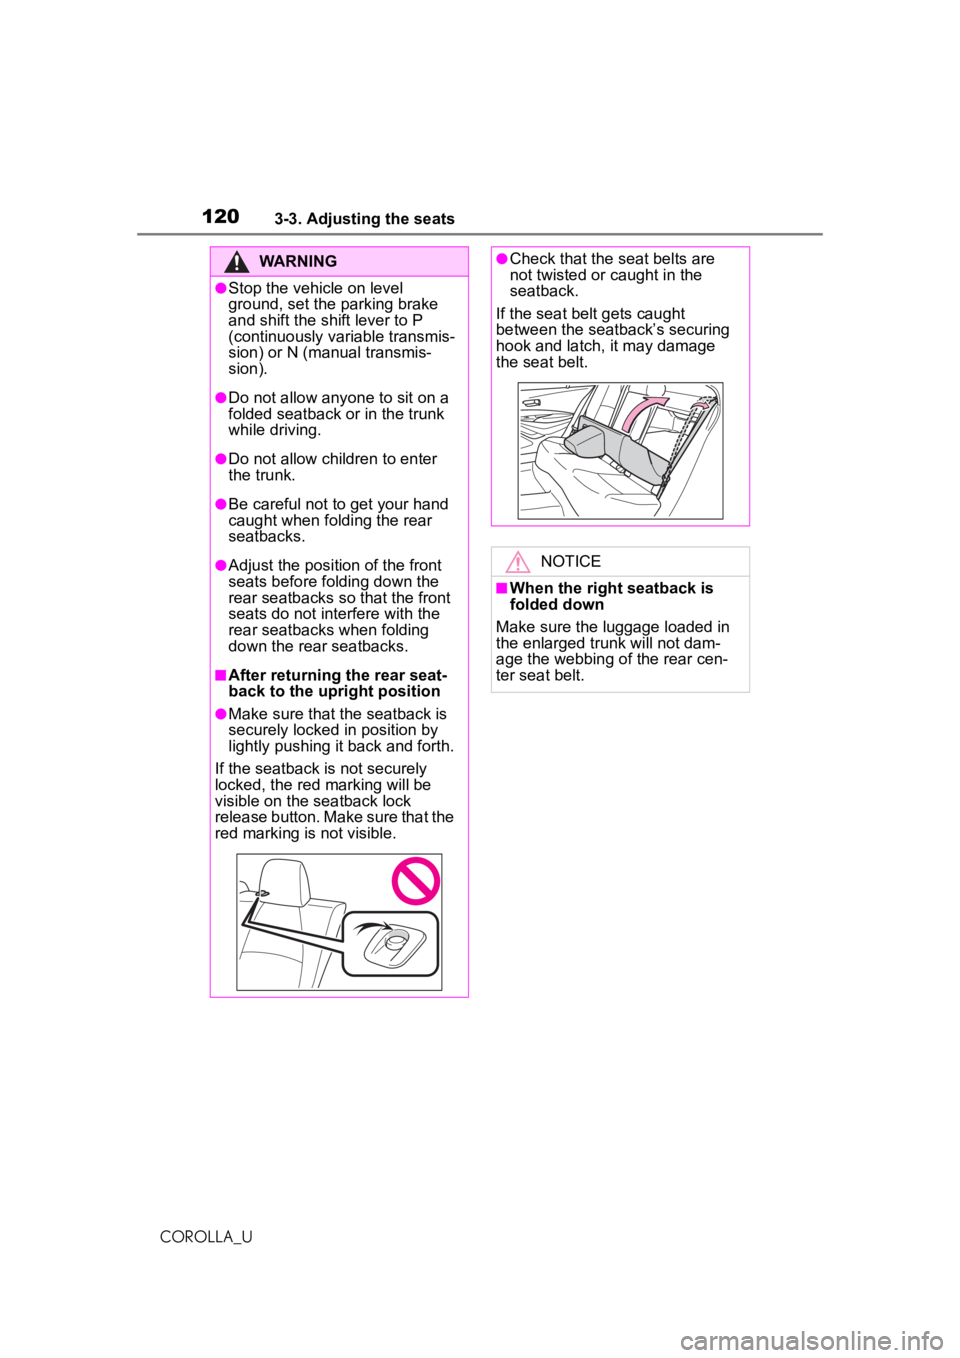
●Make sure that the seatback is
securely locked in position by
lightly pushing it back and forth.
If the seatback is not securely
locked, the red marking will be
visible on the seatback lock
release button. Make sure that the
red marking is not visible.
●Check that the seat belts are
not twisted or caught in the
seatback.
If the seat belt gets caught
between the seatback’s securing
hook and latch, it may damage
the seat belt.
NOTICE
■When the right seatback is
folded down
Make sure the luggage loaded in
the enlarged trunk will not dam-
age the webbing of the rear cen-
ter seat belt.
Page 478 of 588
4788-2. Steps to take in an emergency
COROLLA_U
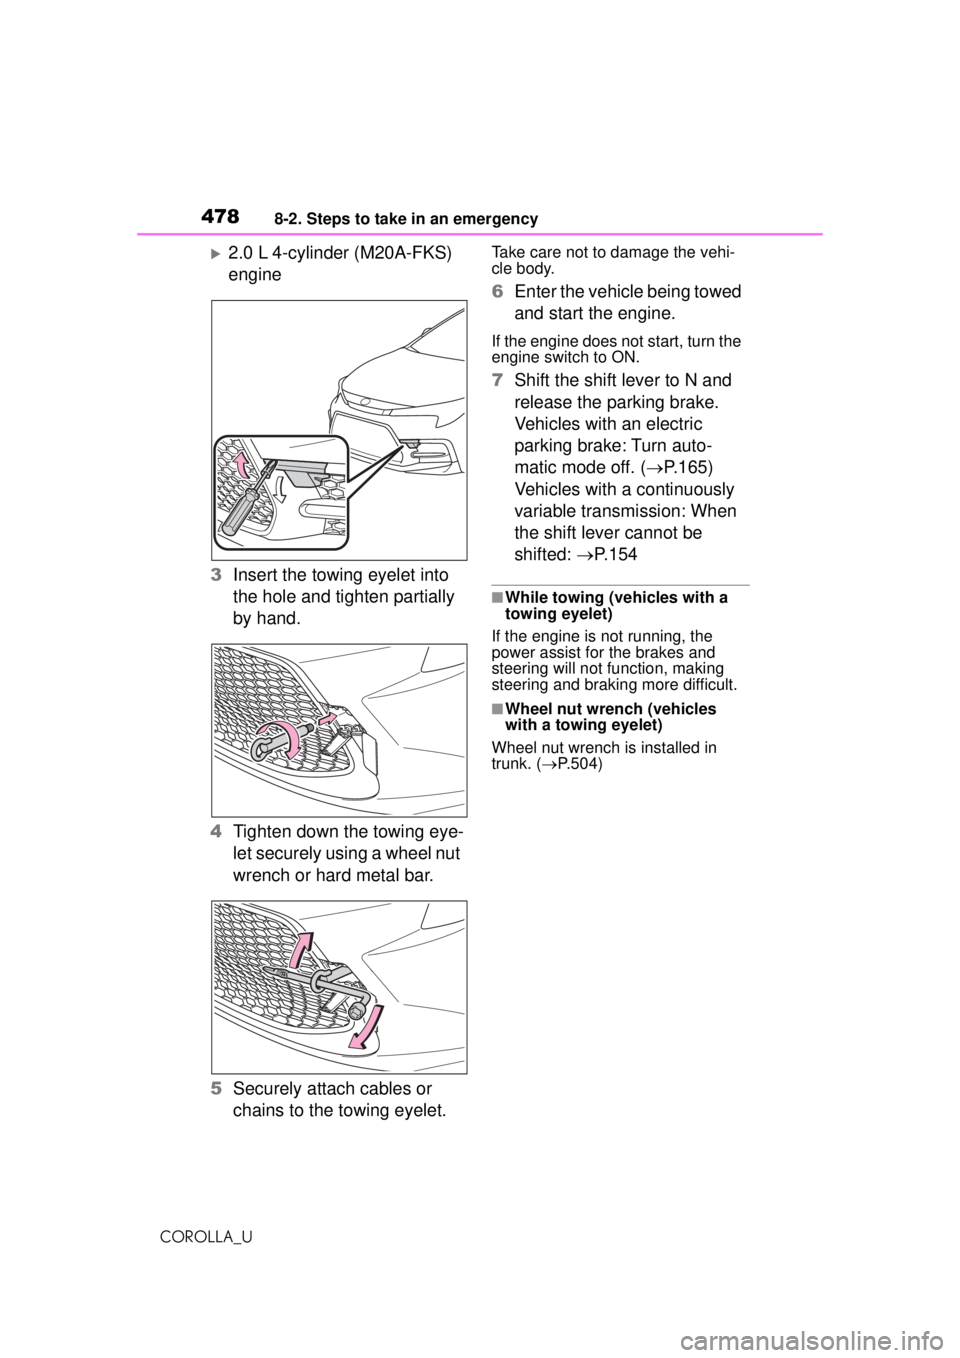
2.0 L 4-cylinder (M20A-FKS)
engine
3 Insert the towing eyelet into
the hole and tighten partially
by hand.
4 Tighten down the towing eye-
let securely using a wheel nut
wrench or hard metal bar.
5 Securely attach cables or
chains to the towing eyelet.Take care not to damage the vehi-
cle body.
6Enter the vehicle being towed
and start the engine.
If the engine does not start, turn the
engine switch to ON.
7Shift the shift lever to N and
release the parking brake.
Vehicles with an electric
parking brake: Turn auto-
matic mode off. ( P.165)
Vehicles with a continuously
variable transmission: When
the shift lever cannot be
shifted: P. 1 5 4
■While towing (v ehicles with a
towing eyelet)
If the engine is not running, the
power assist for the brakes and
steering will not function, making
steering and braking more difficult.
■Wheel nut wrench (vehicles
with a towing eyelet)
Wheel nut wrench is installed in
trunk. ( P.504)
Page 499 of 588
4998-2. Steps to take in an emergency
COROLLA_U
8
When trouble arises
to be repaired. Turn the compres-
sor switch off and contact your Toy-
ota dealer.
If the tire inflation pressure exceeds
the specified air pressure, let out
some air to adjust the tire inflation
pressure. ( P.500, 531)
15 With the compressor switch
off, disconnect the hose from
the valve on the tire and then
pull out the power plug from
the power outlet socket.
Some sealant may leak when the
hose is removed.
16 Install the valve cap onto the
valve of the emergency
repaired tire.
17 Attach the air release cap to
the end of the hose.
If the air release cap is not
attached, the sealant may leak and
the vehicle may get dirty.
18 Temporarily store the bottle
in the trunk while it is con-
nected to the compressor.
19 To spread the liquid sealant
evenly within the tire, imme-
diately drive safely for about
3 miles (5 km) below 50 mph
(80 km/h).
20 After driving, stop your vehi-
cle in a safe place on a hard, flat surface and reconnect
the repair kit.
Remove the air release cap from
the hose before reconnecting the
hose.
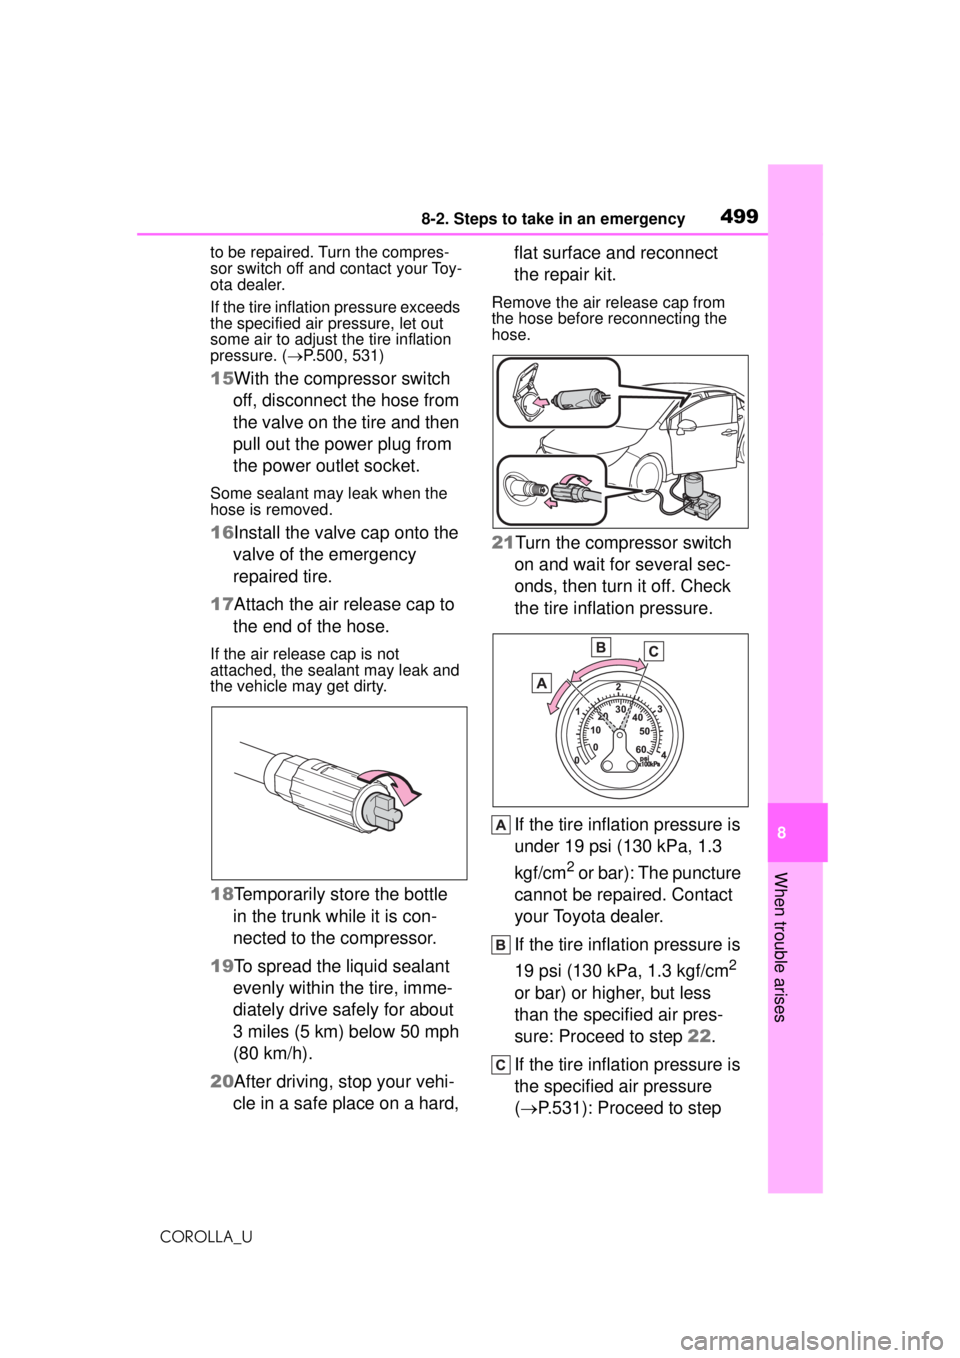
21Turn the compressor switch
on and wait for several sec-
onds, then turn it off. Check
the tire inflation pressure.
If the tire inflation pressure is
under 19 psi (130 kPa, 1.3
kgf/cm
2 or bar): The puncture
cannot be repaired. Contact
your Toyota dealer.
If the tire inflation pressure is
19 psi (130 kPa, 1.3 kgf/cm
2
or bar) or higher, but less
than the specified air pres-
sure: Proceed to step 22.
If the tire inflation pressure is
the specified air pressure
( P.531): Proceed to step
Page 500 of 588
5008-2. Steps to take in an emergency
COROLLA_U
23.
22 Turn the compressor switch
on to inflate the tire until the
specified air pressure is
reached. Drive for about 3
miles (5 km) and then per-
form step 20.
23 Attach the air release cap to
the end of the hose.
If the air release cap is not
attached, the sealant may leak and
the vehicle may get dirty.
24 Store the bottle in the trunk
while it is connected to the
compressor.
25 Taking precautions to avoid
sudden braking, sudden
acceleration and sharp turns,
drive carefully at under 50
mph (80 km/h) to the nearest
Toyota dealer that is less
than 62 miles (100 km) away
for tire repair or replacement.
When having the tire repaired or
replaced, make sure to tell the Toy-
ota dealer that the sealant is
injected.
■If the tire is inflated to more
than the specified air pressure
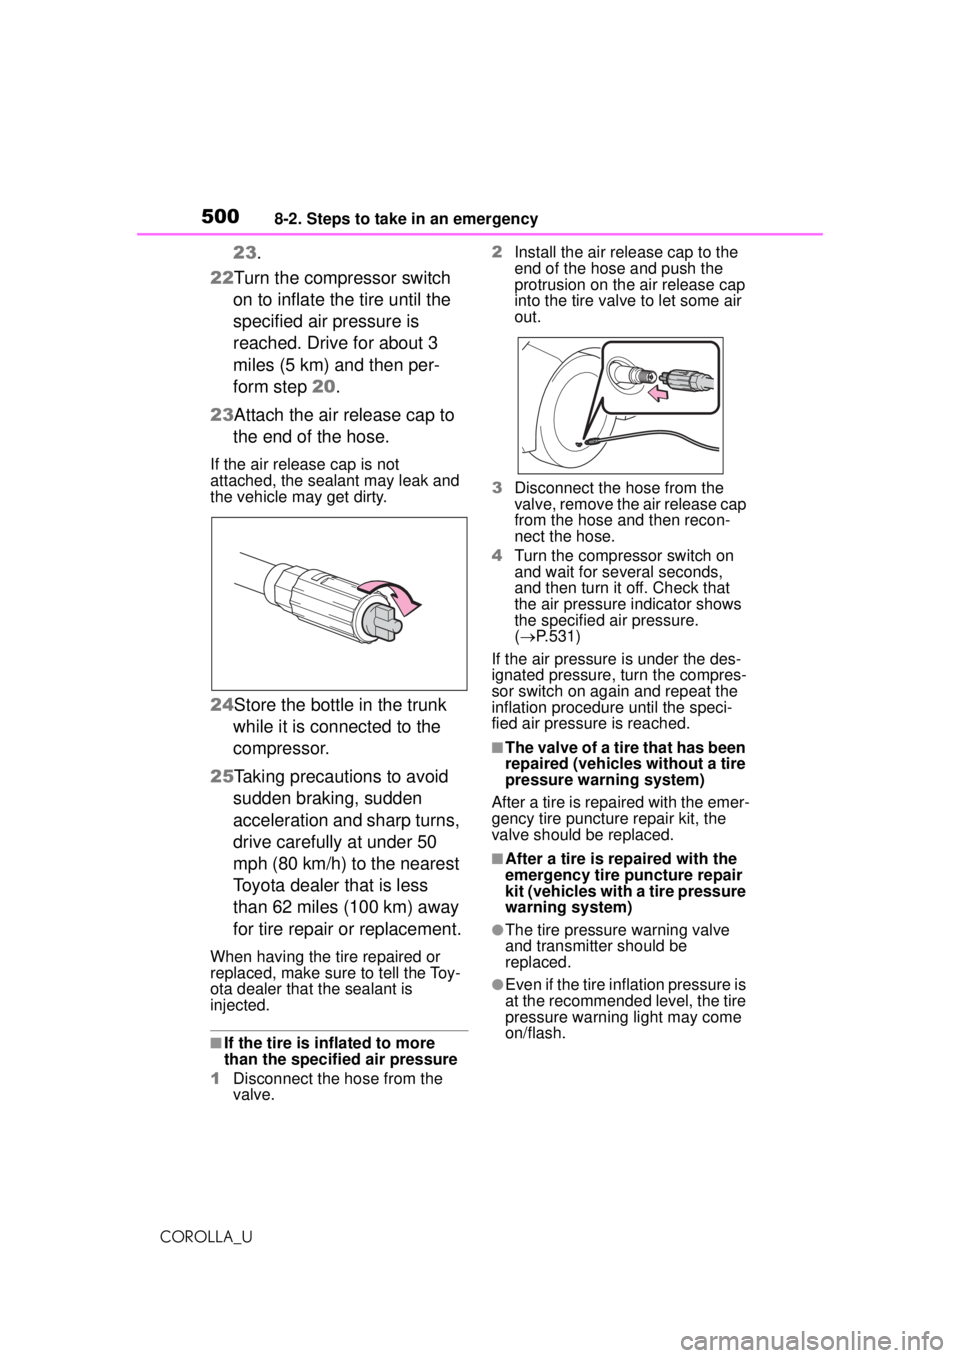
1 Disconnect the hose from the
valve. 2
Install the air release cap to the
end of the hose and push the
protrusion on the air release cap
into the tire valve to let some air
out.
3 Disconnect the hose from the
valve, remove the air release cap
from the hose and then recon-
nect the hose.
4 Turn the compress or switch on
and wait for se veral seconds,
and then turn it off. Check that
the air pressure indicator shows
the specified air pressure.
( P.531)
If the air pressure is under the des-
ignated pressure, turn the compres-
sor switch on again and repeat the
inflation procedure until the speci-
fied air pressure is reached.
■The valve of a tire that has been
repaired (vehicles without a tire
pressure warning system)
After a tire is repaired with the emer-
gency tire puncture repair kit, the
valve should be replaced.
■After a tire is repaired with the
emergency tire puncture repair
kit (vehicles with a tire pressure
warning system)
●The tire pressure warning valve
and transmitter should be
replaced.
●Even if the tire in flation pressure is
at the recommended level, the tire
pressure warning light may come
on/flash.
Page 577 of 588

5771-1. What to do if... (Troubleshooting)
COROLLA_U577Alphabetical Index
Power windows .................... 127
K
Keyless entry Smart key system................. 111
Wireless remote control ......... 98
Keys Battery-saving function......... 112
Electronic key ......................... 96
Engine switch ............... 147, 148
If the electronic key does not operate properly ................. 513
If you lose your keys ............ 513
Key number plate ................... 96
Keyless entry................ 103, 111
Mechanical key ...................... 96
Replacing the battery ........... 458
Warning buzzer .................... 112
Wireless remote control ......... 98
Knee airbags ............................. 29
L
Lane Departure Alert with steer- ing control (LDA)Operation ............................. 205
Warning messages............... 212
Lane Tracing Assist (LTA) Operation ............................. 195
Warning messages............... 204
Language (multi-information dis- play) ......................................... 90
LATCH anchors ........................ 56
LDA (Lane Departure Alert with steering control)Operation ............................. 205
Warning messages............... 212
LDA (Lane Departure Alert with steering control) switch ....... 209
LED accent lights Light switch .......................... 170
Replacing light bulbs ............ 465 Lever
Auxiliary catch le ver .............434
Hood lock releas e lever ........434
Internal trunk release lever ... 111
Shift lever .............153, 155, 160
Turn signal lever ...................162
Wiper lever ...........................176
License plate lights Light switch...........................170
Replacing light bulbs ............465
Wattage ................................533
Light bulbs Replacing .............................464
Lights Automatic High Beam system...........................................173
Front interior lights................398
Headlight switch ...................170
Interior lights .........................398
Interior lights list ...................398
Personal lights ......................399
Rear interior lights ................398
Replacing light bulbs ............465
Trunk light ............................. 110
Turn signal lever ...................162
Vanity lights ..........................412
Wattage ................................533
Linking multi-information display and the system .....................275
Lock steering column ....147, 149
LTA (Lane Tracing Assist) Operation..............................195
Warning messages ...............204
M
MaintenanceDo-it-yourself maintenance ..432
General maintenance ...........428
Maintenance data .................524
Maintenance requirements ...427
Malfunction indicator lamp ....482
Page 583 of 588

5831-1. What to do if... (Troubleshooting)
COROLLA_U583Alphabetical Index
Transmission Continuously variable transmis-sion............................. 153, 155
Driving mode select switch... 249
If the shift lever cannot be shifted from P......................... 154, 157
iMT ....................................... 161
M mode ................................ 158
Manual transmission ............ 160
Paddle shift switches.... 157, 158
Trip meters .......................... 78, 83
Trunk ....................................... 108 Internal trunk release lever... 111
Smart key system................. 109
Trunk light............................. 110
Trunk opener ........................ 109
Wireless remote control ....... 110
Trunk features ........................ 403
Trunk light ............................... 110 Wattage ................................ 533
Turn signal lights Replacing light bulbs ............ 465
Turn signal lever ................... 162
Wattage ................................ 533
U
USB charging port.................. 404
USB memory ........................... 311
USB/AUX port ......................... 304
V
Vanity lights ............................ 412Wattage ................................ 533
Vanity mirrors ......................... 412
Vehicle button (Setup screen) ....................................... 266, 300
Vehicle data recording ............... 7
Vehicle identification number524
Vehicle information display ..... 90 Vehicle settings ......................300
Displaying the vehicle settings screen.................................300
Valet mode setting ................301
Vehicle settings screen.........300
Vehicle Stability Control (VSC) ...............................................250
Voice button (Setup screen) 266, 299
Voice command sy stem .........336
Using the voice command sys- tem .....................................336
Voice command system opera- tion......................................337
Voice settings .........................299 Displaying the voice settings screen.................................299
Voice settings screen ...........299
VSC (Vehicle Stability Control) ...............................................250
W
Warning buzzers ABS ......................................483
Airbags .................................482
Approach warning ........219, 229
Brake hold ............................487
Brake Override System ........483
Brake system ........................481
Charging system ..................482
Downshifting .........................159
Drive-Start Control................483
Electric power steering .........484
Engine ..................................482
High coolant temperature .....481
Key reminder ........................148
LDA (Lane Departure Alert with steering control)..........205, 485
Low engine oil pressure .......482
LTA (Lane Tracing Assist) ...195, 485
Open door ....................105, 107