steering TOYOTA COROLLA 2021 (in English) User Guide
[x] Cancel search | Manufacturer: TOYOTA, Model Year: 2021, Model line: COROLLA, Model: TOYOTA COROLLA 2021Pages: 624, PDF Size: 20.3 MB
Page 39 of 624
391-1. For safe use
1
For safety and security
COROLLA_U
WA R N I N G
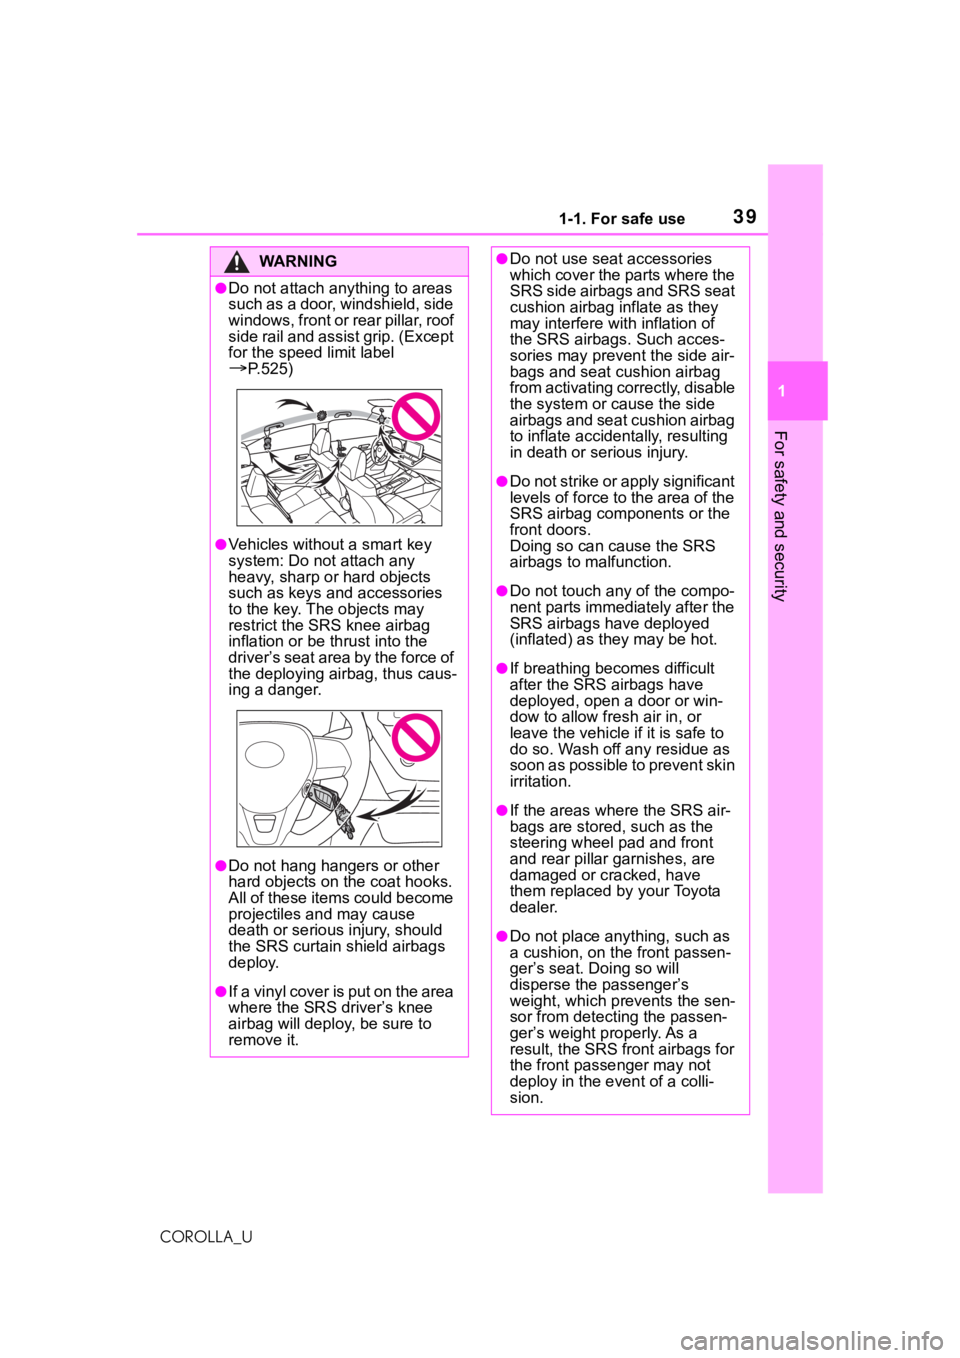
●Do not attach anything to areas
such as a door, windshield, side
windows, front or rear pillar, roof
side rail and assist grip. (Except
for the speed limit label
P.525)
●Vehicles without a smart key
system: Do not attach any
heavy, sharp or hard objects
such as keys and accessories
to the key. The objects may
restrict the SRS knee airbag
inflation or be thrust into the
driver’s seat area by the force of
the deploying airbag, thus caus-
ing a danger.
●Do not hang hangers or other
hard objects on the coat hooks.
All of these items could become
projectiles and may cause
death or serious injury, should
the SRS curtain shield airbags
deploy.
●I f a vin yl co ver is p u t on t he ar ea
where the SRS driver’s knee
airbag will deploy, be sure to
remove it.
●Do not use seat accessories
which cover the parts where the
SRS side airbags and SRS seat
cushion airbag inflate as they
may interfere with inflation of
the SRS airbags. Such acces-
sories may prevent the side air-
bags and seat cushion airbag
from activating correctly, disable
the system or cause the side
airbags and seat cushion airbag
to inflate accidentally, resulting
in death or se rious injury.
●Do not strike or apply significant
levels of force to the area of the
SRS airbag components or the
front doors.
Doing so can cause the SRS
airbags to malfunction.
●Do not touch any of the compo-
nent parts immediately after the
SRS airbags have deployed
(inflated) as they may be hot.
●If breathing becomes difficult
after the SRS airbags have
deployed, open a door or win-
dow to allow fresh air in, or
leave the vehicle if it is safe to
do so. Wash off any residue as
soon as possible to prevent skin
irritation.
●If the areas where the SRS air-
bags are stored, such as the
steering wheel pad and front
and rear pillar garnishes, are
damaged or cracked, have
them replaced by your Toyota
dealer.
●Do not place anything, such as
a cushion, on the front passen-
ger’s seat. Doing so will
disperse the passenger’s
weight, which prevents the sen-
sor from detecting the passen-
ger’s weight properly. As a
result, the SRS front airbags for
the front passenger may not
deploy in the event of a colli-
sion.
Page 40 of 624
401-1. For safe use
COROLLA_U
WA R N I N G
■Modification and disposal of
SRS airbag system compo-
nents
Do not dispose of your vehicle or
perform any of the following modi-
fications without consulting your
Toyota dealer. The SRS airbags
may malfunction or deploy
(inflate) accidentally, causing
death or serious injury.
●Installation, removal, disassem-
bly and repair of the SRS air-
bags
●Repairs, modifications, removal
or replacement of the steering
wheel, instrument panel, dash-
board, seats or seat upholstery,
front, side and rear pillars, roof
side rails, front door panels,
front door trims or front door
speakers
●Modifications to the front door
panel (such as making a hole in
it)
●Repairs or modifications of the
front fender, front bumper, or
side of the occ upant compart-
ment
●Installation of a grille guard (bull
bars, kangaroo bar, etc.), snow
plows, winches or roof luggage
carrier
●Modifications to the vehicle’s
suspension system
●Installation of electronic devices
such as mobile two-way radios
and CD players
●Modifications to your vehicle for
a person with a physical disabil-
ity
Page 87 of 624
872-1. Instrument cluster
2
Vehicle status information and indicators
COROLLA_U
7-inch display (when digital speedometer is displayed)
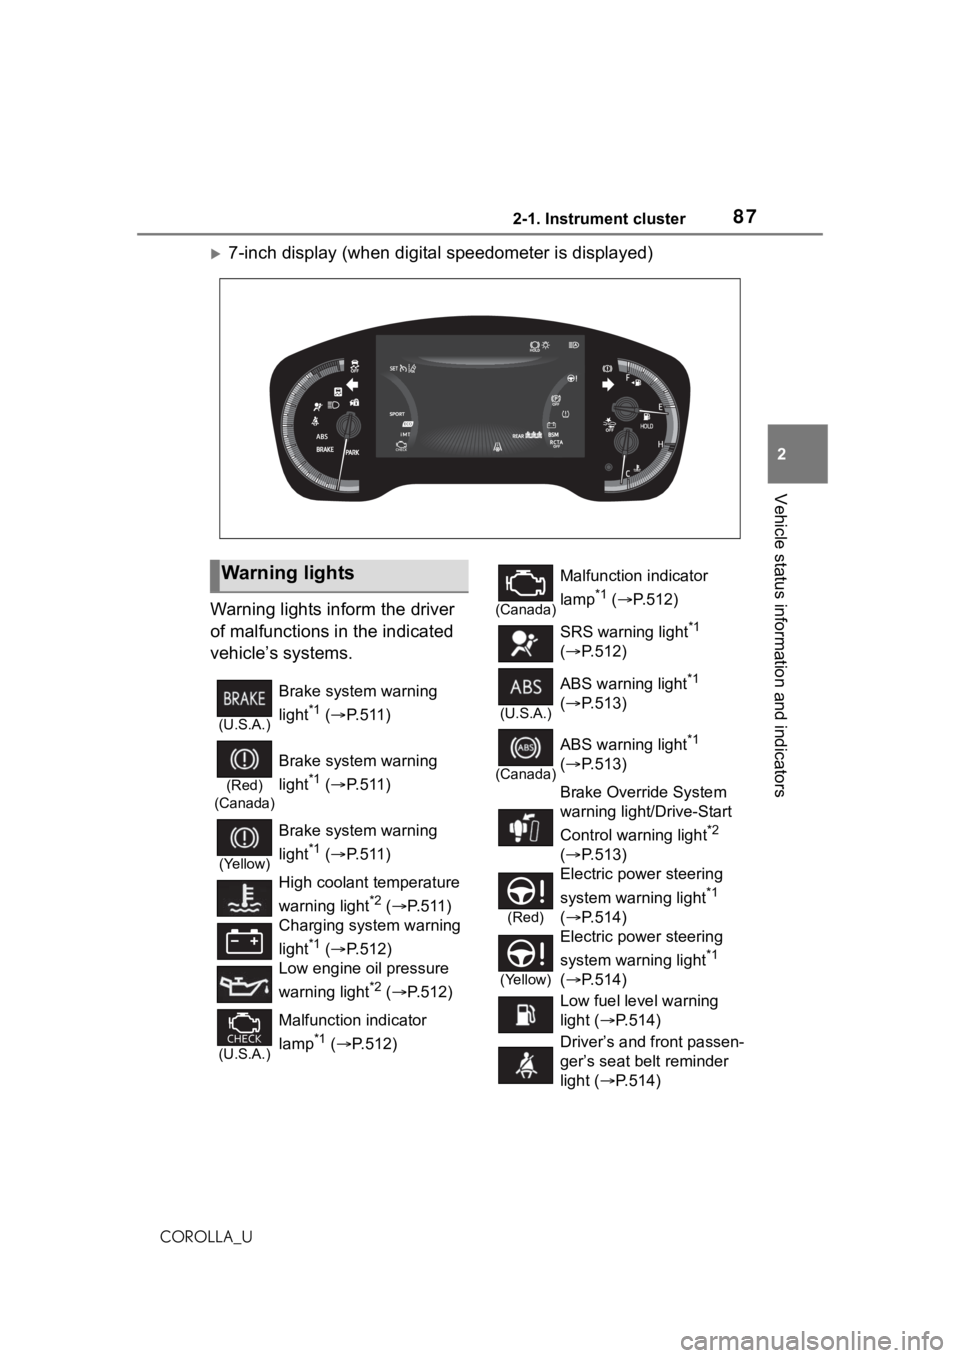
Warning lights inform the driver
of malfunctions in the indicated
vehicle’s systems.
Warning lights
(U.S.A.)
Brake system warning
light
*1 ( P.511)
(Red)
(Canada)
Brake system warning
light
*1 ( P.511)
(Yellow)
Brake system warning
light
*1 ( P.511)
High coolant temperature
warning light
*2 ( P.511)
Charging system warning
light
*1 ( P.512)
Low engine oil pressure
warning light
*2 ( P.512)
(U.S.A.)
Malfunction indicator
lamp
*1 ( P.512)
(Canada)
Malfunction indicator
lamp
*1 ( P.512)
SRS warning light
*1
( P.512)
(U.S.A.)
ABS warning light*1
( P.513)
(Canada)
ABS warning light*1
( P.513)
Brake Override System
warning light/Drive-Start
Control warning light
*2
( P.513)
(Red)
Electric power steering
system warning light
*1
( P.514)
(Yellow)
Electric power steering
system warning light
*1
( P.514)
Low fuel level warning
light ( P.514)
Driver’s and front passen-
ger’s seat belt reminder
light ( P.514)
Page 100 of 624
1002-1. Instrument cluster
COROLLA_U
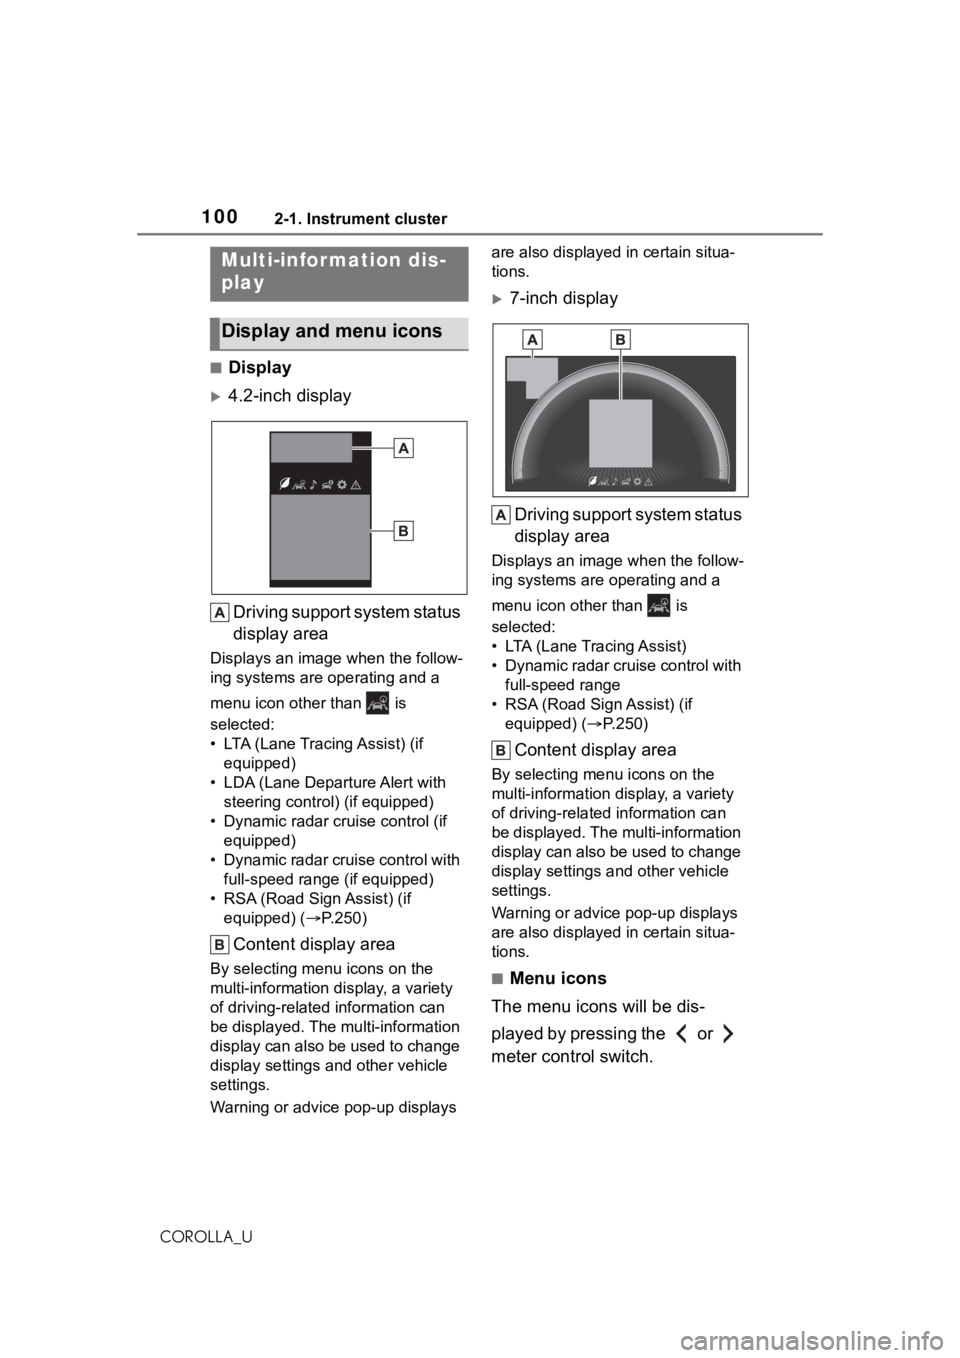
■Display
4.2-inch displayDriving support system status
display area
Displays an image when the follow-
ing systems are operating and a
menu icon other than is
selected:
• LTA (Lane Tracing Assist) (if equipped)
• LDA (Lane Depar ture Alert with
steering control) (if equipped)
• Dynamic radar cruise control (if equipped)
• Dynamic radar cruise control with full-speed range (if equipped)
• RSA (Road Sign Assist) (if equipped) ( P.250)
Content display area
By selecting menu icons on the
multi-information di splay, a variety
of driving-related information can
be displayed. The multi-information
display can also be used to change
display settings and other vehicle
settings.
Warning or advice pop-up displays are also displayed in certain situa-
tions.
7-inch display
Driving support system status
display area
Displays an image when the follow-
ing systems are operating and a
menu icon other than is
selected:
• LTA (Lane Tracing Assist)
• Dynamic radar cruise control with full-speed range
• RSA (Road Sign Assist) (if equipped) ( P.250)
Content display area
By selecting menu icons on the
multi-information di splay, a variety
of driving-related information can
be displayed. The multi-information
display can also be used to change
display settings and other vehicle
settings.
Warning or advice pop-up displays
are also displayed in certain situa-
tions.
■Menu icons
The menu icons will be dis-
played by pressing the or
meter control switch.
Multi-infor mation dis-
play
Display and menu icons
Page 103 of 624
1032-1. Instrument cluster
2
Vehicle status information and indicators
COROLLA_U
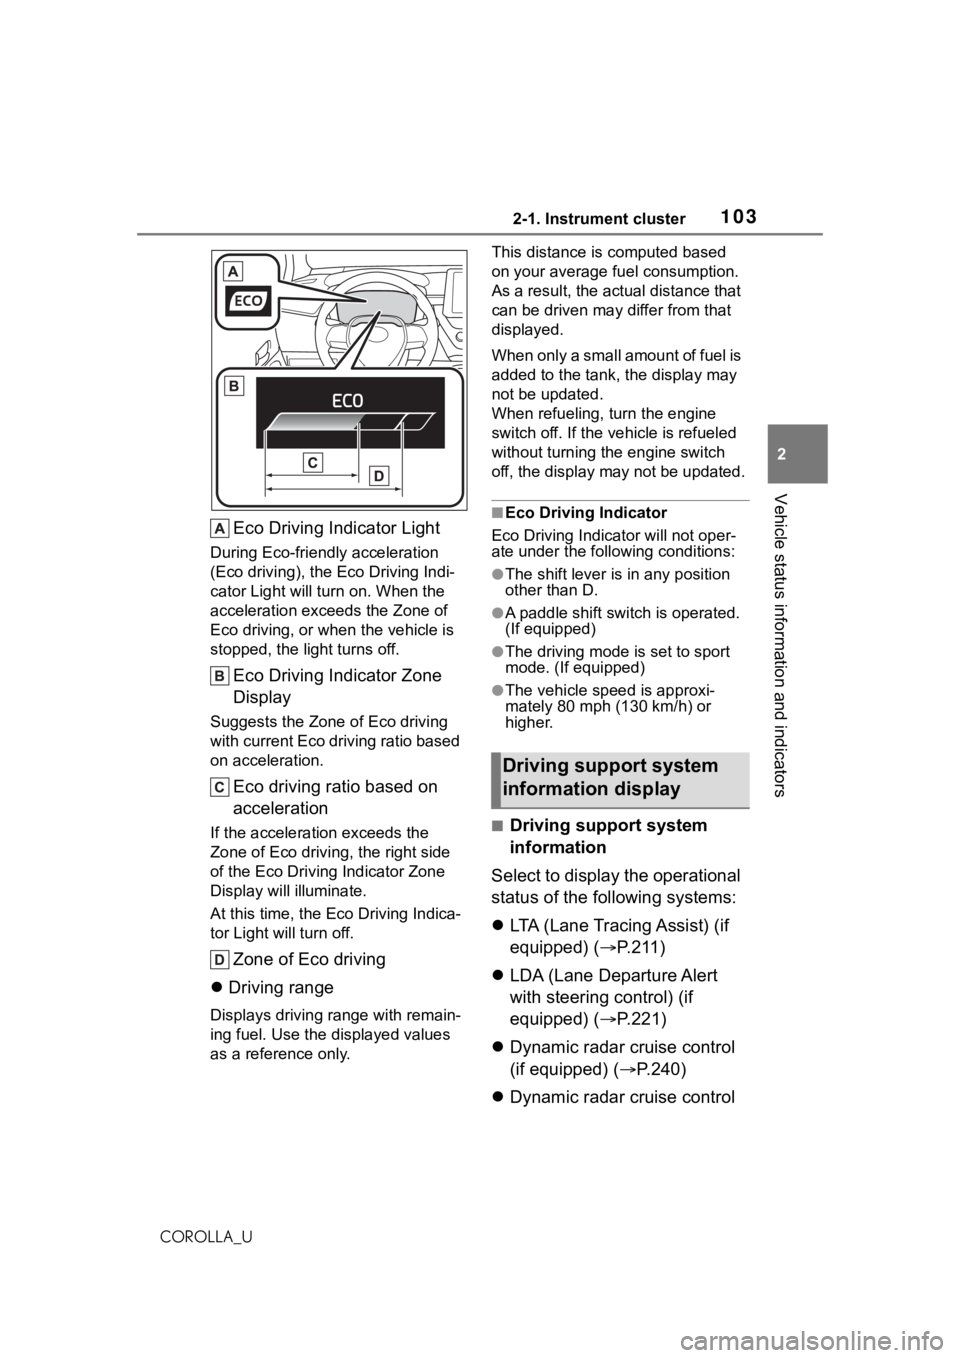
Eco Driving Indicator Light
During Eco-friendly acceleration
(Eco driving), the Eco Driving Indi-
cator Light will turn on. When the
acceleration exceeds the Zone of
Eco driving, or when the vehicle is
stopped, the light turns off.
Eco Driving Indicator Zone
Display
Suggests the Zone of Eco driving
with current Eco driving ratio based
on acceleration.
Eco driving ratio based on
acceleration
If the acceleration exceeds the
Zone of Eco driving, the right side
of the Eco Driving Indicator Zone
Display will illuminate.
At this time, the Eco Driving Indica-
tor Light will turn off.
Zone of Eco driving
Driving range
Displays driving range with remain-
ing fuel. Use the d isplayed values
as a reference only. This distance is computed based
on your average f
uel consumption.
As a result, the actual distance that
can be driven may differ from that
displayed.
When only a small amount of fuel is
added to the tank, the display may
not be updated.
When refueling, turn the engine
switch off. If the ve hicle is refueled
without turning the engine switch
off, the display may not be updated.
■Eco Driving Indicator
Eco Driving Indicator will not oper-
ate under the following conditions:
●The shift lever is in any position
other than D.
●A paddle shift switch is operated.
(If equipped)
●The driving mode is set to sport
mode. (If equipped)
●The vehicle spe ed is approxi-
mately 80 mph (130 km/h) or
higher.
■Driving support system
information
Select to display the operational
status of the following systems:
LTA (Lane Tracing Assist) (if
equipped) ( P.211)
LDA (Lane Departure Alert
with steering control) (if
equipped) ( P.221)
Dynamic radar cruise control
(if equipped) ( P.240)
Dynamic radar cruise control
Driving support system
information display
Page 109 of 624
109
3
3
Before driving
COROLLA_U
Before driving
.3-1. Key informationKeys ............................ 110
3-2. Opening, closing and locking the doors
Doors .......................... 117
Trunk ........................... 122
Smart key system ....... 125
3-3. Adjusting the seats Front seats .................. 133
Rear seats................... 134
Head restraints............ 136
3-4. Adjusting the steering wheel and mirrors
Steering wheel ............ 138
Inside rear view mirror .................................. 139
Outside rear view mirrors .................................. 140
3-5. Opening and closing the windows
Power windows ........... 142
Moon roof .................... 145
Page 138 of 624
1383-4. Adjusting the steering wheel and mirrors
COROLLA_U
3-4.Adjusting the steering wheel and mirrors
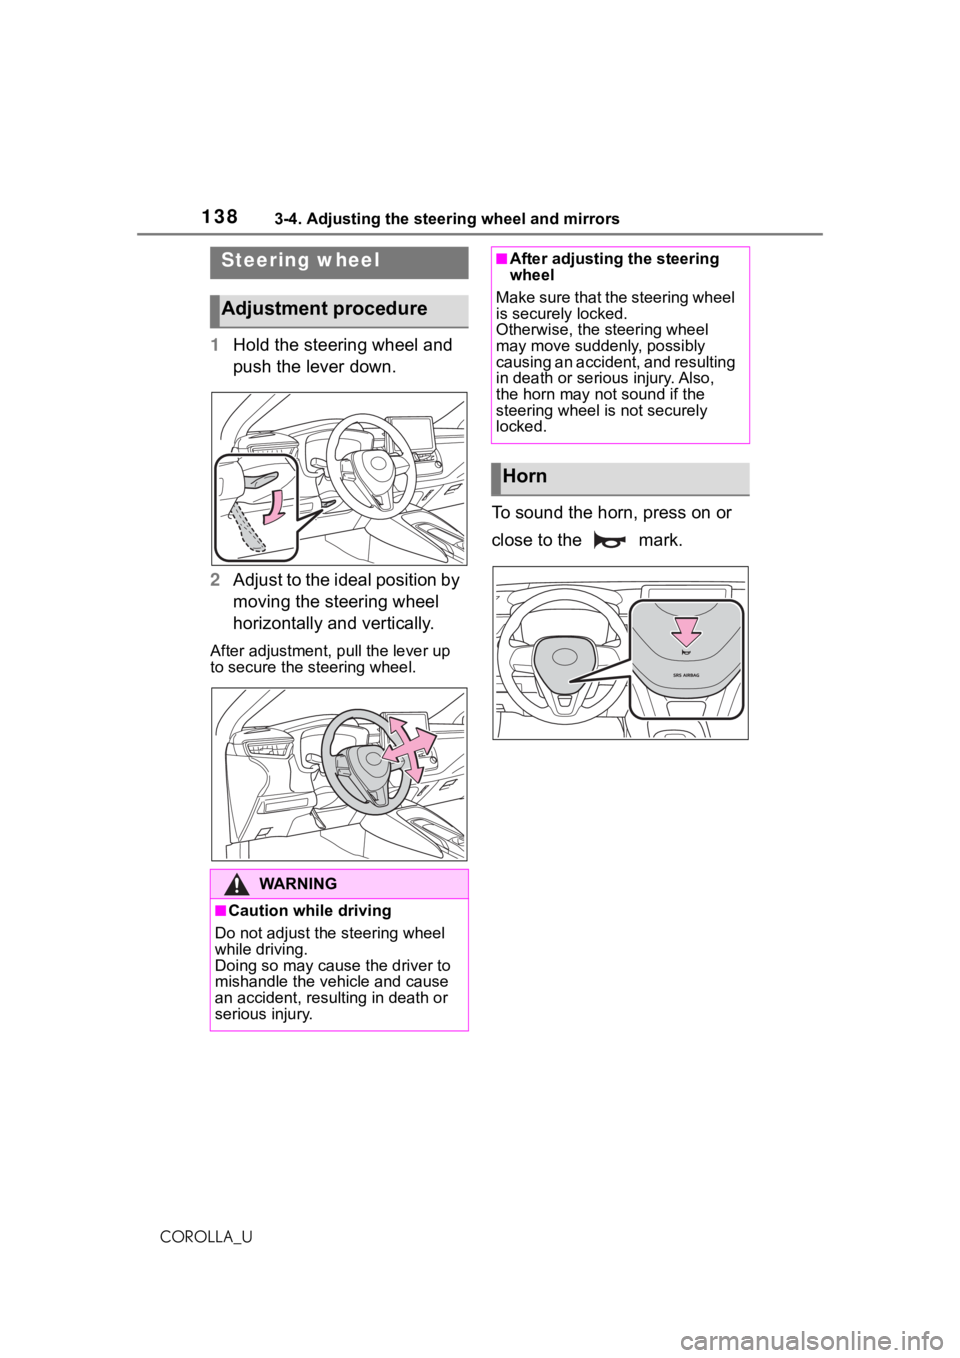
1Hold the steering wheel and
push the lever down.
2 Adjust to the ideal position by
moving the steering wheel
horizontally and vertically.
After adjustment, pull the lever up
to secure the steering wheel.
To sound the horn, press on or
close to the mark.
Steering wheel
Adjustment procedure
WA R N I N G
■Caution while driving
Do not adjust the steering wheel
while driving.
Doing so may cause the driver to
mishandle the vehicle and cause
an accident, resul ting in death or
serious injury.
■After adjusting the steering
wheel
Make sure that the steering wheel
is securely locked.
Otherwise, the steering wheel
may move suddenly, possibly
causing an accident, and resulting
in death or seriou s injury. Also,
the horn may not sound if the
steering wheel is not securely
locked.
Horn
Page 139 of 624
1393-4. Adjusting the steering wheel and mirrors
3
Before driving
COROLLA_U
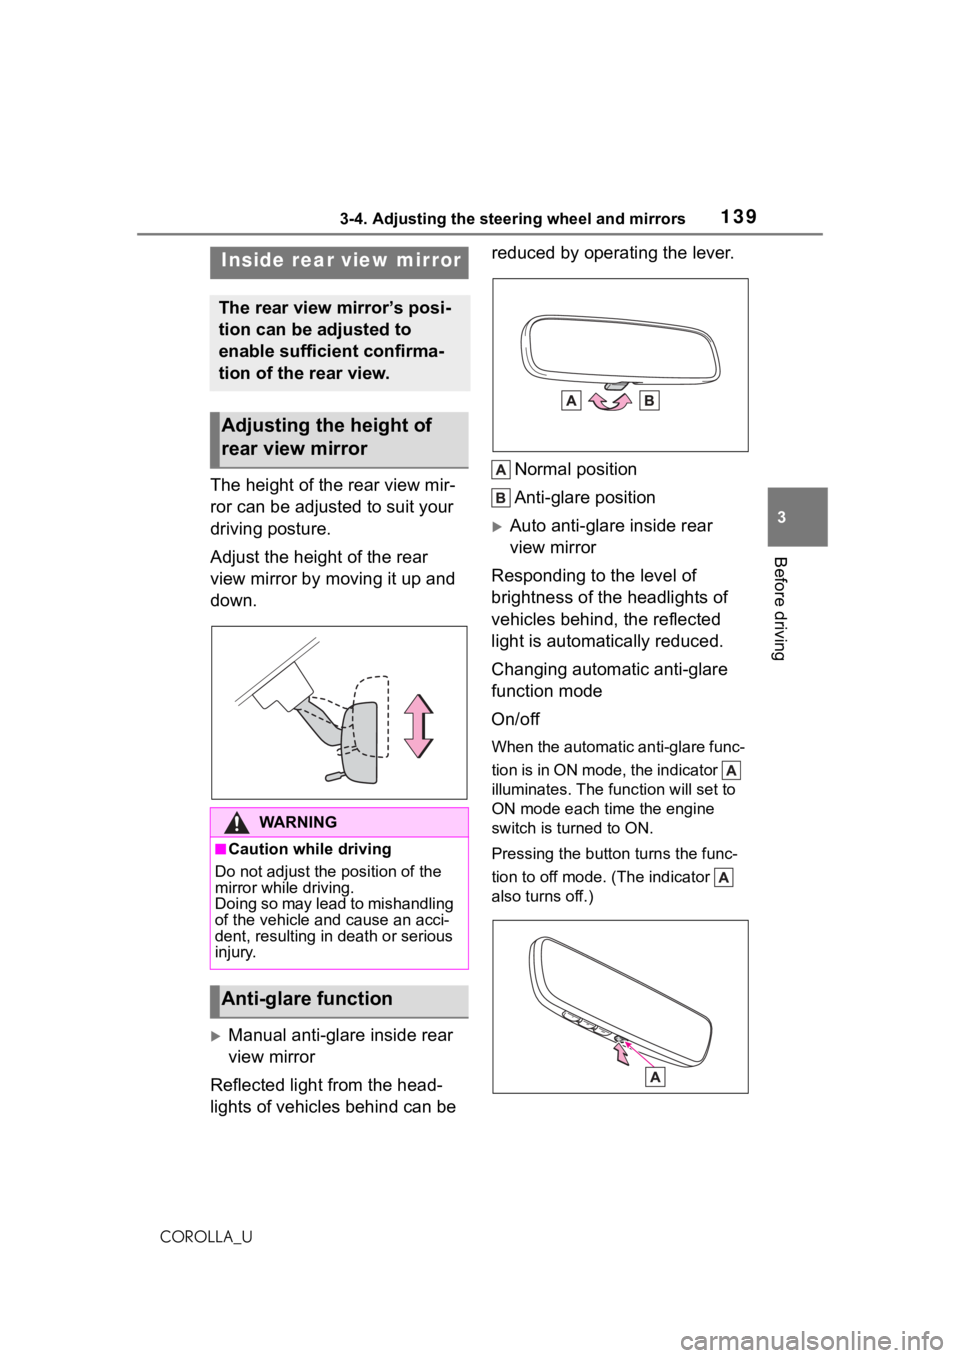
The height of the rear view mir-
ror can be adjusted to suit your
driving posture.
Adjust the height of the rear
view mirror by moving it up and
down.
Manual anti-glare inside rear
view mirror
Reflected light from the head-
lights of vehicles behind can be reduced by operating the lever.
Normal position
Anti-glare position
Auto anti-glare inside rear
view mirror
Responding to the level of
brightness of the headlights of
vehicles behind, the reflected
light is automatically reduced.
Changing automatic anti-glare
function mode
On/off
When the automatic anti-glare func-
tion is in ON mode, the indicator
illuminates. The func tion will set to
ON mode each time the engine
switch is turned to ON.
Pressing the button turns the func-
tion to off mode. (The indicator
also turns off.)
Inside rear view mirror
The rear view mirror’s posi-
tion can be adjusted to
enable sufficient confirma-
tion of the rear view.
Adjusting the height of
rear view mirror
WA R N I N G
■Caution while driving
Do not adjust the position of the
mirror while driving.
Doing so may lead to mishandling
of the vehicle and cause an acci-
dent, resulting in death or serious
injury.
Anti-glare function
Page 140 of 624
1403-4. Adjusting the steering wheel and mirrors
COROLLA_U
■To prevent sensor error (vehi-
cles with an auto anti-glare
inside rear view mirror)
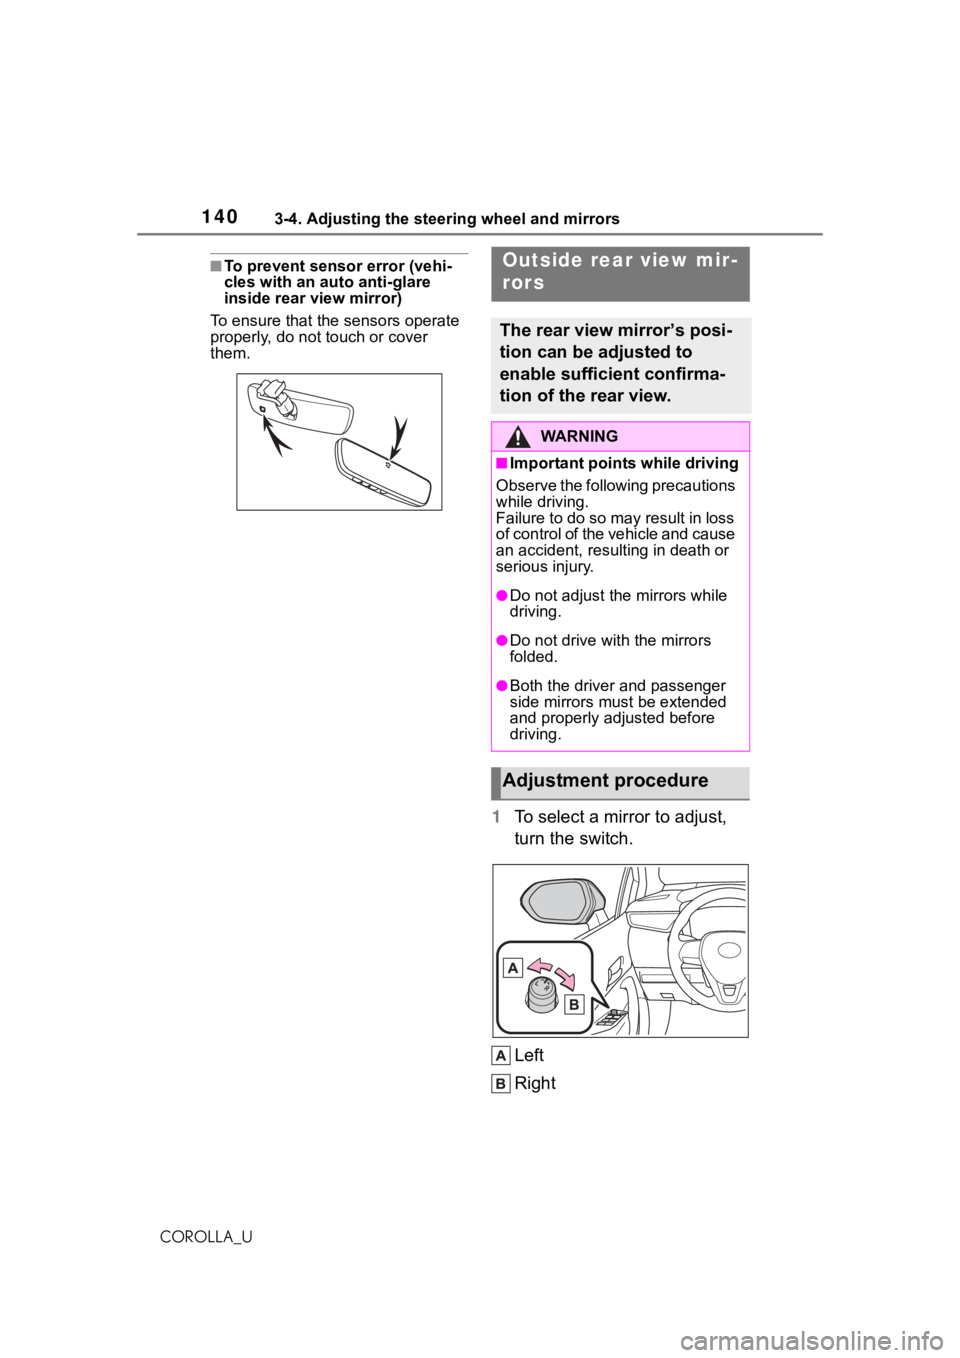
To ensure that the sensors operate
properly, do not touch or cover
them.
1 To select a mirror to adjust,
turn the switch.
Left
Right
Outside rear view mir-
rors
The rear view mirror’s posi-
tion can be adjusted to
enable sufficient confirma-
tion of the rear view.
WA R N I N G
■Important points while driving
Observe the following precautions
while driving.
Failure to do so may result in loss
o f c o n t r o l o f t h e v e h i c l e a n d c a u s e
an accident, resulting in death or
serious injury.
●Do not adjust th e mirrors while
driving.
●Do not drive wit h the mirrors
folded.
●Both the driver and passenger
side mirrors must be extended
and properly adjusted before
driving.
Adjustment procedure
Page 141 of 624
1413-4. Adjusting the steering wheel and mirrors
3
Before driving
COROLLA_U
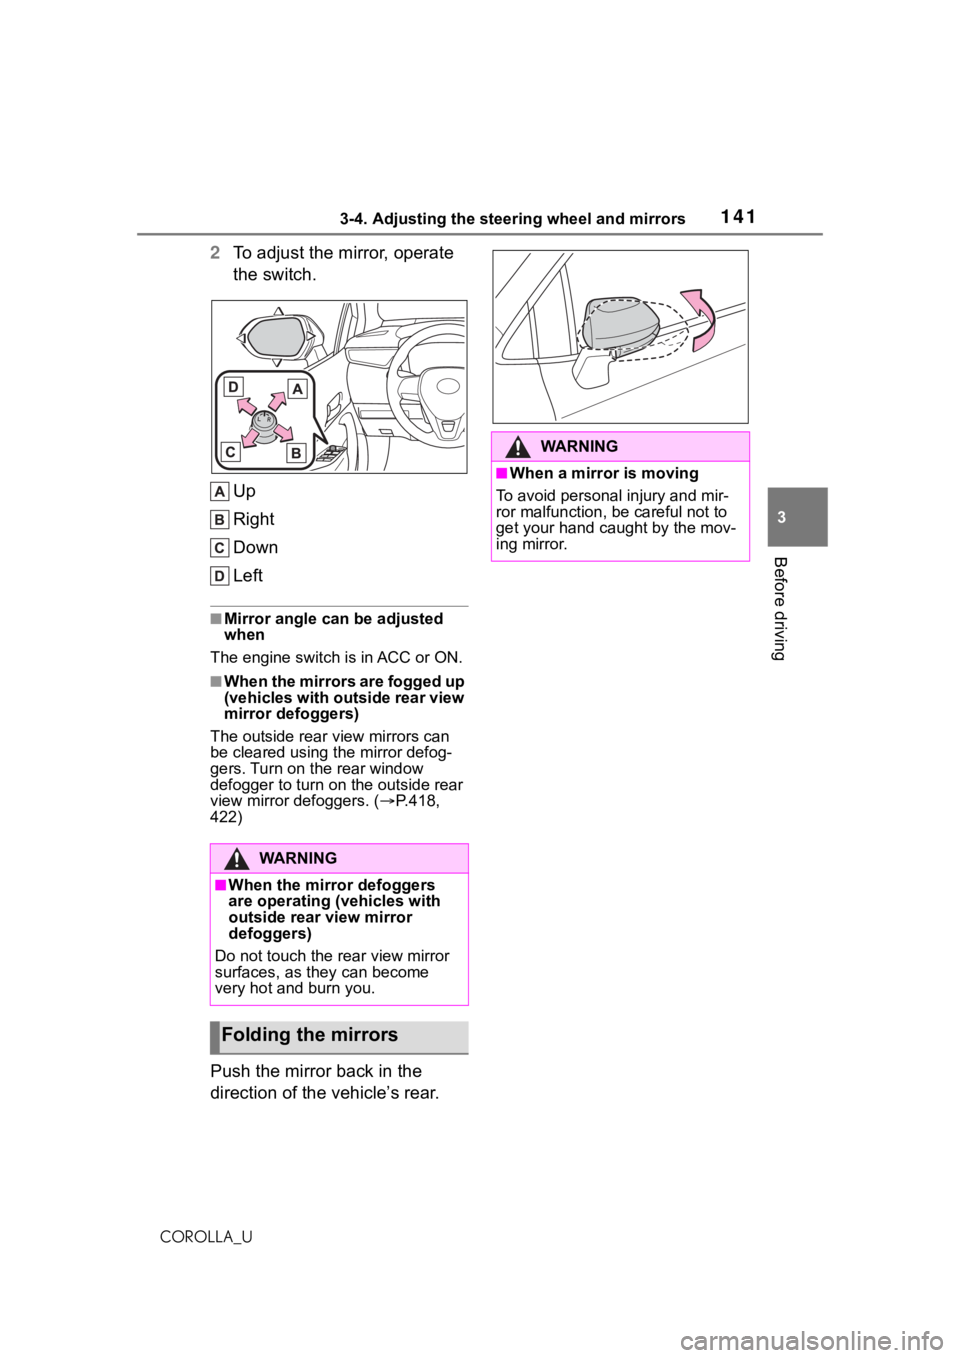
2To adjust the mirror, operate
the switch.
Up
Right
Down
Left
■Mirror angle can be adjusted
when
The engine switch is in ACC or ON.
■When the mirrors are fogged up
(vehicles with outside rear view
mirror defoggers)
The outside rear v iew mirrors can
be cleared using the mirror defog-
gers. Turn on the rear window
defogger to turn on the outside rear
view mirror defoggers. ( P.418,
422)
Push the mirror back in the
direction of the vehicle’s rear.
WA R N I N G
■When the mirror defoggers
are operating (vehicles with
outside rear view mirror
defoggers)
Do not touch the rear view mirror
surfaces, as they can become
very hot and burn you.
Folding the mirrors
WA R N I N G
■When a mirror is moving
To avoid personal injury and mir-
ror malfunction, be careful not to
get your hand caught by the mov-
ing mirror.