Engine TOYOTA COROLLA 2022 (in English) Manual PDF
[x] Cancel search | Manufacturer: TOYOTA, Model Year: 2022, Model line: COROLLA, Model: TOYOTA COROLLA 2022Pages: 678, PDF Size: 147.24 MB
Page 168 of 678
1664-2. Driving procedures
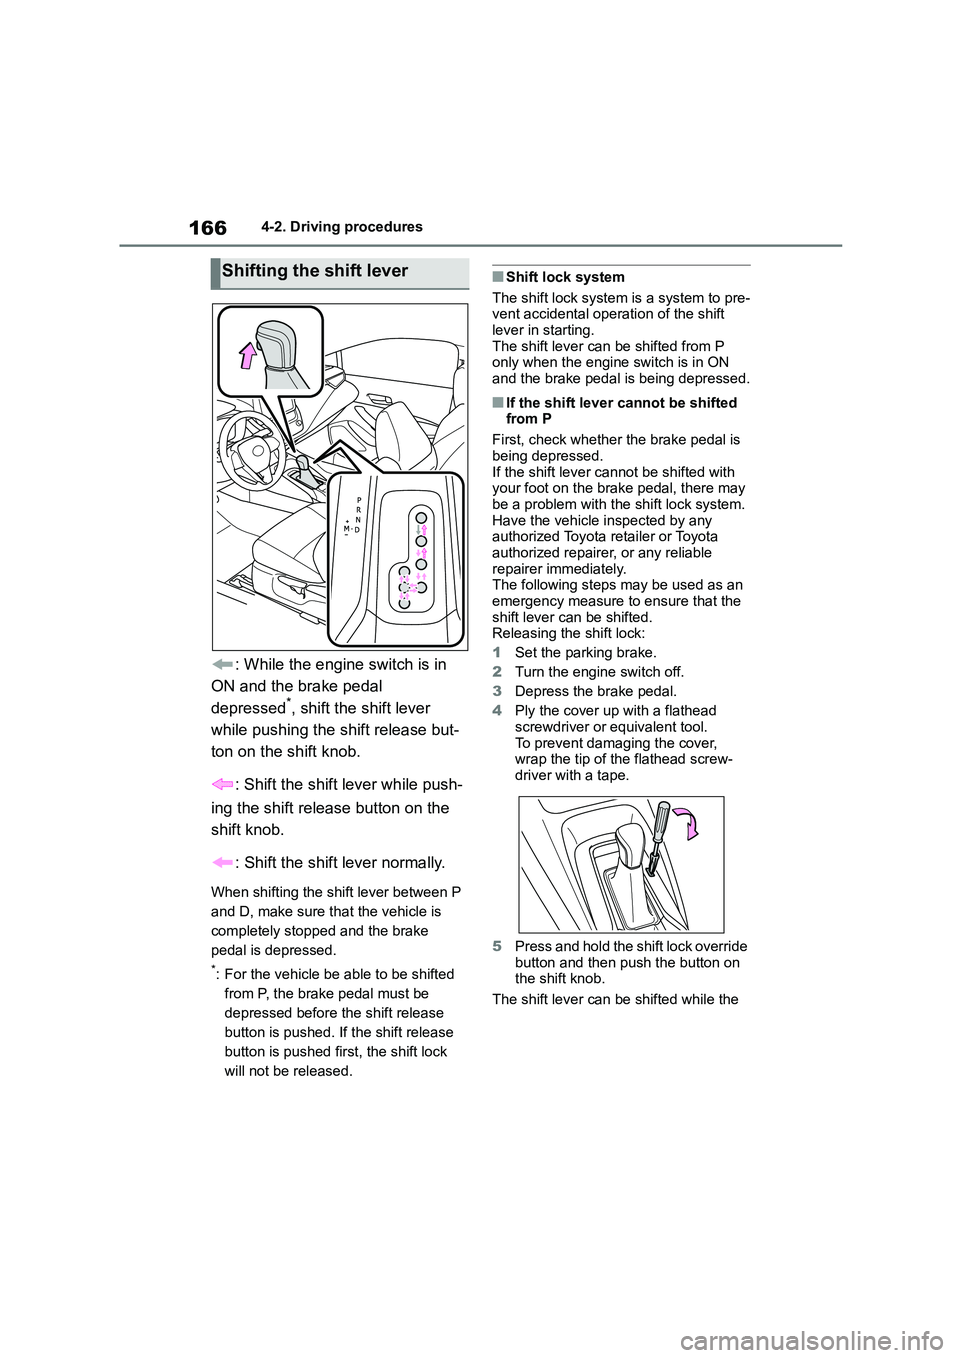
: While the engine switch is in
ON and the brake pedal
depressed*, shift the shift lever
while pushing the shift release but-
ton on the shift knob.
: Shift the shift lever while push-
ing the shift release button on the
shift knob.
: Shift the shift lever normally.
When shifting the shift lever between P
and D, make sure that the vehicle is
completely stopped and the brake
pedal is depressed.
*: For the vehicle be able to be shifted
from P, the brake pedal must be
depressed before the shift release
button is pushed. If the shift release
button is pushed first, the shift lock
will not be released.
■Shift lock system
The shift lock system is a system to pre-
vent accidental operation of the shift
lever in starting. The shift lever can be shifted from P
only when the engine switch is in ON
and the brake pedal is being depressed.
■If the shift lever cannot be shifted from P
First, check whether the brake pedal is
being depressed. If the shift lever cannot be shifted with
your foot on the brake pedal, there may
be a problem with the shift lock system. Have the vehicle inspected by any
authorized Toyota retailer or Toyota
authorized repairer, or any reliable repairer immediately.
The following steps may be used as an
emergency measure to ensure that the shift lever can be shifted.
Releasing the shift lock:
1 Set the parking brake.
2 Turn the engine switch off.
3 Depress the brake pedal.
4 Ply the cover up with a flathead
screwdriver or equivalent tool. To prevent damaging the cover,
wrap the tip of the flathead screw-
driver with a tape.
5 Press and hold the shift lock override
button and then push the button on
the shift knob.
The shift lever can be shifted while the
Shifting the shift lever
Page 169 of 678
167
4
4-2. Driving procedures
Driving
both buttons are pressed.
P. 3 1 4
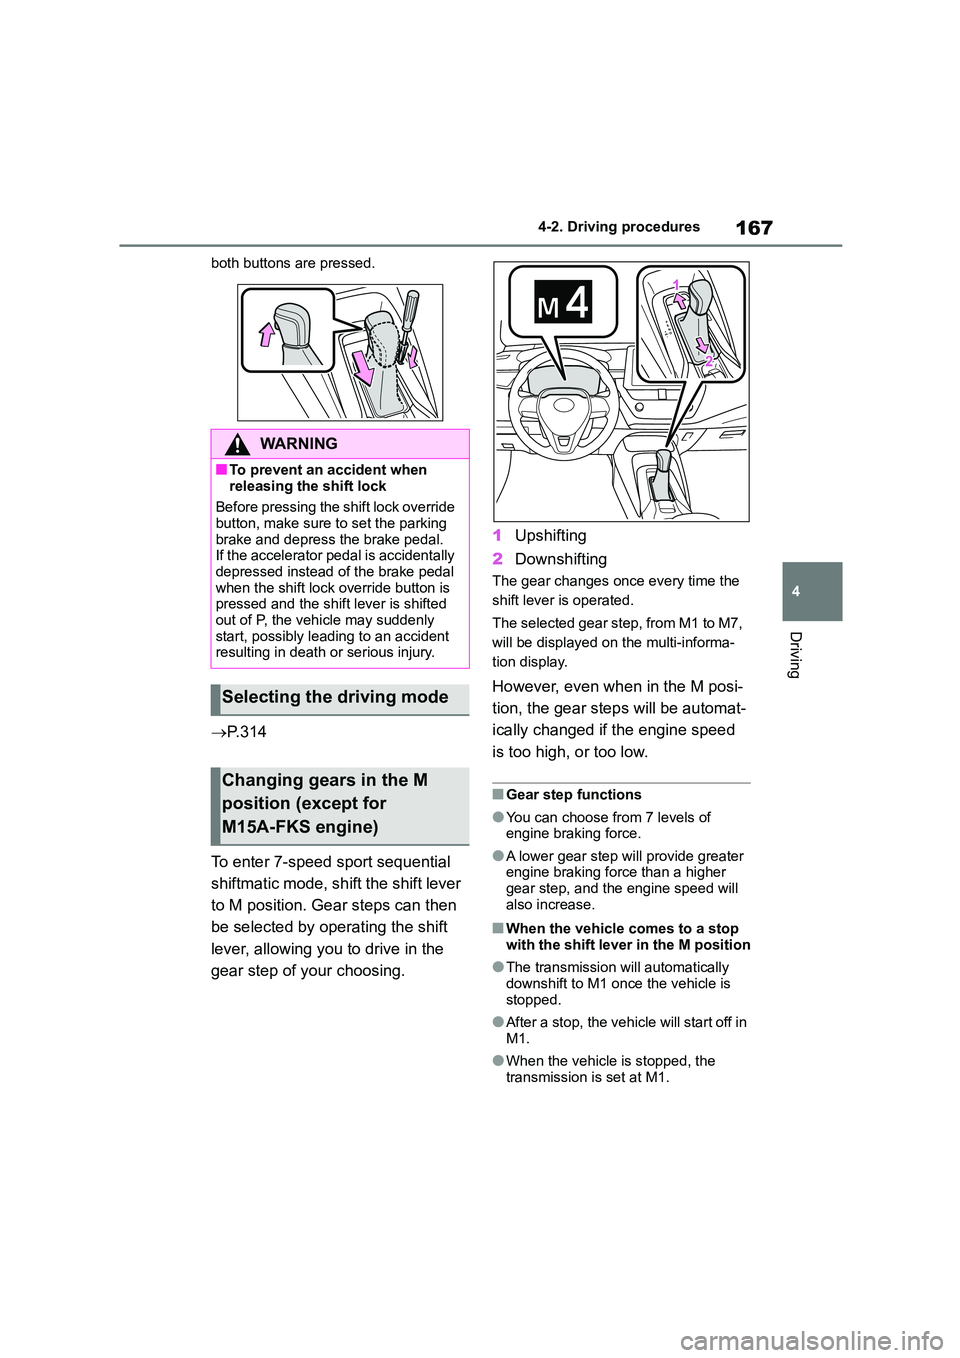
To enter 7-speed sport sequential
shiftmatic mode, sh ift the shift lever
to M position. Gear steps can then
be selected by operating the shift
lever, allowing you to drive in the
gear step of your choosing.
1 Upshifting
2 Downshifting
The gear changes once every time the
shift lever is operated.
The selected gear step, from M1 to M7,
will be displayed on the multi-informa-
tion display.
However, even when in the M posi-
tion, the gear steps will be automat-
ically changed if the engine speed
is too high, or too low.
■Gear step functions
●You can choose from 7 levels of
engine braking force.
●A lower gear step will provide greater
engine braking force than a higher
gear step, and the engine speed will also increase.
■When the vehicle comes to a stop
with the shift lever in the M position
●The transmission will automatically
downshift to M1 once the vehicle is
stopped.
●After a stop, the vehicle will start off in
M1.
●When the vehicle is stopped, the
transmission is set at M1.
WA R N I N G
■To prevent an accident when
releasing the shift lock
Before pressing the shift lock override
button, make sure to set the parking
brake and depress the brake pedal. If the accelerator pedal is accidentally
depressed instead of the brake pedal
when the shift lock override button is pressed and the shift lever is shifted
out of P, the vehicle may suddenly
start, possibly leading to an accident resulting in death or serious injury.
Selecting the driving mode
Changing gears in the M
position (except for
M15A-FKS engine)
Page 170 of 678
1684-2. Driving procedures
■Downshifting restriction warning
buzzer
To help ensure safety and driving perfor-
mance, downshifting operation may
sometimes be restri cted. In some cir- cumstances, downshifting may not be
possible even when the shift lever is
operated. (A buzzer will sound twice.)
■If the 7-speed sport sequential shiftmatic mode indicator does not
come on even after shifting the
shift lever to M
This may indicate a malfunction in the
Multidrive system. Have the vehicle
inspected by any authorized Toyota retailer or Toyota authorized repairer, or
any reliable repairer immediately.
(In this situation, the transmission will operate in the same manner as when
the shift lever is in D.)
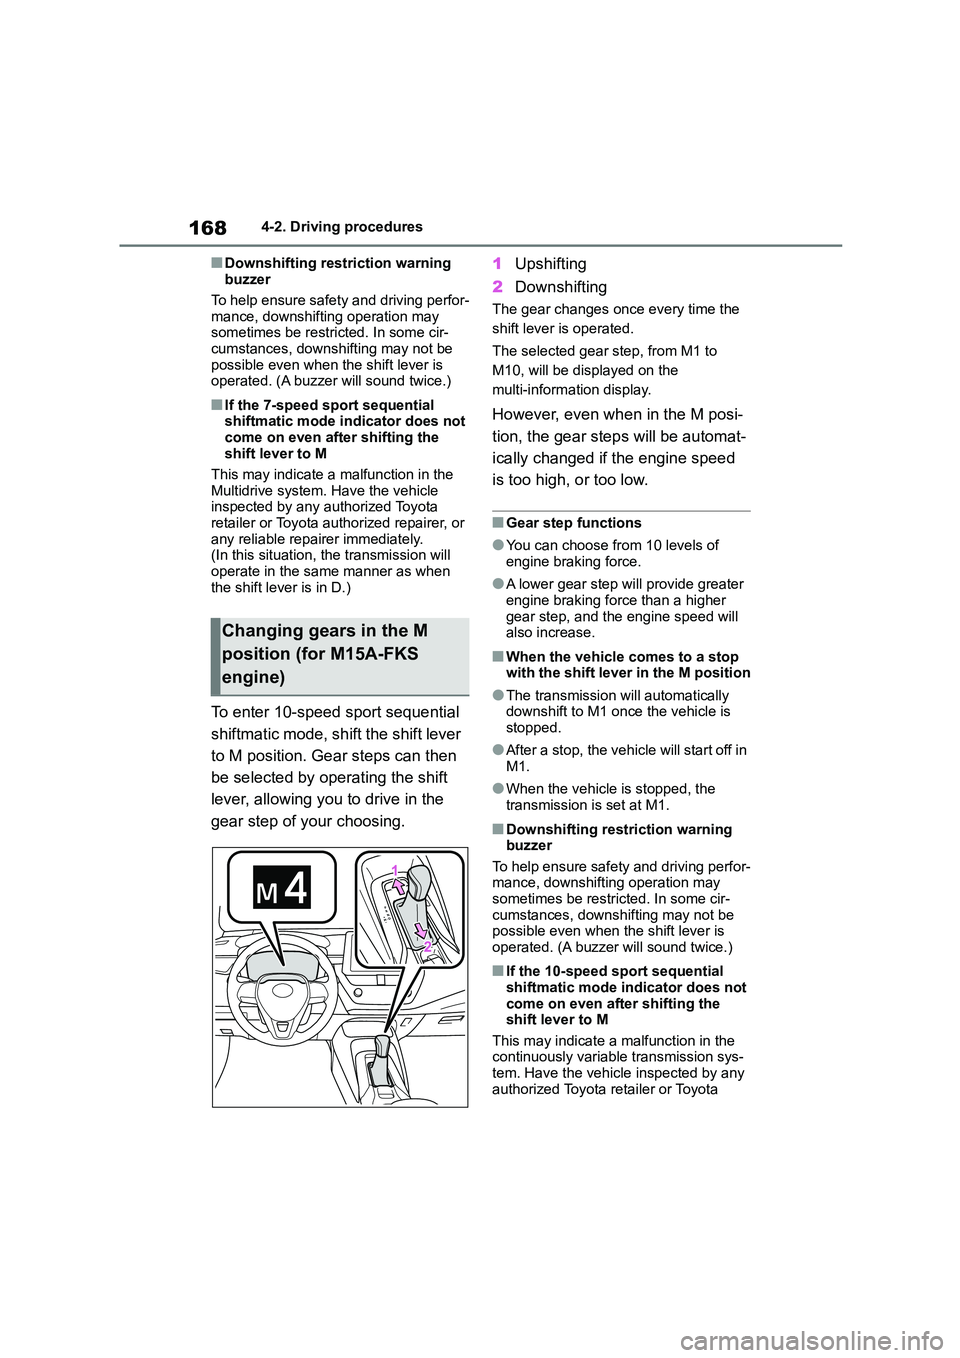
To enter 10-speed sport sequential
shiftmatic mode, sh ift the shift lever
to M position. Gear steps can then
be selected by operating the shift
lever, allowing you to drive in the
gear step of your choosing.
1 Upshifting
2 Downshifting
The gear changes once every time the
shift lever is operated.
The selected gear step, from M1 to
M10, will be displayed on the
multi-information display.
However, even when in the M posi-
tion, the gear steps will be automat-
ically changed if the engine speed
is too high, or too low.
■Gear step functions
●You can choose from 10 levels of engine braking force.
●A lower gear step will provide greater engine braking force than a higher
gear step, and the engine speed will
also increase.
■When the vehicle comes to a stop with the shift lever in the M position
●The transmission will automatically downshift to M1 once the vehicle is
stopped.
●After a stop, the vehicle will start off in
M1.
●When the vehicle is stopped, the
transmission is set at M1.
■Downshifting restriction warning
buzzer
To help ensure safety and driving perfor- mance, downshifting operation may
sometimes be restrict ed. In some cir-
cumstances, downshifting may not be possible even when the shift lever is
operated. (A buzzer will sound twice.)
■If the 10-speed sport sequential
shiftmatic mode indicator does not come on even after shifting the
shift lever to M
This may indicate a malfunction in the continuously variable transmission sys-
tem. Have the vehicle inspected by any
authorized Toyota retailer or Toyota
Changing gears in the M
position (for M15A-FKS
engine)
Page 172 of 678
1704-2. Driving procedures
■Maximum allowable speeds
Observe the following maximum allowa-
ble speeds in each gear when maximum
acceleration is necessary.
1ZR-FAE engine
M15A-FKS engine
The Gear Shift Indicator is a guide
to help the driver achieve improved
fuel economy and reduced exhaust
emissions within limits of engine
performance.
Shift positionMaximum speed
km/h (mph)
151 (31)
294 (58)
3137 (85)
4185 (115)
Shift positionMaximum speed
km/h (mph)
149 (30)
285 (53)
3125 (76)
4169 (105)
5213 (132)
6249 (155)
NOTICE
■To prevent damage to the vehicle
When shifting gears, observe the fol-
lowing precautions. Failure to do so may cause damage to the engine,
manual transmission, and/or clutch.
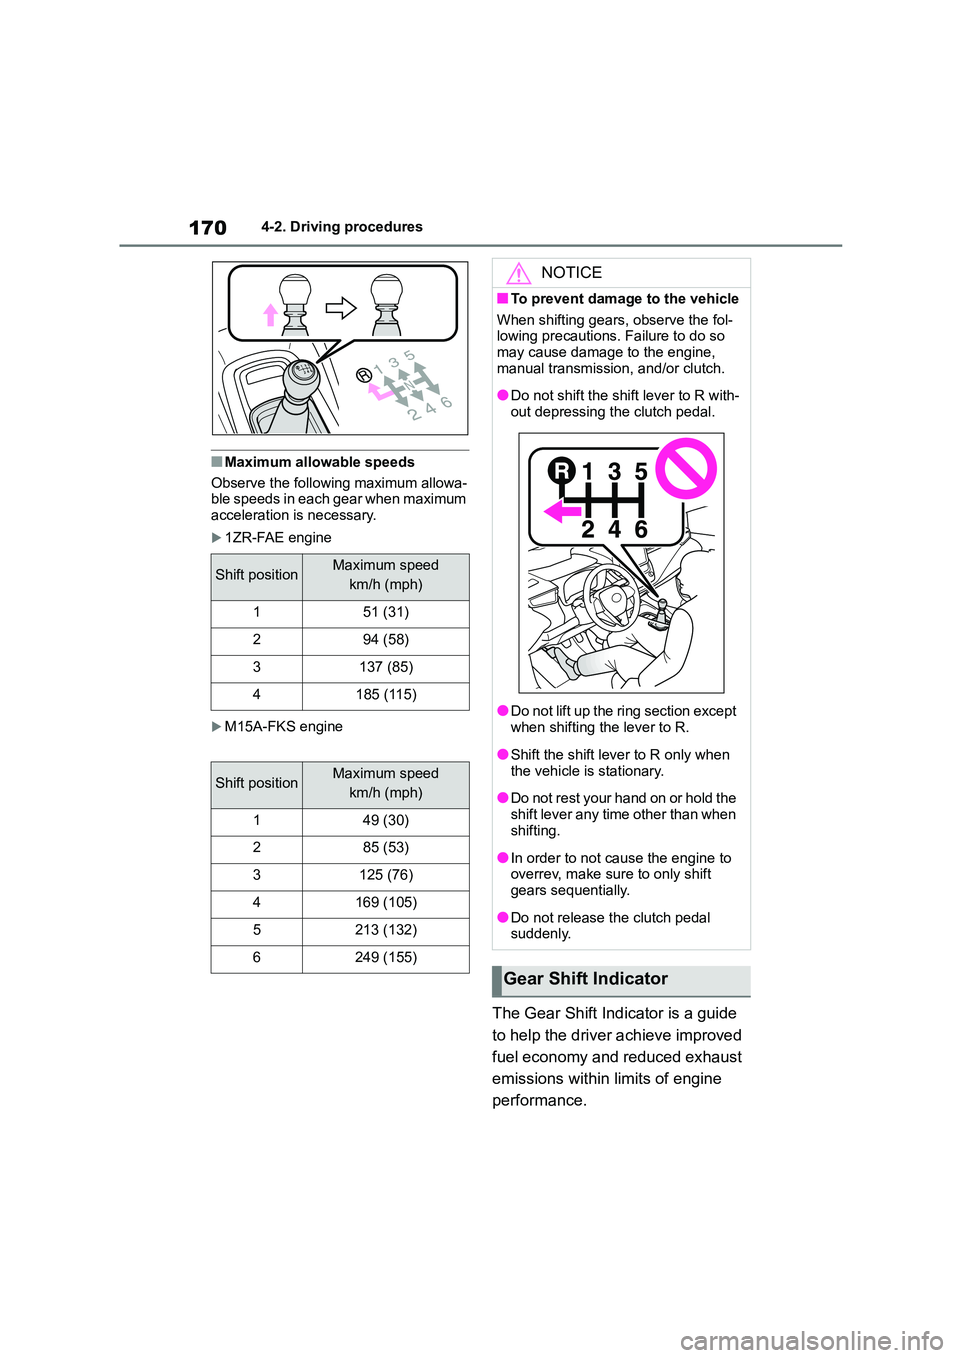
●Do not shift the shift lever to R with-
out depressing the clutch pedal.
●Do not lift up the ring section except
when shifting the lever to R.
●Shift the shift lever to R only when
the vehicle is stationary.
●Do not rest your hand on or hold the
shift lever any time other than when
shifting.
●In order to not cause the engine to
overrev, make sure to only shift gears sequentially.
●Do not release the clutch pedal suddenly.
Gear Shift Indicator
Page 173 of 678
171
4
4-2. Driving procedures
Driving
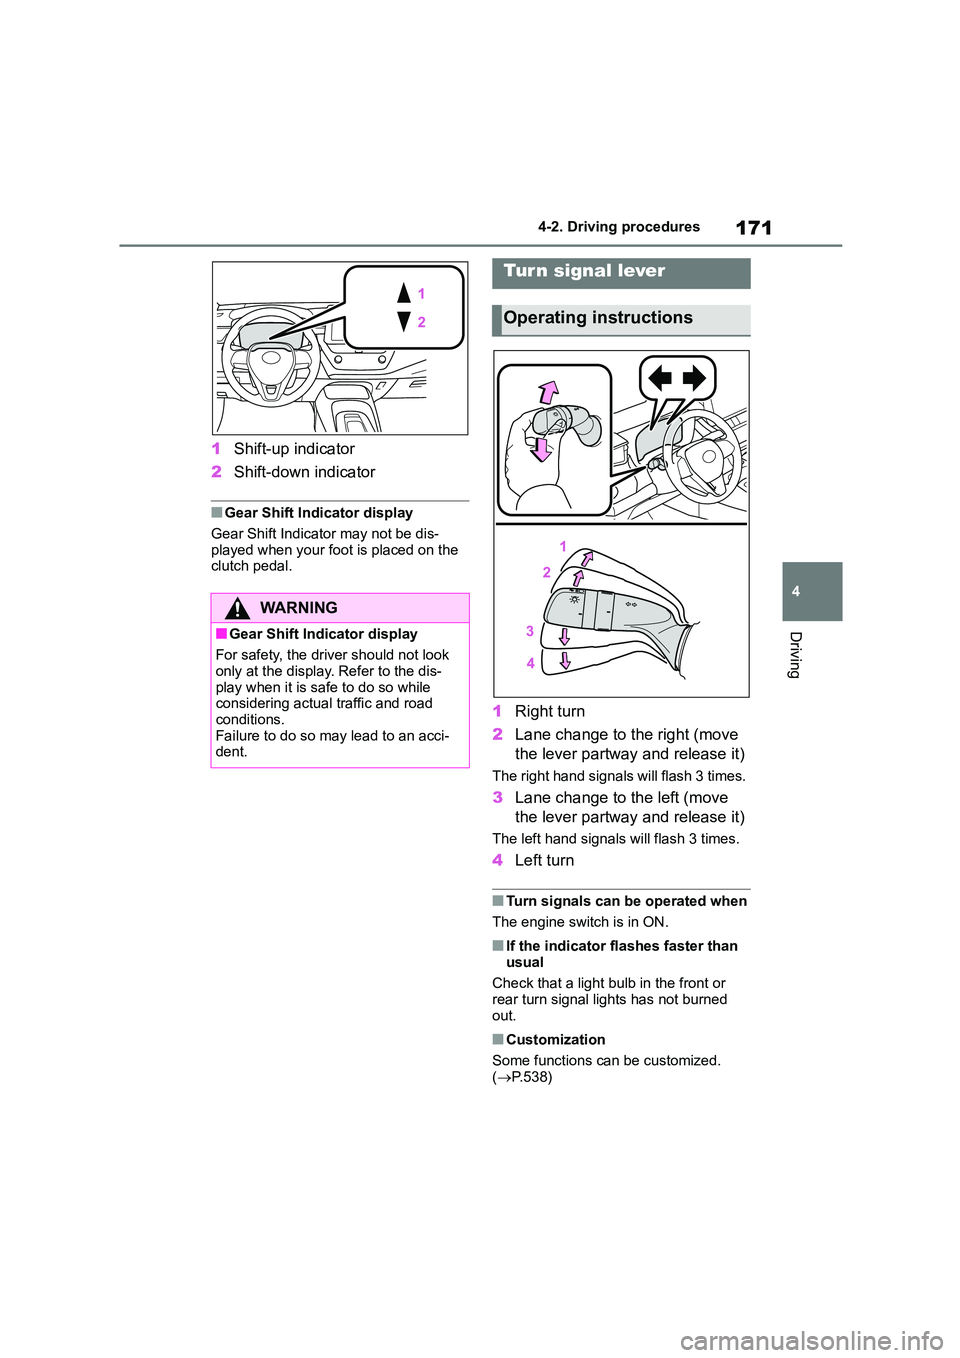
1 Shift-up indicator
2 Shift-down indicator
■Gear Shift Indicator display
Gear Shift Indicator may not be dis-
played when your foot is placed on the
clutch pedal.
1 Right turn
2 Lane change to the right (move
the lever partway and release it)
The right hand signals will flash 3 times.
3 Lane change to the left (move
the lever partway and release it)
The left hand signals will flash 3 times.
4 Left turn
■Turn signals can be operated when
The engine switch is in ON.
■If the indicator flashes faster than
usual
Check that a light bulb in the front or rear turn signal lights has not burned
out.
■Customization
Some functions can be customized. ( P.538)
WA R N I N G
■Gear Shift Indicator display
For safety, the driver should not look
only at the display. Refer to the dis-
play when it is safe to do so while considering actual traffic and road
conditions.
Failure to do so may lead to an acci- dent.
Tur n signal lever
Operating instructions
Page 176 of 678
1744-2. Driving procedures
into P, the parking brake will be
set, and the parking brake indi-
cator and parking brake light will
turn on.
Operate the shift lever with the
vehicle stopped and the brake
pedal depressed.
The parking brake may not operate
automatically if the shift lever is moved
quickly.
In this case, it is necessary to operate
the parking brake switch. ( P.173)
Vehicles with a manual transmis-
sion
When the engine is off, the parking
brake will be set, and the parking
brake indicator and parking brake
light turn on.
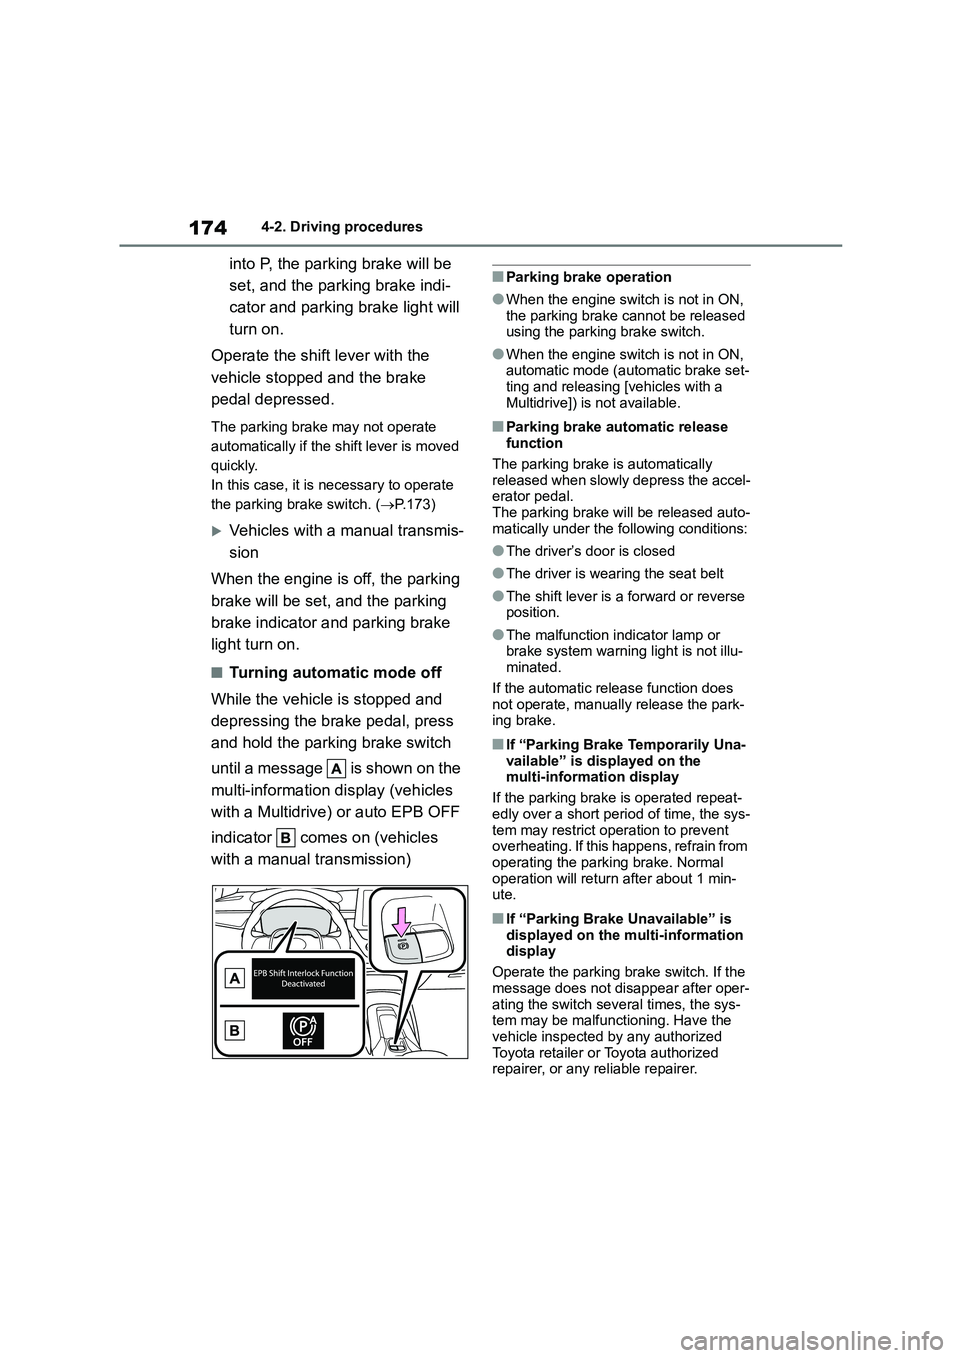
■Turning automatic mode off
While the vehicle is stopped and
depressing the brake pedal, press
and hold the parking brake switch
until a message is shown on the
multi-information display (vehicles
with a Multidrive ) or auto EPB OFF
indicator comes on (vehicles
with a manual transmission)
■Parking brake operation
●When the engine switch is not in ON,
the parking brake cannot be released using the parking brake switch.
●When the engine switch is not in ON, automatic mode (automatic brake set-
ting and releasing [vehicles with a
Multidrive]) is not available.
■Parking brake automatic release function
The parking brake is automatically
released when slowly depress the accel- erator pedal.
The parking brake will be released auto-
matically under the following conditions:
●The driver’s door is closed
●The driver is wearing the seat belt
●The shift lever is a forward or reverse position.
●The malfunction indicator lamp or brake system warning light is not illu-
minated.
If the automatic release function does not operate, manually release the park-
ing brake.
■If “Parking Brake Temporarily Una-
vailable” is displayed on the multi-information display
If the parking brake is operated repeat-
edly over a short period of time, the sys-
tem may restrict operation to prevent overheating. If this happens, refrain from
operating the parking brake. Normal
operation will return after about 1 min- ute.
■If “Parking Brake Unavailable” is
displayed on the multi-information
display
Operate the parking brake switch. If the
message does not disappear after oper-
ating the switch several times, the sys- tem may be malfunctioning. Have the
vehicle inspected by any authorized
Toyota retailer or Toyota authorized repairer, or any reliable repairer.
Page 177 of 678
175
4
4-2. Driving procedures
Driving
■Parking brake operation sound
When the parking brake operates, a motor sound (whirring sound) may be
heard. This does not indicate a malfunc-
tion.
■Parking brake operation
●Depending on the engine switch posi-
tion/mode, the parking brake indicator and parking brake light will turn on
and stay on as described below:
ON: Comes on until the parking brake is released.
Not in ON: Stays on for approximately
15 seconds.
●When the engine switch is turned off
with the parking brake set, the parking brake indicator and parking brake light
will stay on for about 15 seconds. This
does not indicate a malfunction.
■When the parking brake switch malfunctions
Automatic mode (automatic brake set-
ting and releasing) will be turned on automatically.
■Parking the vehicle
P.145
■Parking brake engaged warning
buzzer
A buzzer will sound if the vehicle is
driven with the parking brake engaged.
“Parking Brake ON” is displayed on the multi-information display.
■If the brake system warning light
comes on
P.471
■Usage in winter time
P.321
WA R N I N G
■When parking the vehicle
Do not leave a child in the vehicle
alone. The parking brake may be released unintentionally and there is
the danger of the vehicle moving that
may lead to an accident resulting in death or serious injury.
■Parking brake switch
Do not set any objects near the park- ing brake switch.
Objects may interfer e with the switch
and may lead the parking brake to unexpectedly operate.
NOTICE
■When parking the vehicle
Before you leave the vehicle, set the
parking brake, shift the shift lever to P
(Multidrive) or N (manual transmis- sion) and make sure that the vehicle
does not move.
■When the system malfunctions
Stop the vehicle in a safe place and
check the warning messages.
■When the parking brake cannot
be released due to a malfunction
Driving the vehicle with the parking brake set will lead to brake compo-
nents overheating, which may affect
braking performance and increase brake wear.
Have the vehicle inspected by any
authorized Toyota retailer or Toyota authorized repairer, or any reliable
repairer immediately if this occurs.
Page 179 of 678
177
4
4-2. Driving procedures
Driving
the message and follow the instruc-
tions.
■When the parking brake is set auto- matically while the system is hold-
ing the brakes
Perform any of the following operations to release the parking brake.
●Depress the accelerator pedal. (The parking brake will not be released
automatically if the seat belt is not fas-
tened.)
●Operate the parking brake switch with
the brake pedal depressed.
Make sure that the parking brake indica-
tor light goes off. ( P.173)
■When an inspection at any author-
ized Toyota retailer or Toyota authorized repairer, or any reliable
repairer is necessary
When the brake hold standby indicator (green) does not illuminate even when
the brake hold switch is pressed with the
brake hold system operating conditions met, the system may be malfunctioning.
Have the vehicle inspected at any
authorized Toyota retailer or Toyota authorized repairer, or any reliable
repairer.
■If “Brake Hold Malfunction Press
Brake to Deactivate Visit Your Dealer” or “Brake Hold Malfunction
Visit Your Dealer” is displayed on
the multi-information display
The system may be malfunctioning.
Have the vehicle inspected by any
authorized Toyota retailer or Toyota authorized repairer, or any reliable
repairer.
■Warning messages and buzzers
Warning messages and buzzers are
used to indicate a system malfunction or to inform the driver of the need for cau-
tion. If a warning message is shown on
the multi-information display, read the message and follow the instructions.
■If the brake hold operated indicator
flashes
P.478
WA R N I N G
■When the vehicle is on a steep
incline
When using the brake hold system on a steep incline exercise caution. The
brake hold function may not hold the
vehicle in such a situation.
■When stopped on a slippery road
The system cannot stop the vehicle
when the gripping ability of the tires has been exceeded. Do not use the
system when stopped on a slippery
road.
NOTICE
■When parking the vehicle
The brake hold system is not designed for use when parking the
vehicle for a long period of time. Turn-
ing the engine switch off while the system is holdi ng the brake may
release the brake, which would cause
the vehicle to move. When operating
the engine switch, depress the brake pedal, shift the shift lever to P
(Multidrive) or N (manual transmis-
sion) and set the parking brake.
Page 180 of 678
1784-3. Operating the lights and wipers
4-3.Operating the lights and wipers
Operating the switch turns
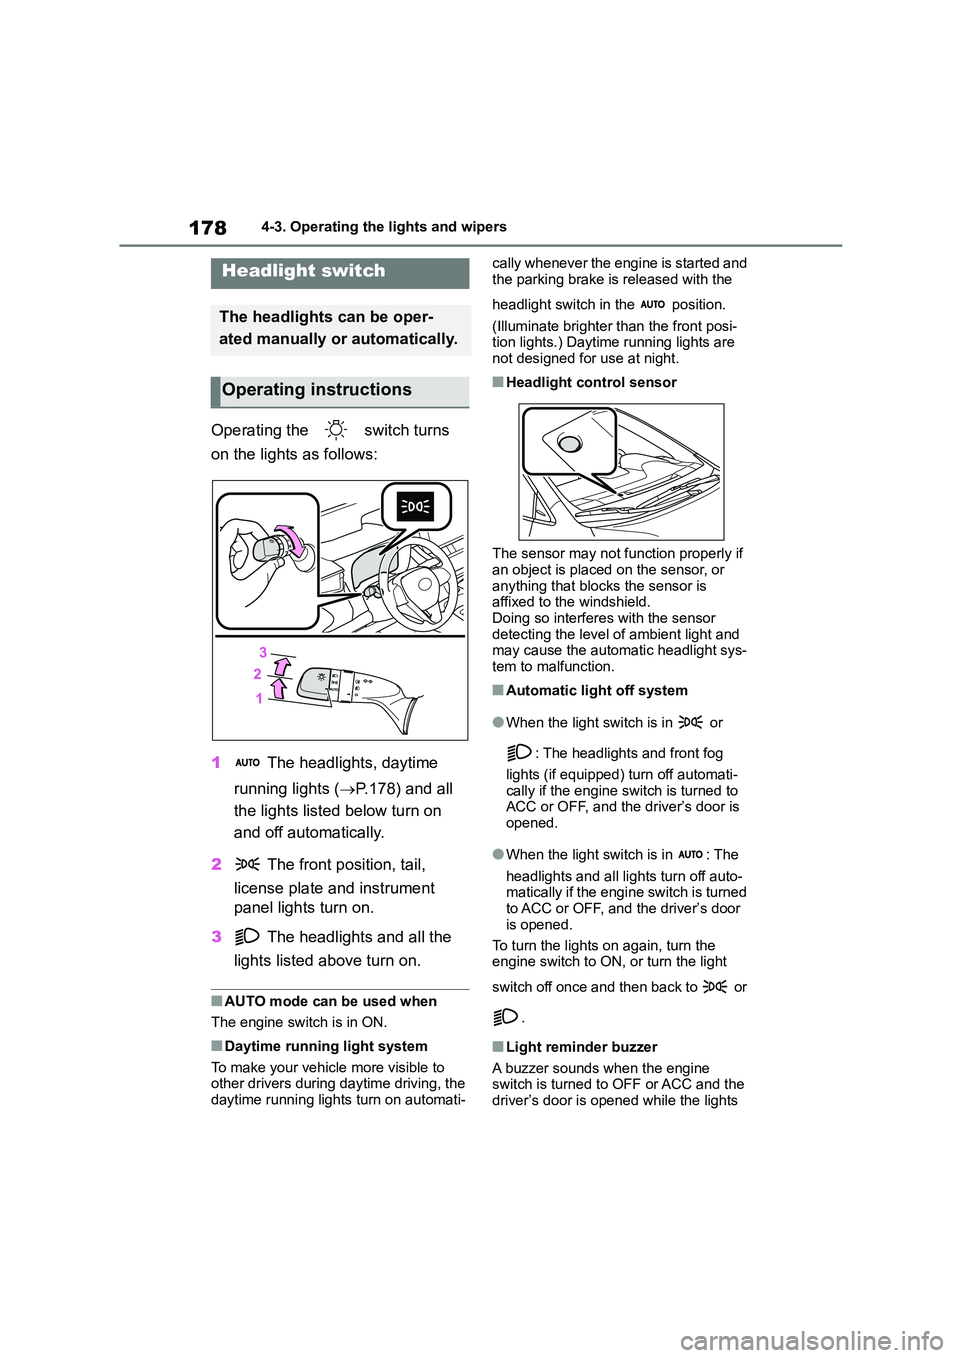
on the lights as follows:
1 The headlights, daytime
running lights ( P.178) and all
the lights listed below turn on
and off automatically.
2 The front position, tail,
license plate and instrument
panel lights turn on.
3 The headlights and all the
lights listed above turn on.
■AUTO mode can be used when
The engine switch is in ON.
■Daytime running light system
To make your vehicle more visible to
other drivers during daytime driving, the daytime running lights turn on automati-
cally whenever the engine is started and
the parking brake is released with the
headlight switch in the position.
(Illuminate brighter than the front posi-
tion lights.) Daytime running lights are not designed for use at night.
■Headlight control sensor
The sensor may not function properly if an object is placed on the sensor, or
anything that blo cks the sensor is
affixed to the windshield. Doing so interferes with the sensor
detecting the level of ambient light and
may cause the autom atic headlight sys- tem to malfunction.
■Automatic light off system
●When the light switch is in or
: The headlights and front fog
lights (if equipped) turn off automati-
cally if the engine switch is turned to ACC or OFF, and the driver’s door is
opened.
●When the light switch is in : The
headlights and all lights turn off auto-
matically if the engine switch is turned to ACC or OFF, and the driver’s door
is opened.
To turn the lights on again, turn the engine switch to ON, or turn the light
switch off once and then back to or
.
■Light reminder buzzer
A buzzer sounds when the engine switch is turned to OFF or ACC and the
driver’s door is opened while the lights
Headlight switch
The headlights can be oper-
ated manually or automatically.
Operating instructions
Page 181 of 678
179
4
4-3. Operating the lights and wipers
Driving
are turned on.
■Battery-saving function
In order to prevent the battery of the vehicle from discharging, if the light
switch is in the or position
when the engine switch is turned off the battery saving function will operate and
automatically turn off all the lights after
approximately 20 minutes. When the engine switch is turned to ON, the bat-
tery-saving function will be disabled.
When any of the following are per- formed, the battery-saving function is
canceled once and then reactivated. All
the lights will turn off automatically 20 minutes after the battery- saving func-
tion has been reactivated:
●When the headlight switch is operated
●When a door is opened or closed
■Customization
Some functions can be customized.
( P.538)
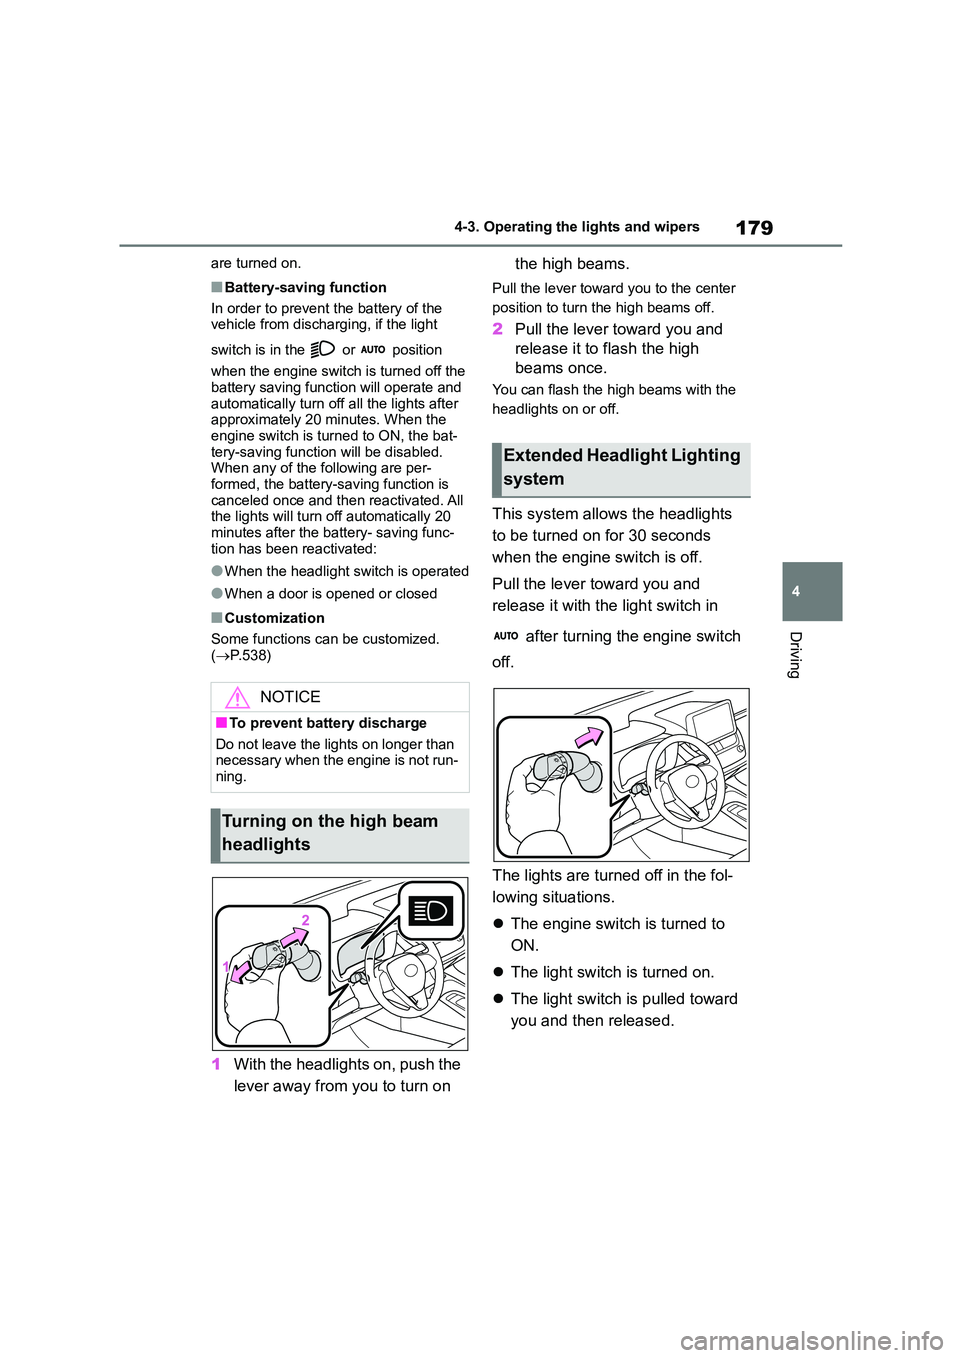
1With the headlights on, push the
lever away from you to turn on
the high beams.
Pull the lever toward you to the center
position to turn the high beams off.
2 Pull the lever toward you and
release it to flash the high
beams once.
You can flash the high beams with the
headlights on or off.
This system allows the headlights
to be turned on for 30 seconds
when the engine switch is off.
Pull the lever toward you and
release it with the light switch in
after turning the engine switch
off.
The lights are turned off in the fol-
lowing situations.
The engine switch is turned to
ON.
The light switch is turned on.
The light switch is pulled toward
you and then released.
NOTICE
■To prevent battery discharge
Do not leave the lights on longer than necessary when the engine is not run-
ning.
Turning on the high beam
headlights
Extended Headlight Lighting
system