key TOYOTA COROLLA 2023 Service Manual
[x] Cancel search | Manufacturer: TOYOTA, Model Year: 2023, Model line: COROLLA, Model: TOYOTA COROLLA 2023Pages: 468, PDF Size: 14.4 MB
Page 156 of 468

1564-2. Driving procedures
engine switch mode.
■Engine switch illumination
According to the situation, the
engine switch illumi nation operates
as follows:
●When a door is opened, or the
engine switch mode is changed
from ACC or ON to off, the engine
switch illumination comes on.
●When depressing the brake pedal
with carrying the electronic key on
your person, the engine switch
illumination blinks.
●When the engine switch mode is
in ACC or ON, the engine switch
illumination is constantly illumi-
nated.
■If the engine does not start
●The engine immobilizer system
may not have been deactivated.
( P. 7 7 )
Contact your Toyota dealer.
●If a message related to start-up is
shown on the multi-information
display, read the message and fol-
low the instructions.
■If the battery is discharged
The engine cannot be started using
the smart key system. Refer to
P.383 to restart the engine.
■Electronic key battery depletion
P. 1 0 6
■Conditions affecting operation
P. 1 2 1
■Notes for the entry function
P.122
■Electronic key battery
P.333
■Operation of the engine switch
●If the switch is not pressed shortly
and firmly, the engine switch
mode may not change or the
engine may not start.
●If attempting to restart the engine
immediately after turning the
engine switch off, the engine may
not start in some cases. After turn-
ing the engine switch off, please
wait a few seconds before restart-
ing the engine.
■Customization
If the smart key system has been
deactivated in a customized setting,
refer to P.381.
WARNING
■When starting the engine
Always start the engine while sit-
ting in the driver’s seat. Do not
depress the accelerator pedal
while starting the engine under
any circumstances.
Doing so may cause an accident
resulting in death o r serious injury.
NOTICE
■When starting the engine
●Do not race a cold engine.
●If the engine becomes difficult to
start or stalls frequently, have
your vehicle checked by your
Toyota dealer immediately.
Page 157 of 468
1574-2. Driving procedures
4
Driving
1Stop the vehicle completely.
2 Set the parking brake
( 168), and shift the shift
lever to P.
Check the parking brake indicator
is illuminated.
3 Press the engine switch
shortly and firmly.
The engine will stop, and the meter
display will be extinguished.
4Release the brake pedal and
check that “ACCESSORY” or
“IGNITION ON” is not shown
on the multi-information dis-
p l a y.
■Automatic engine shut off fea-
ture
●The vehicle is equipped with a
feature that automatically shuts off
the engine when the shift lever is
in P with the engine running for an
extended period.
●The engine will automatically shut
off after approximately 1 hour if it
has been left running while the
shift lever is in P.
●The timer for the automatic engine
shut off feature will reset if the
brake pedal is depre ssed or if the
shift lever is in a position other than P.
●After the vehicle
is parked, if the
door is locked with the door lock
switch ( P.115) from the inside or
the mechanical key (P.381) from
the outside, the automatic engine
shut off feature will be disabled.
The timer for the automatic engine
shut off feature will be re-enabled
if the driver’s door is opened.NOTICE
■Symptoms indicating a mal-
function with the engine
switch
If the engine switch seems to be
operating somewh at differently
than usual, such as the switch
sticking slightly, there may be a
malfunction. Contact your Toyota
dealer immediately.
Stopping the engine
WARNING
■Stopping the engine in an
emergency
●If you want to stop the engine in
an emergency while driving the
vehicle, press and hold the
engine switch for more than 2
seconds, or press it briefly 3
times or more in succession.
( P.348)
However, do not touch the
engine switch while driving
except in an emergency. Turn-
ing the engine off while driving
will not cause loss of steering or
braking control, but the power
assist to these systems will be
lost. This will make it more diffi-
cult to steer and brake, so you
should pull over and stop the
vehicle as soon as it is safe to
do so.
●If the engine switch is operated
while the vehicle is running, a
warning message will be shown
on the multi-information display
and a buzzer sounds.
●To restart the engine after per-
forming an emergency shut-
down, shift the shift lever to N
and then press the engine
switch.
Page 174 of 468
1744-3. Operating the lights and wipers
●To make your vehicle more visible
to other drivers during daytime
driving, the daytime running lights
turn on automatically when all of
the following conditions are met.
(The daytime running lights are
not designed for use at night.)
• The engine is running
• The parking brake is released
• The headlight switch is in the
or
* position
*: When the surroundings are bright
The daytime running lights remain
on after they illumi nate, even if the
parking brake is set again.
●For the U.S.A.: Daytime running
lights can be turned off by operat-
ing the switch.
●Compared to turning on the head-
lights, the daytime running light
system offers gr eater durability
and consumes less electricity, so
it can help improve fuel economy.
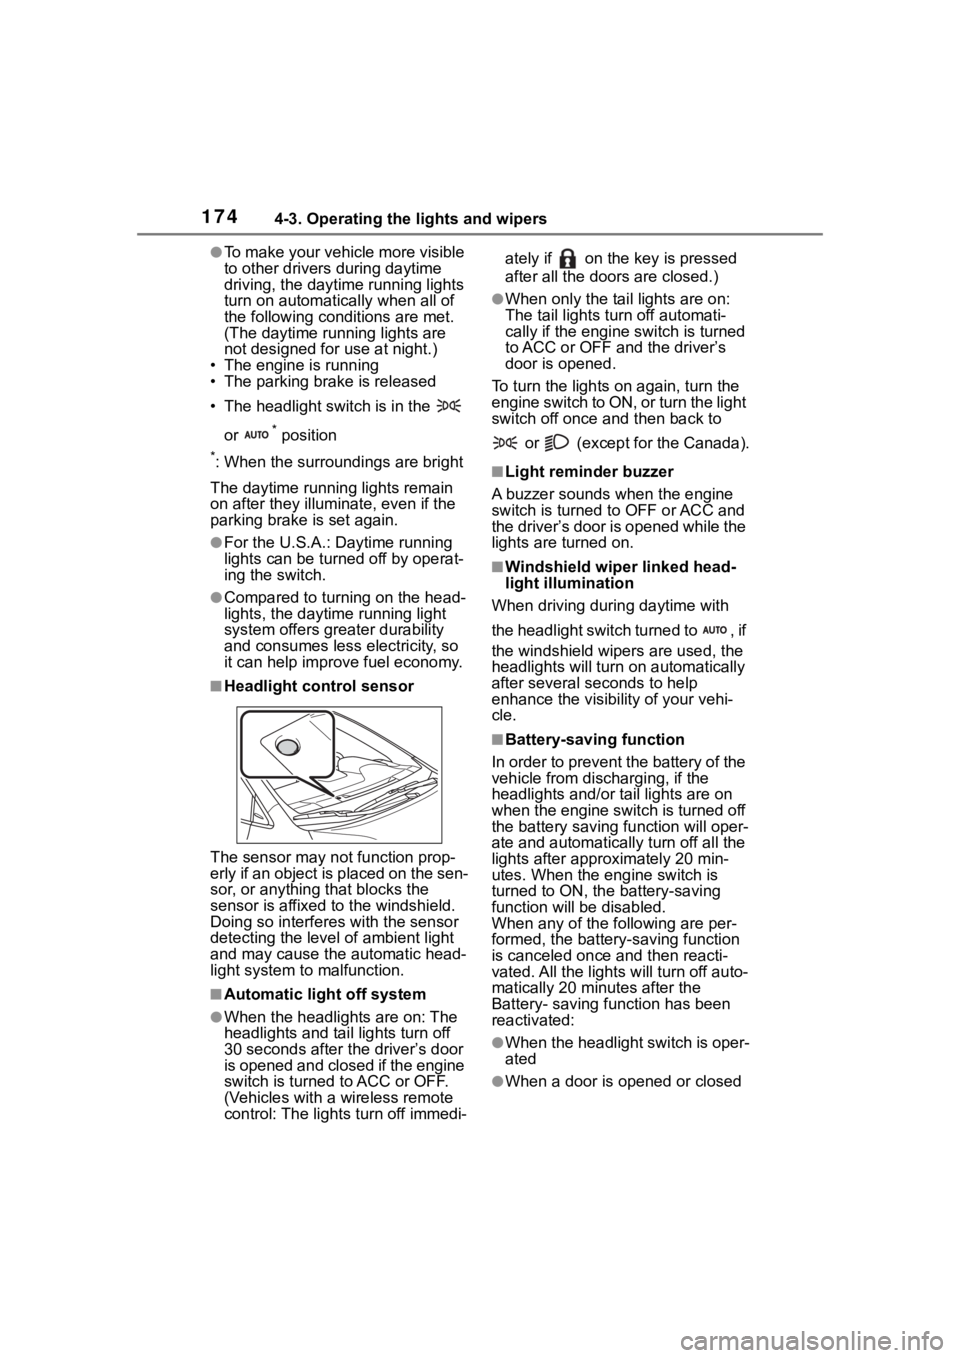
■Headlight control sensor
The sensor may not function prop-
erly if an object is placed on the sen-
sor, or anything that blocks the
sensor is affixed to the windshield.
Doing so interfere s with the sensor
detecting the level of ambient light
and may cause the automatic head-
light system to malfunction.
■Automatic light off system
●When the headlights are on: The
headlights and tail lights turn off
30 seconds after the driver’s door
is opened and closed if the engine
switch is turned to ACC or OFF.
(Vehicles with a wireless remote
control: The lights turn off immedi- ately if on the key is pressed
after all the doors are closed.)
●When only the tail lights are on:
The tail lights turn off automati-
cally if the engine switch is turned
to ACC or OFF and the driver’s
door is opened.
To turn the lights on again, turn the
engine switch to ON, or turn the light
switch off once and then back to
or (except for the Canada).
■Light reminder buzzer
A buzzer sounds when the engine
switch is turned t o OFF or ACC and
the driver’s door is opened while the
lights are turned on.
■Windshield wiper linked head-
light illumination
When driving during daytime with
the headlight switch turned to , if
the windshield wipers are used, the
headlights will turn o n automatically
after several se conds to help
enhance the visibility of your vehi-
cle.
■Battery-saving function
In order to prevent the battery of the
vehicle from discharging, if the
headlights and/or tail lights are on
when the engine switch is turned off
the battery saving function will oper-
ate and automatically turn off all the
lights after approximately 20 min-
utes. When the engine switch is
turned to ON, the battery-saving
function will be disabled.
When any of the following are per-
formed, the battery-saving function
is canceled once and then reacti-
vated. All the lights will turn off auto-
matically 20 minutes after the
Battery- saving function has been
reactivated:
●When the headlight switch is oper-
ated
●When a door is opened or closed
Page 272 of 468
2725-2. Using the interior lights
interior light will turn on when a
door is open and turn off when
all of them are closed.
When the rear interior light is on
linked to the door position for
the front interior lights, it will not
turn off even though the switch
is pressed.
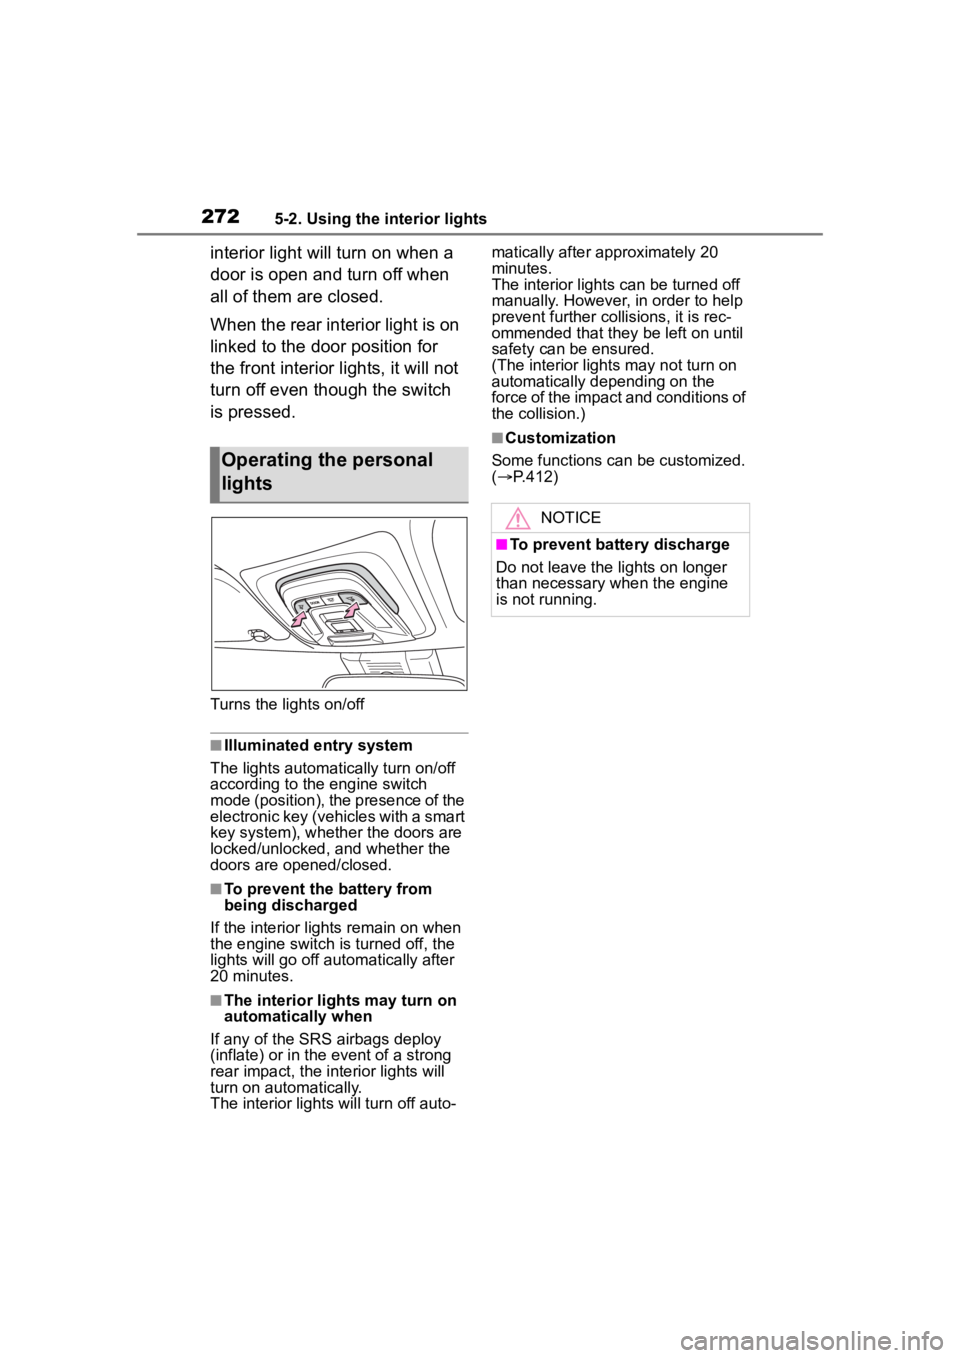
Turns the lights on/off
■Illuminated entry system
The lights automatically turn on/off
according to the engine switch
mode (position), the presence of the
electronic key (vehicles with a smart
key system), whether the doors are
locked/unlocked, and whether the
doors are opened/closed.
■To prevent the battery from
being discharged
If the interior lights remain on when
the engine switch is turned off, the
lights will go off automatically after
20 minutes.
■The interior lights may turn on
automatically when
If any of the SRS airbags deploy
(inflate) or in the event of a strong
rear impact, the interior lights will
turn on automatically.
The interior lights will turn off auto- matically after approximately 20
minutes.
The interior lights can be turned off
manually. However, in order to help
prevent further co
llisions, it is rec-
ommended that they be left on until
safety can be ensured.
(The interior lights may not turn on
automatically depending on the
force of the impact and conditions of
the collision.)
■Customization
Some functions can be customized.
( P.412)
Operating the personal
lights
NOTICE
■To prevent battery discharge
Do not leave the lights on longer
than necessary w hen the engine
is not running.
Page 281 of 468
2815-4. Other interior features
5
Interior features
■The wireless charger can be
operated when
The engine switch is in ACC or ON.
■Portable devices that can be
charged
●Portable devices compatible with
the Qi wireless charging standard
can be charged by the wireless
charger. However, compatibility
with all devices which meet the Qi
wireless charging standard is not
guaranteed.
●The wireless charger is designed
to supply low power electricity (5
W or less) to a cellular phone,
smartphone, or other portable
device.
■If a cover or accessory is
attached to the portable device
Do not charge a portable device if a
cover or accessory which is not Qi
compatible is attached. Depending
on the type of cover (including for certain genuine manufacture parts)
and/or accessory a
ttached, it may
not be possible to charge the porta-
ble device. If the portable device is
placed on the charging area and
does not charge, remove the cover
and/or accessories.
■If interference is heard in AM
radio broadcasts while
charging
Turn off the wireless charger and
check if the noise is reduced. If
noise is reduced, press and hold the
power supply switch of the wireless
charger for 2 se conds. The fre-
quency of the wireless charger is
changed and noise may be
reduced. When the frequency is
changed, the operation indicator
light will blink (orange) 2 times.
■Charging precautions
●If the electronic key cannot be
detected in the cabin, charging
cannot be performed. When a
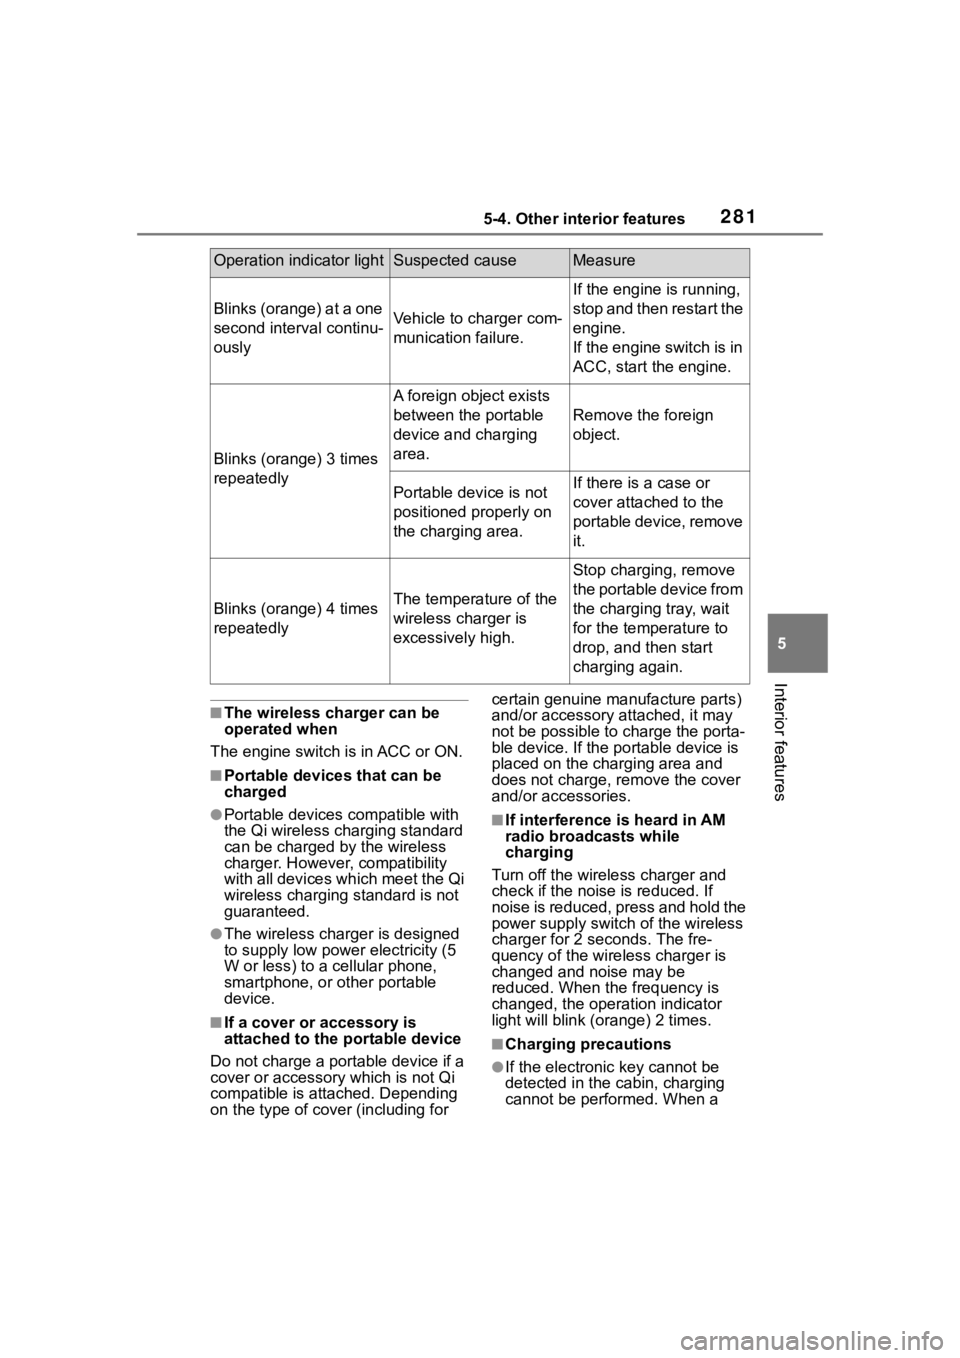
Operation indicator lightSuspected causeMeasure
Blinks (orange) at a one
second interval continu-
ouslyVehicle to charger com-
munication failure.
If the engine is running,
stop and then restart the
engine.
If the engine switch is in
ACC, start the engine.
Blinks (orange) 3 times
repeatedly
A foreign object exists
between the portable
device and charging
area.
Remove the foreign
object.
Portable device is not
positioned properly on
the charging area.If there is a case or
cover attached to the
portable device, remove
it.
Blinks (orange) 4 times
repeatedlyThe temperature of the
wireless charger is
excessively high.
Stop charging, remove
the portable device from
the charging tray, wait
for the temperature to
drop, and then start
charging again.
Page 287 of 468
287
6
6
Maintenance and care
Maintenance and care
.6-1. Maintenance and careCleaning and protecting the vehicle exterior .......... 288
Cleaning and protecting the vehicle interior ........... 291
6-2. Maintenance Maintenance requirements.................................. 294
General maintenance.. 296
Emission inspection and maintenance (I/M) pro-
grams ........................ 298
6-3. Do-it-yourself mainte- nance
Do-it-yourself service pre- cautions ..................... 300
Hood ........................... 302
Positioning a floor jack .................................. 303
Engine compartment ... 304
Tires ............................ 311
Tire inflation pressure.. 328
Wheels ......... ...............330
Air conditioning filter .... 331
Wireless remote con- trol/electronic key battery.................................. 333
Checking and replacing fuses.......................... 336
Headlight aim .............. 339
Light bulbs................... 340
Page 288 of 468
2886-1. Maintenance and care
6-1.Maintenance and care
Working from top to bottom,
liberally apply water to the
vehicle body, wheel wells and
underside of the vehicle to
remove any dirt and dust.
Wash the vehicle body using
a sponge or soft cloth, such
as a chamois.
For hard-to-remove marks,
use car wash soap and rinse
thoroughly with water.
Wipe away any water.
Wax the vehicle when the
waterproof coating deterio-
rates.
If water does not bead on a clean
surface, apply wax when the vehi-
cle body is cool.
■Automatic car washes
●Fold the mirrors before washing
the vehicle. Start washing from the
front of the vehicle. Make sure to
extend the mirrors before driving.
●Brushes used in automatic car
washes may scratch the vehicle
surface, parts (wheel, etc.) and
harm your vehicle’s paint.
●Vehicles with a rear spoiler: In cer-
tain automatic car washes, the rear spoiler may interfere with
machine operation. This may pre-
vent the vehicle from being
cleaned properly or result in dam-
age to the r
ear spoiler.
■High pressure car washes
As water may enter the cabin, do
not bring the nozzle tip near the
gaps around the doors or perimeter
of the windows, or spray these
areas continuously.
■When using a car wash (vehi-
cles with a smart key system)
If the door handle becomes wet
while the electronic key is within the
effective range, the door may lock
and unlock repeatedly. In that case,
follow the following correction pro-
cedures to wash the vehicle:
●Place the key in a position 6 ft. (2
m) or more separate from the
vehicle while the vehicle is being
washed. (Take care to ensure that
the key is not stolen.)
●Set the electronic key to bat-
tery-saving mode to disable the
smart key system. ( P.121)
■Wheels and wheel ornaments
●Remove any dirt immediately by
using a neutral detergent.
●Wash detergent off with water
immediately after use.
●To protect the paint from damage,
make sure to obs erve the follow-
ing precautions.
• Do not use acidic, alkaline or abrasive detergent
• Do not use hard brushes
• Do not use detergent on the
wheels when they are hot, such
as after driving or parking in hot
weather
■Brake pads and calipers
Rust may form if the vehicle is
parked with wet brake pads or disc
rotors, causing them to stick. Before
parking the vehicle after it is
washed, drive slo wly and apply the
brakes several times to dry the
Cleaning and protect-
ing the vehicle exte-
rior
Perform cleaning in a man-
ner appropriate to each
component and its material.
Cleaning instructions
Page 309 of 468
3096-3. Do-it-yourself maintenance
6
Maintenance and care
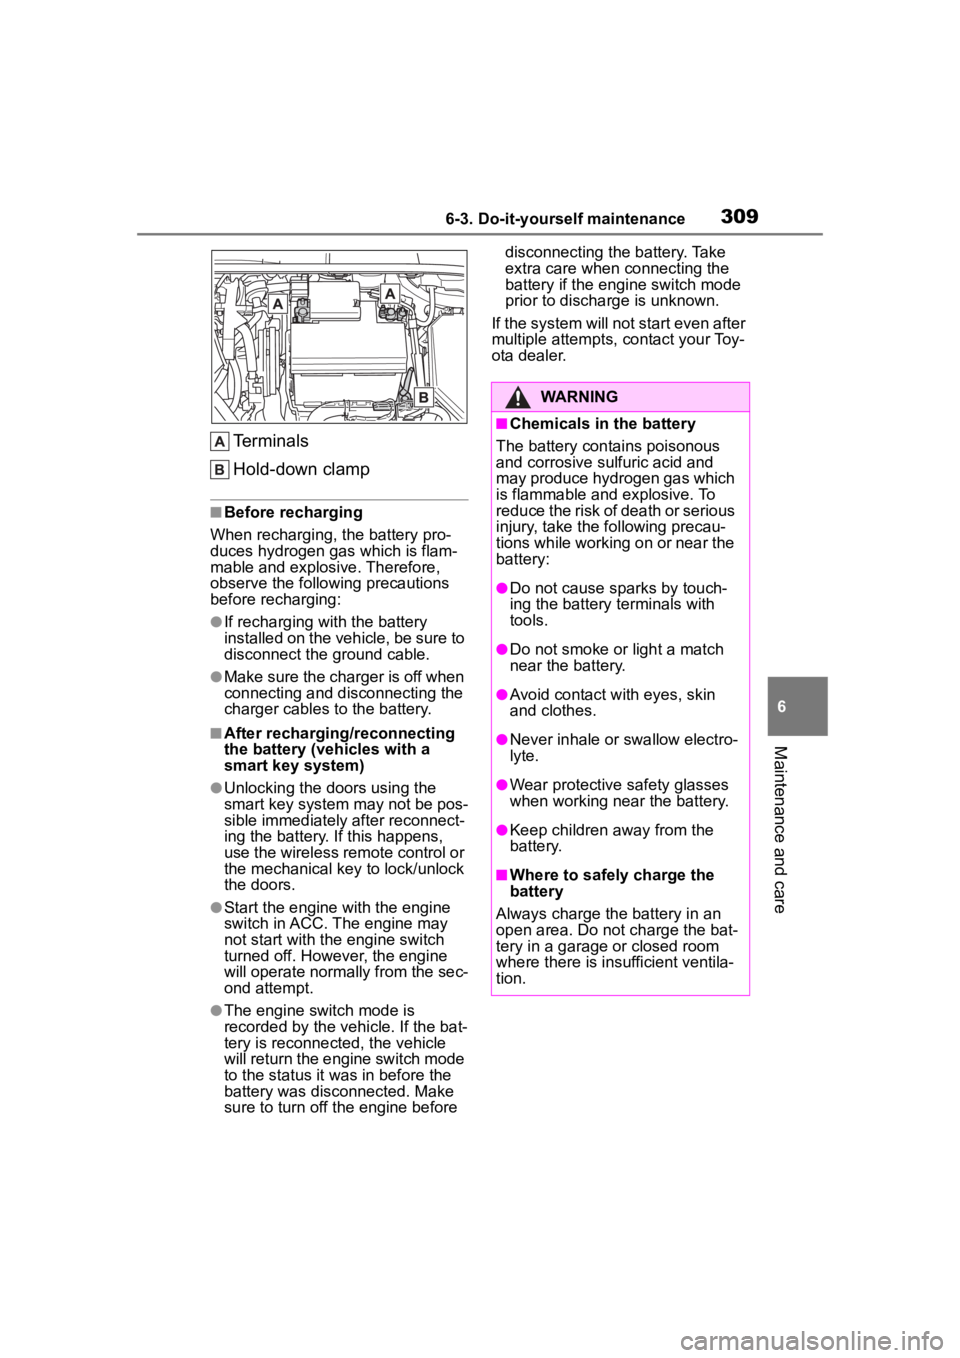
Terminals
Hold-down clamp
■Before recharging
When recharging, t he battery pro-
duces hydrogen ga s which is flam-
mable and explosive. Therefore,
observe the following precautions
before recharging:
●If recharging wi th the battery
installed on the vehicle, be sure to
disconnect the ground cable.
●Make sure the charger is off when
connecting and disconnecting the
charger cables to the battery.
■After recharging/reconnecting
the battery (vehicles with a
smart key system)
●Unlocking the doors using the
smart key system may not be pos-
sible immediately after reconnect-
ing the battery. If this happens,
use the wireless remote control or
the mechanical key to lock/unlock
the doors.
●Start the engine with the engine
switch in ACC. The engine may
not start with the engine switch
turned off. However, the engine
will operate normally from the sec-
ond attempt.
●The engine switch mode is
recorded by the vehicle. If the bat-
tery is reconnected, the vehicle
will return the engi ne switch mode
to the status it was in before the
battery was disconnected. Make
sure to turn off the engine before disconnecting the battery. Take
extra care when connecting the
battery if the engine switch mode
prior to discharge is unknown.
If the system will not start even after
multiple attempts, contact your Toy-
ota dealer.
WARNING
■Chemicals in the battery
The battery contains poisonous
and corrosive sulfuric acid and
may produce hydrogen gas which
is flammable and explosive. To
reduce the risk of death or serious
injury, take the following precau-
tions while working on or near the
battery:
●Do not cause sparks by touch-
ing the battery terminals with
tools.
●Do not smoke or light a match
near the battery.
●Avoid contact with eyes, skin
and clothes.
●Never inhale or swallow electro-
lyte.
●Wear protective safety glasses
when working near the battery.
●Keep children away from the
battery.
■Where to safely charge the
battery
Always charge the battery in an
open area. Do not charge the bat-
tery in a garage or closed room
where there is ins ufficient ventila-
tion.
Page 333 of 468
3336-3. Do-it-yourself maintenance
6
Maintenance and care
*: If equipped
■If the key battery is depleted
The following symptoms may occur:
●The smart key system (if
equipped) and wireless remote
control will not fu nction properly.
●The operational range will be
reduced.
Flathead screwdriver
Small flathead screwdriver
Lithium battery CR2032 (vehi-
cles without a smart key sys-
tem), or CR2450 (vehicles
with a smart key system)
■Use a CR2032 (vehicles without
a smart key system), or CR2450
(vehicles with a smart key sys-
tem) lithium battery
●Batteries can be purchased at
your Toyota dealer, local electrical
appliance shops or camera stores.
●Replace only with the same or
equivalent type recommended by
the manufacturer.
●Dispose of used batteries accord-
ing to local laws.
Vehicles without a smart key
system
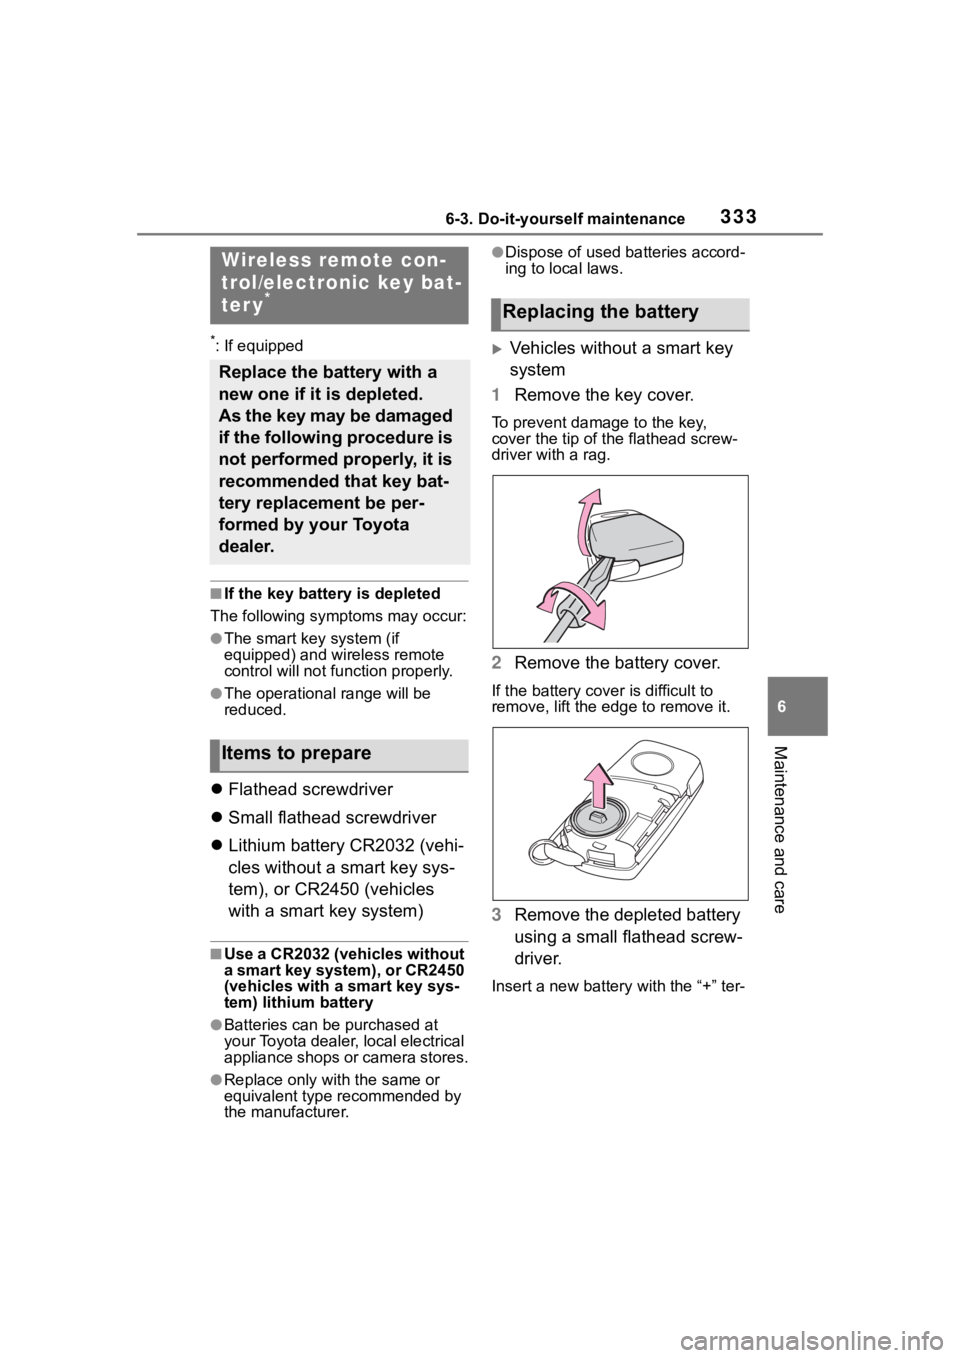
1 Remove the key cover.
To prevent damage to the key,
cover the tip of the flathead screw-
driver with a rag.
2Remove the battery cover.
If the battery cover is difficult to
remove, lift the e dge to remove it.
3Remove the depleted battery
using a small flathead screw-
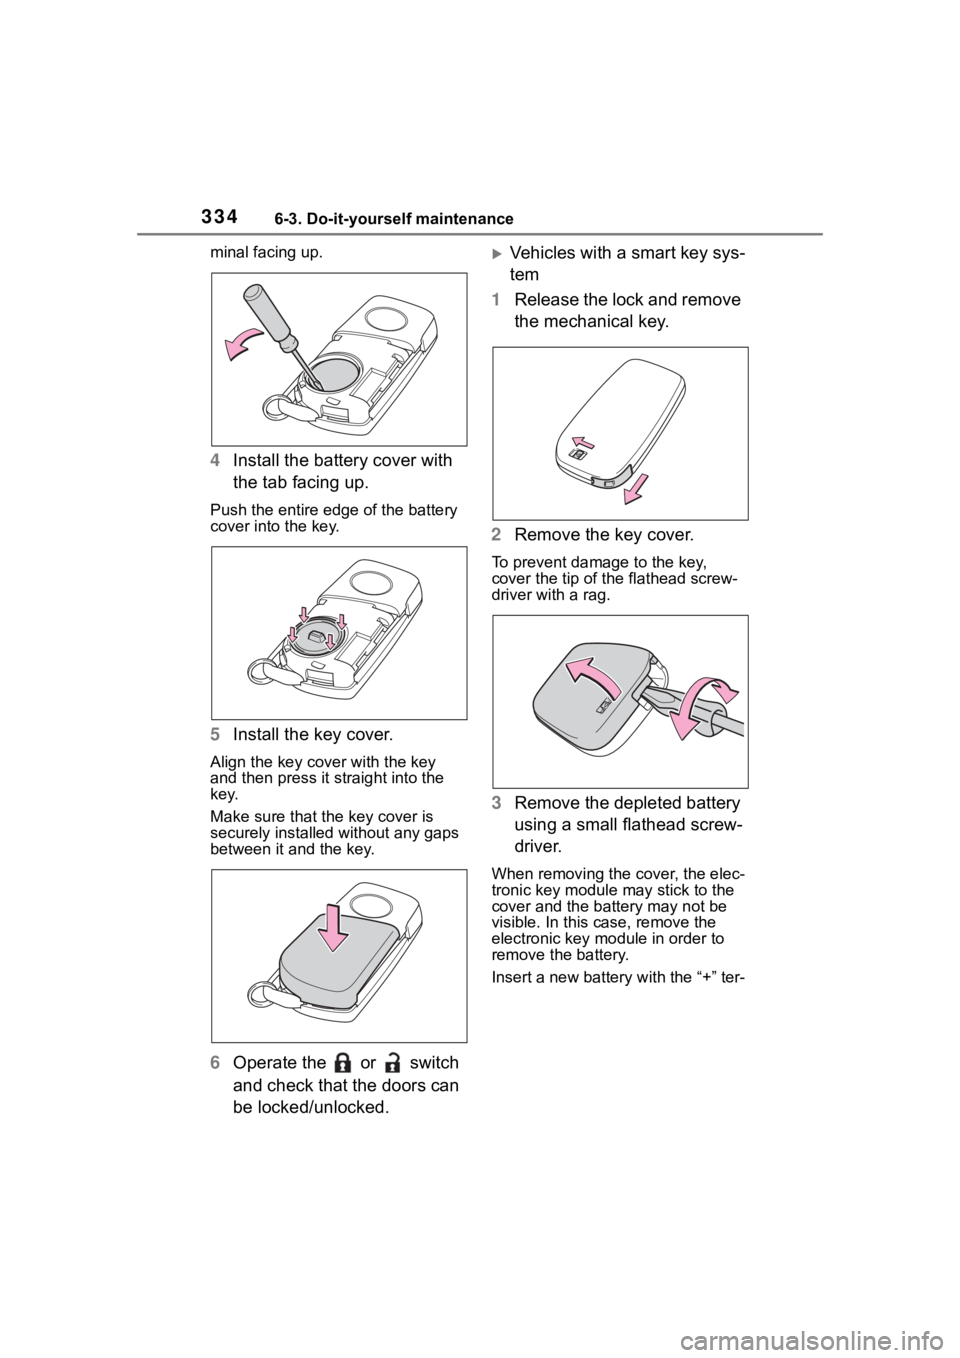
driver.
Insert a new battery with the “+” ter-
Wireless remote con-
trol/electronic key bat-
ter y
*
Replace the battery with a
new one if it is depleted.
As the key may be damaged
if the following procedure is
not performed properly, it is
recommended that key bat-
tery replacement be per-
formed by your Toyota
dealer.
Items to prepare
Replacing the battery
Page 334 of 468
3346-3. Do-it-yourself maintenance
minal facing up.
4Install the battery cover with
the tab facing up.
Push the entire edge of the battery
cover into the key.
5Install the key cover.
Align the key cover with the key
and then press it straight into the
key.
Make sure that the key cover is
securely installed without any gaps
between it and the key.
6Operate the or switch
and check that the doors can
be locked/unlocked.
Vehicles with a smart key sys-
tem
1 Release the lock and remove
the mechanical key.
2 Remove the key cover.
To prevent damage to the key,
cover the tip of the flathead screw-
driver with a rag.
3Remove the depleted battery
using a small flathead screw-
driver.
When removing the cover, the elec-
tronic key module may stick to the
cover and the batt ery may not be
visible. In this case, remove the
electronic key module in order to
remove the battery.
Insert a new battery with the “+” ter-