instrument panel TOYOTA COROLLA 2023 Owners Manual
[x] Cancel search | Manufacturer: TOYOTA, Model Year: 2023, Model line: COROLLA, Model: TOYOTA COROLLA 2023Pages: 468, PDF Size: 14.4 MB
Page 15 of 468
15Pictorial index
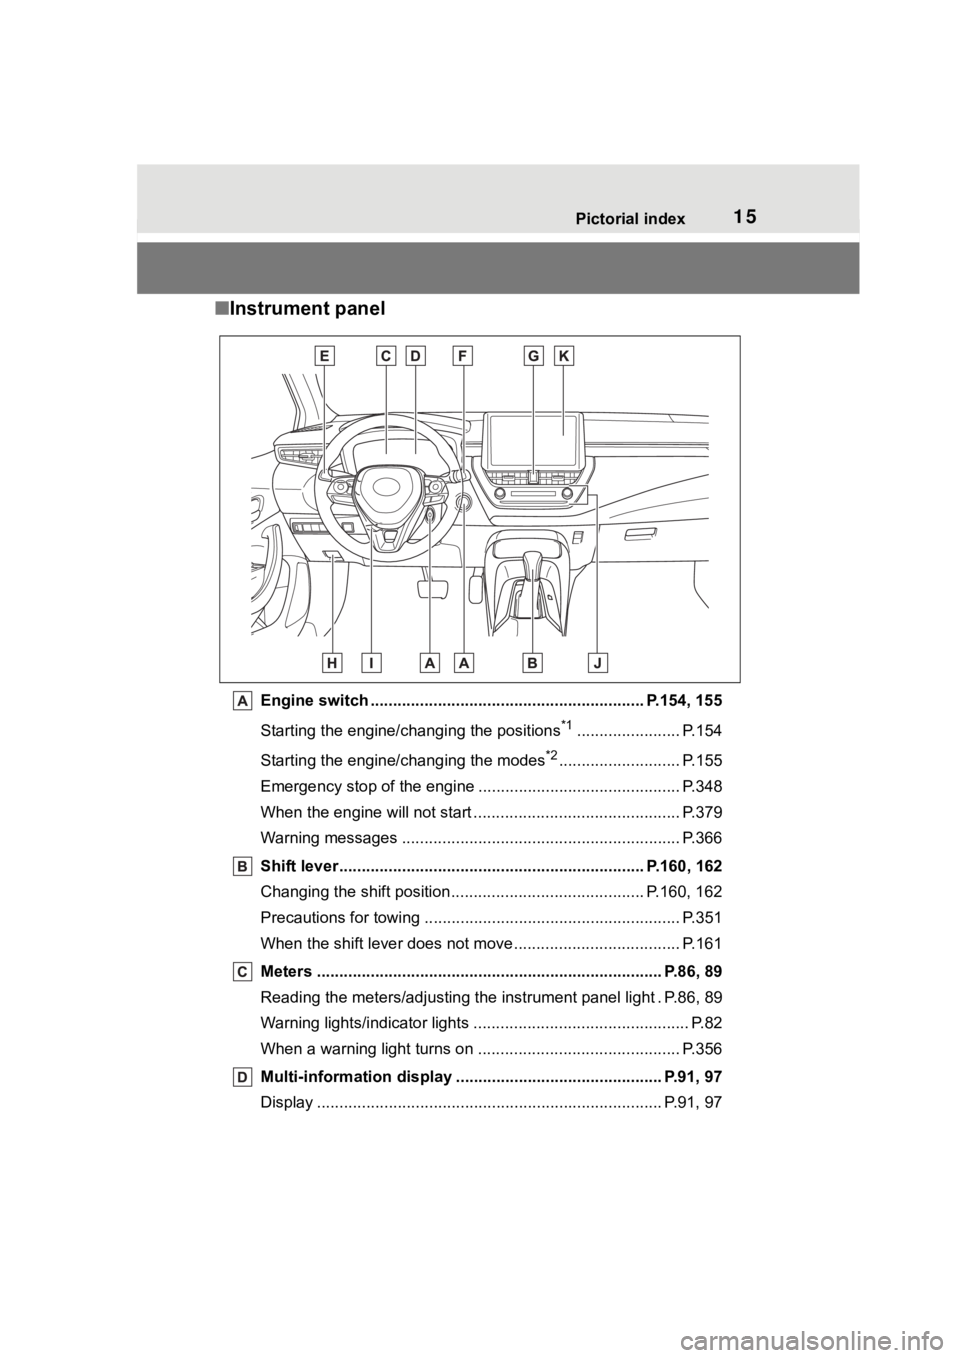
■Instrument panel
Engine switch ............................................................. P.154, 155
Starting the engine/changing the positions
*1....................... P.154
Starting the engine/changing the modes
*2........................... P.155
Emergency stop of the engin e ............................................. P.348
When the engine will not start ................................. ............. P.379
Warning messages ............................................... ............... P.366
Shift lever.................................................... ................ P.160, 162
Changing the shift position.................................... ....... P.160, 162
Precautions for towing .. ....................................... ................ P.351
When the shift lever does not move............................. ........ P.161
Meters ............................................................................. P.86, 89
Reading the meters/adjusting the instrument panel light . P.86, 8 9
Warning lights/indicator lights ................................ ................ P.82
When a warning light turns on .................................. ........... P.356
Multi-information display . ............................................. P.91, 97
Display ........................................................ ..................... P.91, 97
Page 17 of 468
17Pictorial index
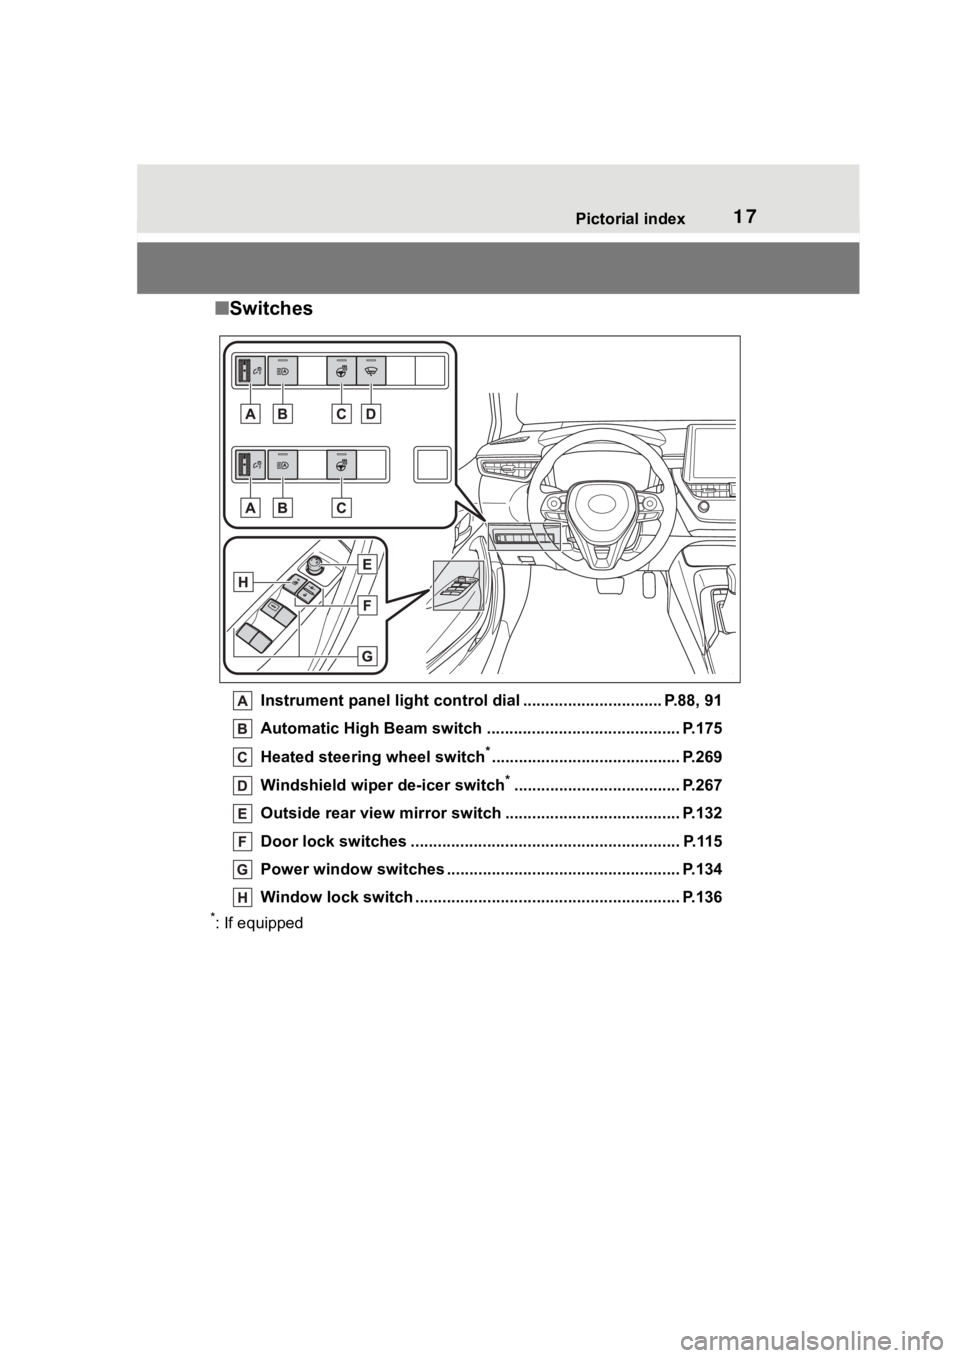
■Switches
Instrument panel light cont rol dial ............................... P.88, 91
Automatic High Beam switch ..................................... ...... P.175
Heated steering wheel switch
*.......................................... P.269
Windshield wiper de-icer switch
*..................................... P.267
Outside rear view mirror s witch ....................................... P.132
Door lock switches ............................................................ P.115
Power window switches ....... ............................................. P.134
Window lock switch ............................................. .............. P.136
*: If equipped
Page 35 of 468
351-1. For safe use
1
For safety and security
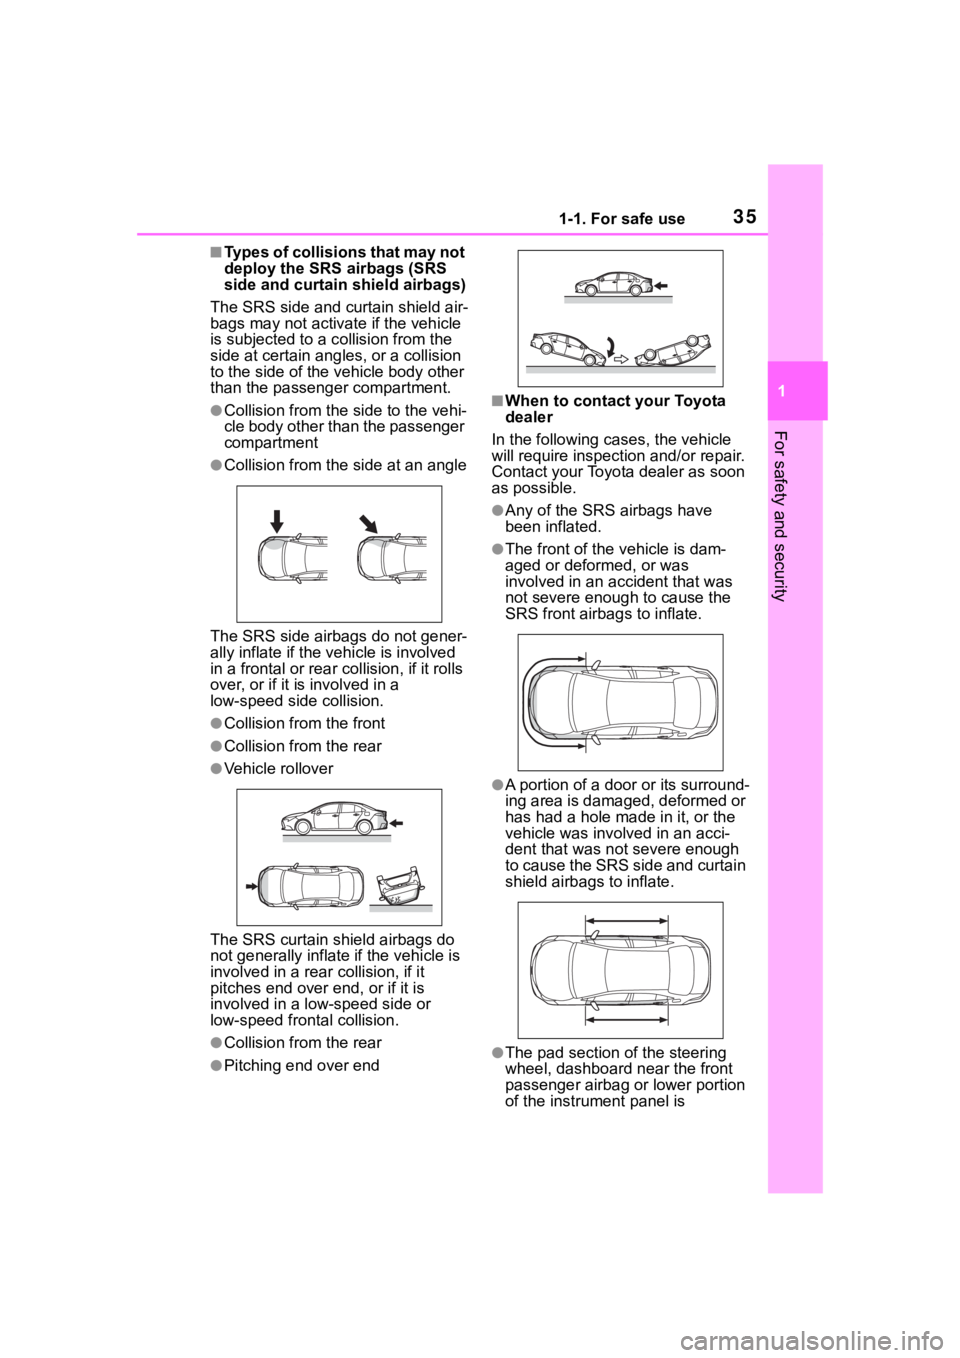
■Types of collisions that may not
deploy the SRS airbags (SRS
side and curtain shield airbags)
The SRS side and curtain shield air-
bags may not activate if the vehicle
is subjected to a c ollision from the
side at certain angl es, or a collision
to the side of the vehicle body other
than the passenger compartment.
●Collision from the s ide to the vehi-
cle body other than the passenger
compartment
●Collision from the s ide at an angle
The SRS side airbags do not gener-
ally inflate if the vehicle is involved
in a frontal or rear c ollision, if it rolls
over, or if it i s involved in a
low-speed side collision.
●Collision from the front
●Collision from the rear
●Vehicle rollover
The SRS curtain shield airbags do
not generally inflate if the vehicle is
involved in a rear collision, if it
pitches end over end, or if it is
involved in a low-speed side or
low-speed fron tal collision.
●Collision from the rear
●Pitching end over end
■When to contact your Toyota
dealer
In the following ca ses, the vehicle
will require inspecti on and/or repair.
Contact your Toyota dealer as soon
as possible.
●Any of the SRS airbags have
been inflated.
●The front of the vehicle is dam-
aged or deformed, or was
involved in an accident that was
not severe enough to cause the
SRS front airbags to inflate.
●A portion of a door or its surround-
ing area is damaged, deformed or
has had a hole made in it, or the
vehicle was involved in an acci-
dent that was not severe enough
to cause the SRS side and curtain
shield airbags to inflate.
●The pad section of the steering
wheel, dashboard near the front
passenger airbag or lower portion
of the instrument panel is
Page 38 of 468
381-1. For safe use
WARNING
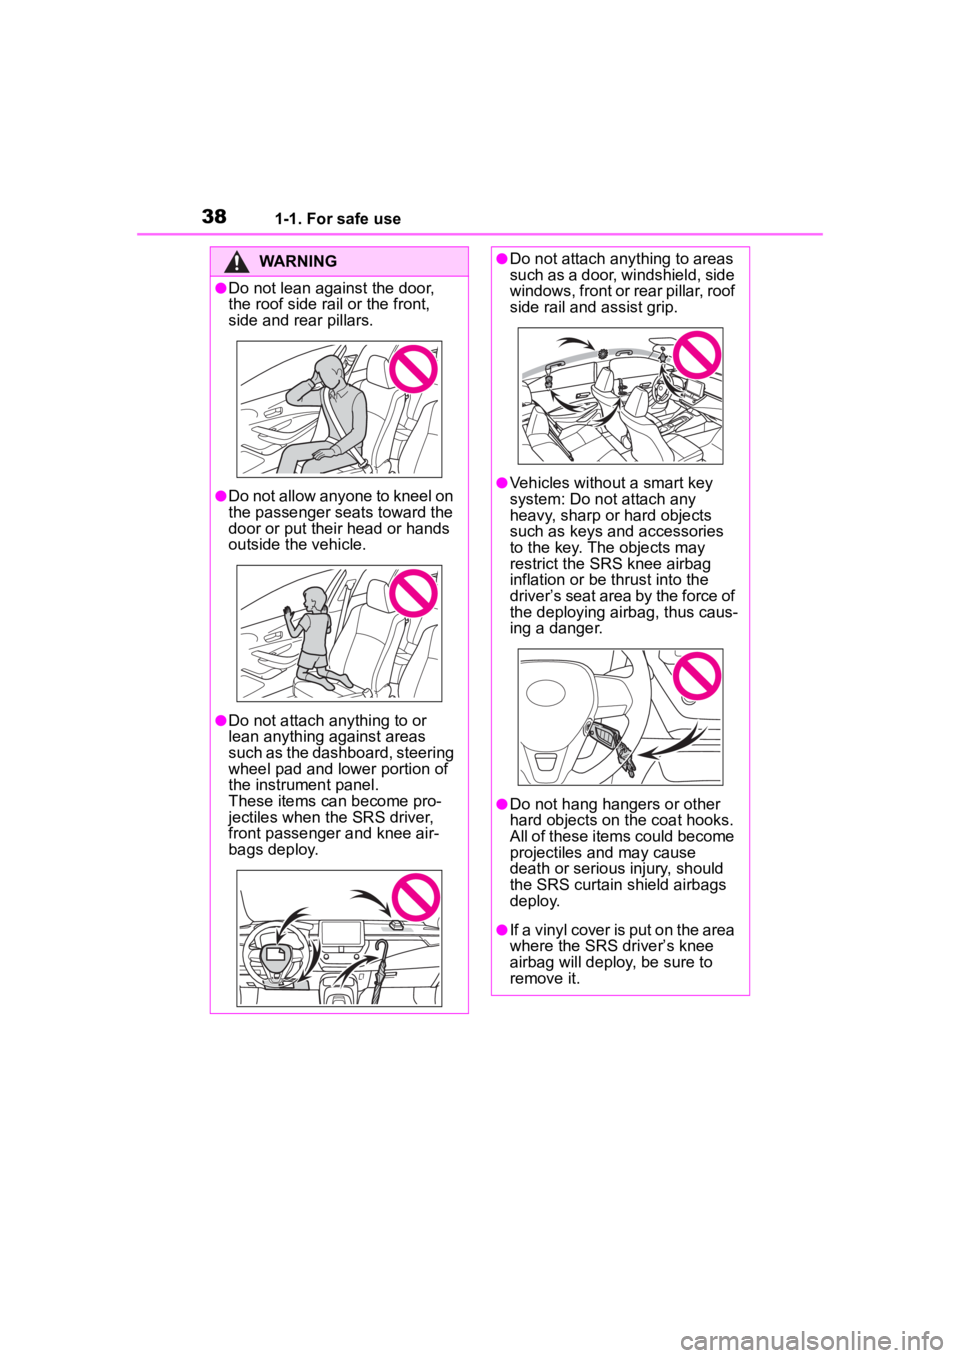
●Do not lean against the door,
the roof side rail or the front,
side and rear pillars.
●Do not allow anyone to kneel on
the passenger seats toward the
door or put their head or hands
outside the vehicle.
●Do not attach anything to or
lean anything against areas
such as the dashboard, steering
wheel pad and lower portion of
the instrument panel.
These items can become pro-
jectiles when the SRS driver,
front passenger and knee air-
bags deploy.
●Do not attach anything to areas
such as a door, windshield, side
windows, front or rear pillar, roof
side rail and assist grip.
●Vehicles without a smart key
system: Do not attach any
heavy, sharp or hard objects
such as keys and accessories
to the key. The objects may
restrict the SRS knee airbag
inflation or be thrust into the
driver’s seat area by the force of
the deploying airbag, thus caus-
ing a danger.
●Do not hang hangers or other
hard objects on the coat hooks.
All of these items could become
projectiles and may cause
death or serious injury, should
the SRS curtain shield airbags
deploy.
●If a vinyl cover is put on the area
where the SRS driver’s knee
airbag will deploy, be sure to
remove it.
Page 39 of 468
391-1. For safe use
1
For safety and security
WARNING
●Do not use seat accessories
which cover the parts where the
SRS side airbags and SRS seat
cushion airbag inflate as they
may interfere with inflation of
the SRS airbags. Such acces-
sories may prevent the side air-
bags and seat cushion airbag
from activating correctly, disable
the system or cause the side
airbags and seat cushion airbag
to inflate accidentally, resulting
in death or serious injury.
●Do not strike or apply significant
levels of force to the area of the
SRS airbag components or the
front doors.
Doing so can cause the SRS
airbags to malfunction.
●Do not touch any of the compo-
nent parts immediately after the
SRS airbags have deployed
(inflated) as they may be hot.
●If breathing becomes difficult
after the SRS airbags have
deployed, open a door or win-
dow to allow fresh air in, or
leave the vehicle if it is safe to
do so. Wash off any residue as
soon as possible to prevent skin
irritation.
●If the areas where the SRS air-
bags are stored, such as the
steering wheel pad and front
and rear pillar ga rnishes, are
damaged or cracked, have
them replaced by your Toyota
dealer.
●Do not place anything, such as
a cushion, on the front passen-
ger’s seat. Doing so will
disperse the passenger’s
weight, which prevents the sen-
sor from detecting the passen-
ger’s weight properly. As a
result, the SRS front airbags for
the front passenger may not
deploy in the event of a colli-
sion.
■Modification and disposal of
SRS airbag system compo-
nents
Do not dispose of your vehicle or
perform any of the following modi-
fications without consulting your
Toyota dealer. The SRS airbags
may malfunction or deploy
(inflate) accidentally, causing
death or serious injury.
●Installation, re moval, disassem-
bly and repair of the SRS air-
bags
●Repairs, modific ations, removal
or replacement of the steering
wheel, instrument panel, dash-
board, seats or seat upholstery,
front, side and rear pillars, roof
side rails, front door panels,
front door trims or front door
speakers
●Modifications to the front door
panel (such as making a hole in
it)
●Repairs or modifications of the
front fender, front bumper, or
side of the occupant compart-
ment
●Installation of a grille guard (bull
bars, kangaroo bar, etc.), snow
plows, winches or roof luggage
carrier
●Modifications to the vehicle’s
suspension system
Page 82 of 468
822-1. Instrument cluster
2-1.Instrument cluster
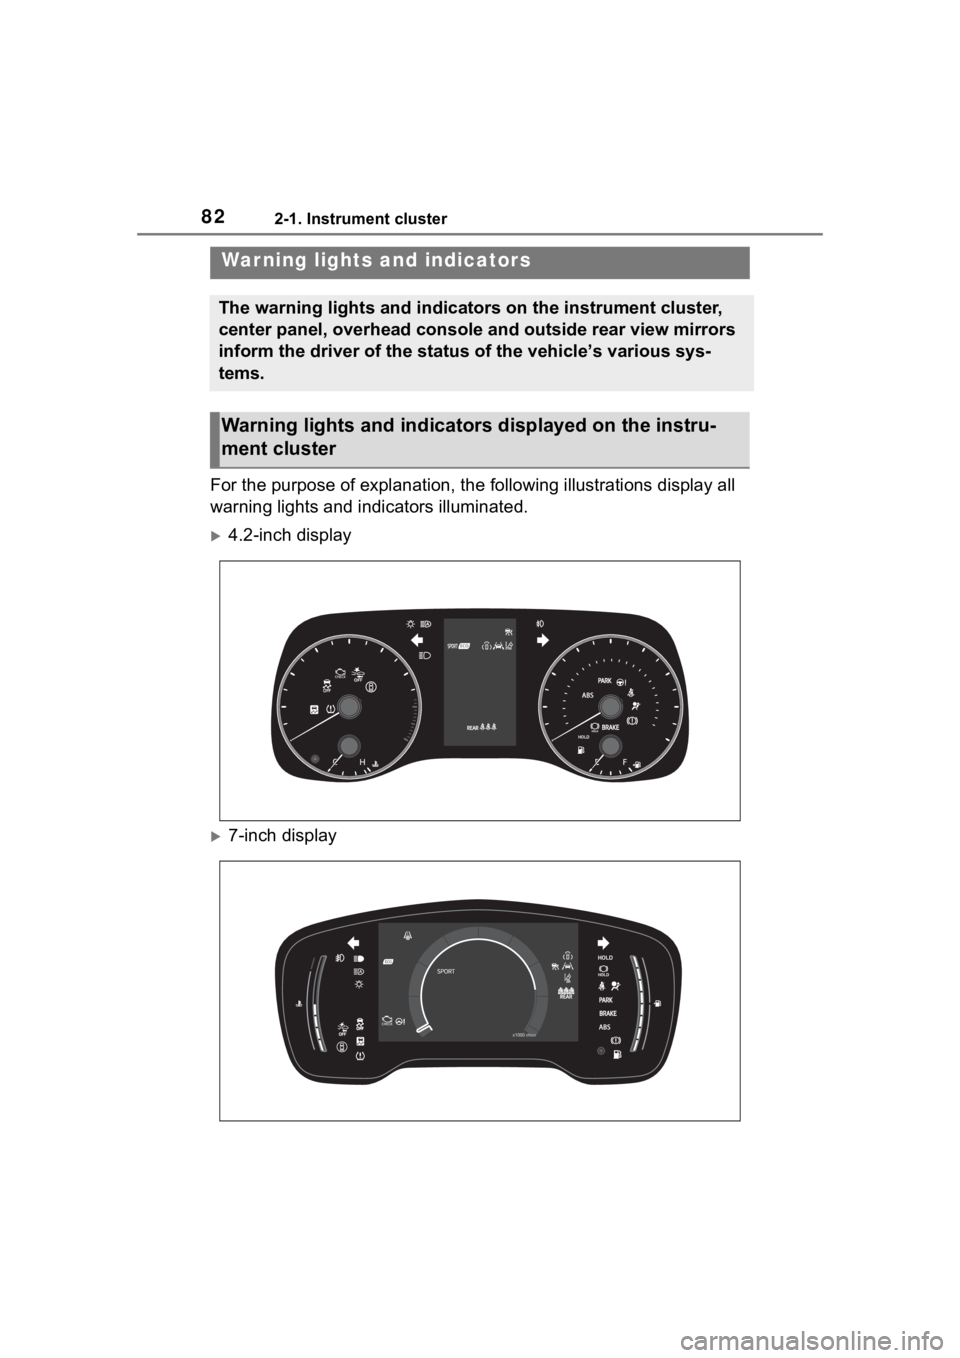
For the purpose of explanation, the following illustrations display all
warning lights and indicators illuminated.
4.2-inch display
7-inch display
War ning lights and indicators
The warning lights and indicators on the instrument cluster,
center panel, overhead console and outside rear view mirrors
inform the driver of the status of the vehicle’s various sys-
tems.
Warning lights and indicators displayed on the instru-
ment cluster
Page 85 of 468
852-1. Instrument cluster
2
Vehicle status information and indicators
*1: These lights come on when the engine switch is turned to ON to
indicate that a system check is
being performed. They will turn
off after the engine is started, or
after a few seconds. There may
be a malfunction in a system if
the lights do not come on, or turn
off. Have the vehicle inspected
by your Toyota dealer.
*2: This light comes on when the system is turned off.
*3: This light illumi nates on the out-
side rear view mirrors.
*4: This light illuminates on the multi-information display.
*5: When the outside temperature is approximately 37°F (3°C) or
lower, this indicator will flash for
approximately 10 seconds, then
stay on.
*6: This light illuminates on the cen-ter panel.
*7: This light illuminates on the over-head console.
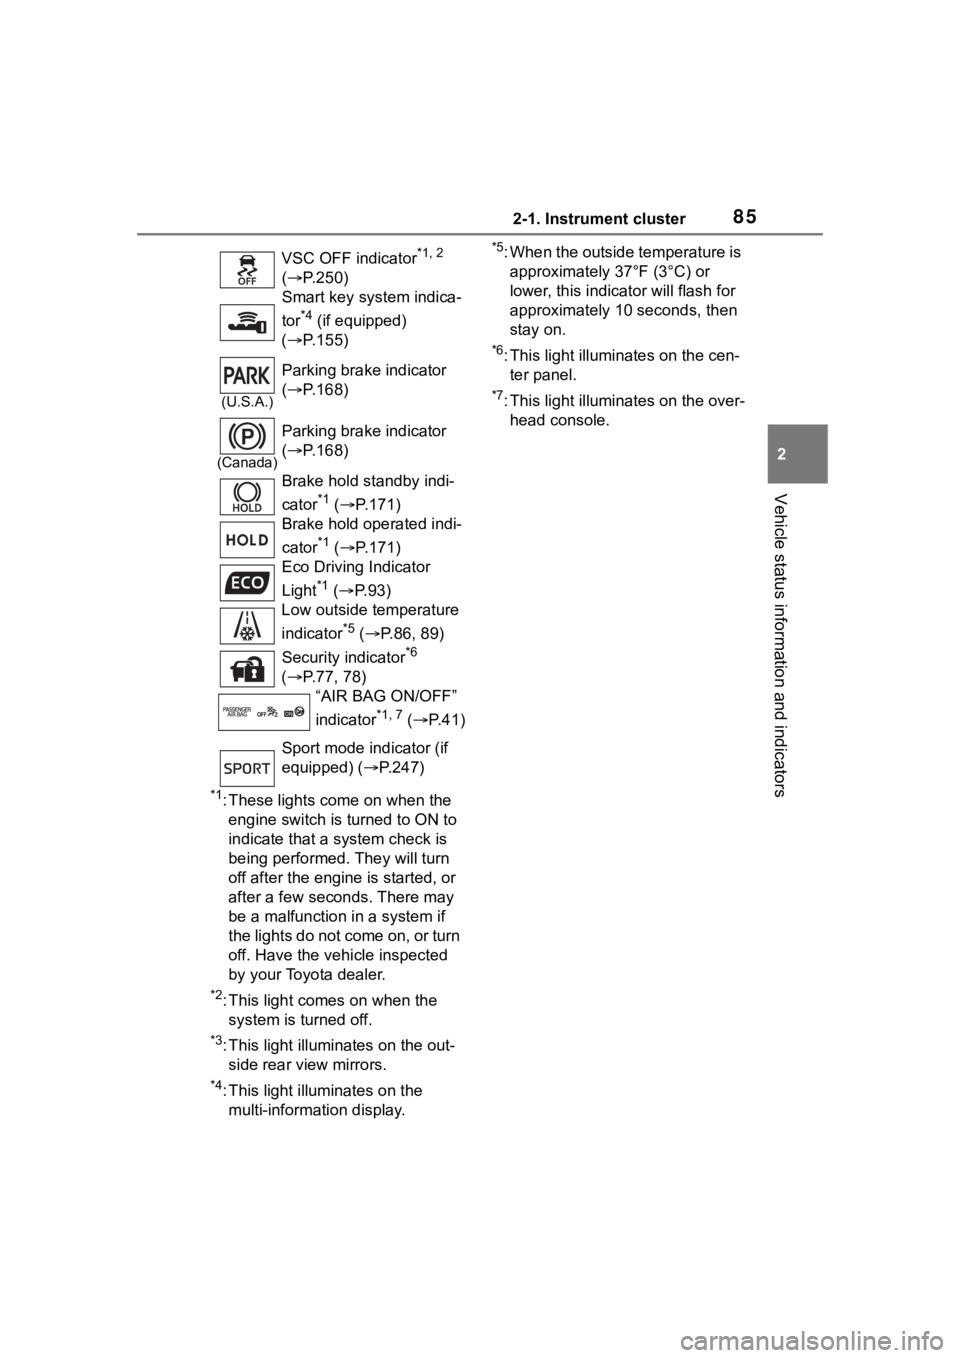
VSC OFF indicator
*1, 2
( P.250)
Smart key system indica-
tor
*4 (if equipped)
( P.155)
(U.S.A.)
Parking brake indicator
( P.168)
(Canada)
Parking brake indicator
( P.168)
Brake hold standby indi-
cator
*1 ( P.171)
Brake hold operated indi-
cator
*1 ( P.171)
Eco Driving Indicator
Light
*1 ( P. 9 3 )
Low outside temperature
indicator
*5 ( P.86, 89)
Security indicator
*6
( P.77, 78)
“AIR BAG ON/OFF”
indicator
*1, 7 ( P. 4 1 )
Sport mode indicator (if
equipped) ( P.247)
Page 88 of 468
882-1. Instrument cluster
different distances independently.
To reset, display the desired trip
meter and press and hold the dis-
play change button.
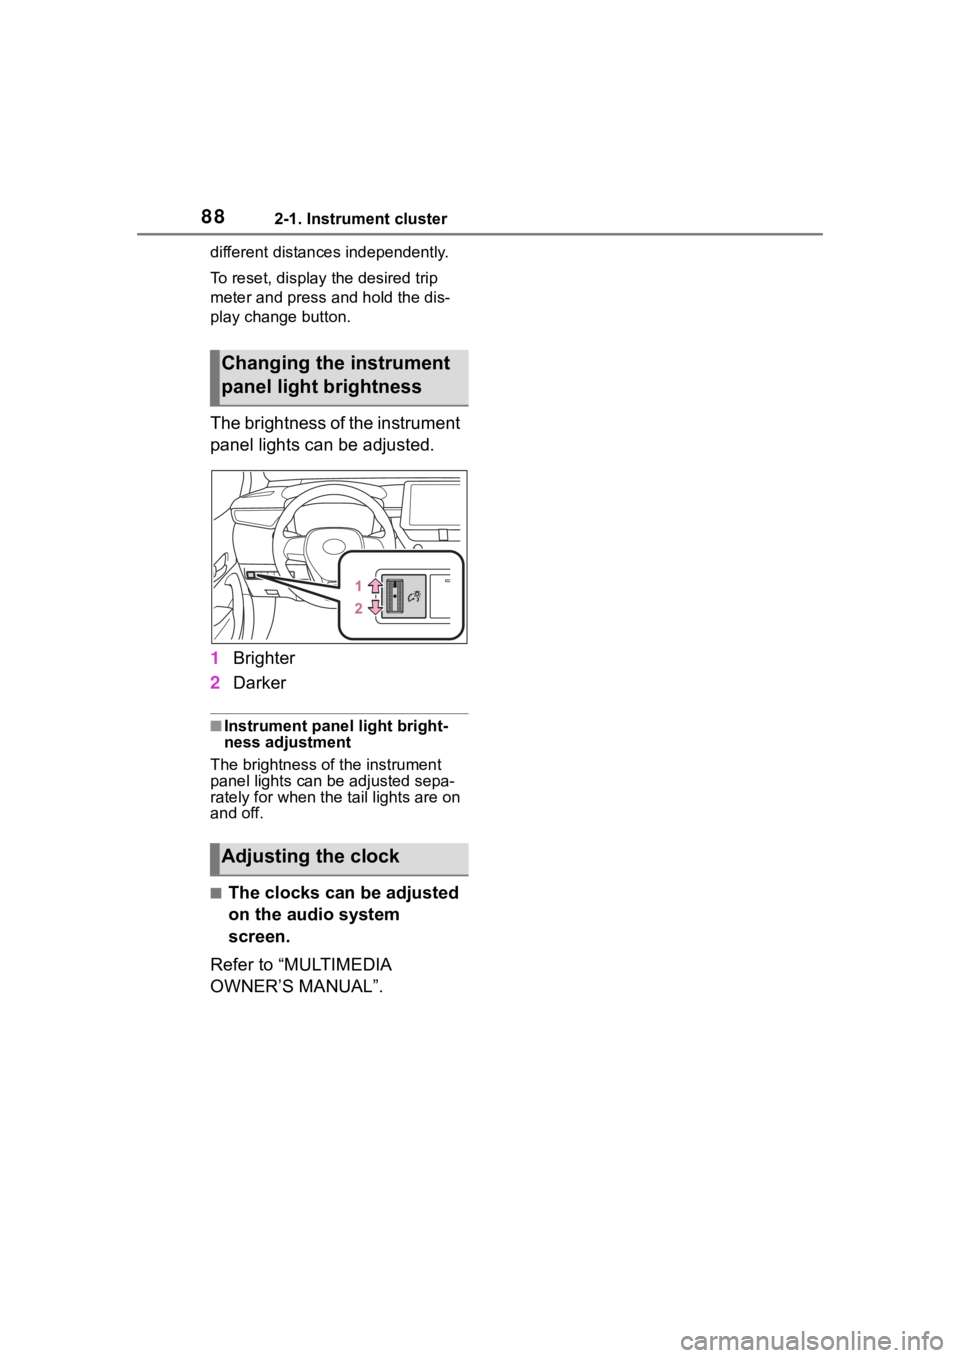
The brightness of the instrument
panel lights can be adjusted.
1Brighter
2 Darker
■Instrument panel light bright-
ness adjustment
The brightness of the instrument
panel lights can be adjusted sepa-
rately for when the tail lights are on
and off.
■The clocks can be adjusted
on the audio system
screen.
Refer to “MULTIMEDIA
OWNER’S MANUAL”.
Changing the instrument
panel light brightness
Adjusting the clock
Page 91 of 468
912-1. Instrument cluster
2
Vehicle status information and indicators
can be used to record and display
different distances independently.
To reset, display the desired trip
meter and press and hold the dis-
play change button.
The brightness of the instrument
panel lights can be adjusted.
1Brighter
2 Darker
■Instrument panel light bright-
ness adjustment
The brightness of the instrument
panel lights can be adjusted sepa-
rately for when the tail lights are on
and off.
■The clocks can be adjusted
on the audio system
screen.
Refer to “MULTIMEDIA
OWNER’S MANUAL”.
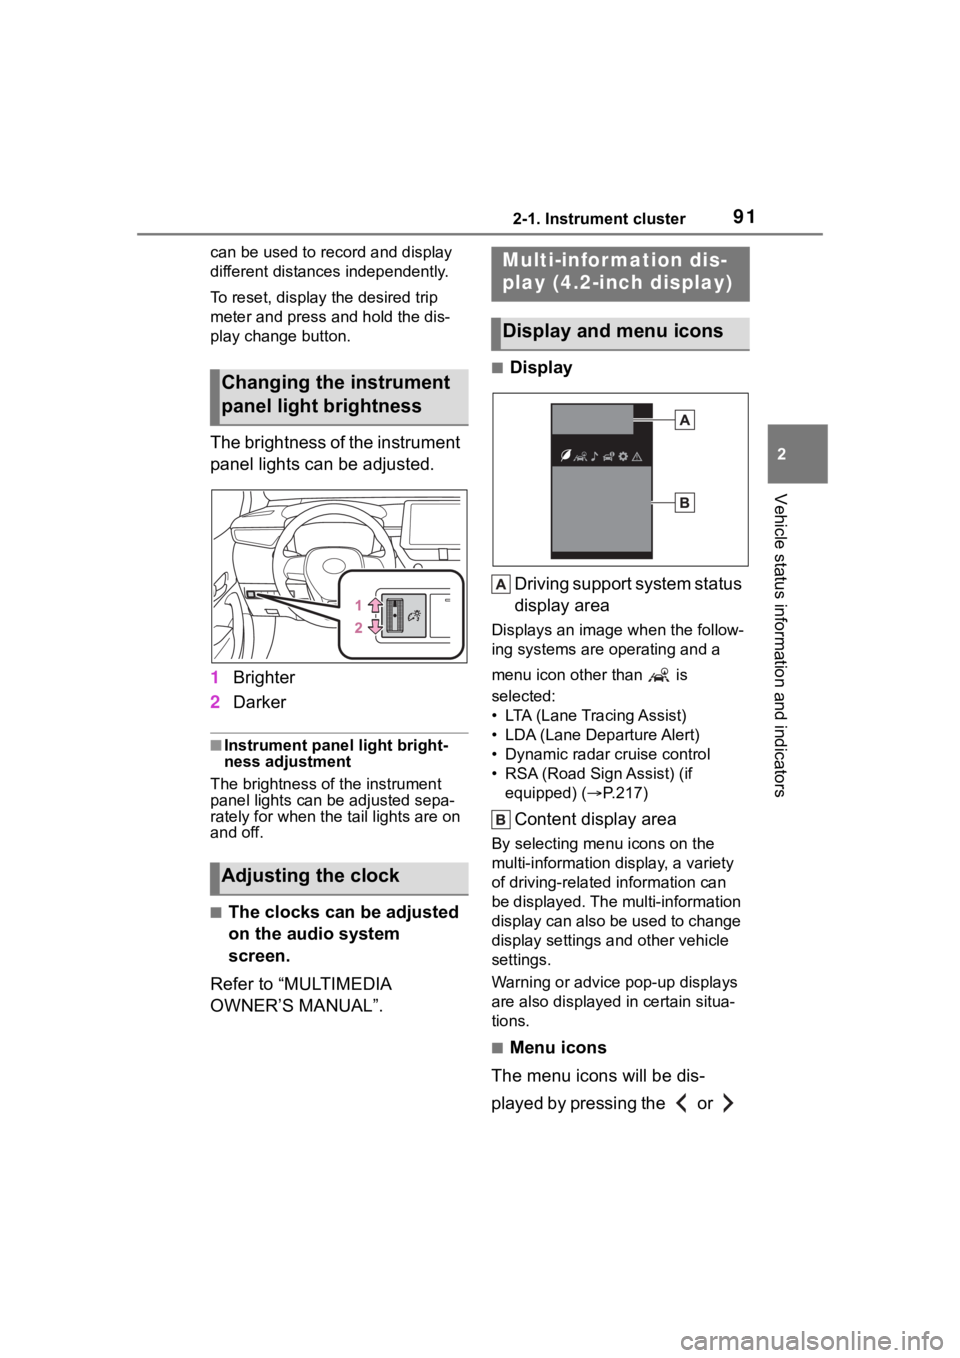
■Display
Driving support system status
display area
Displays an image when the follow-
ing systems are operating and a
menu icon other than is
selected:
• LTA (Lane Tracing Assist)
• LDA (Lane Departure Alert)
• Dynamic radar cruise control
• RSA (Road Sign Assist) (if equipped) ( P.217)
Content display area
By selecting menu icons on the
multi-information di splay, a variety
of driving-related information can
be displayed. The multi-information
display can also be used to change
display settings and other vehicle
settings.
Warning or advice pop-up displays
are also displayed in certain situa-
tions.
■Menu icons
The menu icons will be dis-
played by pressing the or
Changing the instrument
panel light brightness
Adjusting the clock
Multi-infor mation dis-
play (4.2-inch display)
Display and menu icons
Page 122 of 468

1223-2. Opening, closing and locking the doors
●Near a TV tower, electric power
plant, gas station, radio station,
large display, airpo rt or other facil-
ity that generates strong radio
waves or electrical noise
●When carrying a portable radio,
cellular phone, cordless phone or
other wireless communication
device
●When the electronic key is in con-
tact with, or is covered by the fol-
lowing metallic objects
• Cards to which al uminum foil is
attached
• Cigarette boxes that have alumi- num foil inside
• Metallic wallets or bags
• Coins
• Hand warmers made of metal
• Media such as CDs and DVDs
●When other wireless keys (that
emit radio waves) are being used
nearby
●When carrying the electronic key
together with the following devices
that emit radio waves
• Another vehicle’s electronic key or a wireless key that emits radio
waves
• Personal computers or personal digital assistants (PDAs)
• Digital audio players
• Portable game systems
●If window tint with a metallic con-
tent or metallic objects are
attached to the rear window
●When the electronic key is placed
near a battery charger or elec-
tronic devices
●When the vehicle is parked in a
pay parking spot where radio
waves are emitted
If the doors cannot be
locked/unlocked using the smart key
system, lock/unlock the doors by
performing any of the following:
●Bring the electronic key close to
either front door handle and oper-
ate the entry function.
●Operate the wireless remote con- trol.
If the doors cannot be
locked/unlocked using the above
methods, use the mechanical key.
( P.382)
If the engine cannot be started using
the smart key system, refer to
P.382.
■Note for the entry function
●Even when the electronic key is
within the effective range (detec-
tion areas), the system may not
operate properly in the following
cases:
• The electronic key is too close to the window or outside door han-
dle, near the ground, or in a high
place when the doors are locked
or unlocked.
• The electronic key is near the ground or in a high place, or too
close to the center of the rear
bumper when the trunk is opened.
• The electronic key is on the instru- ment panel, rear package tray or
floor, or in the door pockets or
glove box when the engine is
started or engine switch modes
are changed.
●Do not leave the electronic key on
top of the instrument panel or near
the door pockets when exiting the
vehicle. Depending on the radio
wave reception conditions, it may
be detected by the antenna out-
side the cabin and the door will
become lockable from the outside,
possibly trapping the electronic
key inside the vehicle.
●As long as the electronic key is
within the effective range, the
doors may be locked or unlocked
by anyone. However, only the
doors detecting the electronic key
can be used to unlock the vehicle.
●Even if the electro nic key is not
inside the vehicle, it may be possi-
ble to start the engine if the elec-
tronic key is near the window.
●The doors may unlock or lock if a
large amount of water splashes on