sensor TOYOTA COROLLA 2023 Owners Manual
[x] Cancel search | Manufacturer: TOYOTA, Model Year: 2023, Model line: COROLLA, Model: TOYOTA COROLLA 2023Pages: 468, PDF Size: 14.4 MB
Page 6 of 468

6
may work in situations where it
should not be working.
Installing electronic devices and
radios increases the risk of
cyber attacks through the
installed parts, which may lead
to unexpected accidents and
leakage of personal informa-
tion. Toyota does not make any
guarantees for problems caused
by installing non-genuine Toyota
products.
The installation of a mobile
two-way radio system in your
vehicle could affect electronic
systems such as:
Multiport fuel injection sys-
tem/sequential multiport fuel
injection system
Toyota Safety Sense 3.0
Anti-lock brake system
SRS airbag system
Seat belt pretensioner system
Be sure to check with your Toy-
ota dealer for precautionary
measures or special instructions
regarding installation of a mobile
two-way radio system. This vehicle is equipped with
sophisticated computers that
record certain data regarding
vehicle controls and operations.
Data recorded by the comput-
ers
*1
Certain data, such as the following,
is recorded dependi ng on the oper-
ation timing and status of each
function.
• Basic vehicle behavior related data (engine speed, accelera-
tor/brake pedal operation, vehi-
cle speed, etc.)
• Operating state of the driving support systems (recorded during
system operation, includes basic
vehicle behavior related data)
• Driving support system sensor data
• Image data (images from the front, rear and side cameras)
*2
• Location information
These computers do not record
conversations, sounds, or
images of the inside of the vehi-
cle.
Also, personal information which
may be used to identify the
owner of the vehicle (name,
gender, age, etc.) is not
recorded.
*1: The recorded data varies accord-
ing to the vehicle grade level and
options with which it is equipped.
*2: The vehicle has multiple cam-eras. For details on from which
Cyber Attack Risk
Installation of a mobile
two-way radio system
Vehicle data recording
Page 7 of 468

7
cameras images are recorded,
contact your Toyota dealer.
Usage of recorded data and
personal information by the
Toyota Safety Sense 3.0
The operating state of each sys-
tem, data from eac h sensor, image
data (images from the front/rear
cameras), and position information
is recorded by the Toyota Safety
Sense 3.0 in the following situa-
tions. Toyota obtains this informa-
tion when the vehicle is brought to
the dealership or when sent to the
Toyota servers.
• In certain collisions or colli- sion-like situations
• When driving on roads with cer- tain traffic situ ations, such as
congestion, poor road surfaces,
poor weather, etc.
• When driving on certain roads, such as roads which were
recently opened or extended
• After the engine is started, for a certain amount of time
To learn more about the vehicle
data collected, used and shared by
Toyota, please visit www.toy-
ota.com/privacyvts/.
Data provision and use pur-
pose by third parties
Data recorded by the computers
may be used for collision analysis,
malfunction diagnosis, automated
driving, advanced safety and map
related technologies (technology,
product development, product
improvement, etc.) and products
and services which use data (maps
used for automated driving and advanced safety
technologies, driv-
ing condition analysis, analysis of
the driving environment, such as
road infrastructure, traffic condition
communication, etc. Herein
referred to as “individual ser-
vices”.) Also, this data may be used
for customer support related to a
collision, collision analysis or reso-
lution.
In situations such as the following,
Toyota may disclose the recorded
data to a third party:
• When the consent of the vehicle owner (or the lessee if the vehicle
is leased) has been given
• When officially requested by the police, a court of law or a govern-
ment agency
• When it is to be used by Toyota in a lawsuit
• When data is to be used research purposes after processing so that
the data is not ti ed to a specific
vehicle or vehicle owner
In addition to the above, Toyota
may disclose the data recorded by
the Toyota Safety Sense 3.0 to a
third party in the following situa-
tions:
• When separate consent of the vehicle owner (or the lessee if the
vehicle is leased) has been given.
This includes situations when the
user subscribes to an individual
service which is provided by a
second party and uses vehicle
recorded data, where the provider
has obtained the user’s consent
for providing data to a third-party
• When providing data to a com- pany involved in autonomous
Page 32 of 468
321-1. For safe use
SRS rear side airbags
Can help protect the torso of occupants in the rear outer seats
SRS curtain shield airbags
• Can help protect primarily the h ead of occupants in the outer seats
• Can help prevent the occupants from being thrown from the vehi cle in the
event of vehicle rollover
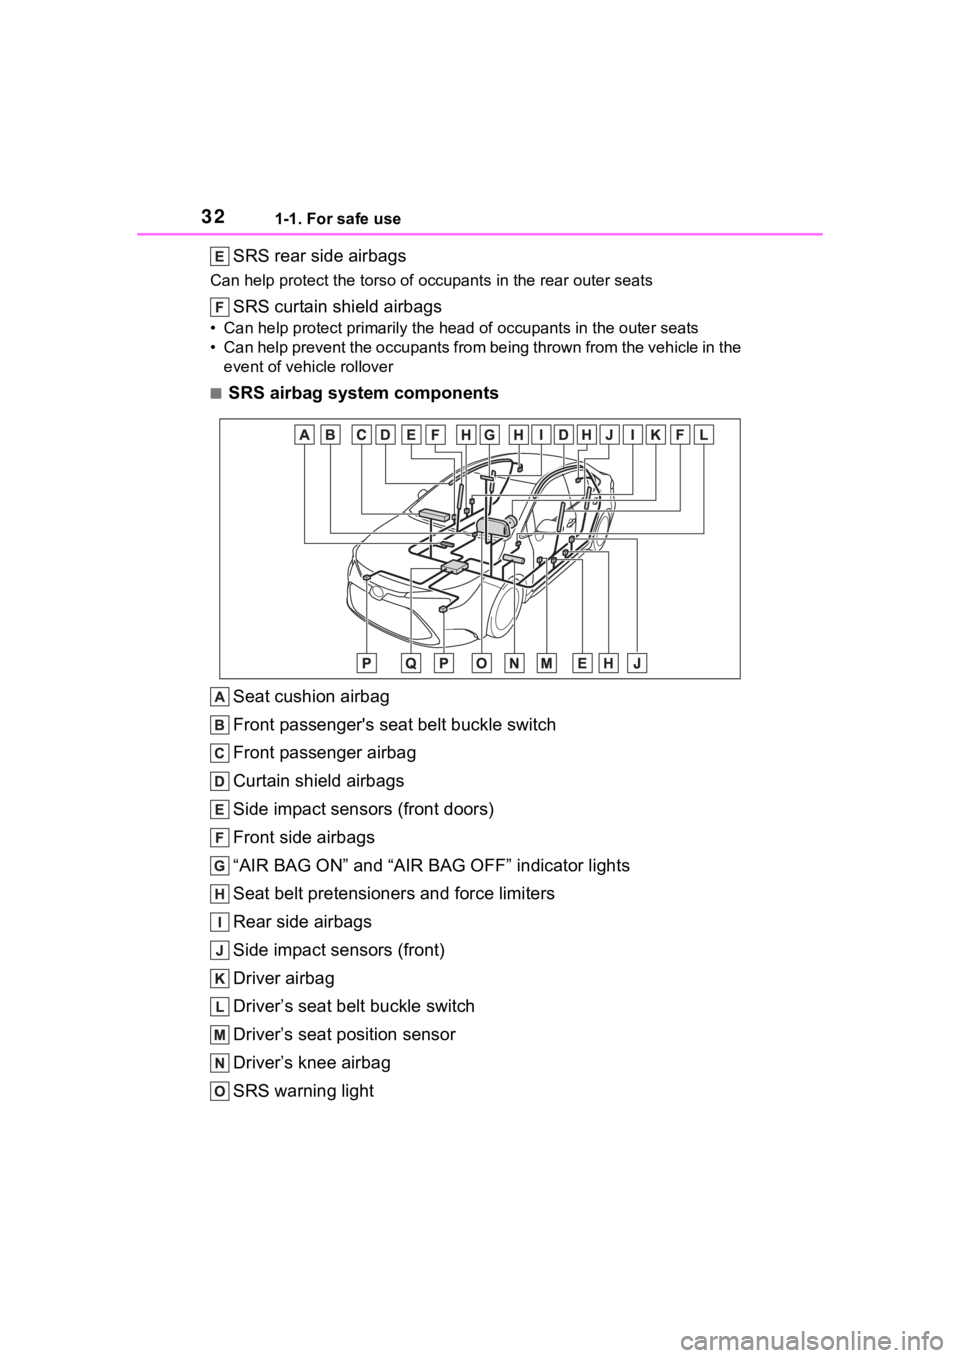
■SRS airbag system components
Seat cushion airbag
Front passenger's seat belt buckle switch
Front passenger airbag
Curtain shield airbags
Side impact sensors (front doors)
Front side airbags
“AIR BAG ON” and “AIR BAG OFF” indicator lights
Seat belt pretensioners and force limiters
Rear side airbags
Side impact sensors (front)
Driver airbag
Driver’s seat bel t buckle switch
Driver’s seat position sensor
Driver’s knee airbag
SRS warning light
Page 33 of 468

331-1. For safe use
1
For safety and security
Front impact sensors
Airbag sensor assembly
Your vehicle is equipped with ADVANCED AIRBAGS designed
based on the US motor vehicle safety standards (FMVSS208). The
airbag sensor assembly (ECU) cont rols airbag deployment based on
information obtained from the sensors etc. shown in the system
components diagram above. This in formation includes crash sever-
ity and occupant information. As the airbags deploy, a chemical
reaction in the inflators quickly fills the airbags with non-toxic gas to
help restrain the motion of the occupants.
■If the SRS airbags deploy
(inflate)
●Slight abrasions, burns, bruising
etc., may be sustained from SRS
airbags, due to the extremely high
speed deployment (inflation) by
hot gases.
●A loud noise and white powder will
be emitted.
●Parts of the airbag module (steer-
ing wheel hub, airbag cover and
inflator) as well as the front seats,
parts of the front and rear pillars,
and roof side rails, may be hot for
several minutes. T he airbag itself
may also be hot.
●The windshield may crack.
●The brakes and st op lights will be
controlled automatically. ( P.249)
●The interior lights will turn on auto-
matically. ( P.272)
●The emergency flashers will turn
on automatically. ( P.348)
●Fuel supply to the engine will be
stopped. (P.355)
●For Safety Connect subscribers, if
any of the followin g situations
occur, the system is designed to
send an emergency call to the
response center, notifying them of
the vehicle’s location (without
needing to push the “SOS” button)
and an agent will attempt to speak
with the occupants to ascertain the level of emergency and assis-
tance required. If the occupants
are unable to communicate, the
agent automatically treats the call
as an emergency and helps to dis-
patch the necessary emergency
services. (
P. 7 2 )
• An SRS airbag is deployed.
• A seat belt pretensioner is acti- vated.
• The vehicle is involved in a severe rear-end collision.
■SRS airbag deployment condi-
tions (SRS front airbags)
●The SRS front airbags will deploy
in the event of an impact that
exceeds the set threshold level
(the level of forc e corresponding
to an approximately 12 - 18 mph
[20 - 30 km/h] frontal collision with
a fixed wall that does not move or
deform).
However, this threshold velocity will
be considerably higher in the follow-
ing situations:
• If the vehicle strikes an object, such as a parked vehicle or sign
pole, which can move or deform
on impact
• If the vehicle is involved in an underride collision, such as a colli-
sion in which the front of the vehi-
cle “underrides”, or goes under,
the bed of a truck
●Depending on the type of collision,
it is possible that only the seat belt
pretensioners will activate.
Page 111 of 468
1113-2. Opening, closing and locking the doors
3
Before driving
3-2.Opening, closing and locking the doors
■Smart key system (if
equipped)
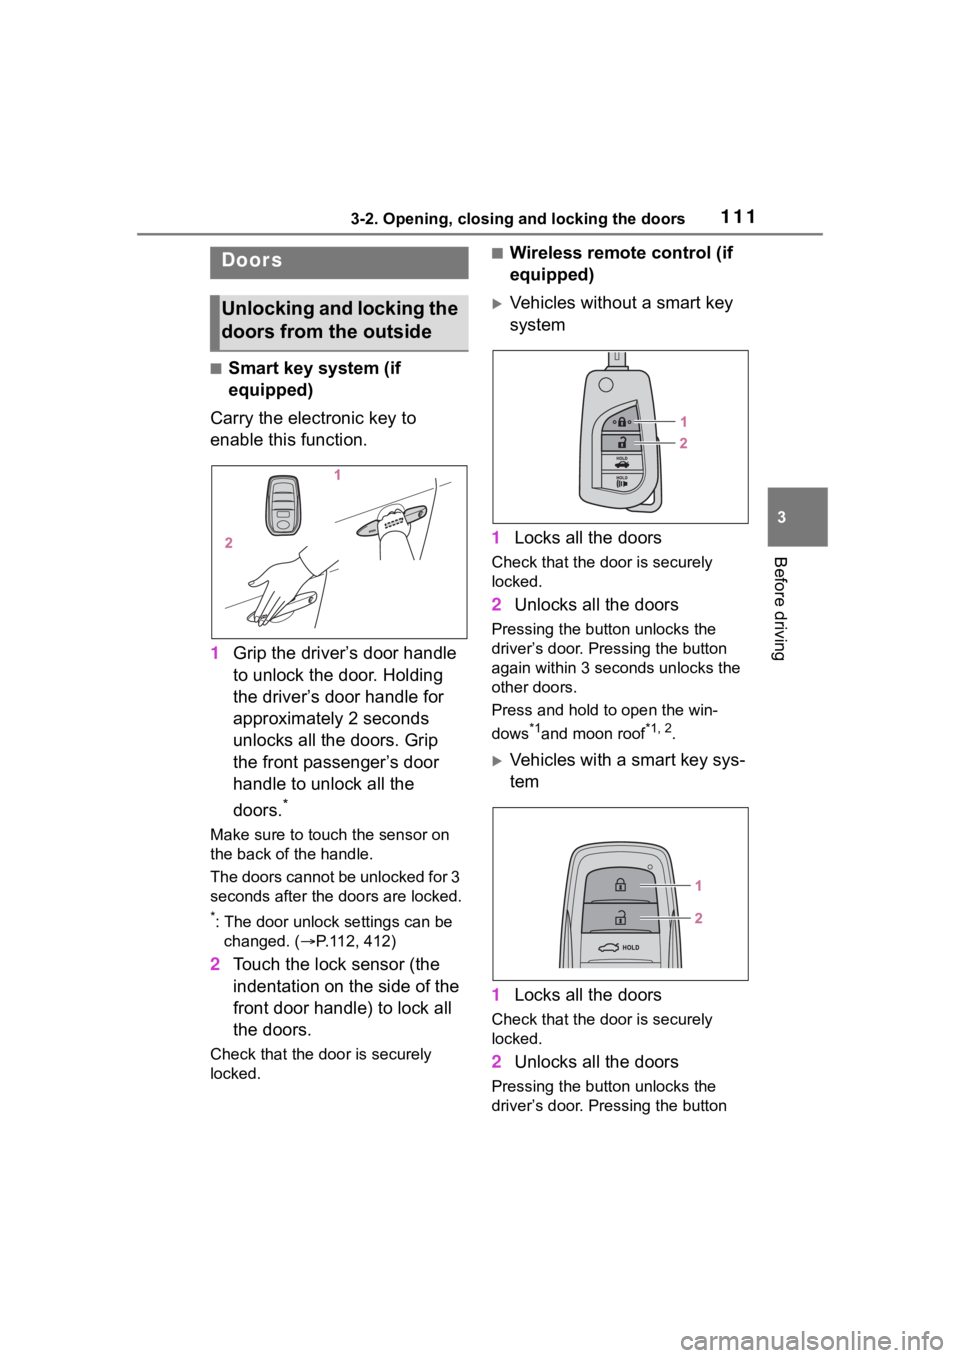
Carry the electronic key to
enable this function.
1 Grip the driver’s door handle
to unlock the door. Holding
the driver’s door handle for
approximately 2 seconds
unlocks all the doors. Grip
the front passenger’s door
handle to unlock all the
doors.
*
Make sure to touch the sensor on
the back of the handle.
The doors cannot be unlocked for 3
seconds after the doors are locked.
*: The door unlock settings can be
changed. ( P.112, 412)
2 Touch the lock sensor (the
indentation on the side of the
front door handle) to lock all
the doors.
Check that the door is securely
locked.
■Wireless remote control (if
equipped)
Vehicles without a smart key
system
1 Locks all the doors
Check that the d oor is securely
locked.
2 Unlocks all the doors
Pressing the button unlocks the
driver’s door. Pressing the button
again within 3 seconds unlocks the
other doors.
Press and hold to open the win-
dows
*1and moon roof*1, 2.
Vehicles with a smart key sys-
tem
1 Locks all the doors
Check that the d oor is securely
locked.
2 Unlocks all the doors
Pressing the button unlocks the
driver’s door. Pressing the button
Doors
Unlocking and locking the
doors from the outside
Page 113 of 468
1133-2. Opening, closing and locking the doors
3
Before driving
is not opened within 60 seconds
after is pressed, the doors will
be locked again an d the alarm will
automatically be set.)
In case that the alarm is triggered,
immediately stop the alarm. ( P. 7 8 )
■Operation signals (with a wire-
less remote control function)
Vehicles without a smart key sys-
tem
A buzzer sounds and the emer-
gency flashers flash to indicate that
the doors have been
locked/unlocked using the wireless
remote control. (Locked: Once;
Unlocked: Twice)
Vehicles with a smart key system
A buzzer sounds and the emer-
gency flashers flash to indicate that
the doors have been
locked/unlocked using the entry
function or wireless remote control.
(Locked: Once; Unlocked: Twice)
A buzzer sounds to indicate that the
windows and moon roof
*are operat-
ing.
*: If equipped
■S e c u r i t y f e a t u r e ( w i t h a w i r e l e s s
remote control function)
Vehicles without a smart key sys-
tem
If a door is not opened within
approximately 60 seconds after the
vehicle is unlocked using the wire-
less remote control, the security fea-
ture automatically locks the vehicle
again.
Vehicles with a smart key system
If a door is not opened within
approximately 60 seconds after the
vehicle is unlocked using the entry
function or wireless remote control,
the security featu re automatically
locks the vehicle again.
■When the door cannot be
locked by the lock sensor on
the surface of the front door
handle (vehicles with a smart
key system)
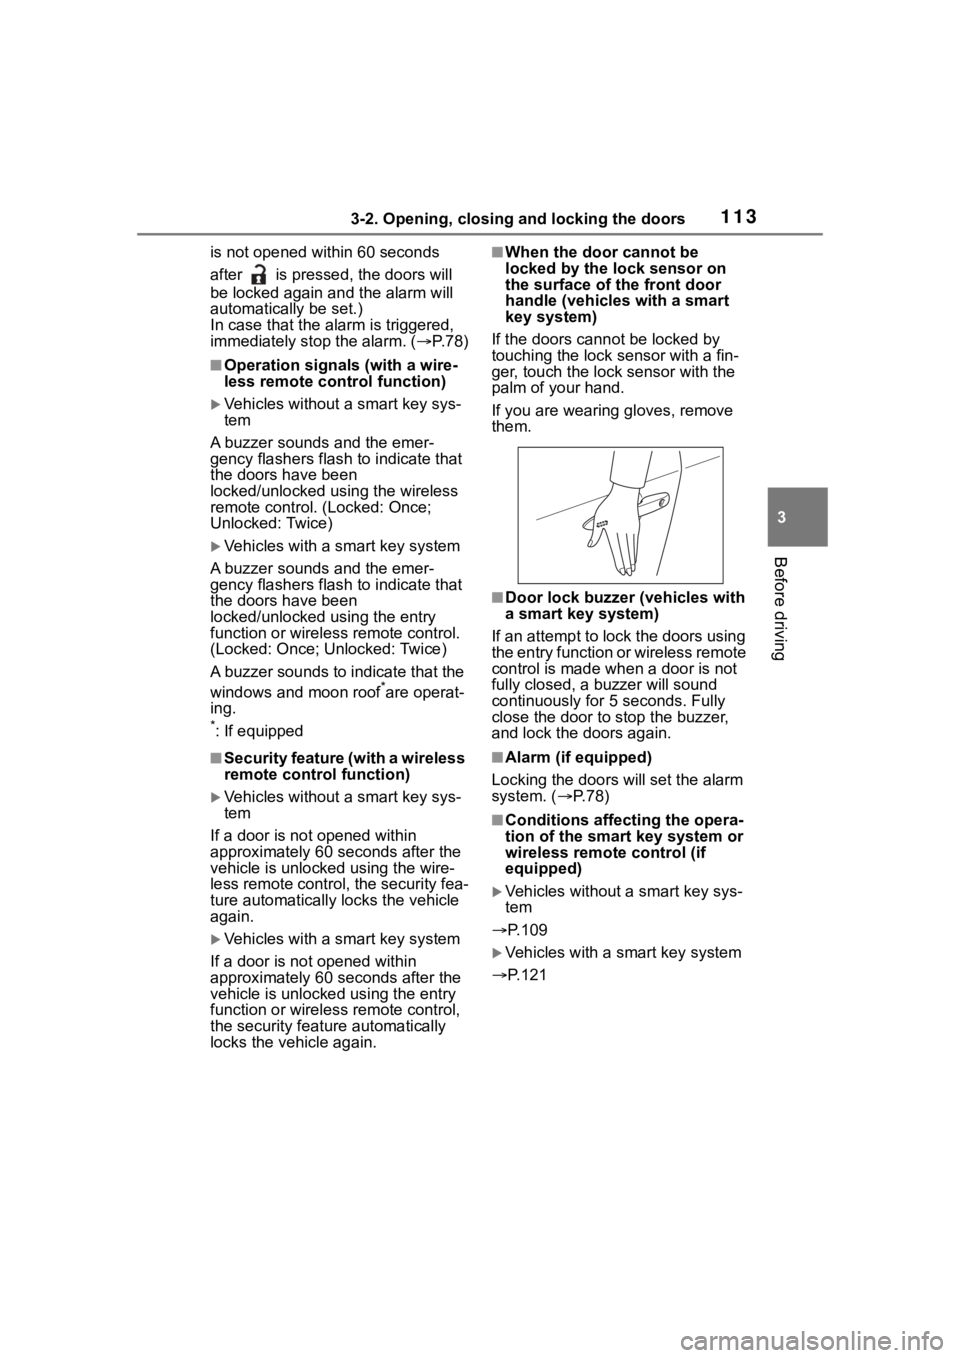
If the doors cannot be locked by
touching the lock se nsor with a fin-
ger, touch the lock sensor with the
palm of your hand.
If you are wearing gloves, remove
them.
■Door lock buzzer (vehicles with
a smart key system)
If an attempt to lock the doors using
the entry function or wireless remote
control is made when a door is not
fully closed, a b uzzer will sound
continuously for 5 seconds. Fully
close the door to stop the buzzer,
and lock the doors again.
■Alarm (if equipped)
Locking the doors will set the alarm
system. ( P. 7 8 )
■Conditions affecting the opera-
tion of the smart key system or
wireless remote control (if
equipped)
Vehicles without a smart key sys-
tem
P.109
Vehicles with a smart key system
P.121
Page 123 of 468

1233-2. Opening, closing and locking the doors
3
Before driving
the door handle, such as in the
rain or in a car wash when the
electronic key is within the effec-
tive range. (The doors will auto-
matically be locked after
approximately 60 seconds if the
doors are not opened and closed.)
●If the wireless remote control is
used to lock the doors when the
electronic key is near the vehicle,
there is a possib ility that the door
may not be unlocke d by the entry
function. (Use the wireless remote
control to unloc k the doors.)
●If the doors have been locked
from outside of the vehicle and are
then not unlocked using the wire-
less remote contr ol or smart key
system, the engine cannot be
started using the smart key sys-
tem. (However, if the doors have
been locked from inside the vehi-
cle, the engine can be started
using the smart key system.)
If it is necessary to start the
engine, it can be started using the
procedure in “If the electronic key
dose not operate properly”
( P.382).
●Touching the door lock or unlock
sensor while wearing gloves may
prevent lock or unlock operation.
●When the lock op eration is per-
formed using the lock sensor, rec-
ognition signals will be shown up
to two consecutive times. After
this, no recogniti on signals will be
given.
●If the door handle becomes wet
while the electronic key is within
the effective ran ge, the door may
lock and unlock repeatedly. In that
case, follow the fo llowing correc-
tion procedures to wash the vehi-
cle:
• Place the electronic key in a loca- tion 6 ft. (2 m) or more away from
the vehicle. (Take care to ensure
that the key is not stolen.)
• Set the electronic key to bat-
tery-saving mode to disable the
smart key system. ( P.121)
●If the electronic key is inside the
vehicle and a door handle
becomes wet during a car wash, a
message may be shown on the
multi-information display and a
buzzer will sound outside the vehi-
cle. To turn off the alarm, lock all
the doors.
●The lock sensor may not work
properly if it comes into contact
with ice, snow, mud, etc. Clean
the lock sensor and attempt to
operate it again.
●A sudden handle operation or a
handle operation immediately
after entering the effective range
may prevent the doors from being
unlocked. Touch the door unlock
sensor and check that the doors
are unlocked befo re pulling the
door handle again.
●If there is another electronic key in
the detection area, it may take
slightly longer to unlock the doors
after the door handle is gripped.
■When the vehicle is not driven
for extended periods
●To prevent theft of the vehicle, do
not leave the electronic key within
6 ft. (2 m) of the vehicle.
●The smart key system can be
deactivated in advance. ( P.412)
●Setting the electronic key to bat-
tery-saving mode helps to reduce
key battery depletion. ( P.121)
■To operate the system properly
●Make sure to carry the electronic
key when operating the system.
Do not get the electronic key too
close to the vehicle when operat-
ing the system from the outside of
the vehicle.
Depending on the position and hold-
ing condition of the electronic key,
the key may not be detected cor-
rectly and the system may not oper-
ate properly. (The alarm may go off
accidentally, or the door lock pre-
vention function m ay not operate.)
Page 174 of 468
1744-3. Operating the lights and wipers
●To make your vehicle more visible
to other drivers during daytime
driving, the daytime running lights
turn on automatically when all of
the following conditions are met.
(The daytime running lights are
not designed for use at night.)
• The engine is running
• The parking brake is released
• The headlight switch is in the
or
* position
*: When the surroundings are bright
The daytime running lights remain
on after they illumi nate, even if the
parking brake is set again.
●For the U.S.A.: Daytime running
lights can be turned off by operat-
ing the switch.
●Compared to turning on the head-
lights, the daytime running light
system offers gr eater durability
and consumes less electricity, so
it can help improve fuel economy.
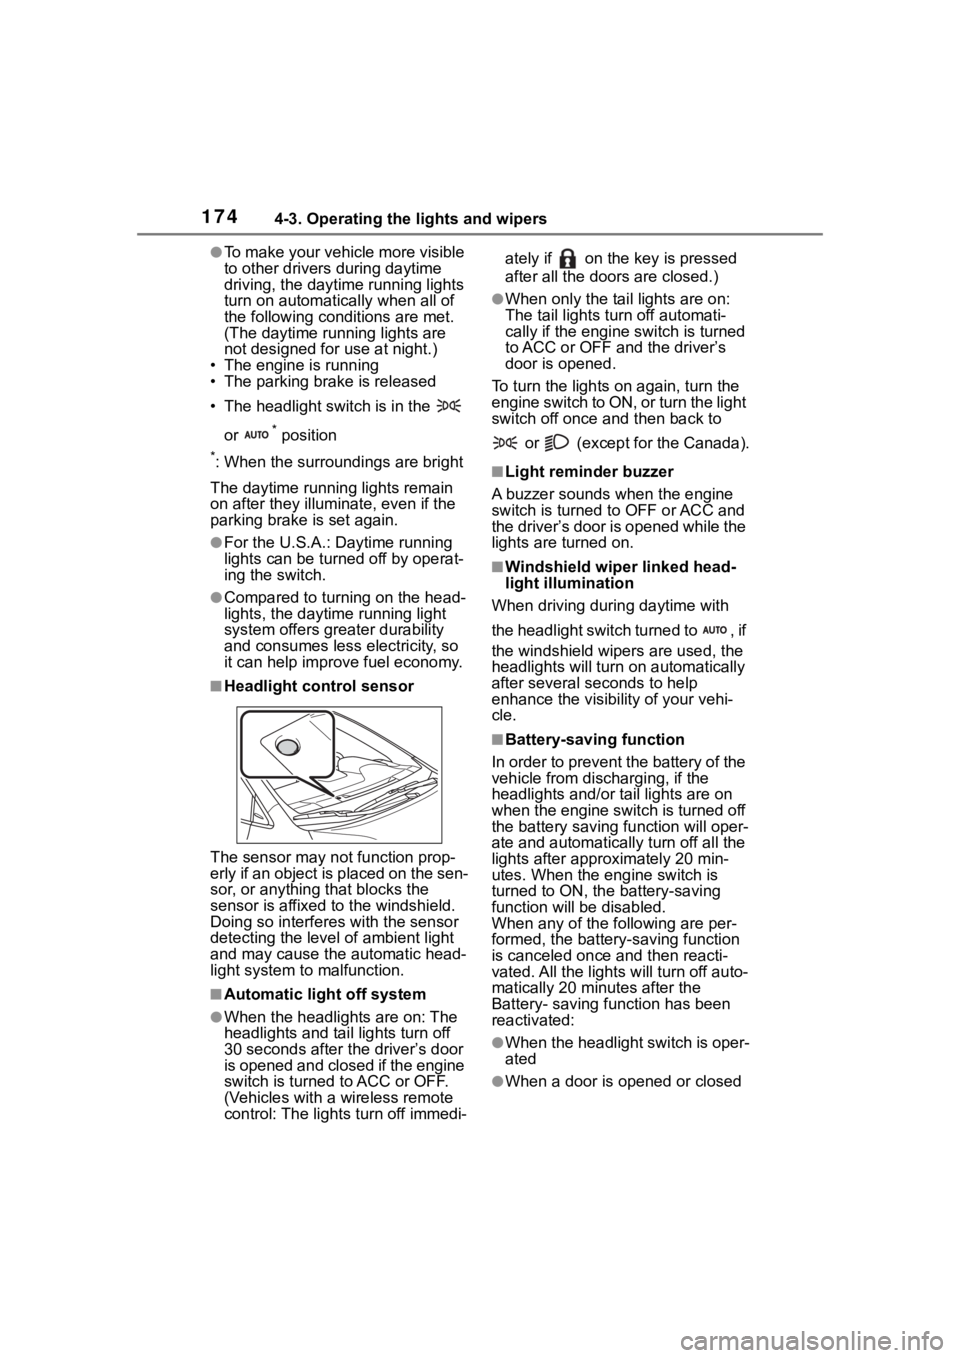
■Headlight control sensor
The sensor may not function prop-
erly if an object is placed on the sen-
sor, or anything that blocks the
sensor is affixed to the windshield.
Doing so interfere s with the sensor
detecting the level of ambient light
and may cause the automatic head-
light system to malfunction.
■Automatic light off system
●When the headlights are on: The
headlights and tail lights turn off
30 seconds after the driver’s door
is opened and closed if the engine
switch is turned to ACC or OFF.
(Vehicles with a wireless remote
control: The lights turn off immedi- ately if on the key is pressed
after all the doors are closed.)
●When only the tail lights are on:
The tail lights turn off automati-
cally if the engine switch is turned
to ACC or OFF and the driver’s
door is opened.
To turn the lights on again, turn the
engine switch to ON, or turn the light
switch off once and then back to
or (except for the Canada).
■Light reminder buzzer
A buzzer sounds when the engine
switch is turned t o OFF or ACC and
the driver’s door is opened while the
lights are turned on.
■Windshield wiper linked head-
light illumination
When driving during daytime with
the headlight switch turned to , if
the windshield wipers are used, the
headlights will turn o n automatically
after several se conds to help
enhance the visibility of your vehi-
cle.
■Battery-saving function
In order to prevent the battery of the
vehicle from discharging, if the
headlights and/or tail lights are on
when the engine switch is turned off
the battery saving function will oper-
ate and automatically turn off all the
lights after approximately 20 min-
utes. When the engine switch is
turned to ON, the battery-saving
function will be disabled.
When any of the following are per-
formed, the battery-saving function
is canceled once and then reacti-
vated. All the lights will turn off auto-
matically 20 minutes after the
Battery- saving function has been
reactivated:
●When the headlight switch is oper-
ated
●When a door is opened or closed
Page 176 of 468
1764-3. Operating the lights and wipers
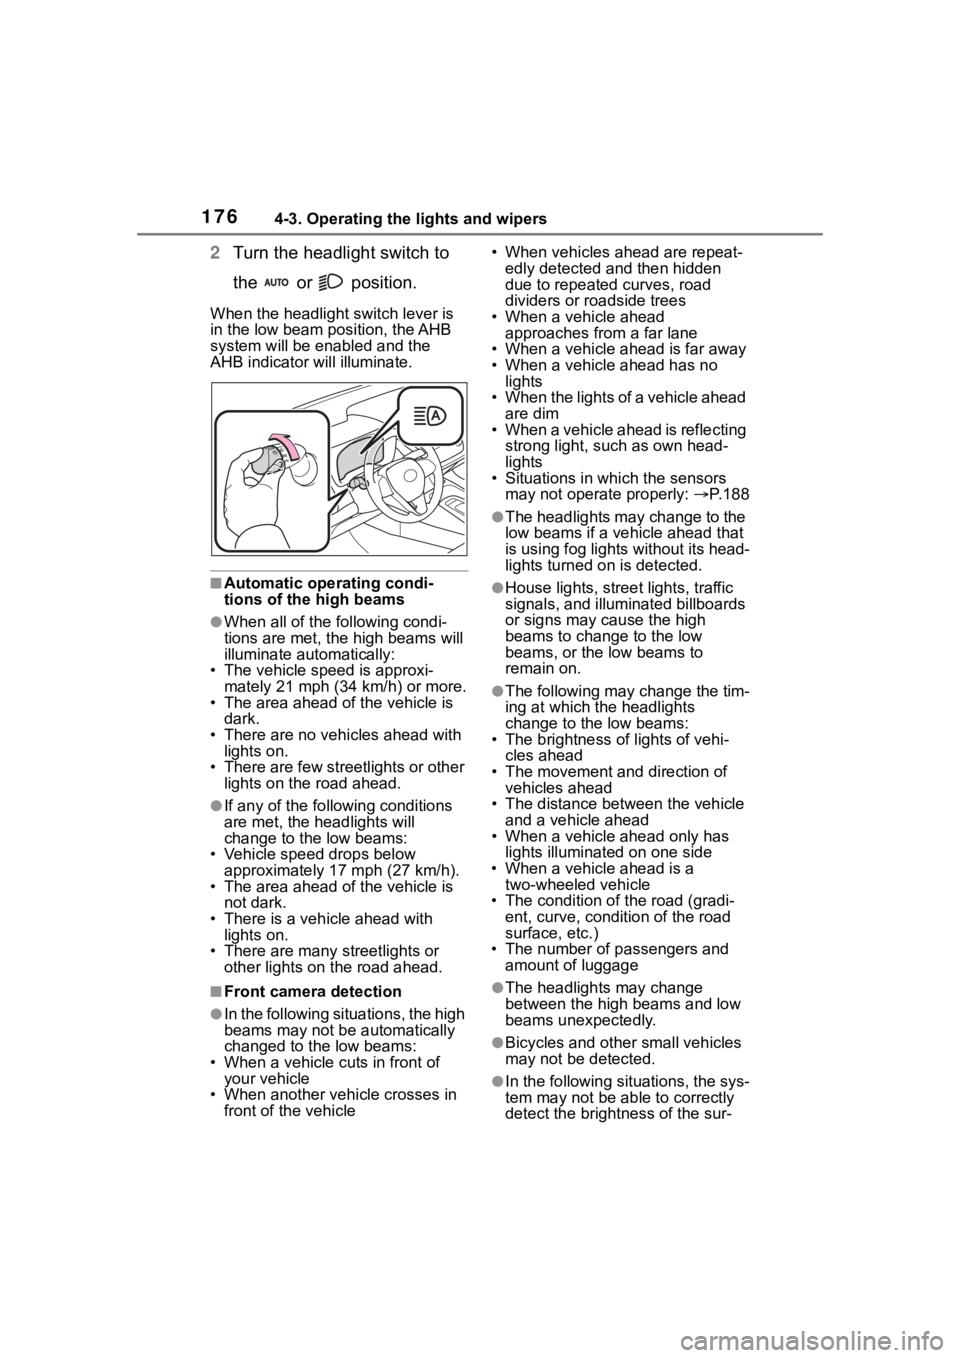
2Turn the headlight switch to
the or position.
When the headlight switch lever is
in the low beam position, the AHB
system will be enabled and the
AHB indicator will illuminate.
■Automatic operating condi-
tions of the high beams
●When all of the following condi-
tions are met, the high beams will
illuminate automatically:
• The vehicle speed is approxi-
mately 21 mph (34 km/h) or more.
• The area ahead of the vehicle is dark.
• There are no vehicles ahead with lights on.
• There are few streetlights or other
lights on the road ahead.
●If any of the following conditions
are met, the headlights will
change to the low beams:
• Vehicle speed drops below
approximately 17 mph (27 km/h).
• The area ahead of the vehicle is not dark.
• There is a vehi cle ahead with
lights on.
• There are many streetlights or
other lights on the road ahead.
■Front camera detection
●In the following situations, the high
beams may not be automatically
changed to the low beams:
• When a vehicle cuts in front of your vehicle
• When another vehicle crosses in front of the vehicle • When vehicles ahead are repeat-
edly detected and then hidden
due to repeated curves, road
dividers or roadside trees
• When a vehicle ahead approaches from a far lane
• When a vehicle ahead is far away
• When a vehicle ahead has no lights
• When the lights of a vehicle ahead are dim
• When a vehicle ahead is reflecting
strong light, such as own head-
lights
• Situations in which the sensors
may not operate properly: P. 1 8 8
●The headlights may change to the
low beams if a vehicle ahead that
is using fog lights without its head-
lights turned on is detected.
●House lights, street lights, traffic
signals, and illuminated billboards
or signs may cause the high
beams to change to the low
beams, or the low beams to
remain on.
●The following may change the tim-
ing at which the headlights
change to the low beams:
• The brightness o f lights of vehi-
cles ahead
• The movement and direction of vehicles ahead
• The distance between the vehicle and a vehicle ahead
• When a vehicle ahead only has
lights illuminate d on one side
• When a vehicle ahead is a two-wheeled vehicle
• The condition of the road (gradi- ent, curve, condition of the road
surface, etc.)
• The number of passengers and amount of luggage
●The headlights may change
between the high beams and low
beams unexpectedly.
●Bicycles and other small vehicles
may not be detected.
●In the following situations, the sys-
tem may not be able to correctly
detect the brightness of the sur-
Page 177 of 468
1774-3. Operating the lights and wipers
4
Driving
roundings. This may cause the
low beams to remain on or the
high beams to flash or dazzle
pedestrians or vehicles ahead. In
such a case, it is necessary to
manually change between the
high beams and low beams.
• When there are lights similar to headlights or tail li ghts in the sur-
rounding area
• When headlights or tail lights of vehicles ahead are turned off,
dirty, changing color, or not aimed
properly
• When the headlights are repeat-
edly changing between the high
beams and low beams.
• When use of the high beams is
inappropriate or when the high
beams may be flashing or daz-
zling pedestrians or other drivers.
• When the vehicle is used in an area in which vehicles travel on
the opposite side of the road of
the country for wh ich the vehicle
was designed, for example using
a vehicle designed for right-hand
traffic in a left-hand traffic area, or
vice versa
• When it is necessary to disable
the system: P. 1 8 4
• Situations in which the sensors may not operate properly: P. 1 8 8
■Temporarily reducing front
camera sensitivity (for the
U.S.A.)
The sensitivity o f the front camera
can be temporarily reduced.
1 Turn the engine switch off with
the following conditions met.
• The headlight switch is in the
or position.
• The headlight switch lever is in the low beam position.
• The automatic High Beam switch is on.
2 Press the engine switch to ON.
3 Within 60 seconds after perform-
ing step 2, push the headlight
switch lever to the high beam
position then pull it to the original position quickly 10 times, then
leave the lever in its original posi-
tion.
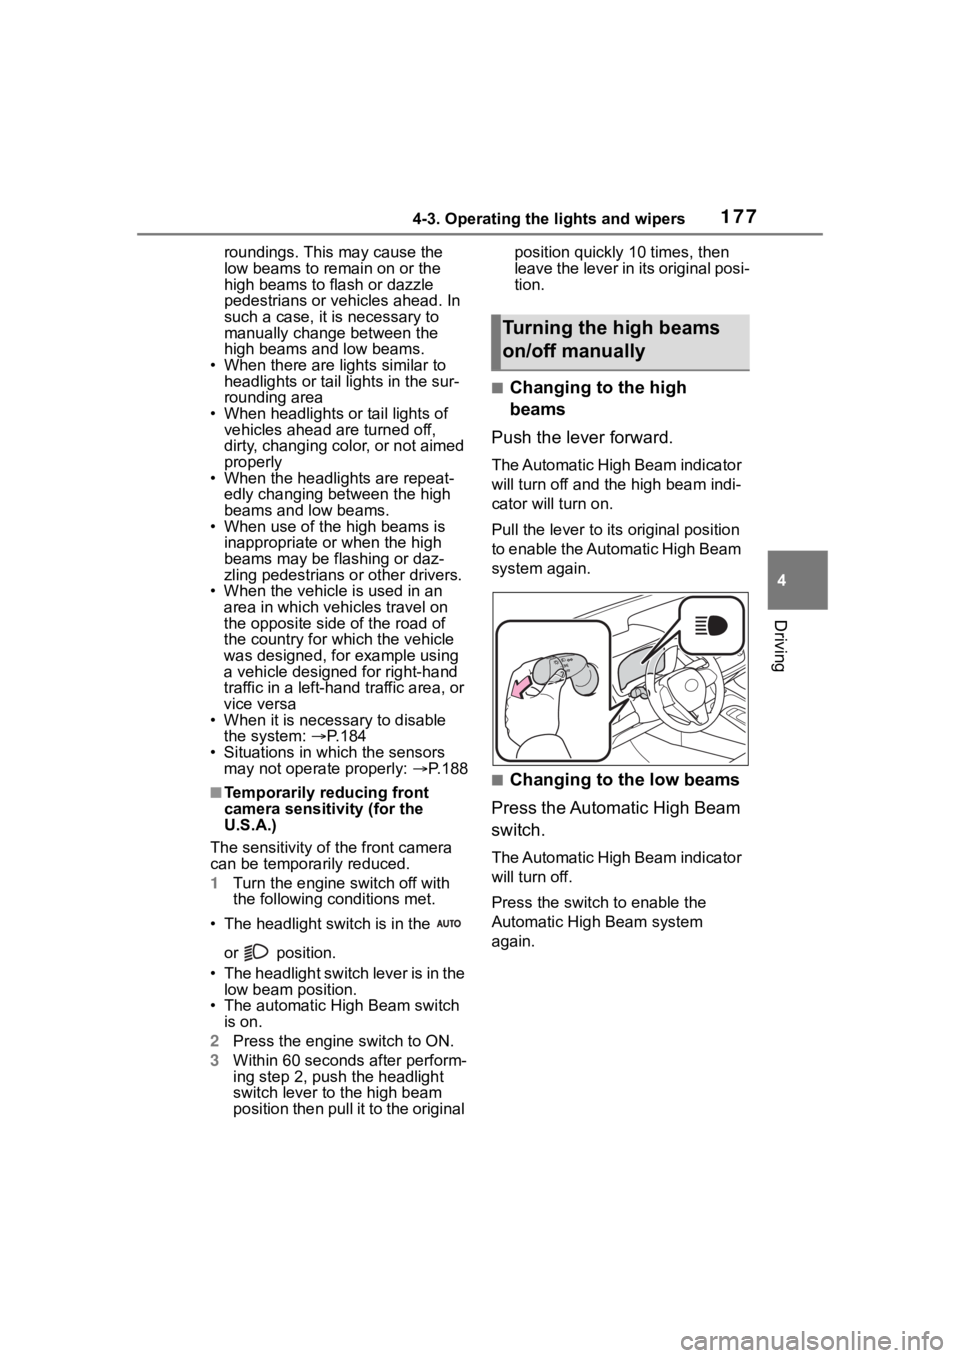
■Changing to the high
beams
Push the lever forward.
The Automatic High Beam indicator
will turn off and the high beam indi-
cator will turn on.
Pull the lever to its original position
to enable the Automatic High Beam
system again.
■Changing to the low beams
Press the Automatic High Beam
switch.
The Automatic High Beam indicator
will turn off.
Press the switch to enable the
Automatic High Beam system
again.
Turning the high beams
on/off manually