change time TOYOTA COROLLA CROSS 2022 Owners Manual
[x] Cancel search | Manufacturer: TOYOTA, Model Year: 2022, Model line: COROLLA CROSS, Model: TOYOTA COROLLA CROSS 2022Pages: 612, PDF Size: 17.18 MB
Page 7 of 612
7
Please note that this manual
applies to all models and
explains all equipment, including
options. Therefore, you may find
explanations for equipment not
installed on your vehicle and the
illustrations used may differ from
your vehicle.
All specifications provided in this
manual are current at the time of
printing. Over time, your vehicle
may receive updates that modify
the vehicle and make material in
this manual incomplete and/or
inaccurate. Because of Toyota's
interest in continual product
improvement, Toyota reserves
the right to make changes to this
manual at any time without
notice.
If Toyota chooses to update the
manual, updated versions can
be viewed by selecting your
vehicle by model and year at the
following URL or on your mobile
device if you have access to the
Toyota app.
www.toyota.com/owners
Approximately five hours after
the engine is turned off, you
may hear sound coming from under the vehicle for several
minutes. This is the sound of a
fuel evaporation leakage check
and, it does not indicate a mal-
function.
A wide variety of non-genuine
spare parts and accessories for
Toyota vehicles are currently
available in the market. You
should know that Toyota does
not warrant these products and
is not responsible for their per-
formance, repair, or replace-
ment, or for any damage they
may cause to, or adverse effect
they may have on, your Toyota
vehicle.
This vehicle should not be modi-
fied with non-genuine Toyota
products. Modification with
non-genuine Toyota products
could affect its performance,
safety or durability, and may
even violate governmental regu-
lations. In addition, damage or
performance problems resulting
from the modification may not
be covered under warranty.
Also, remodeling like this will
have an effect on advanced
safety equipment such as Toy-
ota Safety Sense 2.0 and there
is a danger that it will not work
properly or the danger that it
For your information
Main Owner’s Manual
Noise from under vehicle
after turning off the engine
Accessories, spare parts
and modification of your
To y o t a
Page 73 of 612
731-4. Theft deterrent system
1
For safety and security
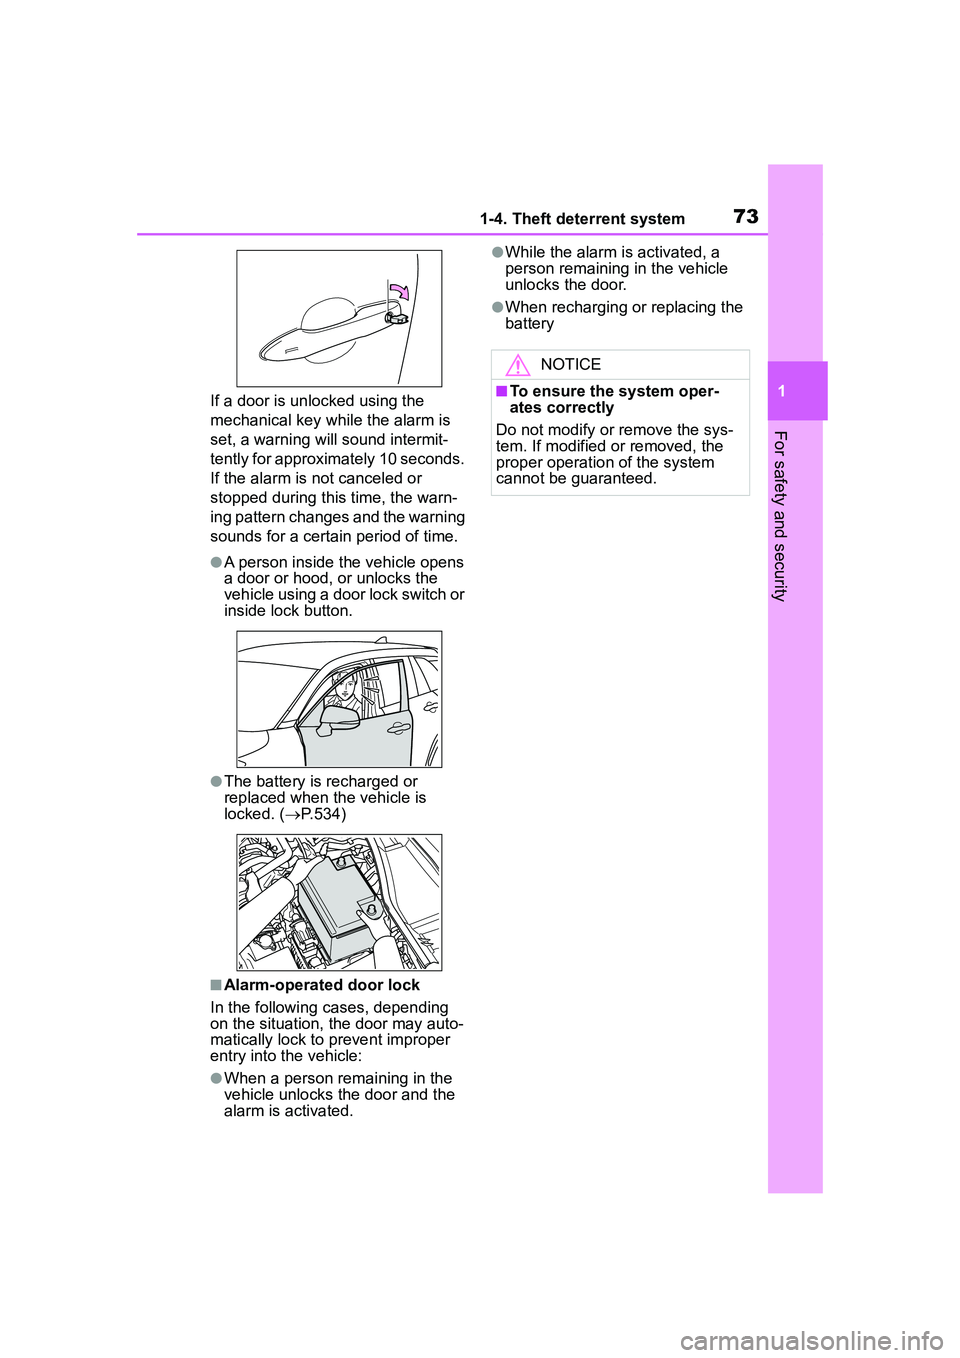
If a door is unlocked using the
mechanical key while the alarm is
set, a warning will sound intermit-
tently for approximately 10 seconds.
If the alarm is not canceled or
stopped during this time, the warn-
ing pattern changes and the warning
sounds for a certain period of time.
●A person inside the vehicle opens
a door or hood, or unlocks the
vehicle using a door lock switch or
inside lock button.
●The battery is recharged or
replaced when the vehicle is
locked. (P.534)
■Alarm-operated door lock
In the following cases, depending
on the situation, the door may auto-
matically lock to prevent improper
entry into the vehicle:
●When a person remaining in the
vehicle unlocks the door and the
alarm is activated.
●While the alarm is activated, a
person remaining in the vehicle
unlocks the door.
●When recharging or replacing the
battery
NOTICE
■To ensure the system oper-
ates correctly
Do not modify or remove the sys-
tem. If modified or removed, the
proper operation of the system
cannot be guaranteed.
Page 83 of 612
832-1. Instrument cluster
2
Vehicle status information and indicators
different distances independently.
To reset, display the desired trip
meter and press and hold the dis-
play change button.
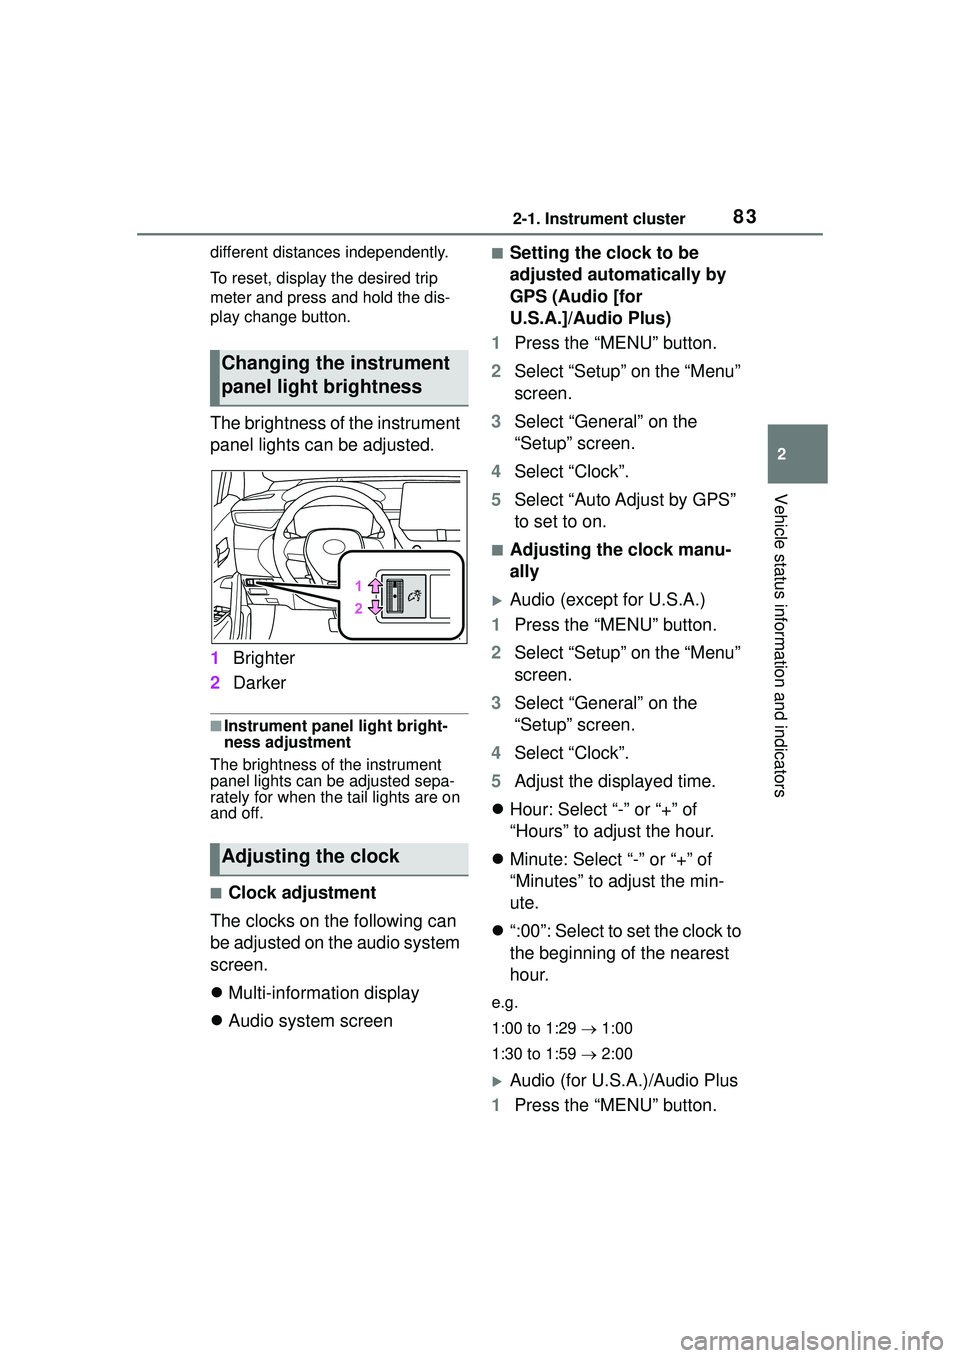
The brightness of the instrument
panel lights can be adjusted.
1Brighter
2 Darker
■Instrument panel light bright-
ness adjustment
The brightness of the instrument
panel lights can be adjusted sepa-
rately for when the tail lights are on
and off.
■Clock adjustment
The clocks on the following can
be adjusted on the audio system
screen.
Multi-information display
Audio system screen
■Setting the clock to be
adjusted automatically by
GPS (Audio [for
U.S.A.]/Audio Plus)
1 Press the “MENU” button.
2 Select “Setup” on the “Menu”
screen.
3 Select “General” on the
“Setup” screen.
4 Select “Clock”.
5 Select “Auto Adjust by GPS”
to set to on.
■Adjusting the clock manu-
ally
Audio (except for U.S.A.)
1 Press the “MENU” button.
2 Select “Setup” on the “Menu”
screen.
3 Select “General” on the
“Setup” screen.
4 Select “Clock”.
5 Adjust the displayed time.
Hour: Select “-” or “+” of
“Hours” to adjust the hour.
Minute: Select “-” or “+” of
“Minutes” to adjust the min-
ute.
“:00”: Select to set the clock to
the beginning of the nearest
hour.
e.g.
1:00 to 1:29 1:00
1:30 to 1:59 2:00
Audio (for U.S.A.)/Audio Plus
1 Press the “MENU” button.
Changing the instrument
panel light brightness
Adjusting the clock
Page 88 of 612
882-1. Instrument cluster
different distances independently.
To reset, display the desired trip
meter and press and hold the dis-
play change button.
The brightness of the instrument
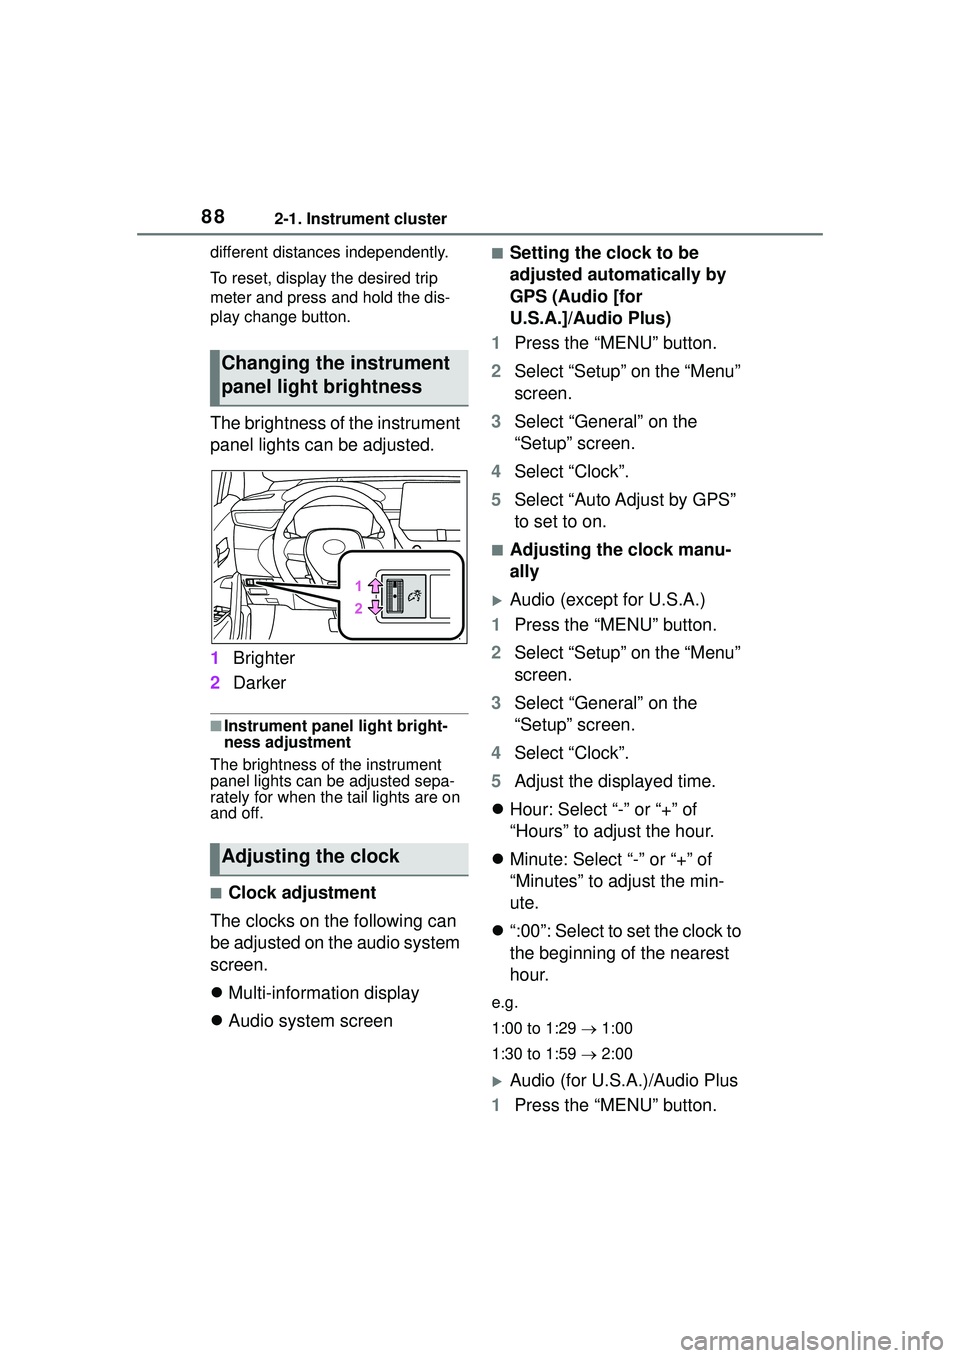
panel lights can be adjusted.
1Brighter
2 Darker
■Instrument panel light bright-
ness adjustment
The brightness of the instrument
panel lights can be adjusted sepa-
rately for when the tail lights are on
and off.
■Clock adjustment
The clocks on the following can
be adjusted on the audio system
screen.
Multi-information display
Audio system screen
■Setting the clock to be
adjusted automatically by
GPS (Audio [for
U.S.A.]/Audio Plus)
1 Press the “MENU” button.
2 Select “Setup” on the “Menu”
screen.
3 Select “General” on the
“Setup” screen.
4 Select “Clock”.
5 Select “Auto Adjust by GPS”
to set to on.
■Adjusting the clock manu-
ally
Audio (except for U.S.A.)
1 Press the “MENU” button.
2 Select “Setup” on the “Menu”
screen.
3 Select “General” on the
“Setup” screen.
4 Select “Clock”.
5 Adjust the displayed time.
Hour: Select “-” or “+” of
“Hours” to adjust the hour.
Minute: Select “-” or “+” of
“Minutes” to adjust the min-
ute.
“:00”: Select to set the clock to
the beginning of the nearest
hour.
e.g.
1:00 to 1:29 1:00
1:30 to 1:59 2:00
Audio (for U.S.A.)/Audio Plus
1 Press the “MENU” button.
Changing the instrument
panel light brightness
Adjusting the clock
Page 91 of 612
912-1. Instrument cluster
2
Vehicle status information and indicators
■Liquid crystal display
Small spots or light spots may
appear on the display. This phenom-
enon is characteristic of liquid crys-
tal displays, and there is no problem
continuing to use the display.
The multi-information display is
operated using the meter control
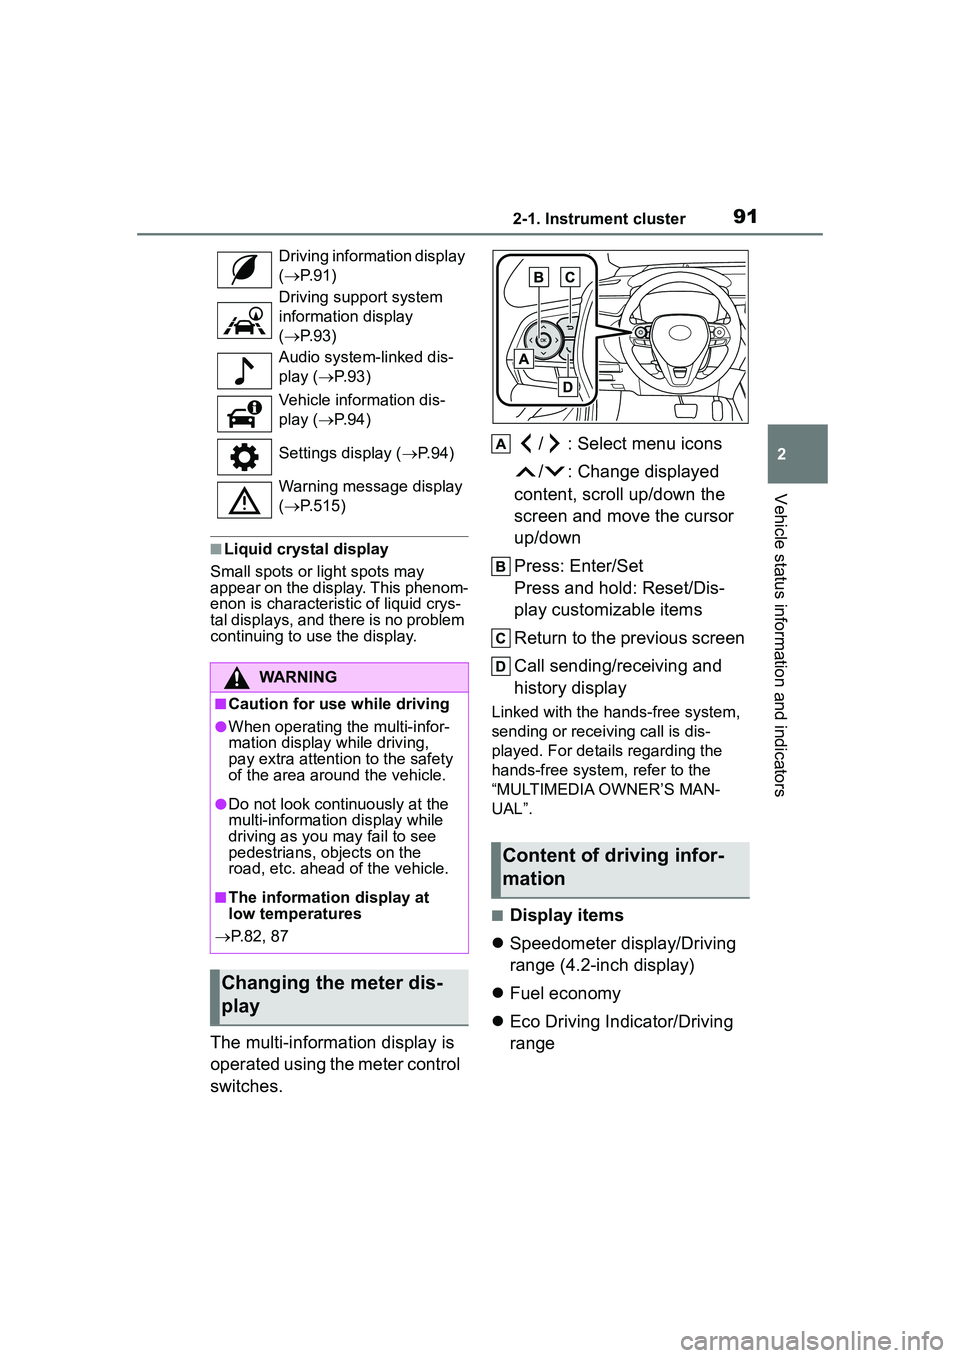
switches. / : Select menu icons
/ : Change displayed
content, scroll up/down the
screen and move the cursor
up/down
Press: Enter/Set
Press and hold: Reset/Dis-
play customizable items
Return to the previous screen
Call sending/receiving and
history display
Linked with the hands-free system,
sending or receiving call is dis-
played. For details regarding the
hands-free system, refer to the
“MULTIMEDIA OWNER’S MAN-
UAL”.
■Display items
Speedometer display/Driving
range (4.2-inch display)
Fuel economy
Eco Driving Indicator/Driving
range
Driving information display
( P. 9 1 )
Driving support system
information display
( P. 9 3 )
Audio system-linked dis-
play ( P. 9 3 )
Vehicle information dis-
play ( P. 9 4 )
Settings display ( P. 9 4 )
Warning message display
( P.515)
WARNING
■Caution for use while driving
●When operating the multi-infor-
mation display while driving,
pay extra attention to the safety
of the area around the vehicle.
●Do not look continuously at the
multi-information display while
driving as you may fail to see
pedestrians, objects on the
road, etc. ahead of the vehicle.
■The information display at
low temperatures
P.82, 87
Changing the meter dis-
play
Content of driving infor-
mation
Page 94 of 612
942-1. Instrument cluster
audio source or track on the
meter using the meter control
switches.
This menu icon can be set to be
displayed/not displayed in .
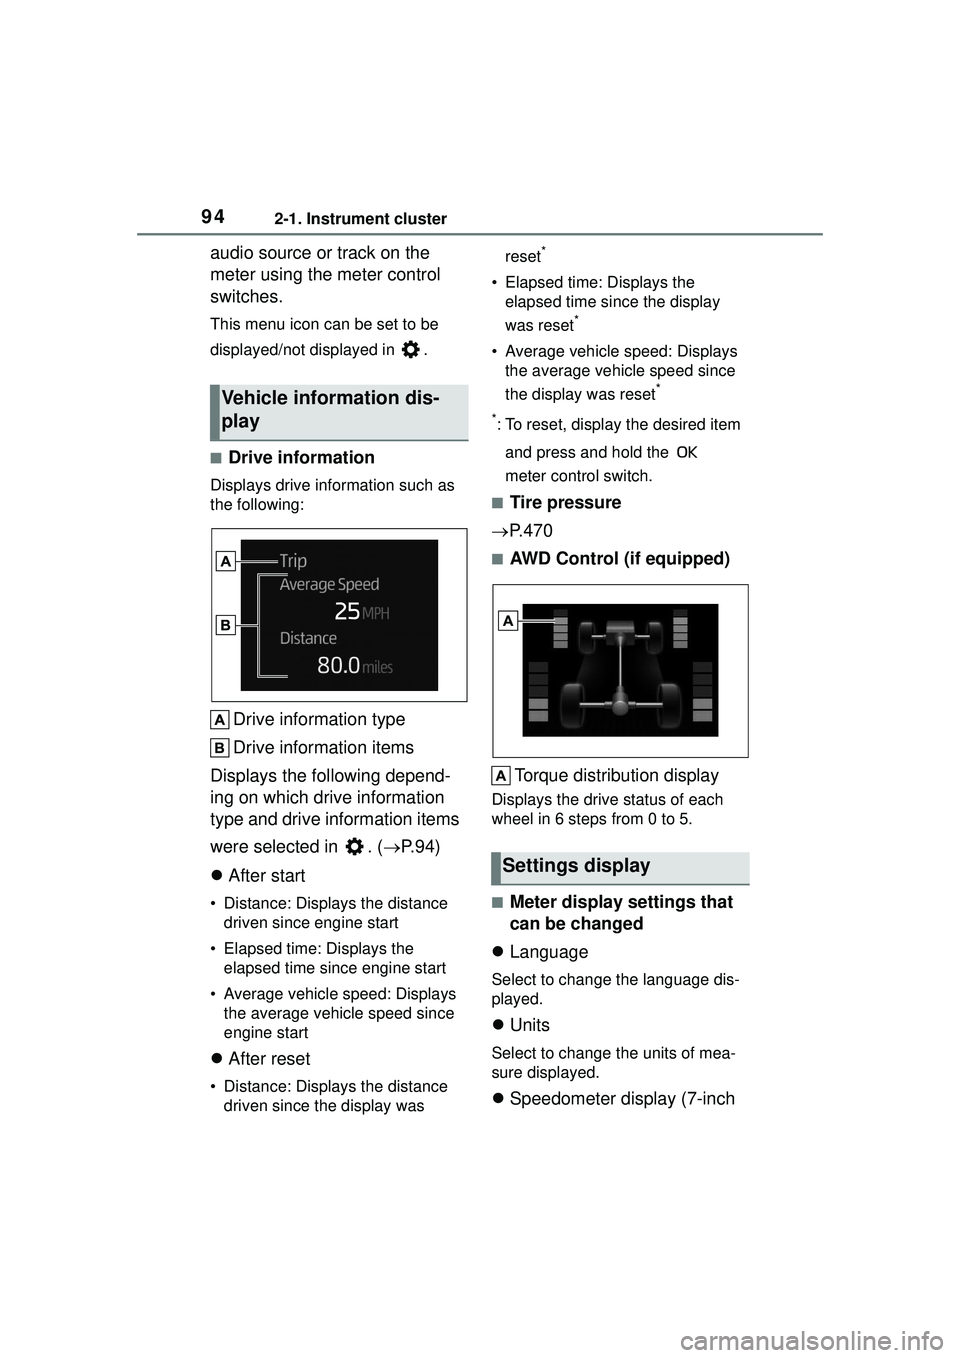
■Drive information
Displays drive information such as
the following:
Drive information type
Drive information items
Displays the following depend-
ing on which drive information
type and drive information items
were selected in . ( P.94)
After start
• Distance: Displays the distance
driven since engine start
• Elapsed time: Displays the elapsed time since engine start
• Average vehicle speed: Displays the average vehicle speed since
engine start
After reset
• Distance: Displays the distance
driven since the display was reset
*
• Elapsed time: Displays the
elapsed time since the display
was reset
*
• Average vehicle speed: Displays the average vehicle speed since
the display was reset
*
*
: To reset, display the desired item and press and hold the
meter control switch.
■Tire pressure
P.470
■AWD Control (if equipped)
Torque distribution display
Displays the drive status of each
wheel in 6 steps from 0 to 5.
■Meter display settings that
can be changed
Language
Select to change the language dis-
played.
Units
Select to change the units of mea-
sure displayed.
Speedometer display (7-inch
Vehicle information dis-
play
Settings display
Page 95 of 612
952-1. Instrument cluster
2
Vehicle status information and indicators
display)
Select to set the display of the
speedometer to analog/digital.
Eco Driving Indicator Light
Select to enable/disable the Eco
Driving Indicator Light.
Fuel economy display
Select to change the average fuel
consumption display between after
start/after reset. ( P. 9 2 )
Select to display/not display the
audio system linked display.
Select to change the displayed con-
tent of the following:
• Drive information type
Select to change the drive informa-
tion type display between after
start/after reset.
• Drive information items
Select to set the first and second
items of the drive information dis-
play to any of the following: aver-
age vehicle
speed/distance/elapsed time.
Pop-up display
Select to enable/disable pop-up
displays for each relevant system.
Multi-information display off
Select to turn the multi-information
display off.
To turn the multi-information display
on again, press any of the following
meter control switches //// /.
Default setting
Select to reset the meter display
settings to the default setting.
■Vehicle functions and set-
tings that can be changed
P.563
■Suspension of the settings dis-
play
●Some settings cannot be changed
while driving. When changing set-
tings, park the vehicle in a safe
place.
●If a warning message is displayed,
operation of the settings display
will be suspended.
Stop & Start system opera-
WARNING
■Cautions during setting up
the display
If the engine is running when
changing the display settings,
ensure that the vehicle is parked
in a place with adequate ventila-
tion. In a closed area such as a
garage, exhaust gases including
harmful carbon monoxide (CO)
may collect and enter the vehicle.
This may lead to death or a seri-
ous health hazard.
NOTICE
■During setting up the display
To prevent battery discharge,
ensure that the engine is running
while setting up the display fea-
tures.
Stop & Start system infor-
mation
Page 105 of 612
1053-2. Opening, closing and locking the doors
3
Before driving
other doors.
Press and hold to open the win-
dows
*1and moon roof*1, 2.
*1: This setting must be customized at your Toyota dealer.
*2: If equipped
■Key
Turning the key operates the
doors as follows:
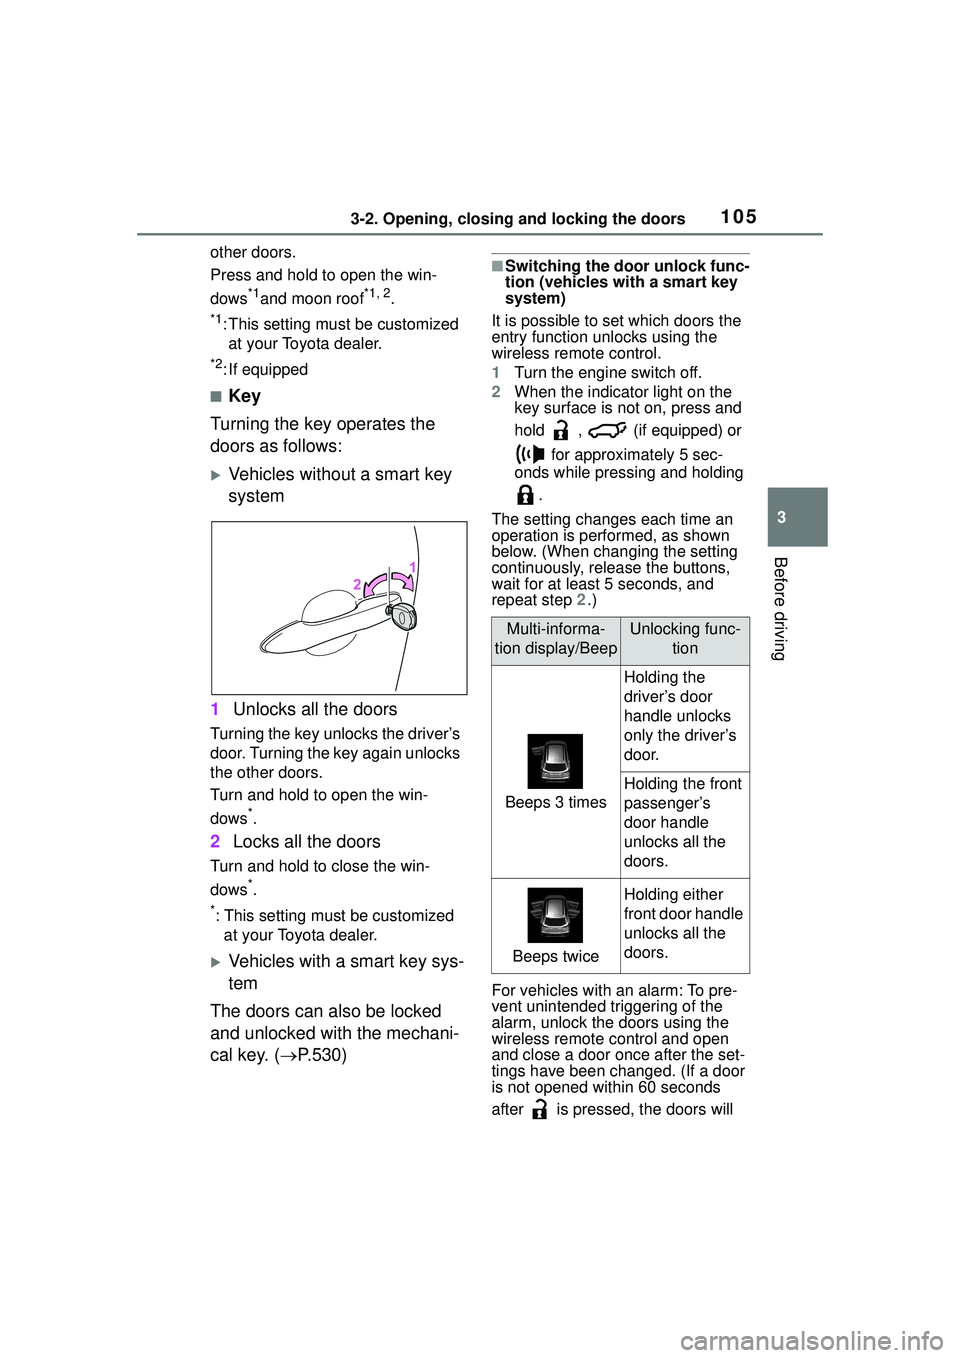
Vehicles without a smart key
system
1 Unlocks all the doors
Turning the key unlocks the driver’s
door. Turning the key again unlocks
the other doors.
Turn and hold to open the win-
dows
*.
2Locks all the doors
Turn and hold to close the win-
dows
*.
*: This setting must be customized
at your Toyota dealer.
Vehicles with a smart key sys-
tem
The doors can also be locked
and unlocked with the mechani-
cal key. ( P.530)
■Switching the door unlock func-
tion (vehicles with a smart key
system)
It is possible to set which doors the
entry function unlocks using the
wireless remote control.
1 Turn the engine switch off.
2 When the indicator light on the
key surface is not on, press and
hold , (if equipped) or
for approximately 5 sec-
onds while pressing and holding
.
The setting changes each time an
operation is performed, as shown
below. (When changing the setting
continuously, release the buttons,
wait for at least 5 seconds, and
repeat step 2.)
For vehicles with an alarm: To pre-
vent unintended triggering of the
alarm, unlock the doors using the
wireless remote control and open
and close a door once after the set-
tings have been changed. (If a door
is not opened within 60 seconds
after is pressed, the doors will
Multi-informa-
tion display/BeepUnlocking func- tion
Beeps 3 times
Holding the
driver’s door
handle unlocks
only the driver’s
door.
Holding the front
passenger’s
door handle
unlocks all the
doors.
Beeps twice
Holding either
front door handle
unlocks all the
doors.
Page 146 of 612
1464-1. Before driving
WARNING
■If the vehicle becomes stuck
Do not spin the wheels exces-
sively when a driven wheel is up
in the air, or the vehicle is stuck in
sand, mud, etc. This may damage
the driveline components or pro-
pel the vehicle forward or back-
ward, causing an accident.
NOTICE
■When driving the vehicle
●Do not depress the accelerator
and brake pedals at the same
time during driving, as this may
restrain the engine output.
●Do not use the accelerator
pedal or depress the accelera-
tor and brake pedals at the
same time to hold the vehicle on
a hill.
■When parking the vehicle
Always set the parking brake and
shift the shift lever to P. Failure to
do so may cause the vehicle to
move or the vehi cle may acceler-
ate suddenly if the accelerator
pedal is accidentally depressed.
■Avoiding damage to vehicle
parts
●Do not turn the steering wheel
fully in either direction and hold
it there for an extended period
of time.
Doing so may damage the
power steering motor.
●When driving over bumps in the
road, drive as slowly as possible
to avoid damaging the wheels,
underside of the vehicle, etc.
■If you get a flat tire while driv-
ing
A flat or damaged tire may cause
the following situations. Hold the
steering wheel firmly and gradu-
ally depress the brake pedal to
slow down the vehicle.
●It may be difficult to control your
vehicle.
●The vehicle will make abnormal
sounds or vibrations.
●The vehicle will lean abnor-
mally.
Information on what to do in case
of a flat tire ( P.518)
■When encountering flooded
roads
Do not drive on a road that has
flooded after heavy rain etc.
Doing so may cause the following
serious damage to the vehicle:
●Engine stalling
●Short in electrical components
●Engine damage caused by
water immersion
In the event that you drive on a
flooded road and the vehicle
becomes flooded or stuck in mud
or sand, be sure to have your Toy-
ota dealer check the following:
●Brake function
●Changes in the quantity and
quality of the engine oil, tran-
saxle fluid, transfer oil (AWD
models), rear differential oil
(AWD models), etc.
●Lubricant condition for the pro-
peller shaft (AWD models),
bearings and suspension joints
(where possible), and the func-
tion of all joints, bearings, etc.
Page 163 of 612
1634-2. Driving procedures
4
Driving
■Key reminder function
A buzzer sounds if the driver’s door
is opened while the engine switch is
in OFF or ACC to remind you to
remove the key.
1 Check that the parking brake
is set. ( P.171)
2 Check that the shift lever is in
P.
3 Firmly depress the brake
pedal.
and a message will be dis-
played on the multi-information dis-
play.
If it is not displayed, the engine
cannot be started.
4 Press the engine switch
shortly and firmly.
When operating the engine switch,
one short, firm press is enough. It is
not necessary to press and hold the
switch.
The engine will crank until it starts
or for up to 30 seconds, whichever
is less.
Continue depressing the brake
pedal until the engine is completely
started.
The engine can be started from any
WARNING
■Caution when driving
Do not turn the engine switch to
OFF while driving. If, in an emer-
gency, you must turn the engine
off while the vehicle is moving,
turn the engine switch only to
ACC to stop the engine. An acci-
dent may result if the engine is
stopped while driving. ( P.496)
NOTICE
■To prevent battery discharge
Do not leave the engine switch in
ACC or ON for long periods of
time without the engine running.
Engine (ignition)
switch (vehicles with
a smar t key system)
Performing the following
operations when carrying
the electronic key on your
person starts the engine or
changes engine switch
modes.
Starting the engine