buttons TOYOTA COROLLA CROSS 2023 Owners Manual
[x] Cancel search | Manufacturer: TOYOTA, Model Year: 2023, Model line: COROLLA CROSS, Model: TOYOTA COROLLA CROSS 2023Pages: 500, PDF Size: 15.11 MB
Page 19 of 500

19Pictorial index
■Interior
SRS airbags .................................................... ...................... P.29
Floor mats..................................................... ........................ P.22
Front seats .................................................... ...................... P.123
Head restraints ................................................ ................... P.126
Seat belts ..................................................... ......................... P.25
Console box ....................................................................... P.306
Inside lock buttons ............................................ ................ P.107
Cup holders .................................................... .................... P.305
Rear seats ..................................................... ...................... P.124
Page 98 of 500
983-1. Key information
3-1.Key information
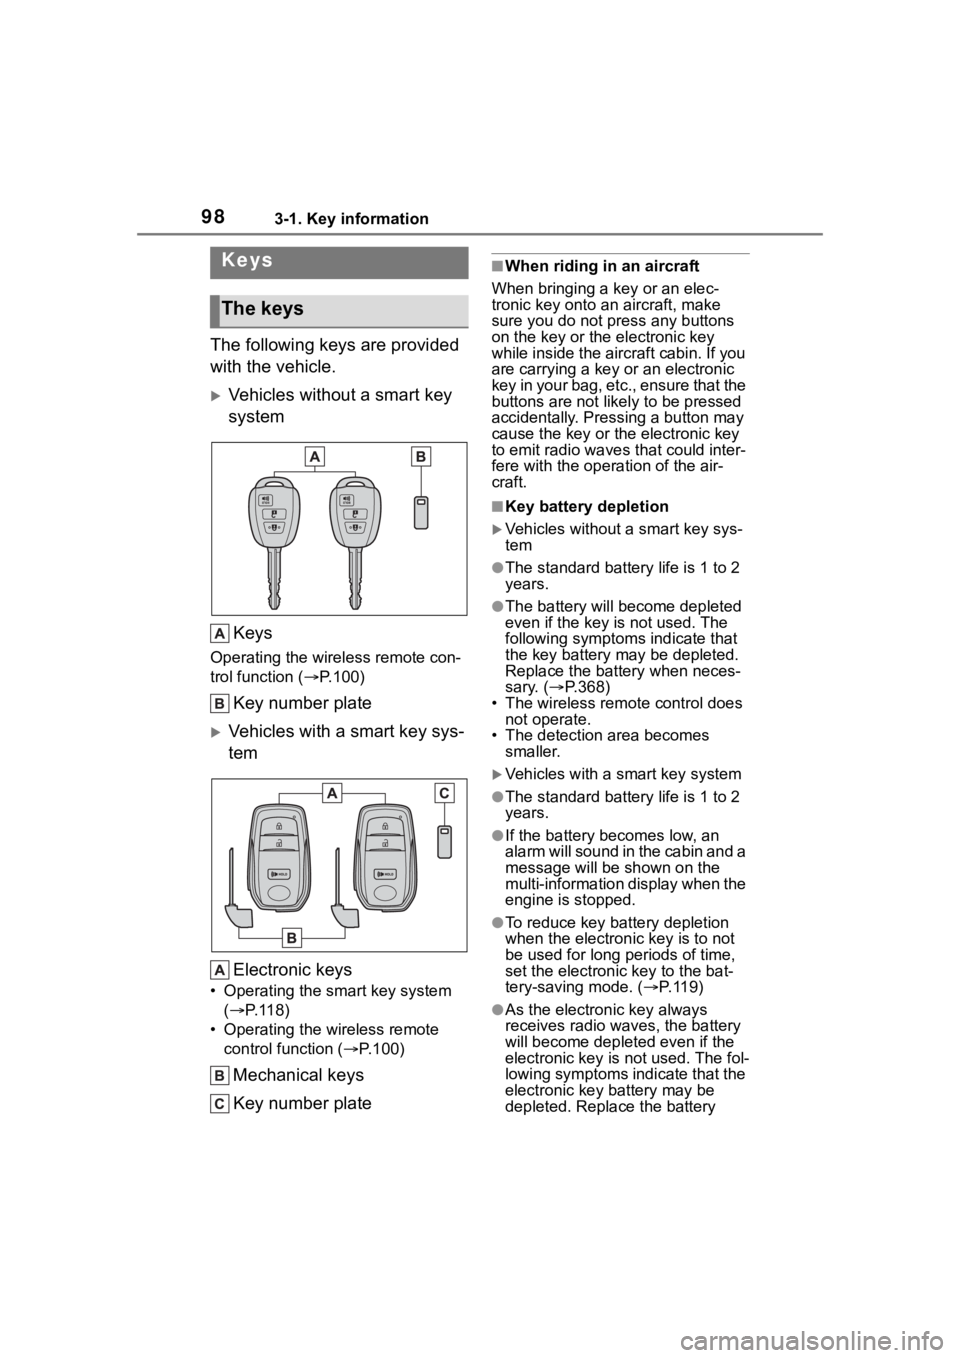
The following keys are provided
with the vehicle.
Vehicles without a smart key
systemKeys
Operating the wireless remote con-
trol function ( P.100)
Key number plate
Vehicles with a smart key sys-
tem
Electronic keys
• Operating the smart key system ( P.118)
• Operating the wireless remote control function ( P.100)
Mechanical keys
Key number plate
■When riding in an aircraft
When bringing a key or an elec-
tronic key onto an aircraft, make
sure you do not press any buttons
on the key or the electronic key
while inside the airc raft cabin. If you
are carrying a key or an electronic
key in your bag, etc., ensure that the
buttons are not likely to be pressed
accidentally. Pressing a button may
cause the key or the electronic key
to emit radio waves that could inter-
fere with the operation of the air-
craft.
■Key battery depletion
Vehicles without a smart key sys-
tem
●The standard battery life is 1 to 2
years.
●The battery will be come depleted
even if the key is not used. The
following symptoms indicate that
the key battery may be depleted.
Replace the battery when neces-
sary. ( P.368)
• The wireless remote control does
not operate.
• The detection area becomes smaller.
Vehicles with a smart key system
●The standard battery life is 1 to 2
years.
●If the battery bec omes low, an
alarm will sound in the cabin and a
message will be shown on the
multi-information display when the
engine is stopped.
●To reduce key battery depletion
when the electronic key is to not
be used for long periods of time,
set the electronic key to the bat-
tery-saving mode. ( P. 1 1 9 )
●As the electronic key always
receives radio waves, the battery
will become depleted even if the
electronic key is not used. The fol-
lowing symptoms indicate that the
electronic key battery may be
depleted. Replace the battery
Keys
The keys
Page 104 of 500
1043-2. Opening, closing and locking the doors
other doors.
Press and hold to open the win-
dows
*1and moon roof*1, 2.
*1:This setting must be customized
at your Toyota dealer.
*2: If equipped
■Key
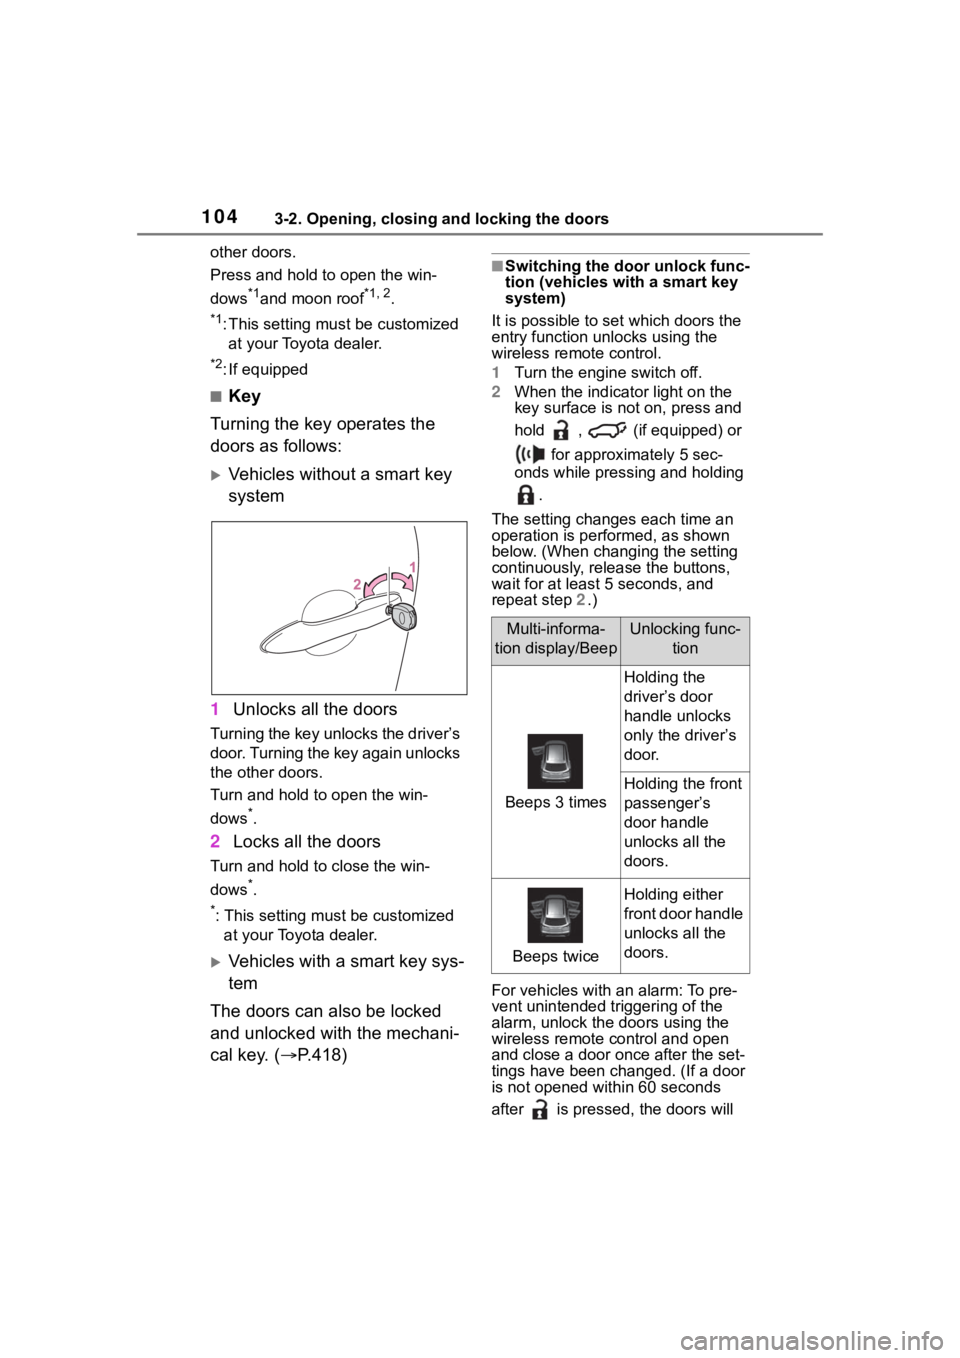
Turning the key operates the
doors as follows:
Vehicles without a smart key
system
1 Unlocks all the doors
Turning the key unlocks the driver’s
door. Turning the key again unlocks
the other doors.
Turn and hold to open the win-
dows
*.
2Locks all the doors
Turn and hold to close the win-
dows
*.
*: This setting must be customized
at your Toyota dealer.
Vehicles with a smart key sys-
tem
The doors can also be locked
and unlocked with the mechani-
cal key. ( P.418)
■Switching the door unlock func-
tion (vehicles with a smart key
system)
It is possible to set which doors the
entry function unlocks using the
wireless remote control.
1 Turn the engine switch off.
2 When the indicator light on the
key surface is not on, press and
hold , (if equipped) or
for approximately 5 sec-
onds while pressing and holding
.
The setting changes each time an
operation is per formed, as shown
below. (When changing the setting
continuously, release the buttons,
wait for at least 5 seconds, and
repeat step 2 .)
For vehicles with an alarm: To pre-
vent unintended triggering of the
alarm, unlock the doors using the
wireless remote control and open
and close a door once after the set-
tings have been ch anged. (If a door
is not opened within 60 seconds
after is presse d, the doors will
Multi-informa-
tion display/BeepUnlocking func- tion
Beeps 3 times
Holding the
driver’s door
handle unlocks
only the driver’s
door.
Holding the front
passenger’s
door handle
unlocks all the
doors.
Beeps twice
Holding either
front door handle
unlocks all the
doors.
Page 106 of 500
1063-2. Opening, closing and locking the doors
Vehicles with a smart key system
Use the mechanical key to lock and
unlock the doors. ( P.418)
Replace the key battery with a new
one if it is depleted. ( P.368)
■If the battery is discharged
(vehicles with a smart key sys-
tem)
The doors cannot be locked and
unlocked using the smart key sys-
tem or wireless remote control. Lock
or unlock the doors using the
mechanical key. ( P.418)
■Rear seat reminder function
In order to remind you not to forget
luggage, etc. in the rear seat, when
the engine switch is turned off after
any of the following conditions are
met, a buzzer will sound and a mes-
sage will be displayed on the
multi-information di splay for approx-
imately 6 seconds.
●The engine is started within
approximately 10 minutes after
opening and closing a rear door.
●A rear door has been opened and
closed after the engine was
started.
However, if a rear door is opened
and then closed within approxi-
mately 2 seconds , the rear seat
reminder function may not operate.
The rear seat rem inder function
determines that luggage, etc. has
been placed in a rear seat based on
opening and closing of a rear door.
Therefore, depending on the situa-
tion, the rear seat reminder function
may not operate and you may still
forget luggage, etc. in the rear seat,
or it may operate unnecessarily.
■Customization
Some functions can be customized.
( P.449)
WARNING
■To prevent an accident
Observe the following precautions
while driving the vehicle.
Failure to do so may result in a
door opening and an occupant
being thrown out o f the vehicle,
resulting in death o r serious injury.
●Ensure that all doors are prop-
erly closed and locked.
●Do not pull the inside door han-
dle while driving.
Be especially careful of the front
doors, as the doors may be
opened even if the inside lock
buttons are in the locked posi-
tion.
●Set the rear door child-protector
locks when children are seated
in the rear seats.
■When opening or closing a
door
Check the surroundings of the
vehicle such as wh ether the vehi-
cle is on an incline, whether there
is enough space for a door to
open and whether a strong wind
is blowing. When opening or clos-
ing the door, hold the door handle
tightly to prepare for any unpre-
dictable movement.
■When using the wireless
remote control or the key and
operating the power win-
dows or moon roof (if
equipped)
Operate the power windows or
moon roof after checking to make
sure that there is no possibility of
any passenger having any of their
body parts caught in the windows
or moon roof. Also, do not allow
children to operate the wireless
remote control or the key. It is
possible for children and other
passengers to get caught in the
power windows or moon roof.
Page 107 of 500
1073-2. Opening, closing and locking the doors
3
Before driving
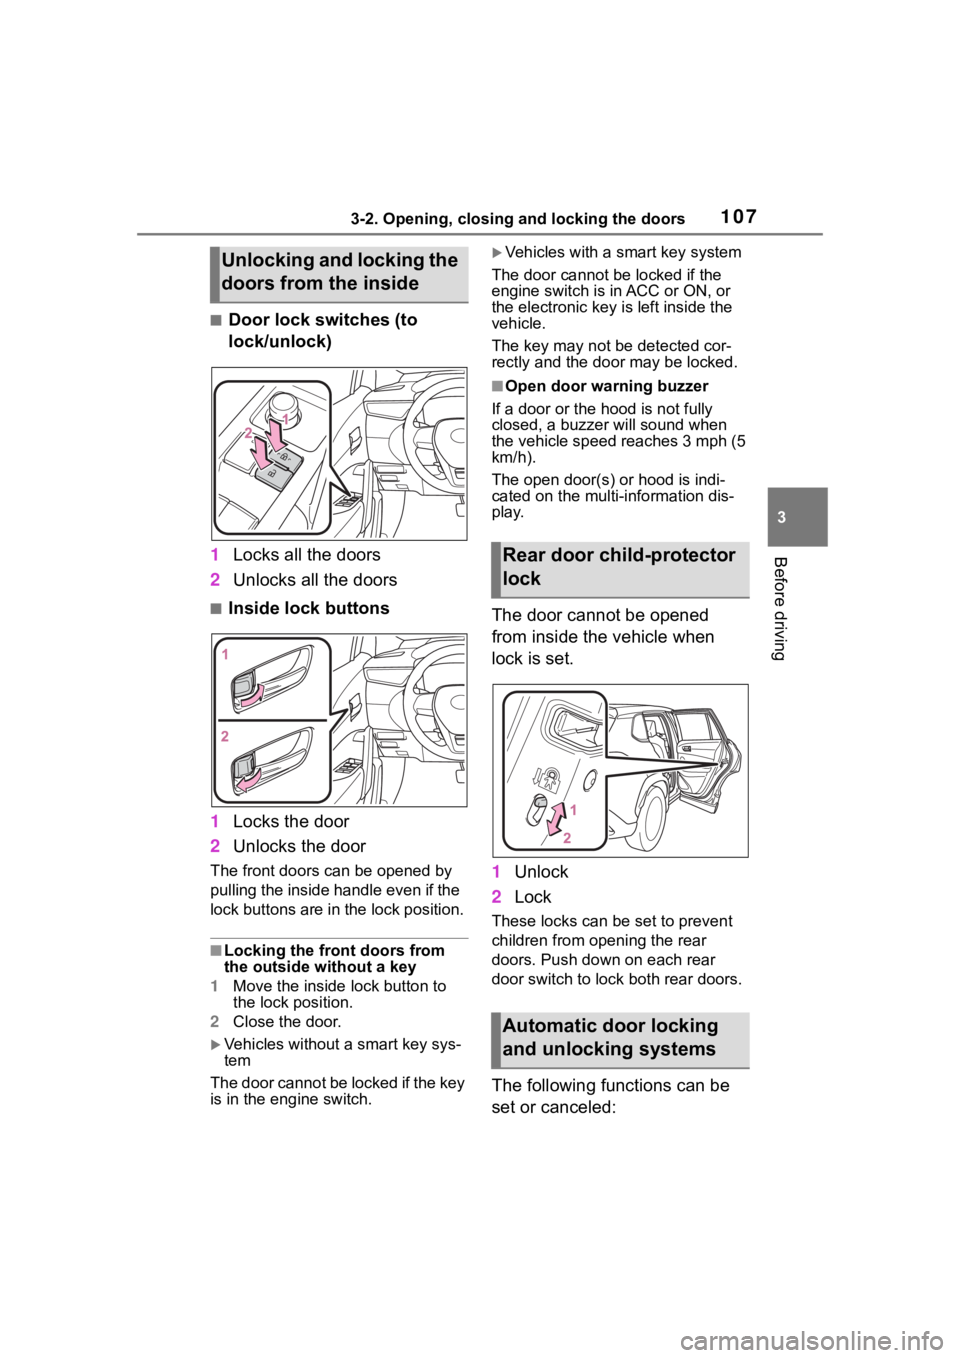
■Door lock switches (to
lock/unlock)
1 Locks all the doors
2 Unlocks all the doors
■Inside lock buttons
1 Locks the door
2 Unlocks the door
The front doors can be opened by
pulling the inside ha ndle even if the
lock buttons are in the lock position.
■Locking the front doors from
the outside without a key
1 Move the inside lock button to
the lock position.
2 Close the door.
Vehicles without a smart key sys-
tem
The door cannot be locked if the key
is in the engine switch.
Vehicles with a smart key system
The door cannot be locked if the
engine switch is in ACC or ON, or
the electronic key is left inside the
vehicle.
The key may not be detected cor-
rectly and the doo r may be locked.
■Open door warning buzzer
If a door or the hood is not fully
closed, a buzzer will sound when
the vehicle speed reaches 3 mph (5
km/h).
The open door(s) or hood is indi-
cated on the multi-information dis-
play.
The door cannot be opened
from inside the vehicle when
lock is set.
1 Unlock
2 Lock
These locks can be set to prevent
children from opening the rear
doors. Push down on each rear
door switch to lock both rear doors.
The following functions can be
set or canceled:
Unlocking and locking the
doors from the inside
Rear door child-protector
lock
Automatic door locking
and unlocking systems
Page 119 of 500
1193-2. Opening, closing and locking the doors
3
Before driving
●Interior buzzer sounds continu-
ously
■If “Key Detected in Vehicle” is
shown on the multi-information
display
An attempt was m ade to lock the
doors using the smart key system
while the electronic key was still
inside the vehicle. Retrieve the elec-
tronic key from the vehicle and lock
the doors again.
■Battery-saving function
The battery-saving function will be
activated in order to prevent the
electronic key battery and the vehi-
cle battery from being discharged
while the vehicle is not operated for
a long time.
●In the following situations, the
smart key system may take some
time to unlock the doors. Also the
illuminated entry system may not
operate properly.
• The electronic key has been left in an area of approximately 11 ft.
(3.5 m) of the outside of the vehi-
cle for 40 seconds or longer.
• The smart key system has not been used for 5 days or longer.
●If the smart key system has not
been used for 14 days or longer,
the doors cann ot be unlocked from any door except the driver’s
door. In this case, hold the driver’s
door handle, or use the wireless
remote control or mechanical key
to unlock the doors.
■Electronic key battery-saving
function
When battery-saving mode is set,
battery depletion is minimized by
stopping the electronic key from
receiving radio waves.
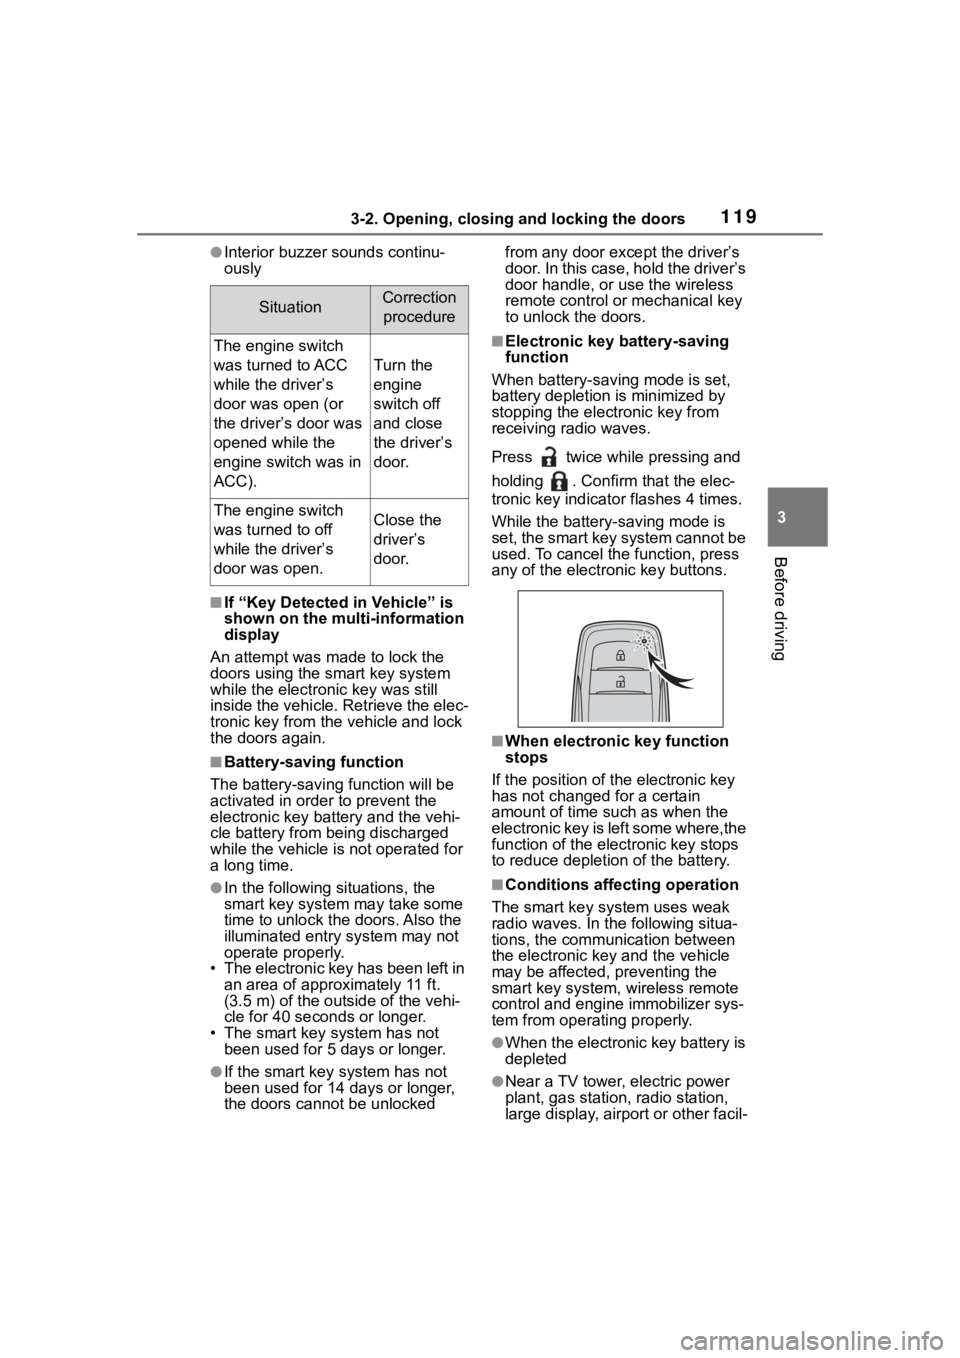
Press twice while pressing and
holding . Confirm that the elec-
tronic key indicator flashes 4 times.
While the battery-saving mode is
set, the smart key system cannot be
used. To cancel the function, press
any of the electronic key buttons.
■When electronic key function
stops
If the position of the electronic key
has not changed for a certain
amount of time suc h as when the
electronic key is left some where,the
function of the elec tronic key stops
to reduce depletion of the battery.
■Conditions affecting operation
The smart key system uses weak
radio waves. In the following situa-
tions, the communication between
the electronic key and the vehicle
may be affected, preventing the
smart key system, wireless remote
control and engi ne immobilizer sys-
tem from operating properly.
●When the electronic key battery is
depleted
●Near a TV tower, electric power
plant, gas station, radio station,
large display, airpo rt or other facil-
SituationCorrection
procedure
The engine switch
was turned to ACC
while the driver’s
door was open (or
the driver’s door was
opened while the
engine switch was in
ACC).
Turn the
engine
switch off
and close
the driver’s
door.
The engine switch
was turned to off
while the driver’s
door was open.Close the
driver’s
door.
Page 320 of 500
3205-4. Other interior features
*: If equipped
■HomeLink® programming pro-
cedure
The programming procedures can
also be found at the following URL.
Website: www.homelink.com/toyota
For support, contact customer sup-
port at the following.
Help Line: 1-800-355-3515
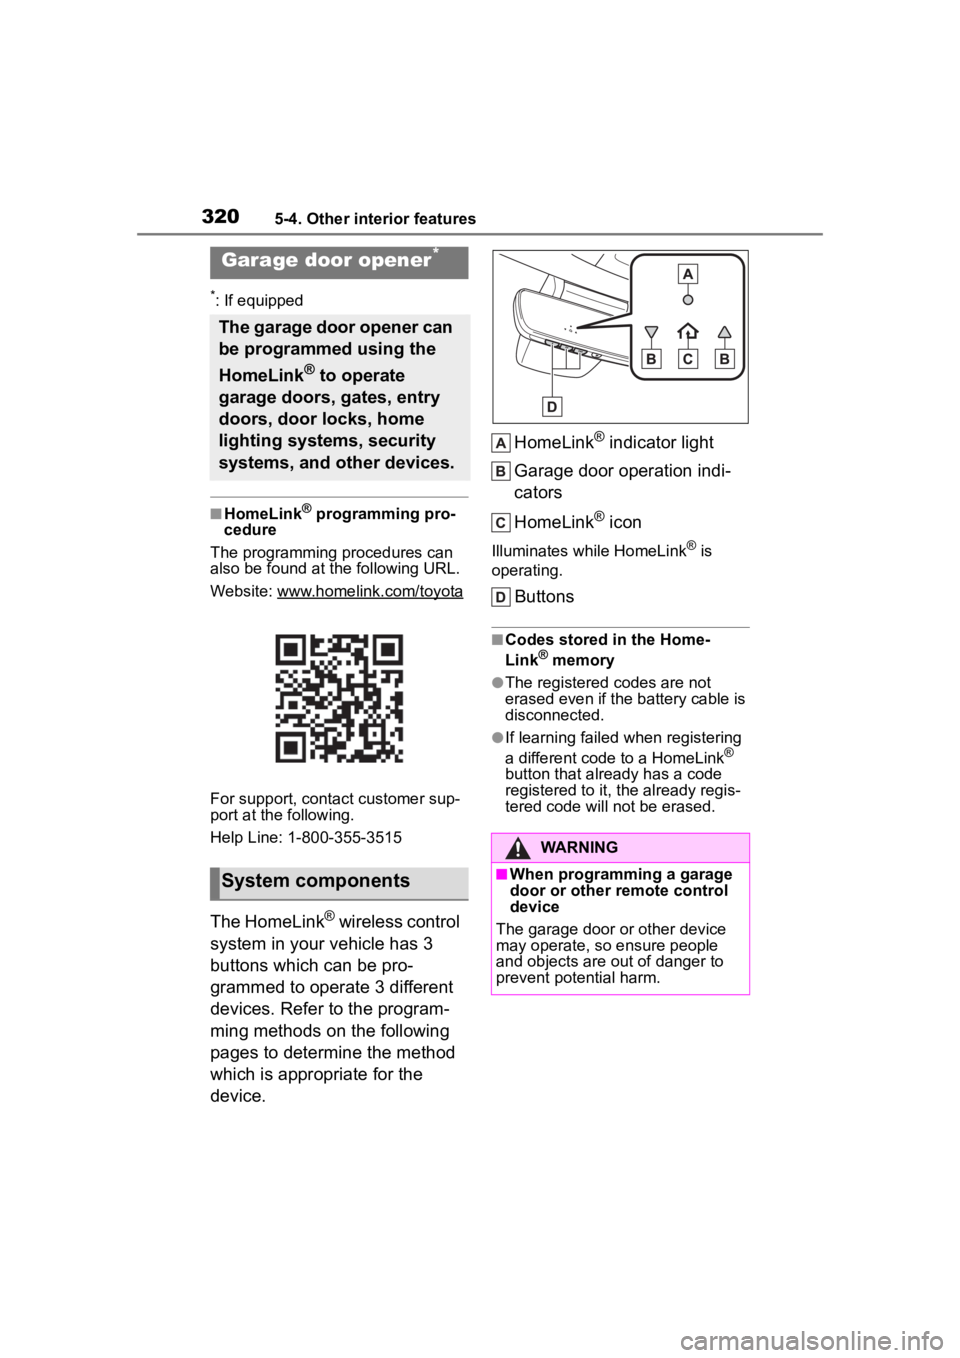
The HomeLink® wireless control
system in your vehicle has 3
buttons which can be pro-
grammed to operate 3 different
devices. Refer to the program-
ming methods on the following
pages to determine the method
which is appropriate for the
device. HomeLink
® indicator light
Garage door operation indi-
cators
HomeLink
® icon
Illuminates while HomeLink® is
operating.
Buttons
■Codes stored in the Home-
Link® memory
●The registered codes are not
erased even if the battery cable is
disconnected.
●If learning failed when registering
a different code to a HomeLink®
button that already has a code
registered to it, the already regis-
tered code will not be erased.
Garage door opener*
The garage door opener can
be programmed using the
HomeLink
® to operate
garage doors, gates, entry
doors, door locks, home
lighting systems, security
systems, and other devices.
System components
WARNING
■When programming a garage
door or other remote control
device
The garage door or other device
may operate, so ensure people
and objects are out of danger to
prevent potential harm.
Page 321 of 500
3215-4. Other interior features
5
Interior features
■Before programming Home-
Link
®
During programming, it is pos-
sible that garage doors,
gates, or other devices may
operate. For this reason,
make sure that people and
objects are clear of the
garage door or other devices
to prevent injury or other
potential harm.
It is recommended that a new
battery be placed in the
remote control transmitter for
more accurate programming.
Garage door opener motors
manufactured after 1995 may
be equipped with rolling code protection. If this is the case,
you may need a stepladder or
other sturdy, safe device to
reach the “Learn” or “Smart”
button on the garage door
opener motor.
■Programming HomeLink®
Steps
1 through 3 must be per-
formed within 60 seconds, oth-
erwise the indicator light will
stop flashing and programming
will not be able to be completed.
1 Press and release the Home-
Link
® button you want to pro-
gram and check that the
HomeLink
® indicator light
flashes (orange).
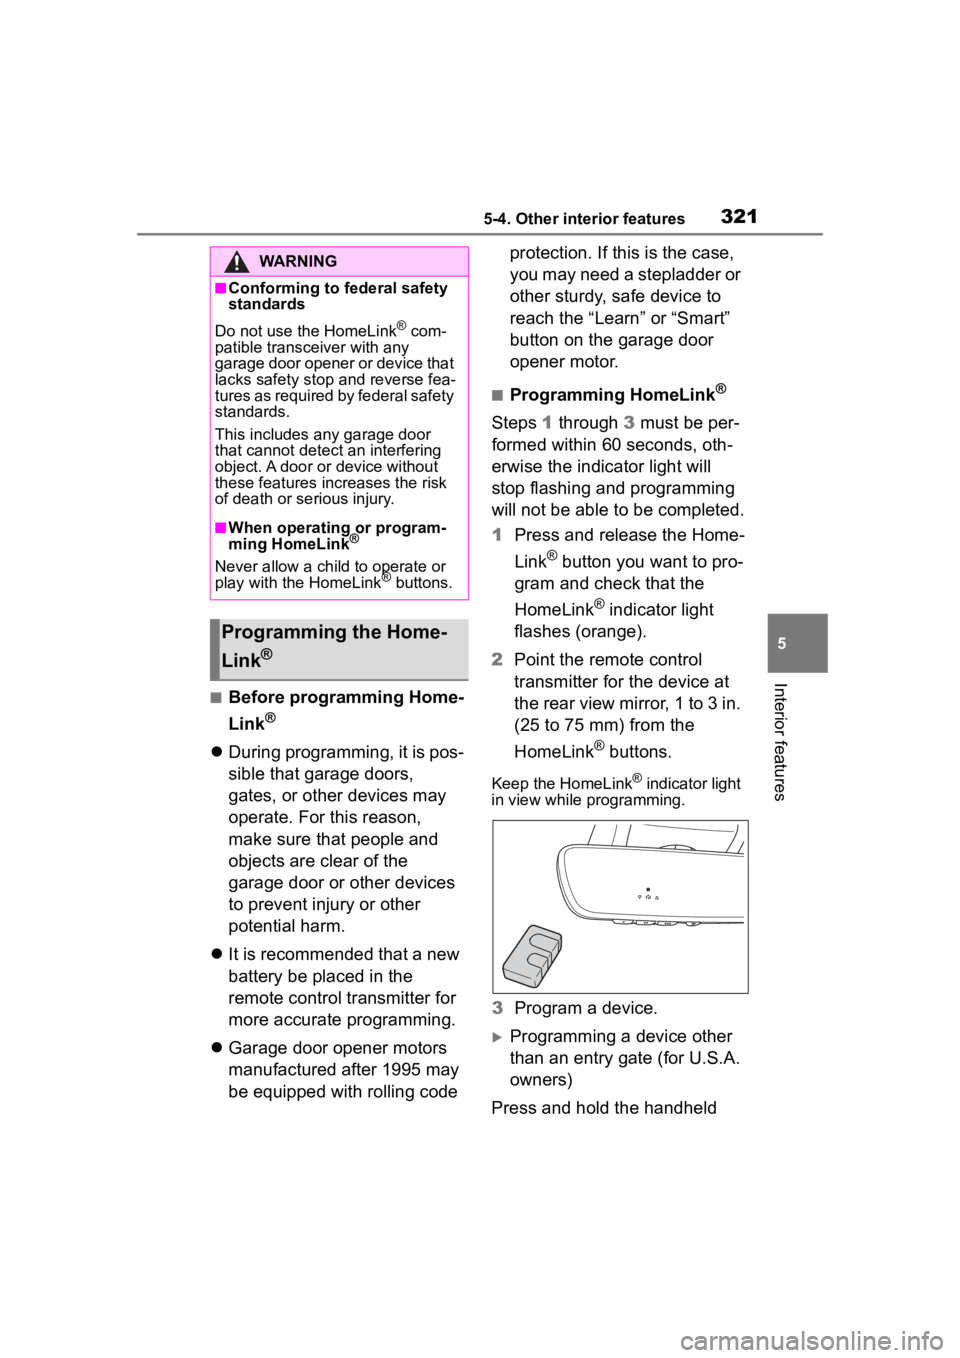
2 Point the remote control
transmitter for the device at
the rear view mirror, 1 to 3 in.
(25 to 75 mm) from the
HomeLink
® buttons.
Keep the HomeLink® indicator light
in view while programming.
3 Program a device.
Programming a device other
than an entry gate (for U.S.A.
owners)
Press and hold the handheld
WARNING
■Conforming to federal safety
standards
Do not use the HomeLink
® com-
patible transceiver with any
garage door opener or device that
lacks safety stop and reverse fea-
tures as required by federal safety
standards.
This includes any garage door
that cannot detect an interfering
object. A door or device without
these features increases the risk
of death or se rious injury.
■When operating or program-
ming HomeLink®
Never allow a child to operate or
play with the HomeLink® buttons.
Programming the Home-
Link
®
Page 322 of 500
3225-4. Other interior features
transmitter button until the
HomeLink
® indicator light
changes from slowly flashing
orange to rapidly flashing green
(rolling code) or continuously lit
green (fixed code), then release
the button.
Programming an entry gate
(for U.S.A. owners)/Program-
ming a device in the Cana-
dian market
Press and release the remote
control transmitter button at 2
second intervals, repeatedly,
until the HomeLink
® indicator
light changes from slowly flash-
ing (orange) to rapidly flashing
(green) (rolling code) or continu-
ously lit (green) (fixed code).
4 Test the HomeLink
® opera-
tion by pressing the newly
programmed button and
observing the indicator light:
Indicator light illuminates:
Programming of a fixed code
device has completed. The
garage door or other device
should operate when a Home-
Link
® button is pressed and
released.
Indicator light flashes rapidly:
The garage door opener
motor or other device is
equipped with a rolling code.
To complete programming,
firmly press and hold the
HomeLink
® button for 2 sec-
onds then release it.
If the garage door or other
device does not operate, pro-
ceed to “Programming a roll-
ing code system”.
5 Repeat the steps above to
program another device for
any of the remaining Home-
Link
® buttons.
■Programming a rolling code
system
2 or more people may be neces-
sary to complete rolling code
programming.
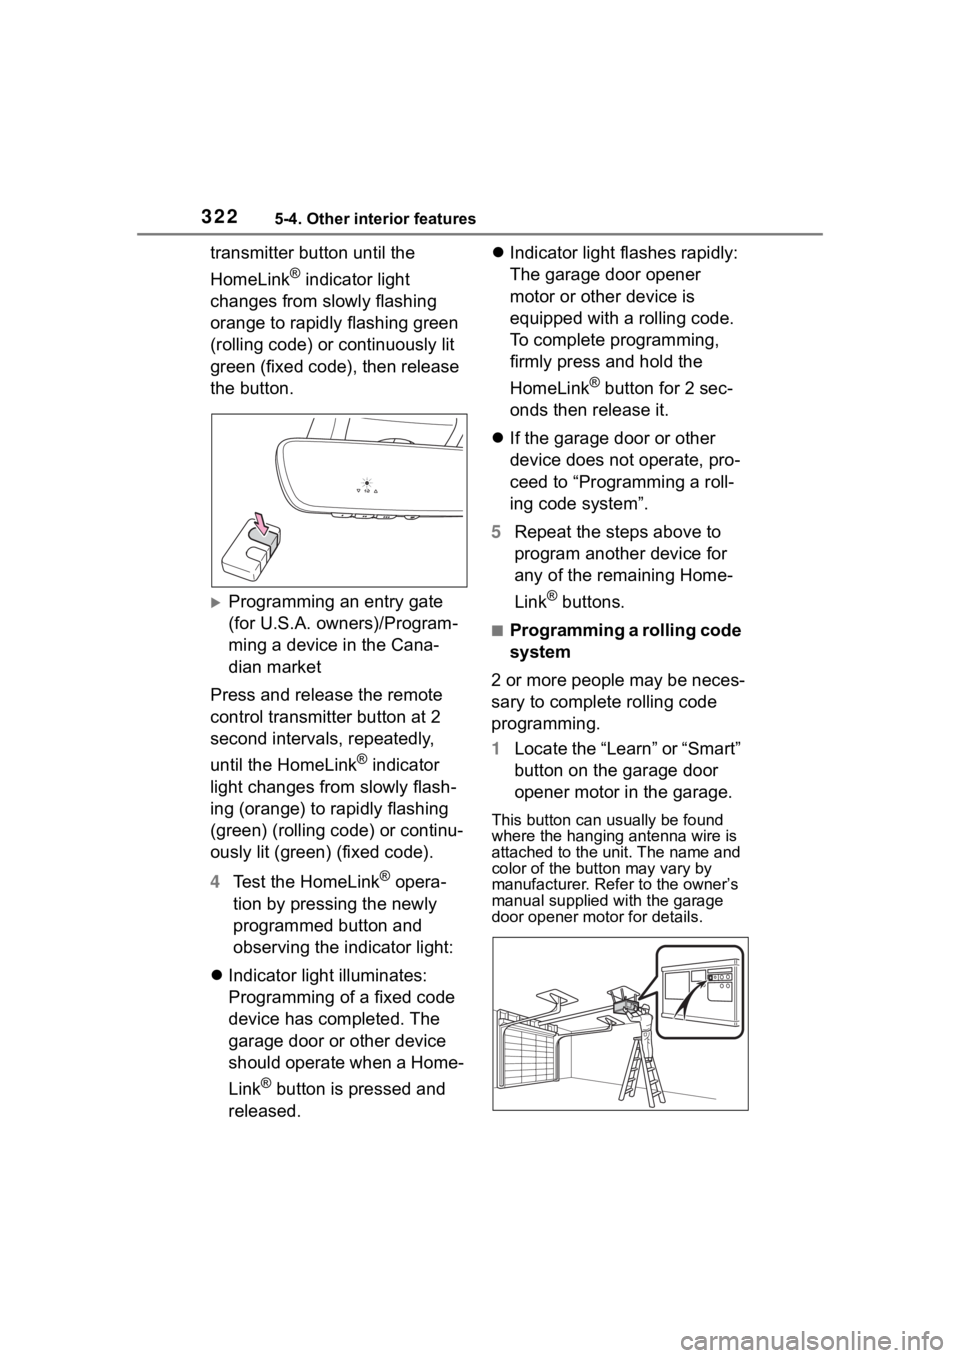
1 Locate the “Learn” or “Smart”
button on the garage door
opener motor in the garage.
This button can usually be found
where the hanging antenna wire is
attached to the unit. The name and
color of the button may vary by
manufacturer. Refer to the owner’s
manual supplied with the garage
door opener motor for details.
Page 324 of 500
3245-4. Other interior features
“Learn” or “Smart” button on
the garage door opener
motor. Within 5 seconds of
the establishment of 2-way
communication with the
garage door opener, both
garage door operation indica-
tors in the vehicle will flash
rapidly (green) and the light
on the garage door opener
motor will blink twice, indicat-
ing that 2-way communica-
tion is enabled.
■Reprogramming a single
HomeLink
® button
When the following procedure is
performed, buttons which
already have devices registered
to them can be overwritten:
1 With one hand, press and
hold the desired HomeLink
®
button.
2 When the HomeLink
® indica-
tor starts flashing (orange),
continue to hold the Home-
Link
® button and perform
“Programming HomeLink
®” 1
(it takes 20 seconds for the
HomeLink
® indicator to start
flashing).
■Before programming
●Install a new battery in the trans-
mitter.
●The battery side of the transmitter
must be pointed away from the
HomeLink
®.
Press the appropriate Home-
Link
® button. The HomeLink®
indicator light should turn on.
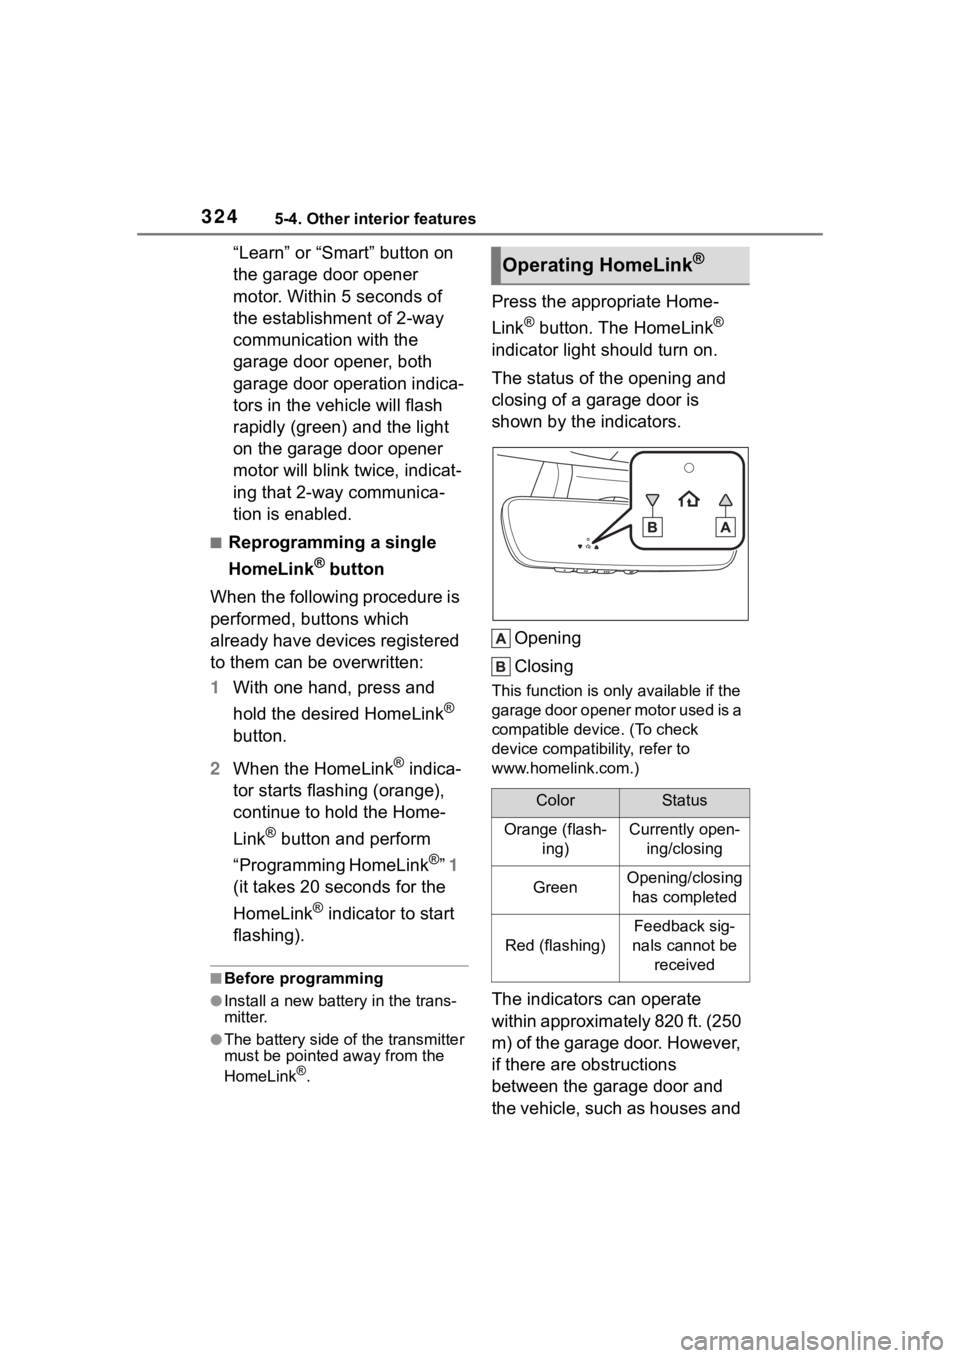
The status of the opening and
closing of a garage door is
shown by the indicators.
Opening
Closing
This function is only available if the
garage door opener motor used is a
compatible device. (To check
device compatibility, refer to
www.homelink.com.)
The indicators can operate
within approximately 820 ft. (250
m) of the garage door. However,
if there are obstructions
between the garage door and
the vehicle, such as houses and
Operating HomeLink®
ColorStatus
Orange (flash- ing)Currently open-ing/closing
GreenOpening/closing has completed
Red (flashing)
Feedback sig-
nals cannot be received