lights TOYOTA COROLLA CROSS 2023 Service Manual
[x] Cancel search | Manufacturer: TOYOTA, Model Year: 2023, Model line: COROLLA CROSS, Model: TOYOTA COROLLA CROSS 2023Pages: 500, PDF Size: 15.11 MB
Page 260 of 500
2604-5. Using the driving support systems
■The system can be operated
when
●The engine switch is in ON.
●Intuitive parking assist function is
on.
●The vehicle speed is less than
about 6 mph (10 km/h).
●A shift position other than P is
selected.
■If “Parking Assist Unavailable
Sensor Blocked” is displayed
on the multi-information display
A sensor may be covered with water
drops, ice, snow, dirt, etc.
Remove the water drops, ice, snow,
dirt, etc., from the sensor to return
the system to normal.
WARNING
■Cautions regarding the use of
the system
There is a limit to the degree of
recognition accuracy and control
performance that this system can
provide, do not ov erly rely on this
system. The driver is always
responsible for paying attention to
the vehicle’ surroundings and
driving safely.
■To ensure the system can
operate properly
Observe the following precau-
tions.
Failing to do so may result in the
vehicle being unable to be driven
safely and possibly cause an acci-
dent.
●Do not damage the sensors,
and always keep them clean.
●Do not attach a sticker or install
an electronic component, such
as a backlit license plate (espe-
cially fluorescent type), fog
lights, fender pole or wireless
antenna near a radar sensor.
●Do not subject the surrounding
area of the sensor to a strong
impact. If subjected to an
impact, have the vehicle
inspected by Toyota dealer. If
the front or rear bumper needs
to be removed/installed or
replaced, contact your Toyota
dealer.
●Do not modify, disassemble or
paint the sensors.
●Do not attach a license plate
cover.
●Keep your tires properly
inflated.
■When to disable the function
In the following situations, disable
the function as it may operate
even though there is no possibility
of a collision.
●Failing to observe the warnings
above.
●A non-genuine Toyota suspen-
sion (lowered suspension, etc.)
is installed.
■Notes when washing the vehi-
cle
Do not apply intensive bursts of
water or steam to the sensor
area.
Doing so may result in the sensor
malfunctioning.
●When using a high pressure
washer to wash the vehicle, do
not spray the sensors directly,
as doing so may cause a sensor
to malfunction.
●When using steam to clean the
vehicle, do not direct steam too
close to the sensors as doing so
may cause a sensor to malfunc-
tion.
Page 275 of 500
2754-5. Using the driving support systems
4
Driving
conditions including normal driv-
ing, during cornering, on a
uphill, when starting off, during
acceleration, on a slippery roads
due to snow or rain, thus con-
tributing to stable operability and
driving stability.
■The Secondary Collision
Brake
When the SRS airbag sensor
detects a collision and the sys-
tem operates, the brakes and
brake lights are automatically
controlled to reduce the vehicle
speed and help reduce the pos-
sibility of further damage due to
a secondary collision.
■When the TRAC/VSC systems
are operating
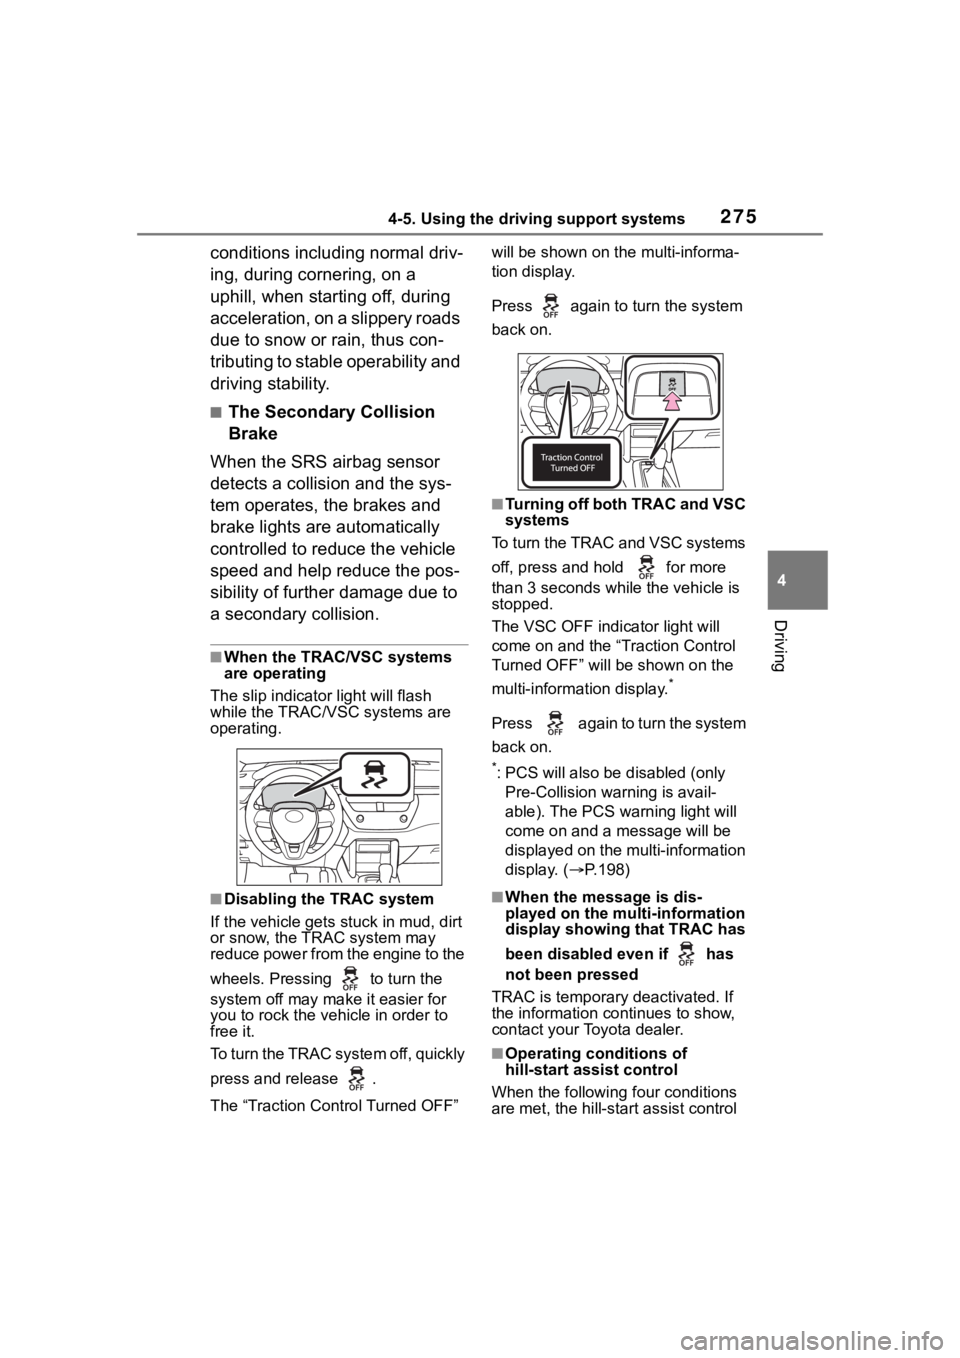
The slip indicator light will flash
while the TRAC/VSC systems are
operating.
■Disabling the TRAC system
If the vehicle gets stuck in mud, dirt
or snow, the TRAC system may
reduce power from the engine to the
wheels. Pressing to turn the
system off may mak e it easier for
you to rock the vehicle in order to
free it.
To turn the TRAC system off, quickly
press and release .
The “Traction Control Turned OFF” will be shown on the multi-informa-
tion display.
Press again to turn the system
back on.
■Turning off both TRAC and VSC
systems
To turn the TRAC and VSC systems
off, press and hold for more
than 3 seconds while the vehicle is
stopped.
The VSC OFF indicator light will
come on and the “Traction Control
Turned OFF” will be shown on the
multi-information display.
*
Press again to turn the system
back on.
*: PCS will also be disabled (only
Pre-Collision warning is avail-
able). The PCS warning light will
come on and a message will be
displayed on the multi-information
display. ( P.198)
■When the message is dis-
played on the multi-information
display showing that TRAC has
been disabled even if has
not been pressed
TRAC is temporary deactivated. If
the information continues to show,
contact your Toyota dealer.
■Operating conditions of
hill-start assist control
When the following four conditions
are met, the hill-star t assist control
Page 280 of 500
2804-6. Driving tips
excess ice or snow that may
have accumulated on the
exterior lights, outside rear
view mirrors, windows, vehi-
cle’s roof, chassis, around the
tires or on the brakes.
Remove any snow or mud
from the bottom of your shoes
before getting in the vehicle.
Accelerate the vehicle slowly,
keep a safe distance between
you and the vehicle ahead, and
drive at a reduced speed suit-
able to road conditions.
Turn automatic mode of the
parking brake off. Otherwise,
the parking brake may freeze
and not be able to be
released automatically.
Also, avoid using the following as
the parking brake may operate
automatically, even if automatic
mode is off.
• Brake hold system
Park the vehicle and shift the
shift lever to P without setting
the parking brake. The park-
ing brake may freeze up, pre-
venting it from being released.
If the vehicle is parked without
setting the parking brake,
make sure to block the
wheels.
Failure to do so may be dan- gerous because it may cause
the vehicle to move unexpect-
edly, possibly leading to an
accident.
When the parking brake is in
automatic mode, release the
parking brake after shifting
the shift lever to P. ( P.172)
Turn off the engin e switch while
pressing the parking brake switch.
If the vehicle is parked without
setting the parking brake,
confirm that the shift lever
cannot be moved out of P.
If the vehicle is left parked
with the brakes damp in cold
temperatures, there is a pos-
sibility of the brakes freezing.
Tire chains cannot be mounted.
Snow tires should be used
instead.When driving the vehicle
When parking the vehicle
Selecting tire chains
Page 285 of 500

285
5
5
Interior features
Interior features
.5-1. Using the air conditioning system and defogger
Manual air conditioning sys- tem ............................ 286
Automatic air conditioning system ....................... 292
Heated steering wheel/seat heaters ...................... 300
5-2. Using the interior lights Interior lights list .......... 302
5-3. Using the storage features List of storage features.................................. 304
Luggage compartment fea- tures .......................... 307
5-4. Other interior features Other interior features . 309
Garage door opener.... 320
Page 302 of 500
3025-2. Using the interior lights
5-2.Using the interior lights
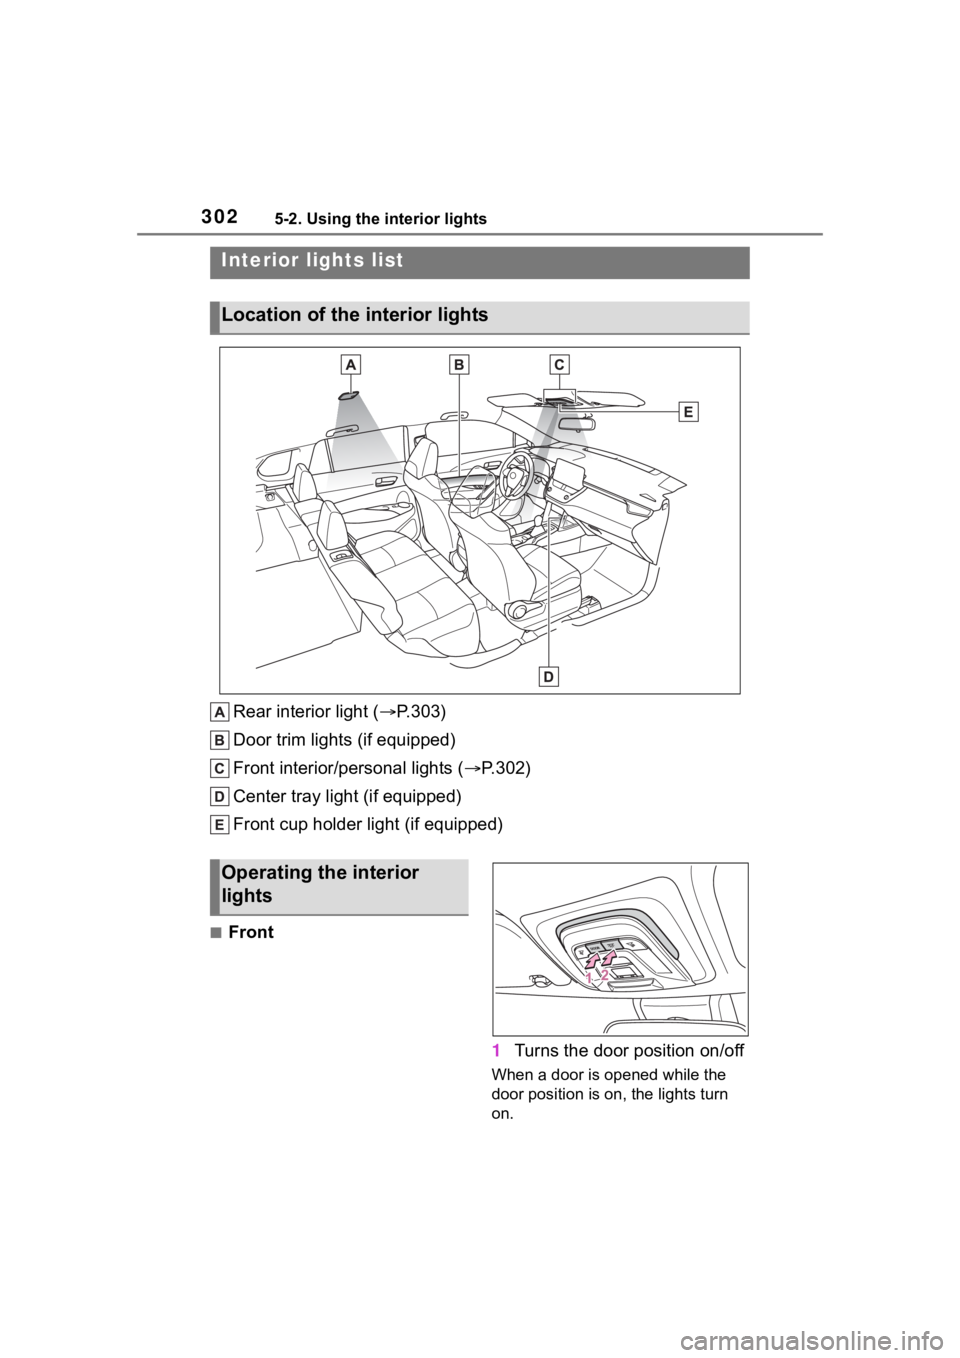
Rear interior light (P.303)
Door trim lights (if equipped)
Front interior/personal lights ( P.302)
Center tray light (if equipped)
Front cup holder light (if equipped)
■Front
1Turns the door position on/off
When a door is opened while the
door position is on, the lights turn
on.
Interior lights list
Location of the i nterior lights
Operating the interior
lights
Page 303 of 500
3035-2. Using the interior lights
5
Interior features
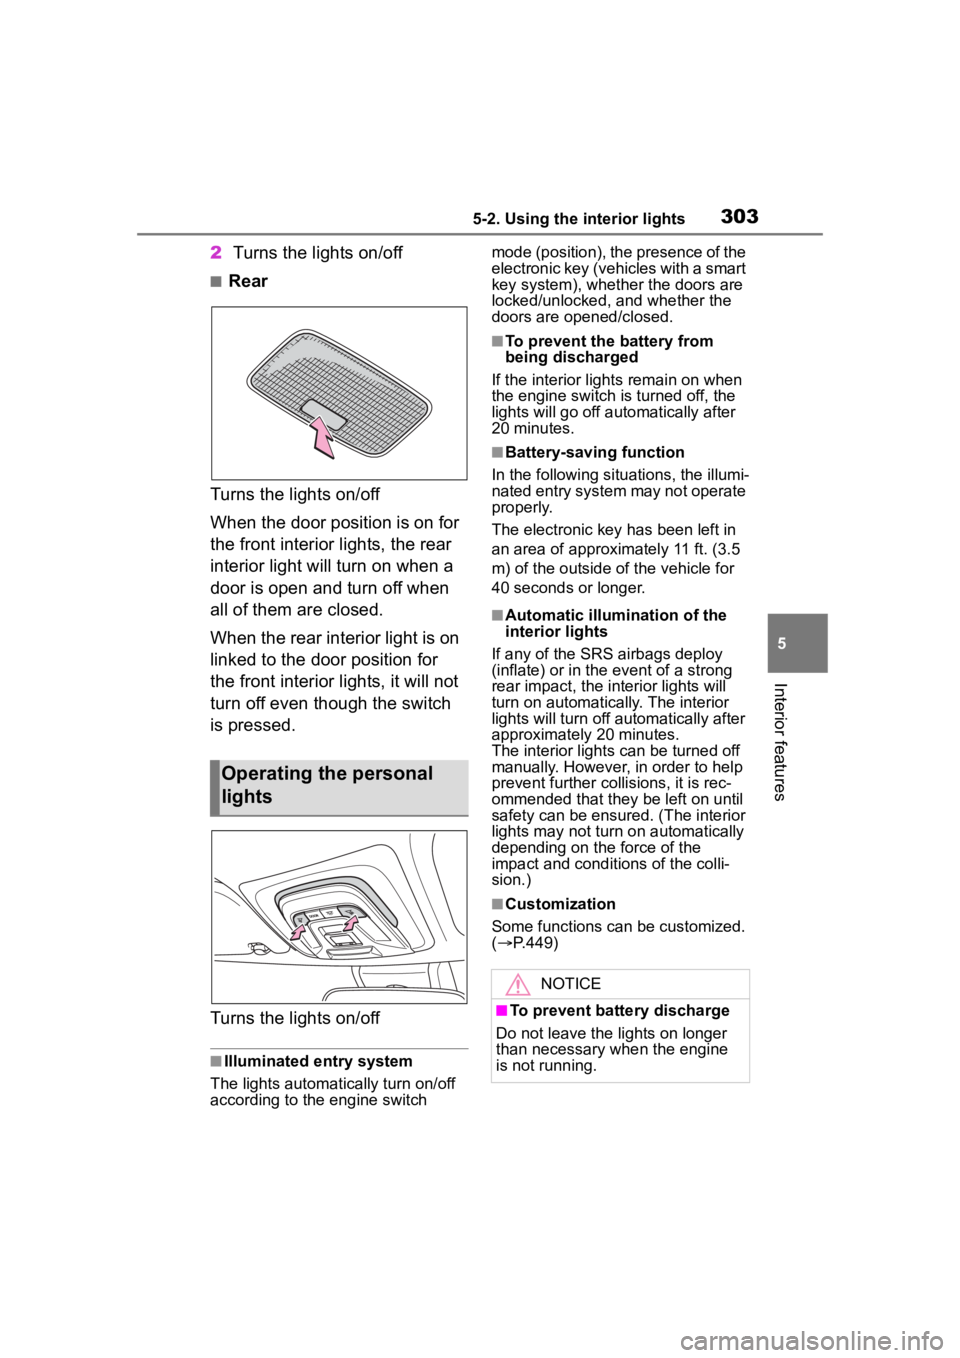
2Turns the lights on/off
■Rear
Turns the lights on/off
When the door position is on for
the front interior lights, the rear
interior light will turn on when a
door is open and turn off when
all of them are closed.
When the rear interior light is on
linked to the door position for
the front interior lights, it will not
turn off even though the switch
is pressed.
Turns the lights on/off
■Illuminated entry system
The lights automatically turn on/off
according to the engine switch mode (position), the presence of the
electronic key (vehicles with a smart
key system), whether the doors are
locked/unlocked, and whether the
doors are opened/closed.
■To prevent the battery from
being discharged
If the interior light s remain on when
the engine switch is turned off, the
lights will go off automatically after
20 minutes.
■Battery-saving function
In the following situations, the illumi-
nated entry system may not operate
properly.
The electronic key has been left in
an area of approximately 11 ft. (3.5
m) of the outside of the vehicle for
40 seconds or longer.
■Automatic illumination of the
interior lights
If any of the SRS airbags deploy
(inflate) or in the event of a strong
rear impact, the in terior lights will
turn on automatically. The interior
lights will turn off automatically after
approximately 20 minutes.
The interior lights can be turned off
manually. However, in order to help
prevent further co llisions, it is rec-
ommended that they be left on until
safety can be ensured. (The interior
lights may not turn on automatically
depending on the force of the
impact and conditions of the colli-
sion.)
■Customization
Some functions can be customized.
( P.449)
Operating the personal
lights
NOTICE
■To prevent battery discharge
Do not leave the lights on longer
than necessary w hen the engine
is not running.
Page 305 of 500
3055-3. Using the storage features
5
Interior features
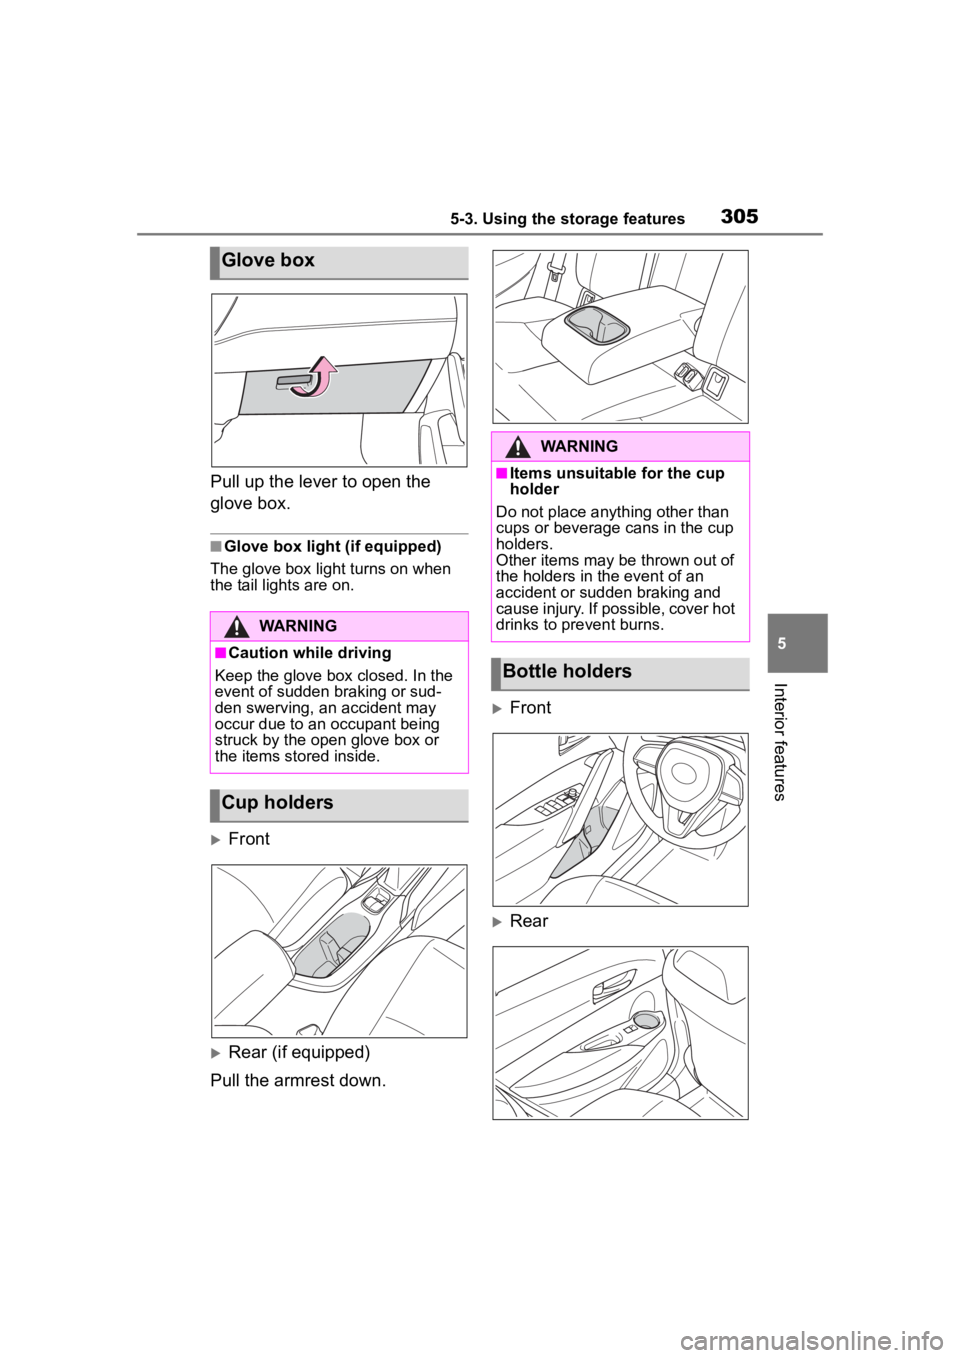
Pull up the lever to open the
glove box.
■Glove box light (if equipped)
The glove box light turns on when
the tail lights are on.
Front
Rear (if equipped)
Pull the armrest down.
Front
Rear
Glove box
WARNING
■Caution while driving
Keep the glove box closed. In the
event of sudden braking or sud-
den swerving, an accident may
occur due to an occupant being
struck by the open glove box or
the items stored inside.
Cup holders
WARNING
■Items unsuitable for the cup
holder
Do not place anyth ing other than
cups or beverage cans in the cup
holders.
Other items may be thrown out of
the holders in the event of an
accident or sudden braking and
cause injury. If possible, cover hot
drinks to pre vent burns.
Bottle holders
Page 313 of 500
3135-4. Other interior features
5
Interior features
supply switch 3 times while
charging is being performed.
If rapid charging is possible,
the operation indicator will
change from illuminated
(orange) to alternating
between (green) and (orange).
When charging is finished, the
rapid charging function will
turn off. To perform rapid
charging again, turn the rapid
charging function back on.
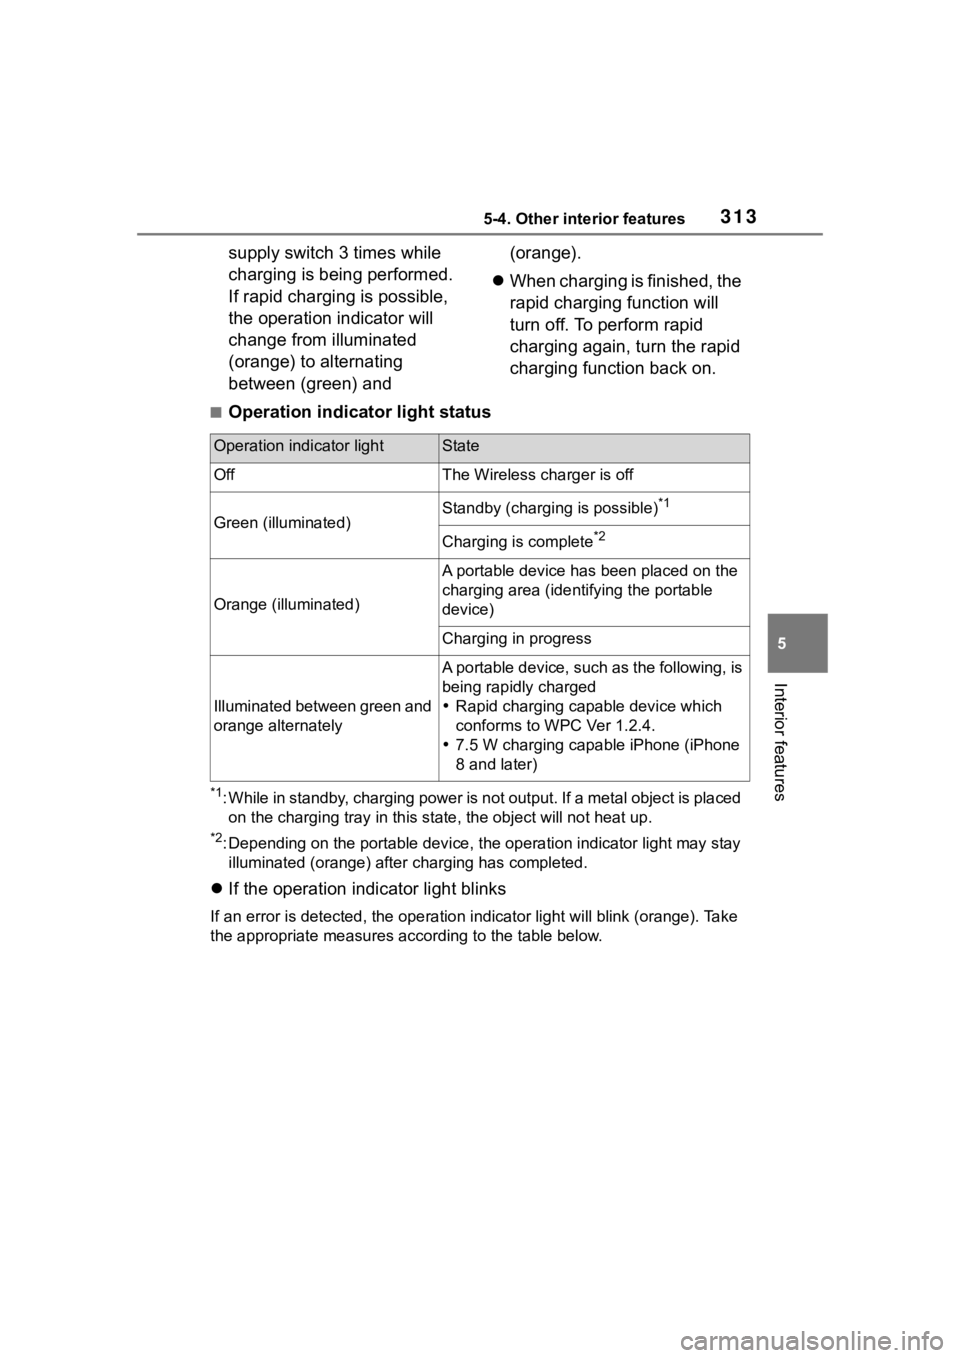
■Operation indicator light status
*1: While in standby, charging power is not output. If a metal obj ect is placed
on the charging tray i n this state, the object will not heat up .
*2: Depending on the portable device, the operation indicator light may stay
illuminated (orang e) after charging has completed.
If the operation indicator light blinks
If an error is detec ted, the operation in dicator light will blink (orange). Take
the appropriate measures according to the table below.
Operation indicator lightState
OffThe Wireless charger is off
Green (illuminated)Standby (charging is possible)*1
Charging is complete*2
Orange (illuminated)
A portable device has been placed on the
charging area (identifying the portable
device)
Charging in progress
Illuminated between green and
orange alternately
A portable device, such as the following, is
being rapidly charged
Rapid charging capable device which
conforms to WPC Ver 1.2.4.
7.5 W charging capable iPhone (iPhone
8 and later)
Page 314 of 500
3145-4. Other interior features
■The wireless charger can be
operated when
The engine switch is in ACC or ON.
■Portable devices that can be
charged
●Portable devices compatible with the Qi wireless charging standard
can be charged by the wireless
charger. However, compatibility
with all devices which meet the Qi
wireless charging standard is not
guaranteed.●The wireless char
ger is designed
to supply low power electricity (5
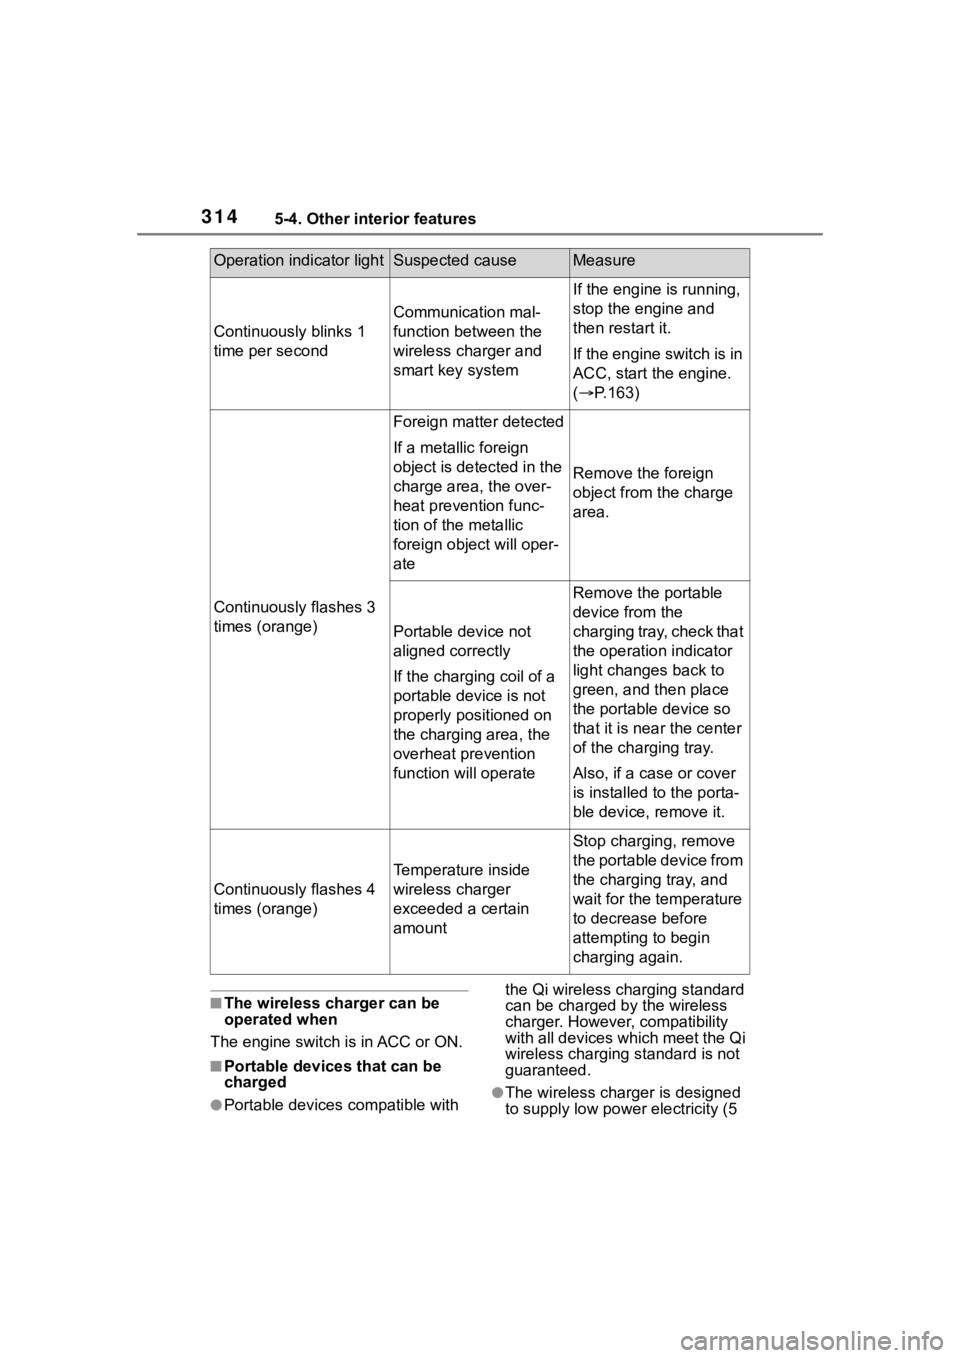
Operation indicator lightSuspected causeMeasure
Continuously blinks 1
time per second
Communication mal-
function between the
wireless charger and
smart key system
If the engine is running,
stop the engine and
then restart it.
If the engine switch is in
ACC, start the engine.
( P.163)
Continuously flashes 3
times (orange)
Foreign matter detected
If a metallic foreign
object is detected in the
charge area, the over-
heat prevention func-
tion of the metallic
foreign obje ct will oper-
ate
Remove the foreign
object from the charge
area.
Portable device not
aligned correctly
If the charging coil of a
portable device is not
properly positioned on
the charging area, the
overheat prevention
function will operate
Remove the portable
device from the
charging tray, check that
the operation indicator
light changes back to
green, and then place
the portable device so
that it is near the center
of the charging tray.
Also, if a case or cover
is installed to the porta-
ble device, remove it.
Continuously flashes 4
times (orange)
Temperature inside
wireless charger
exceeded a certain
amount
Stop charging, remove
the portable device from
the charging tray, and
wait for the temperature
to decrease before
attempting to begin
charging again.
Page 318 of 500
3185-4. Other interior features
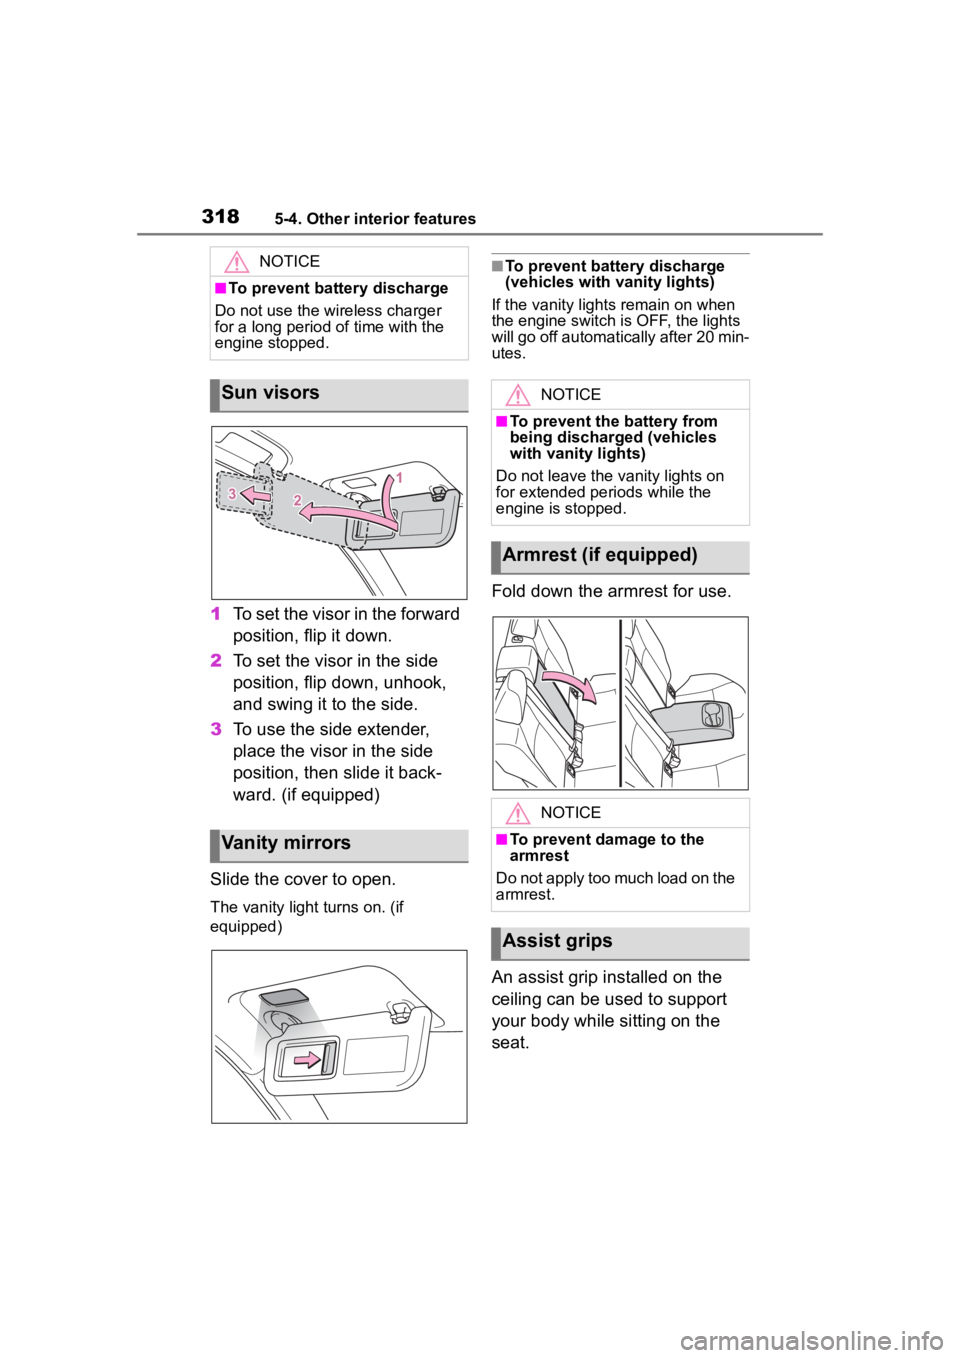
1To set the visor in the forward
position, flip it down.
2 To set the visor in the side
position, flip down, unhook,
and swing it to the side.
3 To use the side extender,
place the visor in the side
position, then slide it back-
ward. (if equipped)
Slide the cover to open.
The vanity light turns on. (if
equipped)
■To prevent battery discharge
(vehicles with vanity lights)
If the vanity lights remain on when
the engine switch is OFF, the lights
will go off automatically after 20 min-
utes.
Fold down the armrest for use.
An assist grip installed on the
ceiling can be used to support
your body while sitting on the
seat.
NOTICE
■To prevent battery discharge
Do not use the wireless charger
for a long period of time with the
engine stopped.
Sun visors
Vanity mirrors
NOTICE
■To prevent the battery from
being discharged (vehicles
with vanity lights)
Do not leave the vanity lights on
for extended periods while the
engine is stopped.
Armrest (if equipped)
NOTICE
■To prevent damage to the
armrest
Do not apply too much load on the
armrest.
Assist grips