lights TOYOTA COROLLA CROSS 2023 User Guide
[x] Cancel search | Manufacturer: TOYOTA, Model Year: 2023, Model line: COROLLA CROSS, Model: TOYOTA COROLLA CROSS 2023Pages: 500, PDF Size: 15.11 MB
Page 72 of 500
722-1. Instrument cluster
2-1.Instrument cluster
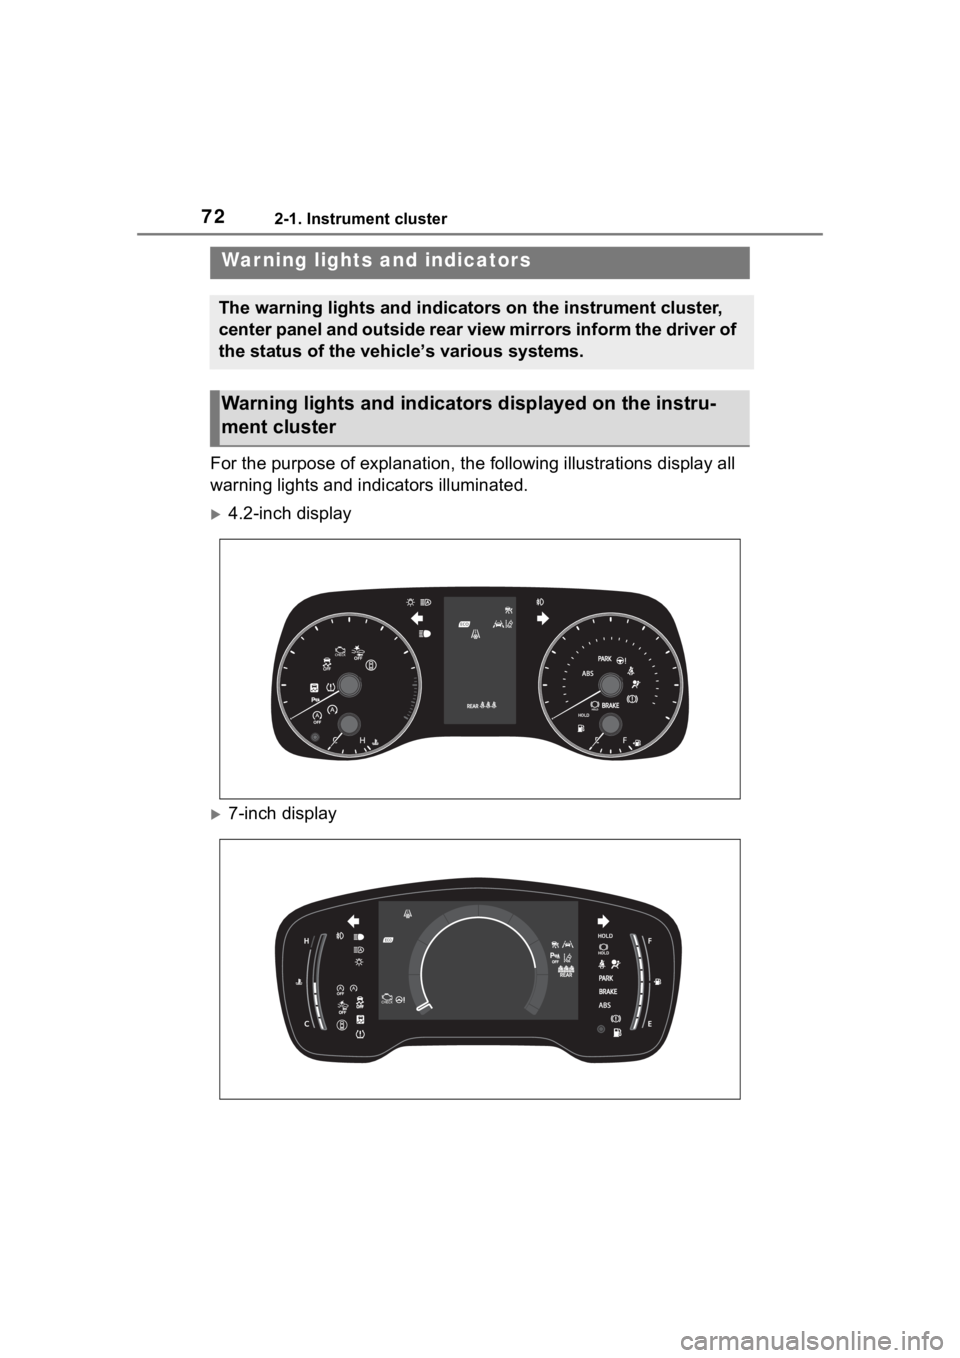
For the purpose of explanation, the following illustrations display all
warning lights and indicators illuminated.
4.2-inch display
7-inch display
War ning lights and indicators
The warning lights and indicators on the instrument cluster,
center panel and outside rear view mirrors inform the driver of
the status of the vehicle’s various systems.
Warning lights and indicators displayed on the instru-
ment cluster
Page 73 of 500
732-1. Instrument cluster
2
Vehicle status information and indicators
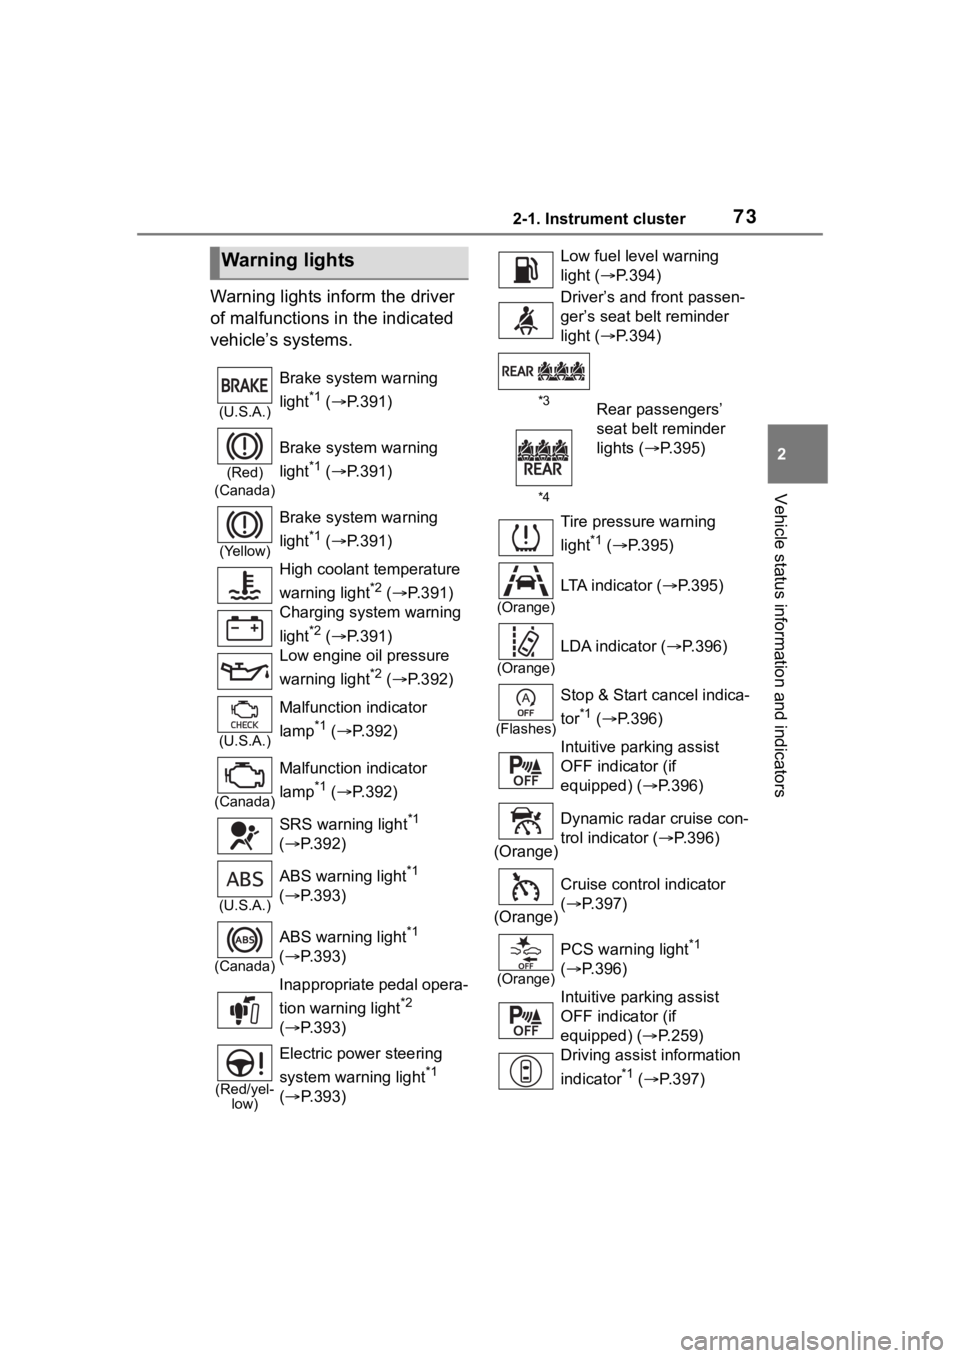
Warning lights inform the driver
of malfunctions in the indicated
vehicle’s systems.
Warning lights
(U.S.A.)
Brake system warning
light
*1 ( P.391)
(Red)
(Canada)
Brake system warning
light
*1 ( P.391)
(Yellow)
Brake system warning
light
*1 ( P.391)
High coolant temperature
warning light
*2 ( P.391)
Charging system warning
light
*2 ( P.391)
Low engine oil pressure
warning light
*2 ( P.392)
(U.S.A.)
Malfunction indicator
lamp
*1 ( P.392)
(Canada)
Malfunction indicator
lamp
*1 ( P.392)
SRS warning light
*1
( P.392)
(U.S.A.)
ABS warning light*1
( P.393)
(Canada)
ABS warning light*1
( P.393)
Inappropriate pedal opera-
tion warning light
*2
( P.393)
(Red/yel-
low)
Electric power steering
system warning light
*1
( P.393)
Low fuel leve l warning
light ( P.394)
Driver’s and front passen-
ger’s seat belt reminder
light ( P.394)
*3
*4Rear passengers’
seat belt reminder
lights ( P.395)
Tire pressure warning
light
*1 ( P.395)
(Orange)
LTA indicator ( P.395)
(Orange)
LDA indicator ( P.396)
(Flashes)
Stop & Start cancel indica-
tor
*1 ( P.396)
Intuitive parking assist
OFF indicator (if
equipped) ( P.396)
(Orange) Dynamic radar cruise con-
trol indicator (
P.396)
(Orange) Cruise control indicator
(
P.397)
(Orange)
PCS warning light*1
( P.396)
Intuitive parking assist
OFF indicator (if
equipped) ( P.259)
Driving assist information
indicator
*1 ( P.397)
Page 74 of 500
742-1. Instrument cluster
*1: These lights come on when the engine switch is turned to ON to
indicate that a system check is
being performed. They will turn
off after the engine is started, or
after a few seconds. There may
be a malfunction in a system if
the lights do not come on, or turn
off. Have the vehicle inspected
by your Toyota dealer.
*2: This light illuminates on the multi-information display.
*3: 4.2-inch display.
*4: 7-inch display.
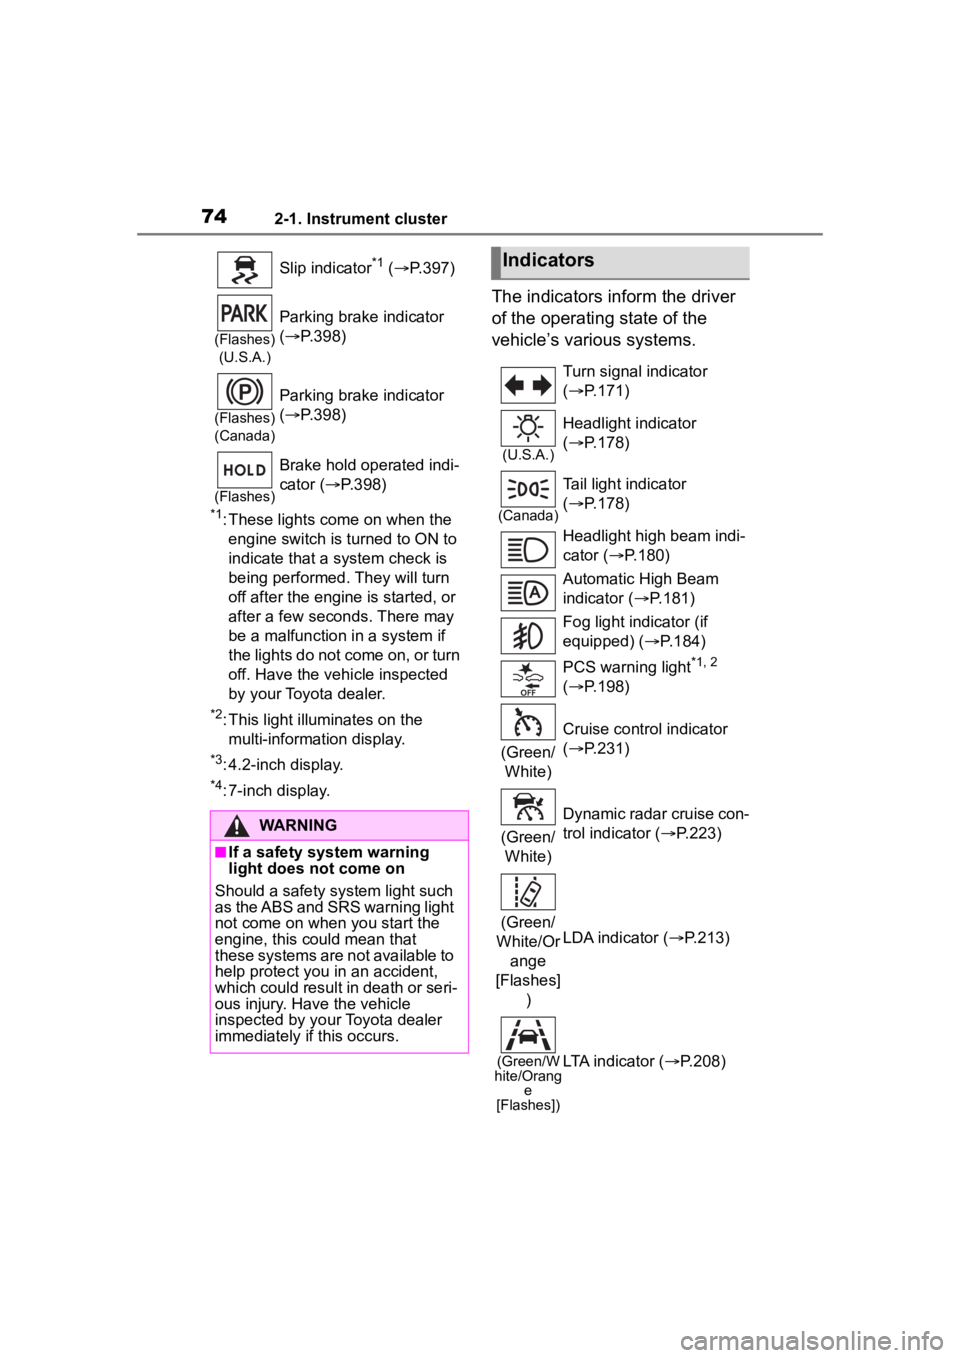
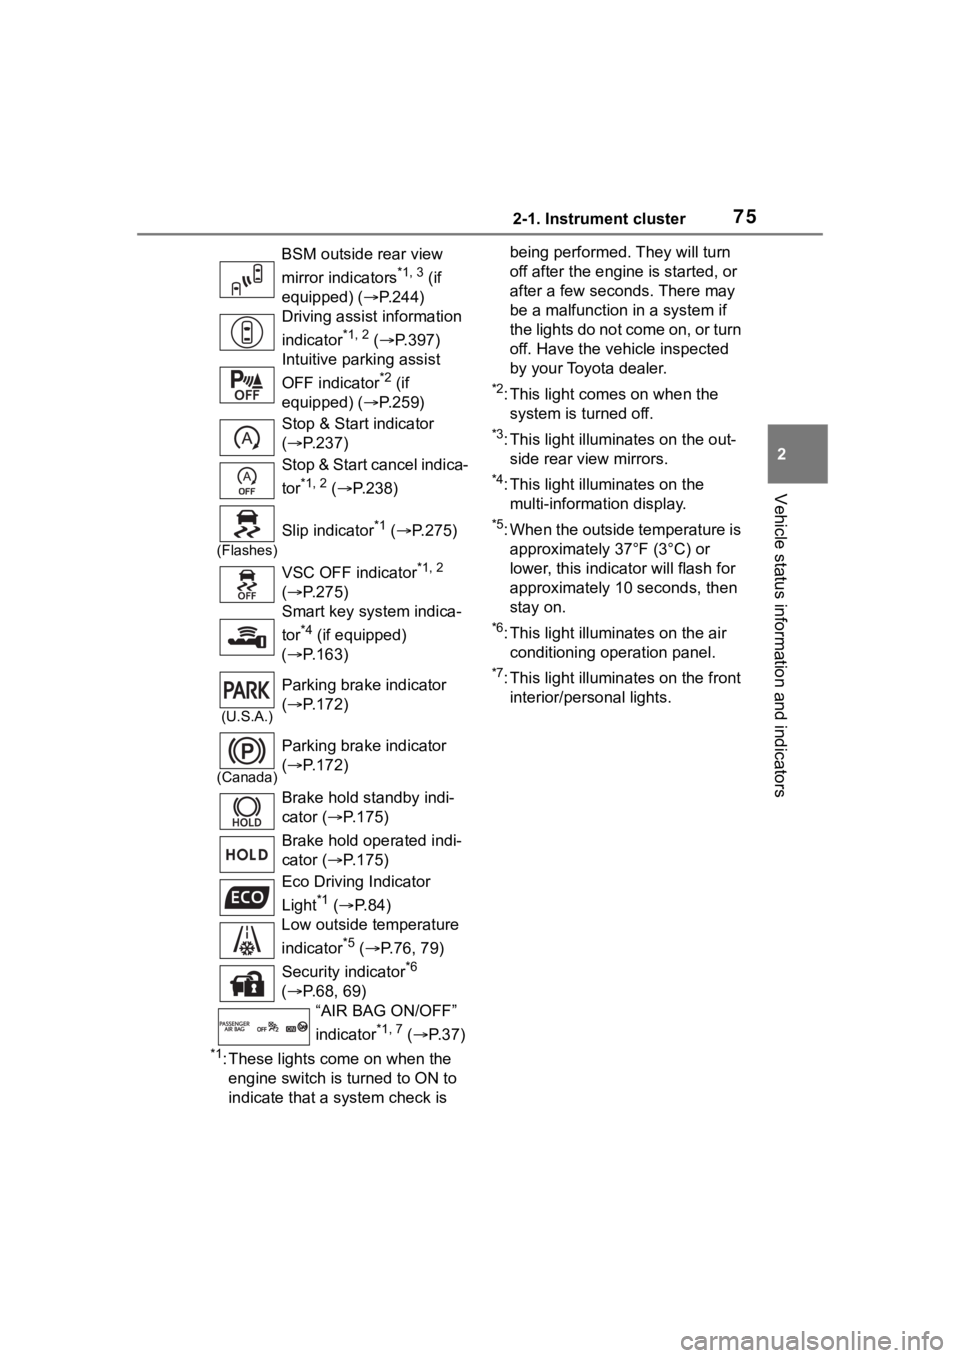
The indicators inform the driver
of the operating state of the
vehicle’s various systems.
Slip indicator*1 ( P.397)
(Flashes)
(U.S.A.)
Parking brake indicator
( P.398)
(Flashes)
(Canada)
Parking brake indicator
( P.398)
(Flashes)
Brake hold operated indi-
cator ( P.398)
WARNING
■If a safety system warning
light does not come on
Should a safety system light such
as the ABS and SRS warning light
not come on when you start the
engine, this could mean that
these systems are not available to
help protect you in an accident,
which could result in death or seri-
ous injury. Have the vehicle
inspected by your Toyota dealer
immediately if this occurs.
Indicators
Turn signal indicator
( P.171)
(U.S.A.)
Headlight indicator
( P.178)
(Canada)
Tail light indicator
( P.178)
Headlight high beam indi-
cator ( P.180)
Automatic High Beam
indicator ( P.181)
Fog light indicator (if
equipped) ( P.184)
PCS warning light
*1, 2
( P.198)
(Green/ White) Cruise control indicator
(
P.231)
(Green/ White) Dynamic radar cruise con-
trol indicator (
P.223)
(Green/
White/Or ange
[Flashes] ) LDA indicator (
P.213)
(Green/W
hite/Orang e
[Flashes])LTA indicator ( P.208)
Page 75 of 500
752-1. Instrument cluster
2
Vehicle status information and indicators
*1: These lights come on when the engine switch is turned to ON to
indicate that a system check is being performed.
They will turn
off after the engine is started, or
after a few seconds. There may
be a malfunction in a system if
the lights do not come on, or turn
off. Have the vehicle inspected
by your Toyota dealer.
*2: This light comes on when the system is turned off.
*3: This light illuminates on the out-side rear view mirrors.
*4: This light illuminates on the multi-information display.
*5: When the outside temperature is approximately 37°F (3°C) or
lower, this indicator will flash for
approximately 10 seconds, then
stay on.
*6: This light illuminates on the air conditioning operation panel.
*7: This light illumina tes on the front
interior/personal lights.
BSM outside rear view
mirror indicators
*1, 3 (if
equipped) ( P.244)
Driving assist information
indicator
*1, 2 ( P.397)
Intuitive parking assist
OFF indicator
*2 (if
equipped) ( P.259)
Stop & Start indicator
( P.237)
Stop & Start cancel indica-
tor
*1, 2 ( P.238)
(Flashes)
Slip indicator*1 ( P.275)
VSC OFF indicator
*1, 2
( P.275)
Smart key system indica-
tor
*4 (if equipped)
( P.163)
(U.S.A.)
Parking brake indicator
( P.172)
(Canada)
Parking brake indicator
( P.172)
Brake hold standby indi-
cator ( P.175)
Brake hold operated indi-
cator ( P.175)
Eco Driving Indicator
Light
*1 ( P. 8 4 )
Low outside temperature
indicator
*5 ( P.76, 79)
Security indicator
*6
( P.68, 69)
“AIR BAG ON/OFF”
indicator
*1, 7 ( P. 3 7 )
Page 78 of 500
782-1. Instrument cluster
different distances independently.
To reset, display the desired trip
meter and press and hold the dis-
play change button.
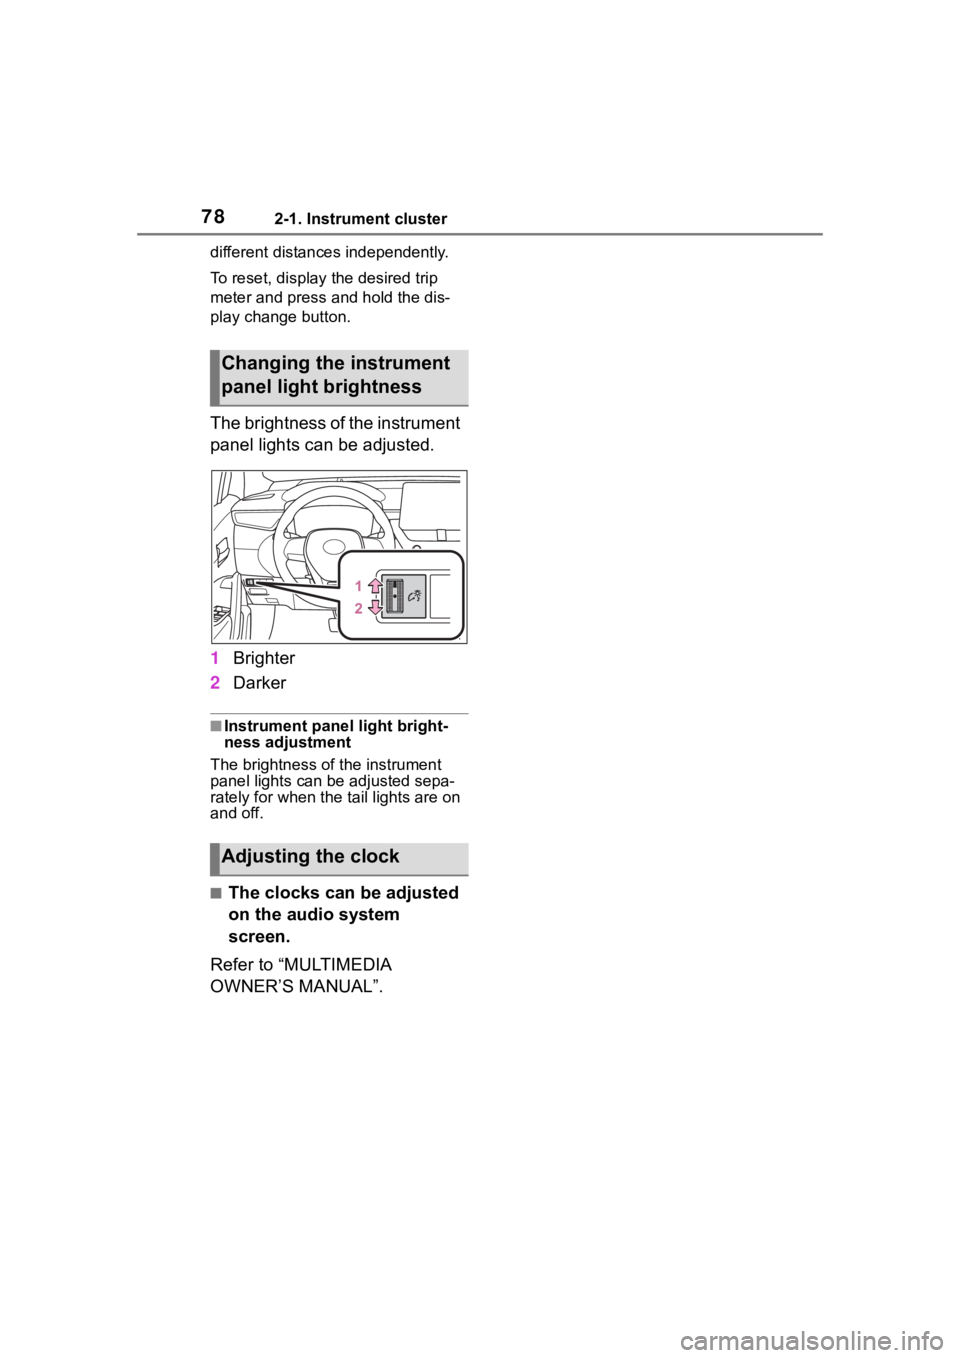
The brightness of the instrument
panel lights can be adjusted.
1Brighter
2 Darker
■Instrument panel light bright-
ness adjustment
The brightness of the instrument
panel lights can be adjusted sepa-
rately for when the tail lights are on
and off.
■The clocks can be adjusted
on the audio system
screen.
Refer to “MULTIMEDIA
OWNER’S MANUAL”.
Changing the instrument
panel light brightness
Adjusting the clock
Page 81 of 500
812-1. Instrument cluster
2
Vehicle status information and indicators
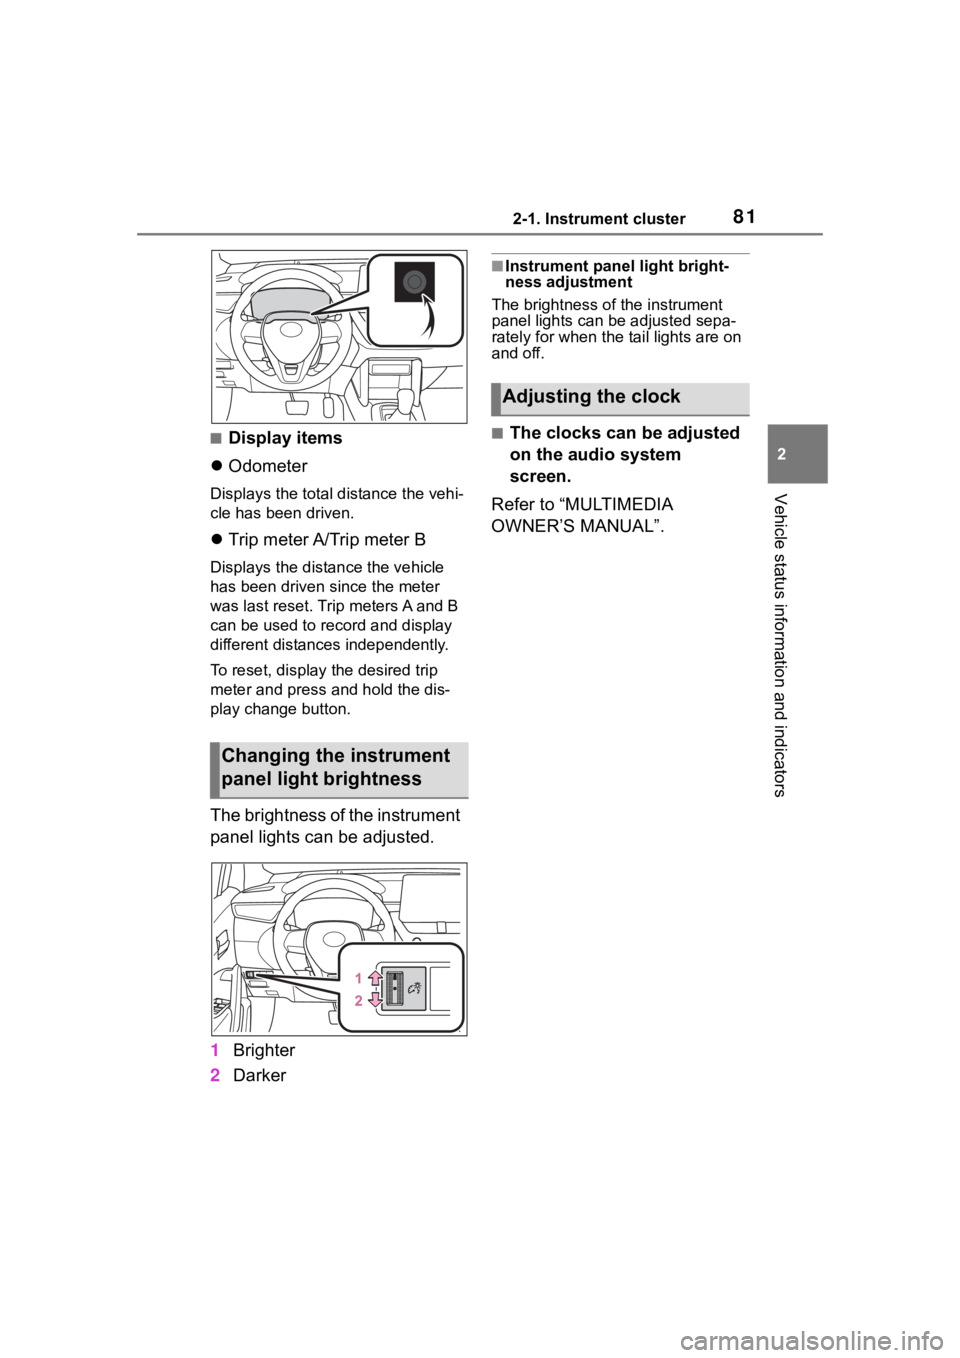
■Display items
Odometer
Displays the total distance the vehi-
cle has been driven.
Trip meter A/Trip meter B
Displays the distan ce the vehicle
has been driven si nce the meter
was last reset. Trip meters A and B
can be used to record and display
different distances independently.
To reset, display the desired trip
meter and press and hold the dis-
play change button.
The brightness of the instrument
panel lights can be adjusted.
1 Brighter
2 Darker
■Instrument panel light bright-
ness adjustment
The brightness of the instrument
panel lights can be adjusted sepa-
rately for when the tail lights are on
and off.
■The clocks can be adjusted
on the audio system
screen.
Refer to “MULTIMEDIA
OWNER’S MANUAL”.
Changing the instrument
panel light brightness
Adjusting the clock
Page 88 of 500
882-1. Instrument cluster
To select a response to a dis-
played suggestion, use the
meter control switches.
■Suggestion to enable the
power back door (if
equipped)
If the power back door system is
disabled (setting on set to
off) and the power back door
switch on the instrument panel
is operated, a suggestion mes-
sage will be displayed asking if
you wish to enable the power
back door system.
To enable the power back door
system, select “Yes”.
After enabling the power back door
system, press the power back door
switch again to open or close the
power back door.
■Suggestion to turn off the
headlights
If the headlights are left on for a
certain amount of time after the
engine switch has been turned
off, if the headlight switch is in
the “AUTO” position, a sugges-
tion message will be displayed
asking if you wish to turn the
headlights off.
To turn the headlights off, select
“Yes”.
If the driver's door is opened after
the engine switch is turned off, this
suggestion message will not be dis-
played.
■Customization
Some functions can be customized.
( P.449)
Page 94 of 500
942-1. Instrument cluster
Displays suggestions to the
driver in the following situations.
To select a response to a dis-
played suggestion, use the
meter control switches.
■Suggestion to enable the
power back door (if
equipped)
If the power back door system is
disabled (setting on set to
off) and the power back door
switch on the instrument panel
is operated, a suggestion mes-
sage will be displayed asking if
you wish to enable the power
back door system.
To enable the power back door system, select “Yes”.
After enabling the power back door
system, press the power back door
switch again to op
en or close the
power back door.
■Suggestion to turn off the
headlights
If the headlights are left on for a
certain amount of time after the
engine switch has been turned
off, if the headlight switch is in
the “AUTO” position, a sugges-
tion message will be displayed
asking if you wish to turn the
headlights off.
To turn the headlights off, select
“Yes”.
If the driver's door is opened after
the engine switch is turned off, this
suggestion message will not be dis-
played.
WARNING
■Cautions during setting up
the display
If the engine is running when
changing the display settings,
ensure that the vehicle is parked
in a place with adequate ventila-
tion. In a closed area such as a
garage, exhaust gases including
harmful carbon monoxide (CO)
may collect and enter the vehicle.
This may lead to death or a seri-
ous health hazard.
NOTICE
■During setting up the display
To prevent battery discharge,
ensure that the engine is running
while setting up the display fea-
tures.
Suggestion function (if
equipped)
Page 100 of 500
1003-1. Key information
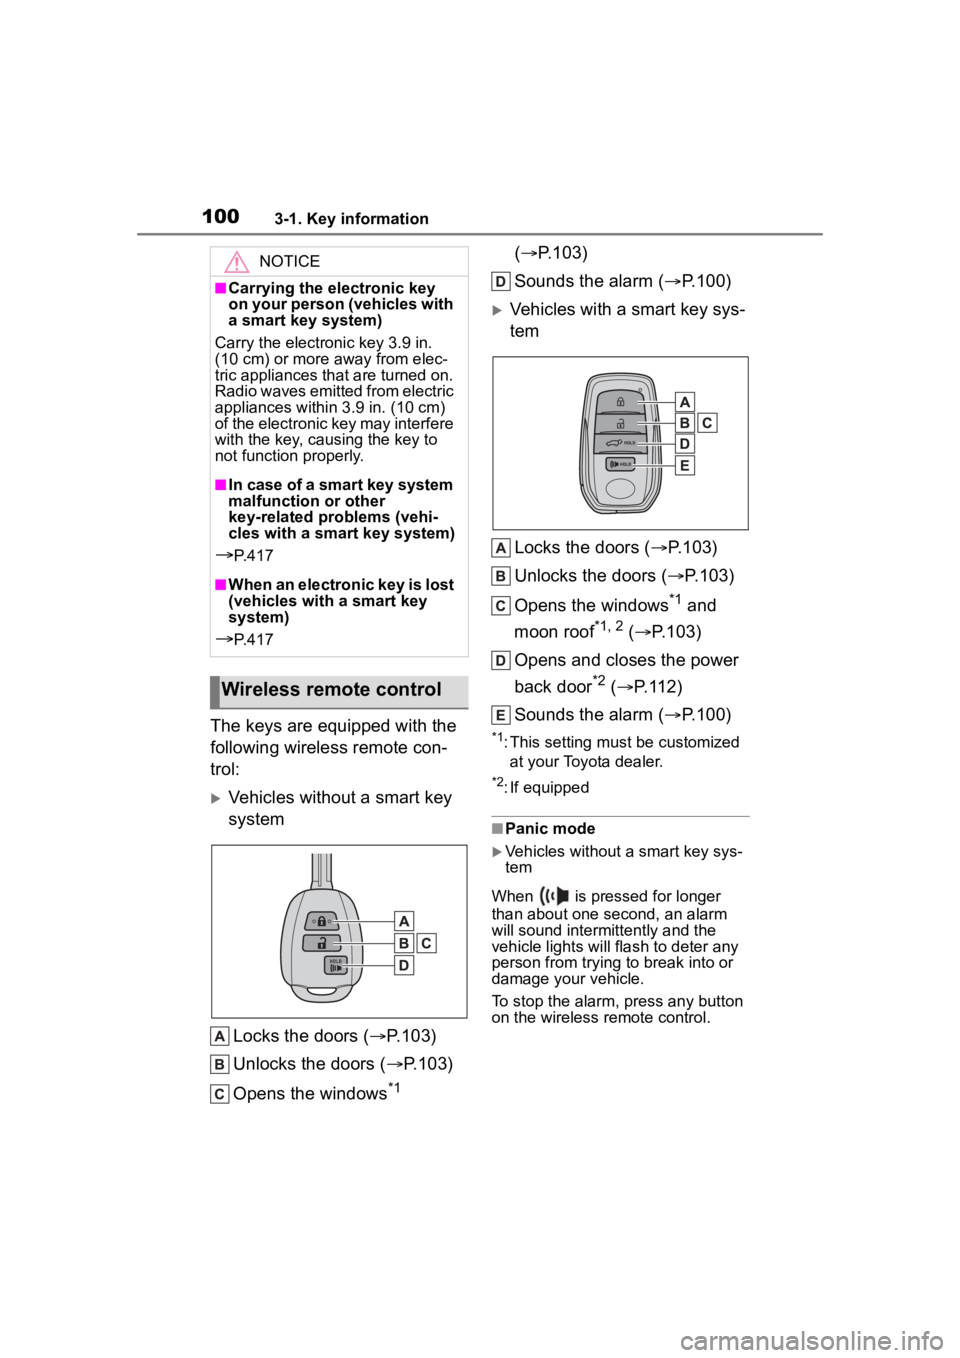
The keys are equipped with the
following wireless remote con-
trol:
Vehicles without a smart key
systemLocks the doors ( P.103)
Unlocks the doors ( P.103)
Opens the windows
*1 (
P.103)
Sounds the alarm ( P.100)
Vehicles with a smart key sys-
tem
Locks the doors ( P.103)
Unlocks the doors ( P.103)
Opens the windows
*1 and
moon roof
*1, 2 ( P.103)
Opens and closes the power
back door
*2 ( P.112)
Sounds the alarm ( P.100)
*1: This setting must be customized
at your Toyota dealer.
*2: If equipped
■Panic mode
Vehicles without a smart key sys-
tem
When is pressed for longer
than about one second, an alarm
will sound intermittently and the
vehicle lights will flash to deter any
person from trying to break into or
damage your vehicle.
To stop the alarm, press any button
on the wireless remote control.
NOTICE
■Carrying the electronic key
on your person (vehicles with
a smart key system)
Carry the electronic key 3.9 in.
(10 cm) or more away from elec-
tric appliances that are turned on.
Radio waves emitted from electric
appliances within 3.9 in. (10 cm)
of the electronic key may interfere
with the key, causing the key to
not function properly.
■In case of a smart key system
malfunction or other
key-related problems (vehi-
cles with a smart key system)
P. 4 1 7
■When an electronic key is lost
(vehicles with a smart key
system)
P. 4 1 7
Wireless remote control
Page 101 of 500
1013-1. Key information
3
Before driving
Vehicles with a smart key system
When is pressed for longer
than about one second, an alarm
will sound intermittently and the
vehicle lights will f lash to deter any
person from trying to break into or
damage your vehicle.
To stop the alarm, press any button
on the electronic key.
■Conditions affect ing the opera-
tion of the smart key system or
wireless remo te control
Vehicles without a smart key sys-
tem
The wireless remote control function
may not operate normally in the fol-
lowing situations:
●When the wireless key battery is
depleted
●Near a TV tower, electric power
plant, gas station , radio station,
large display, airpo rt or other facil-
ity that generates strong radio
waves or electrical noise
●When carrying a portable radio,
cellular phone or other wireless
communication devices
●When the wireles s key is in con-
tact with, or is covered by a metal-
lic object
●When a wireless key (that emits radio waves) is being used nearby
●If window tint wit
h a metallic con-
tent or metallic objects are
attached to the rear window
Vehicles with a smart key system
P. 1 1 9
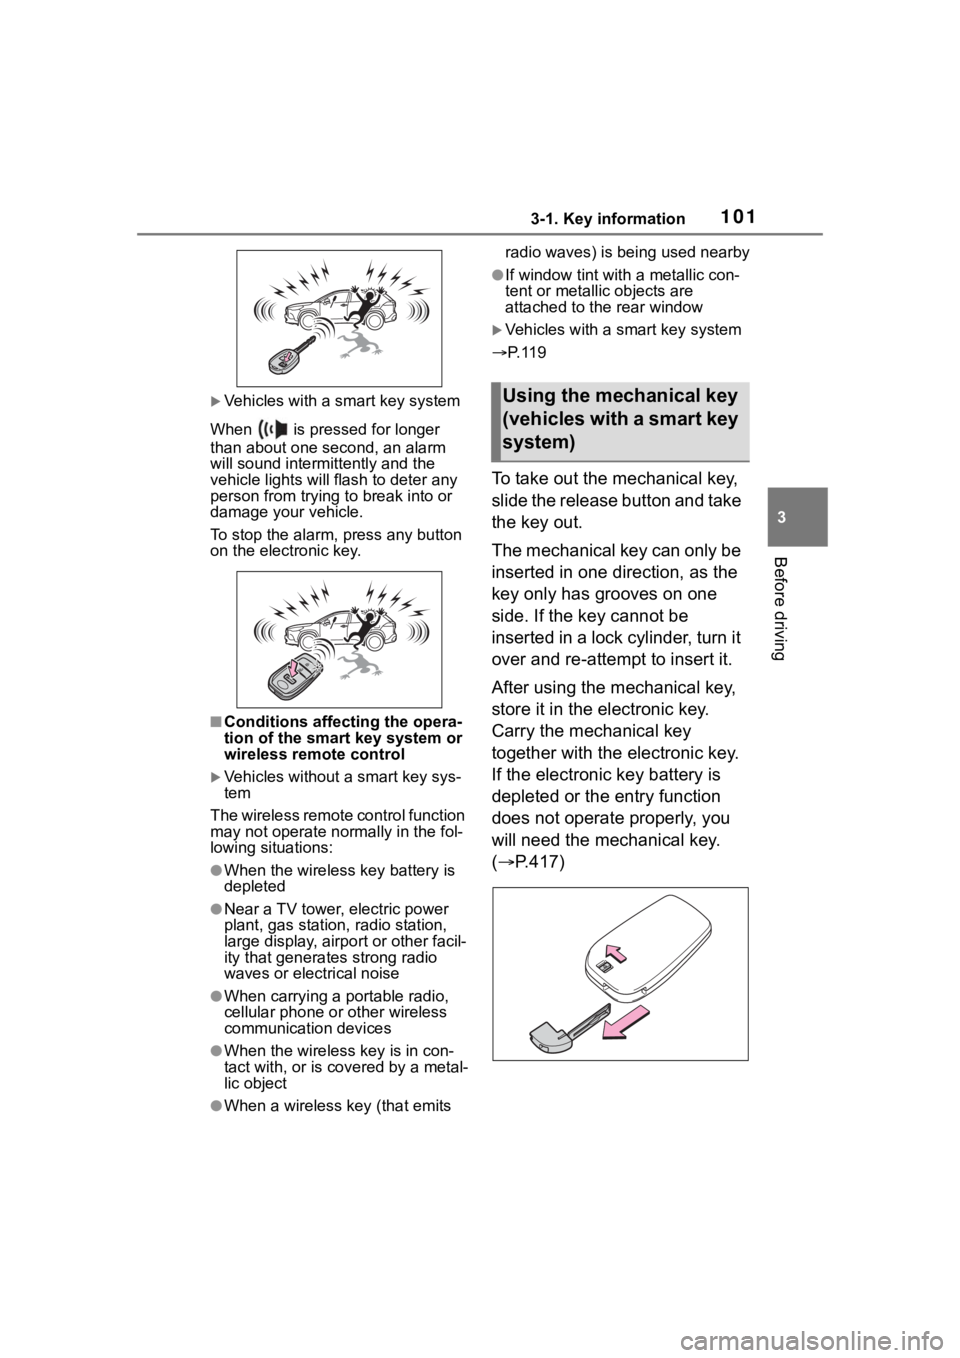
To take out the mechanical key,
slide the release button and take
the key out.
The mechanical key can only be
inserted in one direction, as the
key only has grooves on one
side. If the key cannot be
inserted in a lock cylinder, turn it
over and re-attempt to insert it.
After using the mechanical key,
store it in the electronic key.
Carry the mechanical key
together with the electronic key.
If the electronic key battery is
depleted or the entry function
does not operate properly, you
will need the mechanical key.
( P.417)
Using the mechanical key
(vehicles with a smart key
system)