lights TOYOTA COROLLA CROSS 2023 Workshop Manual
[x] Cancel search | Manufacturer: TOYOTA, Model Year: 2023, Model line: COROLLA CROSS, Model: TOYOTA COROLLA CROSS 2023Pages: 500, PDF Size: 15.11 MB
Page 329 of 500
3296-1. Maintenance and care
6
Maintenance and care
■Bumpers and side moldings (if
equipped)
Do not scrub with abrasive cleaners.
■Plated portions
If dirt cannot be removed, clean the
parts as follows:
●Use a soft cloth dampened with an
approximately 5% solution of neu-
tral detergent and water to clean
the dirt off.
●Wipe the surface with a dry, soft
cloth to remove any remaining
moisture.
●To remove oily deposits, use alco-
hol wet wipes or a similar product.
WARNING
■When washing the vehicle
Do not apply water to the inside of
the engine compartment. Doing
so may cause the electrical com-
ponents, etc. to catch fire.
■Precautions regarding the
exhaust pipe
Exhaust gasses cause the
exhaust pipe to become quite hot.
When washing the vehicle, be
careful not to touch the pipe until it
has cooled sufficiently, as touch-
ing a hot exhaust pipe can cause
burns.
■Precaution regarding the rear
bumper
If the paint of the rear bumper is
chipped or scratched, the follow-
ing systems may not function cor-
rectly. If this occurs, consult your
Toyota dealer.
●Toyota Safety Sense 3.0
●BSM (if equipped)
●RCTA (if equipped)
●SAE (Safe Exit Assist) (if
equipped)
●PKSB (if equipped)
NOTICE
■To prevent paint deteriora-
tion and corrosion on the
body and components (alumi-
num wheels, etc.)
●Wash the vehicle immediately in
the following cases:
• After driving nea r the sea coast
• After driving on salted roads
• If coal tar or tree sap is present on the paint surface
• If dead insects, insect droppings or bird droppings are present on
the paint surface
• After driving in an area contami- nated with soot, oily smoke,
mine dust, iron powder or chem-
ical substances
• If the vehicle becomes heavily soiled with d ust or mud
• If liquids such as benzene and gasoline are spilled on the paint
surface
●If the paint is chipped or
scratched, have it repaired
immediately.
●To prevent the wheels from cor-
roding, remove any dirt and
store in a place with low humid-
ity when storing the wheels.
■Cleaning the exterior lights
●Wash carefully. Do not use
organic substances or scrub
with a hard brush.
This may damage the surfaces
of the lights.
●Do not apply wax to the sur-
faces of the lights.
Wax may cause damage to the
lenses.
Page 337 of 500
3376-2. Maintenance
6
Maintenance and care
Brakes
• The vehicle should not pull to
one side when
the brakes are
applied.
• The brakes should work
effectively.
• The brake pedal should not feel
spongy.
• The brake pedal should not get
too close to the
floor when the
brakes are
applied.
Head
restraints
Do the head
restraints move
smoothly and lock
securely?
Indica-
tors/buzzersDo the indicators
and buzzers func-
tion properly?
LightsDo all the lights
come on?
Parking brake
• Does the park-ing brake oper-
ate normally?
• When parked on a slope and the
parking brake is
on, is the vehicle
securely
stopped?
ItemsCheck points
Seat belts
• Do the seat belts operate
smoothly?
• The seat belts should not be
damaged.
Seats
Do the seat con-
trols operate prop-
erly?
Steering wheel
• Does the steer-ing wheel rotate
smoothly?
• Does the steer- ing wheel have
the correct
amount of free
play?
• There should not be any strange
sounds coming
from the steer-
ing wheel.
Vehicle exterior
ItemsCheck points
DoorsDo the doors oper-
ate smoothly?
Engine hood
Does the engine
hood lock system
work properly?
Fluid leaks
There should not
be any signs of
fluid leakage after
the vehicle has
been parked.
ItemsCheck points
Page 372 of 500
3726-3. Do-it-yourself maintenance
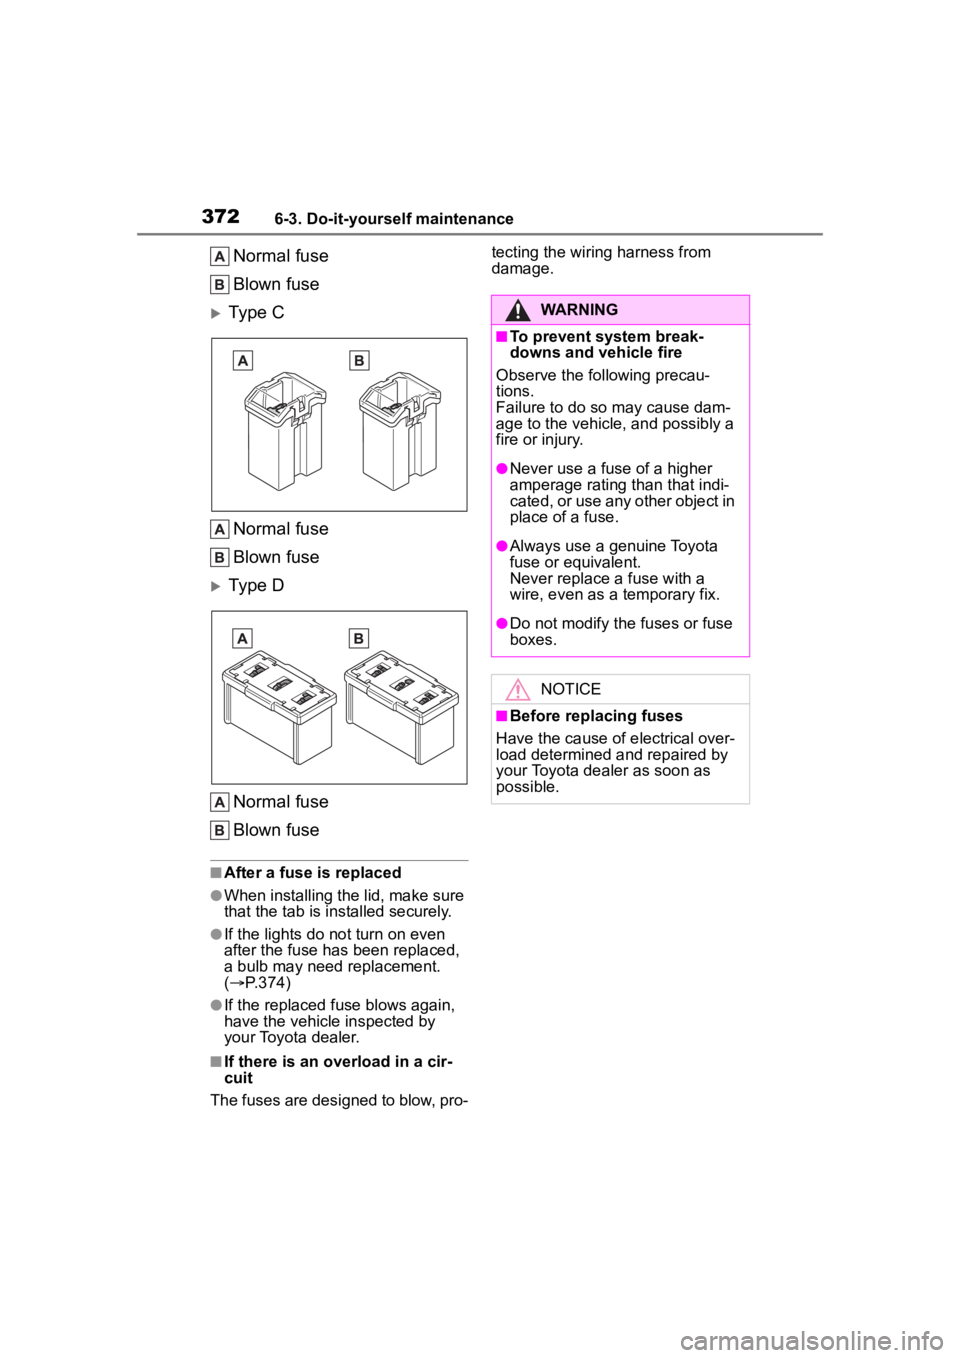
Normal fuse
Blown fuse
Type C
Normal fuse
Blown fuse
Type DNormal fuse
Blown fuse
■After a fuse is replaced
●When installing the lid, make sure
that the tab is installed securely.
●If the lights do n ot turn on even
after the fuse has been replaced,
a bulb may need replacement.
( P.374)
●If the replaced fuse blows again,
have the vehicle inspected by
your Toyota dealer.
■If there is an overload in a cir-
cuit
The fuses are designed to blow, pro- tecting the wiring harness from
damage.
WARNING
■To prevent system break-
downs and vehicle fire
Observe the following precau-
tions.
Failure to do so may cause dam-
age to the vehicle, and possibly a
fire or injury.
●Never use a fuse of a higher
amperage rating than that indi-
cated, or use any other object in
place of a fuse.
●Always use a genuine Toyota
fuse or equivalent.
Never replace a fuse with a
wire, even as a temporary fix.
●Do not modify the fuses or fuse
boxes.
NOTICE
■Before replacing fuses
Have the cause of electrical over-
load determined and repaired by
your Toyota dealer as soon as
possible.
Page 374 of 500
3746-3. Do-it-yourself maintenance
Check the wattage of the light
bulb to be replaced. ( P.435)
P. 1 1 6
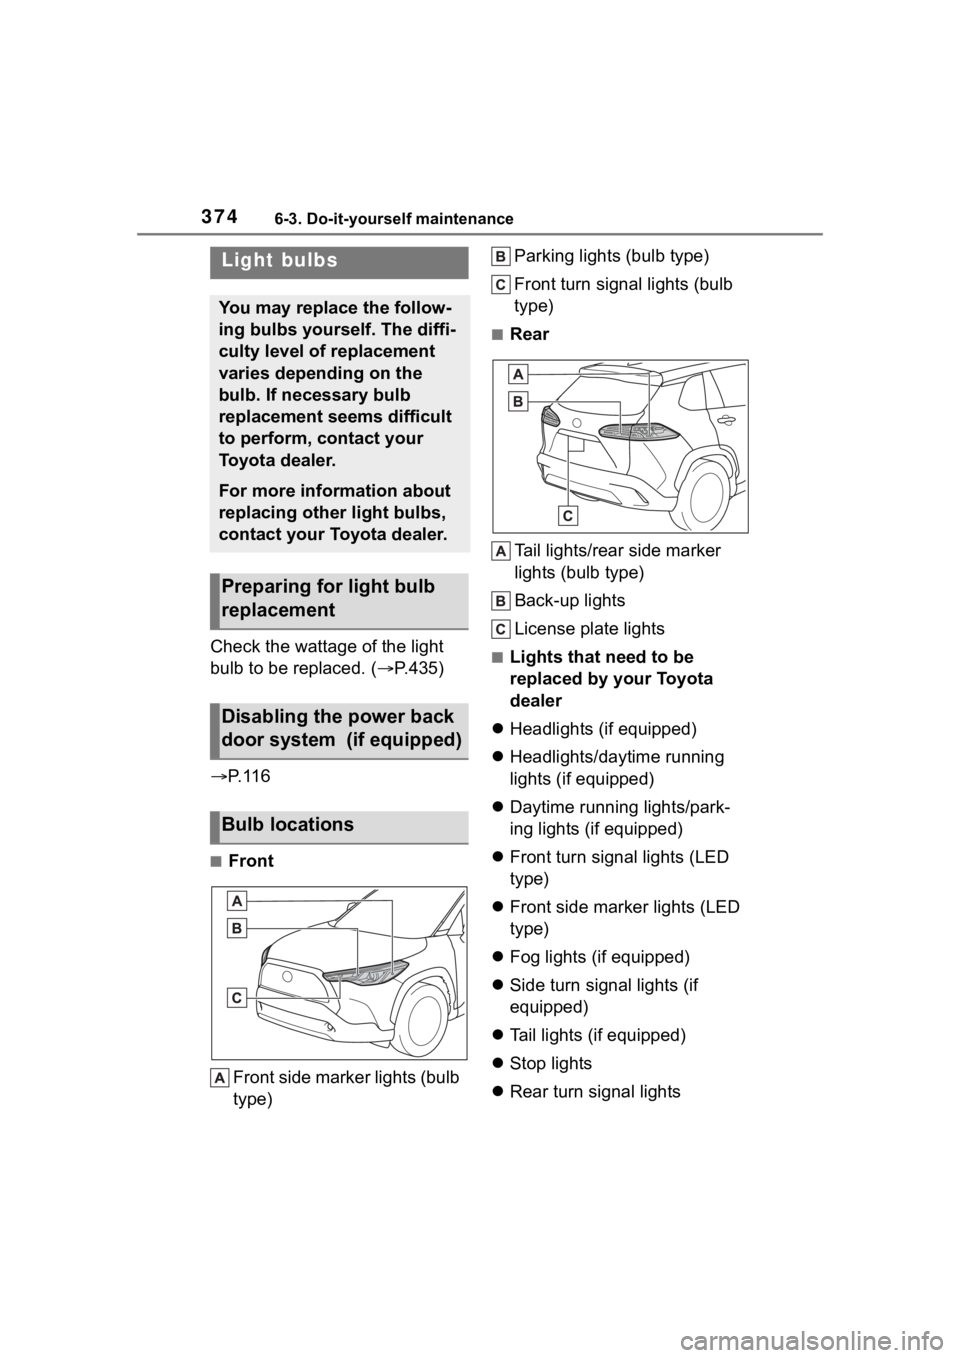
■Front
Front side marker lights (bulb
type) Parking lights (bulb type)
Front turn signal lights (bulb
type)
■Rear
Tail lights/rear side marker
lights (bulb type)
Back-up lights
License plate lights
■Lights that need to be
replaced by your Toyota
dealer
Headlights (if equipped)
Headlights/daytime running
lights (if equipped)
Daytime running lights/park-
ing lights (if equipped)
Front turn signal lights (LED
type)
Front side marker lights (LED
type)
Fog lights (if equipped)
Side turn signal lights (if
equipped)
Tail lights (if equipped)
Stop lights
Rear turn signal lights
Light bulbs
You may replace the follow-
ing bulbs yourself. The diffi-
culty level of replacement
varies depending on the
bulb. If necessary bulb
replacement seems difficult
to perform, contact your
Toyota dealer.
For more information about
replacing other light bulbs,
contact your Toyota dealer.
Preparing for light bulb
replacement
Disabling the power back
door system (if equipped)
Bulb locations
Page 375 of 500
3756-3. Do-it-yourself maintenance
6
Maintenance and care
High mounted stoplight
■LED light bulbs
The lights other than the following
lights each consist of a number of
LEDs. If any of the LEDs burn out,
take your vehicle to your Toyota
dealer to have the light replaced.
●Front side marker lights (bulb
type)
●Parking lights (bulb type)
●Front turn signal lights (bulb type)
●Tail lights/rear side marker lights
(bulb type)
●Back-up lights
●License plate lights
■Condensation build-up on the
inside of the lens
Temporary condensation build-up
on the inside of the headlight lens
does not indicate a malfunction.
Contact your Toyota dealer for more
information in the following situa-
tions:
●Large drops of water have built up
on the inside of the lens.
●Water has built up inside the
headlight.
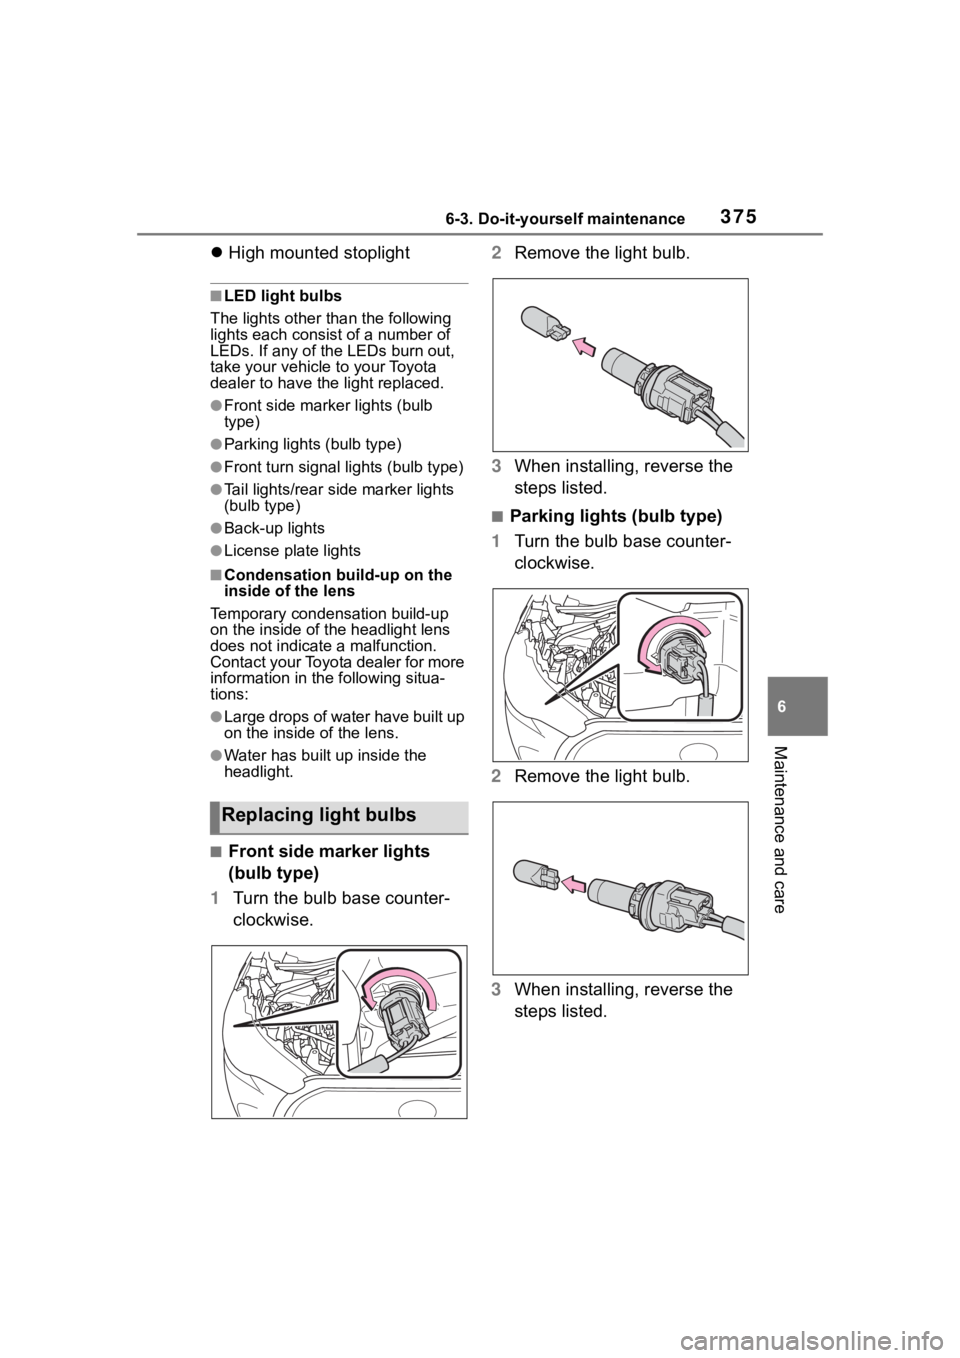
■Front side marker lights
(bulb type)
1 Turn the bulb base counter-
clockwise. 2
Remove the light bulb.
3 When installing, reverse the
steps listed.
■Parking lights (bulb type)
1 Turn the bulb base counter-
clockwise.
2 Remove the light bulb.
3 When installing, reverse the
steps listed.
Replacing light bulbs
Page 376 of 500
3766-3. Do-it-yourself maintenance
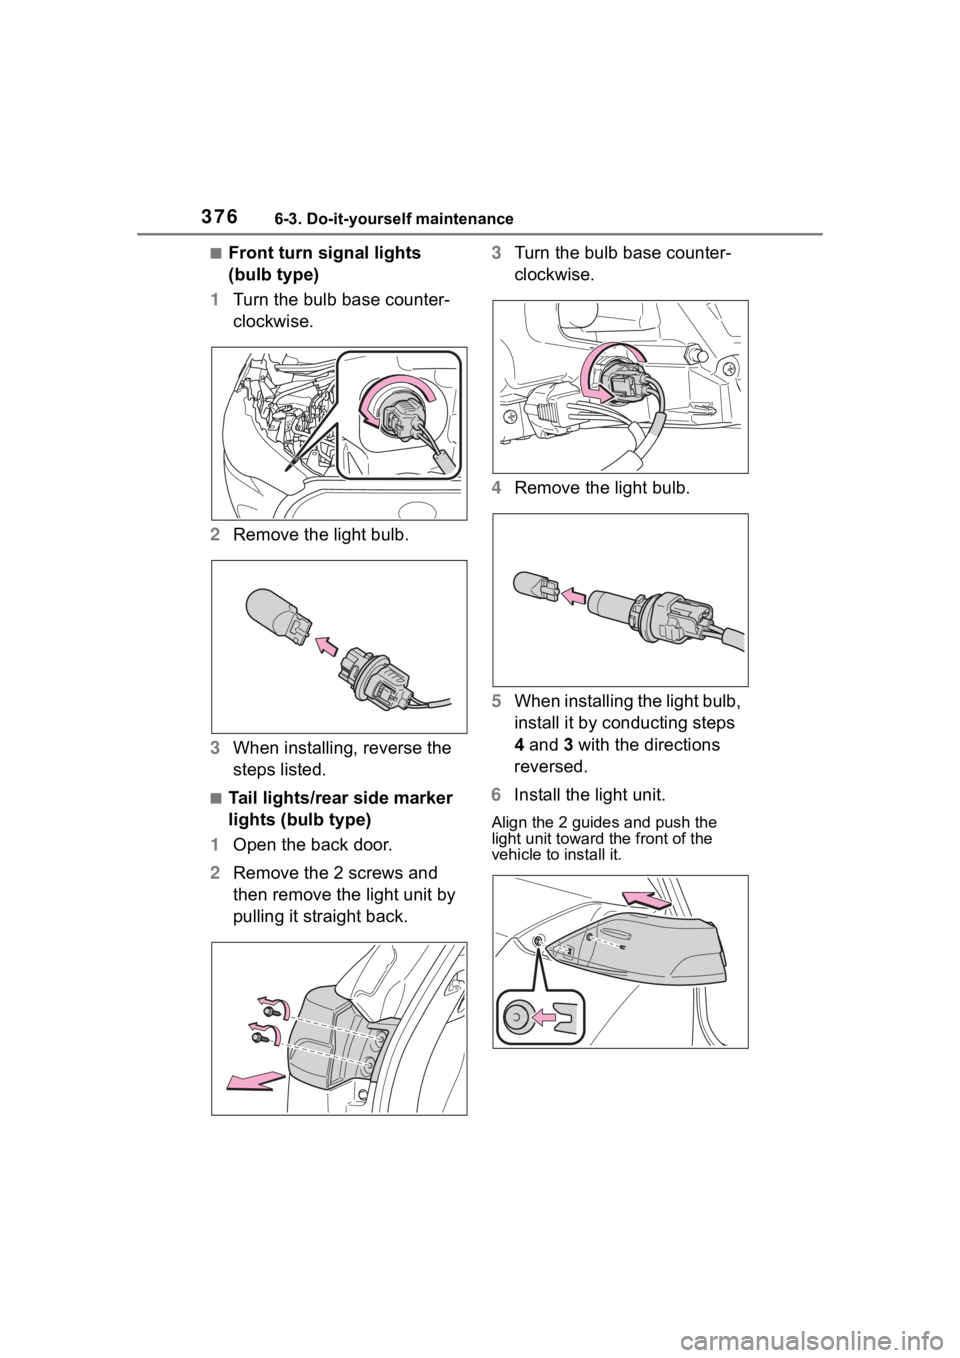
■Front turn signal lights
(bulb type)
1 Turn the bulb base counter-
clockwise.
2 Remove the light bulb.
3 When installing, reverse the
steps listed.
■Tail lights/rear side marker
lights (bulb type)
1 Open the back door.
2 Remove the 2 screws and
then remove the light unit by
pulling it straight back. 3
Turn the bulb base counter-
clockwise.
4 Remove the light bulb.
5 When installing the light bulb,
install it by conducting steps
4 and 3 with the directions
reversed.
6 Install the light unit.
Align the 2 guides and push the
light unit toward the front of the
vehicle to install it.
Page 377 of 500
3776-3. Do-it-yourself maintenance
6
Maintenance and care
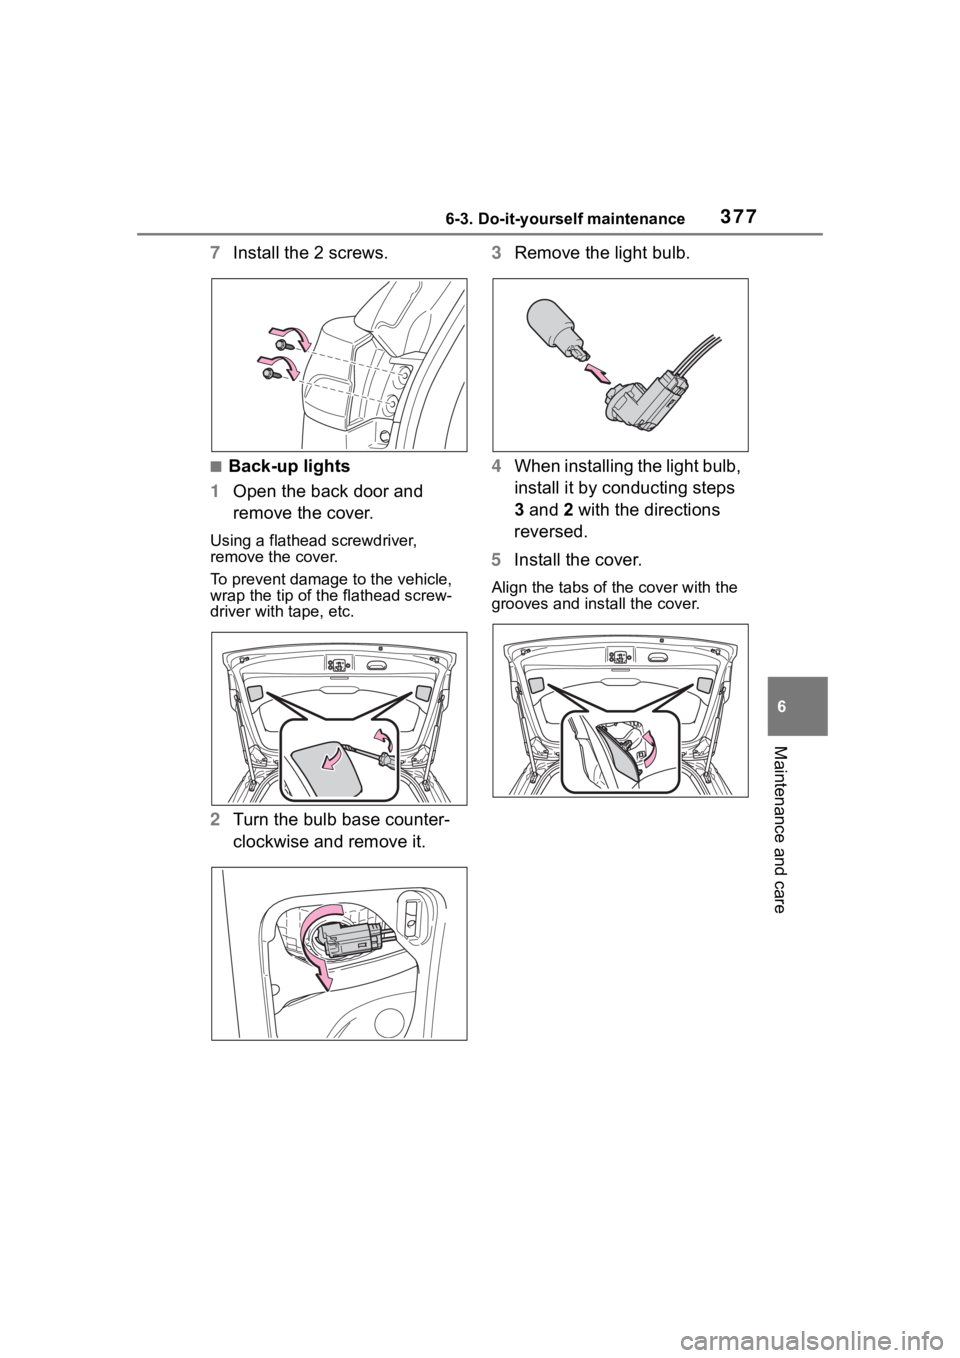
7Install the 2 screws.
■Back-up lights
1 Open the back door and
remove the cover.
Using a flathead screwdriver,
remove the cover.
To prevent damage to the vehicle,
wrap the tip of the flathead screw-
driver with tape, etc.
2Turn the bulb base counter-
clockwise and remove it. 3
Remove the light bulb.
4 When installing the light bulb,
install it by conducting steps
3 and 2 with the directions
reversed.
5 Install the cover.
Align the tabs of the cover with the
grooves and install the cover.
Page 378 of 500
3786-3. Do-it-yourself maintenance
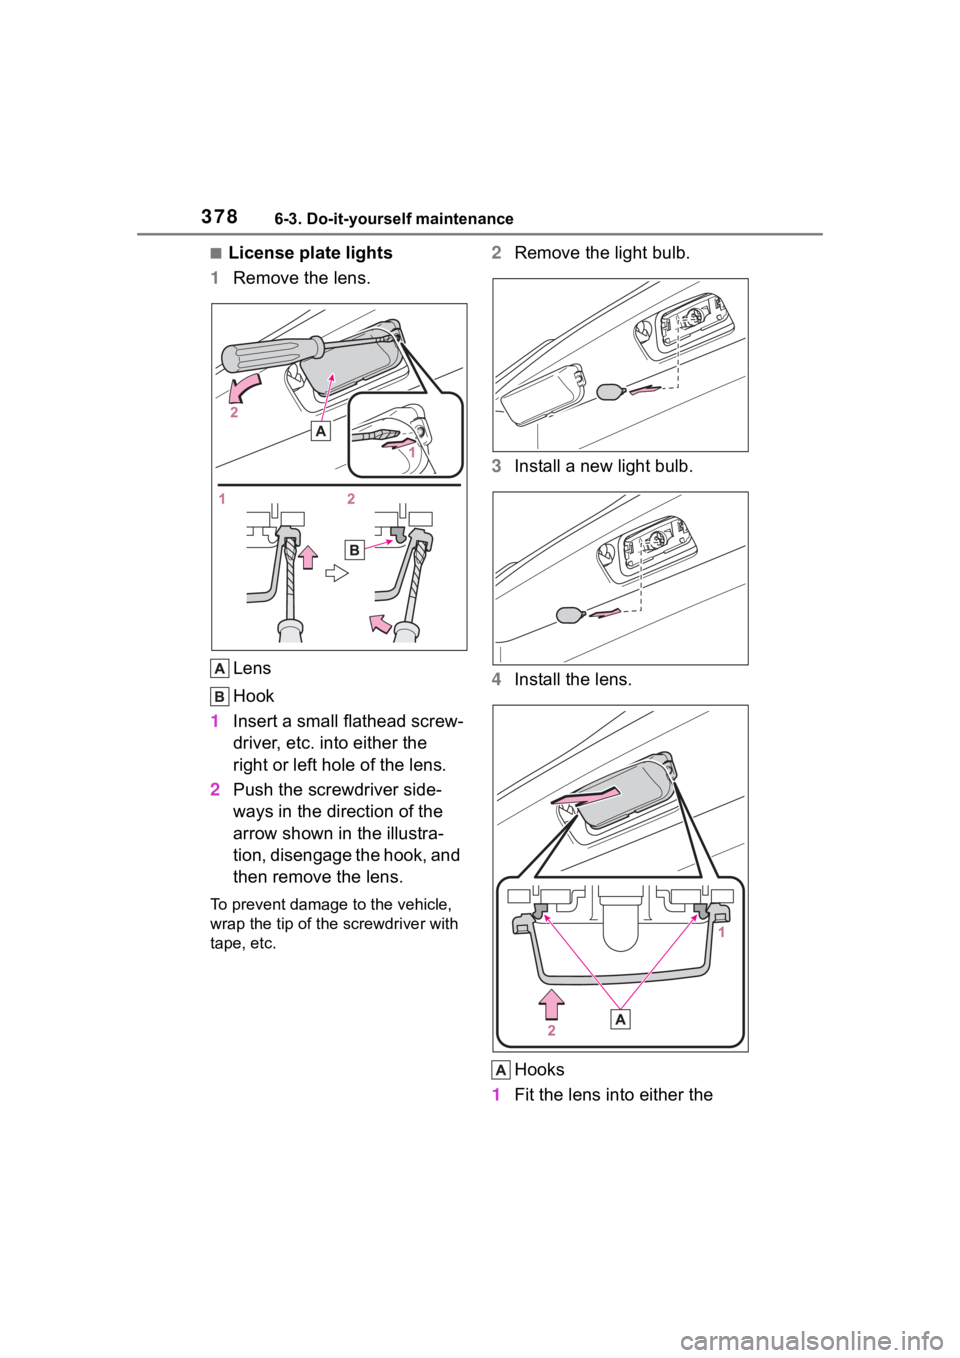
■License plate lights
1 Remove the lens.
Lens
Hook
1 Insert a small flathead screw-
driver, etc. into either the
right or left hole of the lens.
2 Push the screwdriver side-
ways in the direction of the
arrow shown in the illustra-
tion, disengage the hook, and
then remove the lens.
To prevent damage to the vehicle,
wrap the tip of the screwdriver with
tape, etc.
2Remove the light bulb.
3 Install a new light bulb.
4 Install the lens.
Hooks
1 Fit the lens into either the
Page 379 of 500
3796-3. Do-it-yourself maintenance
6
Maintenance and care
right or left hooks.
2 Push the lens into place.
After installation, confirm that the
lens is properly installed by gently
pulling it.
WARNING
■To prevent injury
Before performing any light bulb
replacement procedure, be sure
to turn the e ngine switch off. Fail-
ure to do so may result in burns
from hot compone nts or a part of
your body may get caught on an
operating component, possibly
causing serious injury.
■Replacing light bulbs
●Turn off the lights. Do not
attempt to replace the bulb
immediately after turning off the
lights. The bulbs become very
hot and may cause burns.
●Do not touch the glass portion
of the light bulb with bare
hands. When it is unavoidable
to hold the glass portion, use
and hold with a clean dry cloth
to avoid getting moisture and
oils on the bulb. Also, if the bulb
is scratched or dropped, it may
blow out or crack.
●Fully install light bulbs and any
parts used to secure them. Fail-
ure to do so may result in heat
damage, fire, or water entering
the light unit. This may damage
the lights or cause condensa-
tion to build up on the lens.
■To prevent damage or fire
●Make sure bulbs are fully
seated and locked.
●Check the wattage of the bulb
before installing to prevent heat
damage.
Page 382 of 500
3827-1. Essential information
7-1.Essential information
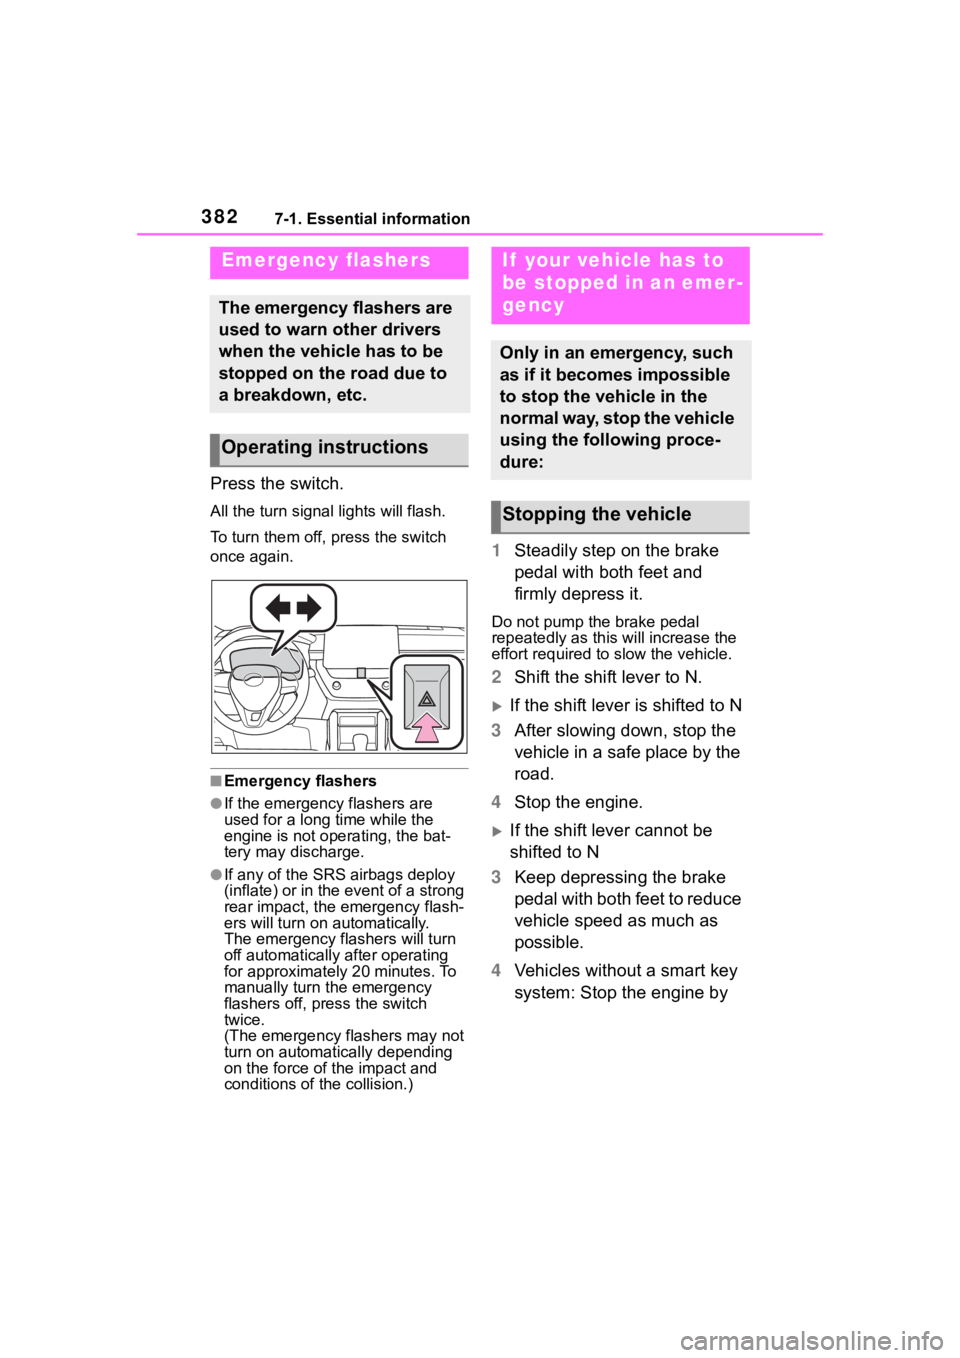
Press the switch.
All the turn signal lights will flash.
To turn them off, press the switch
once again.
■Emergency flashers
●If the emergency flashers are
used for a long time while the
engine is not operating, the bat-
tery may discharge.
●If any of the SRS airbags deploy
(inflate) or in the event of a strong
rear impact, the emergency flash-
ers will turn on automatically.
The emergency flashers will turn
off automatically after operating
for approximately 20 minutes. To
manually turn t he emergency
flashers off, press the switch
twice.
(The emergency flashers may not
turn on automatically depending
on the force of the impact and
conditions of the collision.)
1 Steadily step on the brake
pedal with both feet and
firmly depress it.
Do not pump the brake pedal
repeatedly as this will increase the
effort required to slow the vehicle.
2Shift the shift lever to N.
If the shift lever is shifted to N
3 After slowing down, stop the
vehicle in a safe place by the
road.
4 Stop the engine.
If the shift lever cannot be
shifted to N
3 Keep depressing the brake
pedal with both feet to reduce
vehicle speed as much as
possible.
4 Vehicles without a smart key
system: Stop the engine by
Emergency flashers
The emergency flashers are
used to warn other drivers
when the vehicle has to be
stopped on the road due to
a breakdown, etc.
Operating instructions
If your vehicle has to
be stopped in an emer-
gency
Only in an emergency, such
as if it becomes impossible
to stop the vehicle in the
normal way, stop the vehicle
using the following proce-
dure:
Stopping the vehicle