battery TOYOTA COROLLA CROSS HYBRID 2023 Owner's Guide
[x] Cancel search | Manufacturer: TOYOTA, Model Year: 2023, Model line: COROLLA CROSS HYBRID, Model: TOYOTA COROLLA CROSS HYBRID 2023Pages: 516, PDF Size: 15.96 MB
Page 181 of 516
1814-2. Driving procedures
4
Driving
*1: To improve fuel efficiency and reduce noise, shift the shift lever
to D for normal driving.
*2: By selecting shift ranges using S mode, you can control accelerat-
ing force and engine braking
force.
■Restraining sudden start
(Drive-Start Control)
P. 1 5 9
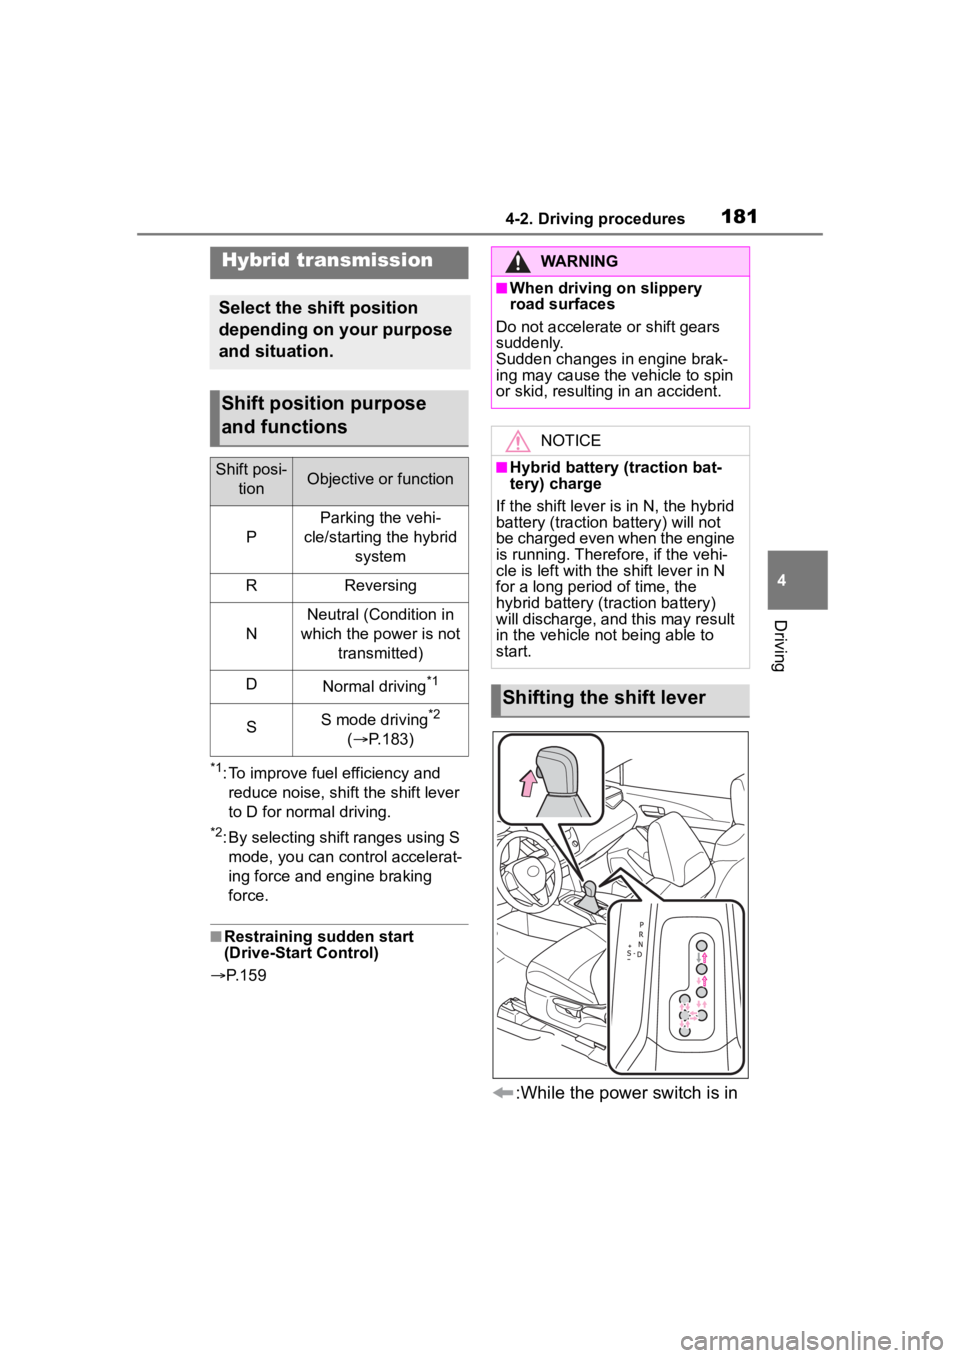
:While the power switch is in
Hybrid transmission
Select the shift position
depending on your purpose
and situation.
Shift position purpose
and functions
Shift posi-
tionObjective or function
P
Parking the vehi-
cle/starting the hybrid system
RReversing
N
Neutral (Condition in
which the power is not transmitted)
DNormal driving*1
SS mode driving*2
( P.183)
WARNING
■When driving on slippery
road surfaces
Do not accelerate or shift gears
suddenly.
Sudden changes in engine brak-
ing may cause the vehicle to spin
or skid, resulting in an accident.
NOTICE
■Hybrid battery (traction bat-
tery) charge
If the shift lever is in N, the hybrid
battery (traction battery) will not
be charged even when the engine
is running. Therefore, if the vehi-
cle is left with the shift lever in N
for a long period of time, the
hybrid battery (traction battery)
will discharge, and this may result
in the vehicle not being able to
start.
Shifting the shift lever
Page 183 of 516
1834-2. Driving procedures
4
Driving
P.283
To drive using temporary shift
range selection, operate the “-”
paddle shift switch. The shift
range can then be selected by
operating the “-” and “+” paddle
shift switches. Changing the
shift range allows restriction of
the highest gear, preventing
upshifting and enabling the level
of engine braking force to be
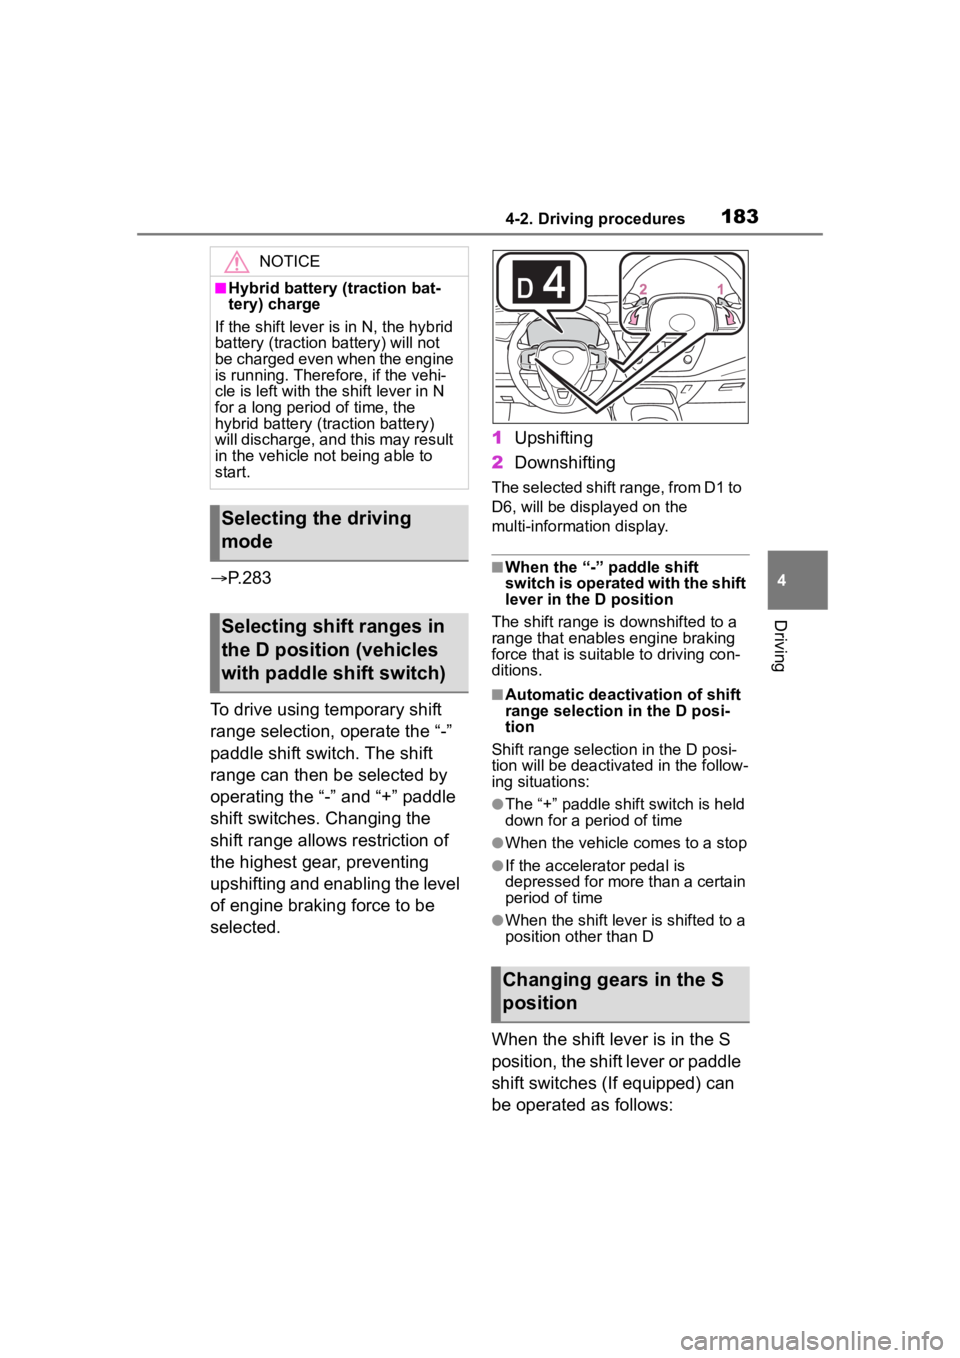
selected. 1
Upshifting
2 Downshifting
The selected shift range, from D1 to
D6, will be displayed on the
multi-information display.
■When the “-” paddle shift
switch is operated with the shift
lever in the D position
The shift range is downshifted to a
range that enables engine braking
force that is suitable to driving con-
ditions.
■Automatic deactivation of shift
range selection in the D posi-
tion
Shift range selection in the D posi-
tion will be deactivated in the follow-
ing situations:
●The “+” paddle shift switch is held
down for a period of time
●When the vehicle comes to a stop
●If the accelerator pedal is
depressed for more than a certain
period of time
●When the shift lever is shifted to a
position other than D
When the shift lever is in the S
position, the shift lever or paddle
shift switches (If equipped) can
be operated as follows:
NOTICE
■Hybrid battery (traction bat-
tery) charge
If the shift lever is in N, the hybrid
battery (traction battery) will not
be charged even when the engine
is running. Theref ore, if the vehi-
cle is left with the shift lever in N
for a long period of time, the
hybrid battery (tr action battery)
will discharge, and this may result
in the vehicle n ot being able to
start.
Selecting the driving
mode
Selecting shift ranges in
the D position (vehicles
with paddle shift switch)
Changing gears in the S
position
Page 189 of 516
1894-2. Driving procedures
4
Driving
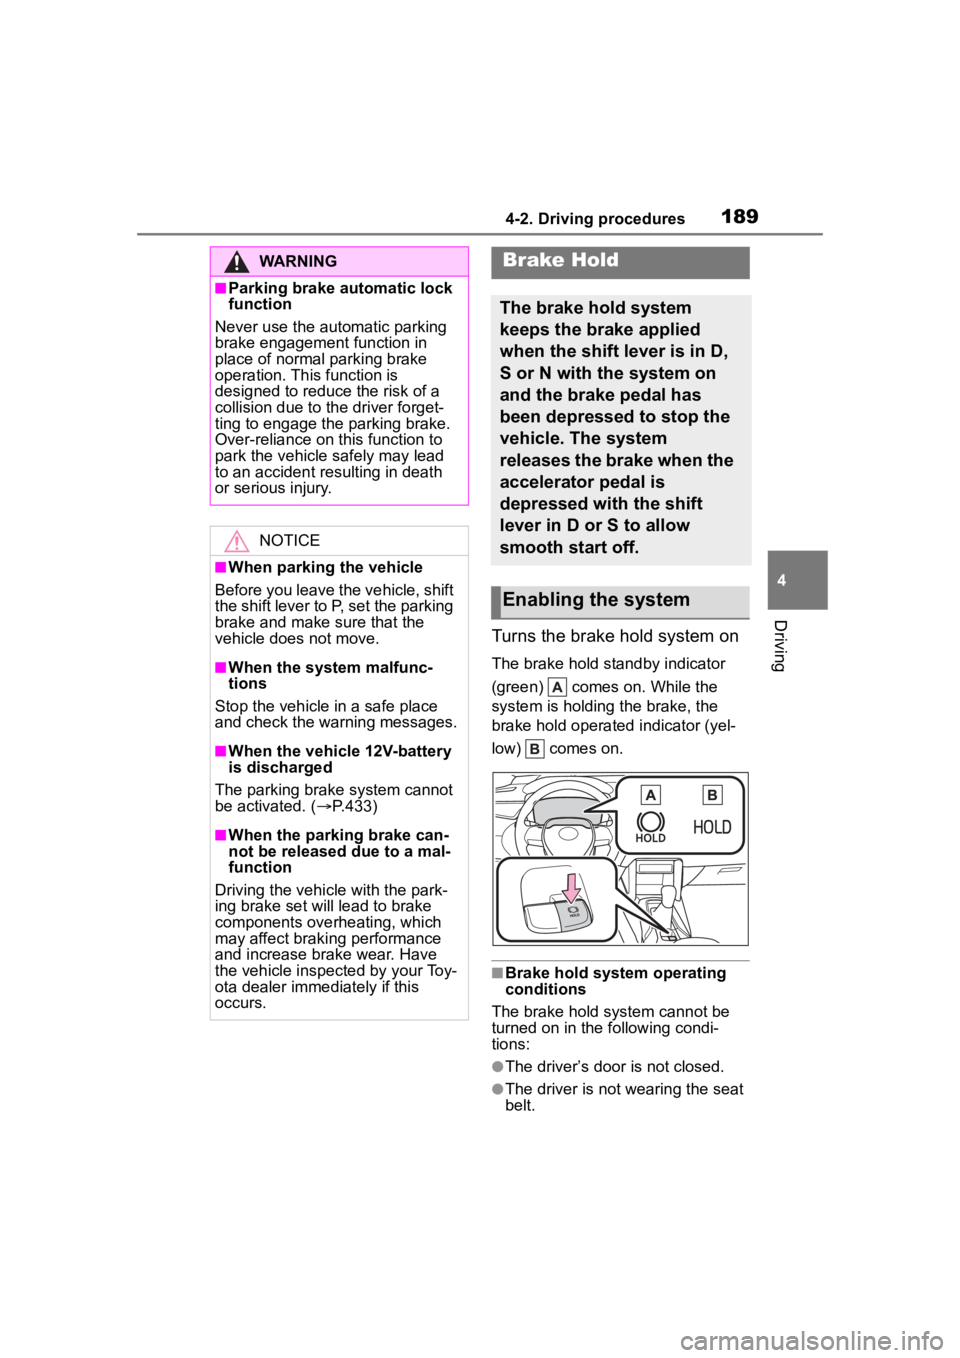
Turns the brake hold system on
The brake hold standby indicator
(green) comes on. While the
system is holding the brake, the
brake hold operated indicator (yel-
low) comes on.
■Brake hold system operating
conditions
The brake hold system cannot be
turned on in the following condi-
tions:
●The driver’s door is not closed.
●The driver is not wearing the seat
belt.
WARNING
■Parking brake automatic lock
function
Never use the automatic parking
brake engagement function in
place of normal parking brake
operation. This function is
designed to reduc e the risk of a
collision due to the driver forget-
ting to engage the parking brake.
Over-reliance on this function to
park the vehicle safely may lead
to an accident resulting in death
or serious injury.
NOTICE
■When parking the vehicle
Before you leave the vehicle, shift
the shift lever to P, set the parking
brake and make sure that the
vehicle does not move.
■When the system malfunc-
tions
Stop the vehicle in a safe place
and check the warning messages.
■When the vehicle 12V-battery
is discharged
The parking brake system cannot
be activated. ( P.433)
■When the parking brake can-
not be released due to a mal-
function
Driving the vehicle with the park-
ing brake set will lead to brake
components overheating, which
may affect braking performance
and increase brake wear. Have
the vehicle inspected by your Toy-
ota dealer immediately if this
occurs.
Brake Hold
The brake hold system
keeps the brake applied
when the shift lever is in D,
S or N with the system on
and the brake pedal has
been depressed to stop the
vehicle. The system
releases the brake when the
accelerator pedal is
depressed with the shift
lever in D or S to allow
smooth start off.
Enabling the system
Page 193 of 516
1934-3. Operating the lights and wipers
4
Driving
nate using the same lights as the
headlights and illuminate darker
than the headlights.
●To make your vehicle more visible
to other drivers during daytime
driving, the daytime running lights
turn on automatically when all of
the following condi tions are met.
(The daytime running lights are
not designed for use at night.)
• The hybrid system is operating.
• The parking brake is released
• The headlight switch is in the
or
* position
*: When the surroundings are bright
The daytime running lights remain
on after they illumi nate, even if the
parking brake is set again.
●Daytime running lights can be
turned off by operating the switch.
●Compared to turning on the head-
lights, the daytime running light
system offers gr eater durability
and consumes less electricity, so
it can help improve fuel economy.
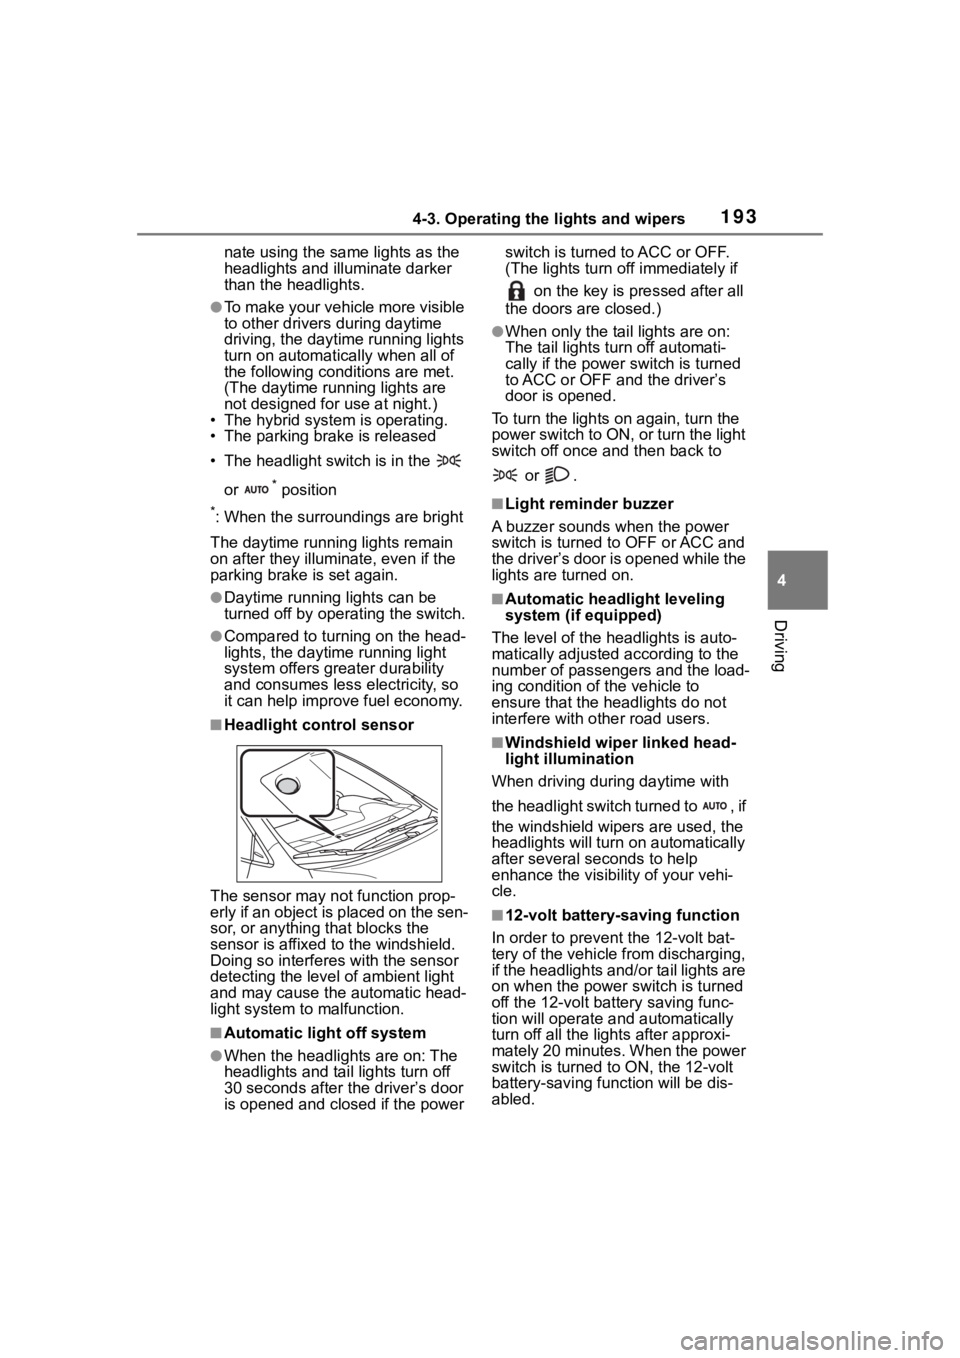
■Headlight control sensor
The sensor may not function prop-
erly if an object is placed on the sen-
sor, or anything that blocks the
sensor is affixed to the windshield.
Doing so interfere s with the sensor
detecting the level of ambient light
and may cause the automatic head-
light system to malfunction.
■Automatic light off system
●When the headlights are on: The
headlights and tail lights turn off
30 seconds after the driver’s door
is opened and clos ed if the power switch is turned to ACC or OFF.
(The lights turn off immediately if
on the key is pressed after all
the doors are closed.)
●When only the tail lights are on:
The tail lights turn off automati-
cally if the power switch is turned
to ACC or OFF and the driver’s
door is opened.
To turn the lights on again, turn the
power switch to ON, or turn the light
switch off once and then back to
or .
■Light reminder buzzer
A buzzer sounds when the power
switch is turned t o OFF or ACC and
the driver’s door is opened while the
lights are turned on.
■Automatic headlight leveling
system (if equipped)
The level of the headlights is auto-
matically adjusted according to the
number of passengers and the load-
ing condition of the vehicle to
ensure that the headlights do not
interfere with o ther road users.
■Windshield wiper linked head-
light illumination
When driving during daytime with
the headlight switch turned to , if
the windshield wipers are used, the
headlights will turn o n automatically
after several se conds to help
enhance the visibility of your vehi-
cle.
■12-volt battery-saving function
In order to prevent the 12-volt bat-
tery of the vehicle from discharging,
if the headlights and/or tail lights are
on when the power switch is turned
off the 12-volt battery saving func-
tion will operate and automatically
turn off all the lig hts after approxi-
mately 20 minutes. When the power
switch is turned to ON, the 12-volt
battery-saving function will be dis-
abled.
Page 194 of 516
1944-3. Operating the lights and wipers
When any of the following are per-
formed, the 12-volt battery-saving
function is canceled once and then
reactivated. All the lights will turn off
automatically 20 mi nutes after the
12-volt battery-saving function has
been reactivated:
●When the headlight switch is oper-
ated
●When a door is opened or closed
■Customization
Some functions can be customized.
( P.463)
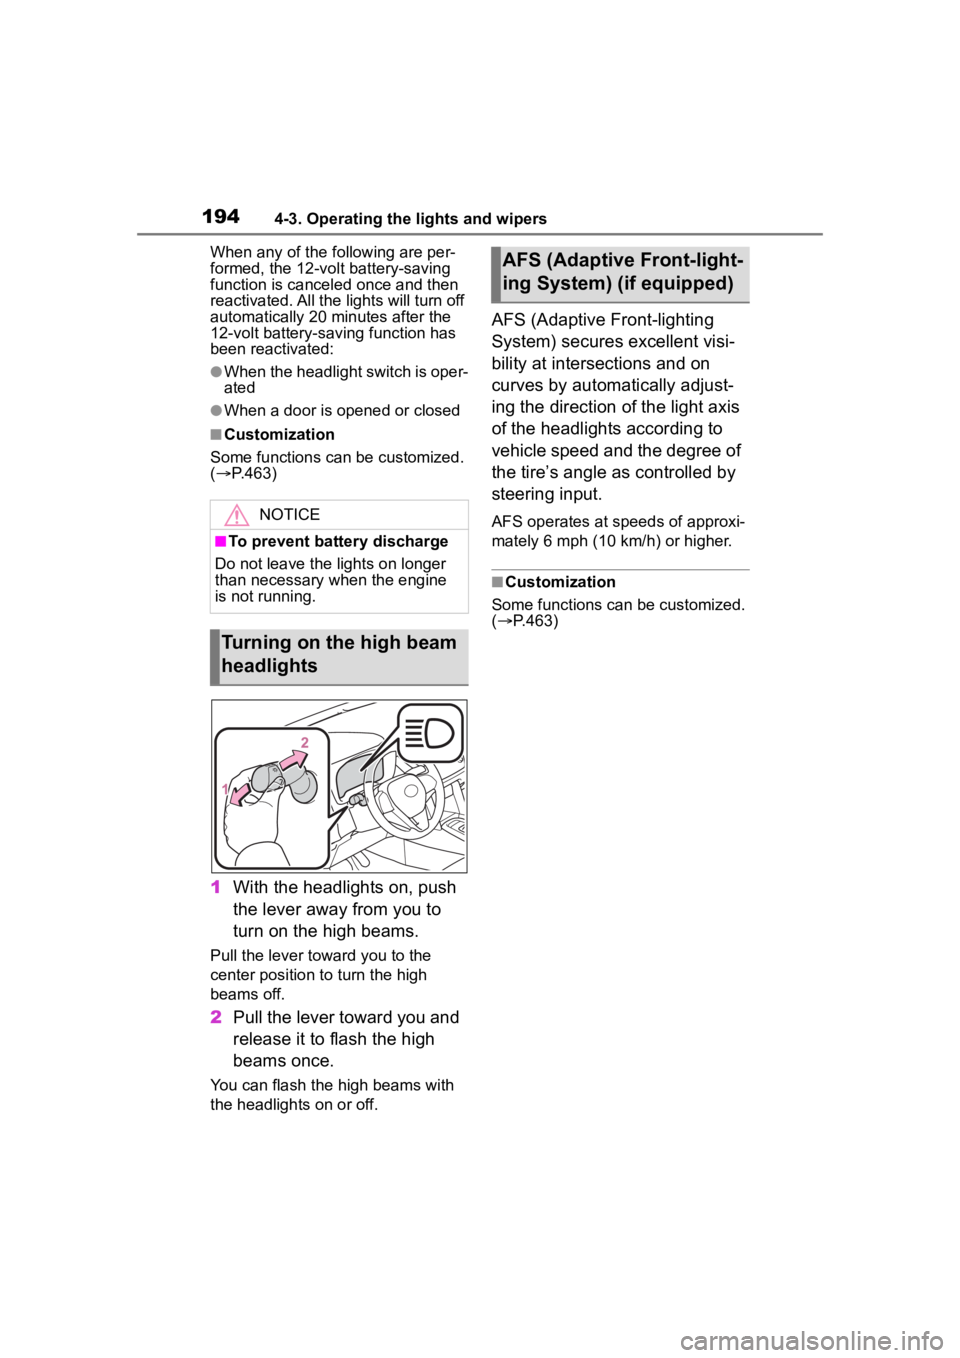
1 With the headlights on, push
the lever away from you to
turn on the high beams.
Pull the lever toward you to the
center position to turn the high
beams off.
2Pull the lever toward you and
release it to flash the high
beams once.
You can flash the high beams with
the headlights on or off.
AFS (Adaptive Front-lighting
System) secures excellent visi-
bility at intersections and on
curves by automatically adjust-
ing the direction of the light axis
of the headlights according to
vehicle speed and the degree of
the tire’s angle as controlled by
steering input.
AFS operates at speeds of approxi-
mately 6 mph (10 k m/h) or higher.
■Customization
Some functions can be customized.
( P.463)
NOTICE
■To prevent battery discharge
Do not leave the lights on longer
than necessary when the engine
is not running.
Turning on the high beam
headlights
AFS (Adaptive Front-light-
ing System) (if equipped)
Page 217 of 516
2174-5. Using the driving support systems
4
Driving
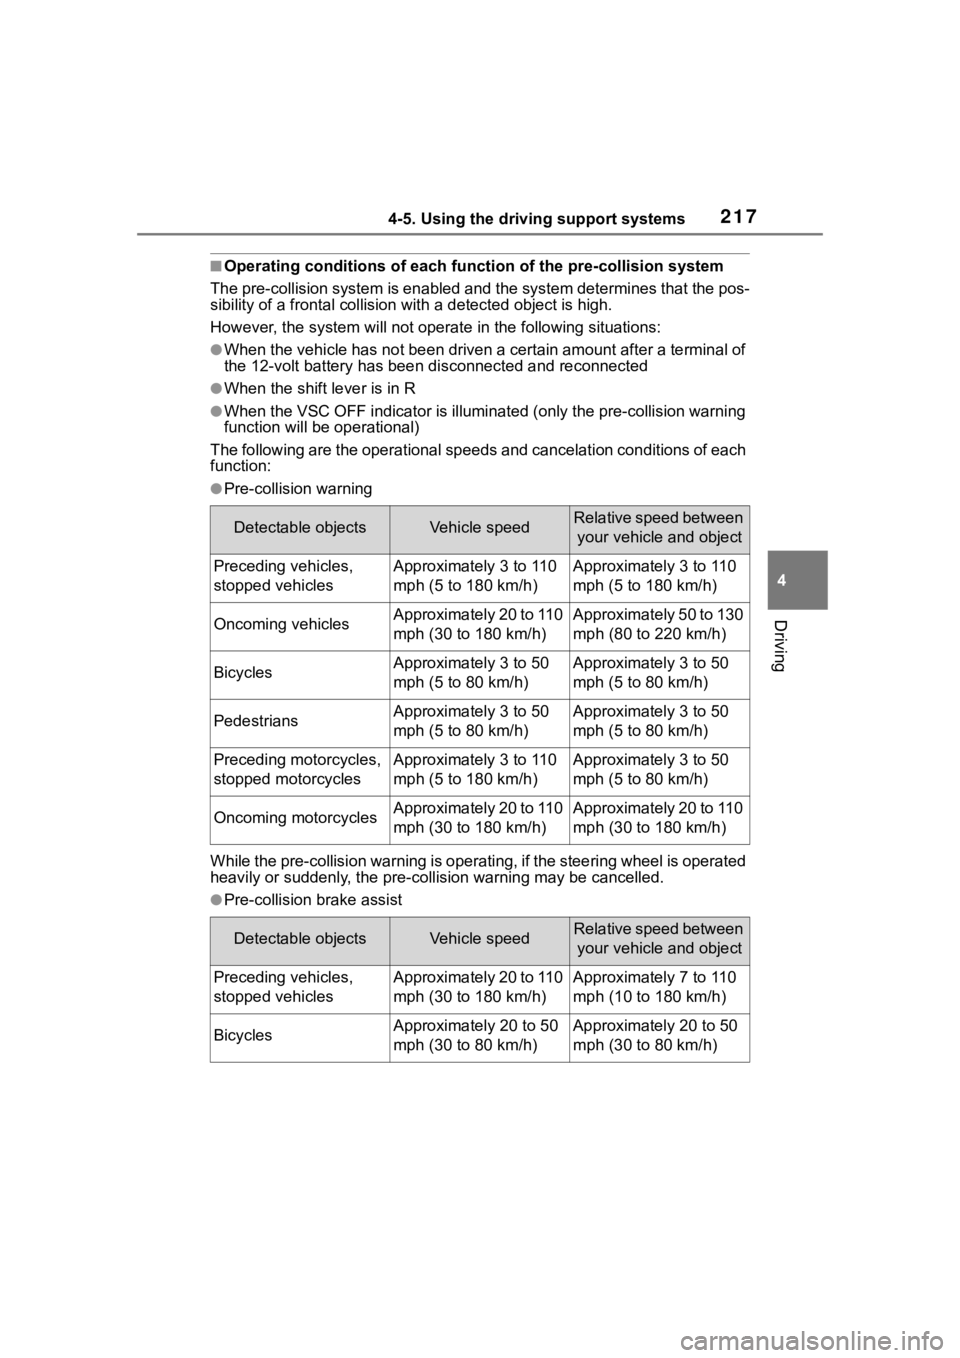
■Operating conditions of each function of the pre-collision system
The pre-collision syst em is enabled and the system determines t hat the pos-
sibility of a frontal c ollision with a detected object is high.
However, the system will not operate in the follo wing situations:
●When the vehicle has not been driven a certain amount after a t erminal of
the 12-volt battery has been d isconnected and reconnected
●When the shift lever is in R
●When the VSC OFF indicator is illuminated (only the pre-collision warning
function will be operational)
The following are the operational speeds and cancelation condit ions of each
function:
●Pre-collision warning
While the pre-collision warning is operating, if the steering w heel is operated
heavily or suddenly, the pre-co llision warning may be cancelled.
●Pre-collision brake assist
Detectable objectsVehicle speedRelative speed between
your vehicle and object
Preceding vehicles,
stopped vehiclesApproximately 3 to 110
mph (5 to 180 km/h)Approximately 3 to 110
mph (5 to 180 km/h)
Oncoming vehiclesApproximately 20 to 110
mph (30 to 180 km/h)Approximately 50 to 130
mph (80 to 220 km/h)
BicyclesApproximately 3 to 50
mph (5 to 80 km/h)Approximately 3 to 50
mph (5 to 80 km/h)
PedestriansApproximately 3 to 50
mph (5 to 80 km/h)Approximately 3 to 50
mph (5 to 80 km/h)
Preceding motorcycles,
stopped motorcyclesApproximately 3 to 110
mph (5 to 180 km/h)Approximately 3 to 50
mph (5 to 80 km/h)
Oncoming motorcyclesApproximately 20 to 110
mph (30 to 180 km/h)Approximately 20 to 110
mph (30 to 180 km/h)
Detectable objectsVehicle speedRelative speed between your vehicle and object
Preceding vehicles,
stopped vehiclesApproximately 20 to 110
mph (30 to 180 km/h)Approximately 7 to 110
mph (10 to 180 km/h)
BicyclesApproximately 20 to 50
mph (30 to 80 km/h)Approximately 20 to 50
mph (30 to 80 km/h)
Page 289 of 516
2894-6. Driving tips
4
Driving
4-6.Driving tips
When using Eco drive mode, the
torque corresponding to the
accelerator pedal depression
amount can be generated more
smoothly than it is in normal
conditions. In addition, the oper-
ation of the air conditioning sys-
tem (heating/cooling) will be
minimized, improving the fuel
economy. (P.283)
The Eco-friendly driving is pos-
sible by keeping the indicate of
Hybrid System Indicator within
Eco area. ( P.93, 100)
Shift the shift lever to D when
stopped at a traffic light, or driv-
ing in heavy traffic etc. Shift the
shift lever to P when parking.
When using the N, there is no
positive effect on fuel consump-
tion. In the N, the gasoline
engine operates but electricity
cannot be generated. Also,
when using the air conditioning system, etc., the hybrid battery
(traction battery) power is con-
sumed.
Drive your vehicle smoothly.
Avoid abrupt acceleration and
deceleration. Gradual accel-
eration and deceleration will
make more effective use of
the electric motor (traction
motor) without having to use
gasoline engine power.
Avoid repeated acceleration.
Repeated acceleration con-
sumes hybrid battery (trac-
tion battery) power, resulting
in poor fuel consumption. Bat-
tery power can be restored by
driving with the accelerator
pedal slightly released.
Make sure to operate the brakes
gently and in a timely manner. A
greater amount of electrical
energy can be regenerated
when slowing down.
Repeated acceleration and
deceleration, as well as long
waits at traffic lights, will lead to
bad fuel economy. Check traffic
reports before leaving and avoid
delays as much as possible.
Hybrid vehicle driving
tips
For economical and ecolog-
ical driving, pay attention to
the following points:
Using Eco drive mode
Use of Hybrid System
Indicator
Shift lever operation
Accelerator pedal/brake
pedal operation
When braking
Delays
Page 291 of 516
2914-6. Driving tips
4
Driving
Use fluids that are appropriate
to the prevailing outside tem-
peratures.
• Engine oil
• Engine/power control unit coolant
• Washer fluid
Have a service technician
inspect the condition of the
12-volt battery.
Have the vehicle fitted with
four snow tires.
Ensure that all tires are the same
size and brand.
Perform the following according
to the driving conditions:
Do not try to forcibly open a
window or move a wiper that
is frozen. Pour warm water
over the frozen area to melt
the ice. Wipe away the water
immediately to prevent it from
freezing.
To ensure proper operation of
the climate control system
fan, remove any snow that
has accumulated on the air
inlet vents in front of the wind-
shield.
Check for and remove any
Winter driving tips
Carry out the necessary
preparations and inspec-
tions before driving the
vehicle in winter. Always
drive the vehicle in a man-
ner appropriate to the pre-
vailing weather conditions.
Pre-winter preparations
WARNING
■Driving with snow tires
Observe the following precautions
to reduce the risk of accidents.
Failure to do so m ay result in a
loss of vehicle control and cause
death or serious injury.
●Use tires of the size specified.
●Maintain the recommended
level of air pressure.
●Do not drive in excess of 75
mph (120 km/h), regardless of
the type of snow tires being
used.
●Use snow tires on all, not just
some wheels.
NOTICE
■Driving with tire chains
Do not fit tire chains. Tire chains
may damage the vehicle body
and suspension, and adversely
affect driving performance.
■Repairing or replacing snow
tires
Request repairs or replacement of
snow tires from Toyota dealers or
legitimate tire retailers.
This is because the removal and
attachment of snow tires affects
the operation of the tire pressure
warning valves and transmitters.
Before driving the vehicle
Page 295 of 516
2954-6. Driving tips
4
Driving
NOTICE
■To prevent water damage
Take all necessary safety mea-
sures to ensure that water dam-
age to the hybrid battery (traction
battery), hybrid s ystem or other
components does not occur.
●Water entering the engine com-
partment may cause severe
damage to the hybrid system.
Water entering the interior may
cause the hybrid battery (trac-
tion battery) stowed under the
rear seats to short circuit.
●Water entering the hybrid trans-
mission will cause deterioration
in transmission quality. The mal-
function indicator may come on,
and the vehicle may not be driv-
able.
●Water can wash the grease
from wheel bearings, causing
rusting and premature failure,
and may also enter the differen-
tials and hybrid transmission,
reducing the gea r oil’s lubricat-
ing qualities.
■When you drive through
water
If driving through water, such as
when crossing shallow streams,
first check the depth of the water
and the bottom of the riverbed for
firmness. Drive slowly and avoid
deep water.
■Inspection after off-road driv-
ing
●Sand and mud that has accu-
mulated around brake discs
may affect braking efficiency
and may damage brake system
components.
●Always perform a maintenance
inspection aft er each day of
off-road driving that has taken
you through rough terrain, sand,
mud, or water. For scheduled
maintenance information, refer
to the “Scheduled Maintenance
Guide” or “Owner’s Manual
Supplement”.
Page 303 of 516
3035-1. Using the air conditioning system and defogger
5
Interior features
1Press the automatic mode
switch.
2 Adjust the temperature set-
ting.
3 To stop the operation, press
the off switch.
If the fan speed setting or air
flow modes are operated, the
automatic mode indicator goes
off. However, automatic mode
for functions other than that
operated is maintained.
■Using automatic mode
Fan speed is adjusted automati-
cally according to the temperature setting and the ambient conditions.
Therefore, the fan may stop for a
while until warm or
cool air is ready
to flow immediately after the auto-
matic mode switch pressed.
This function automatically con-
trols the air conditioning airflow
so that priority is given to the
front seats. Unnecessary air
conditioning is suppressed, con-
tributing to increased fuel effi-
ciency.
Front seat concentrated airflow
mode operates in the following
situations.
No passengers are detected
in the rear seats
The windshield defogger is
not operating
While operating, illumi-
nates.
■Manually turning front seat
concentrated airflow mode
on/off
In front seat concentrated air-
flow mode, directing airflow to
the front seats only and to all
seats can be switched via switch
operation. When the mode has
been switched manually, auto-
matic airflow control stops oper-
ating.
Press on the air condi-
tioning operation panel and
WARNING
■When the outside rear view
mirror defoggers are operat-
ing
Do not touch the outside rear view
mirror surfaces, as they can
become very hot and burn you.
NOTICE
■To prevent 12-volt battery dis-
charge
Do not leave the air conditioning
system on longer than necessary
when the hybrid system is off.
■When repairing/replacing
parts of the air conditioning
system
Have repair/replacement per-
formed by your Toyota dealer.
When a part of the air conditioning
system, such as the evaporator, is
to be replaced, it must be
replaced with a new one.
Using automatic mode
Front seat concentrated
airflow mode (S-FLOW)