USB TOYOTA COROLLA HATCHBACK 2021 Accessories, Audio & Navigation (in English)
[x] Cancel search | Manufacturer: TOYOTA, Model Year: 2021, Model line: COROLLA HATCHBACK, Model: TOYOTA COROLLA HATCHBACK 2021Pages: 264, PDF Size: 7.82 MB
Page 161 of 264
1614-6. Tips for operating the audio/visual system
COROLLA_HB_Navi_(U)
4
Audio/visual system
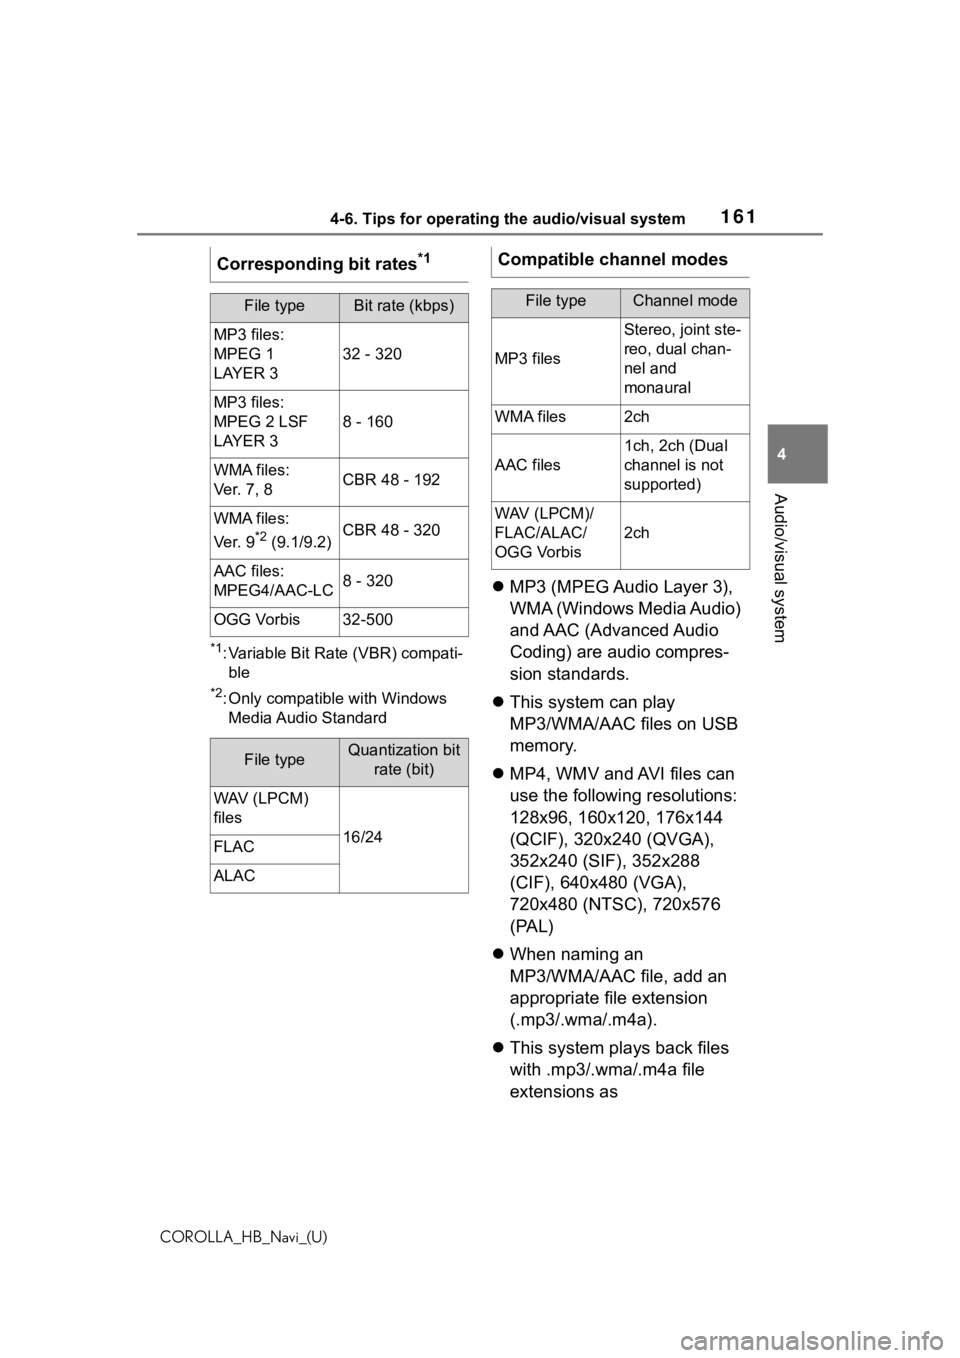
*1: Variable Bit Rate (VBR) compati- ble
*2: Only compatible with Windows Media Audio Standard
MP3 (MPEG Audio Layer 3),
WMA (Windows Media Audio)
and AAC (Advanced Audio
Coding) are audio compres-
sion standards.
This system can play
MP3/WMA/AAC files on USB
memory.
MP4, WMV and AVI files can
use the following resolutions:
128x96, 160x120, 176x144
(QCIF), 320x240 (QVGA),
352x240 (SIF), 352x288
(CIF), 640x480 (VGA),
720x480 (NTSC), 720x576
(PAL)
When naming an
MP3/WMA/AAC file, add an
appropriate file extension
(.mp3/.wma/.m4a).
This system plays back files
with .mp3/.wma/.m4a file
extensions as
Corresponding bit rates
*1
File typeBit rate (kbps)
MP3 files:
MPEG 1
LAYER 3
32 - 320
MP3 files:
MPEG 2 LSF
LAYER 3
8 - 160
WMA files:
Ver. 7, 8CBR 48 - 192
WMA files:
Ver. 9
*2 (9.1/9.2)CBR 48 - 320
AAC files:
MPEG4/AAC-LC8 - 320
OGG Vorbis32-500
File typeQuantization bit
rate (bit)
WAV (LPCM)
files
16/24FLAC
ALAC
Compatible channel modes
File typeChannel mode
MP3 files
Stereo, joint ste-
reo, dual chan-
nel and
monaural
WMA files2ch
AAC files
1ch, 2ch (Dual
channel is not
supported)
WAV (LPCM)/
FLAC/ALAC/
OGG Vorbis
2ch
Page 162 of 264
1624-6. Tips for operating the audio/visual system
COROLLA_HB_Navi_(U)
MP3/WMA/AAC files respec-
tively. To prevent noise and
playback errors, use the
appropriate file extension.
MP3 files are compatible with
the ID3 Tag Ver. 1.0, Ver. 1.1,
Ver. 2.2 and Ver. 2.3 formats.
This system cannot display
disc title, track title and artist
name in other formats.
WMA/AAC files can contain a
WMA/AAC tag that is used in
the same way as an ID3 tag.
WMA/AAC tags carry infor-
mation such as track title and
artist name.
The emphasis function is
available only when playing
MP3 files.
This system can play back
AAC files encoded by iTunes.
The sound quality of
MP3/WMA files generally
improves with higher bit rates.
m3u playlists are not compati-
ble with the audio player.
MP3i (MP3 interactive) and
MP3PRO formats are not
compatible with the audio
player.
The player is compatible with
VBR (Variable Bit Rate).
When playing back files
recorded as VBR (Variable Bit
Rate) files, the play time will
not be correctly displayed if
the fast forward or reverse operations are used.
It is not possible to check fold-
ers that do not include
MP3/WMA/AAC files.
MP3/WMA/AAC files in fold-
ers up to 8 levels deep can be
played. However, the start of
playback may be delayed
when using USB memory
containing numerous levels of
folders. For this reason, we
recommend creating USB
memory with no more than 2
levels of folders.
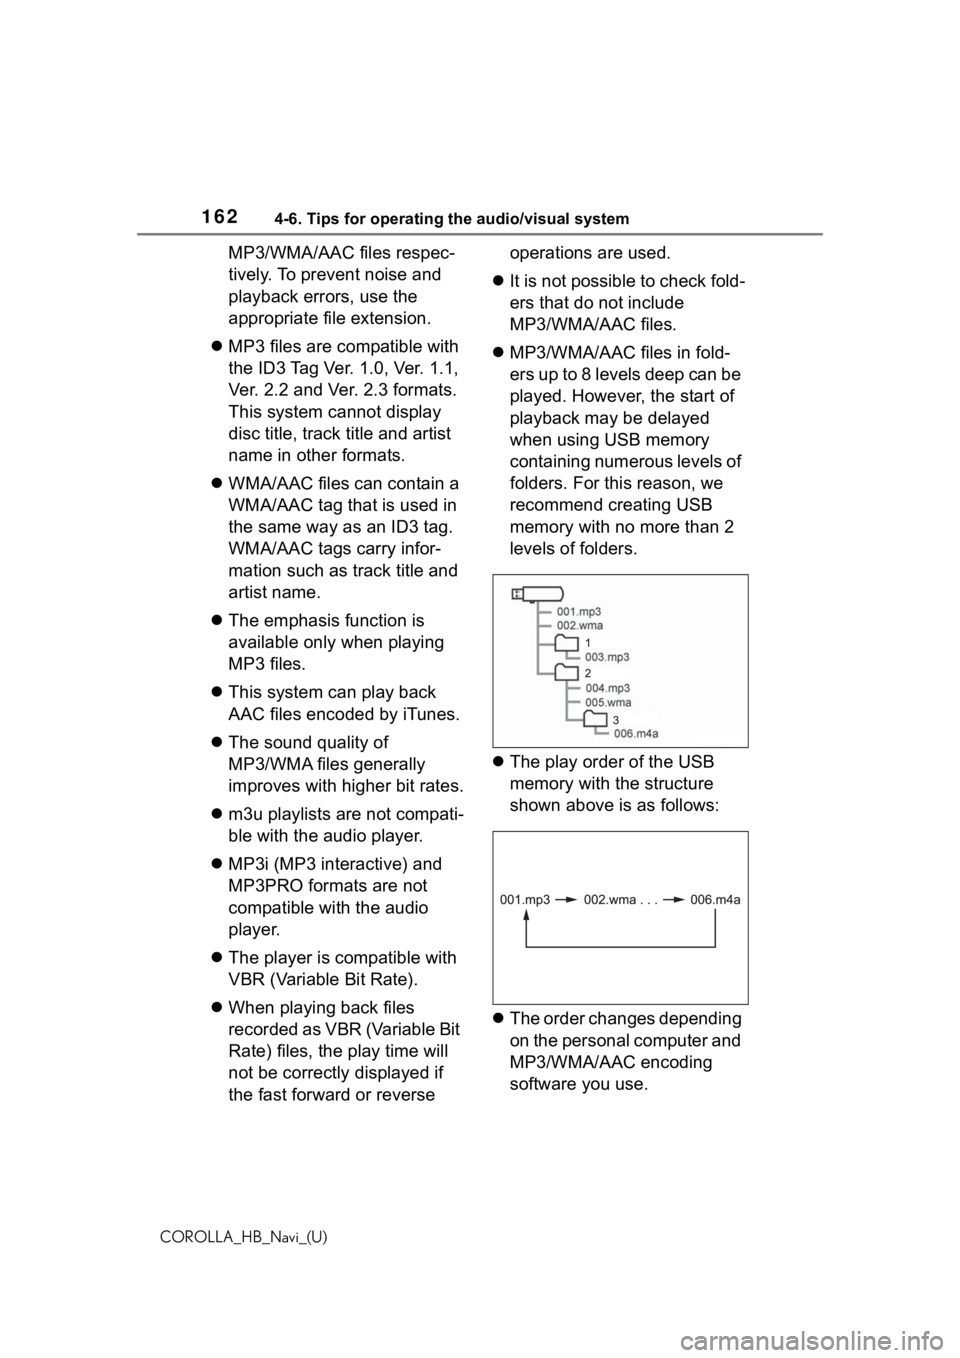
The play order of the USB
memory with the structure
shown above is as follows:
The order changes depending
on the personal computer and
MP3/WMA/AAC encoding
software you use.
Page 165 of 264
1654-6. Tips for operating the audio/visual system
COROLLA_HB_Navi_(U)
4
Audio/visual system
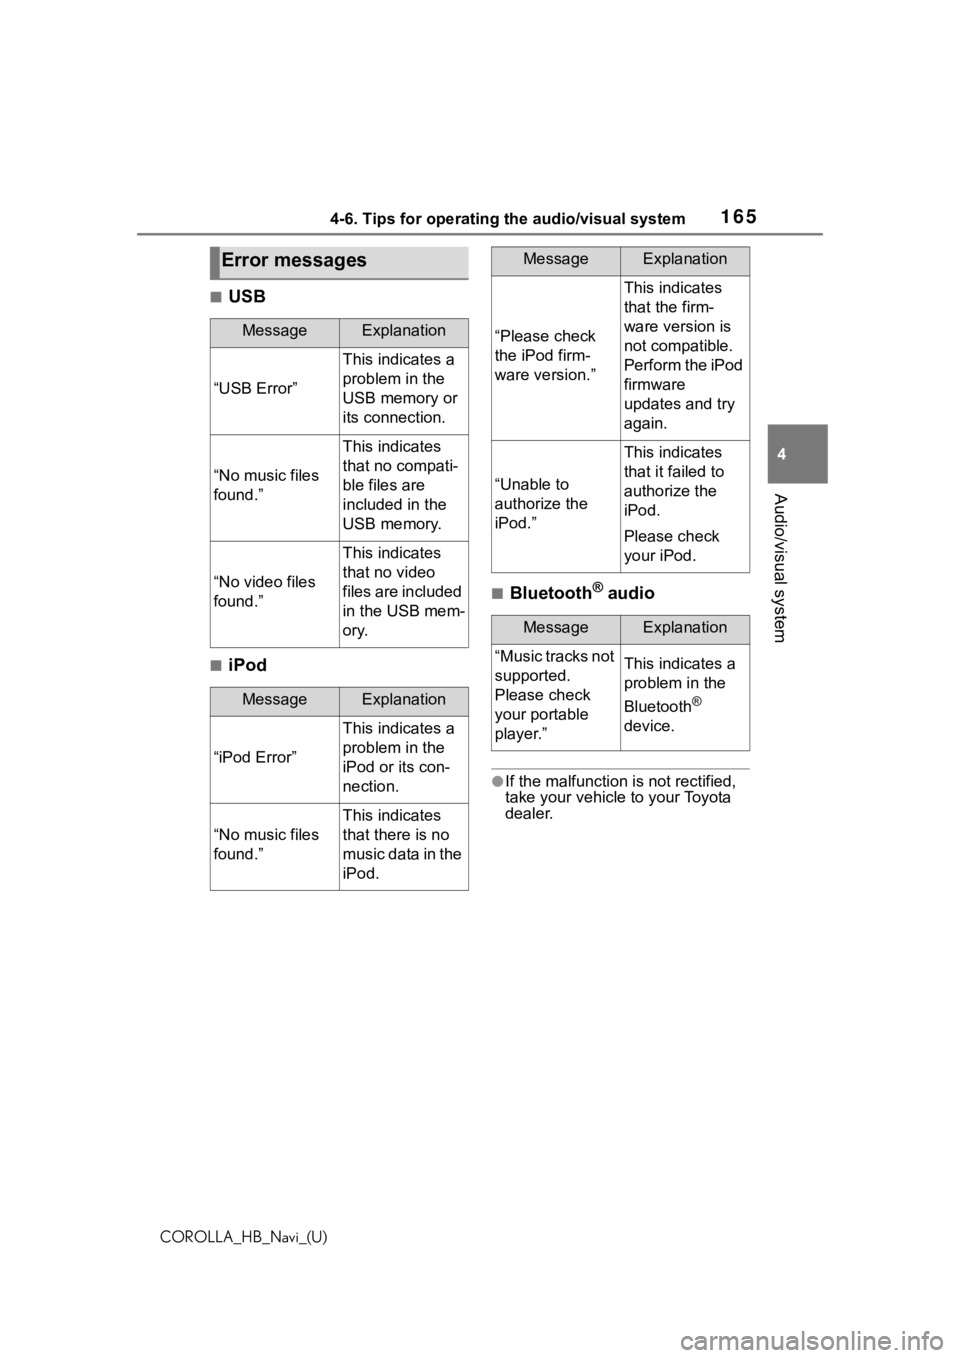
■USB
■iPod
■Bluetooth® audio
●If the malfunction is not rectified,
take your vehicle to your Toyota
dealer.
Error messages
MessageExplanation
“USB Error”
This indicates a
problem in the
USB memory or
its connection.
“No music files
found.”
This indicates
that no compati-
ble files are
included in the
USB memory.
“No video files
found.”
This indicates
that no video
files are included
in the USB mem-
ory.
MessageExplanation
“iPod Error”
This indicates a
problem in the
iPod or its con-
nection.
“No music files
found.”
This indicates
that there is no
music data in the
iPod.
“Please check
the iPod firm-
ware version.”
This indicates
that the firm-
ware version is
not compatible.
Perform the iPod
firmware
updates and try
again.
“Unable to
authorize the
iPod.”
This indicates
that it failed to
authorize the
iPod.
Please check
your iPod.
MessageExplanation
“Music tracks not
supported.
Please check
your portable
player.”This indicates a
problem in the
Bluetooth
®
device.
MessageExplanation
Page 175 of 264
1755-1. Voice command system operation
COROLLA_HB_Navi_(U)
5
Voice command system
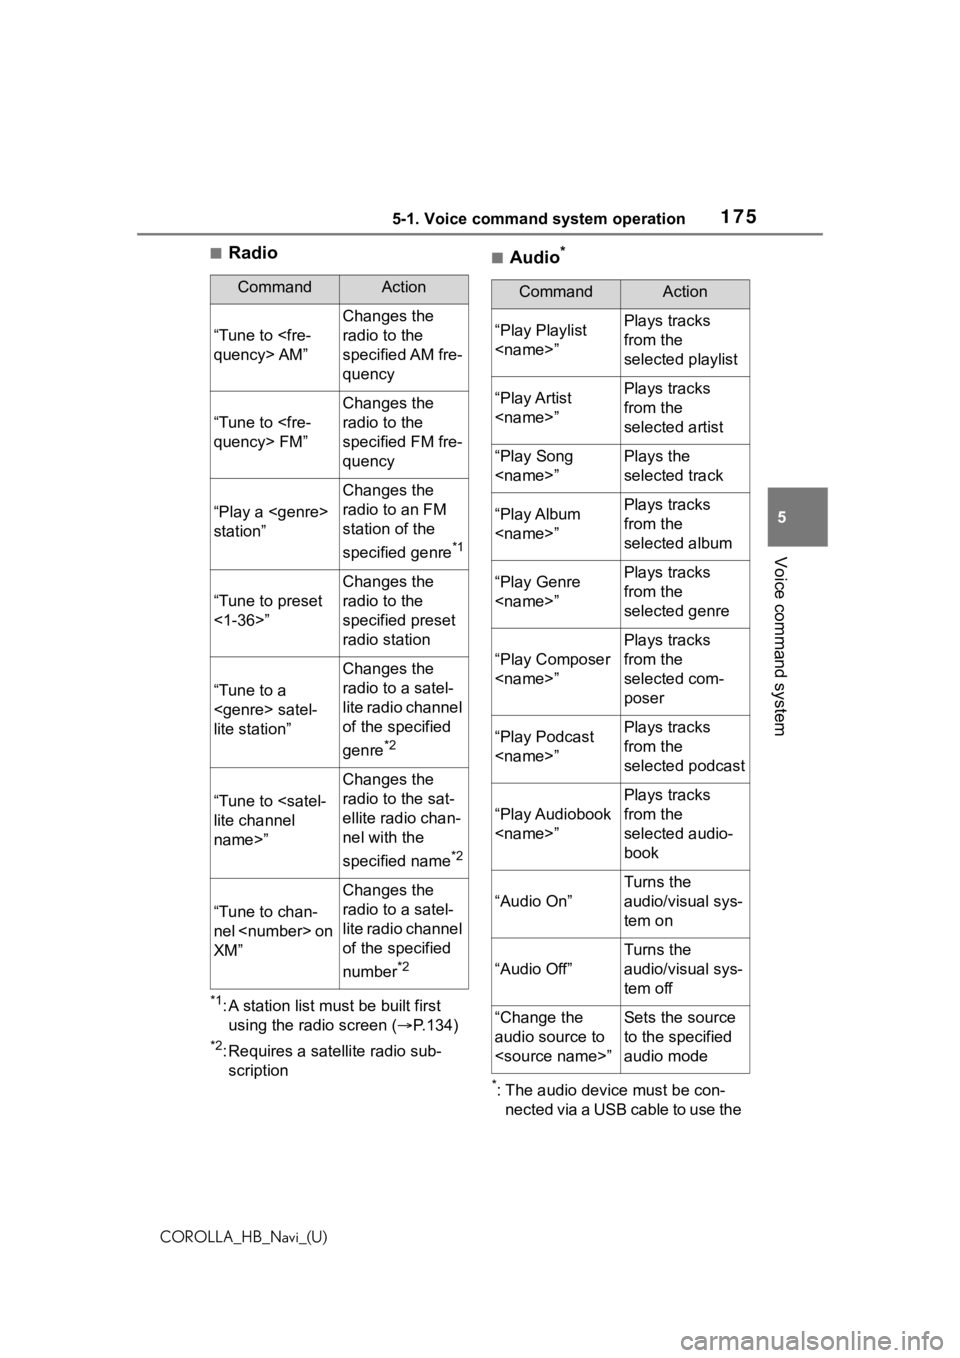
■Radio
*1: A station list must be built first using the radio screen ( P.134)
*2: Requires a satellite radio sub-
scription
■Audio*
*: The audio device must be con- nected via a USB cable to use the
CommandAction
“Tune to
Changes the
radio to the
specified AM fre-
quency
“Tune to
Changes the
radio to the
specified FM fre-
quency
“Play a
station”
Changes the
radio to an FM
station of the
specified genre
*1
“Tune to preset
<1-36>”
Changes the
radio to the
specified preset
radio station
“Tune to a
lite station”
Changes the
radio to a satel-
lite radio channel
of the specified
genre
*2
“Tune to
name>”
Changes the
radio to the sat-
ellite radio chan-
nel with the
specified name
*2
“Tune to chan-
nel
XM”
Changes the
radio to a satel-
lite radio channel
of the specified
number
*2
CommandAction
“Play Playlist
from the
selected playlist
“Play Artist
from the
selected artist
“Play Song
selected track
“Play Album
from the
selected album
“Play Genre
from the
selected genre
“Play Composer
Plays tracks
from the
selected com-
poser
“Play Podcast
from the
selected podcast
“Play Audiobook
Plays tracks
from the
selected audio-
book
“Audio On”
Turns the
audio/visual sys-
tem on
“Audio Off”
Turns the
audio/visual sys-
tem off
“Change the
audio source to
to the specified
audio mode
Page 200 of 264
2008-1. Phone operation (Hands-free system for cellular phones)
COROLLA_HB_Navi_(U)
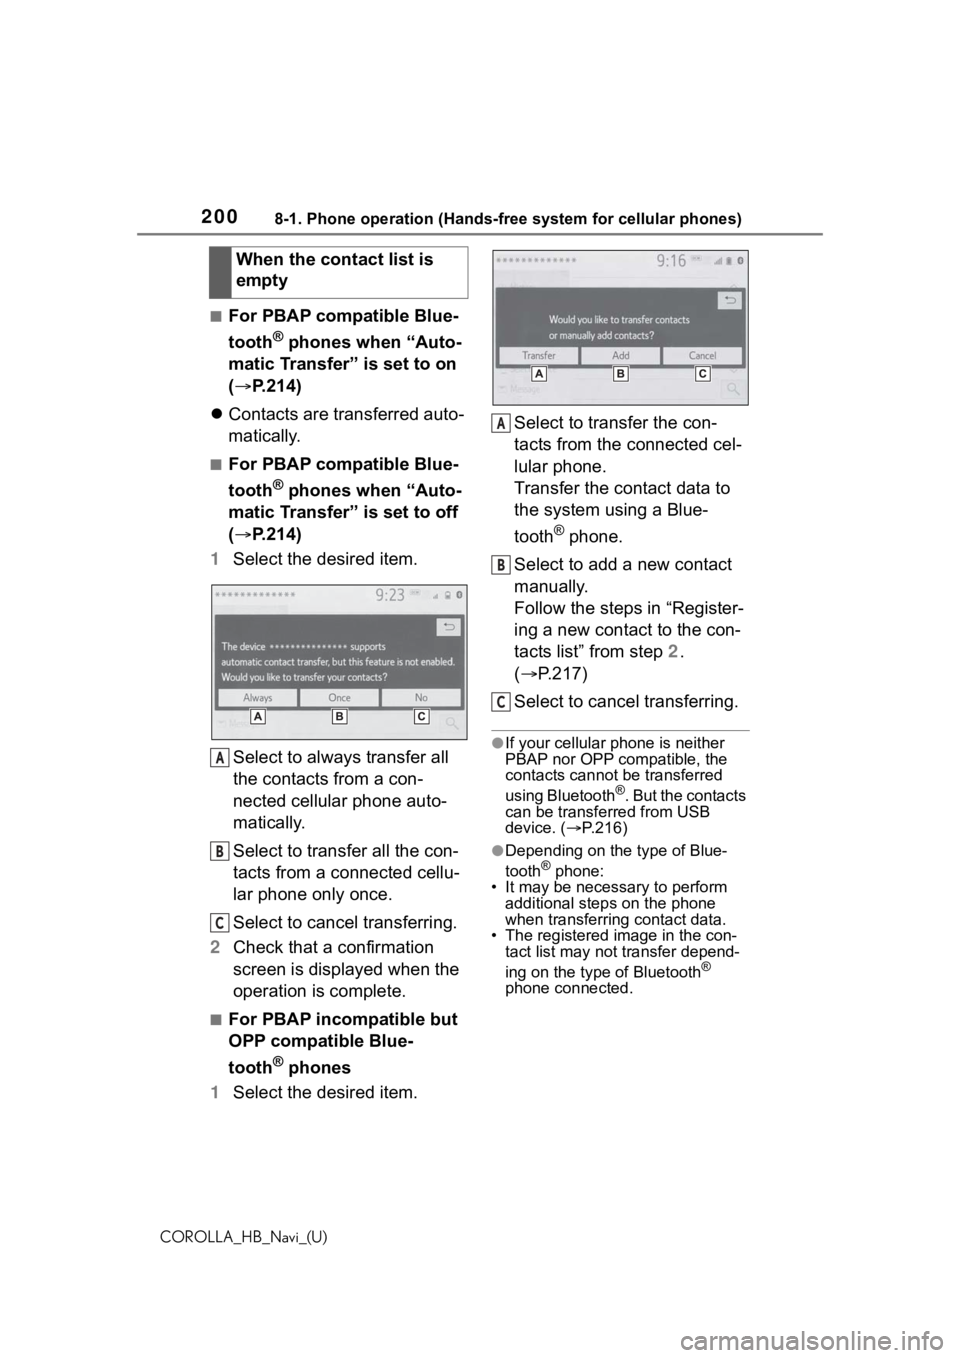
■For PBAP compatible Blue-
tooth
® phones when “Auto-
matic Transfer” is set to on
( P.214)
Contacts are transferred auto-
matically.
■For PBAP compatible Blue-
tooth
® phones when “Auto-
matic Transfer” is set to off
( P.214)
1 Select the desired item.
Select to always transfer all
the contacts from a con-
nected cellular phone auto-
matically.
Select to transfer all the con-
tacts from a connected cellu-
lar phone only once.
Select to cancel transferring.
2 Check that a confirmation
screen is displayed when the
operation is complete.
■For PBAP incompatible but
OPP compatible Blue-
tooth
® phones
1 Select the desired item. Select to transfer the con-
tacts from the connected cel-
lular phone.
Transfer the contact data to
the system using a Blue-
tooth
® phone.
Select to add a new contact
manually.
Follow the steps in “Register-
ing a new contact to the con-
tacts list” from step 2.
( P.217)
Select to cancel transferring.
●If your cellular phone is neither
PBAP nor OPP compatible, the
contacts cannot be transferred
using Bluetooth
®. But the contacts
can be transferred from USB
device. ( P.216)
●Depending on the type of Blue-
tooth® phone:
• It may be necessary to perform
additional steps on the phone
when transferring contact data.
• The registered image in the con-
tact list may not transfer depend-
ing on the type of Bluetooth
®
phone connected.
When the contact list is
empty
A
B
C
A
B
C
Page 216 of 264

2168-2. Setup
COROLLA_HB_Navi_(U)“Replace Contacts”: Select to trans-
fer the contact fro
m the connected
cellular phone and replace the cur-
rent one.
“Add Contact”: Select to transfer
the desired contact data from the
connected cellular phone to add to
the current one.
4 Transfer the contact data to
the system using a Blue-
tooth
® phone.
This operation may be unnec-
essary depending on the type
of Bluetooth
® phone.
To cancel this function, select
“Cancel”.
5 Check that a confirmation
screen is displayed when the
operation is complete.
Backed-up contact data
(“vCard” formatted) can be
transferred from USB device or
Bluetooth
® phone to this sys-
tem.
1 Connect a USB device.
( P.130)
2 Select “Transfer Contacts
from Device”.
3 Select “From USB”.
4 Select “USB 1” or “USB 2”
when the multiple USB
devices are connected. If a
USB device is connected,
skip this procedure.
5 Select “Replace Contacts” or
“Add Contact”. If the contact is not registered, skip this
procedure.
“Replace Contacts”: Select to trans-
fer the contact fr
om the connected
USB device or Bluetooth
® phone
and replace the current one.
“Add Contact”: Select to transfer
the desired contact data from the
connected USB de vice or Blue-
tooth
® phone to add to the current
one.
6 Select a desired file from
vCard file list.
7 Check that a confirmation
screen is displayed when the
operation is complete.
●Depending on the type of Blue-
tooth® phone used and number of
files, it may take time to display
vCard file lists and download con-
tacts.
●Downloading may not complete
correctly in the following cases:
• If the engine switch is turned off during downloading.
• If the USB device or Bluetooth
®
phone is removed before down-
loading is complete.
From USB device
Page 229 of 264
2299-1. Connected Services overview
COROLLA_HB_Navi_(U)
9
Connected Services
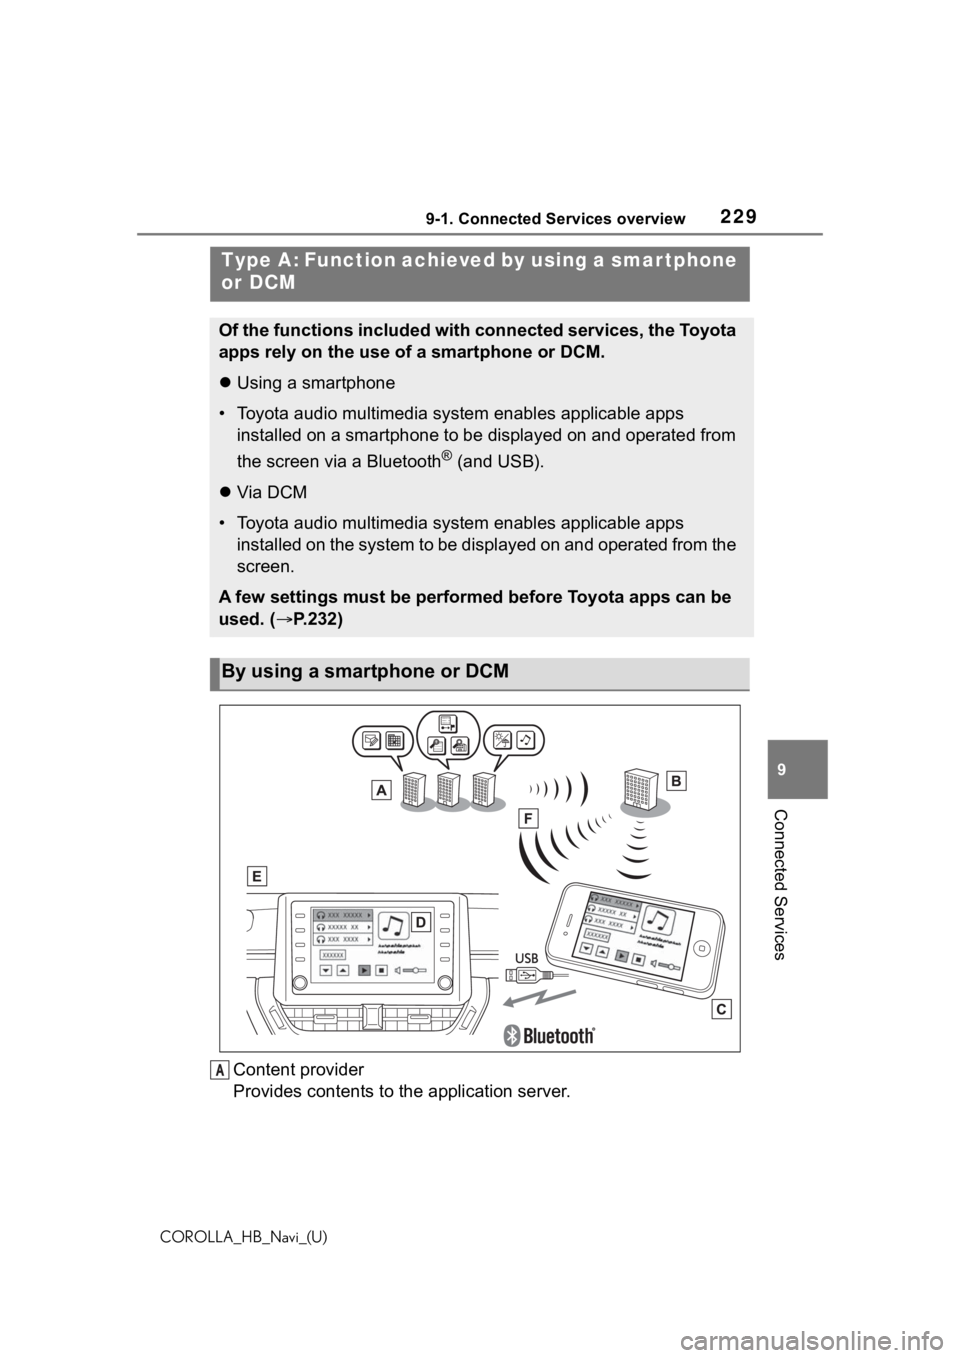
Content provider
Provides contents to the application server.
Type A: Function achieved by using a smar tphone
or DCM
Of the functions included with connected services, the Toyota
apps rely on the use of a smartphone or DCM.
Using a smartphone
• Toyota audio multimedia system enables applicable apps
installed on a smartphone to be displayed on and operated from
the screen via a Bluetooth
® (and USB).
Via DCM
• Toyota audio multimedia system enables applicable apps
installed on the system to be displayed on and operated from th e
screen.
A few settings must be performed before Toyota apps can be
used. ( P.232)
By using a smartphone or DCM
A
Page 244 of 264
2449-3. Setup
COROLLA_HB_Navi_(U)
9-3.Setup
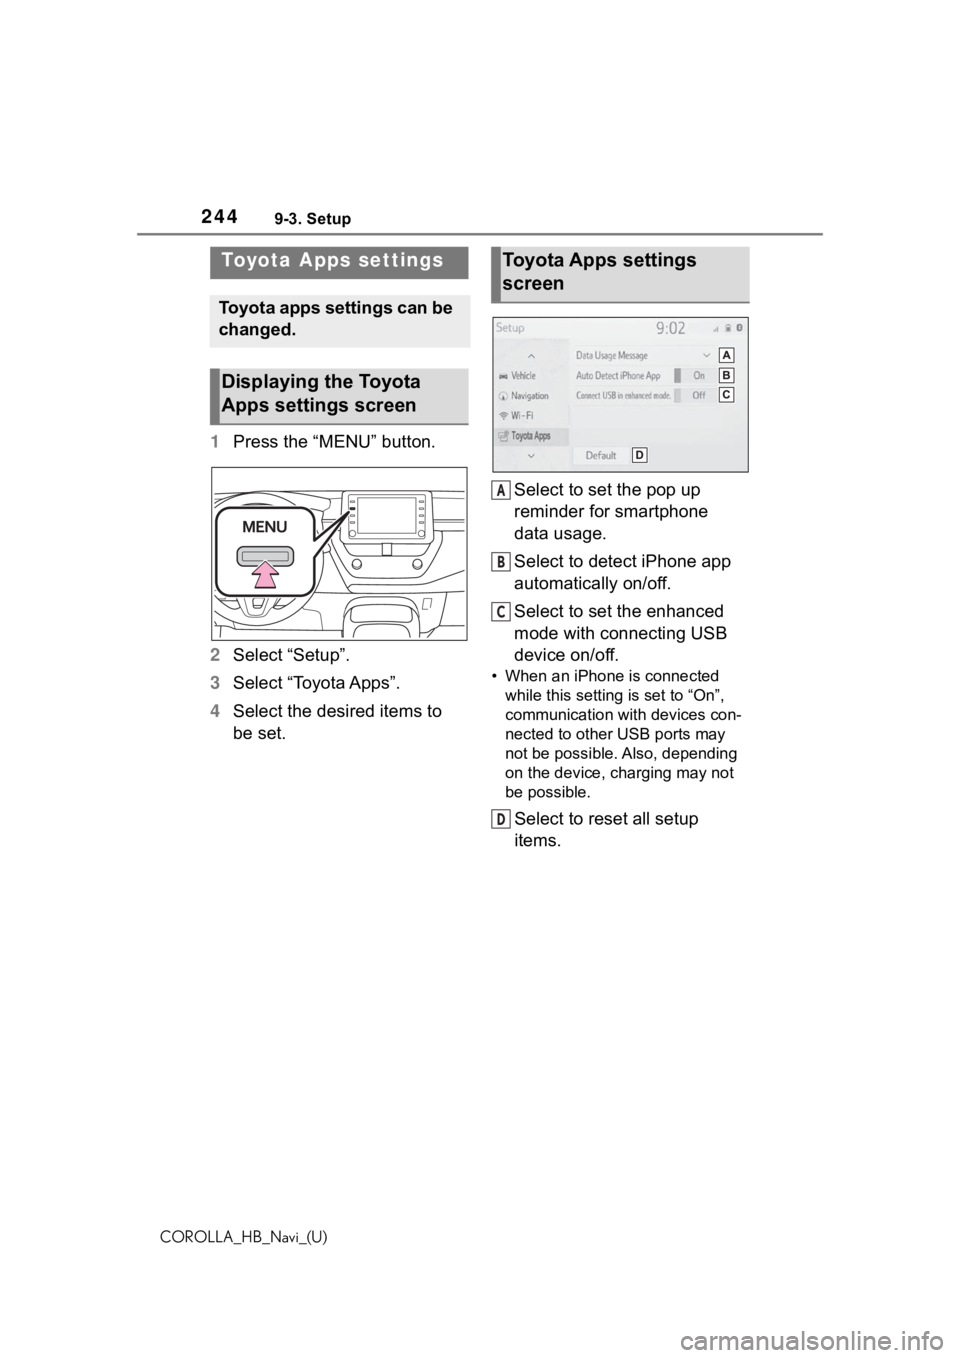
1Press the “MENU” button.
2 Select “Setup”.
3 Select “Toyota Apps”.
4 Select the desired items to
be set. Select to set the pop up
reminder for smartphone
data usage.
Select to detect iPhone app
automatically on/off.
Select to set the enhanced
mode with connecting USB
device on/off.
• When an iPhone is connected
while this setting is set to “On”,
communication with devices con-
nected to other USB ports may
not be possible. Also, depending
on the device, charging may not
be possible.
Select to reset all setup
items.
Toyota Apps settings
Toyota apps settings can be
changed.
Displaying the Toyota
Apps settings screen
Toyota Apps settings
screen
A
B
C
D
Page 246 of 264
246Alphabetical Index
COROLLA_HB_Navi_(U)
Alphabetical Index
A
A route from the Cloud ............ 99
AM ............................................ 134
Android Auto .......................... 148
Apple CarPlay/Android Auto ... 55
APPS button ........... .................. 12
Apps button (Menu screen) ..... 14
Audio ....................................... 128 Audio source ........................ 129
Operating information........... 157
Reordering the audio source 130
Screen adjustment ............... 132
Some basics......................... 129
Sound settings ..................... 130
Turning the system on and off........................................... 129
USB port............................... 130
Voice command system ....... 133
AUDIO button............................ 12
Audio button (Menu screen).... 14
Audio button (Setup screen) ... 18
Audio settings ........................ 155 Common settings ................. 155
Radio settings ...................... 156
Audio source .......................... 129
B
Basic operation ........................ 74
Bluetooth® audio .................... 149
Registering/Conn ecting a Blue-
tooth
® device...................... 152
Bluetooth® button (Setup
screen) .................................... 18
Bluetooth
® details settings ..... 41
Bluetooth® setup screen ........ 41
Connecting a Bluetooth® device
............................................. 42
Deleting a Bluetooth
® device . 44
Detailed settings screen ......... 47
Displaying the Bluetooth
® setup
screen .................................. 41 Registering a Bluetooth
® device
.............................................44
Bluetooth
® hands-free system
...............................................192
Bluetooth
® phone message func-
tion .........................................206 Calling the message sender .210
Checking received messages ...........................................207
Displaying the message screen ...........................................206
Receiving a mess age ...........207
Replying to a message (dicta- tion reply)............................208
Replying to a message (quick reply) ..................................209
Buttons overview......................12
C
Clock settings ...........................63
Command list ..........................172
D
Data service button (Setup screen) .....................................18
Data services settings............180
DCM .........................232, 234, 236
Destination Assist ..................242
Destination button (Menu screen) .....................................14
Destination search ...................86
Destination search operation Address ..................................90
Contact ...................................90
Destination Assist ...................89
Emergency .............................89
Favorite list .............................88
Home ................................23, 87
Keyword .................................88
One-touch setting home/favorite.............................................94
Page 249 of 264
249Alphabetical Index
COROLLA_HB_Navi_(U)
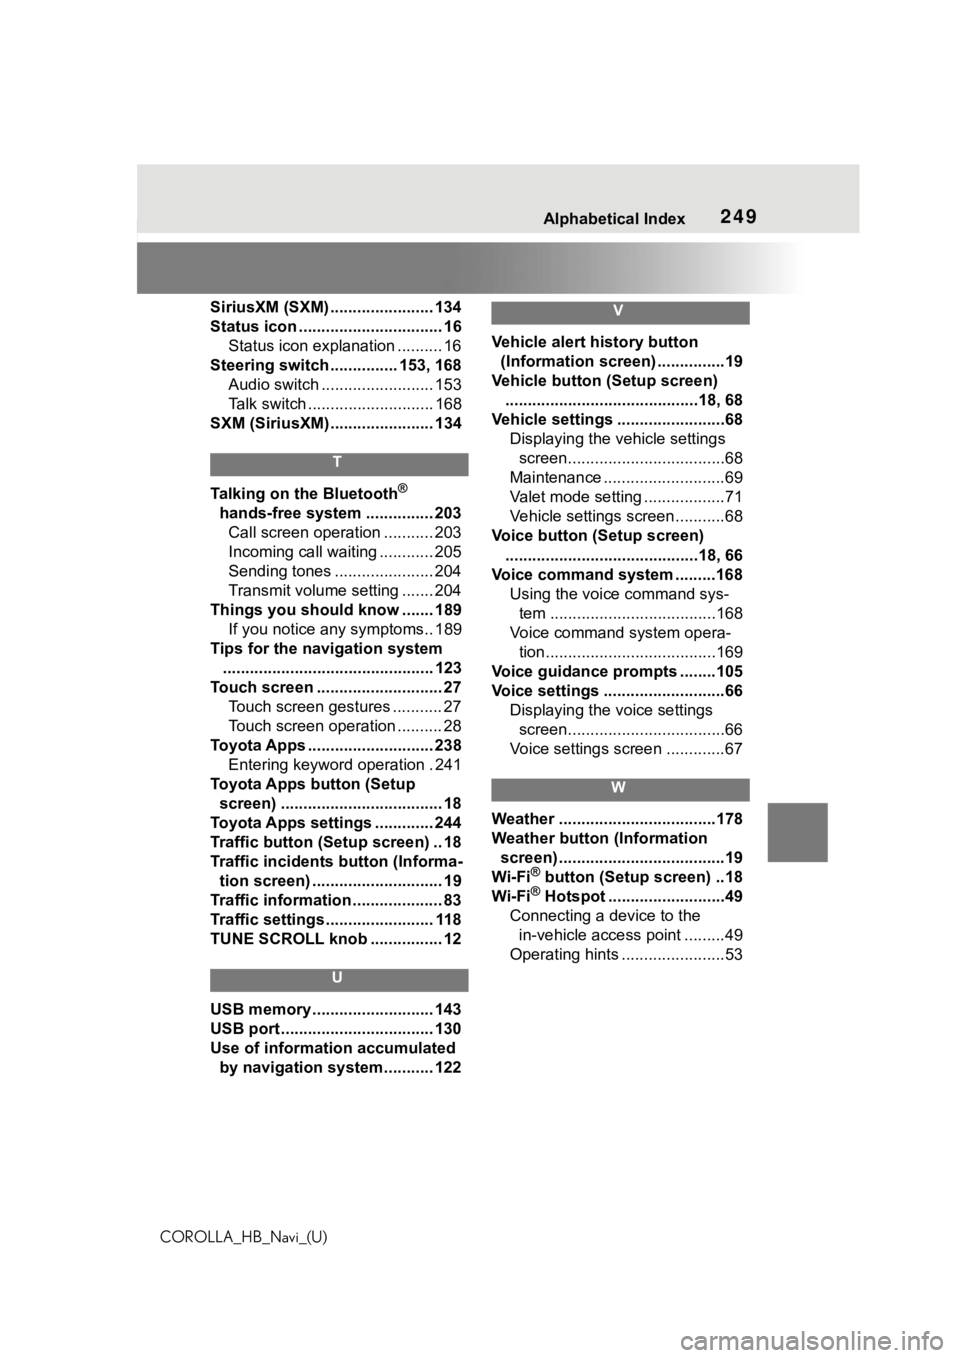
SiriusXM (SXM) ....................... 134
Status icon ................................ 16 Status icon explanation .......... 16
Steering switch ............... 153, 168 Audio switch ......................... 153
Talk switch ............................ 168
SXM (SiriusXM) ....................... 134
T
Talking on the Bluetooth®
hands-free system ............... 203 Call screen operation ........... 203
Incoming call waiting ............ 205
Sending tones ...................... 204
Transmit volume setting ....... 204
Things you should know ....... 189 If you notice any symptoms.. 189
Tips for the navigation system ............................................... 123
Touch screen ............................ 27 Touch screen gestures ........... 27
Touch screen operation .......... 28
Toyota Apps ............................ 238 Entering keyword operation . 241
Toyota Apps button (Setup screen) .................................... 18
Toyota Apps settings ............. 244
Traffic button (Setup screen) .. 18
Traffic incidents button (Informa- tion screen) ............................. 19
Traffic information .................... 83
Traffic settings ........................ 118
TUNE SCROLL knob ................ 12
U
USB memory ........................... 143
USB port .................................. 130
Use of information accumulated by navigation system........... 122
V
Vehicle alert history button (Information screen) ...............19
Vehicle button (Setup screen) ...........................................18, 68
Vehicle settings ........................68 Displaying the vehicle settings screen...................................68
Maintenance ...........................69
Valet mode setting ..................71
Vehicle settings screen...........68
Voice button (Setup screen) ...........................................18, 66
Voice command system .........168 Using the voice command sys-tem .....................................168
Voice command system opera- tion......................................169
Voice guidance p rompts ........105
Voice settings ...........................66 Displaying the voice settings screen...................................66
Voice settings screen .............67
W
Weather ...................................178
Weather button (Information screen) .....................................19
Wi-Fi
® button (Setup screen) ..18
Wi-Fi® Hotspot ..........................49
Connecting a device to the in-vehicle access point .........49
Operating hints .......................53