torque TOYOTA COROLLA HATCHBACK 2021 Owners Manual (in English)
[x] Cancel search | Manufacturer: TOYOTA, Model Year: 2021, Model line: COROLLA HATCHBACK, Model: TOYOTA COROLLA HATCHBACK 2021Pages: 576, PDF Size: 12.73 MB
Page 499 of 576

4998-2. Steps to take in an emergency
COROLLA H/B_U
8
When trouble arises
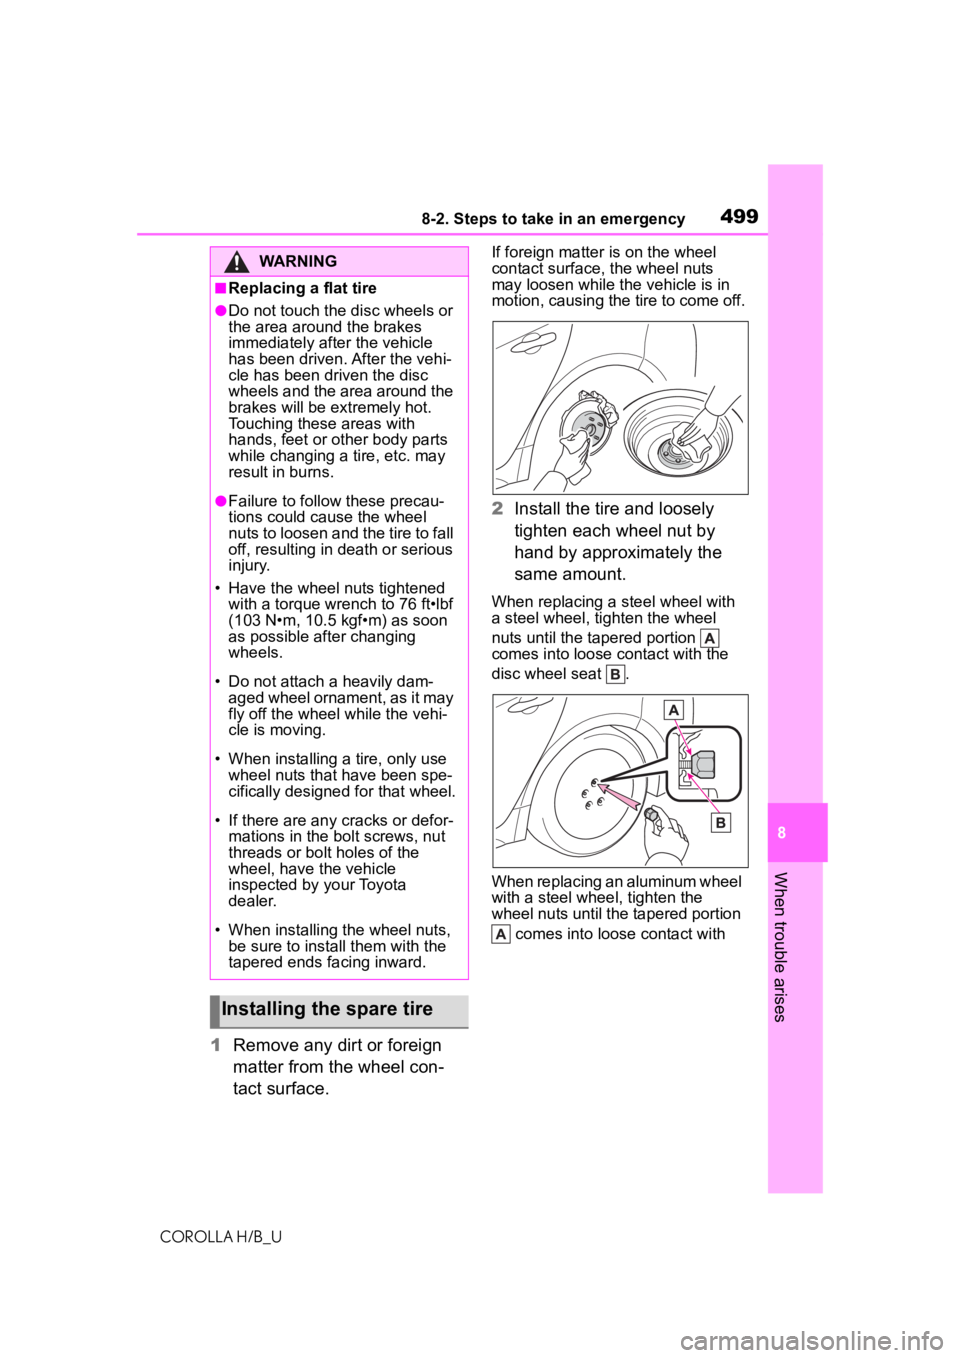
1 Remove any dirt or foreign
matter from the wheel con-
tact surface.
If foreign matter is on the wheel
contact surface, the wheel nuts
may loosen while th e vehicle is in
motion, causing the tire to come off.
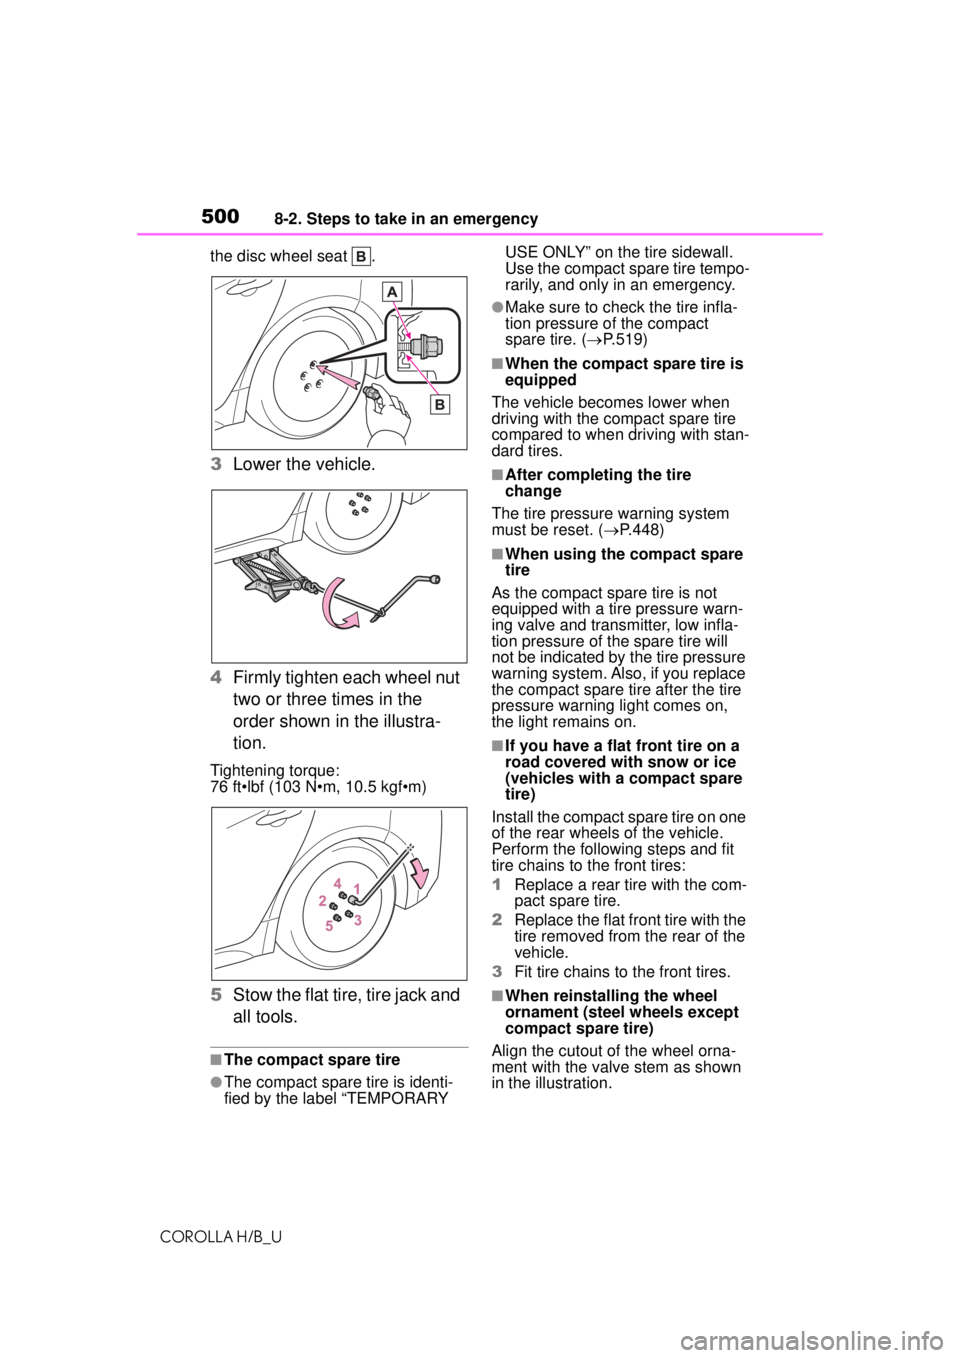
2 Install the tire and loosely
tighten each wheel nut by
hand by approximately the
same amount.
When replacing a steel wheel with
a steel wheel, tighten the wheel
nuts until the tapered portion
comes into loose contact with the
disc wheel seat .
When replacing an aluminum wheel
with a steel wheel, tighten the
wheel nuts until the tapered portion
comes into loose contact with
WARNING
■Replacing a flat tire
●Do not touch the disc wheels or
the area around the brakes
immediately after the vehicle
has been driven. After the vehi-
cle has been driven the disc
wheels and the area around the
brakes will be extremely hot.
Touching these areas with
hands, feet or other body parts
while changing a tire, etc. may
result in burns.
●Failure to follow these precau-
tions could cause the wheel
nuts to loosen and the tire to fall
off, resulting in death or serious
injury.
• Have the wheel nuts tightened with a torque wrench to 76 ft•lbf
(103 N•m, 10.5 kgf•m) as soon
as possible after changing
wheels.
• Do not attach a heavily dam- aged wheel ornament, as it may
fly off the wheel while the vehi-
cle is moving.
• When installing a tire, only use wheel nuts that have been spe-
cifically designed for that wheel.
• If there are any cracks or defor- mations in the bolt screws, nut
threads or bolt holes of the
wheel, have the vehicle
inspected by your Toyota
dealer.
• When installing the wheel nuts, be sure to install them with the
tapered ends facing inward.
Installing the spare tire
Page 500 of 576

5008-2. Steps to take in an emergency
COROLLA H/B_Uthe disc wheel seat .
3
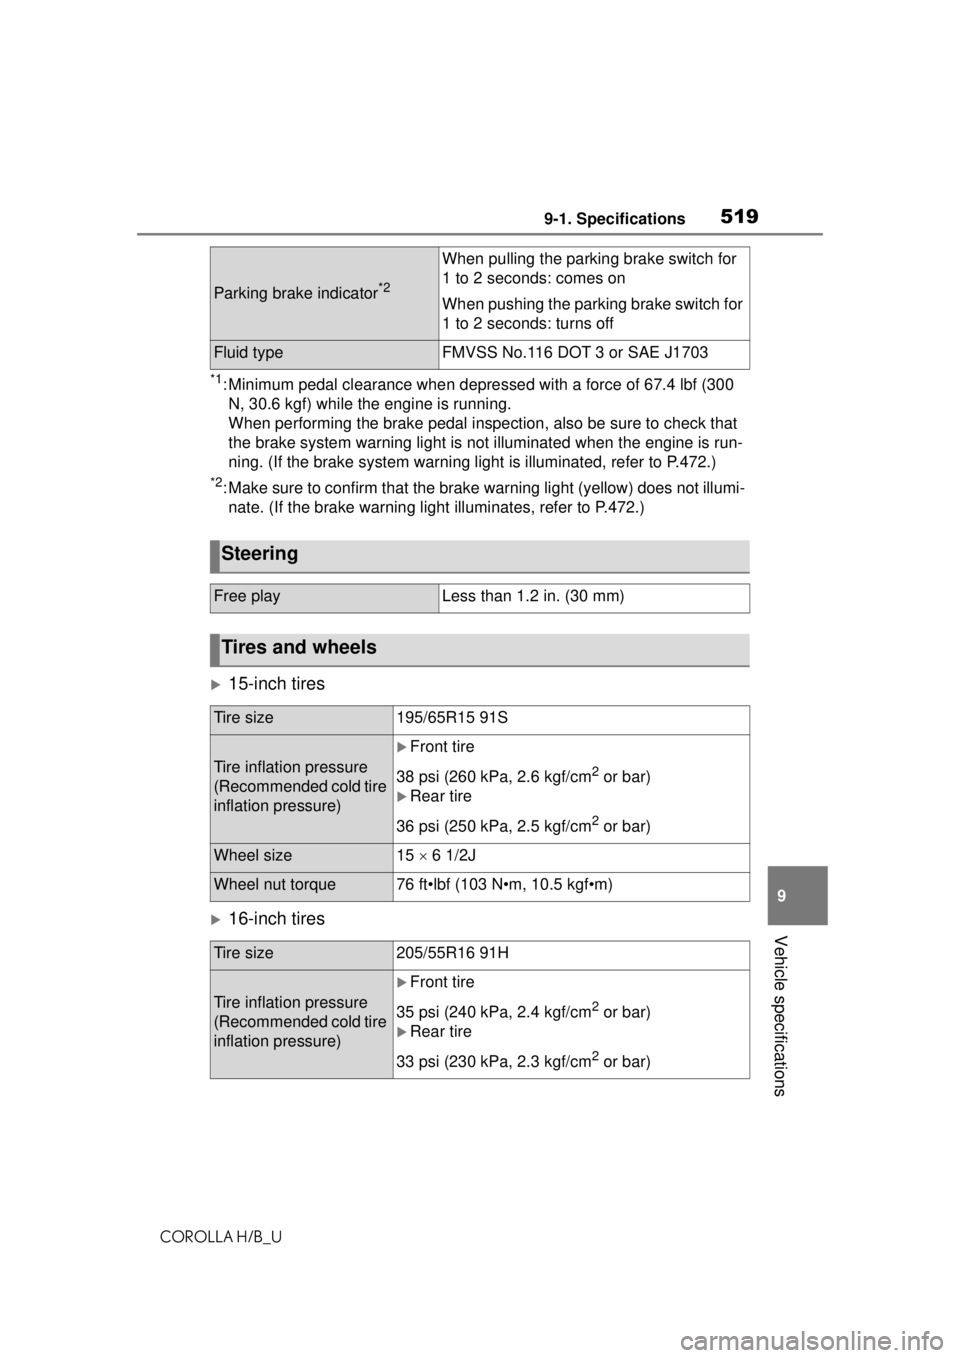
Lower the vehicle.
4 Firmly tighten each wheel nut
two or three times in the
order shown in the illustra-
tion.
Tightening torque:
76 ft•lbf (103 N•m, 10.5 kgf•m)
5Stow the flat tire, tire jack and
all tools.
■The compact spare tire
●The compact spare tire is identi-
fied by the label “TEMPORARY USE ONLY” on the tire sidewall.
Use the compact spare tire tempo-
rarily, and only in an emergency.
●Make sure to check the tire infla-
tion pressure of the compact
spare tire. (
P.519)
■When the compact spare tire is
equipped
The vehicle becomes lower when
driving with the compact spare tire
compared to when driving with stan-
dard tires.
■After completing the tire
change
The tire pressure warning system
must be reset. ( P.448)
■When using the compact spare
tire
As the compact spare tire is not
equipped with a tire pressure warn-
ing valve and transmitter, low infla-
tion pressure of the spare tire will
not be indicated by the tire pressure
warning system. Also, if you replace
the compact spare tire after the tire
pressure warning light comes on,
the light remains on.
■If you have a flat front tire on a
road covered with snow or ice
(vehicles with a compact spare
tire)
Install the compact spare tire on one
of the rear wheels of the vehicle.
Perform the following steps and fit
tire chains to the front tires:
1 Replace a rear tire with the com-
pact spare tire.
2 Replace the flat front tire with the
tire removed from the rear of the
vehicle.
3 Fit tire chains to the front tires.
■When reinstalli ng the wheel
ornament (steel wheels except
compact spare tire)
Align the cutout of the wheel orna-
ment with the valve stem as shown
in the illustration.
Page 519 of 576

5199-1. Specifications
COROLLA H/B_U
9
Vehicle specifications
*1: Minimum pedal clearance when depressed with a force of 67.4 lbf (300 N, 30.6 kgf) while the engine is running.
When performing the brake pedal inspection, also be sure to check that
the brake system warning light is no t illuminated when the engine is run-
ning. (If the brake system warning li ght is illuminated, refer to P.472.)
*2: Make sure to confirm that the brake warning light (yellow) does not illumi-
nate. (If the brake warning light illuminates, refer to P.472.)
15-inch tires
16-inch tires
Parking brake indicator*2
When pulling the parking brake switch for
1 to 2 seconds: comes on
When pushing the parking brake switch for
1 to 2 seconds: turns off
Fluid typeFMVSS No.116 DOT 3 or SAE J1703
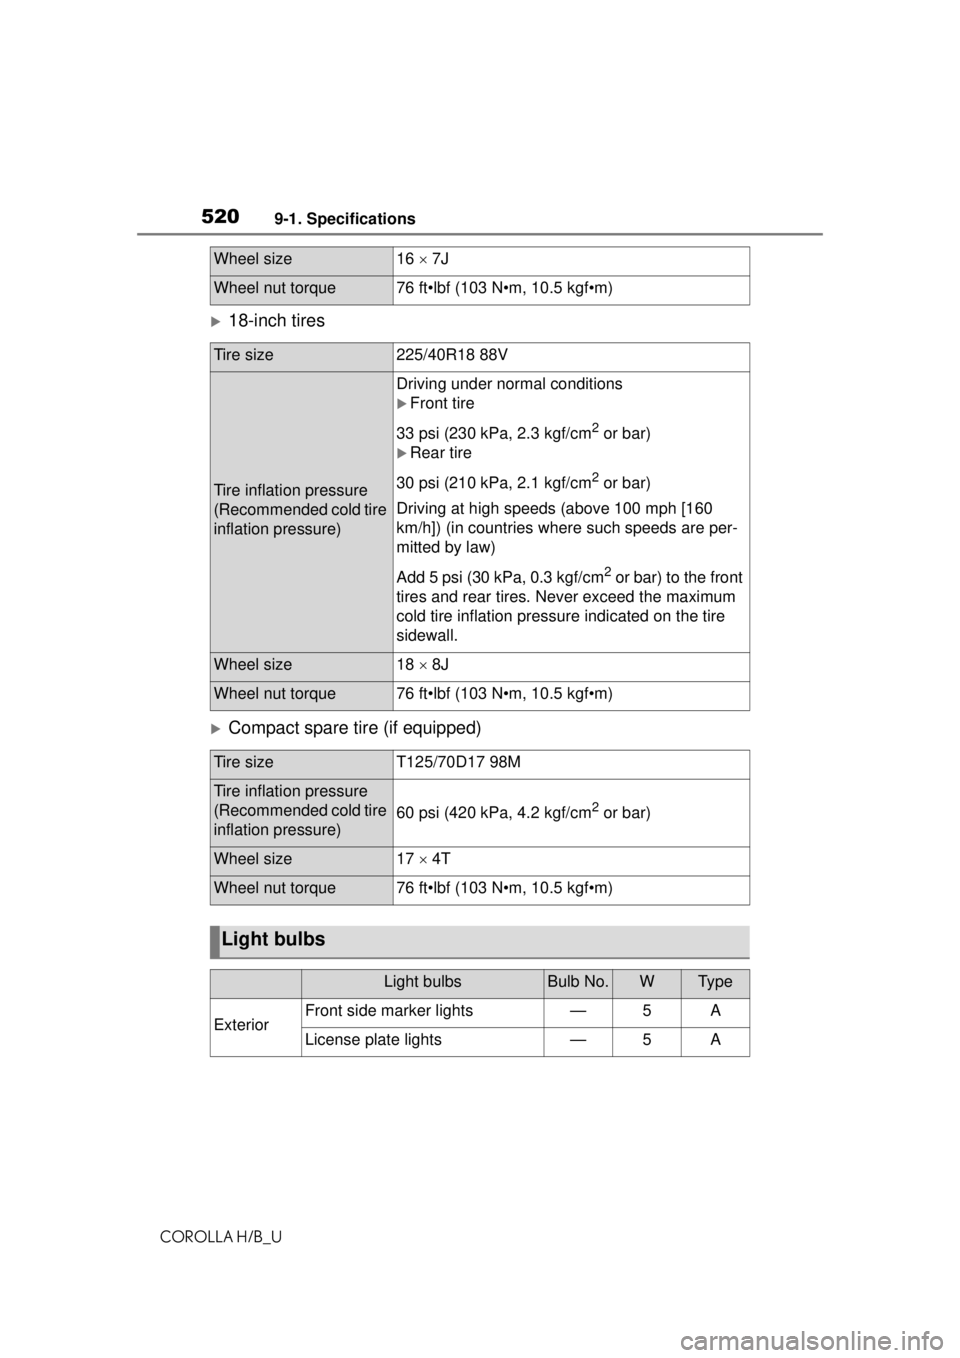
Steering
Free playLess than 1.2 in. (30 mm)
Tires and wheels
Tire size195/65R15 91S
Tire inflation pressure
(Recommended cold tire
inflation pressure)
Front tire
38 psi (260 kPa, 2.6 kgf/cm
2 or bar)
Rear tire
36 psi (250 kPa, 2.5 kgf/cm
2 or bar)
Wheel size15 6 1/2J
Wheel nut torque76 ft•lbf (103 N•m, 10.5 kgf•m)
Tire size205/55R16 91H
Tire inflation pressure
(Recommended cold tire
inflation pressure)
Front tire
35 psi (240 kPa, 2.4 kgf/cm
2 or bar)
Rear tire
33 psi (230 kPa, 2.3 kgf/cm
2 or bar)
Page 520 of 576

5209-1. Specifications
COROLLA H/B_U
18-inch tires
Compact spare tire (if equipped)
Wheel size16 7J
Wheel nut torque76 ft•lbf (103 N•m, 10.5 kgf•m)
Tire size225/40R18 88V
Tire inflation pressure
(Recommended cold tire
inflation pressure)
Driving under normal conditions
Front tire
33 psi (230 kPa, 2.3 kgf/cm
2 or bar)
Rear tire
30 psi (210 kPa, 2.1 kgf/cm
2 or bar)
Driving at high speeds (above 100 mph [160
km/h]) (in countries where such speeds are per-
mitted by law)
Add 5 psi (30 kPa, 0.3 kgf/cm
2 or bar) to the front
tires and rear tires. Ne ver exceed the maximum
cold tire inflation pressu re indicated on the tire
sidewall.
Wheel size18 8J
Wheel nut torque76 ft•lbf (103 N•m, 10.5 kgf•m)
Tire sizeT125/70D17 98M
Tire inflation pressure
(Recommended cold tire
inflation pressure)
60 psi (420 kPa, 4.2 kgf/cm2 or bar)
Wheel size17 4T
Wheel nut torque76 ft•lbf (103 N•m, 10.5 kgf•m)
Light bulbs
Light bulbsBulb No.WTy p e
ExteriorFront side marker lights—5A
License plate lights—5A