stop start TOYOTA COROLLA HATCHBACK 2022 (in English) User Guide
[x] Cancel search | Manufacturer: TOYOTA, Model Year: 2022, Model line: COROLLA HATCHBACK, Model: TOYOTA COROLLA HATCHBACK 2022Pages: 758, PDF Size: 155.26 MB
Page 83 of 758
81
1
1-4. Theft deterrent system
For safety and security
*: If equipped
■Items to check before locking
the vehicle
To prevent unexpected triggering of
the alarm and vehicle theft, make
sure of the following:
Nobody is in the vehicle.
The windows and panoramic
moon roof (if equipped) are
closed before the alarm is set.
No valuables or other personal
items are left in the vehicle.
■Setting
Close the door and hood, and lock
all the doors using the entry func-
tion (if equipped) or wireless
remote control. The system will set
automatically after 30 seconds.
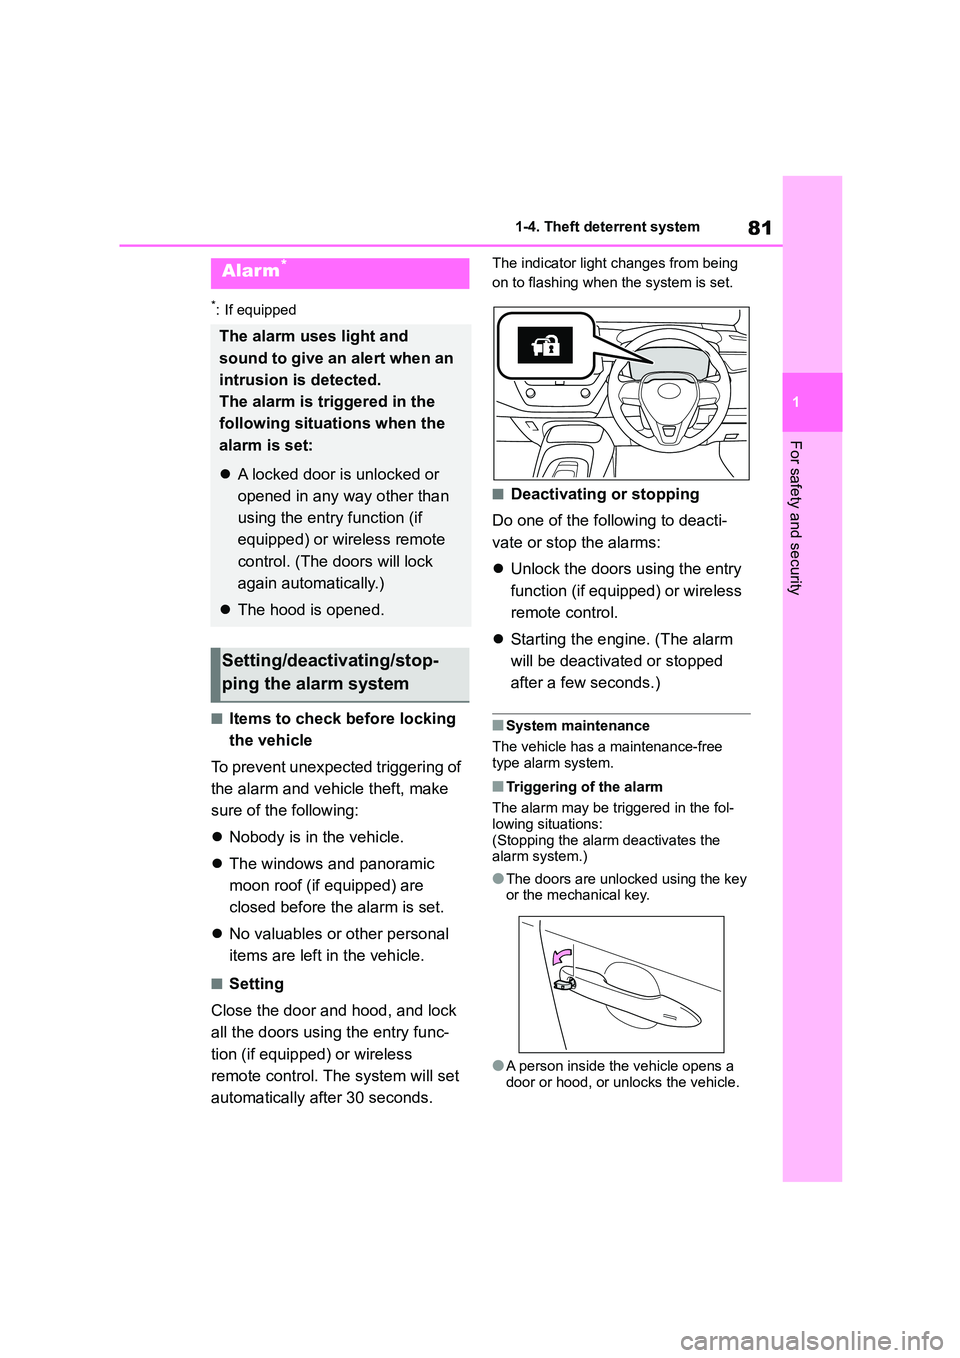
The indicator light changes from being
on to flashing when the system is set.
■Deactivating or stopping
Do one of the following to deacti-
vate or stop the alarms:
Unlock the doors using the entry
function (if equipped) or wireless
remote control.
Starting the engine. (The alarm
will be deactiva ted or stopped
after a few seconds.)
■System maintenance
The vehicle has a maintenance-free
type alarm system.
■Triggering of the alarm
The alarm may be triggered in the fol- lowing situations:
(Stopping the alarm deactivates the
alarm system.)
●The doors are unlocked using the key
or the mechanical key.
●A person inside the vehicle opens a
door or hood, or unlocks the vehicle.
Alarm*
The alarm uses light and
sound to give an alert when an
intrusion is detected.
The alarm is triggered in the
following situations when the
alarm is set:
A locked door is unlocked or
opened in any way other than
using the entry function (if
equipped) or wireless remote
control. (The doors will lock
again automatically.)
The hood is opened.
Setting/deactivating/stop-
ping the alarm system
Page 88 of 758
862-1. Instrument cluster
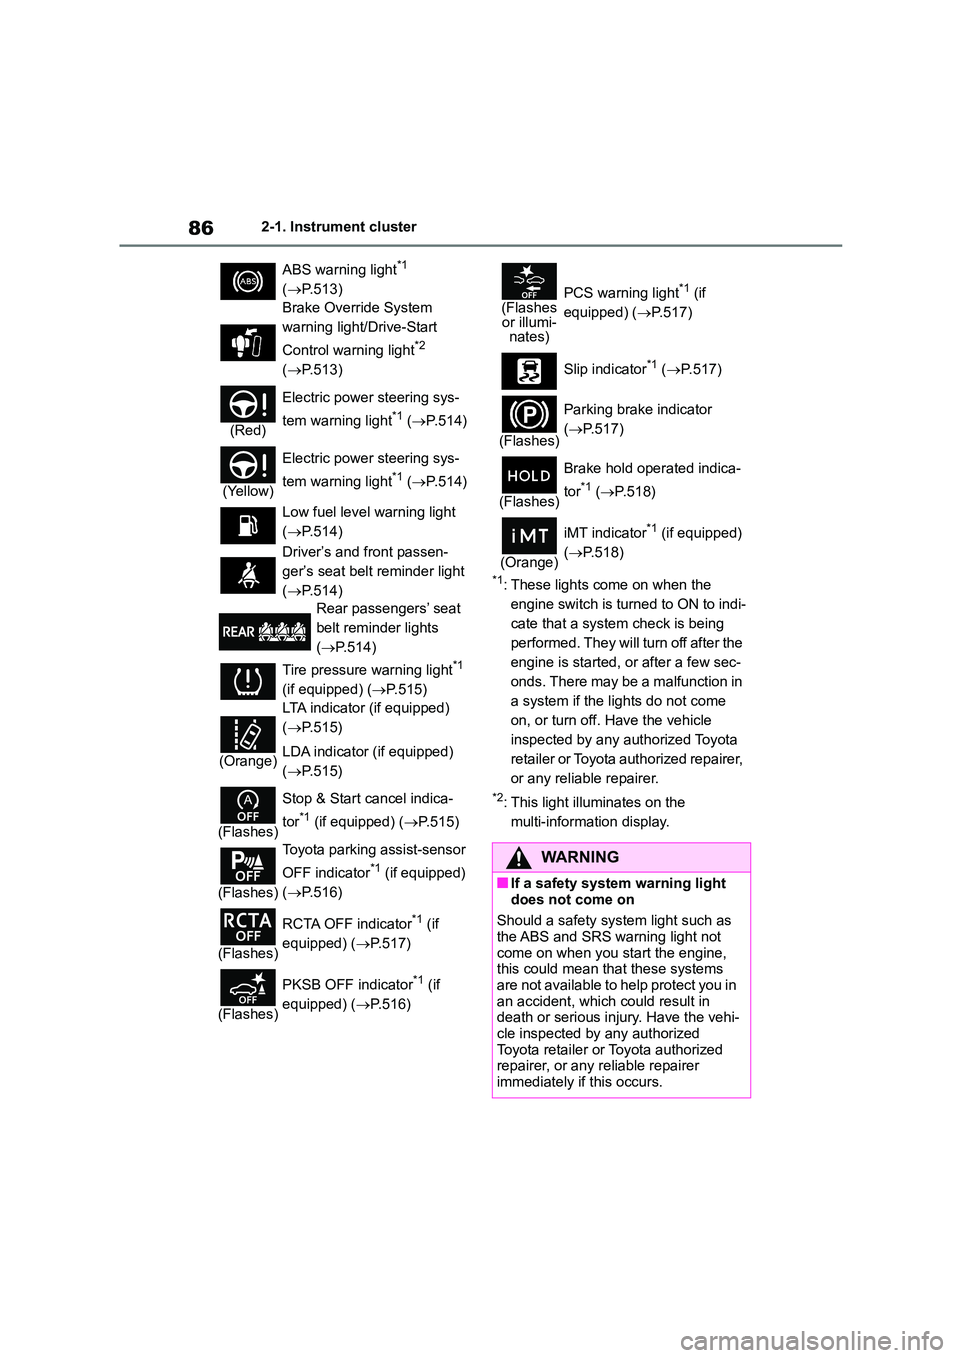
*1: These lights come on when the
engine switch is turned to ON to indi-
cate that a system check is being
performed. They will turn off after the
engine is started, or after a few sec-
onds. There may be a malfunction in
a system if the lights do not come
on, or turn off. Have the vehicle
inspected by any authorized Toyota
retailer or Toyota authorized repairer,
or any reliable repairer.
*2: This light illuminates on the
multi-information display.
ABS warning light*1
( P.513)
Brake Override System
warning light/Drive-Start
Control warning light*2
( P.513)
(Red)
Electric power steering sys-
tem warning light*1 ( P.514)
(Yellow)
Electric power steering sys-
tem warning light*1 ( P.514)
Low fuel level warning light
( P.514)
Driver’s and front passen-
ger’s seat belt reminder light
( P.514)
Rear passengers’ seat
belt reminder lights
( P.514)
Tire pressure warning light*1
(if equipped) ( P.515)
(Orange)
LTA indicator (if equipped)
( P.515)
LDA indicator (if equipped)
( P.515)
(Flashes)
Stop & Start cancel indica-
tor*1 (if equipped) ( P.515)
(Flashes)
Toyota parking assist-sensor
OFF indicator*1 (if equipped)
( P.516)
(Flashes)
RCTA OFF indicator*1 (if
equipped) ( P.517)
(Flashes)
PKSB OFF indicator*1 (if
equipped) ( P.516)
(Flashes or illumi-nates)
PCS warning light*1 (if
equipped) ( P.517)
Slip indicator*1 ( P.517)
(Flashes)
Parking brake indicator
( P.517)
(Flashes)
Brake hold operated indica-
tor*1 ( P.518)
(Orange)
iMT indicator*1 (if equipped)
( P.518)
WA R N I N G
■If a safety system warning light
does not come on
Should a safety syst em light such as the ABS and SRS warning light not
come on when you start the engine,
this could mean that these systems are not available to help protect you in
an accident, which could result in
death or serious injury. Have the vehi-
cle inspected by any authorized Toyota retailer or Toyota authorized
repairer, or any reliable repairer
immediately if this occurs.
Page 89 of 758
87
2
2-1. Instrument cluster
Vehicle status information and indicators
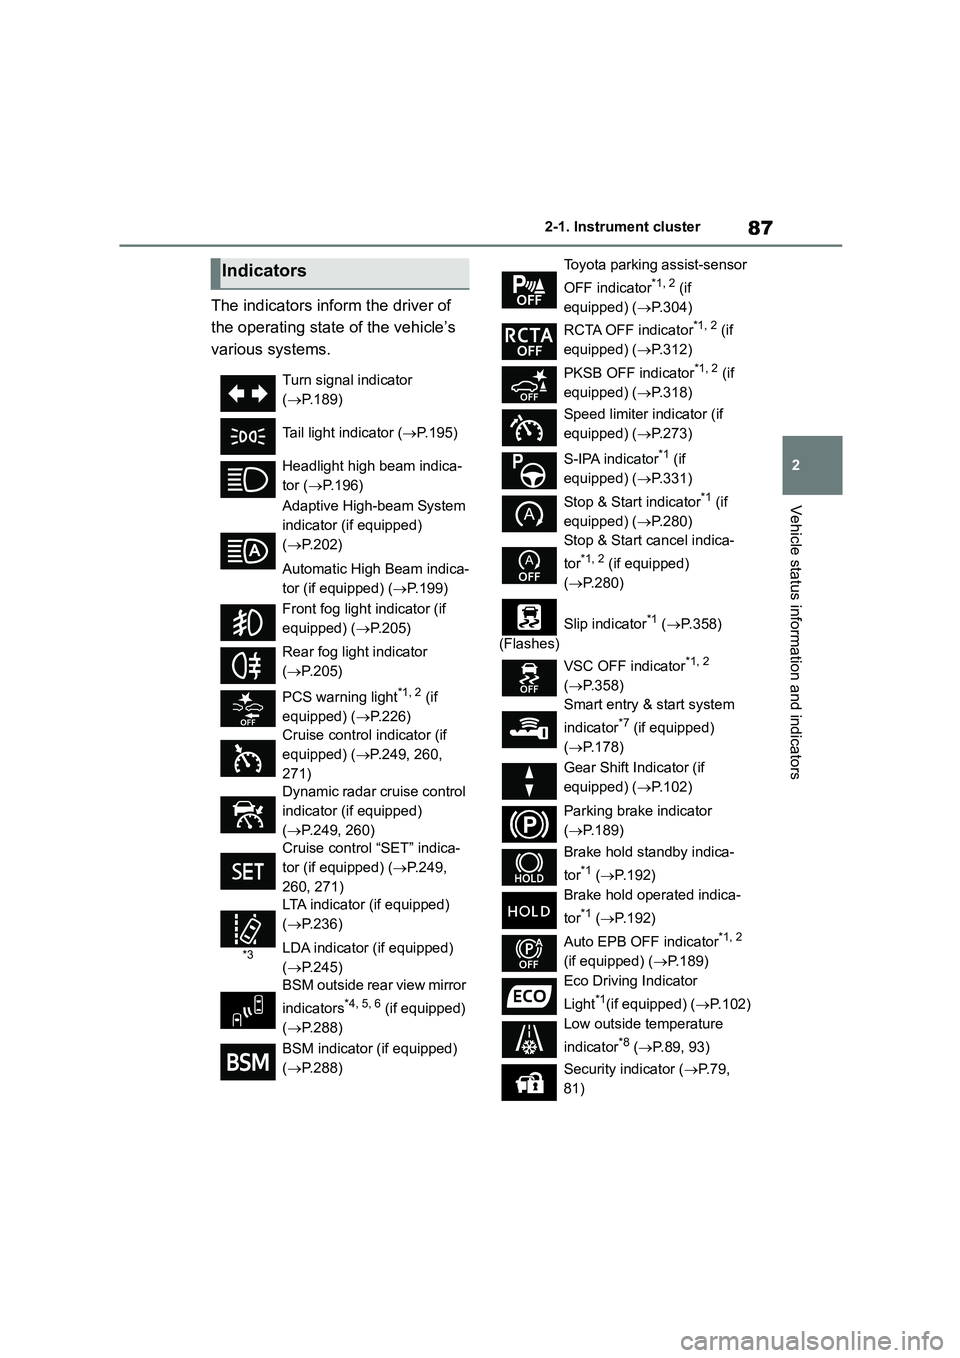
The indicators inform the driver of
the operating state of the vehicle’s
various systems.
Indicators
Turn signal indicator
( P.189)
Tail light indicator ( P.195)
Headlight high beam indica-
tor ( P.196)
Adaptive High-beam System
indicator (if equipped)
( P.202)
Automatic High Beam indica-
tor (if equipped) ( P.199)
Front fog light indicator (if
equipped) ( P.205)
Rear fog light indicator
( P.205)
PCS warning light*1, 2 (if
equipped) ( P.226)
Cruise control indicator (if
equipped) ( P.249, 260,
271)
Dynamic radar cruise control
indicator (if equipped)
( P.249, 260)
Cruise control “SET” indica-
tor (if equipped) ( P.249,
260, 271)
*3
LTA indicator (if equipped)
( P.236)
LDA indicator (if equipped)
( P.245)
BSM outside rear view mirror
indicators*4, 5, 6 (if equipped)
( P.288)
BSM indicator (if equipped)
( P.288)
Toyota parking assist-sensor
OFF indicator*1, 2 (if
equipped) ( P.304)
RCTA OFF indicator*1, 2 (if
equipped) ( P.312)
PKSB OFF indicator*1, 2 (if
equipped) ( P.318)
Speed limiter indicator (if
equipped) ( P.273)
S-IPA indicator*1 (if
equipped) ( P.331)
Stop & Start indicator*1 (if
equipped) ( P.280)
Stop & Start cancel indica-
tor*1, 2 (if equipped)
( P.280)
(Flashes)
Slip indicator*1 ( P.358)
VSC OFF indicator*1, 2
( P.358)
Smart entry & start system
indicator*7 (if equipped)
( P.178)
Gear Shift Indicator (if
equipped) ( P.102)
Parking brake indicator
( P.189)
Brake hold standby indica-
tor*1 ( P.192)
Brake hold operated indica-
tor*1 ( P.192)
Auto EPB OFF indicator*1, 2
(if equipped) ( P.189)
Eco Driving Indicator
Light*1(if equipped) ( P.102)
Low outside temperature
indicator*8 ( P.89, 93)
Security indicator ( P. 7 9 ,
81)
Page 104 of 758
1022-1. Instrument cluster
be updated.
When refueling, turn the engine switch
off. If the vehicle is refueled without
turning the engine switch off, the dis-
play may not be updated.
The average fuel economy display
can be changed in . ( P.104)
Average fuel economy (after
start)
Displays the average fuel consumption
since engine start.
Average fuel economy (after
refuel)
Displays the average fuel consumption
since the vehicle was refueled.
■Eco Driving Indicator/Driving
range (if equipped)
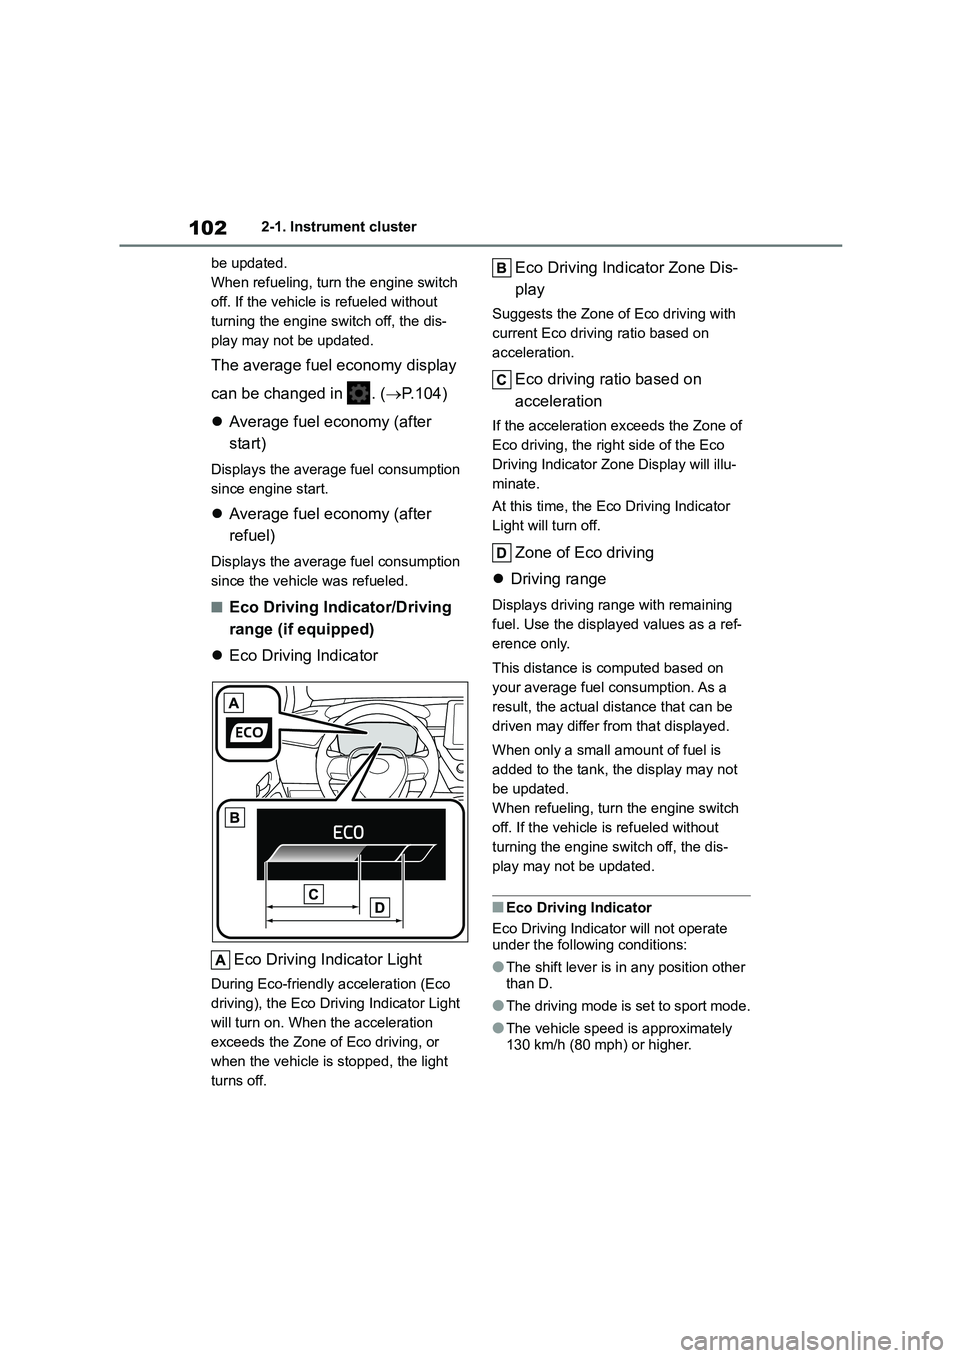
Eco Driving Indicator
Eco Driving Indicator Light
During Eco-friendly acceleration (Eco
driving), the Eco Driving Indicator Light
will turn on. When the acceleration
exceeds the Zone of Eco driving, or
when the vehicle is stopped, the light
turns off.
Eco Driving Indicator Zone Dis-
play
Suggests the Zone of Eco driving with
current Eco driving ratio based on
acceleration.
Eco driving ratio based on
acceleration
If the acceleration exceeds the Zone of
Eco driving, the right side of the Eco
Driving Indicator Zone Display will illu-
minate.
At this time, the Eco Driving Indicator
Light will turn off.
Zone of Eco driving
Driving range
Displays driving range with remaining
fuel. Use the displayed values as a ref-
erence only.
This distance is computed based on
your average fuel consumption. As a
result, the actual distance that can be
driven may differ from that displayed.
When only a small amount of fuel is
added to the tank, the display may not
be updated.
When refueling, turn the engine switch
off. If the vehicle is refueled without
turning the engine switch off, the dis-
play may not be updated.
■Eco Driving Indicator
Eco Driving Indicator will not operate
under the following conditions:
●The shift lever is in any position other
than D.
●The driving mode is set to sport mode.
●The vehicle speed is approximately 130 km/h (80 mph) or higher.
Page 107 of 758
105
2
2-1. Instrument cluster
Vehicle status information and indicators
■Vehicle functions and settings
that can be changed
P. 5 7 7
■Suspension of the settings display
●Some settings cannot be changed
while driving. When changing set-
tings, park the vehicle in a safe place.
●If a warning message is displayed,
operation of the settings display will be suspended.
Stop & Start system operation
time (after start)/status notifica-
tion
Displays the current amount of time the
engine has been stopped by the opera-
tion of the Stop & Start system.
Also shows the status of the Stop &
Start system with a pop-up display.
( P.285)
Stop & Start system settings
The length of time of the Stop & Start
system will operate when the “A/C”
switch of the air co nditioning system is
on can be set to 2 different levels in
of the multi-information display.
( P.285)
WA R N I N G
■Cautions during setting up the
display
If the engine is running when chang- ing the display settings, ensure that
the vehicle is parked in a place with
adequate ventilation. In a closed area such as a garage, exhaust gases
including harmful carbon monoxide
(CO) may collect and enter the vehi- cle. This may lead to death or a seri-
ous health hazard.
NOTICE
■During setting up the display
To prevent battery discharge, ensure
that the engine is running while set-
ting up the display features.
Stop & Start system infor-
mation (if equipped)
Page 117 of 758
115
3
3-1. Key information
Before driving
Vehicles with a smart entry & start
system
●The standard battery life is 1 to 2
years.
●If the battery becomes low, an alarm
will sound in the cabin and a message will be shown on the multi-information
display when the engine is stopped.
●To reduce key battery depletion when
the electronic key is to not be used for
long periods of time, set the electronic key to the batter y-saving mode.
( P.138)
●As the electronic key always receives
radio waves, the battery will become
depleted even if the electronic key is not used. The following symptoms
indicate that the electronic key battery
may be depleted. Replace the battery when necessary. ( P.490)
• The smart entry & start system or the
wireless remote control does not oper- ate.
• The detection area becomes smaller.
• The LED indicator on the key surface does not turn on.
●To avoid serious deterioration, do not leave the electronic key within 1 m (3
ft.) of the following electrical appli-
ances that produce a magnetic field: •TVs
• Personal computers
• Cellular phones, cordless phones and battery chargers
• Recharging cellular phones or cord-
less phones • Table lamps
• Induction cookers
●If the electronic key is near the vehicle
for longer than necessary, even if the
smart entry & start system is not oper-
ated, the key battery may become depleted faster than normal.
■Replacing the battery
P.490
■If “New Key Registered Contact
Your Dealer if You Did Not Register a New Key” is shown on the
multi-information display (vehicles
with a smart entry & start system)
This message will be displayed each
time the driver’s door is opened when
the doors are unlocked from the outside for approximately 10 days after a new
electronic key has been registered.
If this message is displayed but you have not had a new electronic key regis-
tered, ask any authorized Toyota retailer
or Toyota authorized repairer, or any reli- able repairer to check if an unknown
electronic key (other than those in your
possession) has been registered.
■If a wrong key is used
The key cylinder rotates freely, isolated
from the internal mechanism.
NOTICE
■To prevent key damage
●Do not drop the keys, subject them to strong shocks or bend them.
●Do not expose the keys to high temperatures for long periods of
time.
●Do not get the keys wet or wash
them in an ultrasonic washer etc.
●Vehicles with a smart entry & start
system: Do not attach metallic or
magnetic materials to the keys or place the keys close to such materi-
als.
●Do not disassemble the keys.
●Do not attach a sticker or anything else to the surface of the key.
●Vehicles with a smart entry & start system: Do not place the keys near
objects that produce magnetic
fields, such as TVs, audio systems and induction cookers.
Page 123 of 758

121
3
3-2. Opening, closing and locking the doors
Before driving
30 seconds after is pressed, the
doors will be locked again and the alarm will automatically be set.)
In case that the alarm is triggered,
immediately stop the alarm. ( P. 8 1 )
■Operation signals
Vehicles without a smart entry & start
system
The emergency flashers flash to indicate
that the doors have been locked/unlocked using the wireless
remote control. (Locked: Once;
Unlocked: Twice)
Vehicles with a smart entry & start
system
The emergency flashers flash to indicate
that the doors have been locked/unlocked using the entry function
or wireless remote control. (Locked:
Once; Unlocked: Twice)
A buzzer sounds to indicate that the win-
dows and panoramic moon roof*are operating.*: If equipped
■Security feature
Vehicles without a smart entry & start system
If a door is not opened within approxi- mately 30 seconds after the vehicle is
unlocked using the wireless remote con-
trol, the security feature automatically locks the vehicle again.
Vehicles with a smart entry & start system
If a door is not opened within approxi-
mately 30 seconds after the vehicle is unlocked using the entry function or
wireless remote contro l, the security fea-
ture automatically locks the vehicle again.
■When the door cannot be locked by
the lock sensor on the surface of
the front door handle (vehicles with a smart entry & start system)
If the doors cannot be locked by touch-
ing the lock sensor with a finger, touch
the lock sensor with the palm of your
hand.
If you are wearing gloves, remove them.
■Door lock buzzer (vehicles with a smart entry & start system)
If an attempt to lock the doors using the
entry function or wireless remote control is made when a door is not fully closed,
a buzzer will sound continuously for 5
seconds. Fully close the door to stop the buzzer, and lock the doors again.
■Alarm (if equipped)
Locking the doors will set the alarm sys-
tem. ( P. 8 1 )
■Conditions affecting the operation of the smart entry & start system (if
equipped) or wireless remote con-
trol
Vehicles without a smart entry & start
system
P. 1 1 7
Vehicles with a smart entry & start
system
P. 1 3 8
■If the smart entry & start system (if
equipped) or the wireless remote
control does not operate properly
Vehicles without a smart entry & start
system
Replace the key battery with a new one
if it is depleted. ( P.490)
Vehicles with a smart entry & start
system
Use the mechanical key to lock and
unlock the doors. ( P.555)
Replace the key battery with a new one
if it is depleted. ( P.490)
Page 131 of 758
129
3
3-2. Opening, closing and locking the doors
Before driving
have been locked. If the switch is
pressed while the power back door is
closing, the operation will stop.
■Closing the back door using
the back door handle
Lower the back door using the back
door handle, then a buzzer sounds
and the back door automatically
closes.
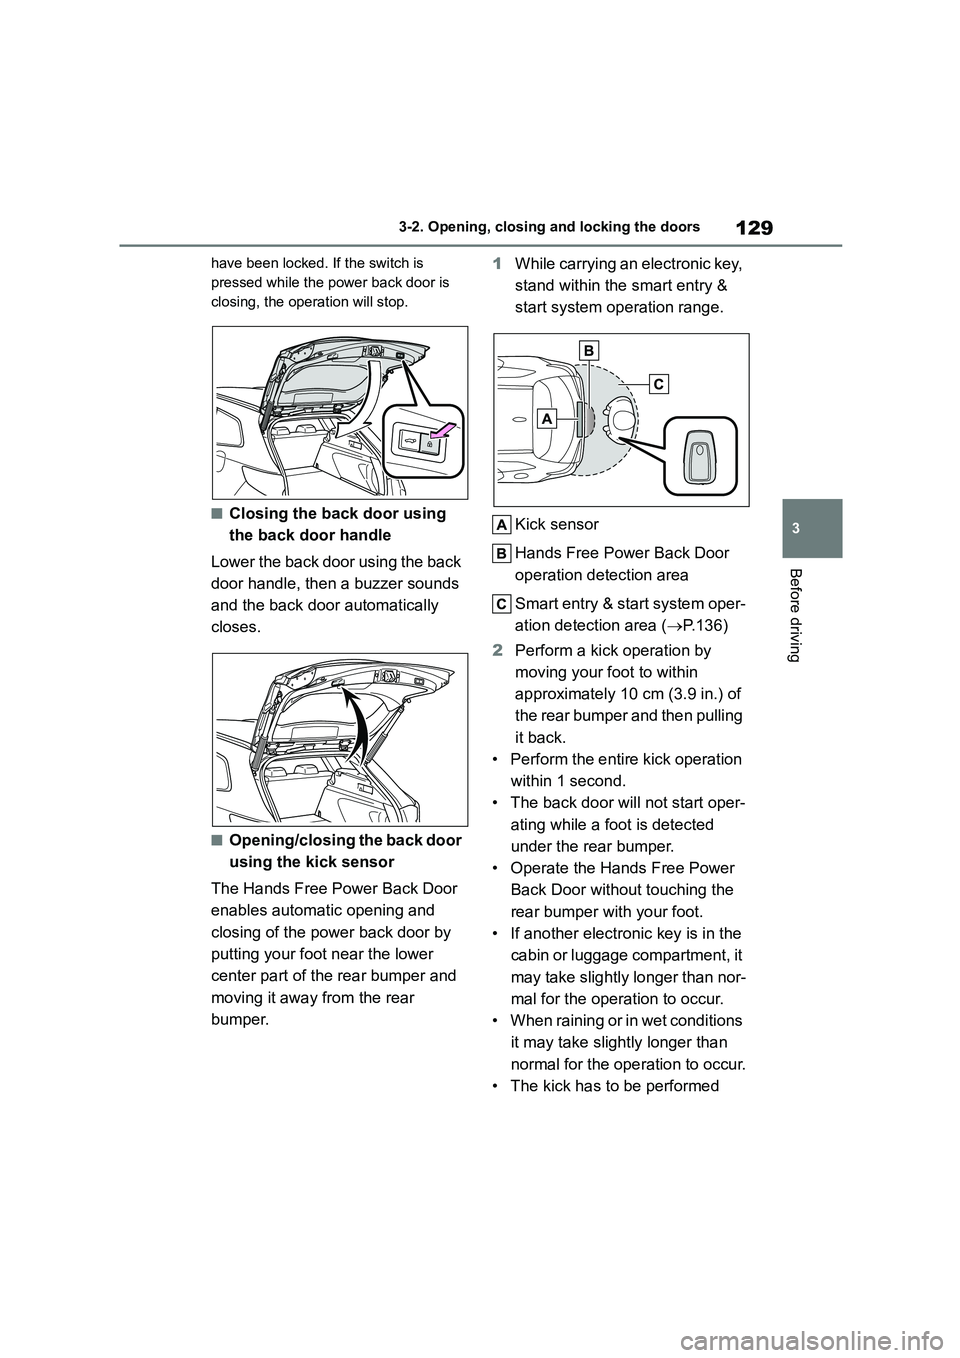
■Opening/closing the back door
using the kick sensor
The Hands Free Power Back Door
enables automatic opening and
closing of the power back door by
putting your foot near the lower
center part of the rear bumper and
moving it away from the rear
bumper.
1 While carrying an electronic key,
stand within the smart entry &
start system operation range.
Kick sensor
Hands Free Power Back Door
operation detection area
Smart entry & start system oper-
ation detection area ( P.136)
2 Perform a kick operation by
moving your foot to within
approximately 10 cm (3.9 in.) of
the rear bu mper and then pulling
it back.
• Perform the entire kick operation
within 1 second.
• The back door will not start oper-
ating while a foot is detected
under the rear bumper.
• Operate the Hands Free Power
Back Door without touching the
rear bumper with your foot.
• If another electronic key is in the
cabin or luggage compartment, it
may take slightly longer than nor-
mal for the operation to occur.
• When raining or in wet conditions
it may take slightly longer than
normal for the operation to occur.
• The kick has to be performed
Page 135 of 758
133
3
3-2. Opening, closing and locking the doors
Before driving
WA R N I N G
●On an incline, the back door may
suddenly shut after it is opened.
Make sure the back door is fully open and secure.
●In the following situations, the power back door may detect an
abnormality and automatic opera-
tion may be stopped. In this case,
the back door has to be operated manually. Take extra care when on
an incline, as the back door may
open or close abruptly.
• When the back door contacts an
obstacle
• When the battery voltage suddenly
drops, such as when the engine switch is turned to ON or the engine
is started during an automatic oper-
ation
●If a heavy object is attached to the
back door, the power back door may not operate, causing a mal-
function, or the power back door
may suddenly shut again after being opened, causing someone’s
hands, head or neck to be caught
and injured. When installing an accessory part to the back door,
ask any authorized Toyota retailer
or Toyota authorized repairer, or any reliable repairer for details.
■Jam protection function
Observe the following precautions.
Failure to do so may cause death or
serious injury.
●Never use any part of your body to
intentionally activate the jam pro- tection function.
●The jam protection function may not work if something gets caught just
before the back door fully closes.
Be careful not to catch fingers caught or anything else.
●The jam protection function may not work depending on the shape of the
object that is caught. Be careful not
to catch fingers or anything else.
■Kick sensor
Observe the following precautions when operating the power back door.
Failure to do so may cause death or
serious injury.
●Check the safety of the surrounding
area to make sure there are no obstacles or anything that could
cause any of your belongings to get
caught.
●When putting your foot near the
lower center part of the rear bumper and moving it from the rear bumper,
be careful not to touch the exhaust
pipes until they have cooled down sufficiently, as touching hot exhaust
pipes can cause burns.
●Do not operate the kick sensor if
there is little space under the rear
bumper.
NOTICE
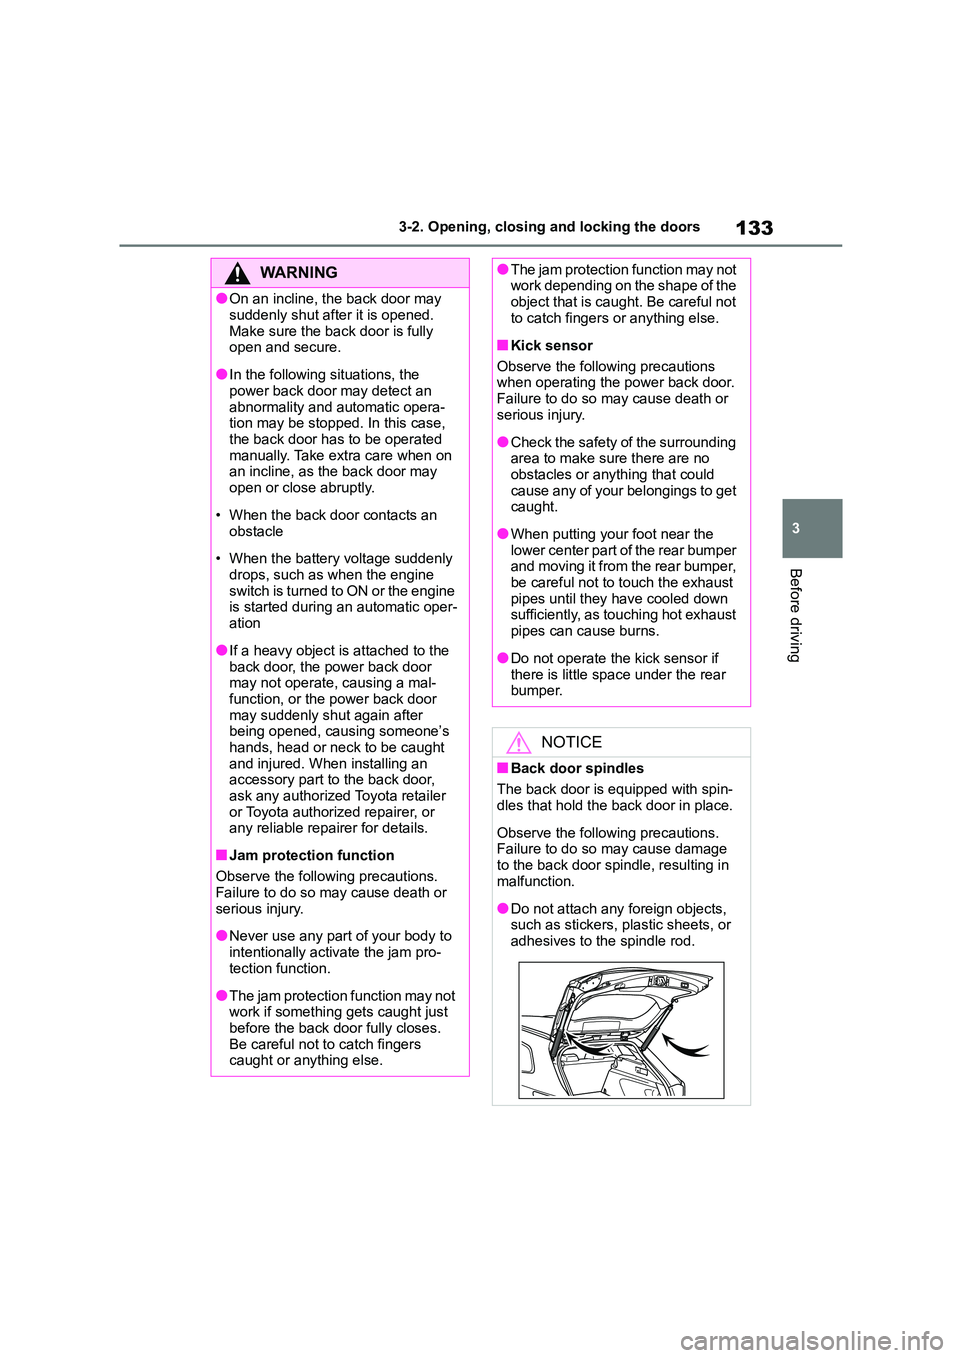
■Back door spindles
The back door is equipped with spin-
dles that hold the back door in place.
Observe the following precautions.
Failure to do so may cause damage
to the back door spindle, resulting in malfunction.
●Do not attach any foreign objects, such as stickers, plastic sheets, or
adhesives to the spindle rod.
Page 140 of 758
1383-2. Opening, closing and locking the doors
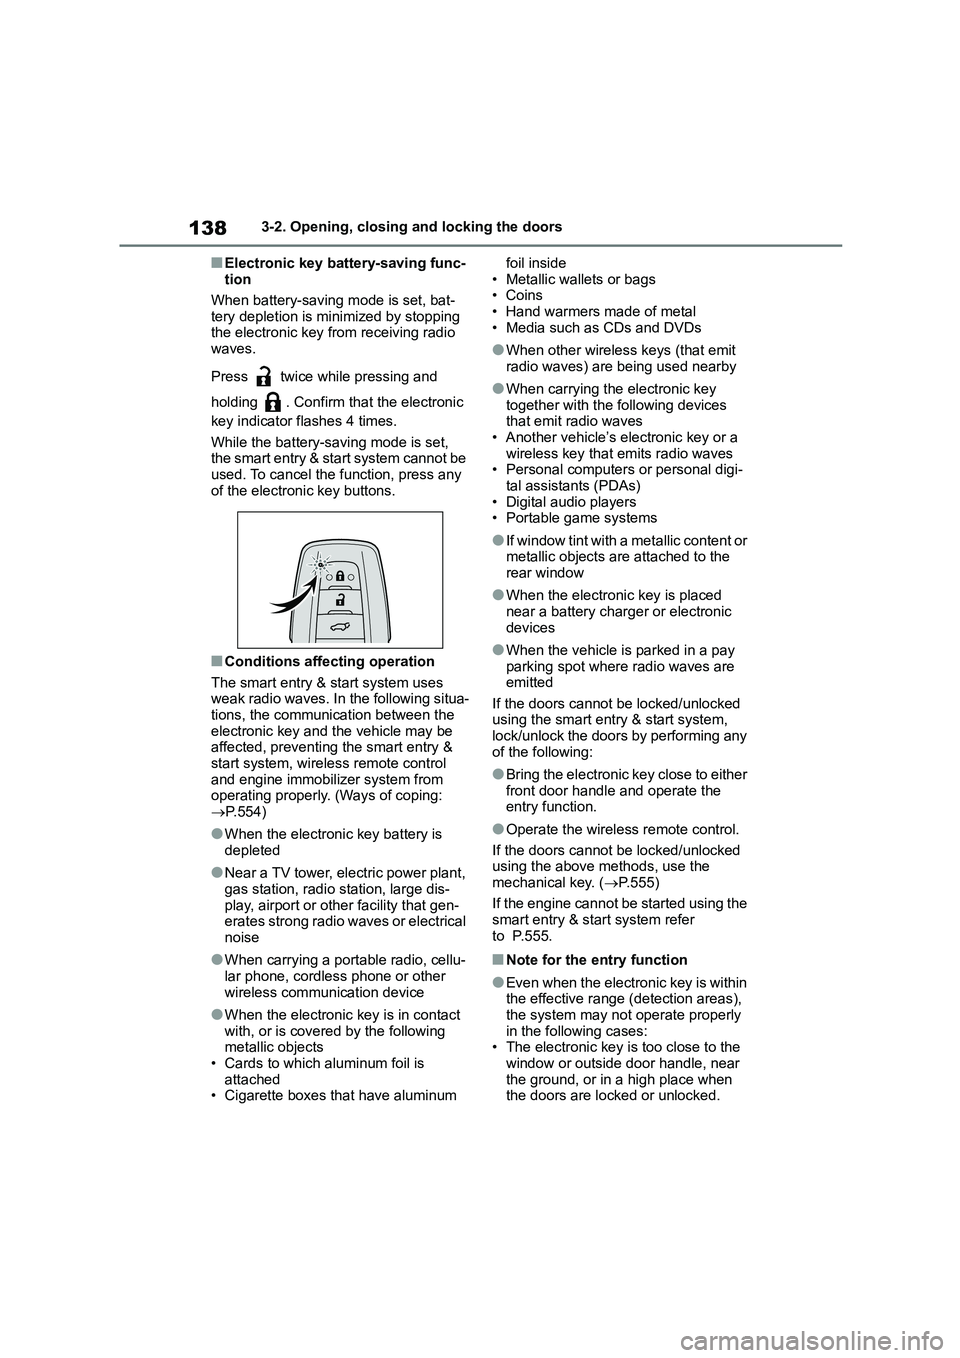
■Electronic key battery-saving func-
tion
When battery-saving mode is set, bat-
tery depletion is minimized by stopping
the electronic key from receiving radio waves.
Press twice while pressing and
holding . Confirm that the electronic
key indicator flashes 4 times.
While the battery-saving mode is set,
the smart entry & start system cannot be used. To cancel the function, press any
of the electronic key buttons.
■Conditions affecting operation
The smart entry & start system uses
weak radio waves. In the following situa- tions, the communication between the
electronic key and the vehicle may be
affected, preventing the smart entry & start system, wireless remote control
and engine immobilizer system from
operating properly. (Ways of coping: P.554)
●When the electronic key battery is depleted
●Near a TV tower, electric power plant, gas station, radio station, large dis-
play, airport or other facility that gen-
erates strong radio waves or electrical
noise
●When carrying a portable radio, cellu-
lar phone, cordless phone or other wireless communication device
●When the electronic key is in contact with, or is covered by the following
metallic objects
• Cards to which aluminum foil is attached
• Cigarette boxes that have aluminum
foil inside
• Metallic wallets or bags •Coins
• Hand warmers made of metal
• Media such as CDs and DVDs
●When other wirele ss keys (that emit
radio waves) are being used nearby
●When carrying the electronic key
together with the following devices that emit radio waves
• Another vehicle’s electronic key or a
wireless key that emits radio waves • Personal computers or personal digi-
tal assistants (PDAs)
• Digital audio players • Portable game systems
●If window tint with a metallic content or metallic objects are attached to the
rear window
●When the electronic key is placed
near a battery charger or electronic
devices
●When the vehicle is parked in a pay
parking spot where radio waves are emitted
If the doors cannot be locked/unlocked
using the smart entry & start system, lock/unlock the doors by performing any
of the following:
●Bring the electronic key close to either
front door handle and operate the
entry function.
●Operate the wireless remote control.
If the doors cannot be locked/unlocked using the above methods, use the
mechanical key. ( P.555)
If the engine cannot be started using the smart entry & start system refer
to P.555.
■Note for the entry function
●Even when the electronic key is within the effective range (detection areas),
the system may not operate properly
in the following cases: • The electronic key is too close to the
window or outside door handle, near
the ground, or in a high place when the doors are locked or unlocked.