sensor TOYOTA COROLLA HATCHBACK 2022 Owners Manual (in English)
[x] Cancel search | Manufacturer: TOYOTA, Model Year: 2022, Model line: COROLLA HATCHBACK, Model: TOYOTA COROLLA HATCHBACK 2022Pages: 758, PDF Size: 155.26 MB
Page 5 of 758
3TABLE OF CONTENTS
1
6
5
4
3
2
9
8
7
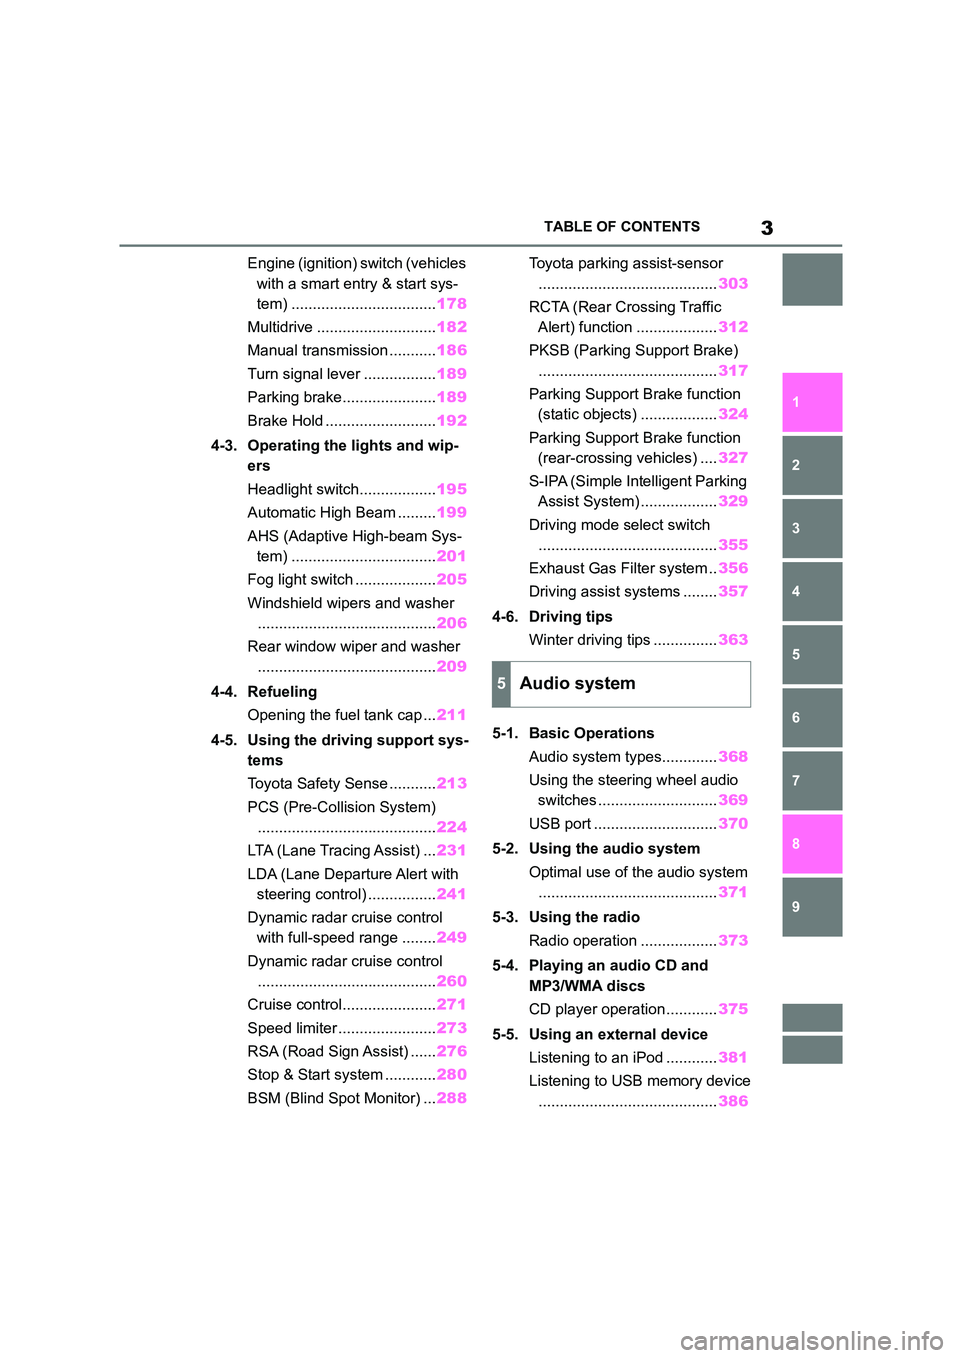
Engine (ignition) switch (vehicles
with a smart entry & start sys-
tem) .................................. 178
Multidrive ............................ 182
Manual transmission ........... 186
Turn signal lever ................. 189
Parking brake...................... 189
Brake Hold .......................... 192
4-3. Operating the lights and wip-
ers
Headlight switch.................. 195
Automatic High Beam ......... 199
AHS (Adaptive High-beam Sys-
tem) .................................. 201
Fog light switch ................... 205
Windshield wipers and washer
.......................................... 206
Rear window wiper and washer
.......................................... 209
4-4. Refueling
Opening the fuel tank cap ... 211
4-5. Using the driving support sys-
tems
Toyota Safety Sense ........... 213
PCS (Pre-Collision System)
.......................................... 224
LTA (Lane Tracing Assist) ... 231
LDA (Lane Departure Alert with
steering control) ................ 241
Dynamic radar cruise control
with full-speed range ........ 249
Dynamic radar cruise control
.......................................... 260
Cruise control...................... 271
Speed limiter ....................... 273
RSA (Road Sign Assist) ...... 276
Stop & Start system ............ 280
BSM (Blind Spot Monitor) ... 288
Toyota parking assist-sensor
.......................................... 303
RCTA (Rear Crossing Traffic
Alert) function ................... 312
PKSB (Parking Support Brake)
.......................................... 317
Parking Support Brake function
(static objects) .................. 324
Parking Support Brake function
(rear-crossing vehicles) .... 327
S-IPA (Simple Intelligent Parking
Assist System) .................. 329
Driving mode select switch
.......................................... 355
Exhaust Gas Filter system .. 356
Driving assist systems ........ 357
4-6. Driving tips
Winter driving tips ............... 363
5-1. Basic Operations
Audio system types............. 368
Using the steering wheel audio
switches ............................ 369
USB port ............................. 370
5-2. Using the audio system
Optimal use of the audio system
..........................................371
5-3. Using the radio
Radio operation .................. 373
5-4. Playing an audio CD and
MP3/WMA discs
CD player operation ............ 375
5-5. Using an external device
Listening to an iPod ............ 381
Listening to USB memory device
.......................................... 386
5Audio system
Page 40 of 758
381-1. For safe use
Can help protect primarily the head of occupants in the outer seats
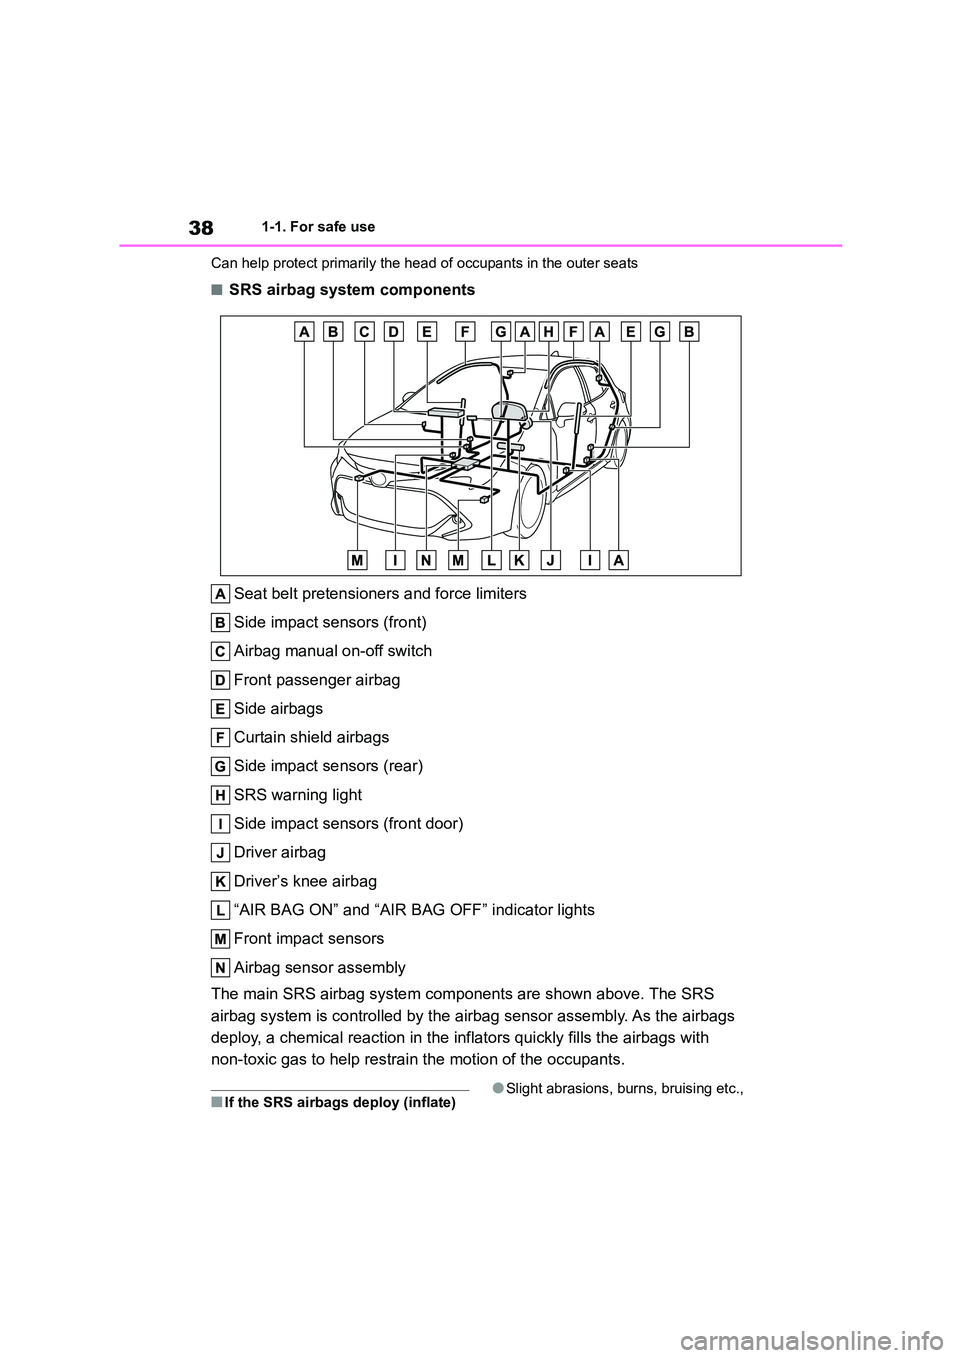
■SRS airbag system components
Seat belt pretensioners and force limiters
Side impact sensors (front)
Airbag manual on-off switch
Front passenger airbag
Side airbags
Curtain shield airbags
Side impact sensors (rear)
SRS warning light
Side impact sensors (front door)
Driver airbag
Driver’s knee airbag
“AIR BAG ON” and “AIR BAG OFF” indicator lights
Front impact sensors
Airbag sensor assembly
The main SRS airbag system components are shown above. The SRS
airbag system is controlled by the airbag sensor assembly. As the airbags
deploy, a chemical reaction in the inflators quickly fills the airbags with
non-toxic gas to help restrain the motion of the occupants.
■If the SRS airbags deploy (inflate)●Slight abrasions, burns, bruising etc.,
Page 75 of 758
73
1
1-3. Emergency assistance
For safety and security
2 Server activates the service in the DCM and defines which vehicle data
to collect.
3 Defined vehicle data is collected by the DCM.
4 Data is shared with the server.
5 Data is stored in the server.
6 Data is processed in the server for fulfilling the service.
7 Processed data is presented to the customer.
For a list of eligible service please visit the Toyota Customer portal.
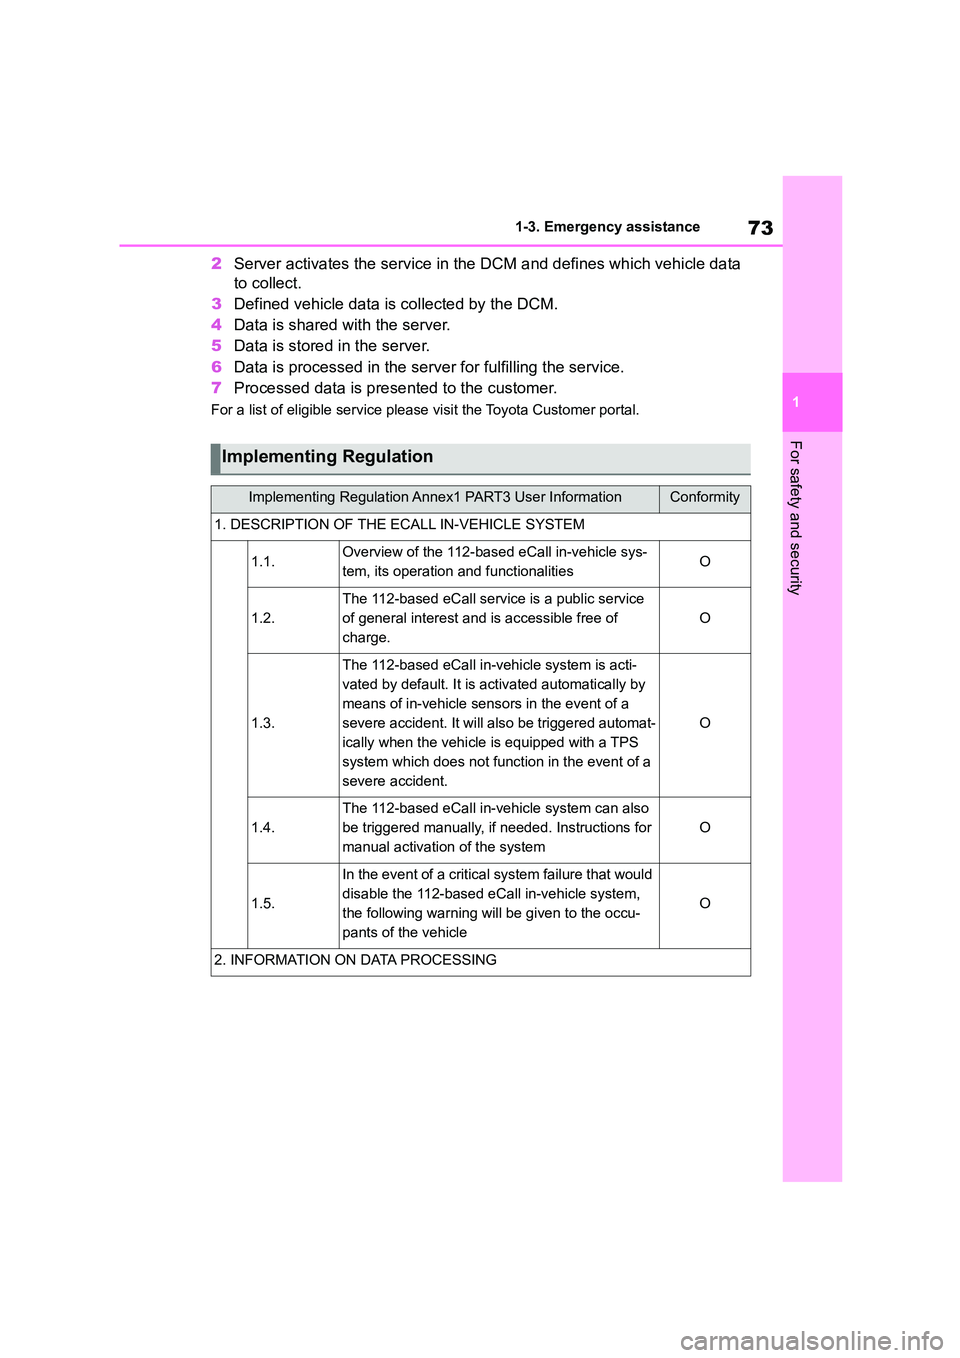
Implementing Regulation
Implementing Regulation Annex1 PART3 User InformationConformity
1. DESCRIPTION OF THE ECALL IN-VEHICLE SYSTEM
1.1.Overview of the 112-based eCall in-vehicle sys-
tem, its operation and functionalitiesO
1.2.
The 112-based eCall service is a public service
of general interest and is accessible free of
charge.
O
1.3.
The 112-based eCall in-vehicle system is acti-
vated by default. It is activated automatically by
means of in-vehicle sensors in the event of a
severe accident. It will also be triggered automat-
ically when the vehicle is equipped with a TPS
system which does not function in the event of a
severe accident.
O
1.4.
The 112-based eCall in-vehicle system can also
be triggered manually, if needed. Instructions for
manual activation of the system
O
1.5.
In the event of a critical system failure that would
disable the 112-based eCall in-vehicle system,
the following warning will be given to the occu-
pants of the vehicle
O
2. INFORMATION ON DATA PROCESSING
Page 82 of 758
801-4. Theft deterrent system
*: If equipped
■Setting
Turn the engine switch off, have all
the passengers exit the vehicle and
ensure that all the doors are closed.
Using the entry function (if
equipped): Touch the sensor area
on the outside door handle twice
within 5 seconds.
Using the wireless remote control:
Press twice within 5 seconds.
■Canceling
Using the entry function (if
equipped): Hold the outside door
handle, press the back door opener
switch or move your foot under the
center of the rear bumper (vehicles
with a power back door).
Using the wireless remote control:
Press .
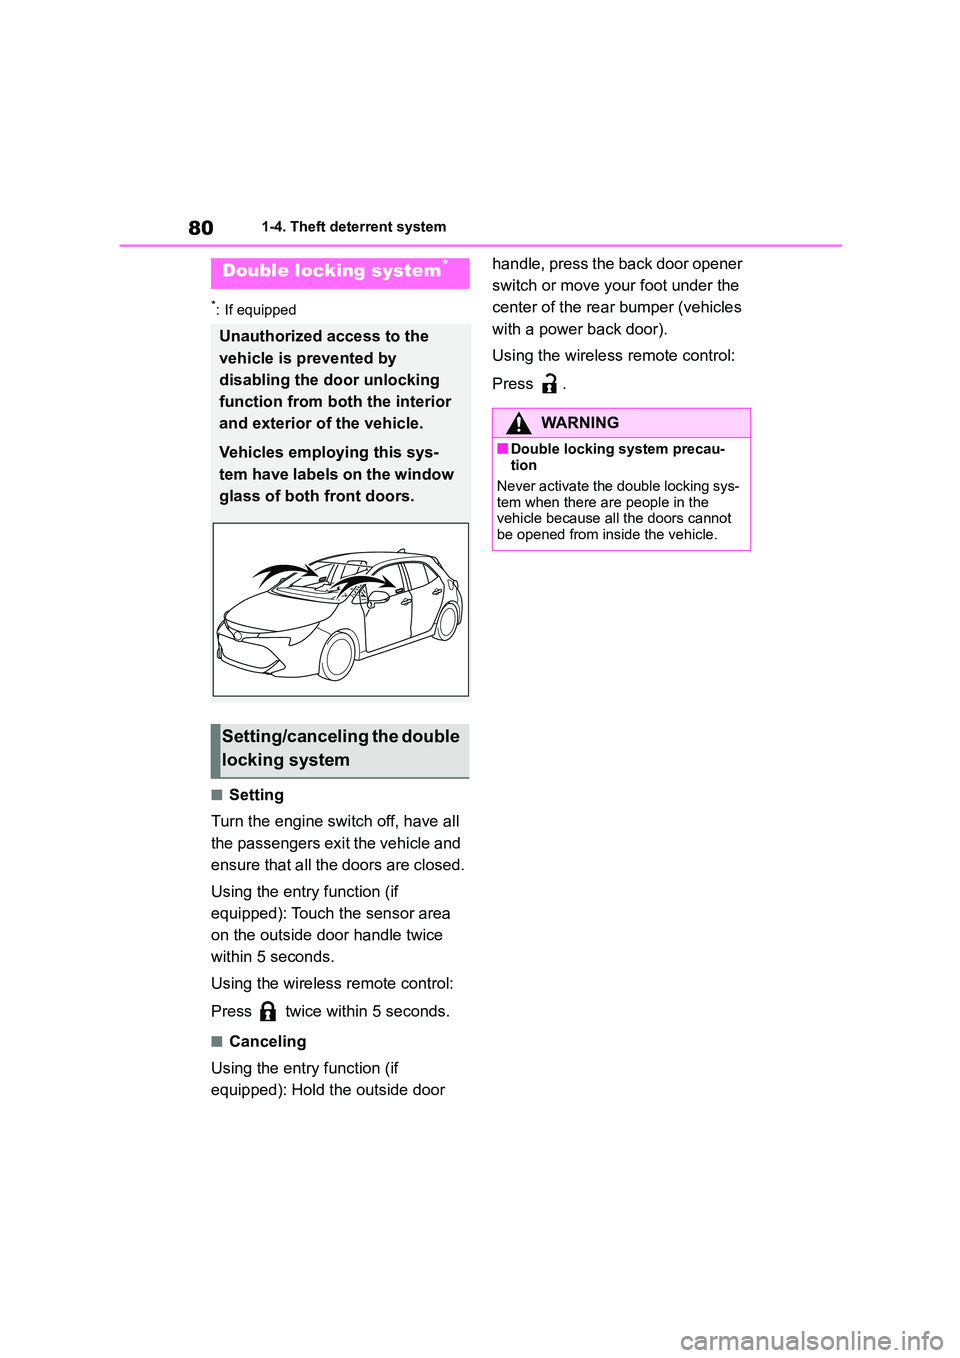
Double locking system*
Unauthorized access to the
vehicle is prevented by
disabling the door unlocking
function from both the interior
and exterior of the vehicle.
Vehicles employing this sys-
tem have labels on the window
glass of both front doors.
Setting/canceling the double
locking system
WA R N I N G
■Double locking system precau- tion
Never activate the double locking sys-
tem when there are people in the vehicle because all the doors cannot
be opened from inside the vehicle.
Page 88 of 758
862-1. Instrument cluster
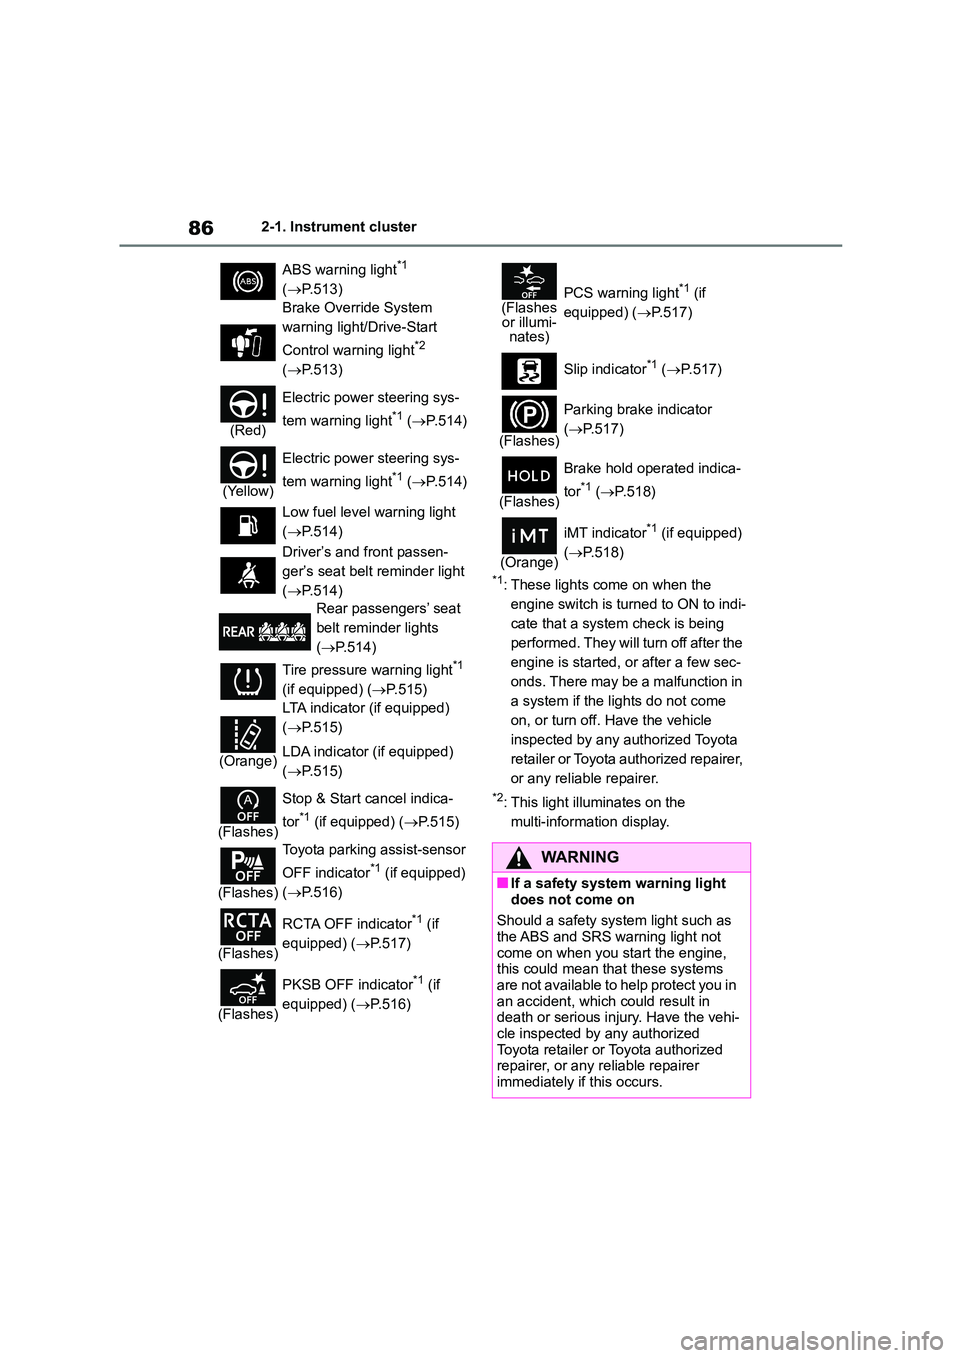
*1: These lights come on when the
engine switch is turned to ON to indi-
cate that a system check is being
performed. They will turn off after the
engine is started, or after a few sec-
onds. There may be a malfunction in
a system if the lights do not come
on, or turn off. Have the vehicle
inspected by any authorized Toyota
retailer or Toyota authorized repairer,
or any reliable repairer.
*2: This light illuminates on the
multi-information display.
ABS warning light*1
( P.513)
Brake Override System
warning light/Drive-Start
Control warning light*2
( P.513)
(Red)
Electric power steering sys-
tem warning light*1 ( P.514)
(Yellow)
Electric power steering sys-
tem warning light*1 ( P.514)
Low fuel level warning light
( P.514)
Driver’s and front passen-
ger’s seat belt reminder light
( P.514)
Rear passengers’ seat
belt reminder lights
( P.514)
Tire pressure warning light*1
(if equipped) ( P.515)
(Orange)
LTA indicator (if equipped)
( P.515)
LDA indicator (if equipped)
( P.515)
(Flashes)
Stop & Start cancel indica-
tor*1 (if equipped) ( P.515)
(Flashes)
Toyota parking assist-sensor
OFF indicator*1 (if equipped)
( P.516)
(Flashes)
RCTA OFF indicator*1 (if
equipped) ( P.517)
(Flashes)
PKSB OFF indicator*1 (if
equipped) ( P.516)
(Flashes or illumi-nates)
PCS warning light*1 (if
equipped) ( P.517)
Slip indicator*1 ( P.517)
(Flashes)
Parking brake indicator
( P.517)
(Flashes)
Brake hold operated indica-
tor*1 ( P.518)
(Orange)
iMT indicator*1 (if equipped)
( P.518)
WA R N I N G
■If a safety system warning light
does not come on
Should a safety syst em light such as the ABS and SRS warning light not
come on when you start the engine,
this could mean that these systems are not available to help protect you in
an accident, which could result in
death or serious injury. Have the vehi-
cle inspected by any authorized Toyota retailer or Toyota authorized
repairer, or any reliable repairer
immediately if this occurs.
Page 89 of 758
87
2
2-1. Instrument cluster
Vehicle status information and indicators
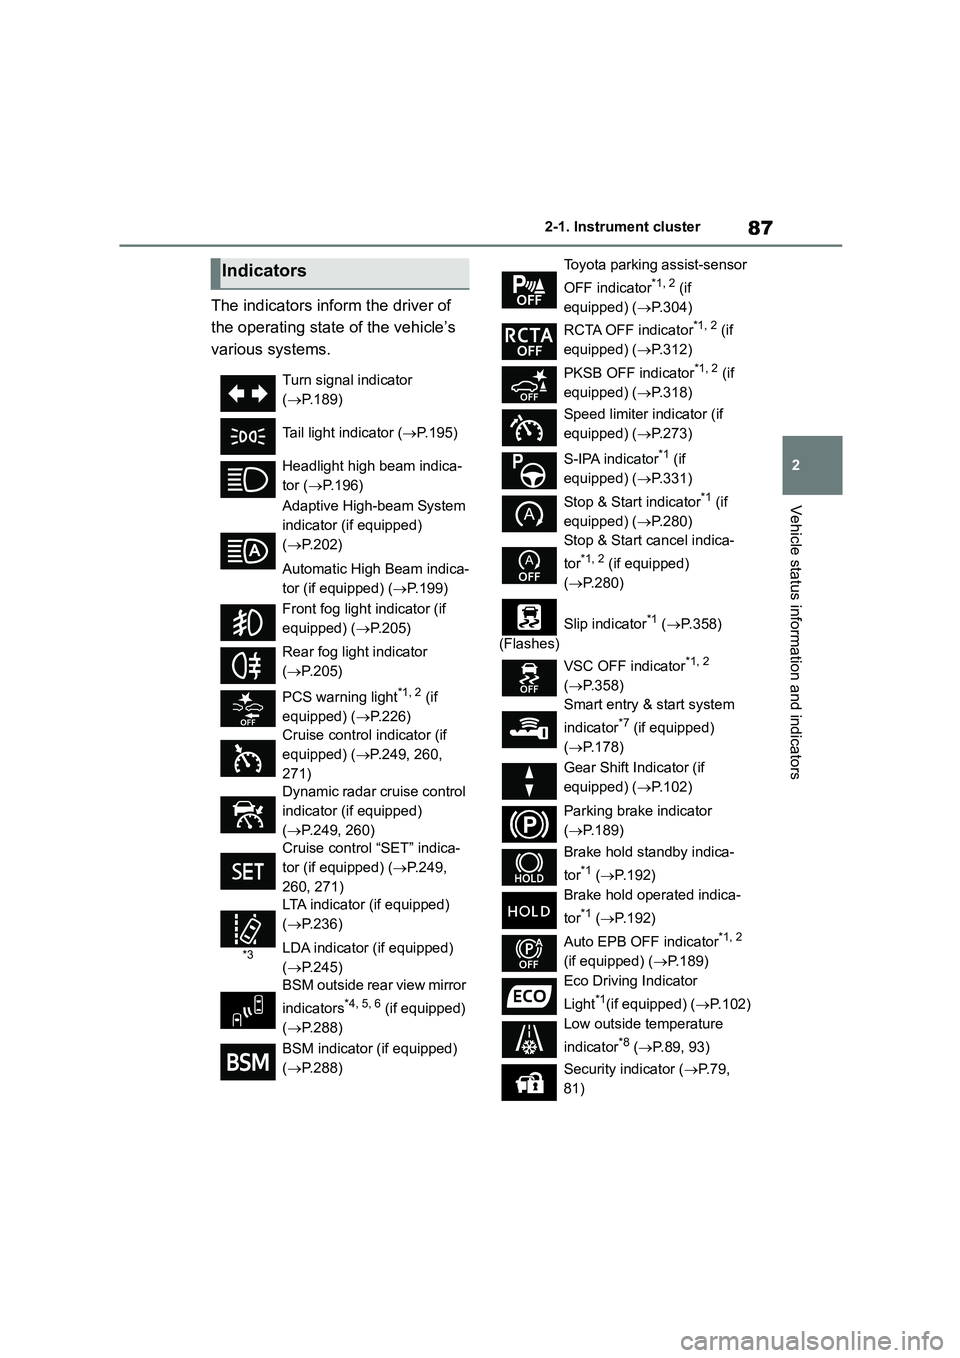
The indicators inform the driver of
the operating state of the vehicle’s
various systems.
Indicators
Turn signal indicator
( P.189)
Tail light indicator ( P.195)
Headlight high beam indica-
tor ( P.196)
Adaptive High-beam System
indicator (if equipped)
( P.202)
Automatic High Beam indica-
tor (if equipped) ( P.199)
Front fog light indicator (if
equipped) ( P.205)
Rear fog light indicator
( P.205)
PCS warning light*1, 2 (if
equipped) ( P.226)
Cruise control indicator (if
equipped) ( P.249, 260,
271)
Dynamic radar cruise control
indicator (if equipped)
( P.249, 260)
Cruise control “SET” indica-
tor (if equipped) ( P.249,
260, 271)
*3
LTA indicator (if equipped)
( P.236)
LDA indicator (if equipped)
( P.245)
BSM outside rear view mirror
indicators*4, 5, 6 (if equipped)
( P.288)
BSM indicator (if equipped)
( P.288)
Toyota parking assist-sensor
OFF indicator*1, 2 (if
equipped) ( P.304)
RCTA OFF indicator*1, 2 (if
equipped) ( P.312)
PKSB OFF indicator*1, 2 (if
equipped) ( P.318)
Speed limiter indicator (if
equipped) ( P.273)
S-IPA indicator*1 (if
equipped) ( P.331)
Stop & Start indicator*1 (if
equipped) ( P.280)
Stop & Start cancel indica-
tor*1, 2 (if equipped)
( P.280)
(Flashes)
Slip indicator*1 ( P.358)
VSC OFF indicator*1, 2
( P.358)
Smart entry & start system
indicator*7 (if equipped)
( P.178)
Gear Shift Indicator (if
equipped) ( P.102)
Parking brake indicator
( P.189)
Brake hold standby indica-
tor*1 ( P.192)
Brake hold operated indica-
tor*1 ( P.192)
Auto EPB OFF indicator*1, 2
(if equipped) ( P.189)
Eco Driving Indicator
Light*1(if equipped) ( P.102)
Low outside temperature
indicator*8 ( P.89, 93)
Security indicator ( P. 7 9 ,
81)
Page 110 of 758
1082-1. Instrument cluster
head-up display.
■Enabling/disabling of the head-up
display
If the head-up display is disabled, it will
remain disabled when the engine switch
is turned off then back to ON.
■Display brightness
The brightness of the head-up display
can be adjusted on of the
multi-information display. Also, it is auto- matically adjusted according to the
ambient brightness.
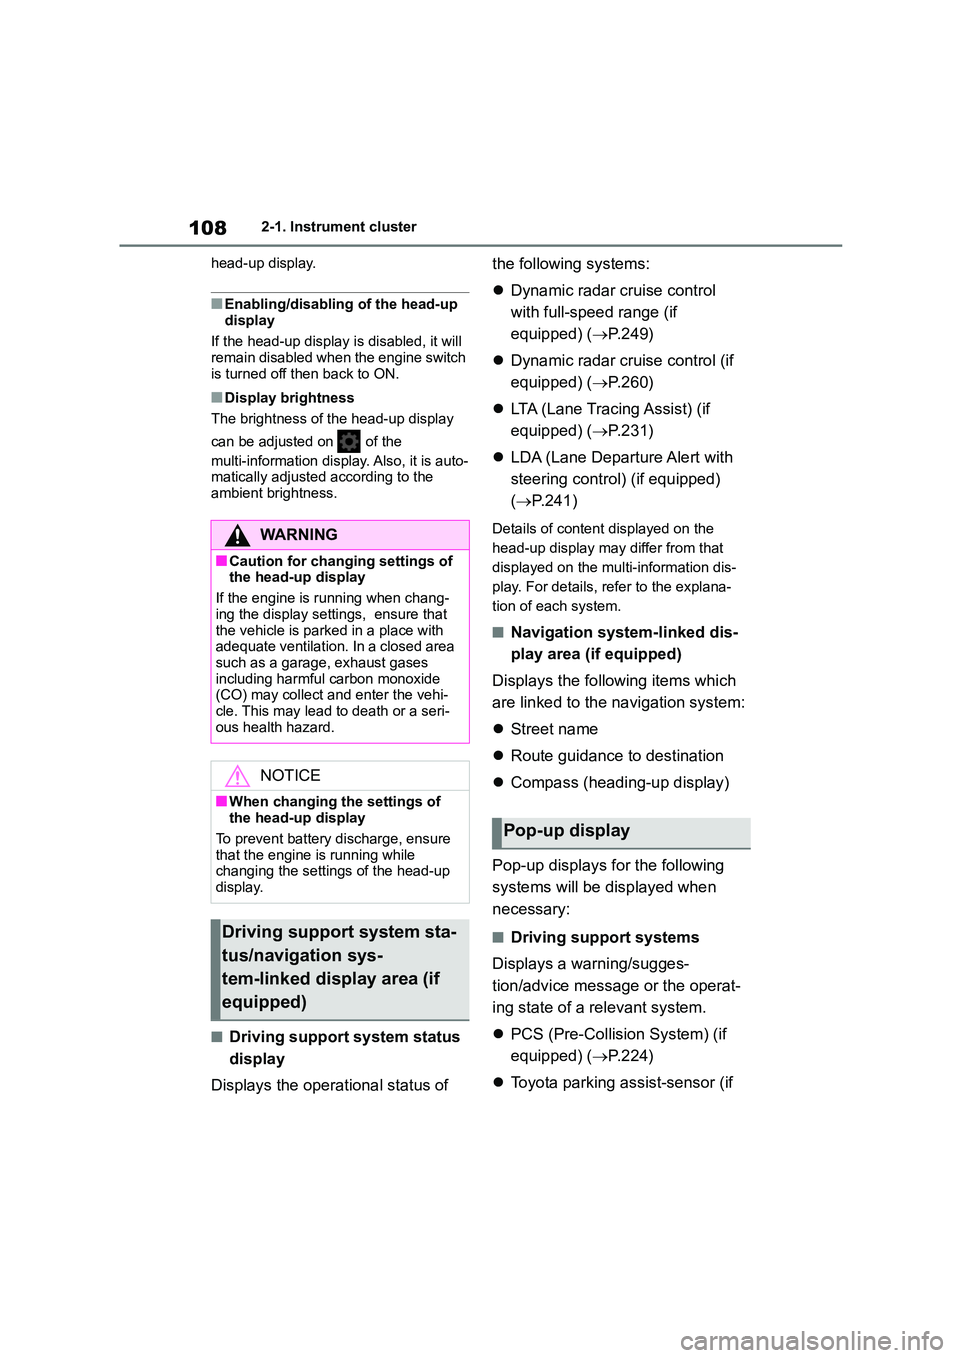
■Driving support system status
display
Displays the operational status of
the following systems:
Dynamic radar cruise control
with full-speed range (if
equipped) ( P.249)
Dynamic radar cruise control (if
equipped) ( P.260)
LTA (Lane Tracing Assist) (if
equipped) ( P.231)
LDA (Lane Departure Alert with
steering control) (if equipped)
( P.241)
Details of content displayed on the
head-up display may differ from that
displayed on the multi-information dis-
play. For details, refer to the explana-
tion of each system.
■Navigation system-linked dis-
play area (if equipped)
Displays the following items which
are linked to the navigation system:
Street name
Route guidance to destination
Compass (heading-up display)
Pop-up displays for the following
systems will be displayed when
necessary:
■Driving support systems
Displays a warning/sugges-
tion/advice message or the operat-
ing state of a relevant system.
PCS (Pre-Collision System) (if
equipped) ( P.224)
Toyota parking assist-sensor (if
WA R N I N G
■Caution for changing settings of
the head-up display
If the engine is running when chang-
ing the display settings, ensure that
the vehicle is parked in a place with adequate ventilation. In a closed area
such as a garage, exhaust gases
including harmful carbon monoxide (CO) may collect and enter the vehi-
cle. This may lead to death or a seri-
ous health hazard.
NOTICE
■When changing the settings of
the head-up display
To prevent battery discharge, ensure that the engine is running while
changing the settings of the head-up
display.
Driving support system sta-
tus/navigation sys-
tem-linked display area (if
equipped)
Pop-up display
Page 121 of 758
119
3
3-2. Opening, closing and locking the doors
Before driving
3-2.Opening, closing and locking the doors
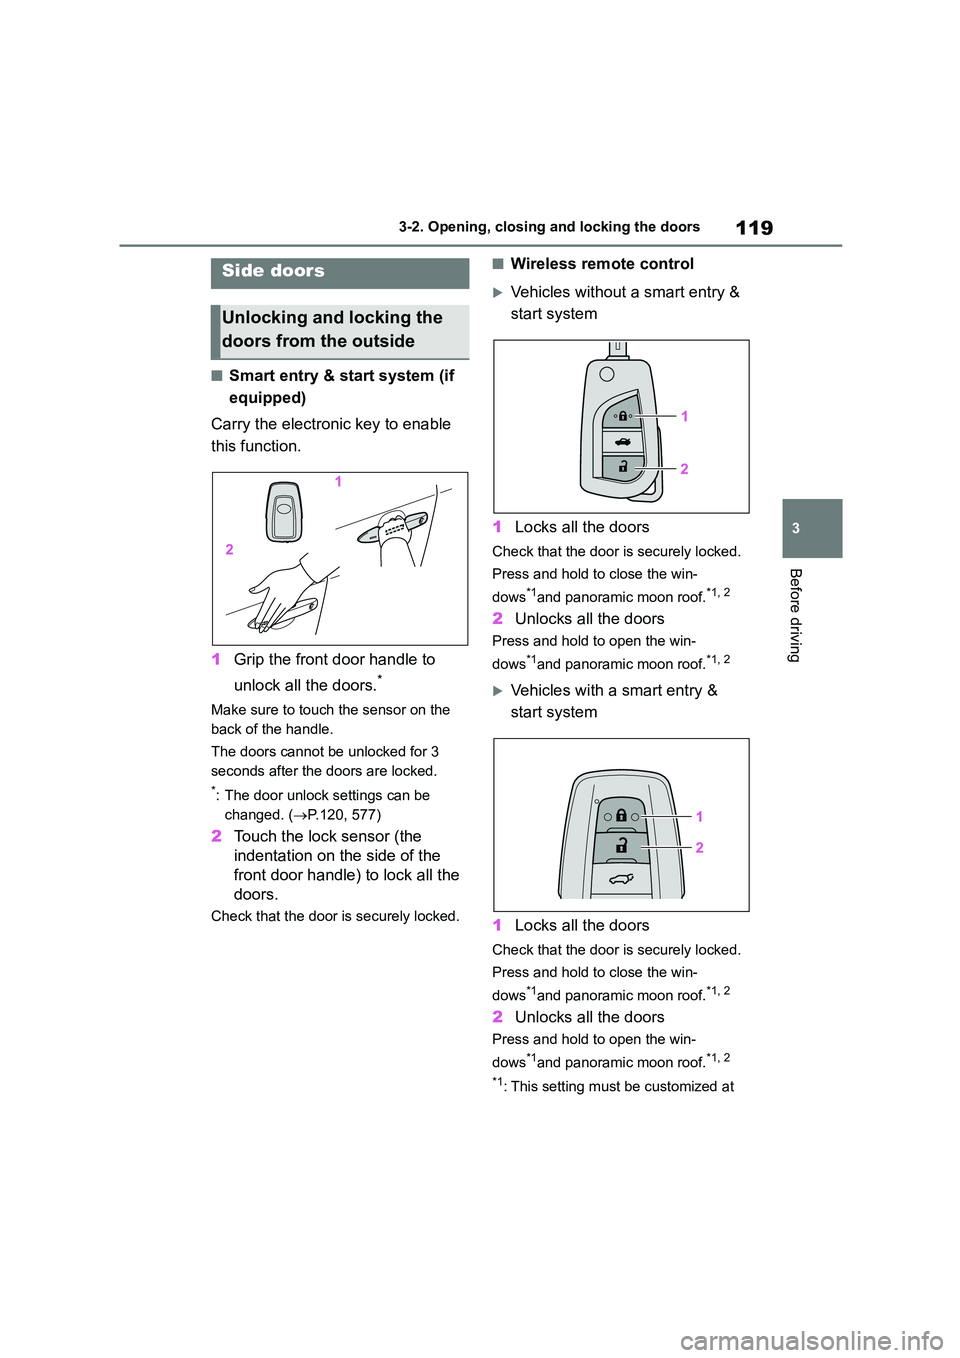
■Smart entry & start system (if
equipped)
Carry the electronic key to enable
this function.
1 Grip the front door handle to
unlock all the doors.*
Make sure to touch the sensor on the
back of the handle.
The doors cannot be unlocked for 3
seconds after the doors are locked.
*: The door unlock settings can be
changed. ( P.120, 577)
2Touch the lock sensor (the
indentation on the side of the
front door handle) to lock all the
doors.
Check that the door is securely locked.
■Wireless remote control
Vehicles without a smart entry &
start system
1 Locks all the doors
Check that the door is securely locked.
Press and hold to close the win-
dows*1and panoramic moon roof.*1, 2
2 Unlocks all the doors
Press and hold to open the win-
dows*1and panoramic moon roof.*1, 2
Vehicles with a smart entry &
start system
1 Locks all the doors
Check that the door is securely locked.
Press and hold to close the win-
dows*1and panoramic moon roof.*1, 2
2 Unlocks all the doors
Press and hold to open the win-
dows*1and panoramic moon roof.*1, 2
*1: This setting must be customized at
Side doors
Unlocking and locking the
doors from the outside
Page 123 of 758

121
3
3-2. Opening, closing and locking the doors
Before driving
30 seconds after is pressed, the
doors will be locked again and the alarm will automatically be set.)
In case that the alarm is triggered,
immediately stop the alarm. ( P. 8 1 )
■Operation signals
Vehicles without a smart entry & start
system
The emergency flashers flash to indicate
that the doors have been locked/unlocked using the wireless
remote control. (Locked: Once;
Unlocked: Twice)
Vehicles with a smart entry & start
system
The emergency flashers flash to indicate
that the doors have been locked/unlocked using the entry function
or wireless remote control. (Locked:
Once; Unlocked: Twice)
A buzzer sounds to indicate that the win-
dows and panoramic moon roof*are operating.*: If equipped
■Security feature
Vehicles without a smart entry & start system
If a door is not opened within approxi- mately 30 seconds after the vehicle is
unlocked using the wireless remote con-
trol, the security feature automatically locks the vehicle again.
Vehicles with a smart entry & start system
If a door is not opened within approxi-
mately 30 seconds after the vehicle is unlocked using the entry function or
wireless remote contro l, the security fea-
ture automatically locks the vehicle again.
■When the door cannot be locked by
the lock sensor on the surface of
the front door handle (vehicles with a smart entry & start system)
If the doors cannot be locked by touch-
ing the lock sensor with a finger, touch
the lock sensor with the palm of your
hand.
If you are wearing gloves, remove them.
■Door lock buzzer (vehicles with a smart entry & start system)
If an attempt to lock the doors using the
entry function or wireless remote control is made when a door is not fully closed,
a buzzer will sound continuously for 5
seconds. Fully close the door to stop the buzzer, and lock the doors again.
■Alarm (if equipped)
Locking the doors will set the alarm sys-
tem. ( P. 8 1 )
■Conditions affecting the operation of the smart entry & start system (if
equipped) or wireless remote con-
trol
Vehicles without a smart entry & start
system
P. 1 1 7
Vehicles with a smart entry & start
system
P. 1 3 8
■If the smart entry & start system (if
equipped) or the wireless remote
control does not operate properly
Vehicles without a smart entry & start
system
Replace the key battery with a new one
if it is depleted. ( P.490)
Vehicles with a smart entry & start
system
Use the mechanical key to lock and
unlock the doors. ( P.555)
Replace the key battery with a new one
if it is depleted. ( P.490)
Page 131 of 758
129
3
3-2. Opening, closing and locking the doors
Before driving
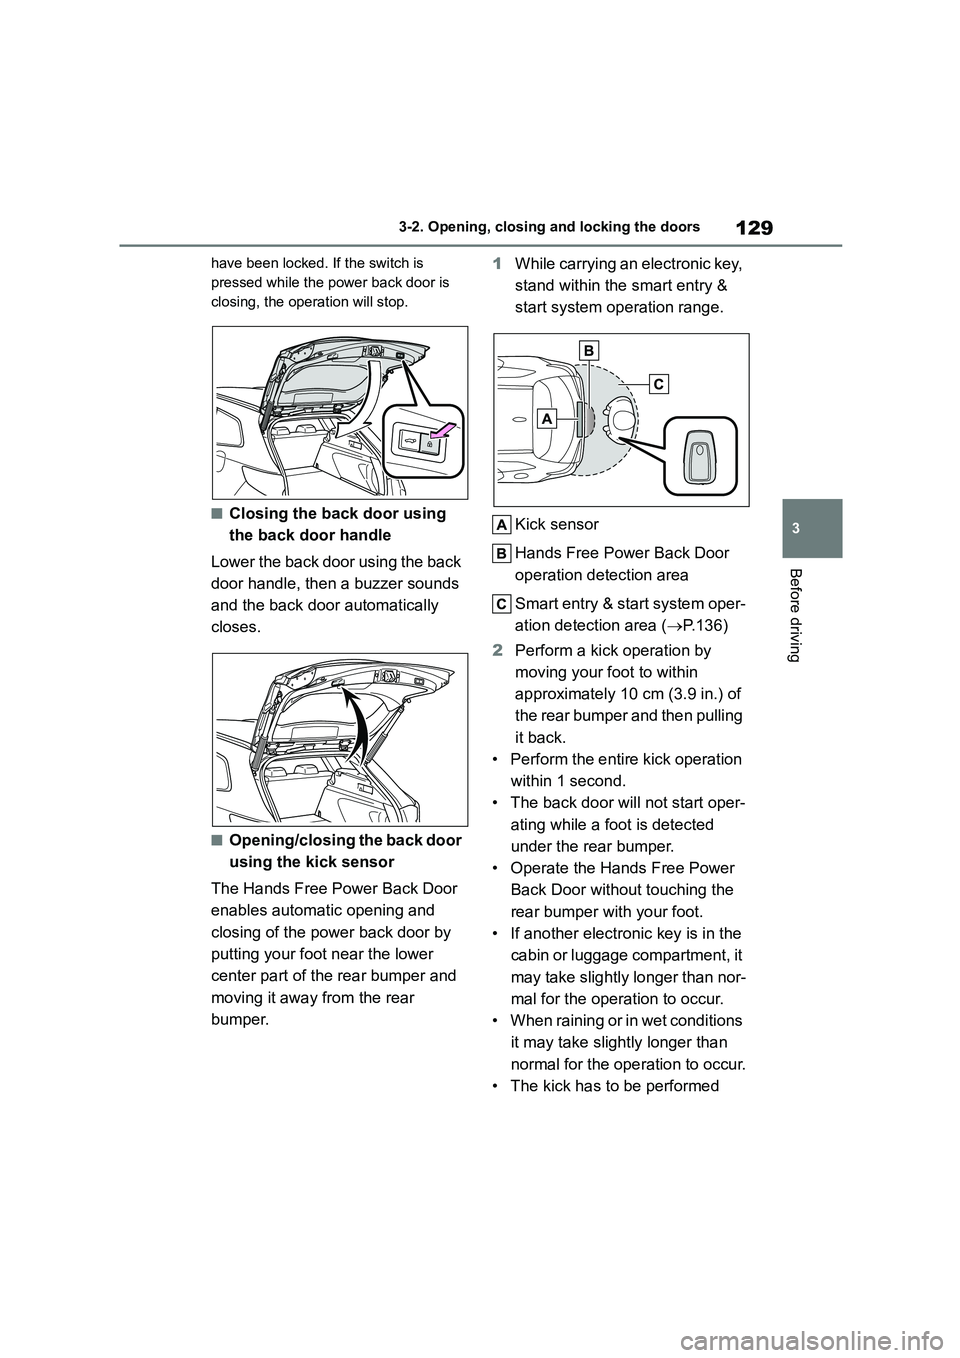
have been locked. If the switch is
pressed while the power back door is
closing, the operation will stop.
■Closing the back door using
the back door handle
Lower the back door using the back
door handle, then a buzzer sounds
and the back door automatically
closes.
■Opening/closing the back door
using the kick sensor
The Hands Free Power Back Door
enables automatic opening and
closing of the power back door by
putting your foot near the lower
center part of the rear bumper and
moving it away from the rear
bumper.
1 While carrying an electronic key,
stand within the smart entry &
start system operation range.
Kick sensor
Hands Free Power Back Door
operation detection area
Smart entry & start system oper-
ation detection area ( P.136)
2 Perform a kick operation by
moving your foot to within
approximately 10 cm (3.9 in.) of
the rear bu mper and then pulling
it back.
• Perform the entire kick operation
within 1 second.
• The back door will not start oper-
ating while a foot is detected
under the rear bumper.
• Operate the Hands Free Power
Back Door without touching the
rear bumper with your foot.
• If another electronic key is in the
cabin or luggage compartment, it
may take slightly longer than nor-
mal for the operation to occur.
• When raining or in wet conditions
it may take slightly longer than
normal for the operation to occur.
• The kick has to be performed