belt TOYOTA COROLLA HYBRID 2020 (in English) Owner's Guide
[x] Cancel search | Manufacturer: TOYOTA, Model Year: 2020, Model line: COROLLA HYBRID, Model: TOYOTA COROLLA HYBRID 2020Pages: 556, PDF Size: 19.28 MB
Page 56 of 556
561-2. Child safety
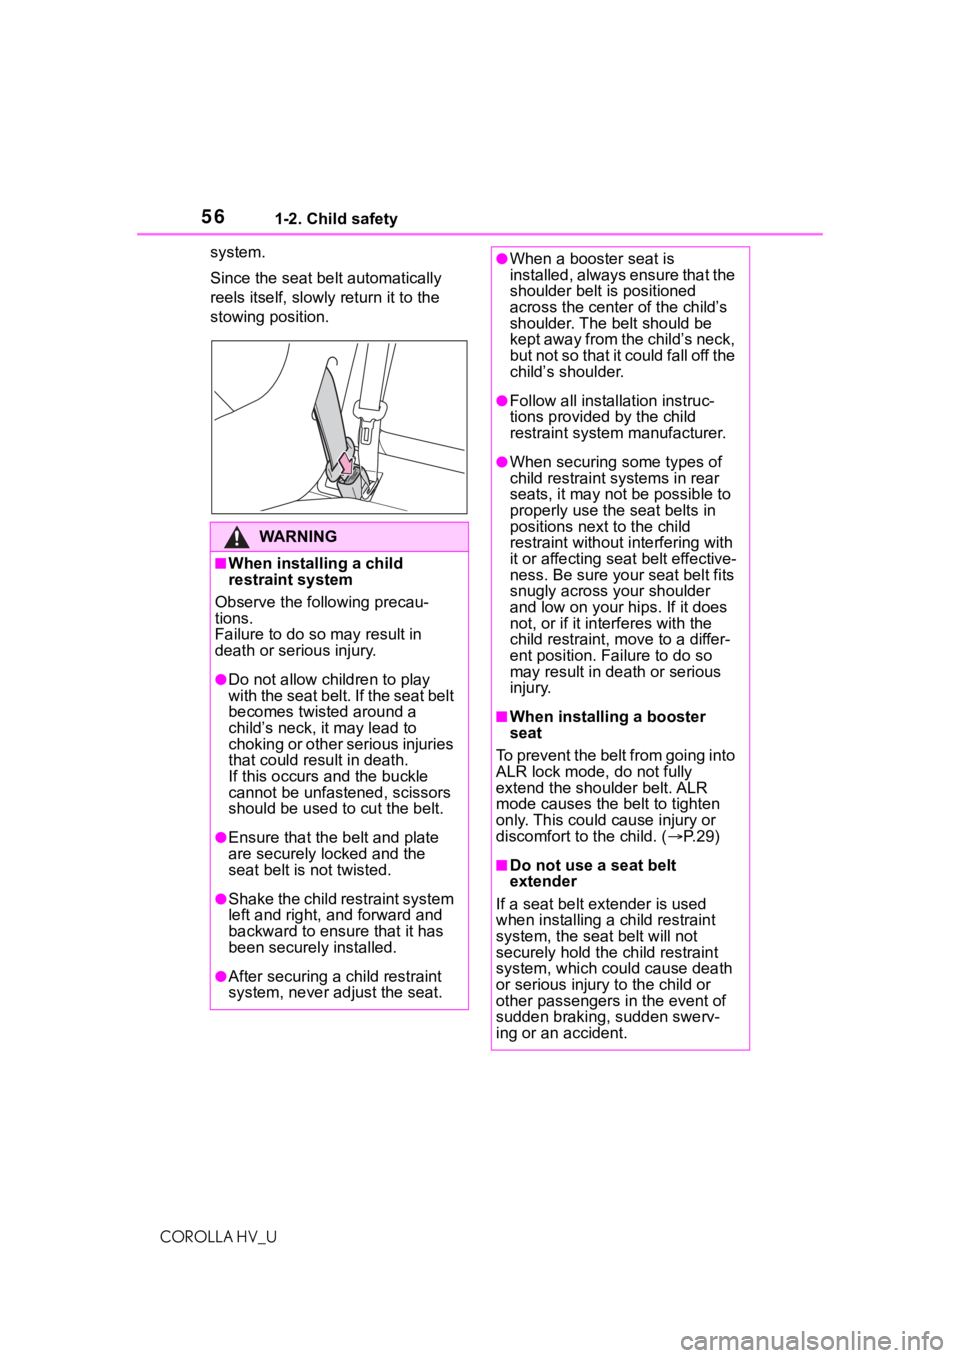
COROLLA HV_Usystem.
Since the seat belt automatically
reels itself, slowly return it to the
stowing position.
WA R N I N G
■When installing a child
restraint system
Observe the following precau-
tions.
Failure to do so m ay result in
death or serious injury.
●Do not allow children to play
with the seat belt. If the seat belt
becomes twisted around a
child’s neck, it may lead to
choking or other serious injuries
that could result in death.
If this occurs and the buckle
cannot be unfastened, scissors
should be used to cut the belt.
●Ensure that the belt and plate
are securely locked and the
seat belt is not twisted.
●Shake the child restraint system
left and right, and forward and
backward to ensure that it has
been securely installed.
●After securing a child restraint
system, never adjust the seat.
●When a booster seat is
installed, always ensure that the
shoulder belt is positioned
across the center of the child’s
shoulder. The belt should be
kept away from the child’s neck,
but not so that it could fall off the
child’s shoulder.
●Follow all installation instruc-
tions provided by the child
restraint system manufacturer.
●When securing some types of
child restraint systems in rear
seats, it may not be possible to
properly use the seat belts in
positions next to the child
restraint without interfering with
it or affecting seat belt effective-
ness. Be sure your seat belt fits
snugly across your shoulder
and low on your hips. If it does
not, or if it interferes with the
child restraint, move to a differ-
ent position. Fa ilure to do so
may result in death or serious
injury.
■When installing a booster
seat
To prevent the belt from going into
ALR lock mode, do not fully
extend the shoulder belt. ALR
mode causes the belt to tighten
only. This could cause injury or
discomfort to the child. ( P. 2 9 )
■Do not use a seat belt
extender
If a seat belt extender is used
when installing a child restraint
system, the seat belt will not
securely hold the child restraint
system, which could cause death
or serious injury to the child or
other passengers in the event of
sudden braking, sudden swerv-
ing or an accident.
Page 58 of 556
581-2. Child safety
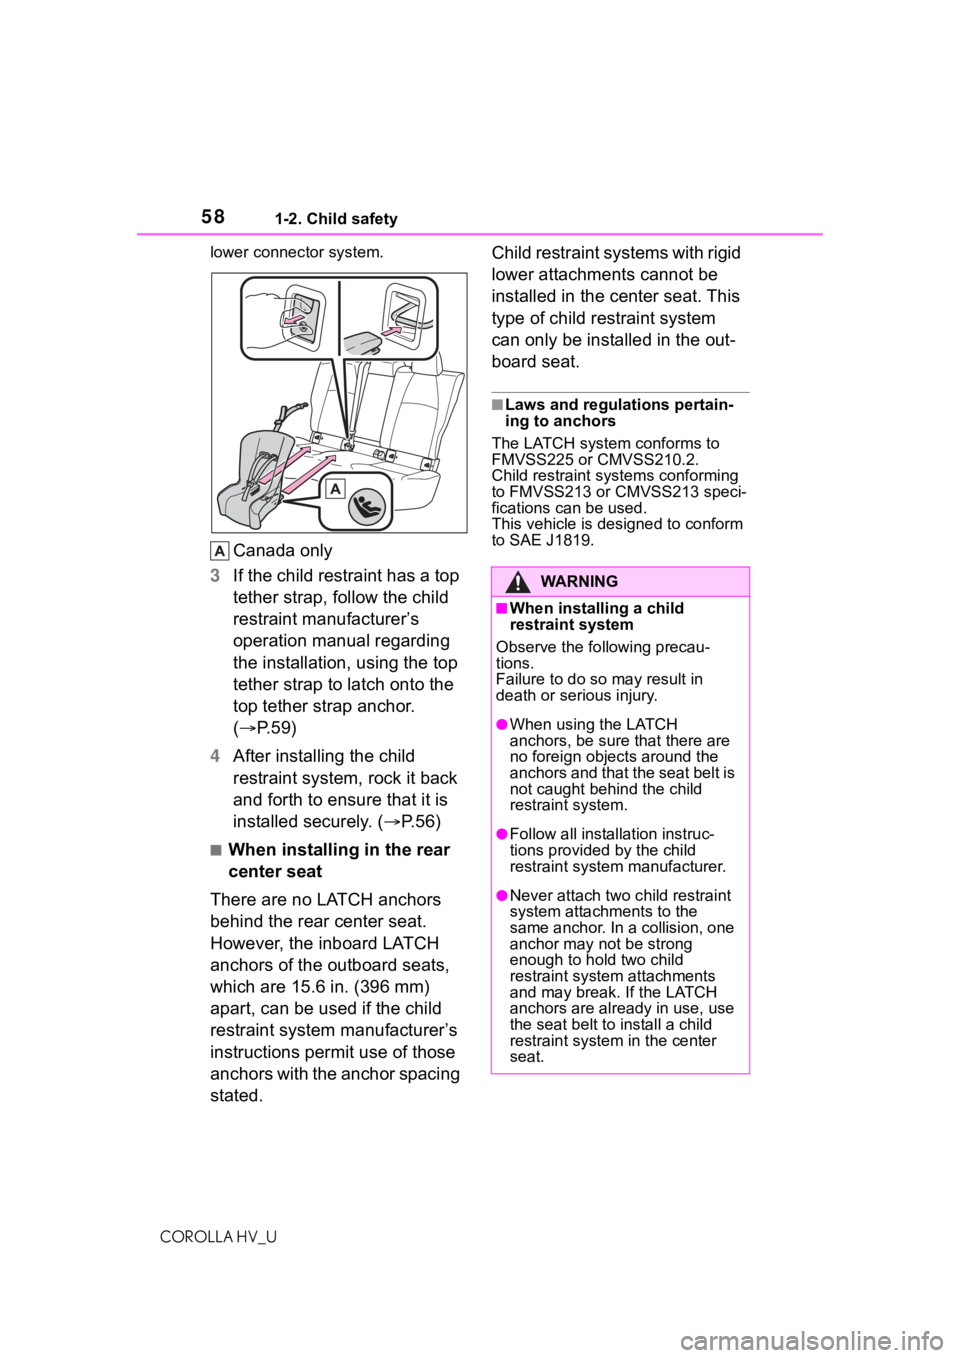
COROLLA HV_Ulower connec
tor system.
Canada only
3 If the child restraint has a top
tether strap, follow the child
restraint manufacturer’s
operation manual regarding
the installation, using the top
tether strap to latch onto the
top tether strap anchor.
( P. 5 9 )
4 After installing the child
restraint system, rock it back
and forth to ensure that it is
installed securely. ( P.56)
■When installing in the rear
center seat
There are no LATCH anchors
behind the rear center seat.
However, the inboard LATCH
anchors of the outboard seats,
which are 15.6 in. (396 mm)
apart, can be used if the child
restraint system manufacturer’s
instructions permit use of those
anchors with the anchor spacing
stated. Child restraint systems with rigid
lower attachments cannot be
installed in the center seat. This
type of child restraint system
can only be installed in the out-
board seat.
■Laws and regulations pertain-
ing to anchors
The LATCH system conforms to
FMVSS225 or CMVSS210.2.
Child restraint systems conforming
to FMVSS213 or CMVSS213 speci-
fications can be used.
This vehicle is designed to conform
to SAE J1819.
WA R N I N G
■When installing a child
restraint system
Observe the following precau-
tions.
Failure to do so may result in
death or serious injury.
●When using the LATCH
anchors, be sure that there are
no foreign objects around the
anchors and that the seat belt is
not caught behind the child
restraint system.
●Follow all installation instruc-
tions provided by the child
restraint system manufacturer.
●Never attach two c hild restraint
system attachments to the
same anchor. In a collision, one
anchor may not be strong
enough to hold two child
restraint system attachments
and may break. If the LATCH
anchors are already in use, use
the seat belt to install a child
restraint system in the center
seat.
Page 59 of 556
591-2. Child safety
COROLLA HV_U
1
For safety and security
■Anchor brackets (for top
tether strap)
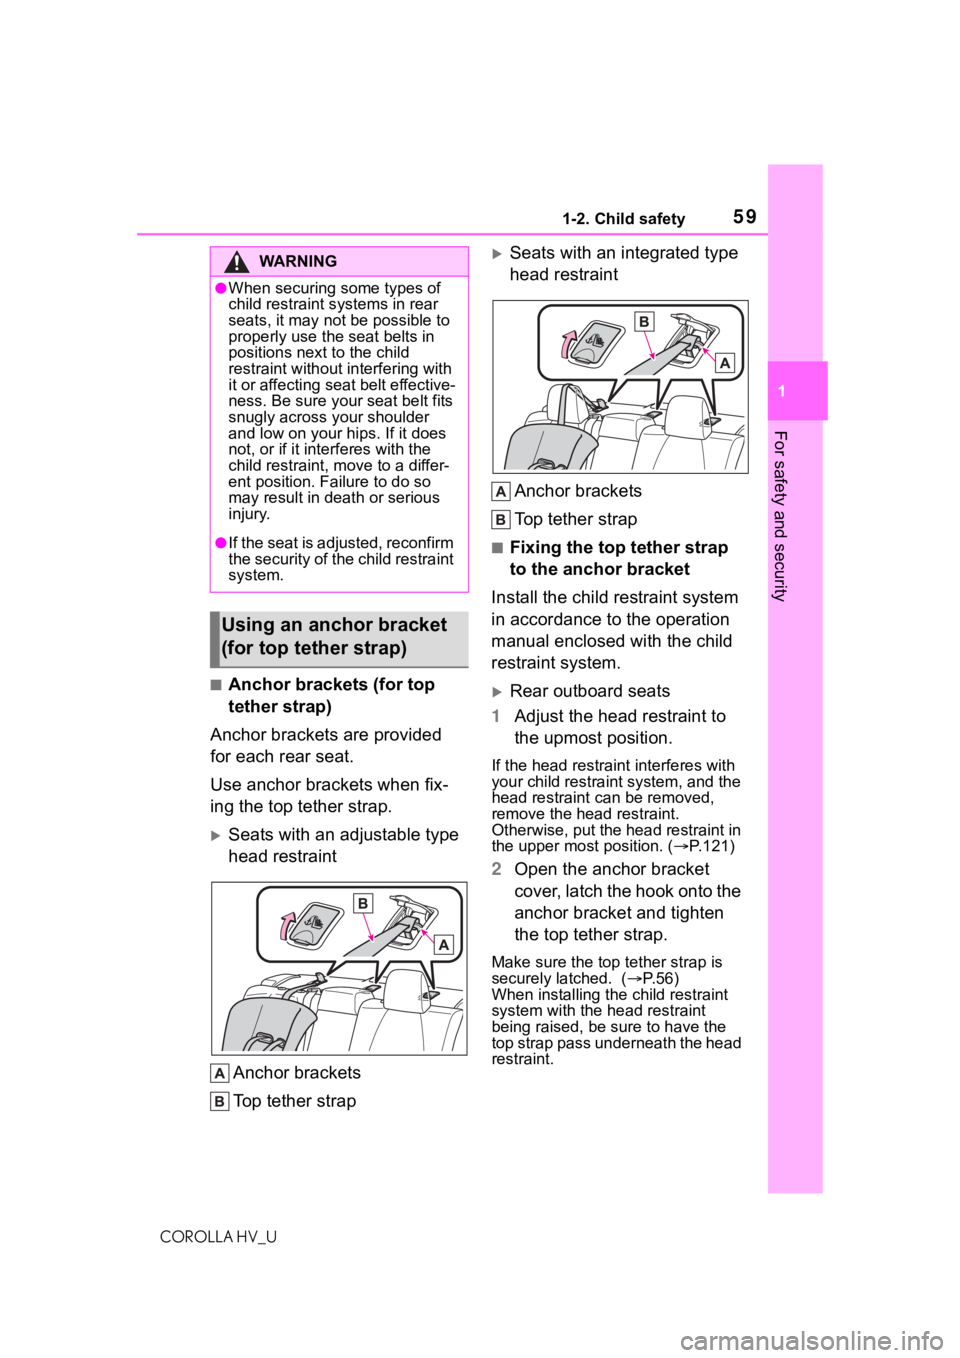
Anchor brackets are provided
for each rear seat.
Use anchor brackets when fix-
ing the top tether strap.
Seats with an adjustable type
head restraint
Anchor brackets
Top tether strap
Seats with an integrated type
head restraintAnchor brackets
Top tether strap
■Fixing the top tether strap
to the anchor bracket
Install the child restraint system
in accordance to the operation
manual enclosed with the child
restraint system.
Rear outboard seats
1 Adjust the head restraint to
the upmost position.
If the head restraint interferes with
your child restraint system, and the
head restraint can be removed,
remove the head restraint.
Otherwise, put the head restraint in
the upper most position. ( P.121)
2Open the anchor bracket
cover, latch the hook onto the
anchor bracket and tighten
the top tether strap.
Make sure the top tether strap is
securely latched. ( P.56)
When installing the child restraint
system with the head restraint
being raised, be sure to have the
top strap pass underneath the head
restraint.
WA R N I N G
●When securing some types of
child restraint s ystems in rear
seats, it may not be possible to
properly use the seat belts in
positions next to the child
restraint without interfering with
it or affecting seat belt effective-
ness. Be sure your seat belt fits
snugly across your shoulder
and low on your hips. If it does
not, or if it interferes with the
child restraint, move to a differ-
ent position. Failure to do so
may result in death or serious
injury.
●If the seat is adjusted, reconfirm
the security of the child restraint
system.
Using an anchor bracket
(for top tether strap)
Page 60 of 556
601-2. Child safety
COROLLA HV_U
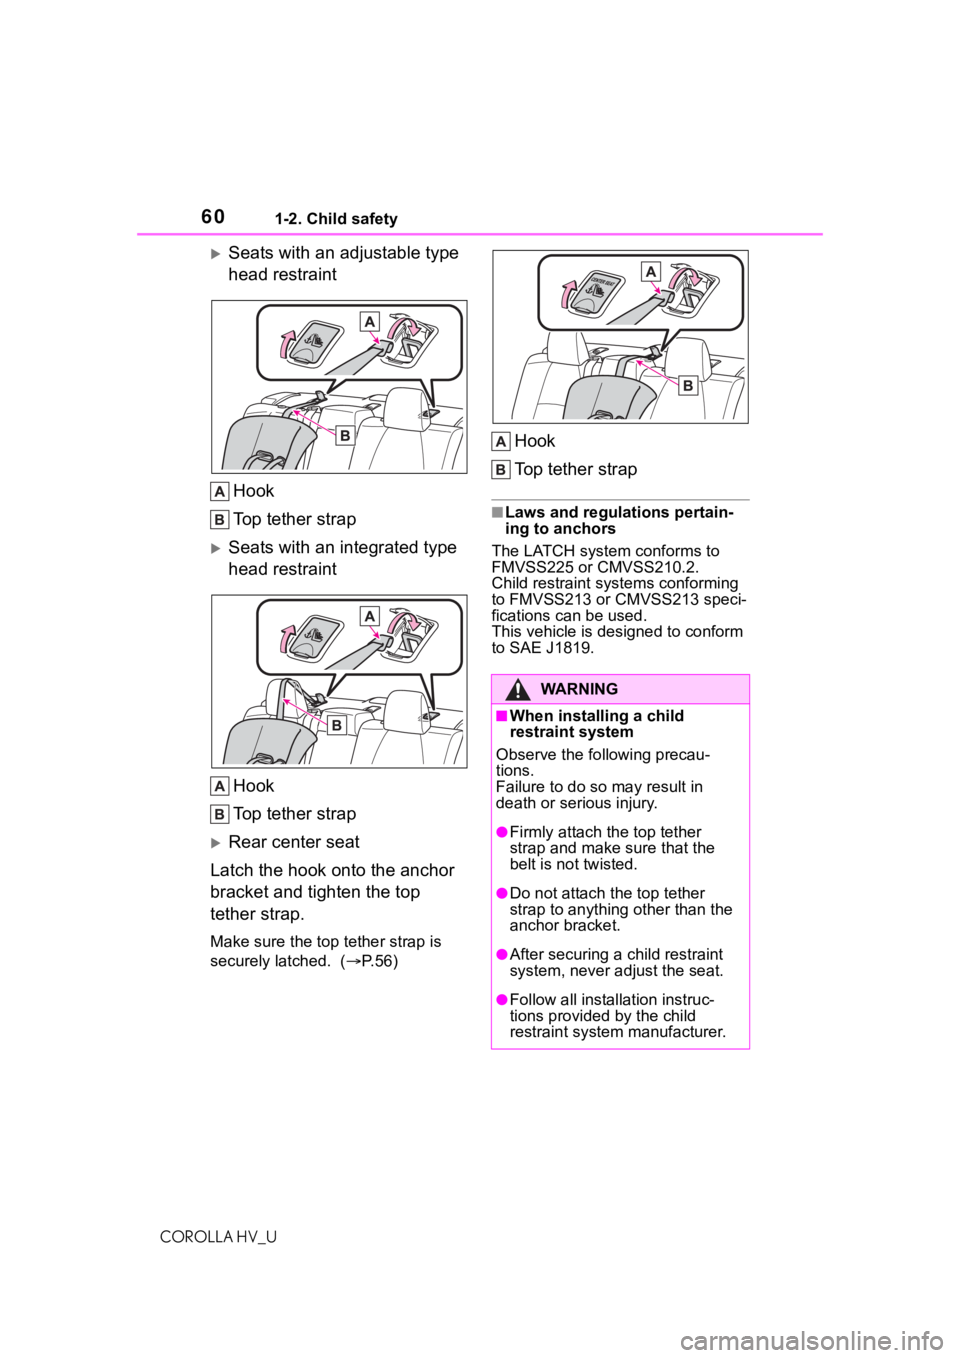
Seats with an adjustable type
head restraintHook
Top tether strap
Seats with an integrated type
head restraint
Hook
Top tether strap
Rear center seat
Latch the hook onto the anchor
bracket and tighten the top
tether strap.
Make sure the top tether strap is
securely latched. ( P. 5 6 )
Hook
Top tether strap
■Laws and regulations pertain-
ing to anchors
The LATCH system conforms to
FMVSS225 or CMVSS210.2.
Child restraint systems conforming
to FMVSS213 or CMVSS213 speci-
fications can be used.
This vehicle is designed to conform
to SAE J1819.
WA R N I N G
■When installing a child
restraint system
Observe the following precau-
tions.
Failure to do so may result in
death or serious injury.
●Firmly attach the top tether
strap and make sure that the
belt is not twisted.
●Do not attach the top tether
strap to anything other than the
anchor bracket.
●After securing a child restraint
system, never adjust the seat.
●Follow all installation instruc-
tions provided by the child
restraint system manufacturer.
Page 81 of 556
812-1. Instrument cluster
COROLLA HV_U
2
Vehicle status information and indicators
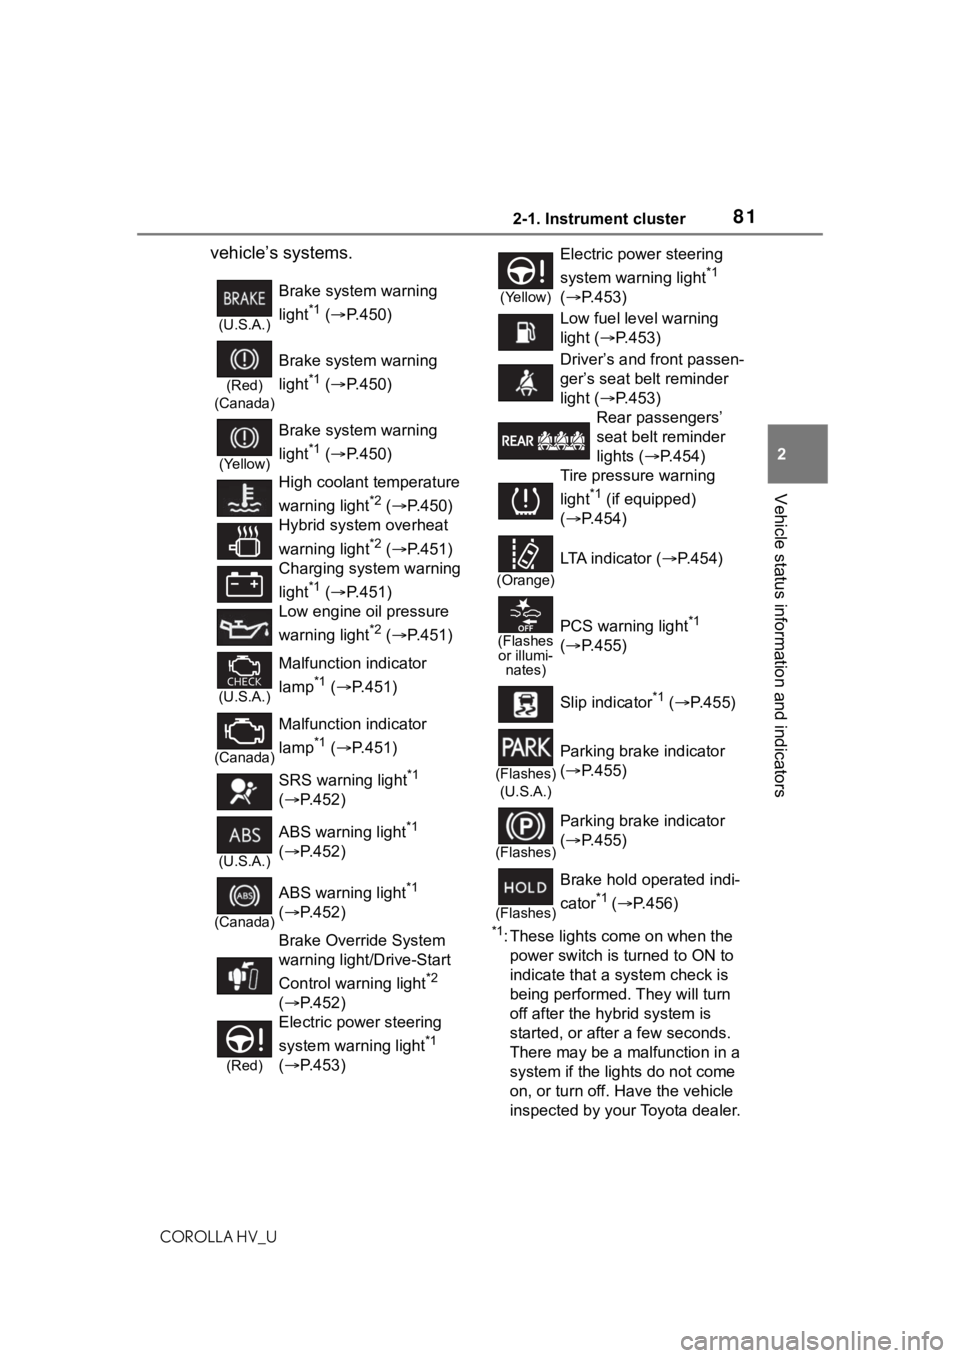
vehicle’s systems.
*1: These lights come on when the power switch is turned to ON to
indicate that a system check is
being performed. They will turn
off after the hybrid system is
started, or after a few seconds.
There may be a malfunction in a
system if the lights do not come
on, or turn off. Have the vehicle
inspected by your Toyota dealer.
(U.S.A.)
Brake system warning
light
*1 ( P.450)
(Red)
(Canada)
Brake system warning
light
*1 ( P.450)
(Yellow)
Brake system warning
light
*1 ( P.450)
High coolant temperature
warning light
*2 ( P.450)
Hybrid system overheat
warning light
*2 ( P.451)
Charging system warning
light
*1 ( P.451)
Low engine oil pressure
warning light
*2 ( P.451)
(U.S.A.)
Malfunction indicator
lamp
*1 ( P.451)
(Canada)
Malfunction indicator
lamp
*1 ( P.451)
SRS warning light
*1
( P.452)
(U.S.A.)
ABS warning light*1
( P.452)
(Canada)
ABS warning light*1
( P.452)
Brake Override System
warning light/Drive-Start
Control warning light
*2
( P.452)
(Red)
Electric power steering
system warning light
*1
( P.453)
(Yellow)
Electric power steering
system warning light
*1
( P.453)
Low fuel level warning
light ( P.453)
Driver’s and front passen-
ger’s seat belt reminder
light ( P.453)
Rear passengers’
seat belt reminder
lights ( P.454)
Tire pressure warning
light
*1 (if equipped)
( P.454)
(Orange)
LTA indicator ( P.454)
(Flashes
or illumi- nates)PCS warning light*1
( P.455)
Slip indicator
*1 ( P.455)
(Flashes)
(U.S.A.)
Parking brake indicator
( P.455)
(Flashes)
Parking brake indicator
( P.455)
(Flashes)
Brake hold operated indi-
cator
*1 ( P.456)
Page 119 of 556
1193-3. Adjusting the seats
COROLLA HV_U
3
Before driving
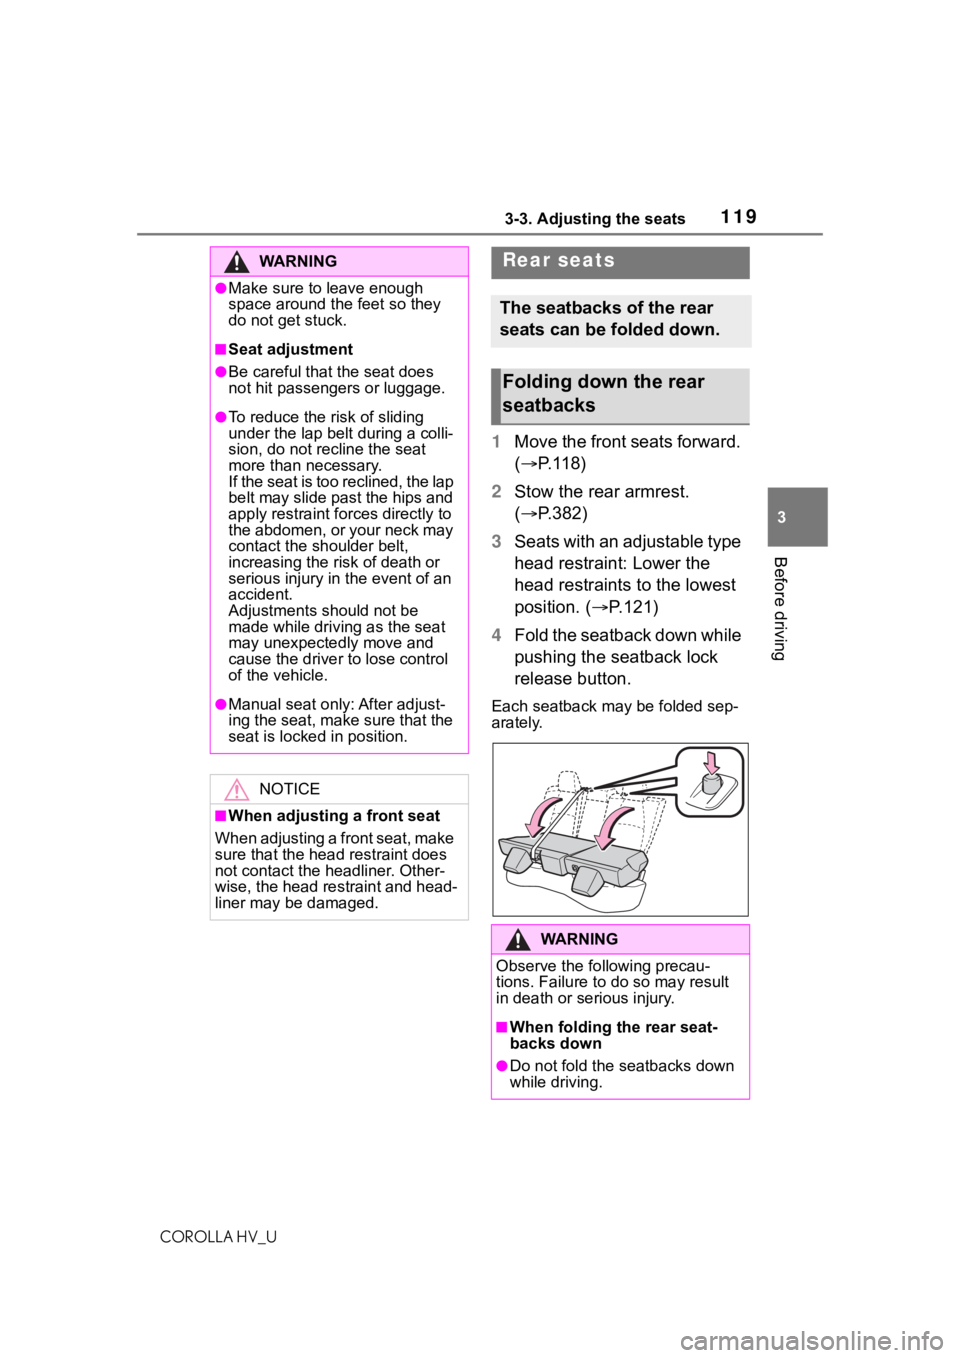
1 Move the front seats forward.
( P. 1 1 8 )
2 Stow the rear armrest.
( P.382)
3 Seats with an adjustable type
head restraint: Lower the
head restraints to the lowest
position. ( P.121)
4 Fold the seatback down while
pushing the seatback lock
release button.
Each seatback may be folded sep-
arately.
WA R N I N G
●Make sure to leave enough
space around the feet so they
do not get stuck.
■Seat adjustment
●Be careful that the seat does
not hit passengers or luggage.
●To reduce the risk of sliding
under the lap belt during a colli-
sion, do not recline the seat
more than necessary.
I f t h e s e a t i s t o o r e c l i n e d , t h e l a p
belt may slide past the hips and
apply restraint forces directly to
the abdomen, or your neck may
contact the shoulder belt,
increasing the ri sk of death or
serious injury in the event of an
accident.
Adjustments should not be
made while driving as the seat
may unexpectedly move and
cause the driver to lose control
of the vehicle.
●Manual seat only: After adjust-
ing the seat, make sure that the
seat is locked in position.
NOTICE
■When adjusting a front seat
When adjusting a front seat, make
sure that the head restraint does
not contact the headliner. Other-
wise, the head restraint and head-
liner may be damaged.
Rear seats
The seatbacks of the rear
seats can be folded down.
Folding down the rear
seatbacks
WA R N I N G
Observe the following precau-
tions. Failure to do so may result
in death or serious injury.
■When folding the rear seat-
backs down
●Do not fold the seatbacks down
while driving.
Page 120 of 556
1203-3. Adjusting the seats
COROLLA HV_U
WA R N I N G
●Stop the vehicle on level
ground, set the parking brake
and shift the shift lever to P.
●Do not allow anyone to sit on a
folded seatback or in the trunk
while driving.
●Do not allow child ren to enter
the trunk.
●Be careful not to get your hand
caught when folding the rear
seatbacks.
●Adjust the position of the front
seats before folding down the
rear seatbacks so that the front
seats do not int erfere with the
rear seatbacks when folding
down the rear seatbacks.
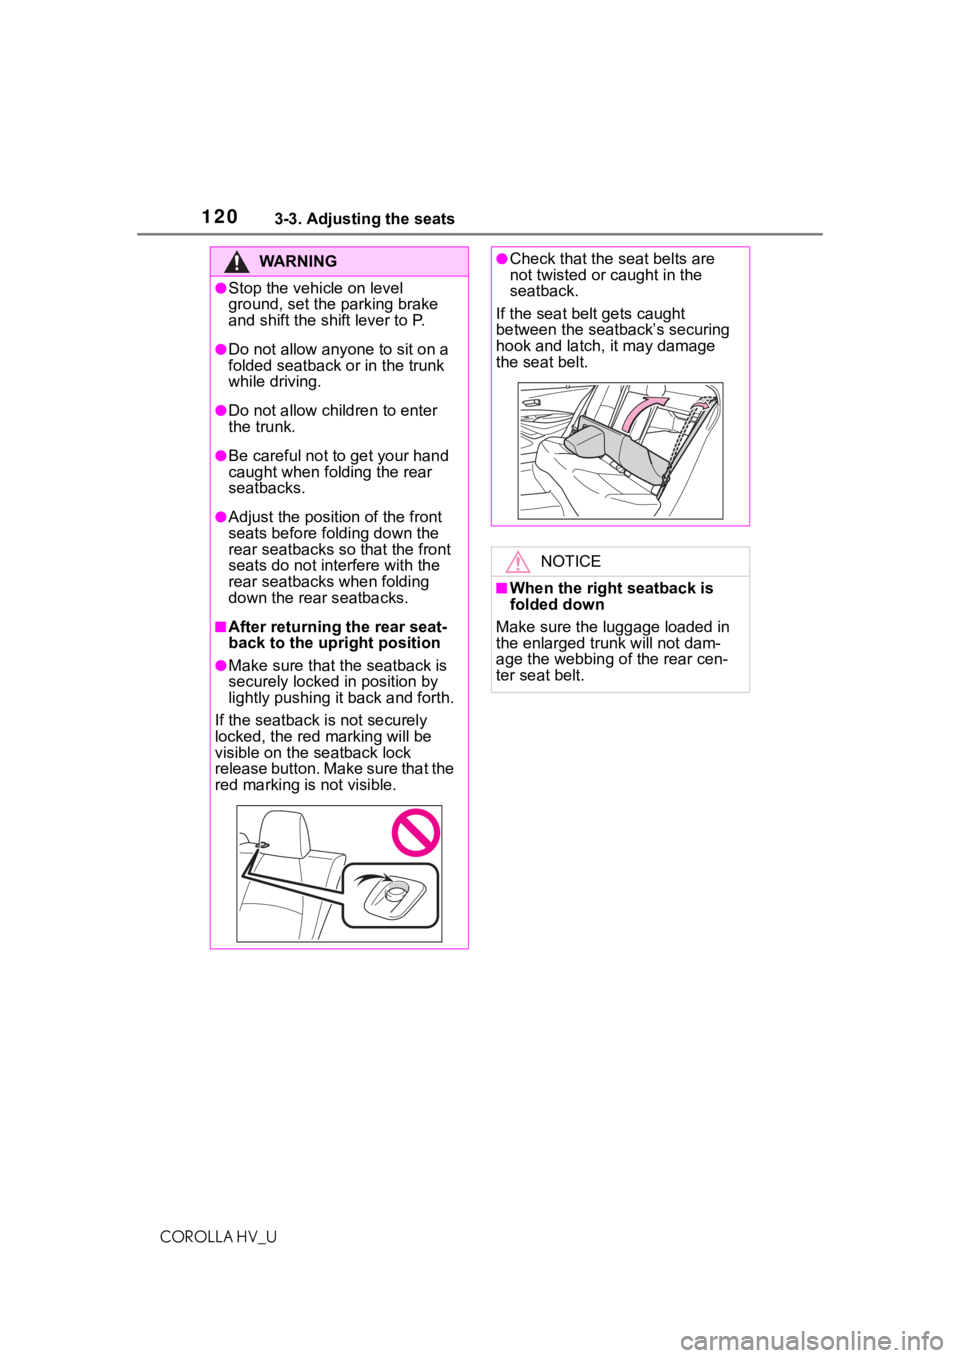
■After returning the rear seat-
back to the upright position
●Make sure that the seatback is
securely locked in position by
lightly pushing it back and forth.
If the seatback is not securely
locked, the red marking will be
visible on the seatback lock
release button. Make sure that the
red marking is not visible.
●Check that the seat belts are
not twisted or caught in the
seatback.
If the seat belt gets caught
between the seatback’s securing
hook and latch, it may damage
the seat belt.
NOTICE
■When the right seatback is
folded down
Make sure the luggage loaded in
the enlarged tr unk will not dam-
age the webbing of the rear cen-
ter seat belt.
Page 140 of 556
1404-1. Before driving
COROLLA HV_U
WA R N I N G
■Things that must not be car-
ried in the trunk
The following things may cause a
fire if loaded in the trunk:
●Receptacles co ntaining gaso-
line
●Aerosol cans
■Storage precautions
Observe the following precau-
tions.
Failure to do so m ay prevent the
pedals from be ing depressed
properly, may block the driver’s
vision, or may result in items hit-
ting the driver or passengers, pos-
sibly causing an accident.
●Stow cargo and luggage in the
trunk whenever possible.
●To prevent cargo and luggage
from sliding forward during
braking, do not stack anything in
the enlarged trunk. Keep cargo
and luggage low, as close to the
floor as possible.
●When you fold down the rear
seats, long items should not be
placed directly behind the front
seats.
●Do not place cargo or luggage
in or on the follo wing locations.
• At the feet of the driver
• On the front passenger or rear seats (when stacking items)
• On the package tray
• On the instrument panel
• On the dashboard
●Secure all items in the occupant
compartment.
●Never allow anyon e to ride in
the enlarged trunk. It is not
designed for passengers. They
should ride in their seats with
their seat belts properly fas-
tened.
■Capacity and distribution
●Do not exceed the maximum
axle weight rating or the total
vehicle weight rating.
●Even if the total load of occu-
pant’s weight and the cargo
load is less than the total load
capacity, do not apply the load
unevenly. Improper loading may
cause deterioration of steering
or braking control which may
cause death or serious injury.
Page 154 of 556
1544-2. Driving procedures
COROLLA HV_U
light will turn on.
Operate the shift lever with the
vehicle stopped and the brake
pedal depressed.
The parking brake may not operate
automatically if the shift lever is
moved quickly.
In this case, it is necessary to oper-
ate the parking brake switch.
( P.153)
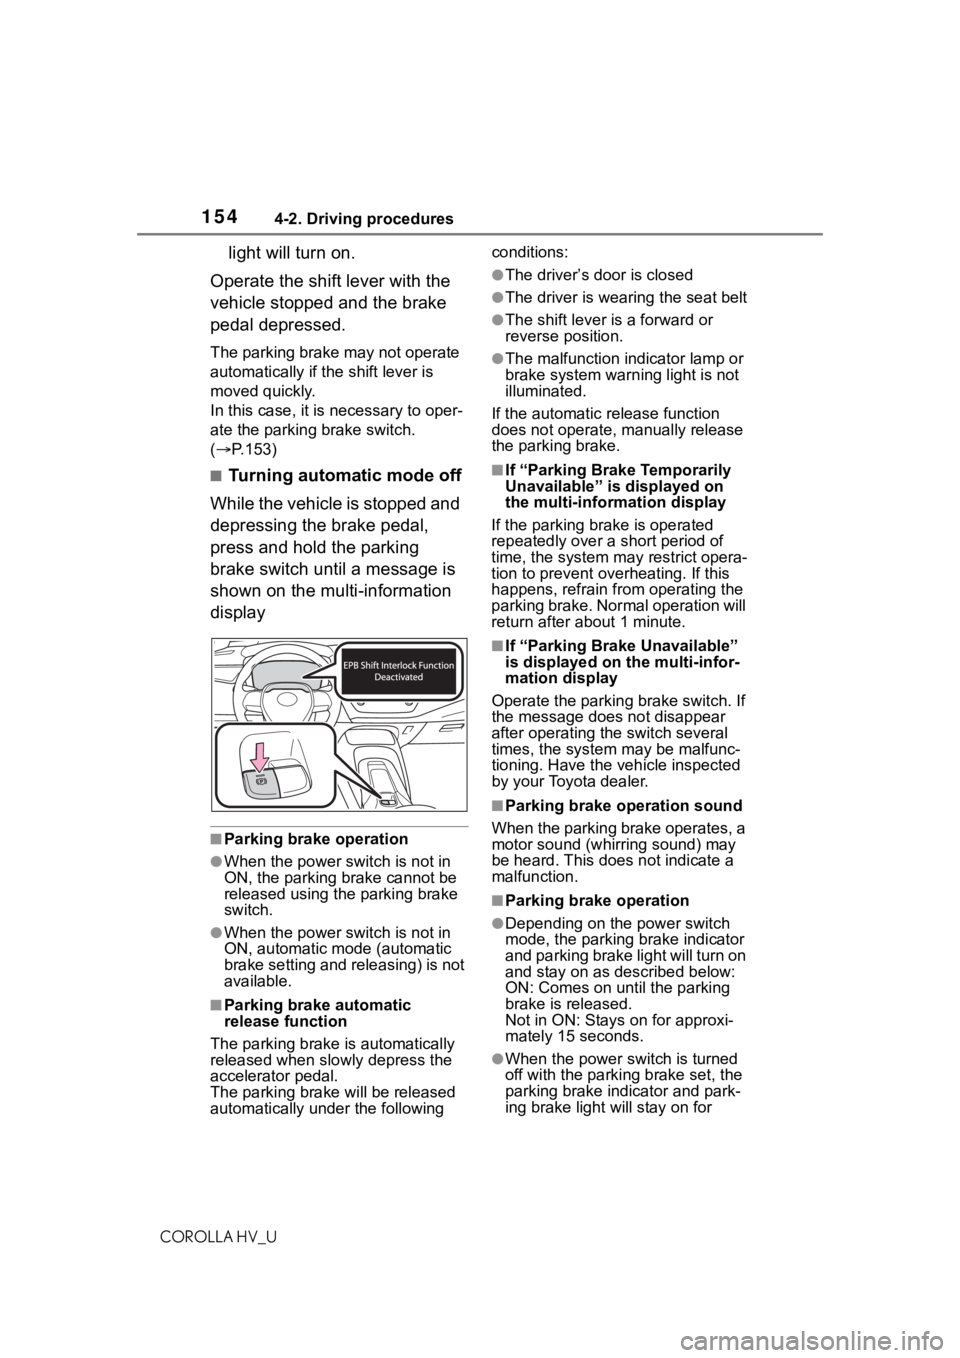
■Turning automatic mode off
While the vehicle is stopped and
depressing the brake pedal,
press and hold the parking
brake switch until a message is
shown on the multi-information
display
■Parking brake operation
●When the power s witch is not in
ON, the parking brake cannot be
released using the parking brake
switch.
●When the power s witch is not in
ON, automatic mode (automatic
brake setting and releasing) is not
available.
■Parking brake automatic
release function
The parking brake is automatically
released when slowly depress the
accelerator pedal.
The parking brake will be released
automatically under the following conditions:
●The driver’s door is closed
●The driver is wearing the seat belt
●The shift lever is a forward or
reverse position.
●The malfunction in
dicator lamp or
brake system warning light is not
illuminated.
If the automatic release function
does not operate, manually release
the parking brake.
■If “Parking Brake Temporarily
Unavailable” is displayed on
the multi-info rmation display
If the parking brake is operated
repeatedly over a short period of
time, the system may restrict opera-
tion to prevent ove rheating. If this
happens, refrain from operating the
parking brake. Normal operation will
return after about 1 minute.
■If “Parking Brake Unavailable”
is displayed on the multi-infor-
mation display
Operate the parking brake switch. If
the message does not disappear
after operating the switch several
times, the system may be malfunc-
tioning. Have the vehicle inspected
by your Toyota dealer.
■Parking brake operation sound
When the parking brake operates, a
motor sound (whirr ing sound) may
be heard. This does not indicate a
malfunction.
■Parking brake operation
●Depending on the power switch
mode, the parking brake indicator
and parking brake light will turn on
and stay on as described below:
ON: Comes on until the parking
brake is released.
Not in ON: Stays on for approxi-
mately 15 seconds.
●When the power switch is turned
off with the parking brake set, the
parking brake indicator and park-
ing brake light will stay on for
Page 156 of 556
1564-2. Driving procedures
COROLLA HV_U
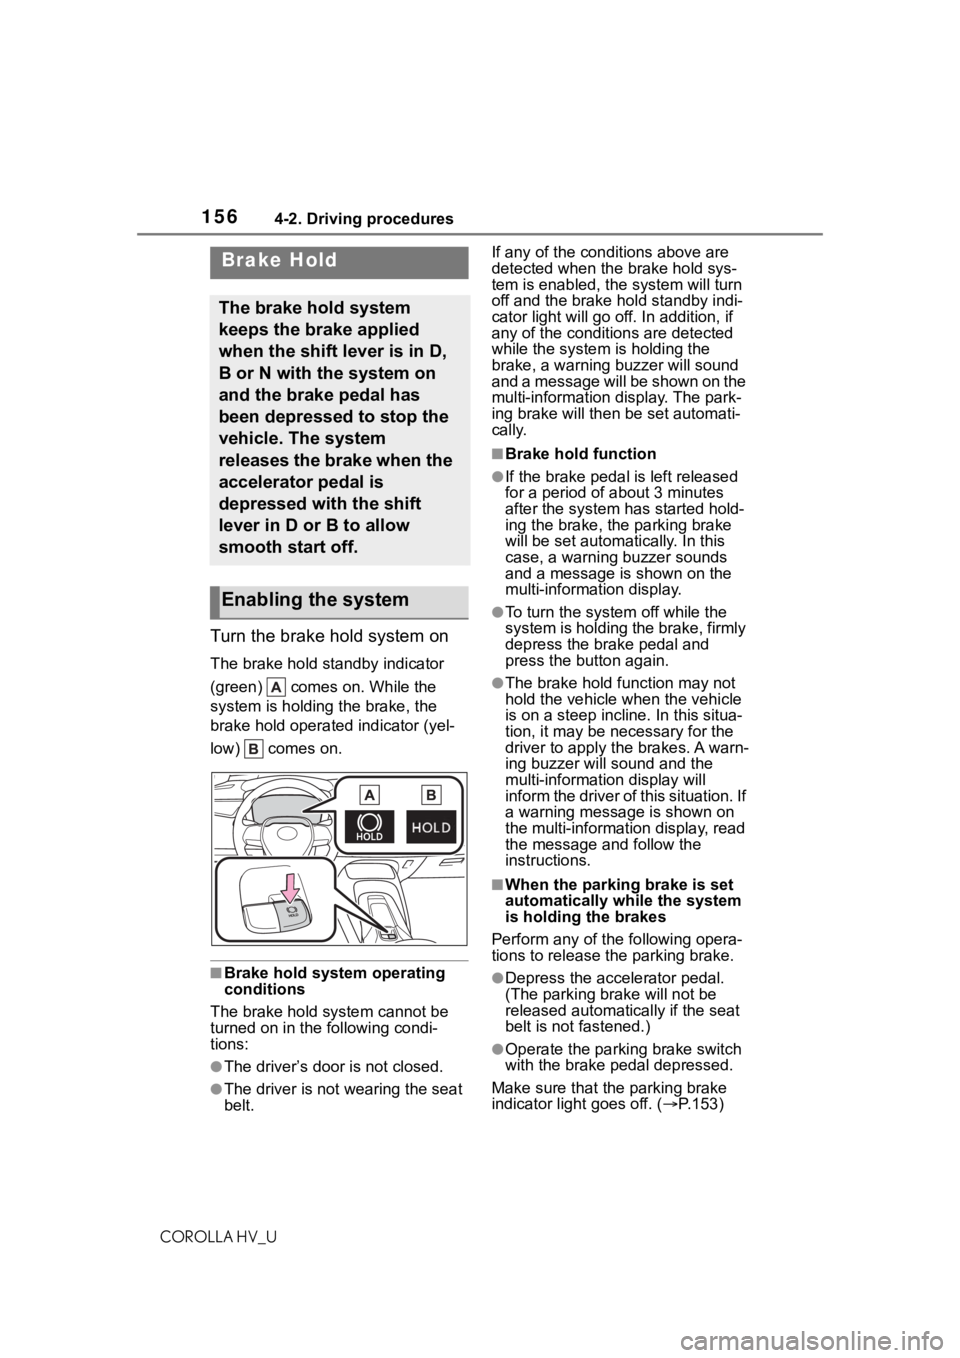
Turn the brake hold system on
The brake hold standby indicator
(green) comes on. While the
system is holding the brake, the
brake hold operated indicator (yel-
low) comes on.
■Brake hold system operating
conditions
The brake hold system cannot be
turned on in the following condi-
tions:
●The driver’s doo r is not closed.
●The driver is not wearing the seat
belt. If any of the cond
itions above are
detected when the brake hold sys-
tem is enabled, the system will turn
off and the brake hold standby indi-
cator light will go off. In addition, if
any of the conditions are detected
while the system is holding the
brake, a warning buzzer will sound
and a message will be shown on the
multi-information display. The park-
ing brake will then be set automati-
cally.
■Brake hold function
●If the brake pedal is left released
for a period of about 3 minutes
after the system has started hold-
ing the brake, the parking brake
will be set automatically. In this
case, a warning buzzer sounds
and a message is shown on the
multi-information display.
●To turn the system off while the
system is holding the brake, firmly
depress the brake pedal and
press the button again.
●The brake hold function may not
hold the vehicle when the vehicle
is on a steep incline. In this situa-
tion, it may be ne cessary for the
driver to apply the brakes. A warn-
ing buzzer will sound and the
multi-information display will
inform the driver of this situation. If
a warning message is shown on
the multi-information display, read
the message and follow the
instructions.
■When the parking brake is set
automatically while the system
is holding the brakes
Perform any of the following opera-
tions to release the parking brake.
●Depress the accelerator pedal.
(The parking brake will not be
released automatically if the seat
belt is not fastened.)
●Operate the parkin g brake switch
with the brake pe dal depressed.
Make sure that the parking brake
indicator light goes off. ( P.153)
Brake Hold
The brake hold system
keeps the brake applied
when the shift lever is in D,
B or N with the system on
and the brake pedal has
been depressed to stop the
vehicle. The system
releases the brake when the
accelerator pedal is
depressed with the shift
lever in D or B to allow
smooth start off.
Enabling the system