flat tire TOYOTA COROLLA HYBRID 2021 (in English) Service Manual
[x] Cancel search | Manufacturer: TOYOTA, Model Year: 2021, Model line: COROLLA HYBRID, Model: TOYOTA COROLLA HYBRID 2021Pages: 584, PDF Size: 19.59 MB
Page 504 of 584
5048-2. Steps to take in an emergency
COROLLA HV_U
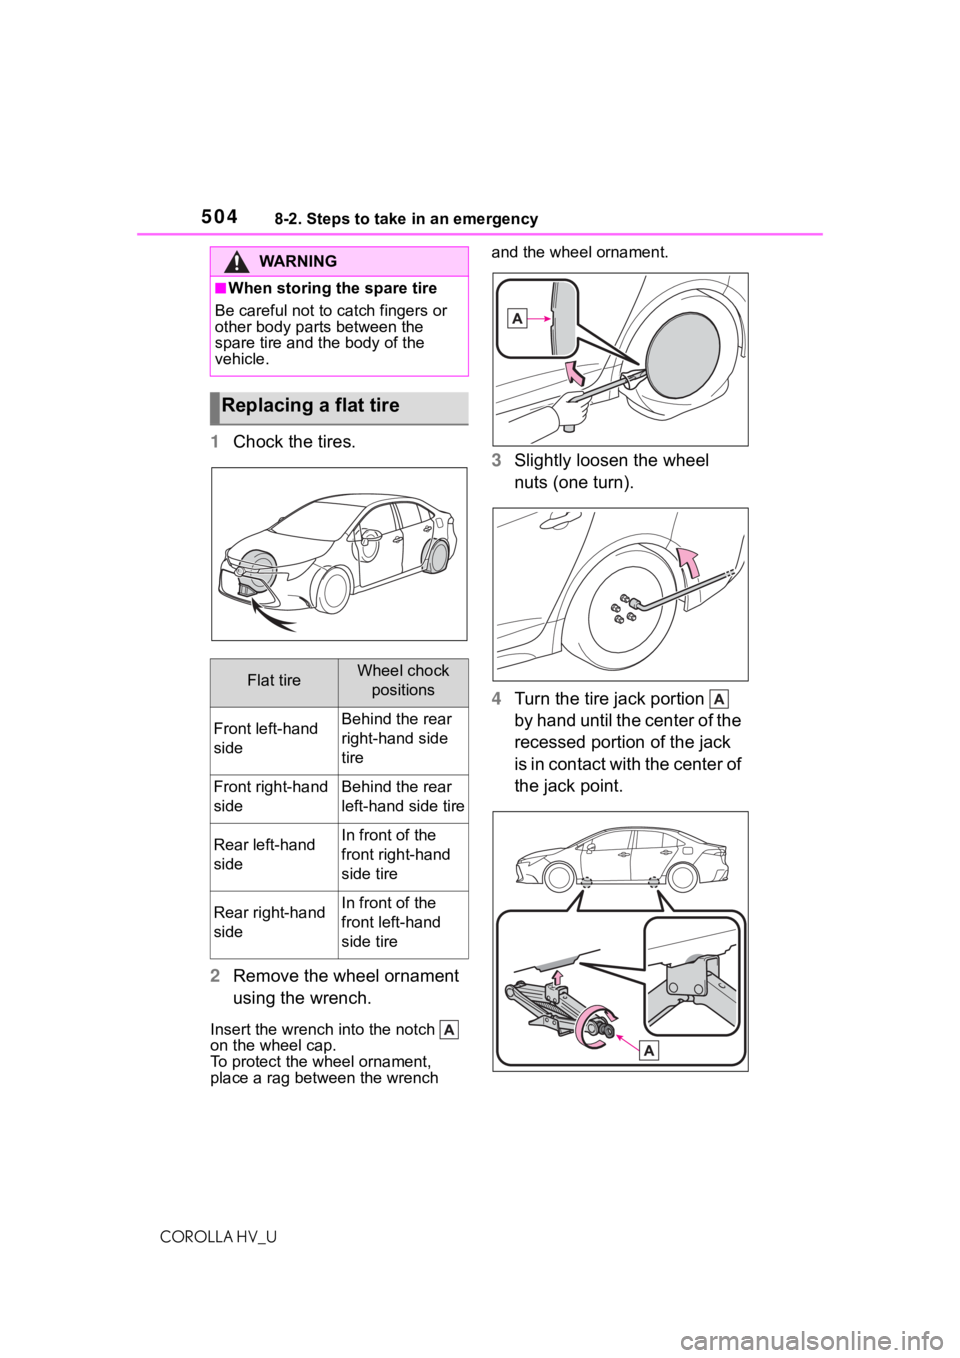
1Chock the tires.
2 Remove the wheel ornament
using the wrench.
Insert the wrench into the notch
on the wheel cap.
To protect the wheel ornament,
place a rag between the wrench and the wheel ornament.
3
Slightly loosen the wheel
nuts (one turn).
4 Turn the tire jack portion
by hand until the center of the
recessed portion of the jack
is in contact with the center of
the jack point.
WA R N I N G
■When storing the spare tire
Be careful not to catch fingers or
other body parts between the
spare tire and the body of the
vehicle.
Replacing a flat tire
Flat tireWheel chock positions
Front left-hand
sideBehind the rear
right-hand side
tire
Front right-hand
sideBehind the rear
left-hand side tire
Rear left-hand
sideIn front of the
front right-hand
side tire
Rear right-hand
sideIn front of the
front left-hand
side tire
Page 505 of 584
5058-2. Steps to take in an emergency
COROLLA HV_U
8
When trouble arises
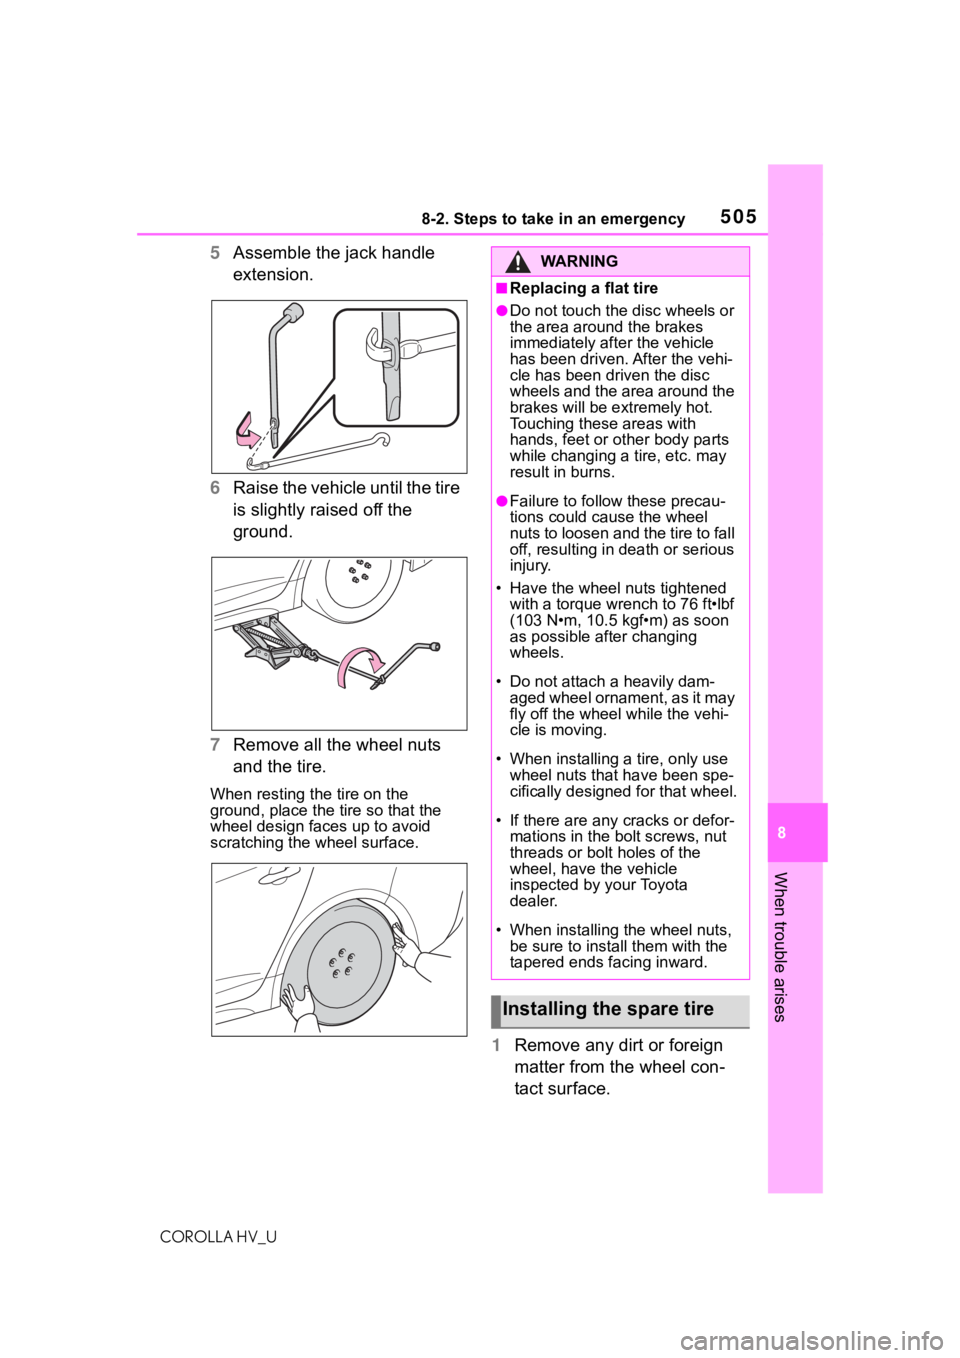
5 Assemble the jack handle
extension.
6 Raise the vehicle until the tire
is slightly raised off the
ground.
7 Remove all the wheel nuts
and the tire.
When resting the tire on the
ground, place the tire so that the
wheel design faces up to avoid
scratching the wheel surface.
1 Remove any dirt or foreign
matter from the wheel con-
tact surface.
WA R N I N G
■Replacing a flat tire
●Do not touch the disc wheels or
the area around the brakes
immediately after the vehicle
has been driven. After the vehi-
cle has been driven the disc
wheels and the area around the
brakes will be extremely hot.
Touching these areas with
hands, feet or oth er body parts
while changing a tire, etc. may
result in burns.
●Failure to follow these precau-
tions could cause the wheel
nuts to loosen and the tire to fall
off, resulting in death or serious
injury.
• Have the wheel nuts tightened
with a torque wrench to 76 ft•lbf
(103 N•m, 10.5 kgf•m) as soon
as possible after changing
wheels.
• Do not attach a heavily dam-
aged wheel ornament, as it may
fly off the wheel while the vehi-
cle is moving.
• When installing a tire, only use wheel nuts that have been spe-
cifically designed for that wheel.
• If there are any cracks or defor- mations in the bolt screws, nut
threads or bolt holes of the
wheel, have the vehicle
inspected by your Toyota
dealer.
• When installing the wheel nuts, be sure to install them with the
tapered ends facing inward.
Installing the spare tire
Page 506 of 584
5068-2. Steps to take in an emergency
COROLLA HV_UIf foreign matter is on the wheel
contact surface,
the wheel nuts
may loosen while the vehicle is in
motion, causing the tire to come off.
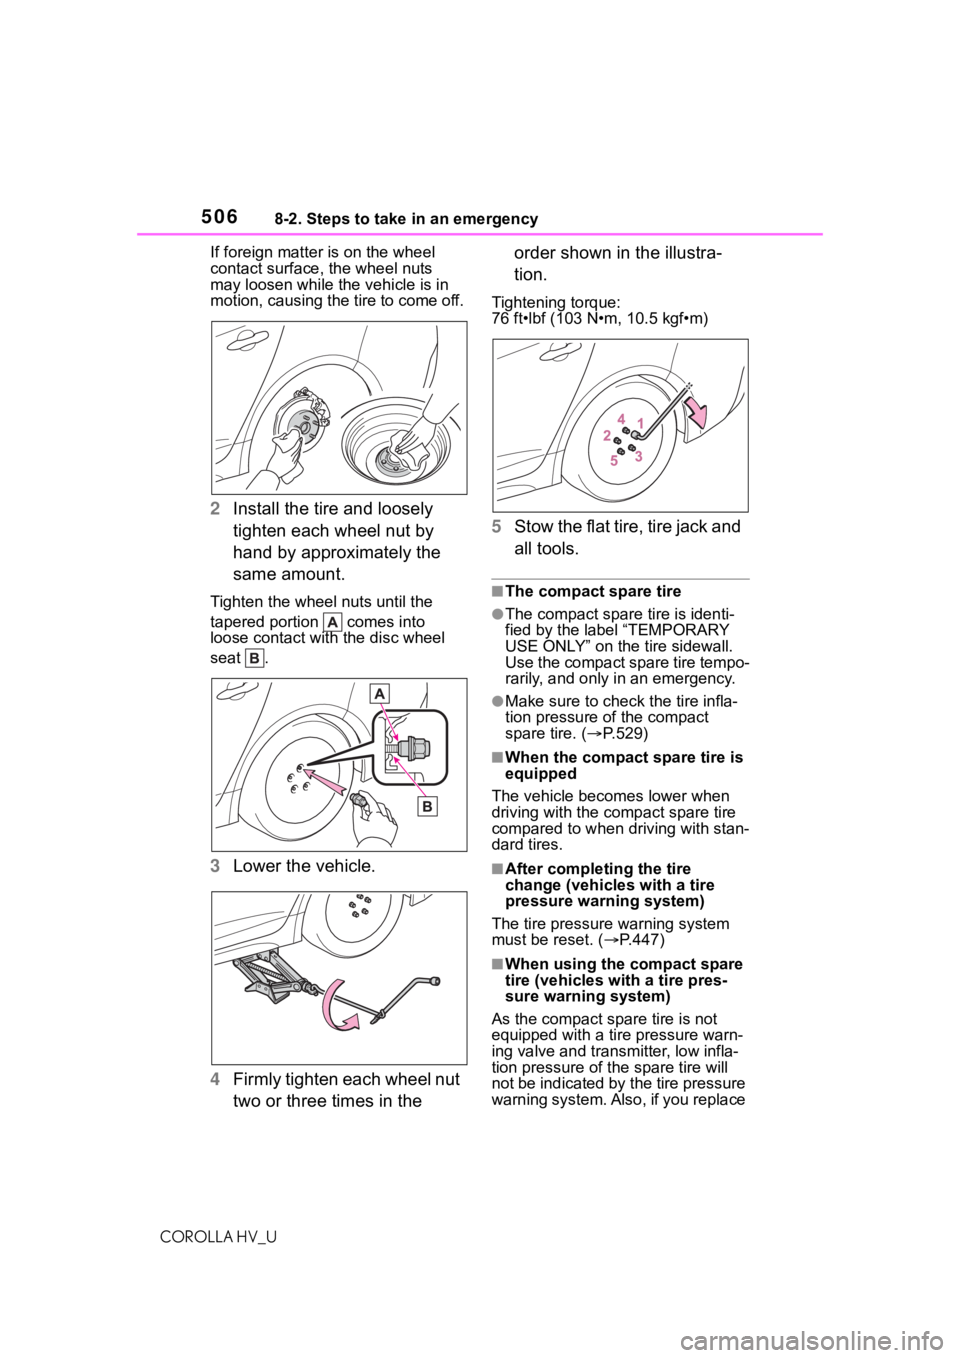
2 Install the tire and loosely
tighten each wheel nut by
hand by approximately the
same amount.
Tighten the whee l nuts until the
tapered portion comes into
loose contact with the disc wheel
seat .
3 Lower the vehicle.
4 Firmly tighten each wheel nut
two or three times in the order shown in the illustra-
tion.
Tightening torque:
76 ft•lbf (103 N•m, 10.5 kgf•m)
5
Stow the flat tire, tire jack and
all tools.
■The compact spare tire
●The compact spare tire is identi-
fied by the label “TEMPORARY
USE ONLY” on the tire sidewall.
Use the compact spare tire tempo-
rarily, and only in an emergency.
●Make sure to check the tire infla-
tion pressure of the compact
spare tire. ( P.529)
■When the compact spare tire is
equipped
The vehicle becomes lower when
driving with the compact spare tire
compared to when driving with stan-
dard tires.
■After completing the tire
change (vehicles with a tire
pressure warning system)
The tire pressure warning system
must be reset. ( P.447)
■When using the compact spare
tire (vehicles with a tire pres-
sure warning system)
As the compact spare tire is not
equipped with a tire pressure warn-
ing valve and transm itter, low infla-
tion pressure of t he spare tire will
not be indicated by the tire pressure
warning system. Also , if you replace
Page 507 of 584
5078-2. Steps to take in an emergency
COROLLA HV_U
8
When trouble arises
the compact spare tire after the tire
pressure warning light comes on,
the light remains on.
■If you have a flat front tire on a
road covered with snow or ice
Install the compact spare tire on one
of the rear wheels of the vehicle.
Perform the following steps and fit
tire chains to the front tires:
1 Replace a rear tire with the com-
pact spare tire.
2 Replace the flat front tire with the
tire removed from the rear of the
vehicle.
3 Fit tire chains to the front tires.
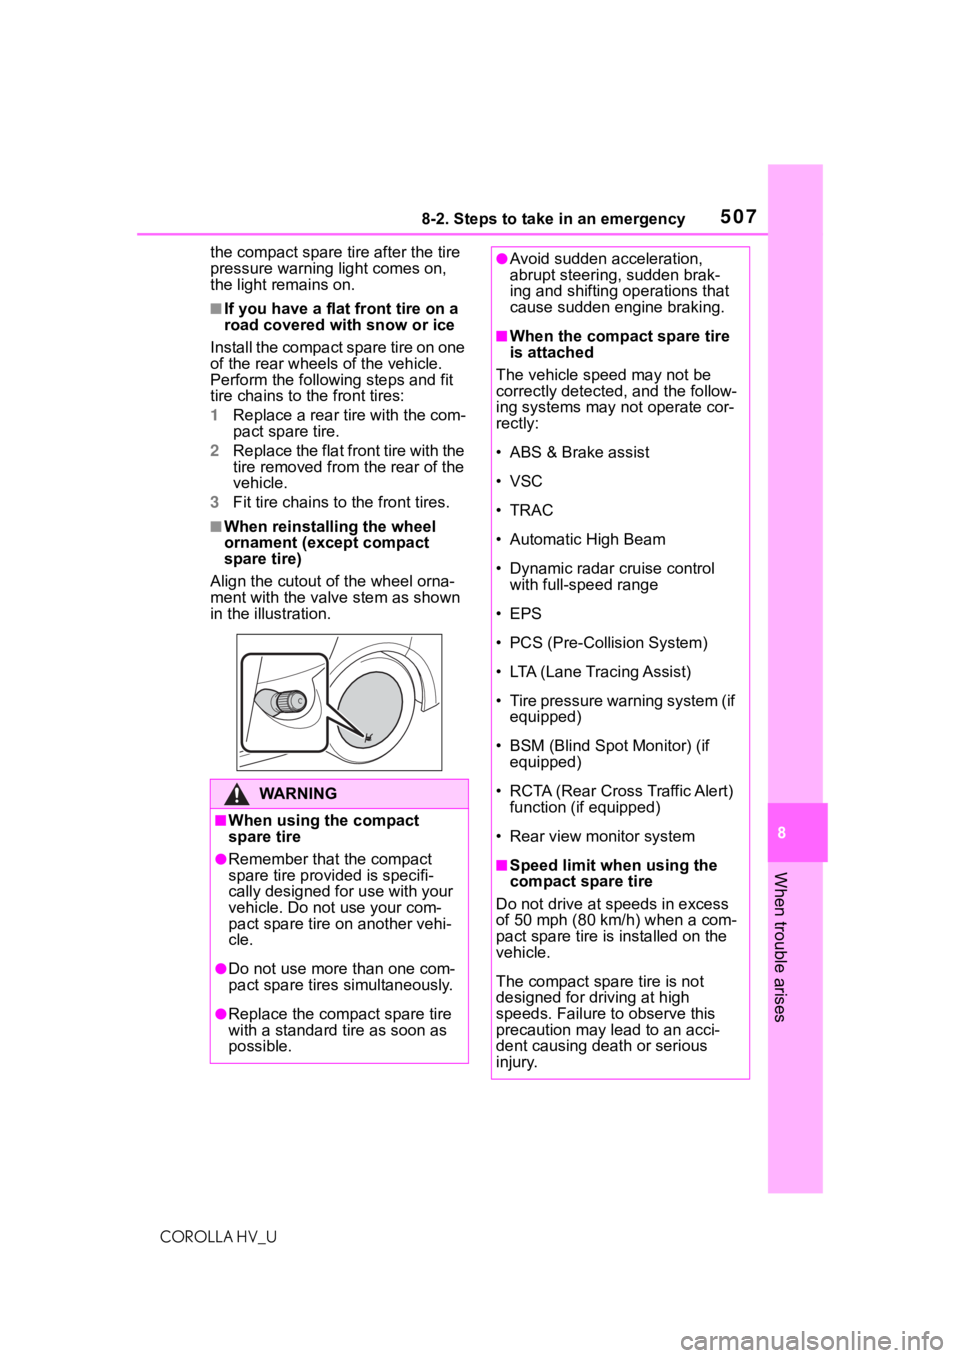
■When reinstalling the wheel
ornament (except compact
spare tire)
Align the cutout o f the wheel orna-
ment with the valve stem as shown
in the illustration.
WA R N I N G
■When using the compact
spare tire
●Remember that the compact
spare tire provided is specifi-
cally designed for use with your
vehicle. Do not use your com-
pact spare tire on another vehi-
cle.
●Do not use more than one com-
pact spare tires simultaneously.
●Replace the compact spare tire
with a standard tire as soon as
possible.
●Avoid sudden acceleration,
abrupt steering, sudden brak-
ing and shifting operations that
cause sudden engine braking.
■When the compact spare tire
is attached
The vehicle speed may not be
correctly detected, and the follow-
ing systems may not operate cor-
rectly:
• ABS & Brake assist
• VSC
•TRAC
• Automatic High Beam
• Dynamic radar cruise control with full-speed range
• EPS
• PCS (Pre-Collision System)
• LTA (Lane Tracing Assist)
• Tire pressure warning system (if equipped)
• BSM (Blind Spot Monitor) (if equipped)
• RCTA (Rear Cross Traffic Alert) function (if equipped)
• Rear view monitor system
■Speed limit when using the
compact spare tire
Do not drive at speeds in excess
of 50 mph (80 km /h) when a com-
pact spare tire is installed on the
vehicle.
The compact spare tire is not
designed for driving at high
speeds. Failure to observe this
precaution may lead to an acci-
dent causing death or serious
injury.
Page 529 of 584
5299-1. Specifications
COROLLA HV_U
9
Vehicle specifications
*1: Minimum pedal clearance when de pressed with a force of 67.4 lbf (300
N, 30.6 kgf) while the hyb rid system is operating.
*2: Make sure to confirm that the brake system warning light (yell ow) does
not illuminate. (If th e brake system warning light illuminates, refer to
P.478.)
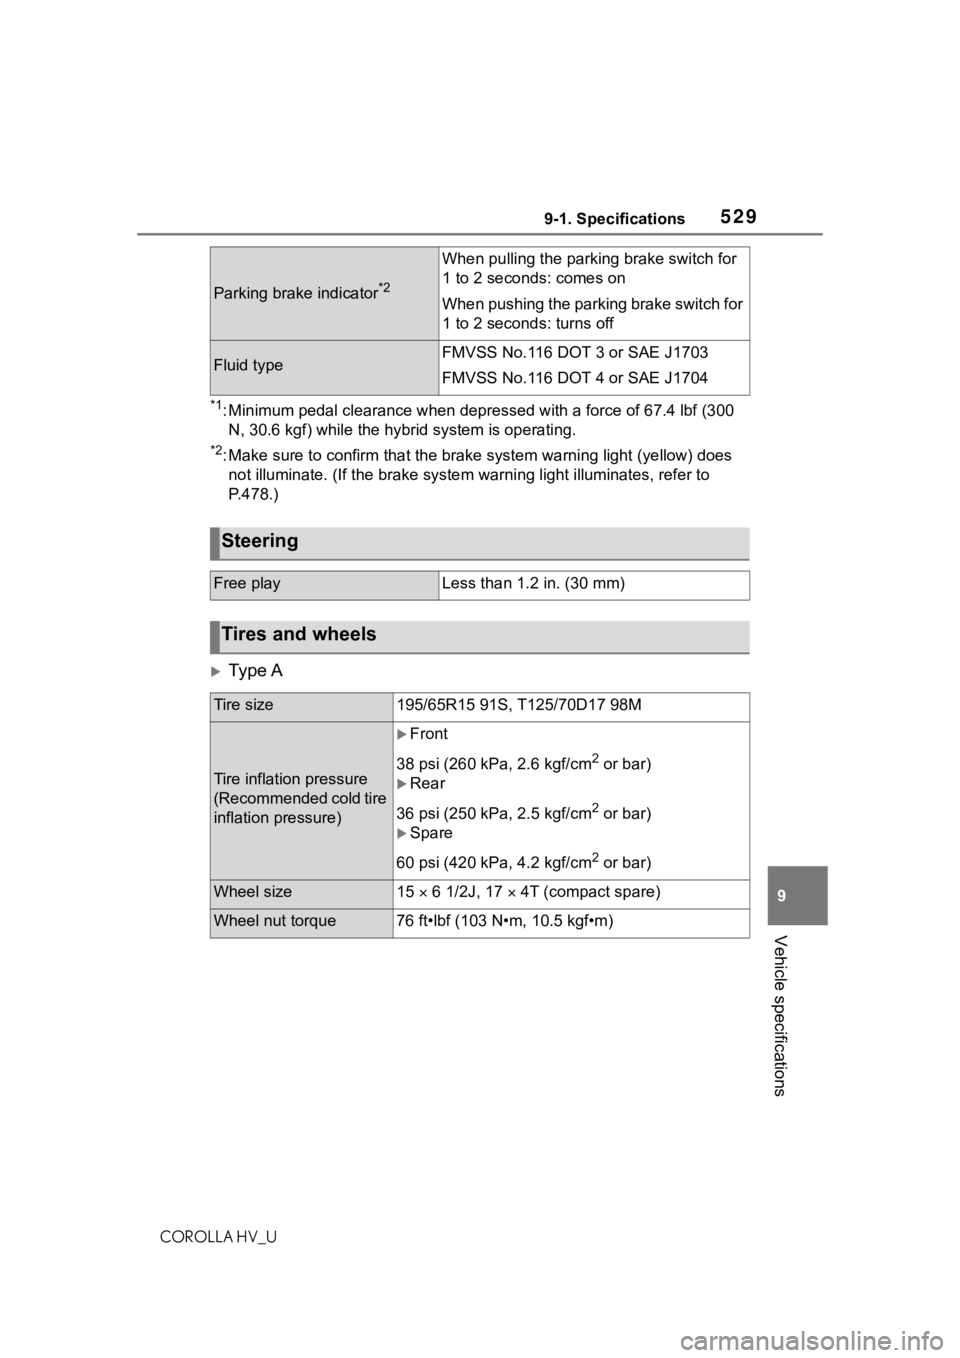
Ty p e A
Parking brake indicator*2
When pulling th e parking brake switch for
1 to 2 seconds: comes on
When pushing the parking brake switch for
1 to 2 seconds: turns off
Fluid typeFMVSS No.116 DOT 3 or SAE J1703
FMVSS No.116 DOT 4 or SAE J1704
Steering
Free playLess than 1.2 in. (30 mm)
Tires and wheels
Tire size195/65R15 91S, T125/70D17 98M
Tire inflation pressure
(Recommended cold tire
inflation pressure)
Front
38 psi (260 kPa, 2.6 kgf/cm
2 or bar)
Rear
36 psi (250 kPa, 2.5 kgf/cm
2 or bar)
Spare
60 psi (420 kPa, 4.2 kgf/cm
2 or bar)
Wheel size15 6 1/2J, 17 4T (compact spare)
Wheel nut torque76 ft•lbf (103 N•m, 10.5 kgf•m)
Page 530 of 584
5309-1. Specifications
COROLLA HV_U
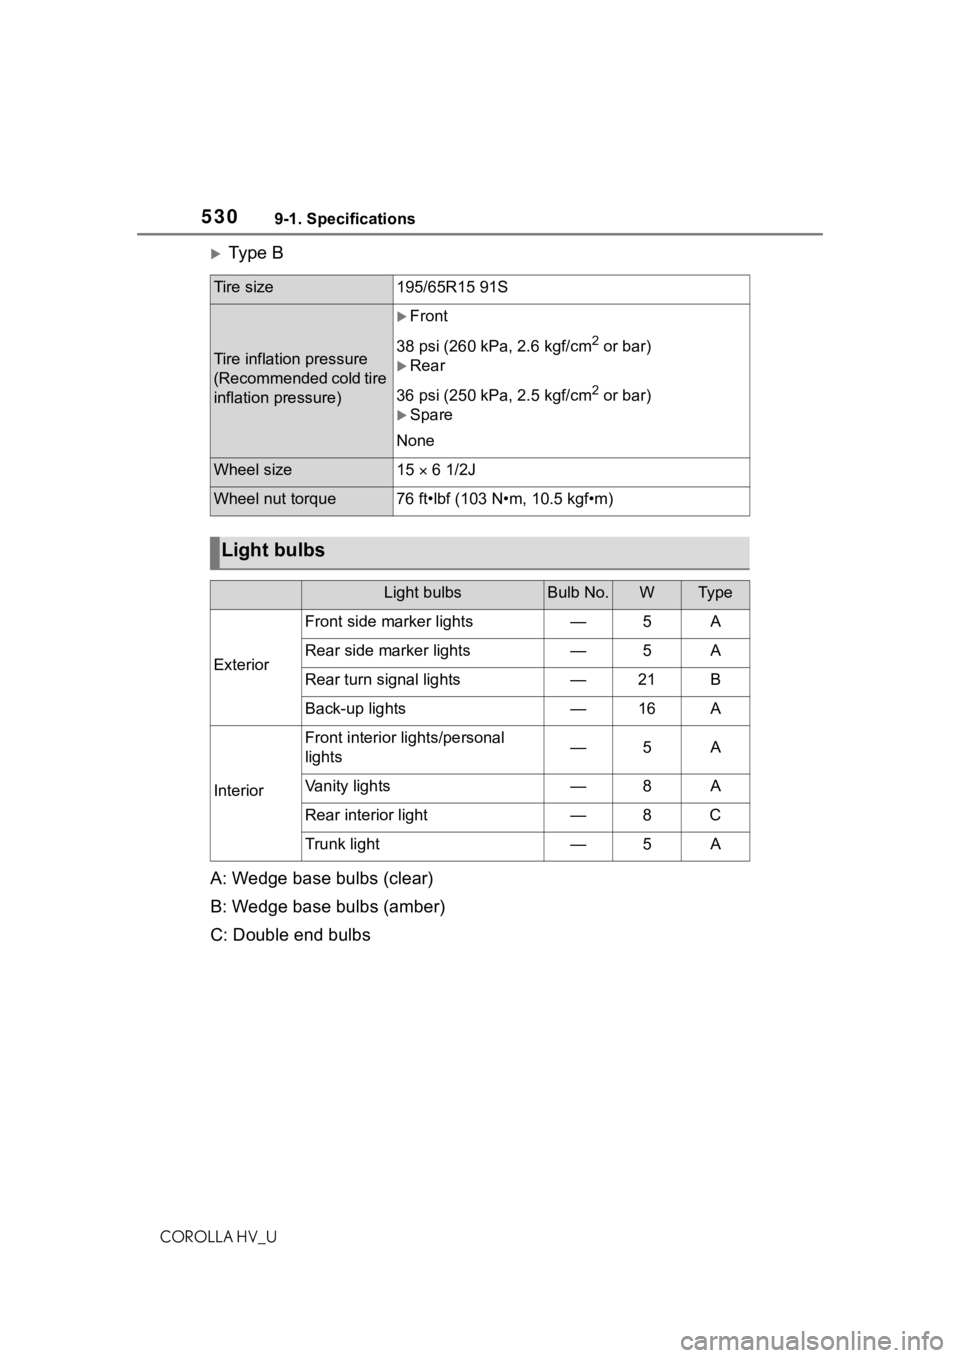
Ty p e B
A: Wedge base bulbs (clear)
B: Wedge base bulbs (amber)
C: Double end bulbs
Tire size195/65R15 91S
Tire inflation pressure
(Recommended cold tire
inflation pressure)
Front
38 psi (260 kPa, 2.6 kgf/cm
2 or bar)
Rear
36 psi (250 kPa, 2.5 kgf/cm
2 or bar)
Spare
None
Wheel size15 6 1/2J
Wheel nut torque76 ft•lbf (103 N•m, 10.5 kgf•m)
Light bulbs
Light bulbsBulb No.WTy p e
Exterior
Front side marker lights—5A
Rear side marker lights—5A
Rear turn signal lights—21B
Back-up lights—16A
Interior
Front interior lights/personal
lights—5A
Vanity lights—8A
Rear interior light—8C
Trunk light—5A
Page 533 of 584
5339-1. Specifications
COROLLA HV_U
9
Vehicle specifications
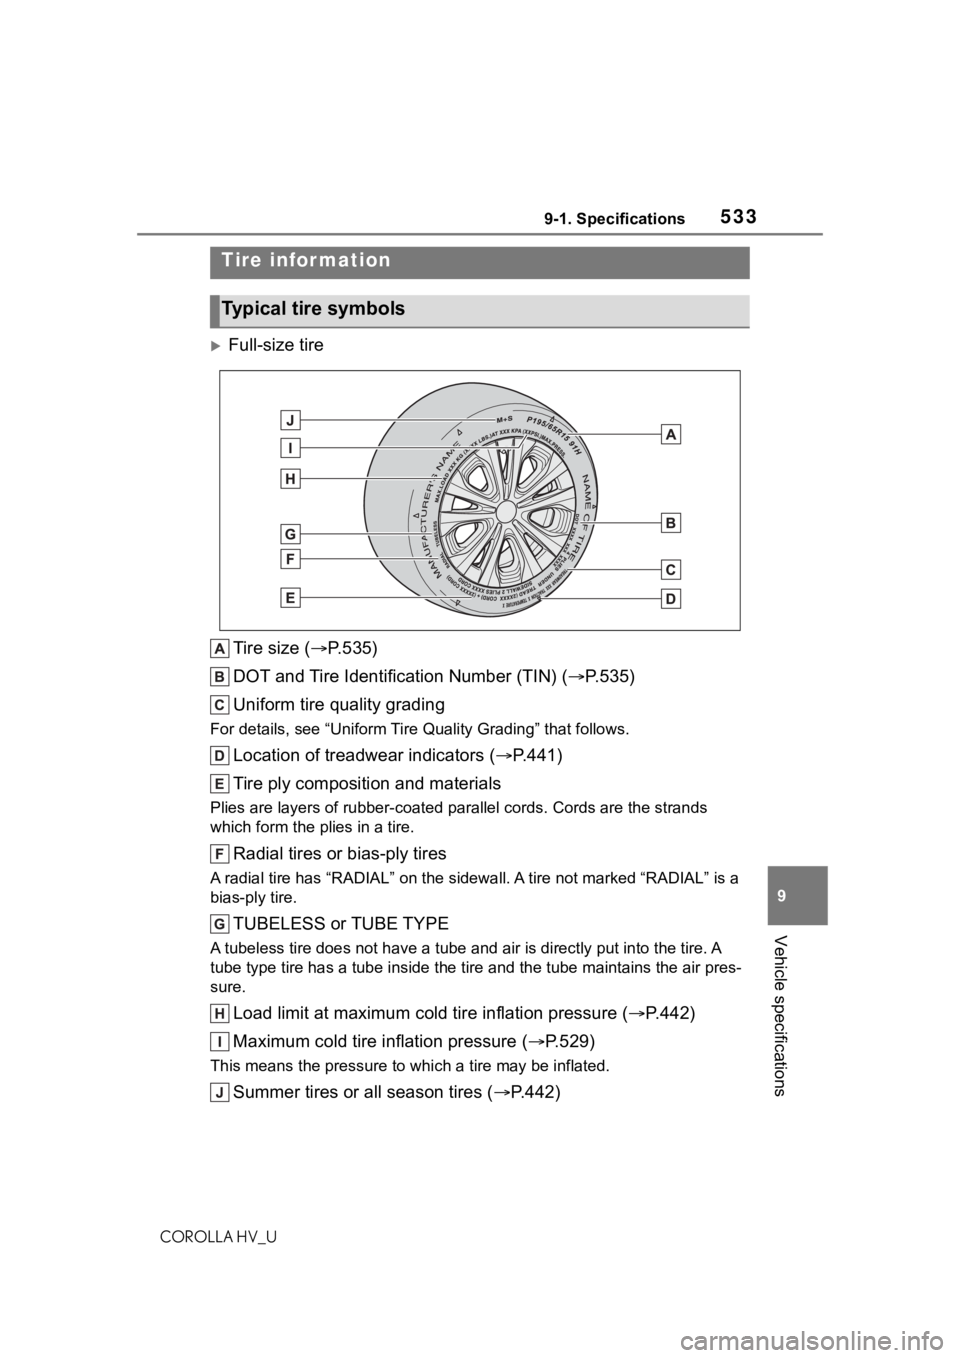
Full-size tire Tire size ( P.535)
DOT and Tire Identification Number (TIN) ( P.535)
Uniform tire quality grading
For details, see “Uniform Tire Quality Grading” that follows.
Location of treadwear indicators ( P.441)
Tire ply composition and materials
Plies are layers of rubber-coat ed parallel cords. Cords are the strands
which form the pl ies in a tire.
Radial tires or bias-ply tires
A radial tire has “RADIAL” on th e sidewall. A tire not marked “RADIAL” is a
bias-ply tire.
TUBELESS or TUBE TYPE
A tubeless tire does not have a tube and air is directly put into the tire. A
tube type tire has a tube inside t he tire and the tube maintains the air pres-
sure.
Load limit at maximum cold tire inflation pressure (P.442)
Maximum cold tire inflation pressure ( P.529)
This means the pressure to w hich a tire may be inflated.
Summer tires or all season tires ( P.442)
Tire information
Typical tire symbols
Page 534 of 584
5349-1. Specifications
COROLLA HV_UAn all season tire has
“M+S” on the sidewal l. A tire not marked “M+S” is a
summer tire.
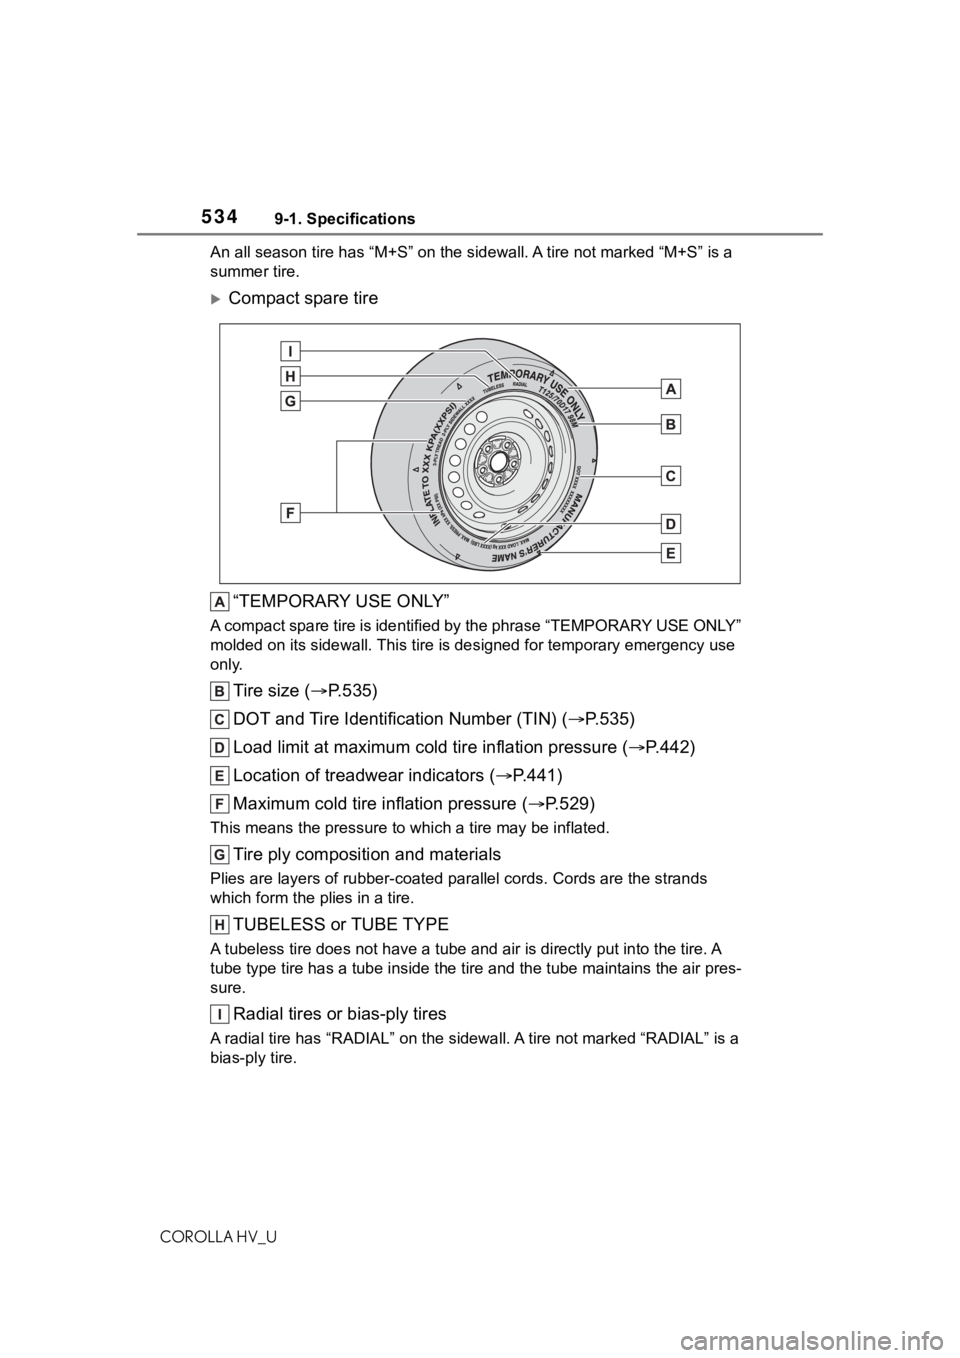
Compact spare tire
“TEMPORARY USE ONLY”
A compact spare tire is identifi ed by the phrase “TEMPORARY USE ONLY”
molded on its sidewall. This tire is designed for temporary eme rgency use
only.
Tire size ( P.535)
DOT and Tire Identification Number (TIN) ( P.535)
Load limit at maximum cold tire inflation pressure (P.442)
Location of treadwear indicators ( P.441)
Maximum cold tire inflation pressure ( P.529)
This means the pressure to w hich a tire may be inflated.
Tire ply composition and materials
Plies are layers of rubber-coat ed parallel cords. Cords are the strands
which form the pl ies in a tire.
TUBELESS or TUBE TYPE
A tubeless tire does not have a tube and air is directly put into the tire. A
tube type tire has a tube inside t he tire and the tube maintains the air pres-
sure.
Radial tires or bias-ply tires
A radial tire has “RADIAL” on th e sidewall. A tire not marked “RADIAL” is a
bias-ply tire.
Page 537 of 584
5379-1. Specifications
COROLLA HV_U
9
Vehicle specifications
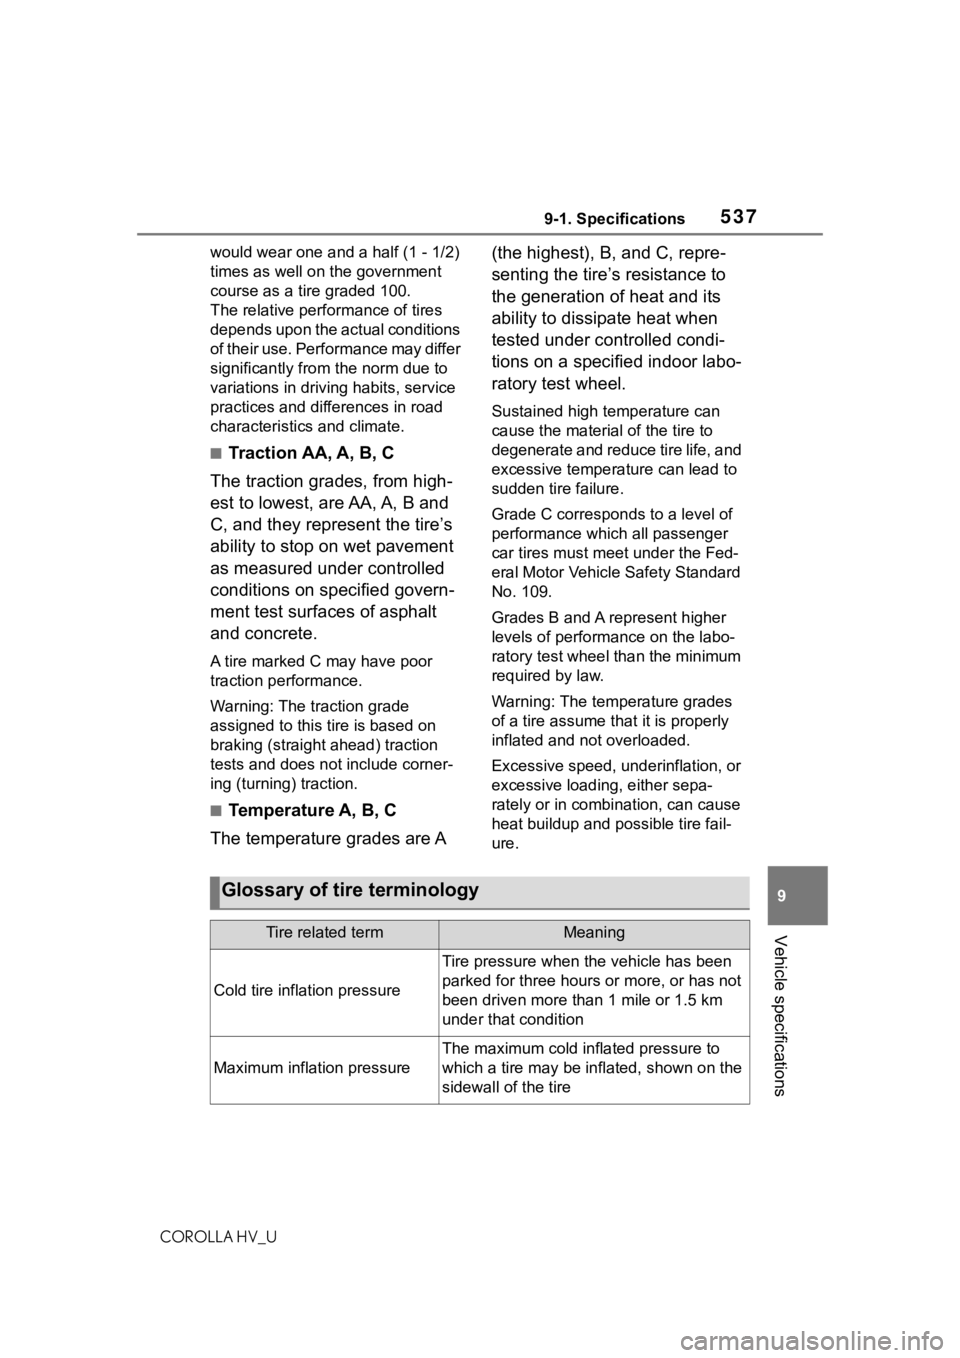
would wear one and a half (1 - 1/2)
times as well on the government
course as a tire graded 100.
The relative perfo rmance of tires
depends upon the actual conditions
of their use. Performance may differ
significantly from the norm due to
variations in driving habits, service
practices and differences in road
characteristics and climate.
■Traction AA, A, B, C
The traction grades, from high-
est to lowest, are AA, A, B and
C, and they represent the tire’s
ability to stop on wet pavement
as measured under controlled
conditions on specified govern-
ment test surfaces of asphalt
and concrete.
A tire marked C may have poor
traction performance.
Warning: The traction grade
assigned to this tire is based on
braking (straight ahead) traction
tests and does not include corner-
ing (turning) traction.
■Temperature A, B, C
The temperature grades are A (the highest), B, and C, repre-
senting the tire’s resistance to
the generation of heat and its
ability to dissipate heat when
tested under controlled condi-
tions on a specified indoor labo-
ratory test wheel.
Sustained high temperature can
cause the material
of the tire to
degenerate and reduce tire life, and
excessive temperature can lead to
sudden tire failure.
Grade C corresponds to a level of
performance which all passenger
car tires must meet under the Fed-
eral Motor Vehicle Safety Standard
No. 109.
Grades B and A represent higher
levels of performance on the labo-
ratory test wheel than the minimum
required by law.
Warning: The temperature grades
of a tire assume tha t it is properly
inflated and not overloaded.
Excessive speed, underinflation, or
excessive loading, either sepa-
rately or in combination, can cause
heat buildup and possible tire fail-
ure.
Glossary of tire terminology
Tire related termMeaning
Cold tire infl ation pressure
Tire pressure when the vehicle has been
parked for three hours or more, or has not
been driven more than 1 mile or 1.5 km
under that condition
Maximum inflation pressure
The maximum cold inf lated pressure to
which a tire may be inflated, shown on the
sidewall of the tire
Page 538 of 584
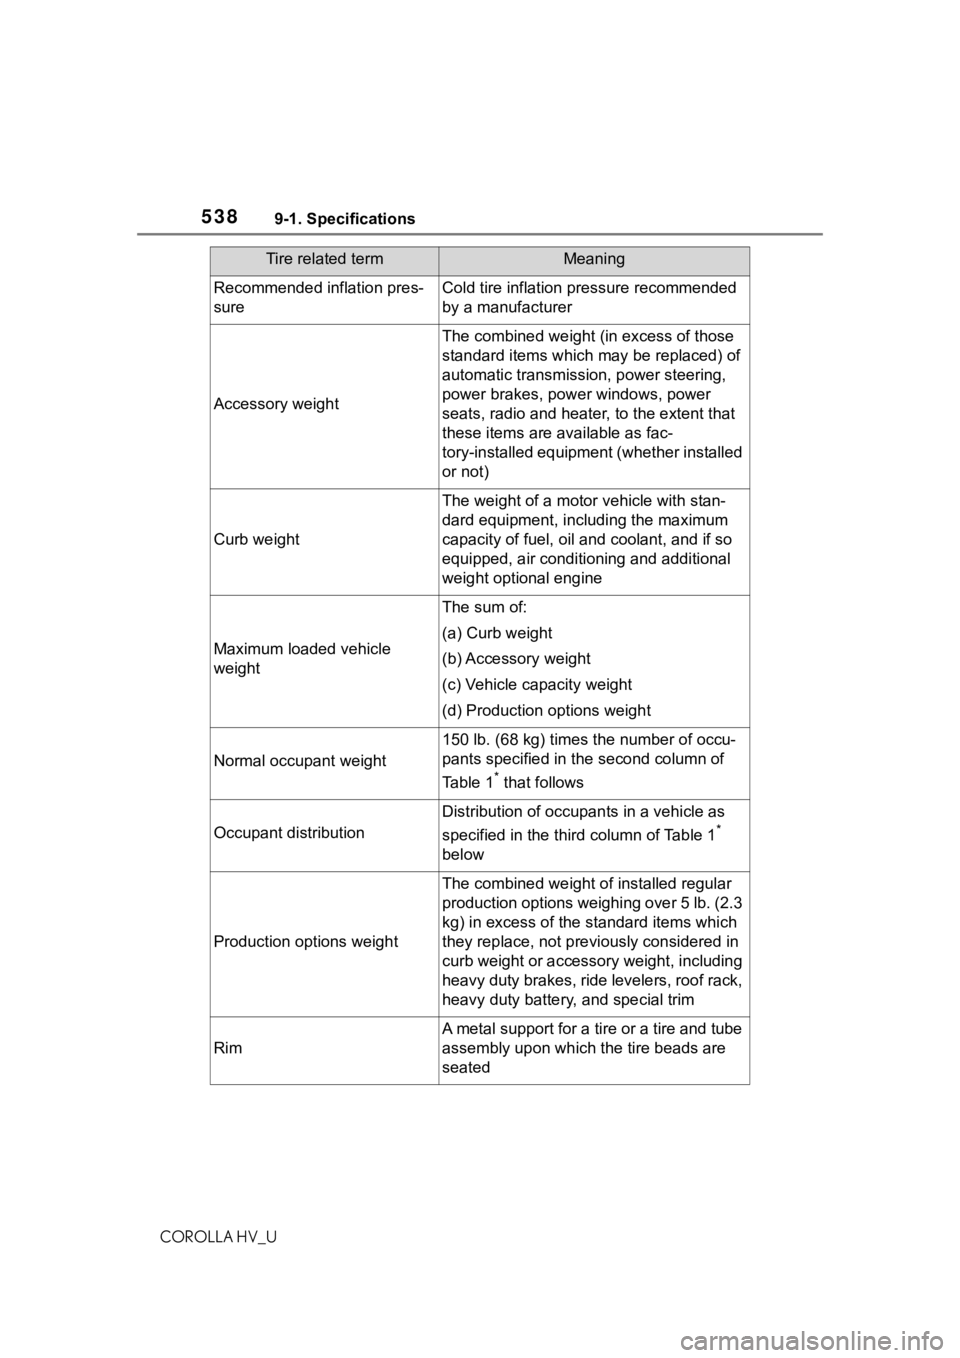
5389-1. Specifications
COROLLA HV_U
Recommended inflation pres-
sureCold tire inflation pressure recommended
by a manufacturer
Accessory weight
The combined weight (in excess of those
standard items which may be replaced) of
automatic transmission, power steering,
power brakes, power windows, power
seats, radio and heater, to the extent that
these items are available as fac-
tory-installed equipment (whether installed
or not)
Curb weight
The weight of a motor vehicle with stan-
dard equipment, including the maximum
capacity of fuel, oil and coolant, and if so
equipped, air conditioning and additional
weight optional engine
Maximum loaded vehicle
weight
The sum of:
(a) Curb weight
(b) Accessory weight
(c) Vehicle capacity weight
(d) Production options weight
Normal occupant weight
150 lb. (68 kg) times the number of occu-
pants specified in the second column of
Table 1
* that follows
Occupant distribution
Distribution of occupan ts in a vehicle as
specified in the thi rd column of Table 1
*
below
Production options weight
The combined weight o f installed regular
production options weighing over 5 lb. (2.3
kg) in excess of the s tandard items which
they replace, not previously considered in
curb weight or accessory weight, including
heavy duty brakes, ride levelers, roof rack,
heavy duty battery, and special trim
Rim
A metal support for a tire or a tire and tube
assembly upon which the tire beads are
seated
Tire related termMeaning