remove seats TOYOTA COROLLA HYBRID 2021 Owners Manual (in English)
[x] Cancel search | Manufacturer: TOYOTA, Model Year: 2021, Model line: COROLLA HYBRID, Model: TOYOTA COROLLA HYBRID 2021Pages: 584, PDF Size: 19.59 MB
Page 42 of 584
421-1. For safe use
COROLLA HV_U
WA R N I N G
●Make sure the “AIR BAG OFF”
indicator light is not illuminated
when using the seat belt
extender for the front passenger
seat. If the “AIR BAG OFF” indi-
cator light is illuminated, discon-
nect the extender tongue from
the seat belt buckle, and recon-
nect the seat belt. Reconnect
the seat belt extender after
making sure the “AIR BAG ON”
indicator light is illuminated. If
you use the seat belt extender
while the “AIR BAG OFF” indi-
cator light is illuminated, the
SRS airbags for the front pas-
senger may not activate, which
could cause death or serious
injury in the ev ent of a collision.
●D o n o t a p p l y a h e a v y l o a d t o t h e
front passenger seat or equip-
ment (e.g. seatback pocket).
●Do not put weight on the front
passenger seat by putting your
hands or feet on the front pas-
senger seat seatback from the
rear passenger seat.
●Do not let a rea r passenger lift
the front passenger seat with
their feet or press on the seat-
back with their legs.
●Do not put objec ts under the
front passenger seat.
●Do not recline t he front passen-
ger seatback so far that it
touches the rear seat. This may
cause the “AIR BAG OFF” indi-
cator light to be illuminated,
which indicates that the SRS
airbags for the front passenger
will not activate in the event of a
severe accident. If the seatback
touches the rear seat, return the
seatback to a pos ition where it
does not touch the rear seat.
Keep the front passenger seat-
back as upright as possible
when the vehicle is moving.
Reclining the seatback exces-
sively may lessen the effective-
ness of the seat belt system.
●If an adult sits i n the front pas-
senger seat, the “AIR BAG ON”
indicator light i s illuminated. If
the “AIR BAG OFF” indicator is
illuminated, ask the passenger
to sit up straight, well back in
the seat, feet on the floor, and
with the seat belt worn correctly.
If the “AIR BAG OFF” indicator
still remains illumi nated, either
ask the passenger to move to
the rear seat, or if that is not
possible, move the front pas-
senger seat fully rearward.
●When it is unavoidable to install
a forward-facing c hild restraint
system on the front passenger
seat, install the child restraint
system on the front passenger
seat in the proper order.
(
P. 5 0 )
●Do not modify or remove the
front seats.
●Do not kick the front passenger
seat or subject it to severe
impact. Otherwise, the SRS
warning light m ay come on to
indicate a malfu nction of the
front passenger occupant clas-
sification system. In this case,
contact your Toyota dealer
immediately.
Page 64 of 584
641-2. Child safety
COROLLA HV_U
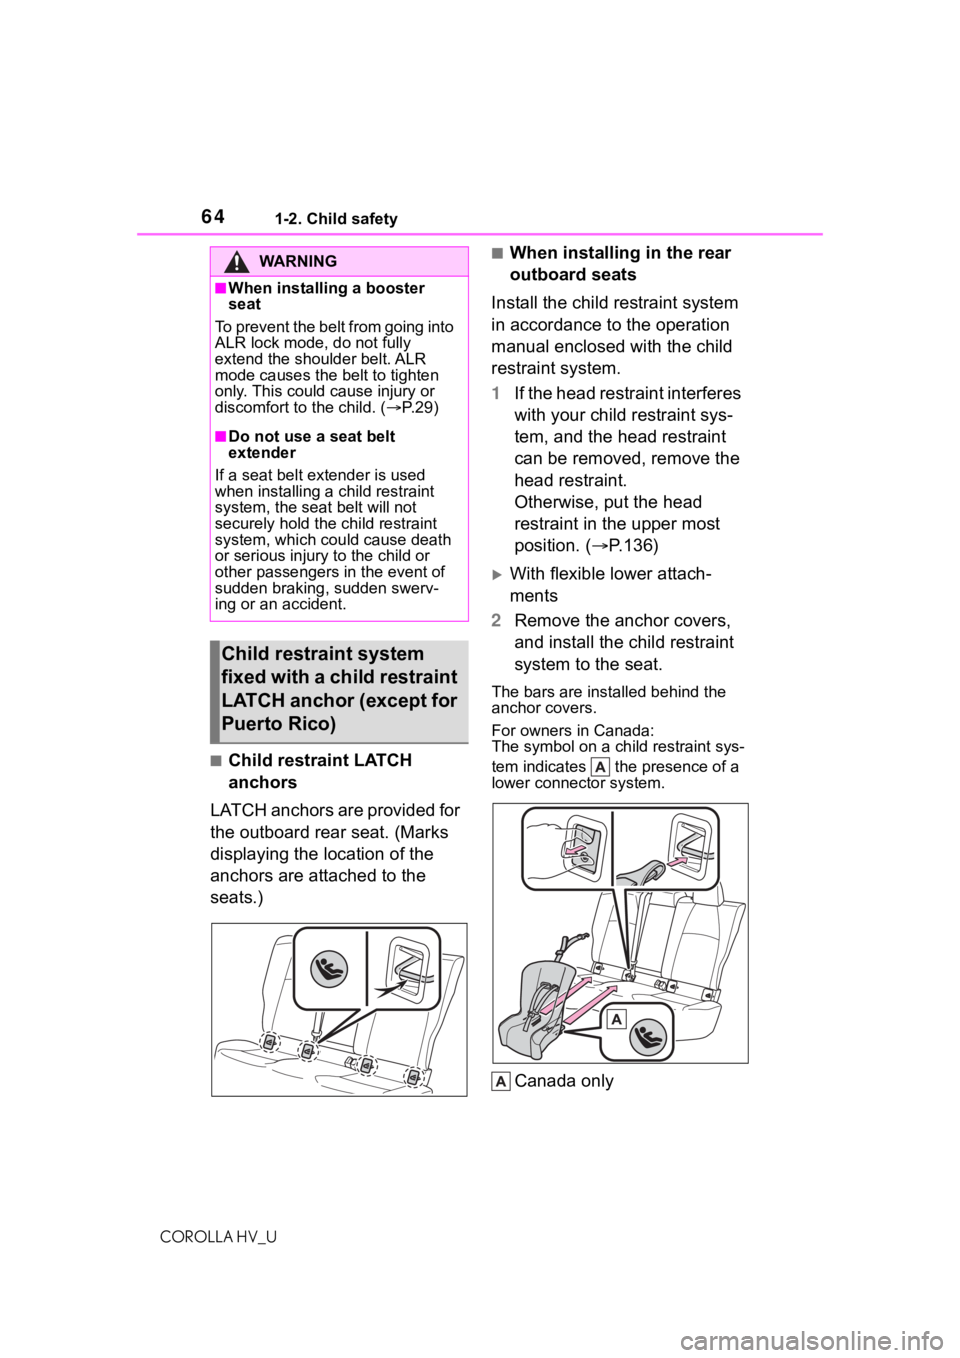
■Child restraint LATCH
anchors
LATCH anchors are provided for
the outboard rear seat. (Marks
displaying the location of the
anchors are attached to the
seats.)
■When installing in the rear
outboard seats
Install the child restraint system
in accordance to the operation
manual enclosed with the child
restraint system.
1 If the head restraint interferes
with your child restraint sys-
tem, and the head restraint
can be removed, remove the
head restraint.
Otherwise, put the head
restraint in the upper most
position. ( P.136)
With flexible lower attach-
ments
2 Remove the anchor covers,
and install the child restraint
system to the seat.
The bars are installed behind the
anchor covers.
For owners in Canada:
The symbol on a child restraint sys-
tem indicates the presence of a
lower connector system.
Canada only
WA R N I N G
■When installing a booster
seat
To pr ev en t t he b elt fr om g oin g int o
ALR lock mode, do not fully
extend the shoulder belt. ALR
mode causes the belt to tighten
only. This could cause injury or
discomfort to the child. ( P.29)
■Do not use a seat belt
extender
If a seat belt extender is used
when installing a child restraint
system, the seat belt will not
securely hold the child restraint
system, which could cause death
or serious injury to the child or
other passengers in the event of
sudden braking, sudden swerv-
ing or an accident.
Child restraint system
fixed with a child restraint
LATCH anchor (except for
Puerto Rico)
Page 65 of 584
651-2. Child safety
COROLLA HV_U
1
For safety and security
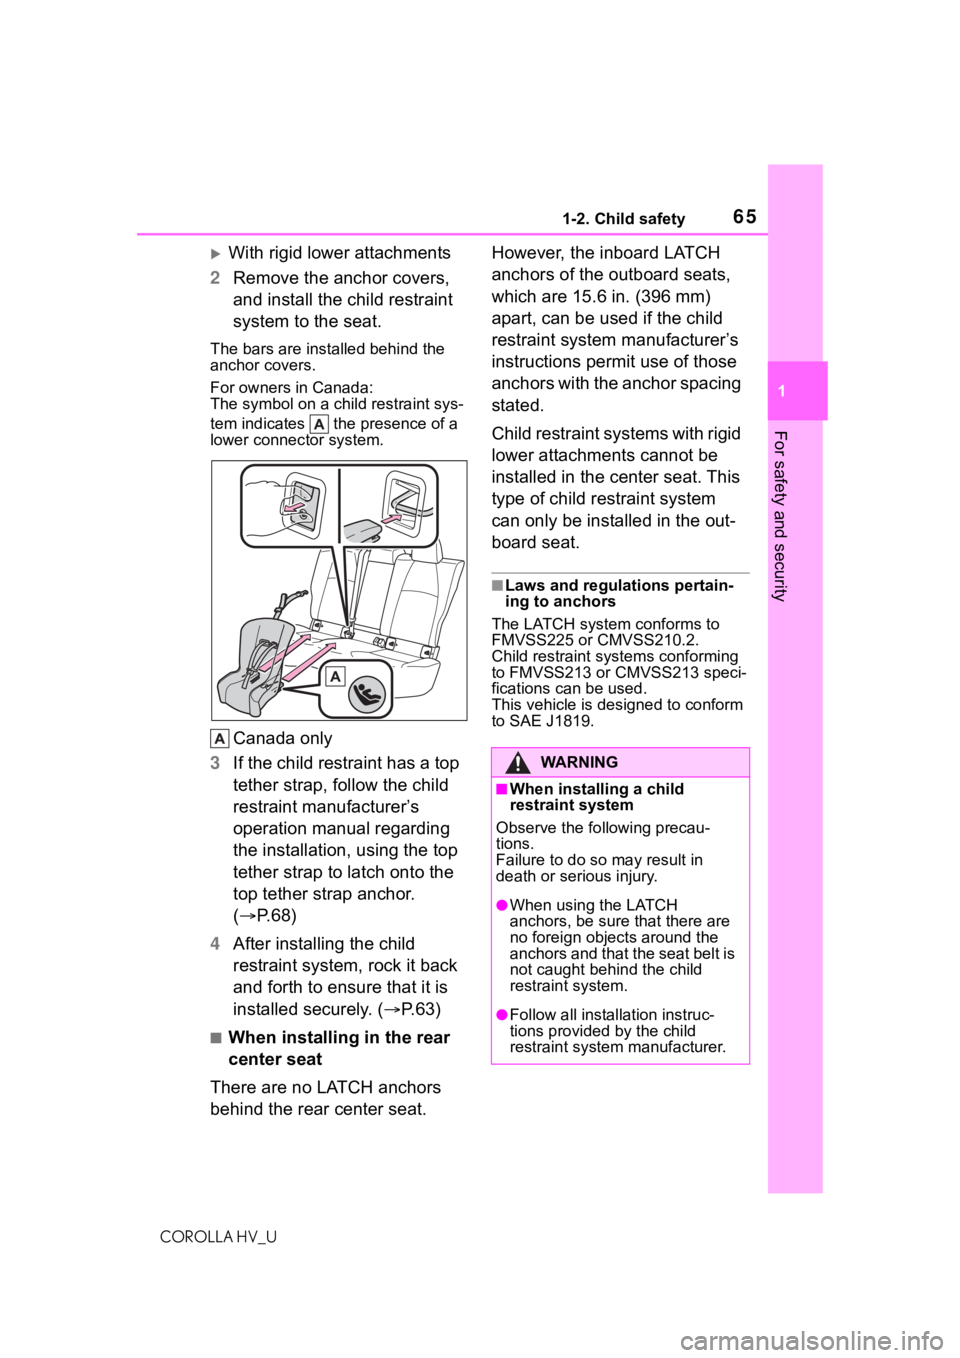
With rigid lower attachments
2 Remove the anchor covers,
and install the child restraint
system to the seat.
The bars are ins talled behind the
anchor covers.
For owners in Canada:
The symbol on a child restraint sys-
tem indicates the presence of a
lower connec tor system.
Canada only
3 If the child restraint has a top
tether strap, follow the child
restraint manufacturer’s
operation manual regarding
the installation, using the top
tether strap to latch onto the
top tether strap anchor.
( P. 6 8 )
4 After installing the child
restraint system, rock it back
and forth to ensure that it is
installed securely. ( P.63)
■When installing in the rear
center seat
There are no LATCH anchors
behind the rear center seat. However, the inboard LATCH
anchors of the outboard seats,
which are 15.6 in. (396 mm)
apart, can be used if the child
restraint system manufacturer’s
instructions permit use of those
anchors with the anchor spacing
stated.
Child restraint systems with rigid
lower attachments cannot be
installed in the center seat. This
type of child restraint system
can only be installed in the out-
board seat.
■Laws and regulations pertain-
ing to anchors
The LATCH system conforms to
FMVSS225 or CMVSS210.2.
Child restraint systems conforming
to FMVSS213 or CMVSS213 speci-
fications can be used.
This vehicle is designed to conform
to SAE J1819.
WA R N I N G
■When installing a child
restraint system
Observe the following precau-
tions.
Failure to do so may result in
death or serious injury.
●When using the LATCH
anchors, be sure that there are
no foreign objects around the
anchors and that the seat belt is
not caught behind the child
restraint system.
●Follow all installation instruc-
tions provided by the child
restraint system manufacturer.
Page 66 of 584
661-2. Child safety
COROLLA HV_U
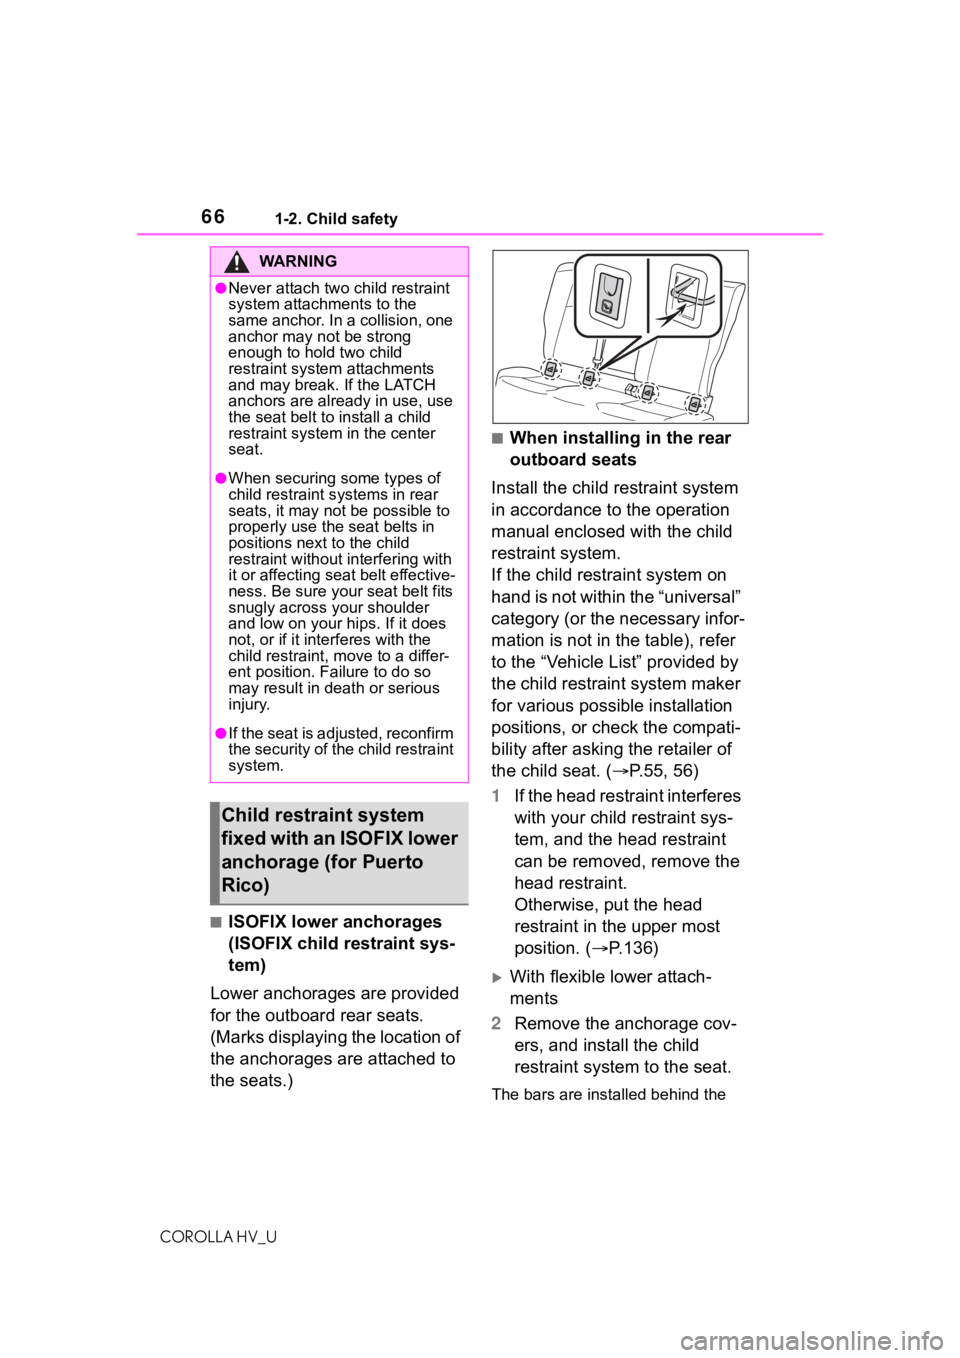
■ISOFIX lower anchorages
(ISOFIX child restraint sys-
tem)
Lower anchorages are provided
for the outboard rear seats.
(Marks displaying the location of
the anchorages are attached to
the seats.)
■When installing in the rear
outboard seats
Install the child restraint system
in accordance to the operation
manual enclosed with the child
restraint system.
If the child restraint system on
hand is not within the “universal”
category (or the necessary infor-
mation is not in the table), refer
to the “Vehicle List” provided by
the child restraint system maker
for various possible installation
positions, or check the compati-
bility after asking the retailer of
the child seat. ( P.55, 56)
1 If the head restraint interferes
with your child restraint sys-
tem, and the head restraint
can be removed, remove the
head restraint.
Otherwise, put the head
restraint in the upper most
position. ( P.136)
With flexible lower attach-
ments
2 Remove the anchorage cov-
ers, and install the child
restraint system to the seat.
The bars are installed behind the
WA R N I N G
●Never attach two child restraint
system attachm ents to the
same anchor. In a collision, one
anchor may not be strong
enough to hold two child
restraint system attachments
and may break. If the LATCH
anchors are already in use, use
the seat belt to install a child
restraint system in the center
seat.
●When securing some types of
child restraint s ystems in rear
seats, it may not be possible to
properly use the seat belts in
positions next to the child
restraint without interfering with
it or affecting seat belt effective-
ness. Be sure your seat belt fits
snugly across your shoulder
and low on your hips. If it does
not, or if it interferes with the
child restraint, move to a differ-
ent position. Failure to do so
may result in death or serious
injury.
●If the seat is adjusted, reconfirm
the security of the child restraint
system.
Child restraint system
fixed with an ISOFIX lower
anchorage (for Puerto
Rico)
Page 67 of 584
671-2. Child safety
COROLLA HV_U
1
For safety and security
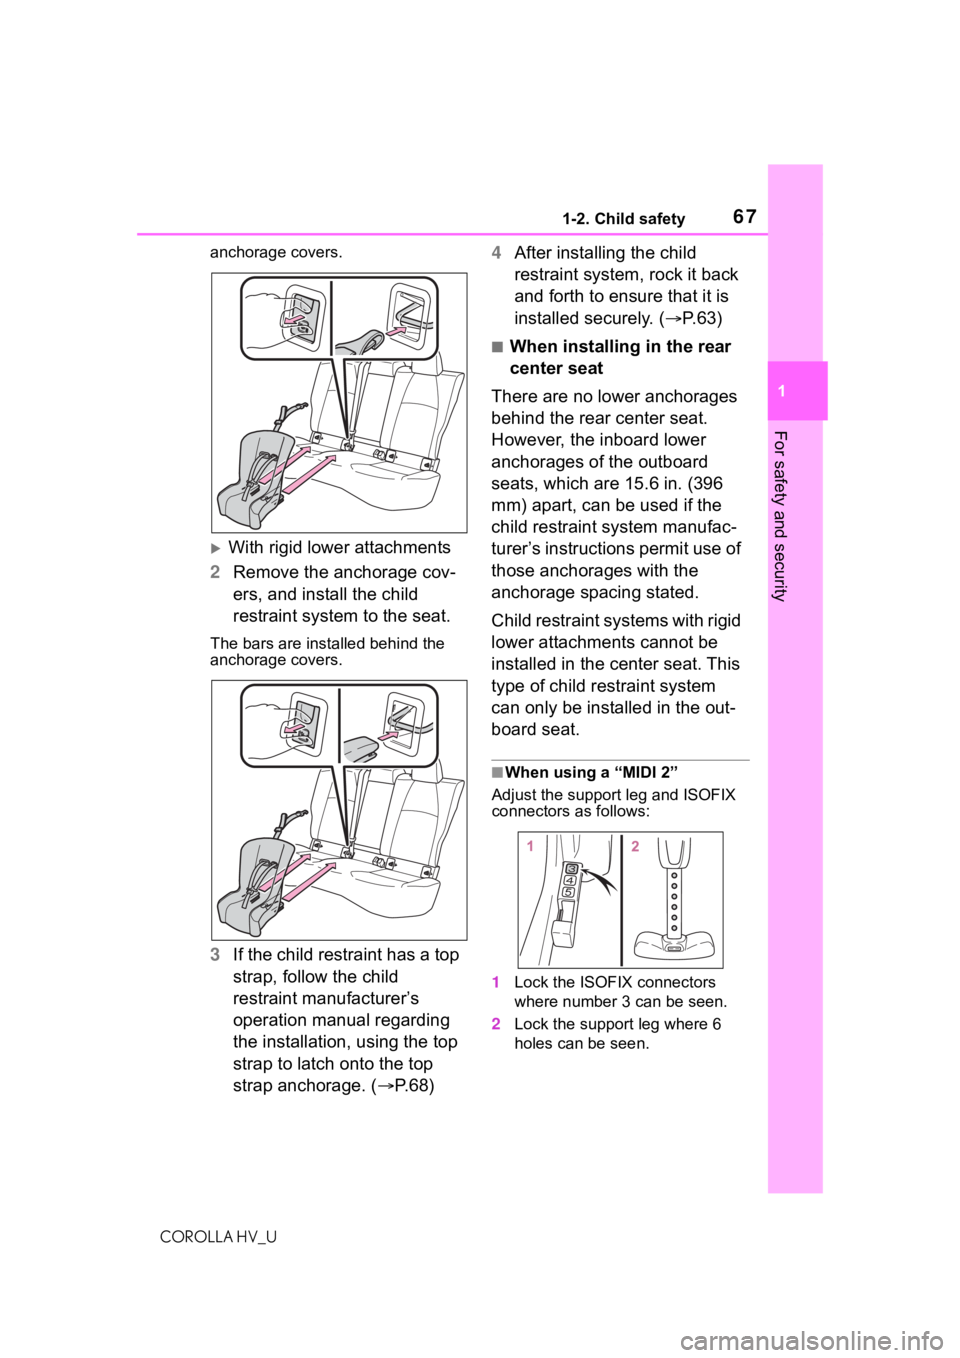
anchorage covers.
With rigid lower attachments
2 Remove the anchorage cov-
ers, and install the child
restraint system to the seat.
The bars are ins talled behind the
anchorage covers.
3 If the child restraint has a top
strap, follow the child
restraint manufacturer’s
operation manual regarding
the installation, using the top
strap to latch onto the top
strap anchorage. ( P. 6 8 )4
After installing the child
restraint system, rock it back
and forth to ensure that it is
installed securely. ( P.63)
■When installing in the rear
center seat
There are no lower anchorages
behind the rear center seat.
However, the inboard lower
anchorages of the outboard
seats, which are 15.6 in. (396
mm) apart, can be used if the
child restraint system manufac-
turer’s instructions permit use of
those anchorages with the
anchorage spacing stated.
Child restraint systems with rigid
lower attachments cannot be
installed in the center seat. This
type of child restraint system
can only be installed in the out-
board seat.
■When using a “MIDI 2”
Adjust the support leg and ISOFIX
connectors as follows:
1 Lock the ISOFIX connectors
where number 3 can be seen.
2 Lock the support leg where 6
holes can be seen.
Page 69 of 584
691-2. Child safety
COROLLA HV_U
1
For safety and security
■Fixing the top tether strap
to the anchor bracket
Install the child restraint system
in accordance to the operation
manual enclosed with the child
restraint system.
Rear outboard seats
1 Adjust the head restraint to
the upmost position.
If the head restraint interferes with
your child restraint system, and the
head restraint can be removed,
remove the head restraint.
Otherwise, put the head restraint in
the upper most position. ( P.136)
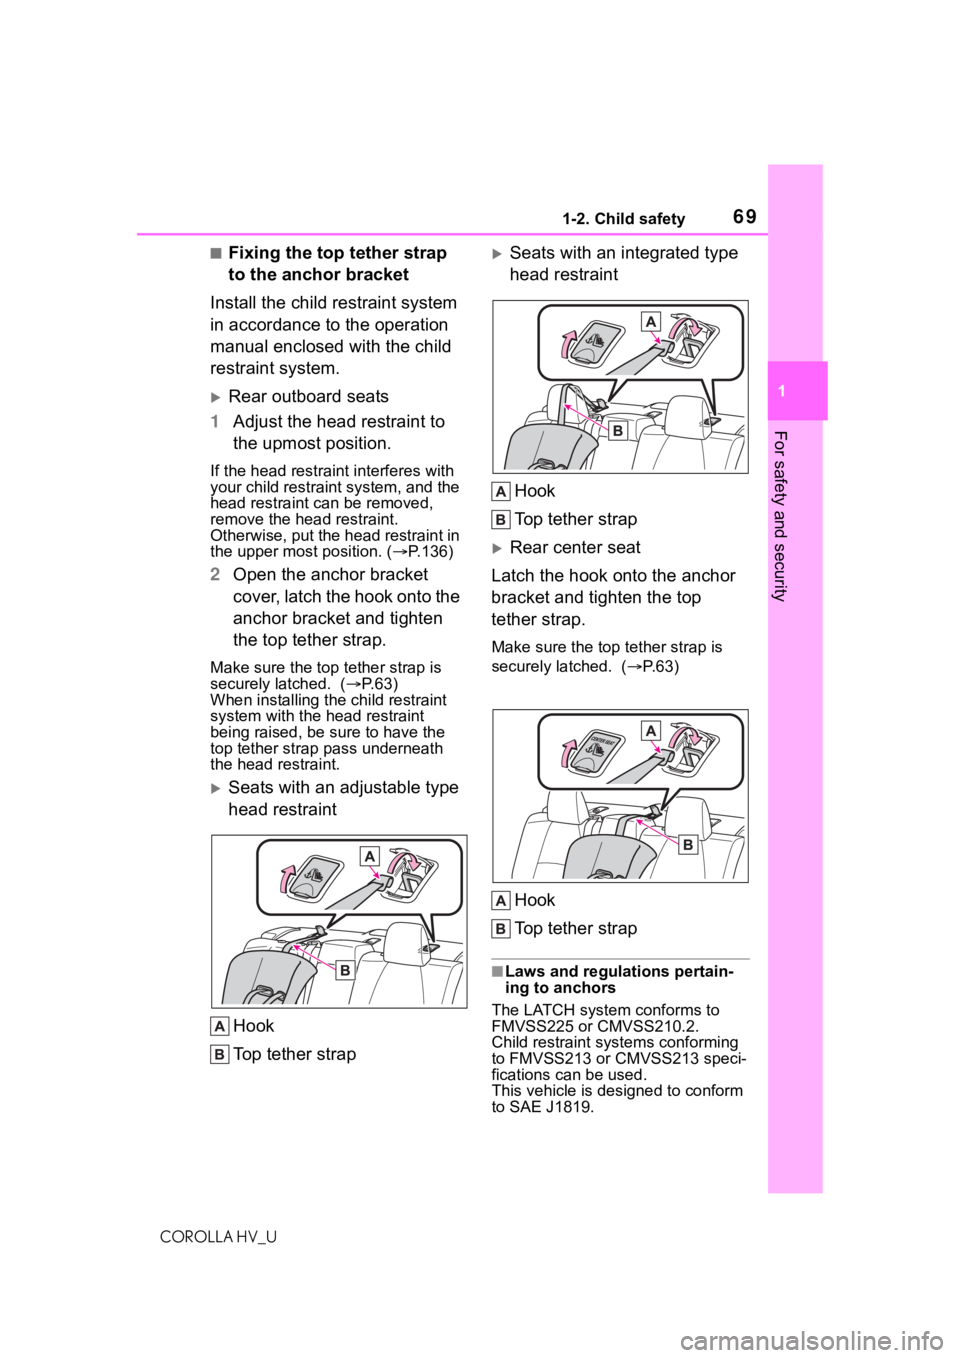
2 Open the anchor bracket
cover, latch the hook onto the
anchor bracket and tighten
the top tether strap.
Make sure the top tether strap is
securely latched. ( P. 6 3 )
When installing the child restraint
system with the head restraint
being raised, be sure to have the
top tether strap pass underneath
the head restraint.
Seats with an adjustable type
head restraint
Hook
Top tether strap
Seats with an integrated type
head restraintHook
Top tether strap
Rear center seat
Latch the hook onto the anchor
bracket and tighten the top
tether strap.
Make sure the top tether strap is
securely latched. ( P.63)
Hook
Top tether strap
■Laws and regulations pertain-
ing to anchors
The LATCH system conforms to
FMVSS225 or CMVSS210.2.
Child restraint systems conforming
to FMVSS213 or CMVSS213 speci-
fications can be used.
This vehicle is designed to conform
to SAE J1819.
Page 70 of 584
701-2. Child safety
COROLLA HV_U
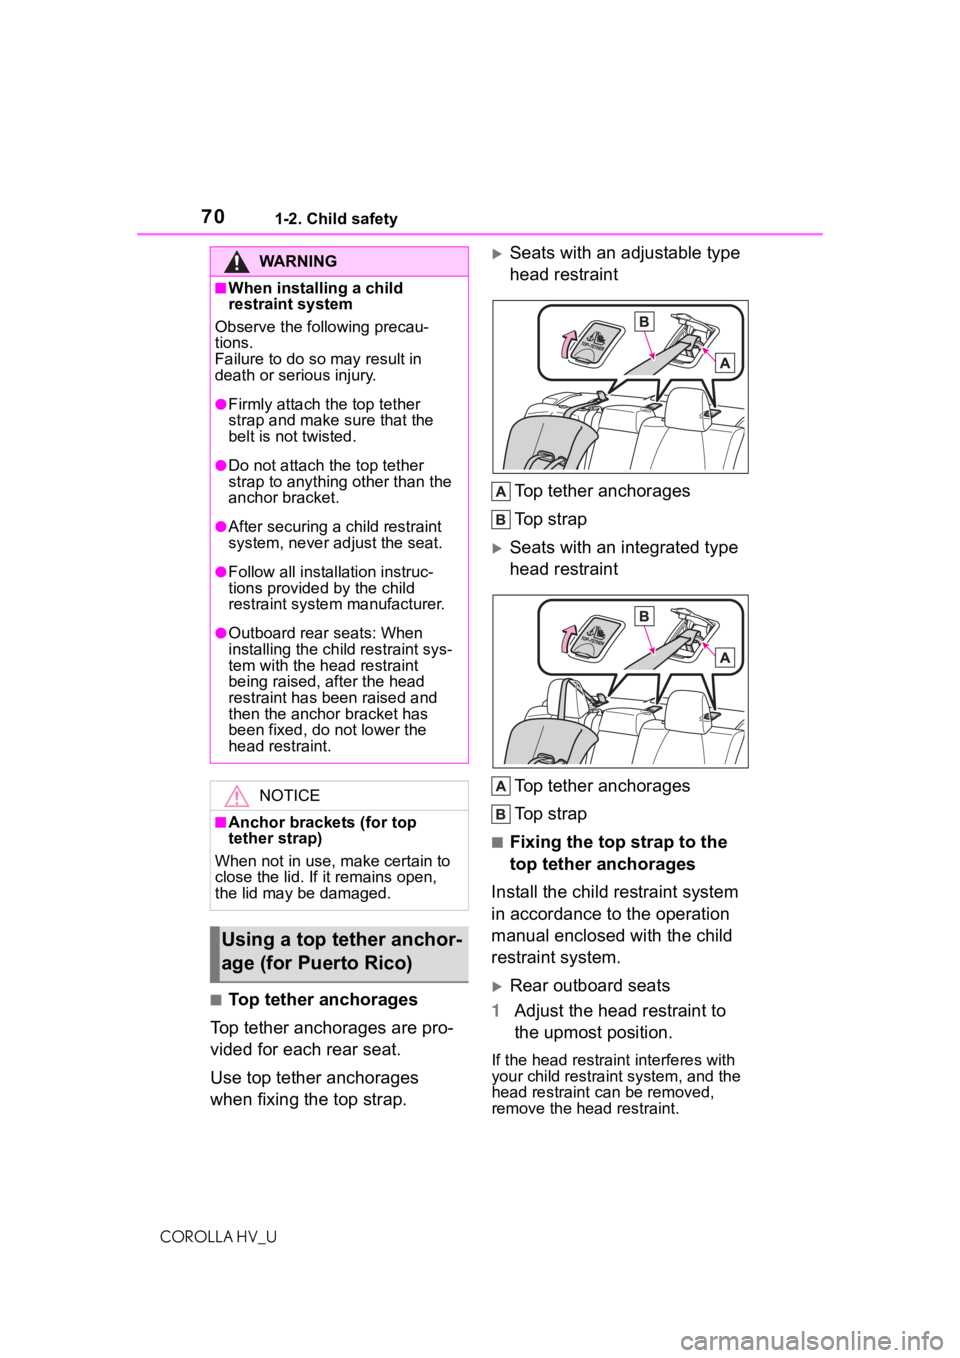
■Top tether anchorages
Top tether anchorages are pro-
vided for each rear seat.
Use top tether anchorages
when fixing the top strap.
Seats with an adjustable type
head restraint
Top tether anchorages
To p s t r a p
Seats with an integrated type
head restraint
Top tether anchorages
To p s t r a p
■Fixing the top strap to the
top tether anchorages
Install the child restraint system
in accordance to the operation
manual enclosed with the child
restraint system.
Rear outboard seats
1 Adjust the head restraint to
the upmost position.
If the head restraint interferes with
your child restraint system, and the
head restraint can be removed,
remove the head restraint.
WA R N I N G
■When installing a child
restraint system
Observe the following precau-
tions.
Failure to do so m ay result in
death or serious injury.
●Firmly attach t he top tether
strap and make sure that the
belt is not twisted.
●Do not attach the top tether
strap to anything other than the
anchor bracket.
●After securing a child restraint
system, never adjust the seat.
●Follow all installation instruc-
tions provided by the child
restraint system manufacturer.
●Outboard rear seats: When
installing the ch ild restraint sys-
tem with the head restraint
being raised, after the head
restraint has been raised and
then the anchor bracket has
been fixed, do not lower the
head restraint.
NOTICE
■Anchor brackets (for top
tether strap)
When not in use, make certain to
close the lid. If it remains open,
the lid may be damaged.
Using a top tether anchor-
age (for Puerto Rico)
Page 82 of 584
821-4. Hybrid system
COROLLA HV_U
■After the 12-volt battery has dis-
charged or when the terminal
has been removed and installed
during exchange, etc.
The gasoline engine may not stop
even if the vehicle is being driven by
the hybrid battery (traction battery).
If this continues for a few days, con-
tact your Toyota dealer.
■Sounds and vibrations specific
to a hybrid vehicle
There may be no engine sound or
vibration even though the vehicle is
able to move with the “READY” indi-
cator is illuminated. For safety, apply
the parking brake and make sure to
shift the shift lever to P when
parked.
The following sounds or vibrations
may occur when the hybrid system
is operating and are not a malfunc-
tion:
●Motor sounds may be heard from
the engine compartment.
●Sounds may be heard from the
hybrid battery (traction battery)
under the rear seats when the
hybrid system starts or stops.
●Relay operating sounds such as a
snap or soft clank will be emitted
from the hybrid battery (traction
battery), under the rear seats,
when the hybrid system is started
or stopped.
●Sounds from the hybrid system
may be heard when the trunk lid is
open.
●Sounds may be heard from the
transmission when the gasoline
engine starts or stops, when driv-
ing at low speeds, or during idling.
●Engine sounds may be heard
when accelerating sharply.
●Sounds may be heard due to
regenerative braking when the
brake pedal is dep ressed or as
the accelerator pedal is released.
●Vibration may be felt when the
gasoline engine starts or stops.
●Cooling fan sounds may be heard
from the air intake vent on the side
of the lower part of the rear right
seat.
■Maintenance, repair, recycling,
and disposal
Contact your Toyota dealer regard-
ing maintenance, repair, recycling
and disposal. Do n ot dispose of the
vehicle yourself.
■Customization
Some functions can be customized.
( P.544)
When driving with the gasoline
engine stopped, a sound, which
changes in accordance with the
driving speed, will be played in
order to warn people nearby of
the vehicle’s approach. The
sound will stop when the vehicle
speed exceeds approximately
22 mph (35 km/h).
■Vehicle proximity notification
system
In the following ca ses, the vehicle
proximity notification system may be
difficult for surrounding people to
hear.
●In very noisy areas
●In the wind or the rain
Also, as the vehicle proximity notifi-
cation system is installed on the
front of the vehicle, it may be more
difficult to hear fr om the rear of the
vehicle compared to the front.
Vehicle proximity notifica-
tion system
Page 136 of 584
1363-3. Adjusting the seats
COROLLA HV_U
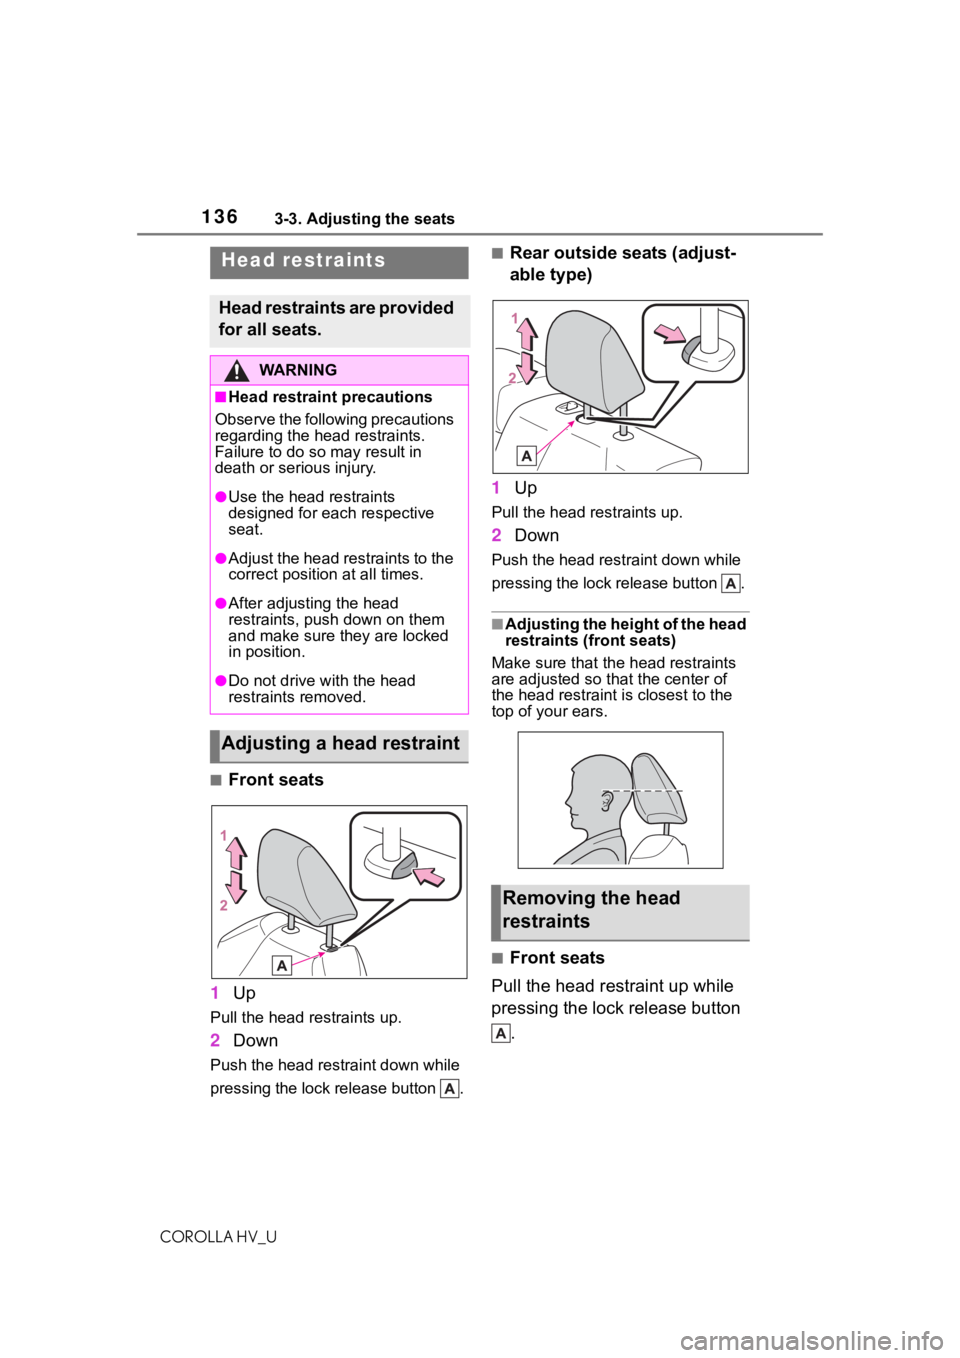
■Front seats
1 Up
Pull the head restraints up.
2Down
Push the head restraint down while
pressing the lock release button .
■Rear outside seats (adjust-
able type)
1 Up
Pull the head restraints up.
2Down
Push the head restraint down while
pressing the lock release button .
■Adjusting the height of the head
restraints (front seats)
Make sure that the head restraints
are adjusted so that the center of
the head restraint i s closest to the
top of your ears.
■Front seats
Pull the head restraint up while
pressing the lock release button .
Head restraints
Head restraints are provided
for all seats.
WA R N I N G
■Head restraint precautions
Observe the following precautions
regarding the head restraints.
Failure to do so m ay result in
death or serious injury.
●Use the head restraints
designed for each respective
seat.
●Adjust the head restraints to the
correct position at all times.
●After adjusting the head
restraints, push down on them
and make sure they are locked
in position.
●Do not drive with the head
restraints removed.
Adjusting a head restraint
Removing the head
restraints
Page 423 of 584
4237-1. Maintenance and care
COROLLA HV_U
7
Maintenance and care
WA R N I N G
■Water in the vehicle
●Do not splash or spill liquid in
the vehicle, such as on the floor,
in the hybrid battery (traction
battery) air intake vent, and in
the trunk. ( P.422)
Doing so may cause the hybrid
battery, electrical components,
etc. to malfunction or catch fire.
●Do not get any of the SRS com-
ponents or wiring in the vehicle
interior wet.
( P.31)
An electrical malfunction may
cause the airbags to deploy or
not function properly, resulting
in death or serious injury.
●Vehicles with wireless charger:
Do not let the wireless charger
( P.402) get wet. Failure to do
so may cause the charger to
become hot and cause burns or
could cause electric shock
resulting in dea th or serious
injury.
■Cleaning the interior (espe-
cially instrument panel)
Do not use polish wax or polish
cleaner. The instrument panel
may reflect off the windshield,
obstructing the dr iver’s view and
leading to an accident, resulting in
death or serious injury.
NOTICE
■Cleaning detergents
●Do not use the f ollowing types
of detergent, as they may dis-
color the vehicle interior or
cause streaks or damage to
painted surfaces:
• Areas other than the seats and steering wheel: Organic sub-
stances such as benzene or
gasoline, alkaline or acidic solu-
tions, dye, and bleach
• Seats: Alkaline or acidic solu- tions, such as th inner, benzene,
and alcohol
• Steering wheel: Organic sub- stances, such as thinner, and
cleaner that contains alcohol
●Do not use polish wax or polish
cleaner. The instrument panel’s
or other interior part’s painted
surface may be damaged.
■Preventing damage to leather
surfaces
Observe the following precautions
to avoid damage to and deteriora-
tion of leather surfaces:
●Remove any dust or dirt from
leather surfaces immediately.
●Do not expose the vehicle to
direct sunlight for extended peri-
ods of time. Park the vehicle in
the shade, especially during
summer.
●Do not place items made of
vinyl, plastic, or containing wax
on the upholstery, as they may
stick to the leather surface if the
vehicle interior heats up signifi-
cantly.
■Water on the floor
Do not wash the v ehicle floor with
water.
Vehicle systems such as the
audio system may be damaged if
water comes into contact with
electrical components such as the
audio system abov e or under the
floor of the vehicle. Water may
also cause the body to rust.
■When cleaning the inside of
the windshield
Do not allow glass cleaner to con-
tact the lens. Also, do not touch
the lens. ( P.183)