lights TOYOTA FJ CRUISER 2010 1.G Service Manual
[x] Cancel search | Manufacturer: TOYOTA, Model Year: 2010, Model line: FJ CRUISER, Model: TOYOTA FJ CRUISER 2010 1.GPages: 439, PDF Size: 11.02 MB
Page 339 of 439
338 4-3. Do-it-yourself maintenance
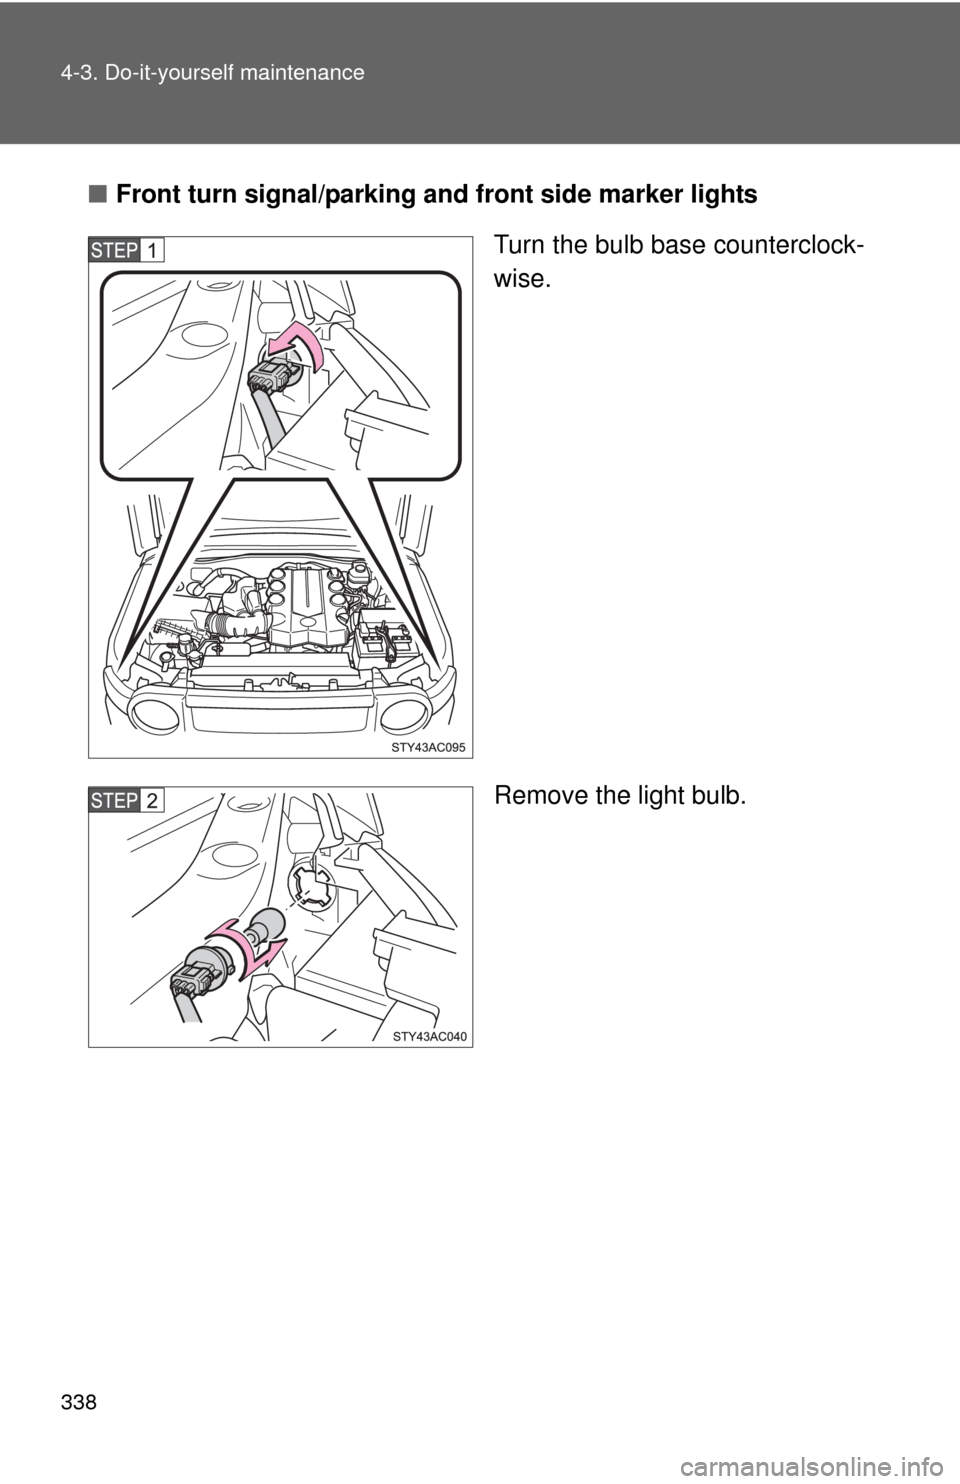
■Front turn signal/parking and front side marker lights
Turn the bulb base counterclock-
wise.
Remove the light bulb.
Page 340 of 439
339 4-3. Do-it-yourself maintenance
4
Maintenance and care
■Back-up lights, stop/tail and rear side marker and rear turn
signal light bulbs
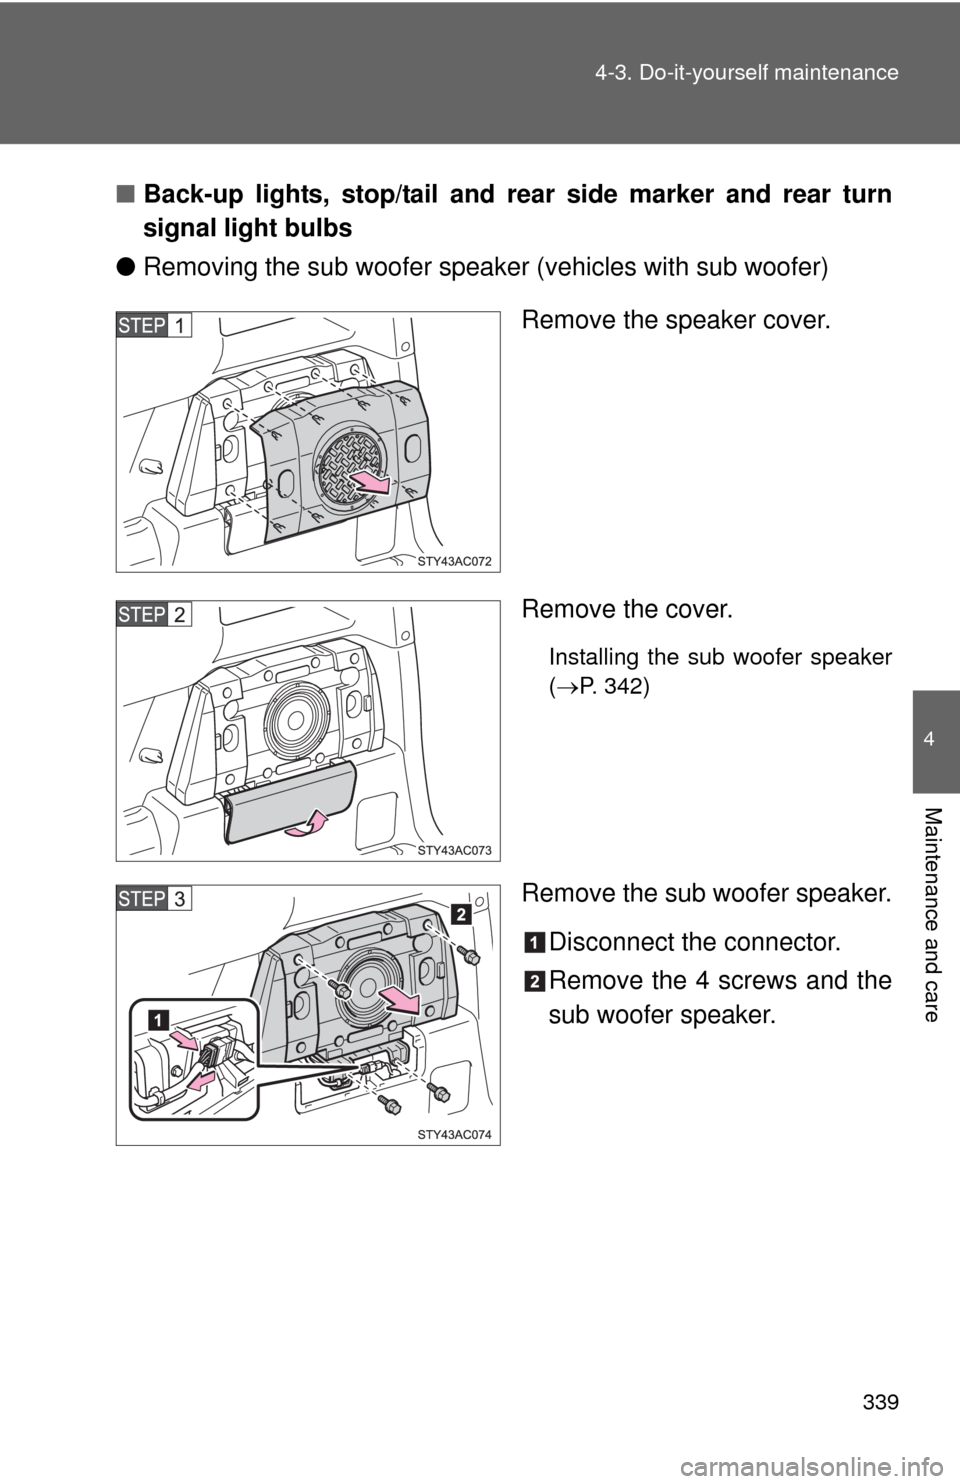
●Removing the sub woofer speaker (vehicles with sub woofer)
Remove the speaker cover.
Remove the cover.
Installing the sub woofer speaker
(P. 342)
Remove the sub woofer speaker.
Disconnect the connector.
Remove the 4 screws and the
sub woofer speaker.
Page 341 of 439
340 4-3. Do-it-yourself maintenance
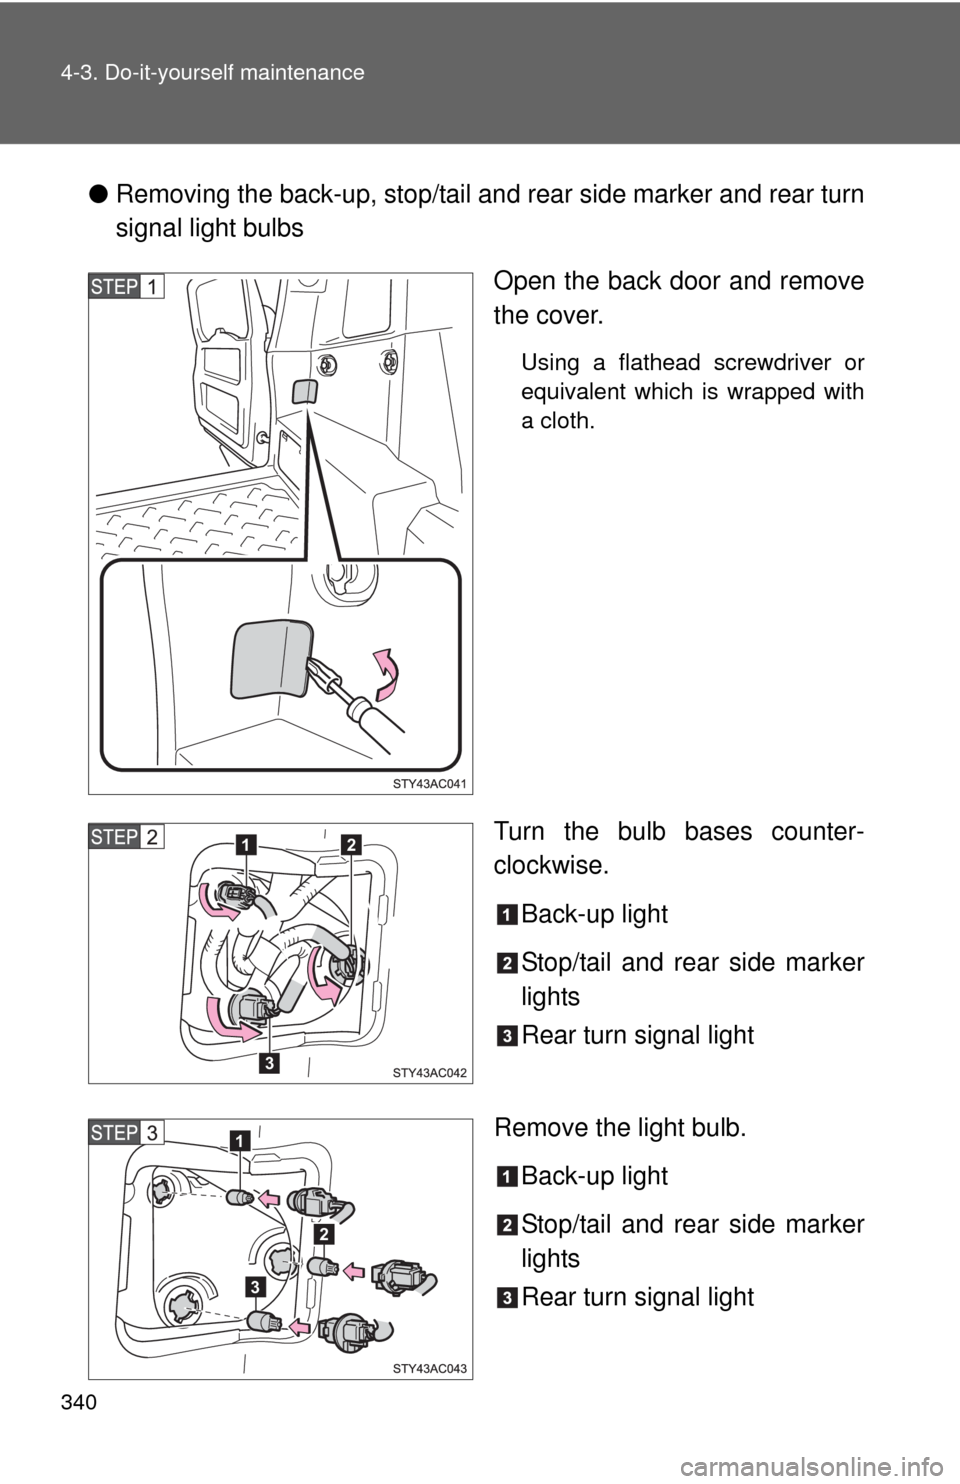
●Removing the back-up, stop/tail and rear side marker and rear turn
signal light bulbs
Open the back door and remove
the cover.
Using a flathead screwdriver or
equivalent which is wrapped with
a cloth.
Turn the bulb bases counter-
clockwise.
Back-up light
Stop/tail and rear side marker
lights
Rear turn signal light
Remove the light bulb.
Back-up light
Stop/tail and rear side marker
lights
Rear turn signal light12
3
1
3
2
Page 342 of 439
341 4-3. Do-it-yourself maintenance
4
Maintenance and care
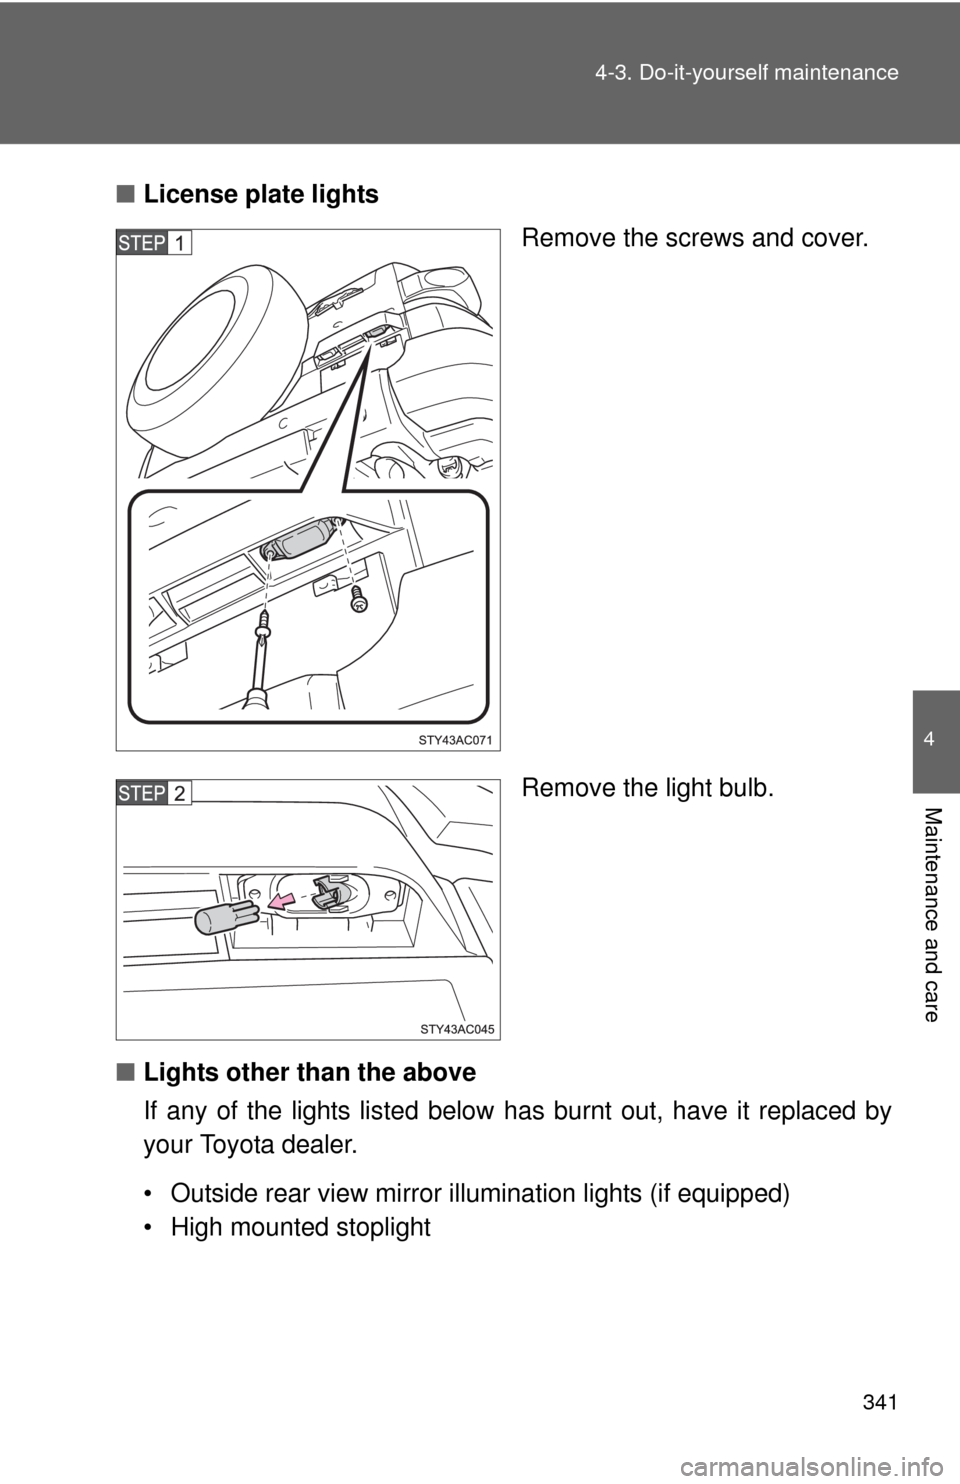
■License plate lights
Remove the screws and cover.
Remove the light bulb.
■Lights other than the above
If any of the lights listed below has burnt out, have it replaced by
your Toyota dealer.
• Outside rear view mirror illumination lights (if equipped)
• High mounted stoplight
Page 343 of 439
342 4-3. Do-it-yourself maintenance
■Condensation build-up on the inside of the lens
Contact your Toyota dealer for more information in the following situations.
Temporary condensation build-up on the inside of the headlight lens does
not indicate a malfunction.
●Large drops of water are built up on the inside of the lens.
●Water has built up inside the headlight.
■LED high mounted stoplight
The high mounted stoplight consists of a number of LEDs. If any of the LEDs
burn out, take your vehicle to your Toyota dealer to have the light replaced.
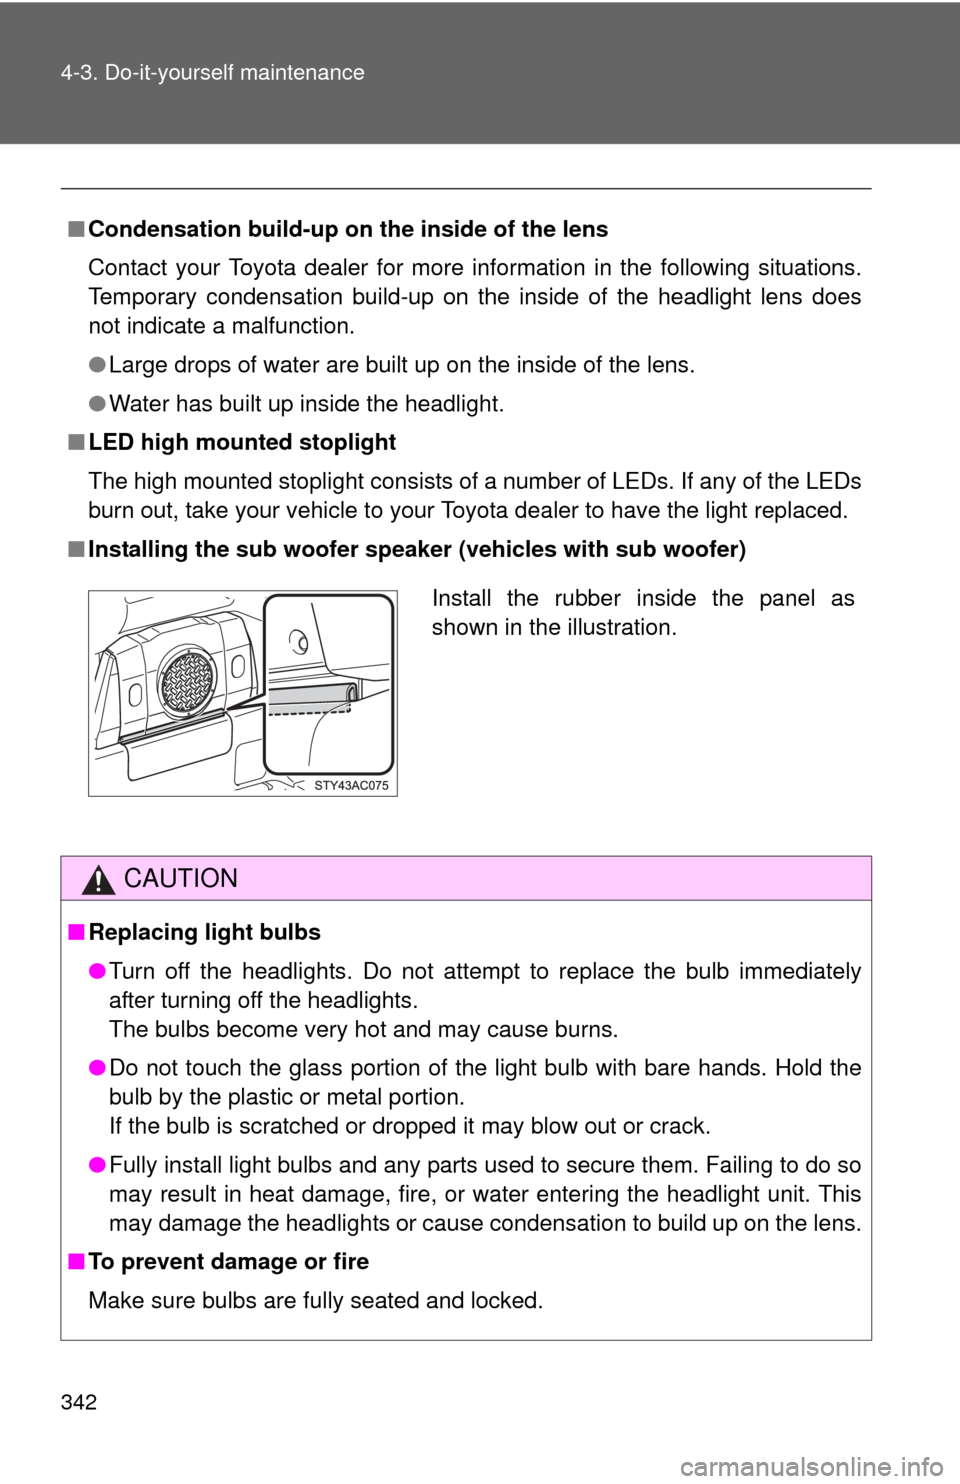
■Installing the sub woofer speaker (vehicles with sub woofer)
CAUTION
■Replacing light bulbs
●Turn off the headlights. Do not attempt to replace the bulb immediately
after turning off the headlights.
The bulbs become very hot and may cause burns.
●Do not touch the glass portion of the light bulb with bare hands. Hold the
bulb by the plastic or metal portion.
If the bulb is scratched or dropped it may blow out or crack.
●Fully install light bulbs and any parts used to secure them. Failing to do so
may result in heat damage, fire, or water entering the headlight unit. This
may damage the headlights or cause condensation to build up on the lens.
■To prevent damage or fire
Make sure bulbs are fully seated and locked.
Install the rubber inside the panel as
shown in the illustration.
Page 345 of 439

344
5-1. Essential information
Emergency flashers
NOTICE
■To prevent battery discharge
Do not leave the emergency flashers on longer than necessary when the
engine is not running.
Use the emergency flashers if the vehicle malfunctions or is
involved in an accident.
Press the switch to flash all
the turn signal lights. To turn
them off, press the switch
once again.
Page 355 of 439
354
5-2. Steps to take in an emergency
If a war ning light tur ns on or a war ning buzzer sounds...
Stop the vehicle immediately. Continuing to drive the vehicle may be dangerous.
The following warning indicates a possible problem in the brake sys-
tem. Immediately stop the vehicle in a safe place and contact your
Toyota dealer.
Warning lightWarning light/Details
Brake system warning light
• Low brake fluid
• Malfunction in the brake system
This light also comes on when the parking brake is
not released. If the light turns off after the parking
brake is fully released, the system is operating nor-
mally.
Calmly perform the following actions if any of the warning lights turn
on or flash. If a light turns on or flashes, but then turns off, this does
not necessarily indicate a malfunction in the system.
Page 379 of 439
378
5-2. Steps to take in an emergency
If the engine will not star t
If the engine still does not start after following the correct starting
procedure (P. 126) or releasing the steering lock (P. 127), confirm
the following points.
■The engine will not start even when the starter motor oper-
ates normally.
One of the following may be the cause of the problem.
●There may not be sufficient fuel in the vehicle’s tank.
Refuel the vehicle.
●The engine may be flooded.
Try to restart the engine once more following correct starting
procedures.
●There may be a malfunction in the engine immobilizer system.
(P. 7 7 )
■The starter motor turns over slowly, the interior lights and
headlights are dim, or the horn does not sound or sounds at
a low volume.
One of the following may be the cause of the problem.
●The battery may be discharged. (P. 379)
●The battery terminal connections may be loose or corroded.
■The starter motor does not turn over, the interior lights and
headlights do not turn on, or the horn does not sound.
One of the following may be the cause of the problem.
●One or both of the battery terminals may be disconnected.
●The battery may be discharged. (P. 379)
Contact your Toyota dealer if the problem cannot be repaired, or if
repair procedures are unknown.
Page 383 of 439
382
5-2. Steps to take in an emergency
■Starting the engine when the battery is discharged (vehicles with an
automatic transmission)
The engine cannot be started by push-starting.
■Avoiding a discharged battery
●Turn off the headlights and the audio system while the engine is turned
off.
●Turn off any unnecessary electrical components when the vehicle is run-
ning at a low speed for an extended period, such as in heavy traffic, etc.
CAUTION
■Avoiding battery fires or explosions
Observe the following precautions to prevent accidentally igniting the flam-
mable gas that may be emitted from the battery.
●Make sure the jumper cable is connected to the correct terminal and that it
is not unintentionally in contact with any part other than the intended termi-
nal.
●Do not allow the jumper cables to come into contact with the “+” and “-” ter-
minals.
●Do not smoke, use matches, cigarette lighters or allow open flame near
the battery.
Once the vehicle’s engine has started, remove the jumper
cables in the exact reverse order in which they were con-
nected.
Once the engine starts, have the vehicle checked at your Toyota
dealer as soon as possible.
Page 396 of 439
393 6-1. Specifications
6
Vehicle specifications
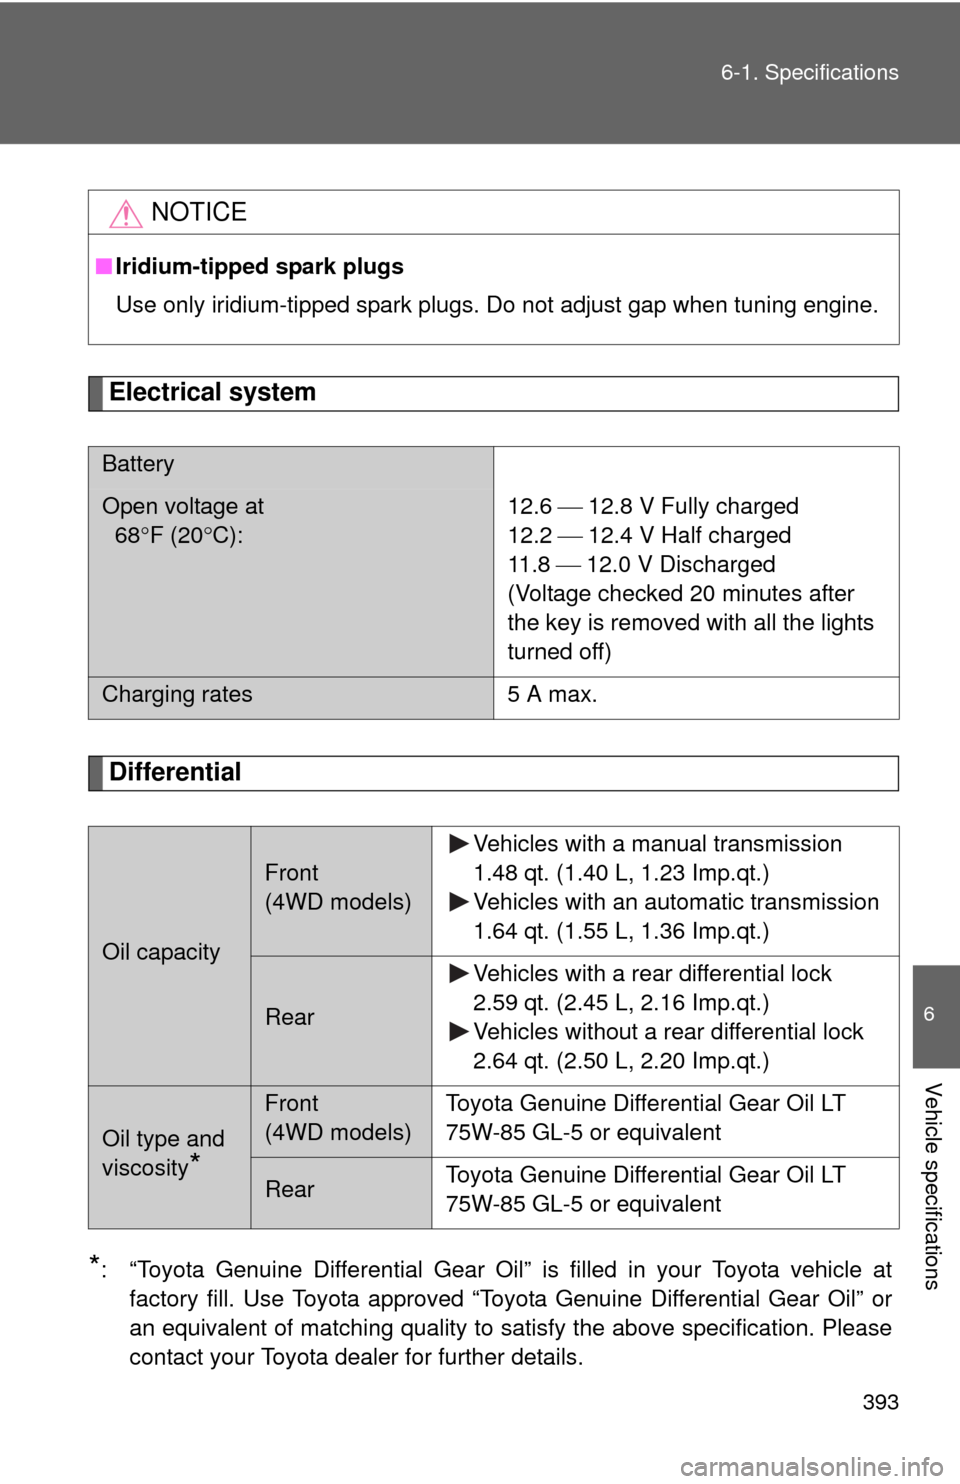
Electrical system
Differential
*: “Toyota Genuine Differential Gear Oil” is filled in your Toyota vehicle at
factory fill. Use Toyota approved “Toyota Genuine Differential Gear Oil” or
an equivalent of matching quality to satisfy the above specification. Please
contact your Toyota dealer for further details.
NOTICE
■Iridium-tipped spark plugs
Use only iridium-tipped spark plugs. Do not adjust gap when tuning engine.
Battery
Open voltage at
68F (20C):12.6 12.8 V Fully charged
12.2 12.4 V Half charged
11 . 8 12.0 V Discharged
(Voltage checked 20 minutes after
the key is removed with all the lights
turned off)
Charging rates 5 A max.
Oil capacity
Front
(4WD models)Vehicles with a manual transmission
1.48 qt. (1.40 L, 1.23 Imp.qt.)
Vehicles with an automatic transmission
1.64 qt. (1.55 L, 1.36 Imp.qt.)
RearVehicles with a rear differential lock
2.59 qt. (2.45 L, 2.16 Imp.qt.)
Vehicles without a rear differential lock
2.64 qt. (2.50 L, 2.20 Imp.qt.)
Oil type and
viscosity
*
Front
(4WD models)Toyota Genuine Differential Gear Oil LT
75W-85 GL-5 or equivalent
RearToyota Genuine Differential Gear Oil LT
75W-85 GL-5 or equivalent