display TOYOTA FJ CRUISER 2014 1.G Service Manual
[x] Cancel search | Manufacturer: TOYOTA, Model Year: 2014, Model line: FJ CRUISER, Model: TOYOTA FJ CRUISER 2014 1.GPages: 572, PDF Size: 9.45 MB
Page 321 of 572
321
3-4. Using the hand
s-free phone system (for cellular phone)
3
Interior features
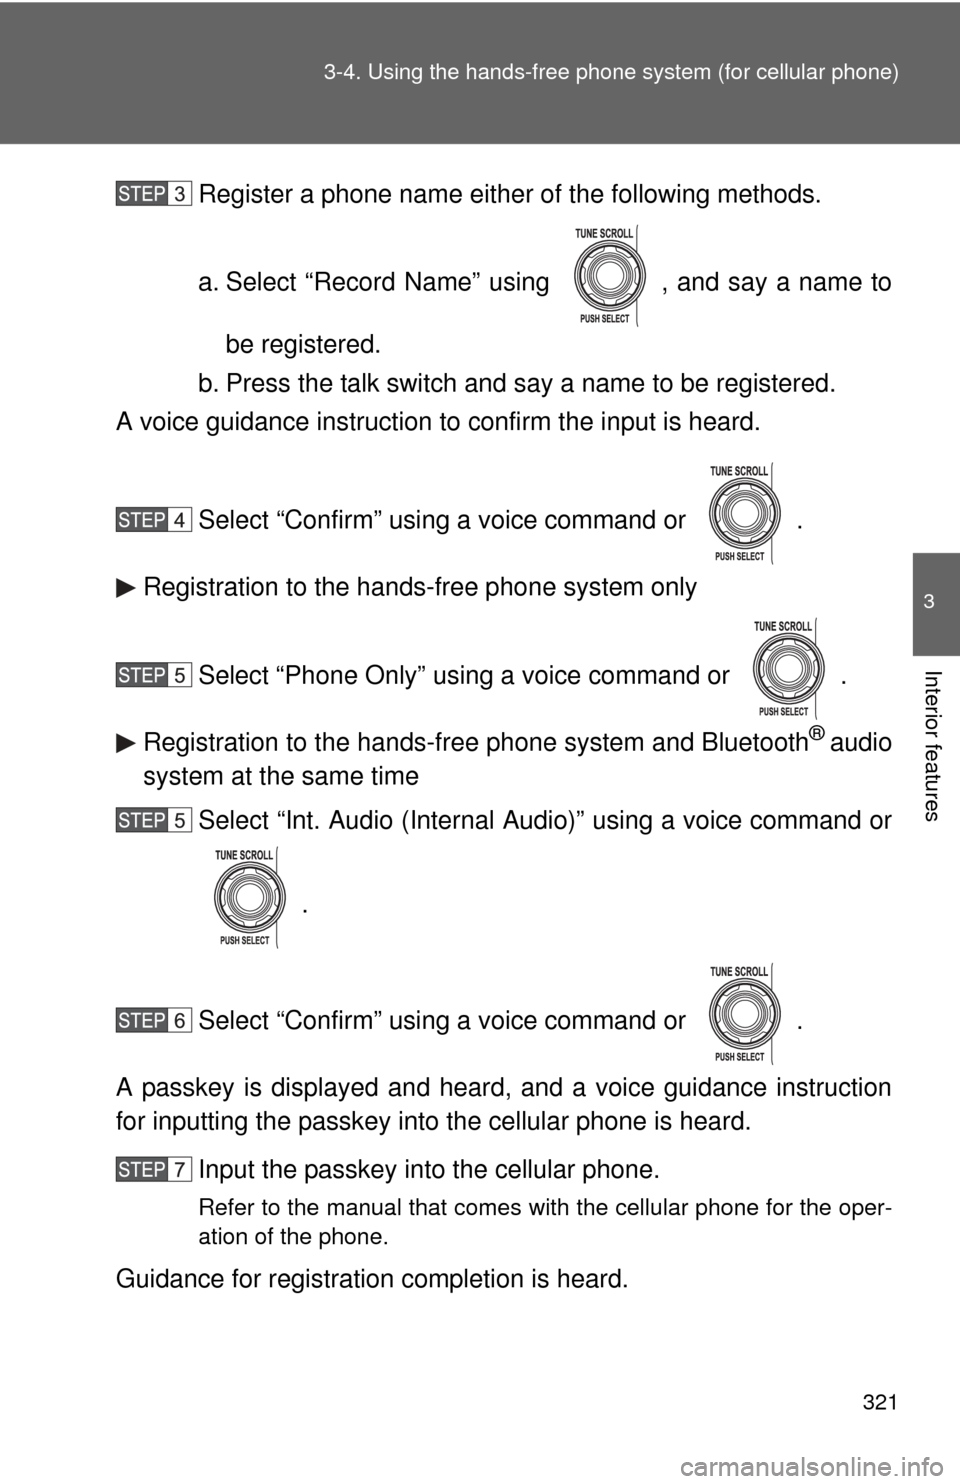
Register a phone name either of the following methods.
a. Select “Record Name” using , and say a name to
be registered.
b. Press the talk switch and say a name to be registered.
A voice guidance instruction to confirm the input is heard.
Select “Confirm” using a voice command or .
Registration to the hands-free phone system only
Select “Phone Only” using a voice command or .
Registration to the hands-free phone system and Bluetooth
® audio
system at the same time
Select “Int. Audio (Internal Audio)” using a voice command or
.
Select “Confirm” using a voice command or .
A passkey is displayed and heard, and a voice guidance instruction
for inputting the passkey into the cellular phone is heard. Input the passkey into the cellular phone.
Refer to the manual that comes with the cellular phone for the oper-
ation of the phone.
Guidance for registration completion is heard.
Page 323 of 572
323
3-4. Using the hand
s-free phone system (for cellular phone)
3
Interior features
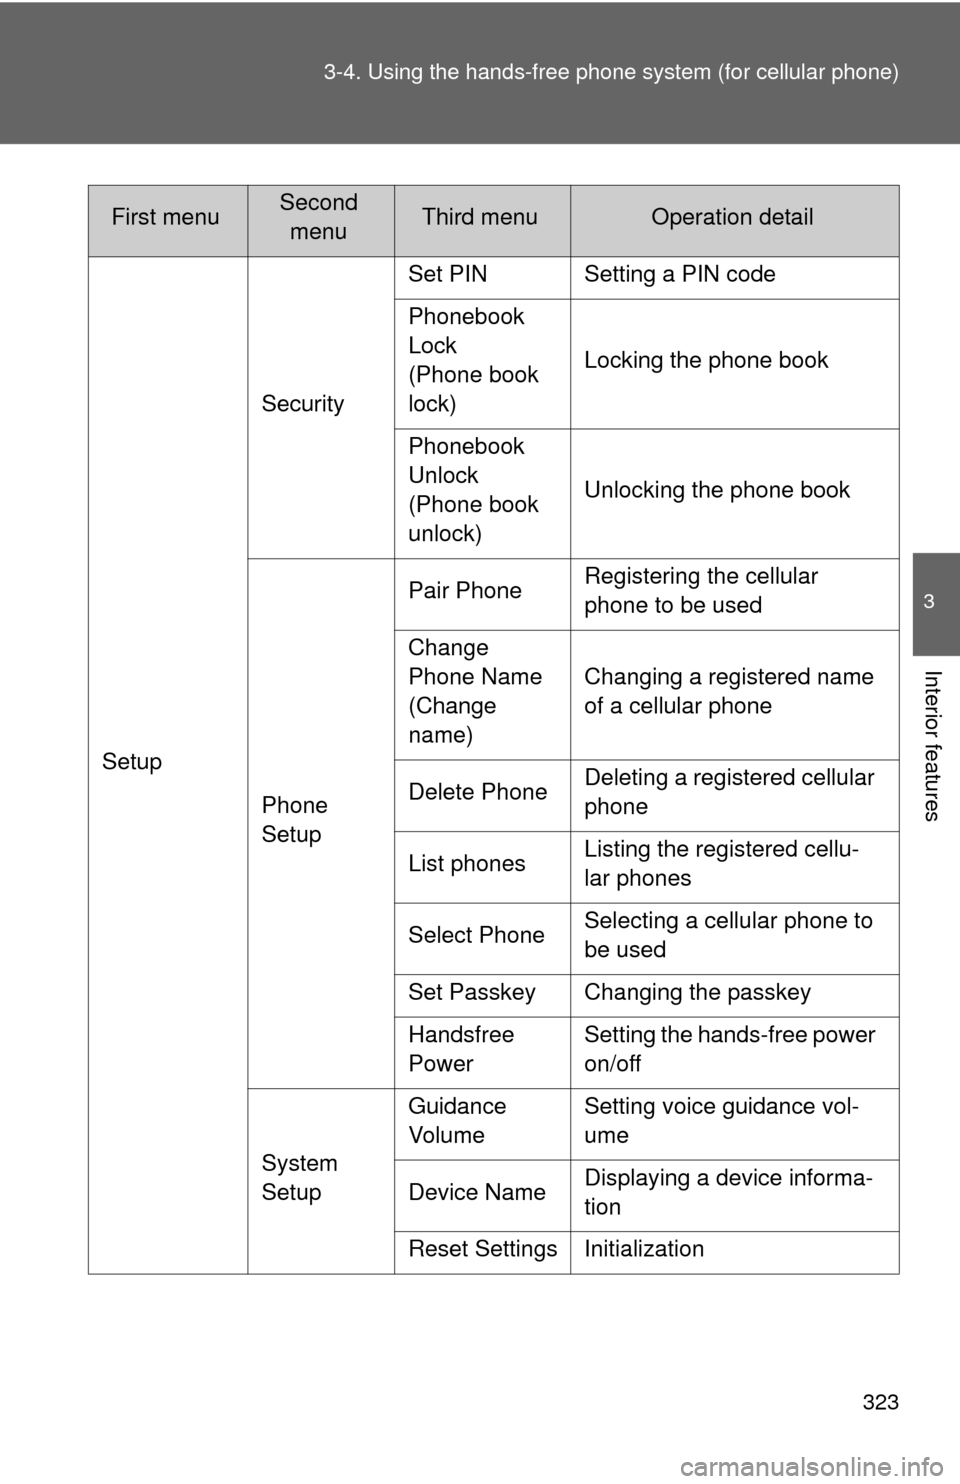
SetupSecurity
Set PIN Setting a PIN code
Phonebook
Lock
(Phone book
lock)
Locking the phone book
Phonebook
Unlock
(Phone book
unlock) Unlocking the phone book
Phone
Setup Pair Phone
Registering the cellular
phone to be used
Change
Phone Name
(Change
name) Changing a registered name
of a cellular phone
Delete Phone Deleting a registered cellular
phone
List phones Listing the registered cellu-
lar phones
Select Phone Selecting a cellular phone to
be used
Set Passkey Changing the passkey
Handsfree
Power Setting the hands-free power
on/off
System
Setup Guidance
Vo l u m e
Setting voice guidance vol-
ume
Device Name Displaying a device informa-
tion
Reset Settings Initialization
First menuSecond menuThird menuOperation detail
Page 337 of 572
337
3-4. Using the hands-free phone system (for cellular phone)
3
Interior features
Security and system setup
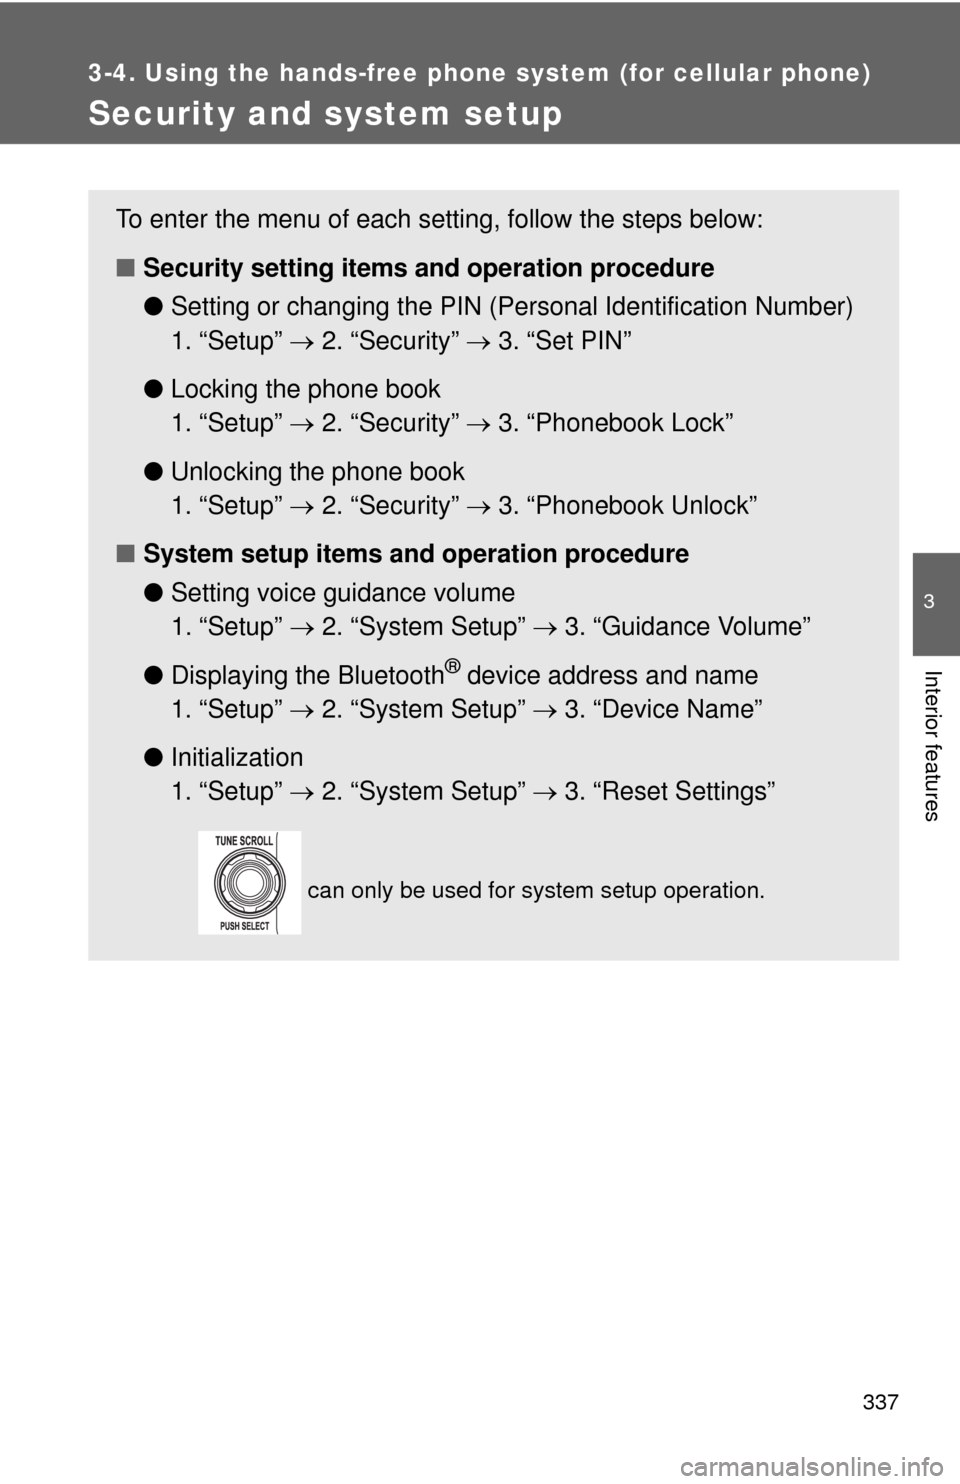
To enter the menu of each setting, follow the steps below:
■Security setting items and operation procedure
● Setting or changing t he PIN (Personal Identification Number)
1. “Setup” 2. “Security” 3. “Set PIN”
● Locking the phone book
1. “Setup” 2. “Security” 3. “Phonebook Lock”
● Unlocking the phone book
1. “Setup” 2. “Security” 3. “Phonebook Unlock”
■ System setup items and operation procedure
●Setting voice guidance volume
1. “Setup” 2. “System Setup” 3. “Guidance Volume”
● Displaying the Bluetooth
® device address and name
1. “Setup” 2. “System Setup” 3. “Device Name”
● Initialization
1. “Setup” 2. “System Setup” 3. “Reset Settings”
can only be used for system setup operation.
Page 340 of 572
340 3-4. Using the hands-free phone system (for cellular phone)
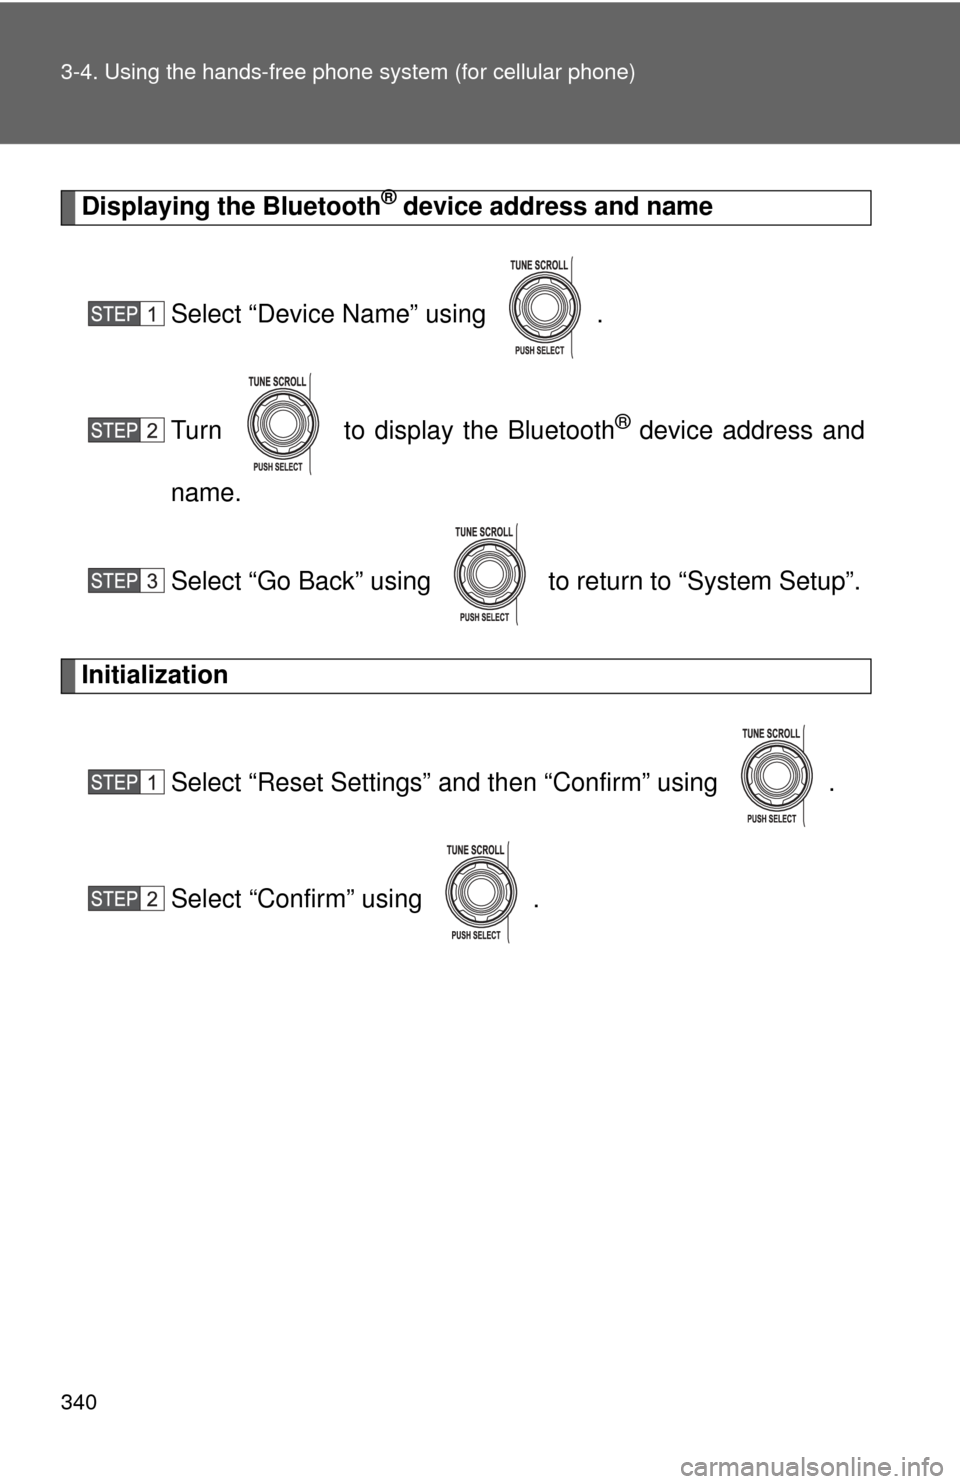
Displaying the Bluetooth® device address and name
Select “Device Name” using .
Turn to display the Bluetooth
® device address and
name.
Select “Go Back” using to return to “System Setup”.
Initialization
Select “Reset Settings” and then “Confirm” using .
Select “Confirm” using .
Page 343 of 572
343
3-4. Using the hand
s-free phone system (for cellular phone)
3
Interior features
■Adding procedure
Select “Add Entry” using a voice command or .
Use one of the following methods to input a telephone num-
ber:
Inputting a telephone number using a voice command STEP2-1 Select “By Voice (By voice)” using a voice com-
mand or .
STEP2-2 Press the talk switch, say the desired number, and select “Confirm” using a voice command.
Transferring data from the cellular phone
STEP2-1 Select “By Phone” and then “Confirm” using a voice
command or .
STEP2-2 Transfer the data from the cellular phone.
Refer to the manual that comes with the cellular phone
for the details of transferring data.
STEP2-3 Select the data to be registered by either of the fol- lowing methods:
a. Say “Previous” or “Next” until the desired data isdisplayed, and select “Confirm” using a voice
command.
b. Select the desired data using .
Page 344 of 572
344 3-4. Using the hands-free phone system (for cellular phone)
Inputting a phone number using
STEP2-1 Select “Manual Input” using .
STEP2-2 Input a phone number using , and press once again.
Input the phone number 1 digit at a time.
Selecting a phone number from outgoing or incoming call history STEP2-1 Select “Call History” using a voice command or
.
STEP2-2 Select “Outgoing Ca ll History (Outgoing)” or
“Incoming Call History (I ncoming)” using a voice
command or .
STEP2-3 Select the data to be re gistered by either of the fol-
lowing methods:
a. Say “Previous” or “Go back” until the desired data is displayed, and select “Confirm” using a
voice command.
b. Select the desired data using .
Page 363 of 572
363
3-7. Other interior features
3
Interior features
Clock
■The clock is displayed when
The engine switch is in the ACC or ON position.
■ When disconnecting and reco nnecting battery terminals
The time display will automatically be set to 1:00.
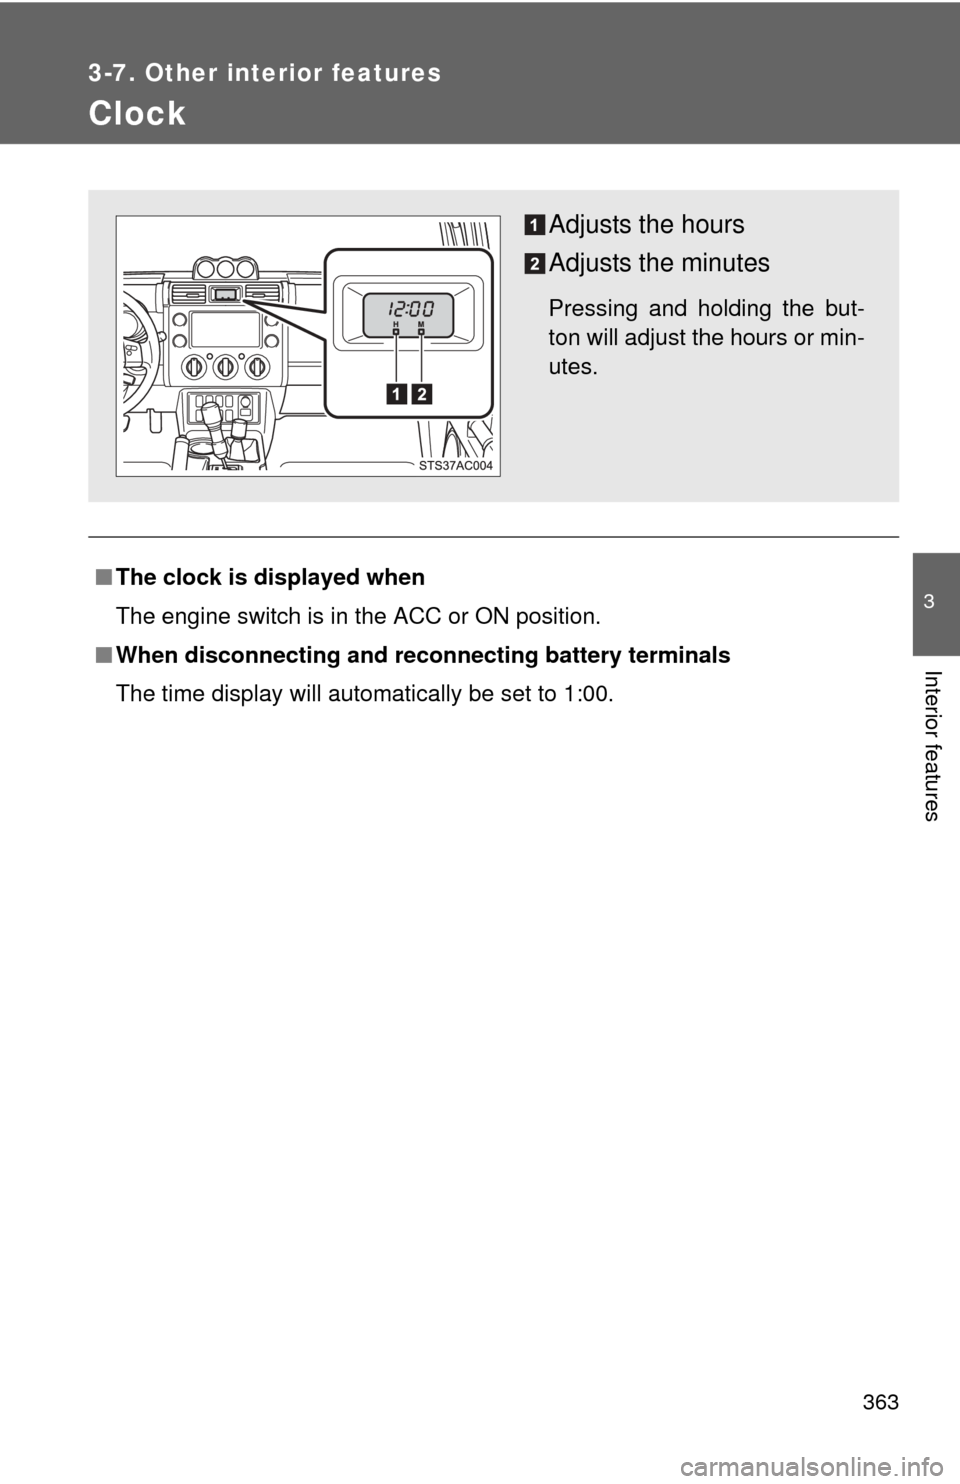
Adjusts the hours
Adjusts the minutes
Pressing and holding the but-
ton will adjust the hours or min-
utes.
Page 364 of 572
364
3-7. Other interior features
Outside temperature display
: If equipped
■When – –°C or – –°F is displayed
The system may be malfunctioning. Take your vehicle to your Toyota dealer.
■ The outside air temperature is displayed when
The engine switch is in the ON position.
■ When disconnecting and reco nnecting battery terminals
The display will automatically be set to the initial mode.
■ Display
In the following situations, the correct outside temperature may not be dis-
played, or the display may take longer than normal to change.
●When stopped, or driving at low speeds (less than 12 mph [20 km/h])
● When the outside temperature has changed suddenly (at the entrance/
exit of a garage, tunnel, etc.)
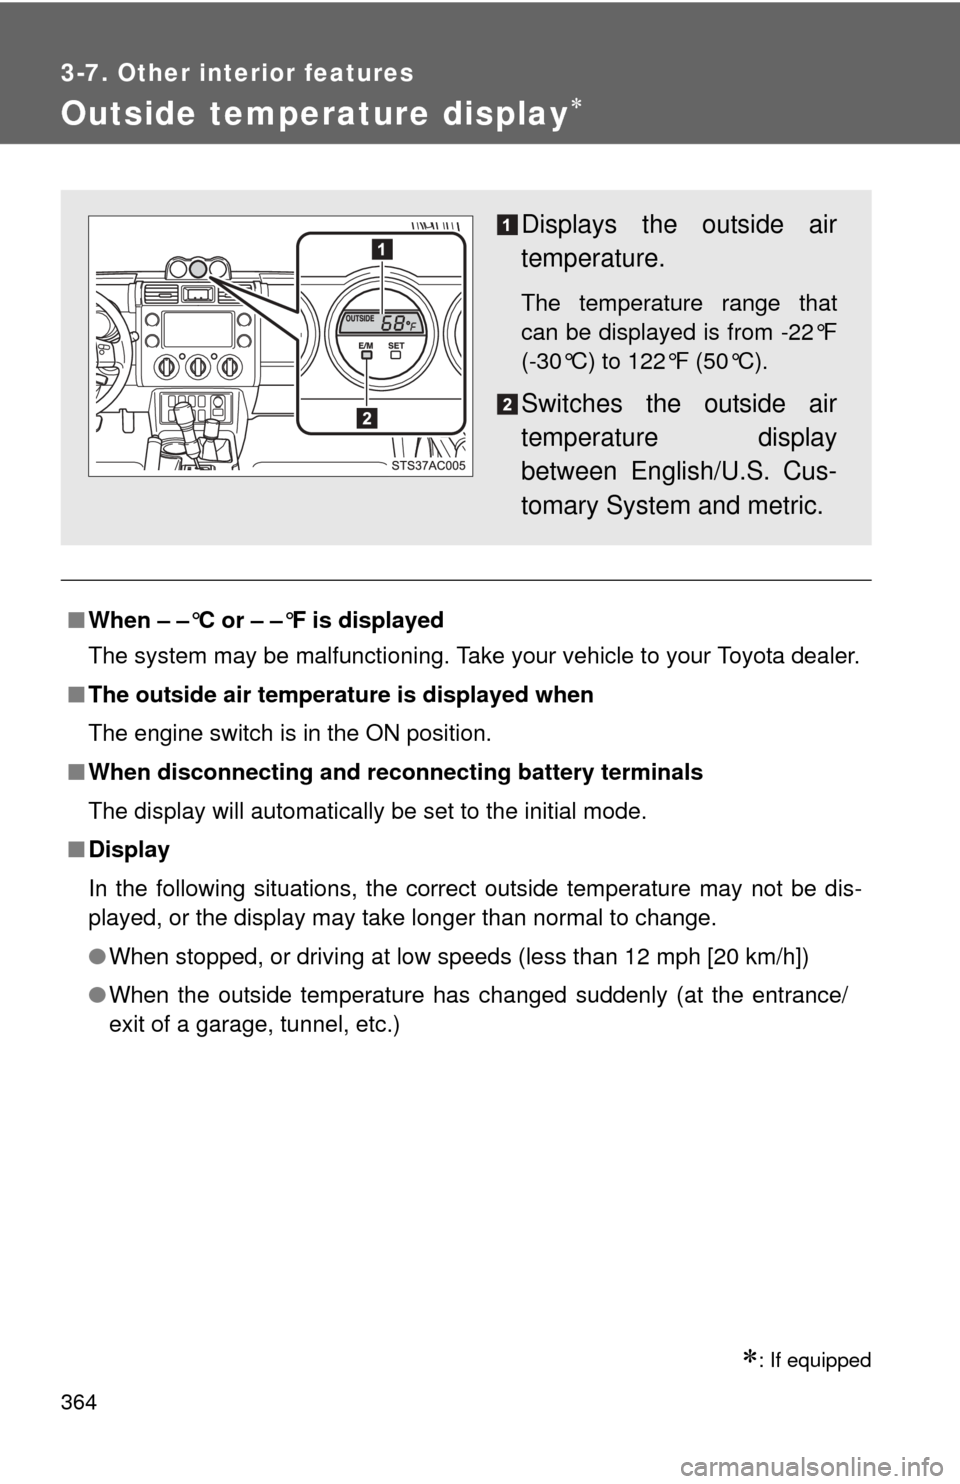
Displays the outside air
temperature.
The temperature range that
can be displayed is from -22°F
(-30°C) to 122°F (50°C).
Switches the outside air
temperature display
between English/U.S. Cus-
tomary System and metric.
Page 379 of 572
379
3-7. Other interior features
3
Interior features
Garage door opener
The garage door opener (HomeLink® Universal Transceiver) is manufac-
tured under license from HomeLink®.
Training the HomeLink® (for U.S. owners)
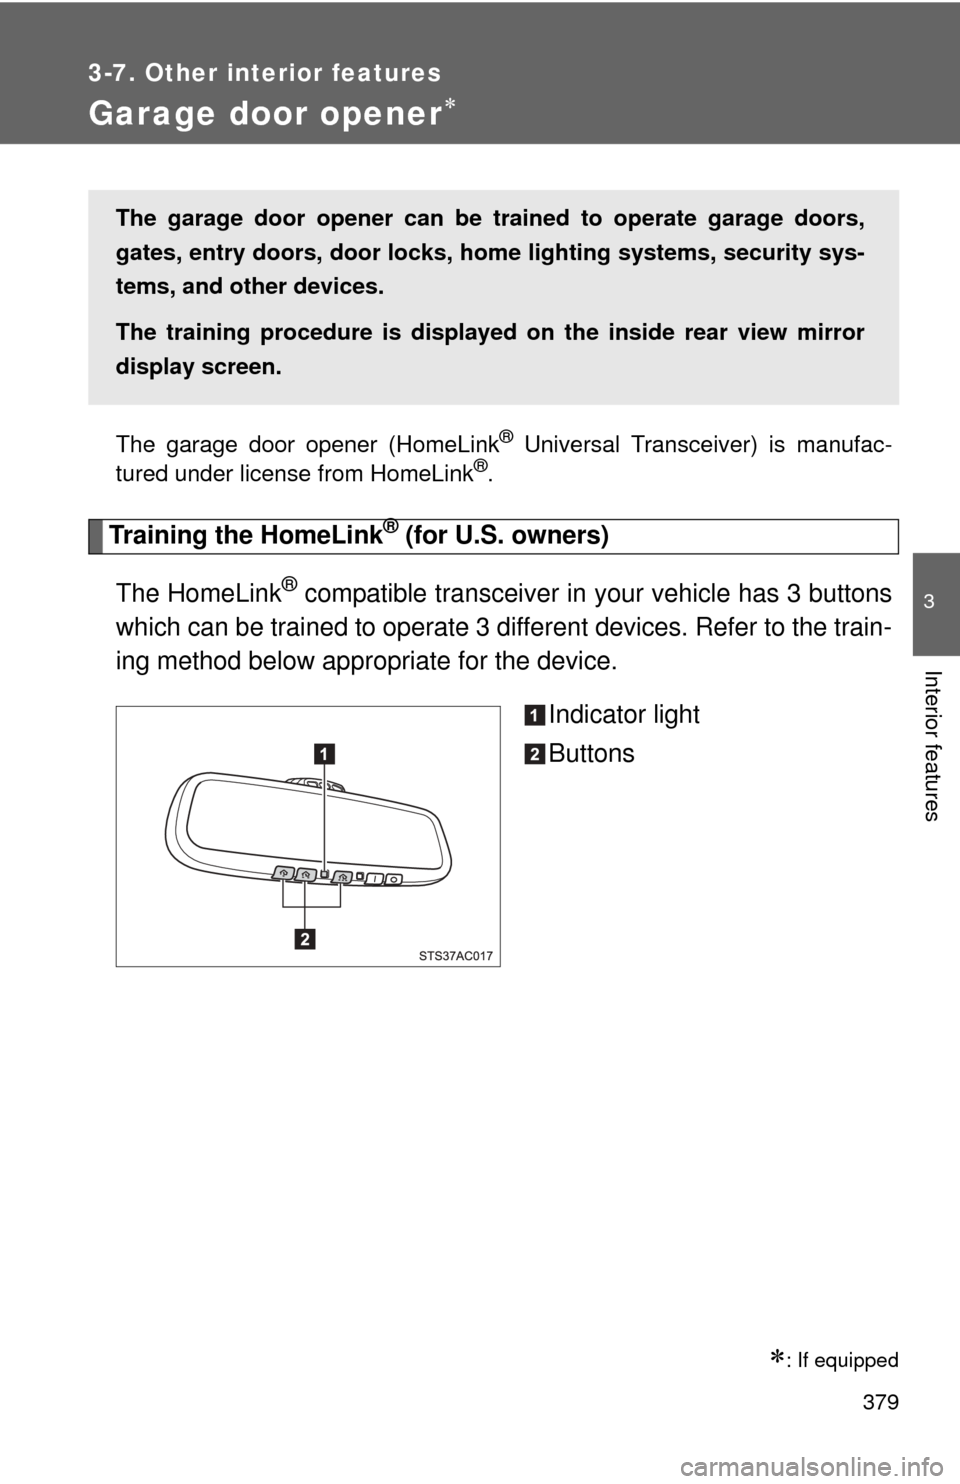
The HomeLink
® compatible transceiver in your vehicle has 3 buttons
which can be trained to operate 3 different devices. Refer to the train-
ing method below appropriate for the device.
Indicator light
Buttons
: If equipped
The garage door opener can be trained to operate garage doors,
gates, entry doors, door locks, home lighting systems, security sys-
tems, and other devices.
The training procedure is displayed on the inside rear view mirror
display screen.
Page 386 of 572
386 3-7. Other interior features
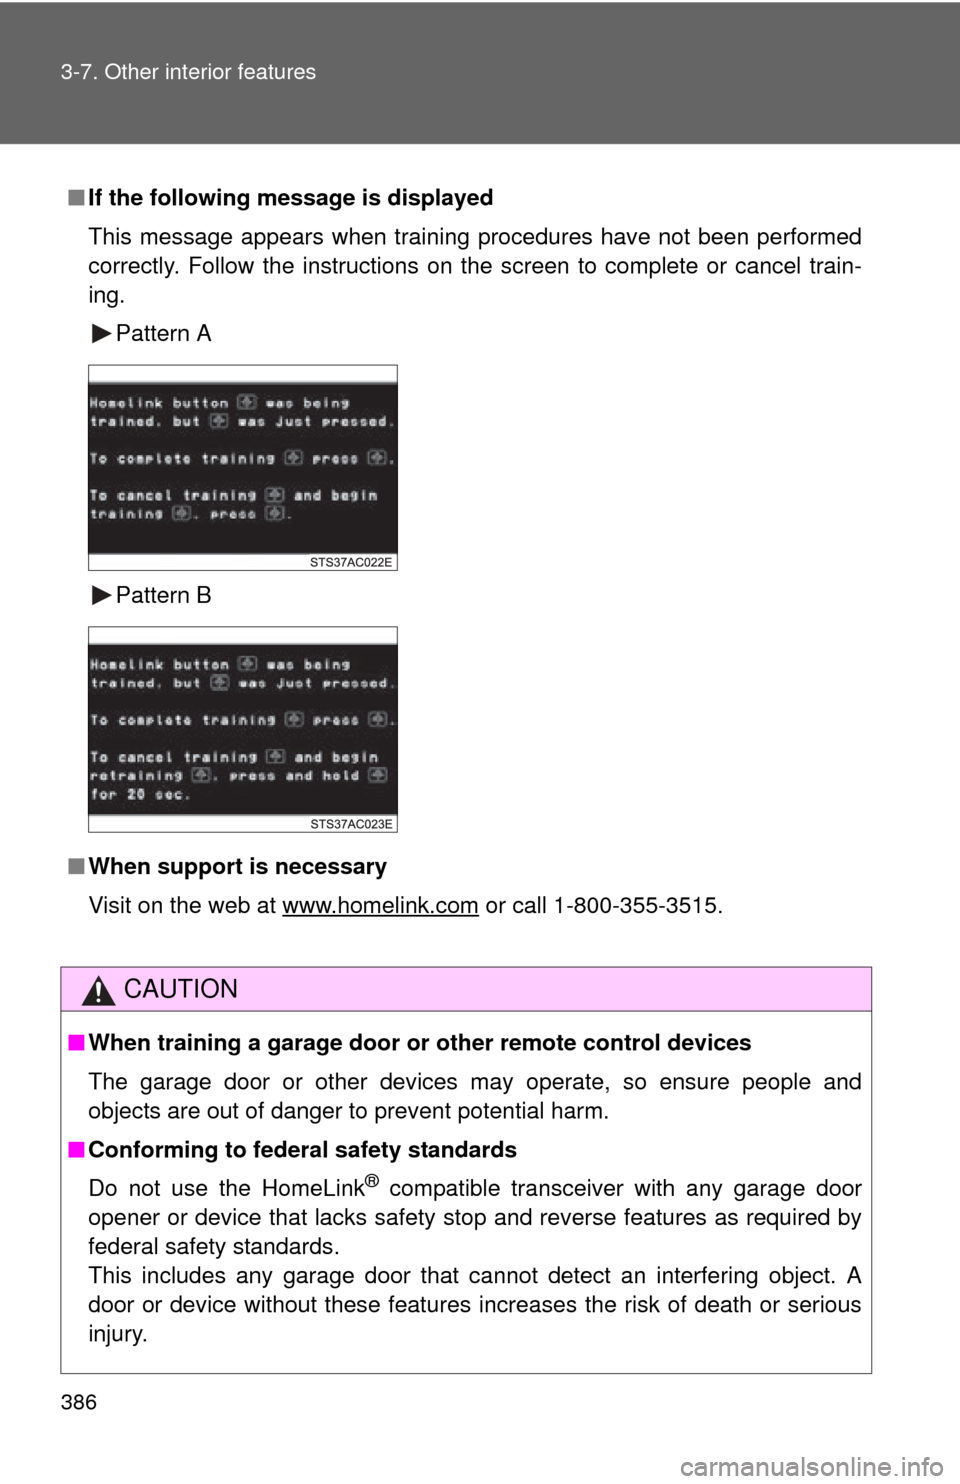
■If the following message is displayed
This message appears when training procedures have not been performed
correctly. Follow the instructions on the screen to complete or cancel train-
ing.
Pattern A
Pattern B
■ When support is necessary
Visit on the web at www.homelink.com
or call 1-800-355-3515.
CAUTION
■When training a garage door or other remote control devices
The garage door or other devices may operate, so ensure people and
objects are out of danger to prevent potential harm.
■ Conforming to federal safety standards
Do not use the HomeLink
® compatible transceiver with any garage door
opener or device that lacks safety stop and reverse features as required by
federal safety standards.
This includes any garage door that cannot detect an interfering object. A
door or device without these features increases the risk of death or serious
injury.