high beam TOYOTA FR-S 2013 Owners Manual (in English)
[x] Cancel search | Manufacturer: TOYOTA, Model Year: 2013, Model line: FR-S, Model: TOYOTA FR-S 2013Pages: 412, PDF Size: 5.3 MB
Page 6 of 412
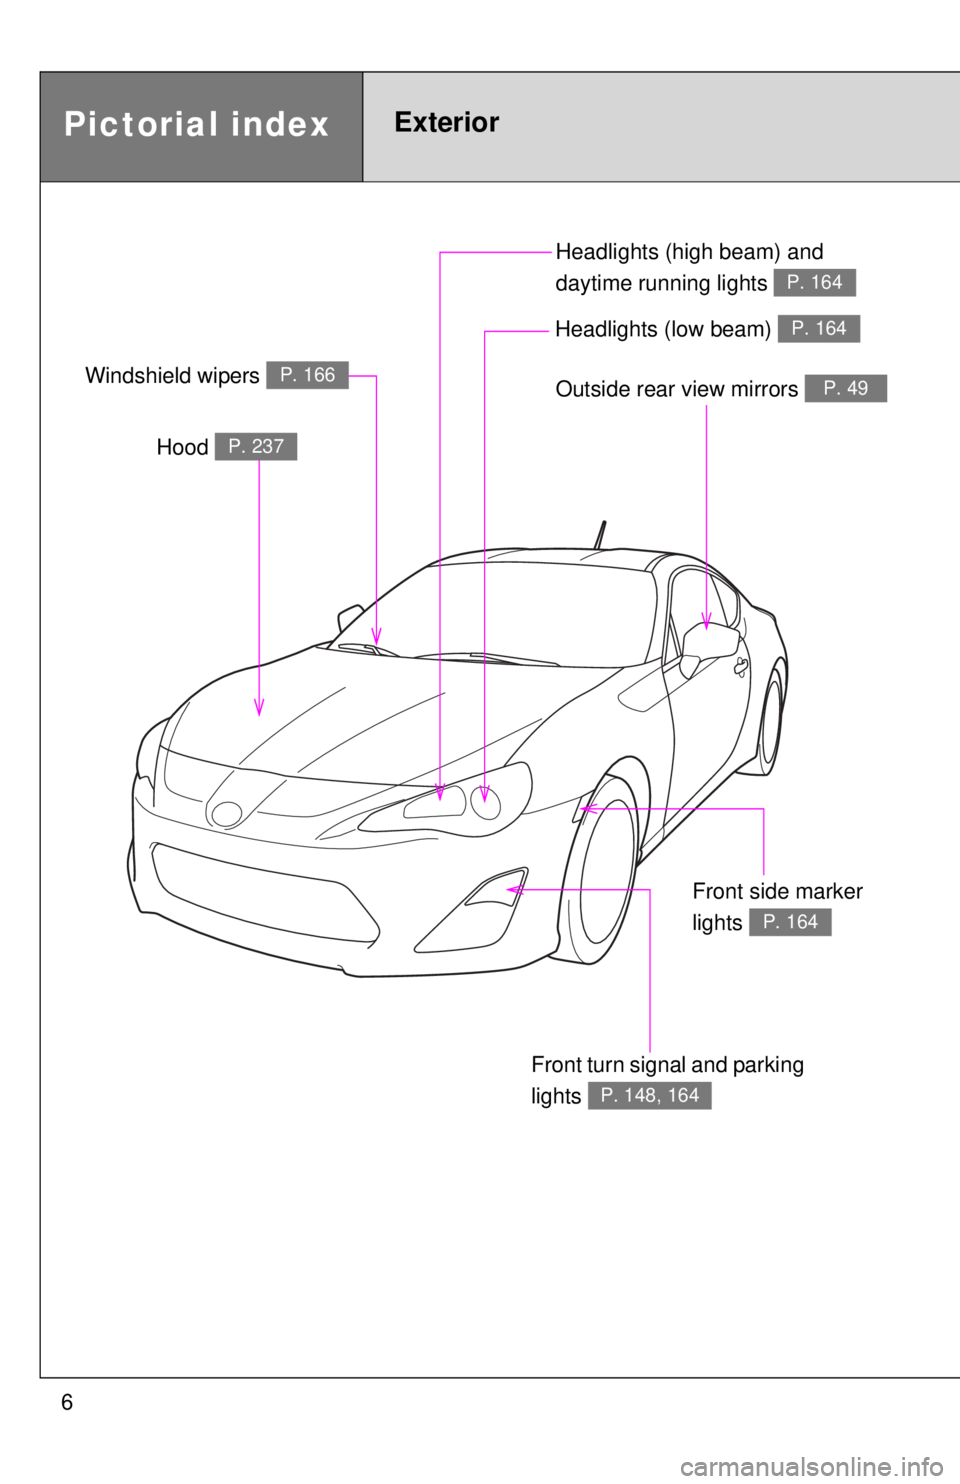
6Headlights (high beam) and
daytime running lights
P. 164
Pictorial indexExterior
Outside rear view mirrors P. 49
Front turn signal and parking
lights
P. 148, 164
Hood P. 237
Windshield wipers P. 166
Headlights (low beam) P. 164
Front side marker
lights
P. 164
Page 156 of 412
156 2-2. Instrument cluster
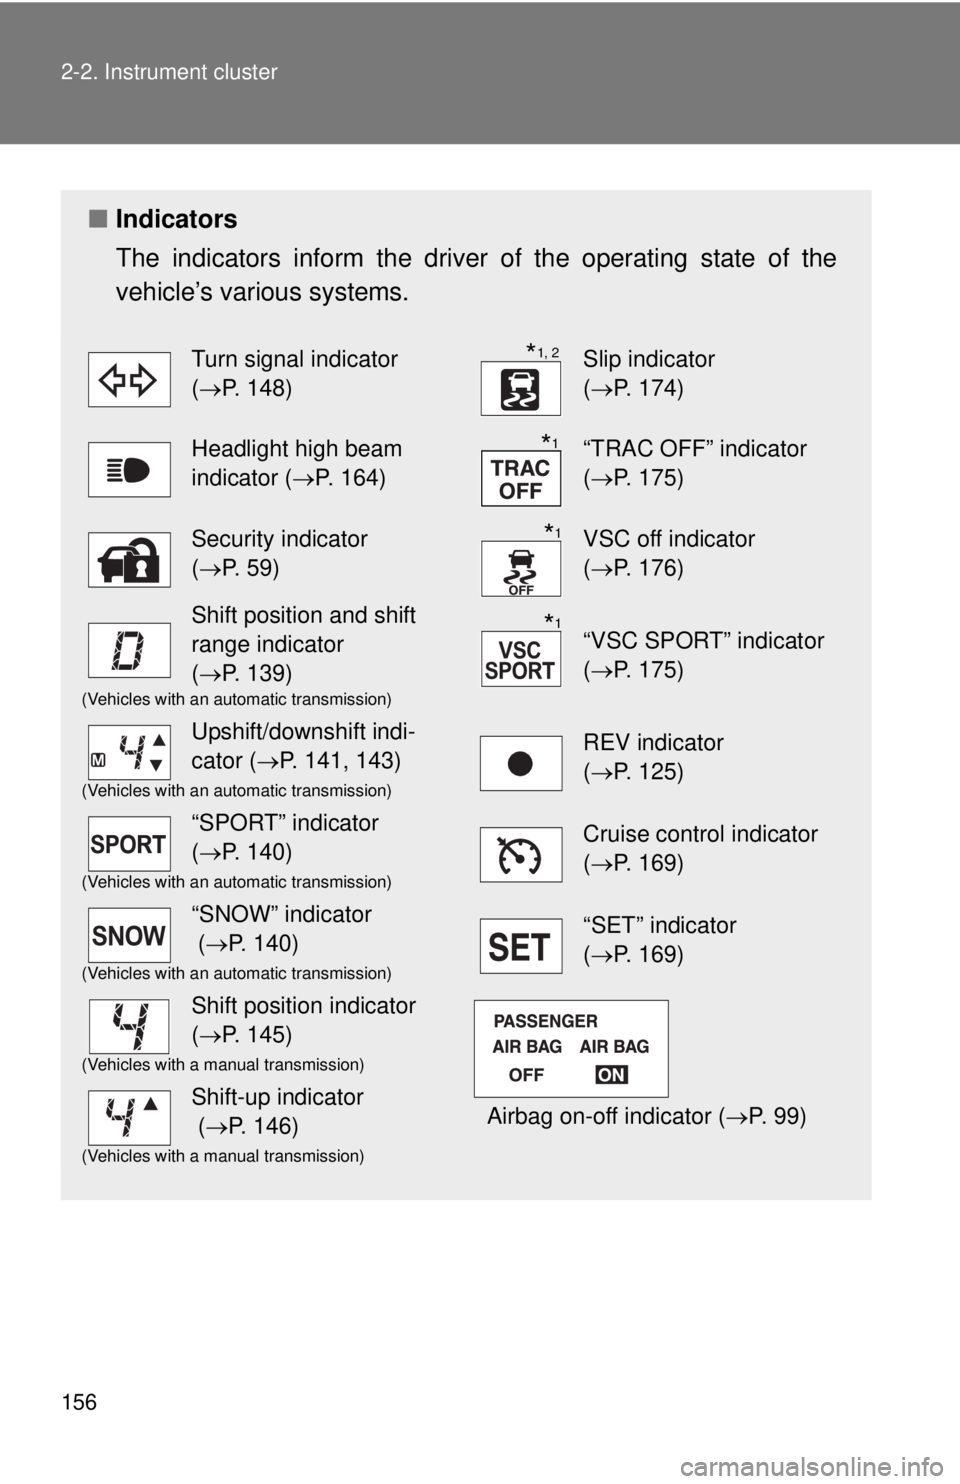
■Indicators
The indicators inform the driver of the operating state of the
vehicle’s various systems.
Turn signal indicator
(P. 148)Slip indicator
(P. 174)
Headlight high beam
indicator ( P. 164)“TRAC OFF” indicator
(P. 175)
Security indicator
(P. 59)VSC off indicator
(P. 176)
Shift position and shift
range indicator
(P. 139)
“VSC SPORT” indicator
(P. 175)
(Vehicles with an automatic transmission)
Upshift/downshift indi-
cator ( P. 141, 143)REV indicator
(P. 125)
(Vehicles with an automatic transmission)
“SPORT” indicator
(P. 140)Cruise control indicator
(P. 169)
(Vehicles with an automatic transmission)
“SNOW” indicator
( P. 140)“SET” indicator
(P. 169)
(Vehicles with an automatic transmission)
Shift position indicator
(P. 145)
Airbag on-off indicator ( P. 99)
(Vehicles with a manual transmission)
Shift-up indicator
(P. 146)
(Vehicles with a manual transmission)
*1, 2
*1
*1
*1
Page 164 of 412
164
2-3. Operating the lights and windshield wipers
Headlight switch
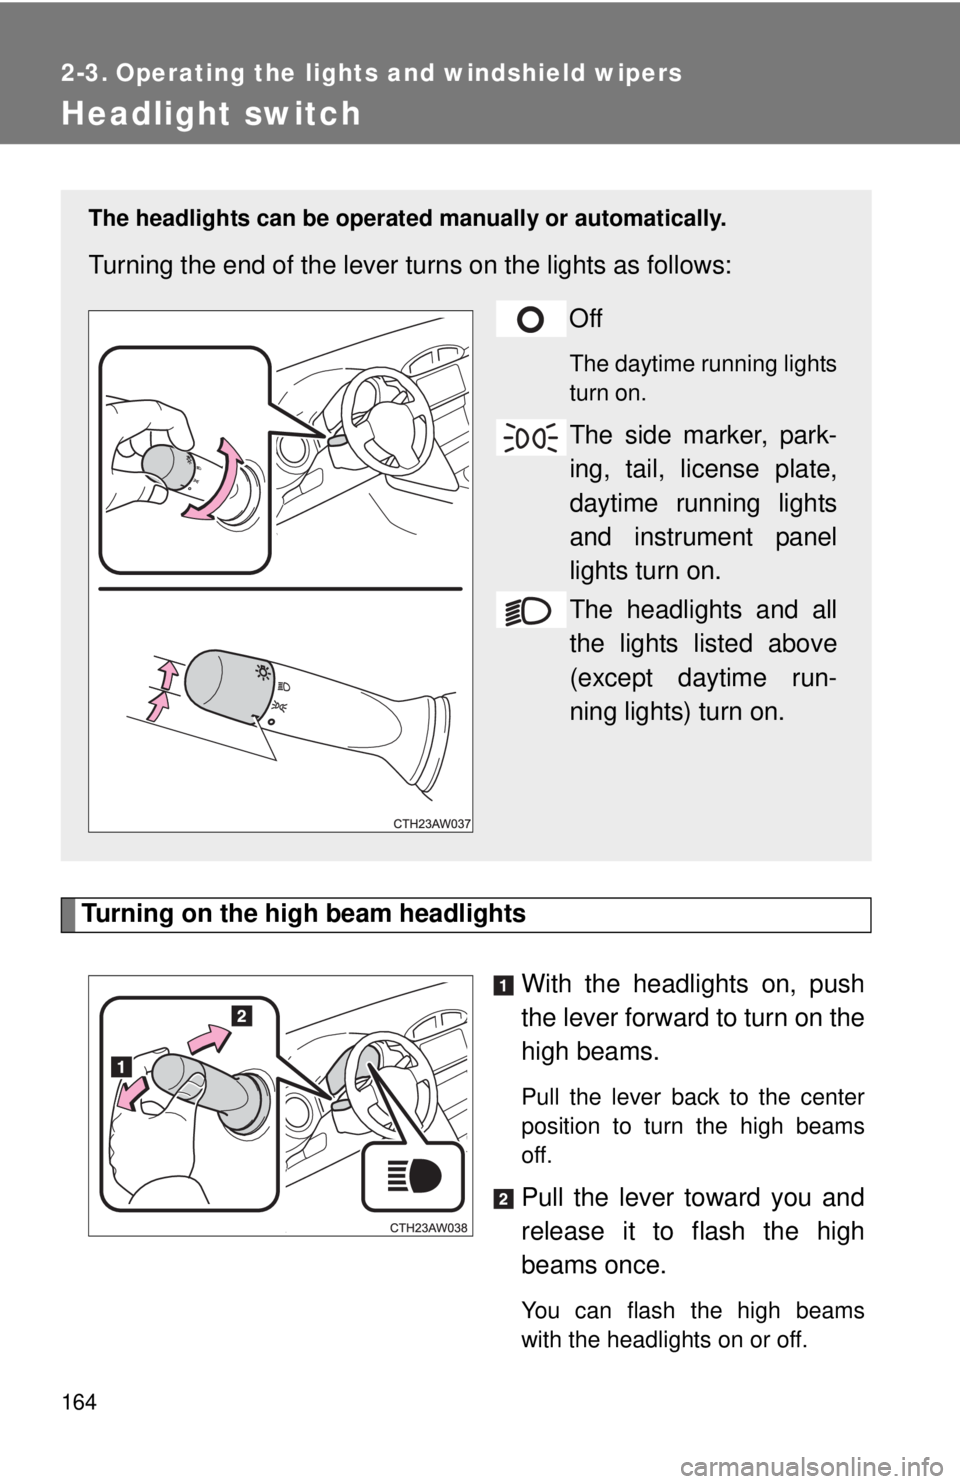
Turning on the high beam headlightsWith the headlights on, push
the lever forward to turn on the
high beams.
Pull the lever back to the center
position to turn the high beams
off.
Pull the lever toward you and
release it to flash the high
beams once.
You can flash the high beams
with the headlights on or off.
The headlights can be operated manually or automatically.
Turning the end of the lever turns on the lights as follows:
Off
The daytime running lights
turn on.
The side marker, park-
ing, tail, license plate,
daytime running lights
and instrument panel
lights turn on.
The headlights and all
the lights listed above
(except daytime run-
ning lights) turn on.
Page 278 of 412

278 4-3. Do-it-yourself maintenance
Note
One of each of the following spare fuses are provided: 7.5 A, 10 A, 15
A, 20 A, 25 A, 30 A.
37HORN NO. 2 7.5 A Horn
38HORN NO. 1 7.5 A Horn
39H-LP LH LO 15 A Left-hand headlight (low beam)
40H-LP RH LO 15 A Right-hand headlight (low beam)
41H-LP LH HI 10 A Left-hand headlight (high beam)
42H-LP RH HI 10 A Right-hand headlight (high beam)
43INJ 30 AMultiport fuel injection system/
sequential multiport fuel injection
system
44H-LP WASHER 30 A
45AM2 NO. 1 40 A Starting system, engine control unit
46EPS
80 A Electric power steering
47A/B MAIN 15 A SRS airbag system
48ECU-B7.5 AWireless remote control, main body
ECU
49DOME
20 A Interior light
50IG27.5 A Engine control unit
FuseAmpereCircuit
Page 281 of 412
281
4-3. Do-it-yourself maintenance
4
Maintenance and care
Light bulbs
You may replace the following bulbs by yourself. The difficulty level
of replacement varies depending on the bulb. If necessary bulb
replacement seems difficult to perf orm, contact your Scion dealer.
■Preparing a replacement light bulb
Check the wattage of the light bulb being replaced. ( P. 351)
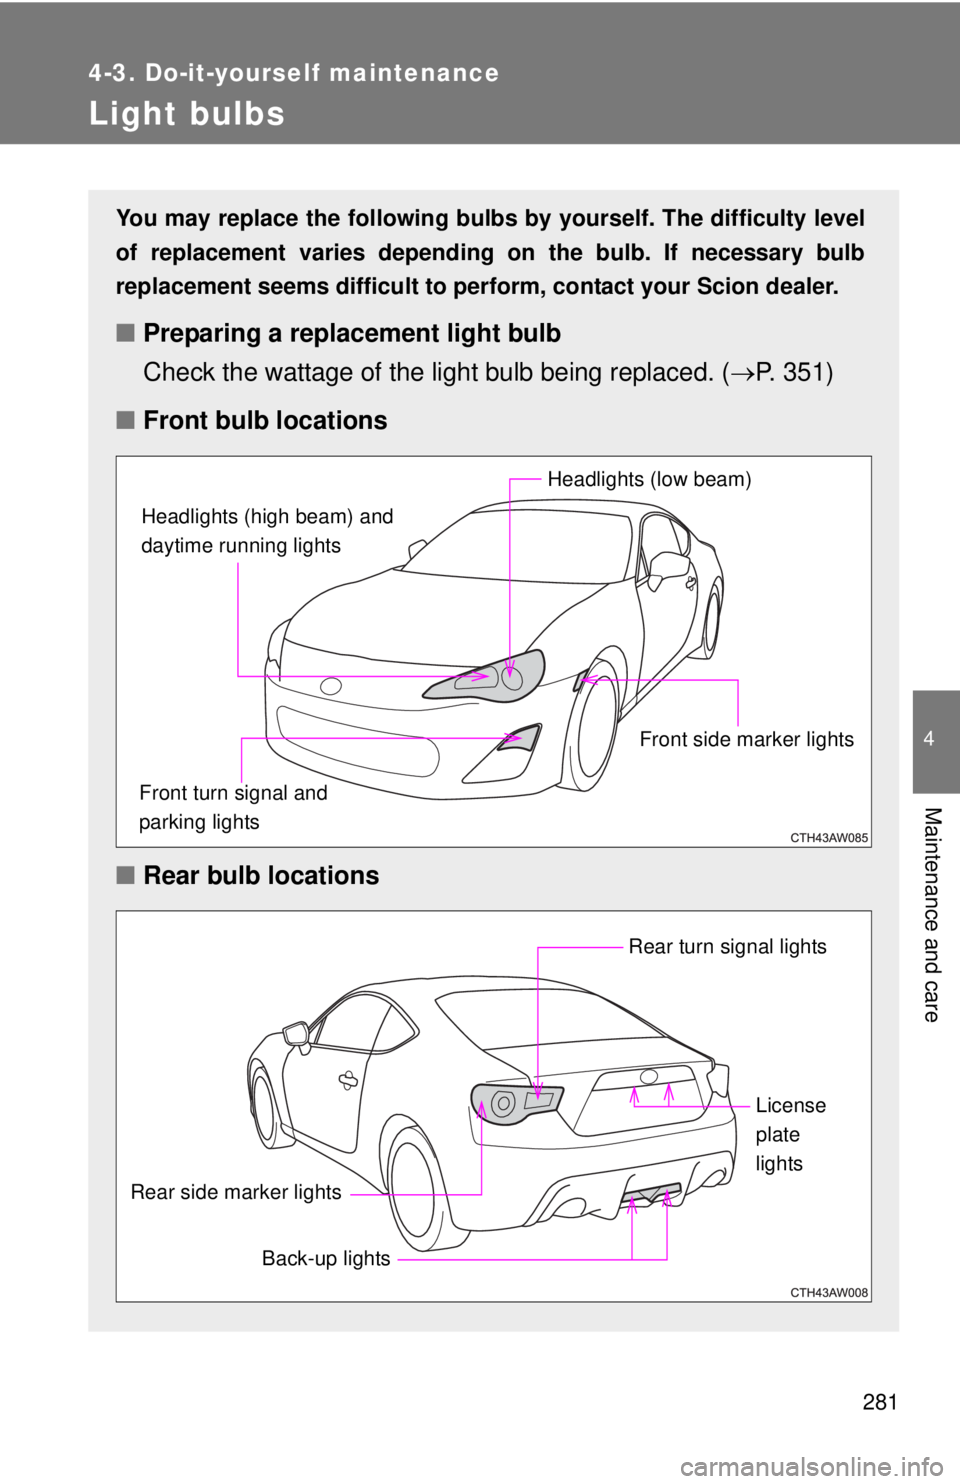
■ Front bulb locations
■ Rear bulb locations
Headlights (high beam) and
daytime running lights
Headlights (low beam)
Front side marker lights
Front turn signal and
parking lights
Rear turn signal lights
Rear side marker lights
Back-up lights License
plate
lights
Page 283 of 412
283
4-3. Do-it-yourself maintenance
4
Maintenance and care
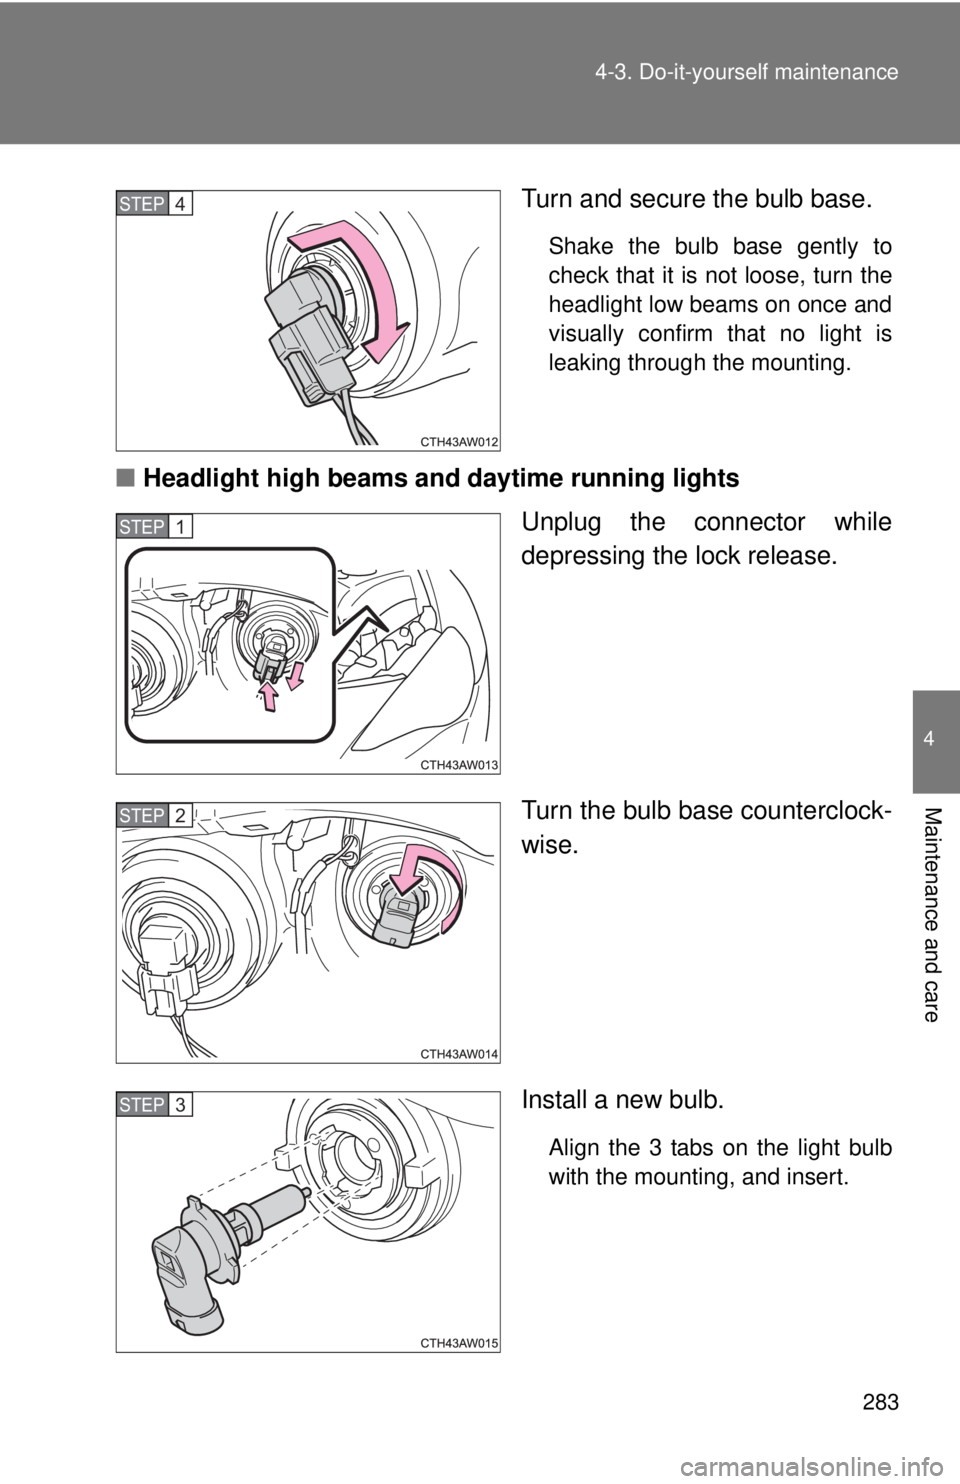
Turn and secure the bulb base.
Shake the bulb base gently to
check that it is not loose, turn the
headlight low beams on once and
visually confirm that no light is
leaking through the mounting.
■
Headlight high beams and daytime running lights
Unplug the connector while
depressing the lock release.
Turn the bulb base counterclock-
wise.
Install a new bulb.
Align the 3 tabs on the light bulb
with the mounting, and insert.
STEP 4
STEP 1
STEP 2
STEP 3
Page 284 of 412
284 4-3. Do-it-yourself maintenance
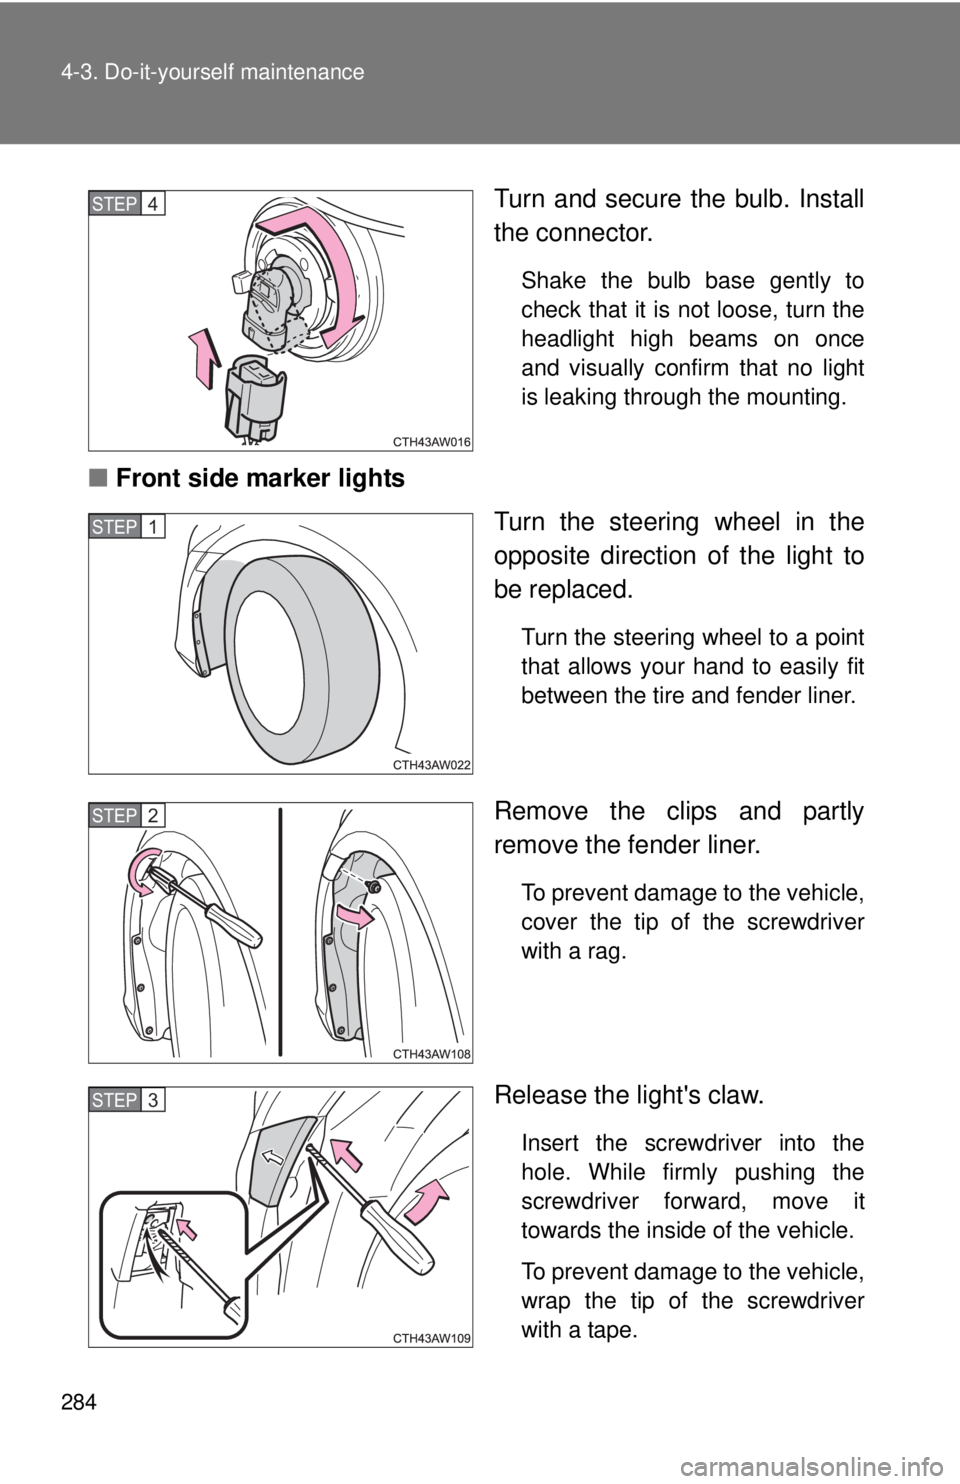
Turn and secure the bulb. Install
the connector.
Shake the bulb base gently to
check that it is not loose, turn the
headlight high beams on once
and visually confirm that no light
is leaking through the mounting.
■Front side marker lights
Turn the steering wheel in the
opposite direction of the light to
be replaced.
Turn the steering wheel to a point
that allows your hand to easily fit
between the tire and fender liner.
Remove the clips and partly
remove the fender liner.
To prevent damage to the vehicle,
cover the tip of the screwdriver
with a rag.
Release the light's claw.
Insert the screwdriver into the
hole. While firmly pushing the
screwdriver forward, move it
towards the inside of the vehicle.
To prevent damage to the vehicle,
wrap the tip of the screwdriver
with a tape.
STEP 4
STEP 1
STEP 2
STEP 3
Page 351 of 412
351
6-1. Specifications
6
Vehicle specifications
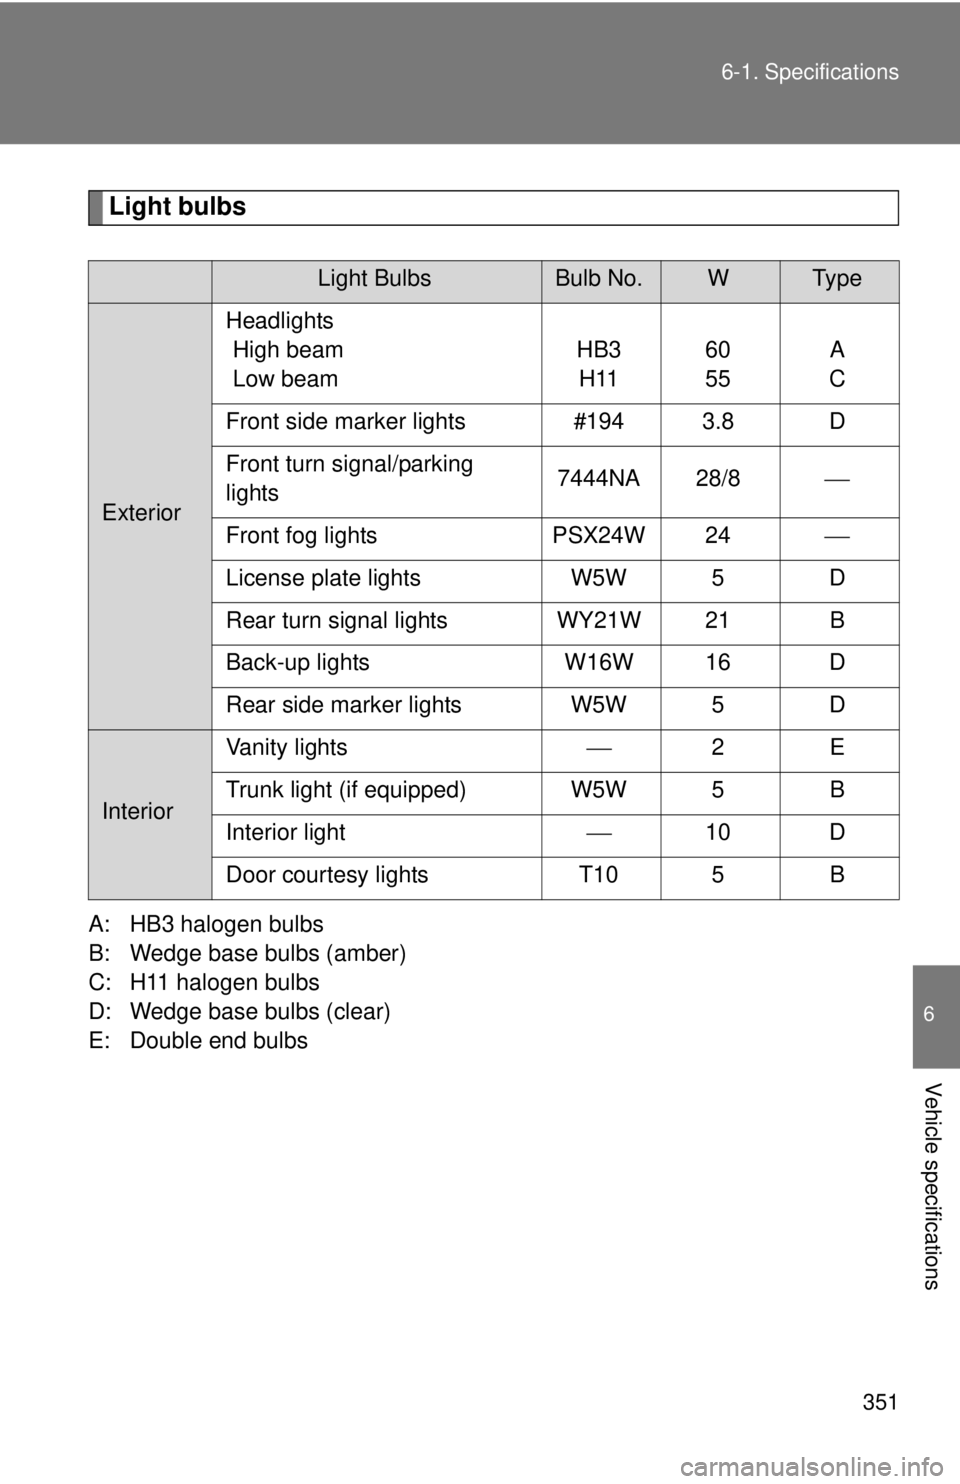
Light bulbs
A: HB3 halogen bulbs
B: Wedge base bulbs (amber)
C: H11 halogen bulbs
D: Wedge base bulbs (clear)
E: Double end bulbs
Light BulbsBulb No.WTy p e
Exterior
Headlights
High beam
Low beam HB3
H11 60
55A
C
Front side marker lights #194 3.8 D
Front turn signal/parking
lights 7444NA 28/8
Front fog lights PSX24W 24
License plate lights W5W 5 D
Rear turn signal lights WY21W 21 B
Back-up lights W16W 16 D
Rear side marker lights W5W 5 D
Interior Vanity lights
2E
Trunk light (if equipped) W5W 5 B
Interior light 10 D
Door courtesy lights T10 5 B