ECO mode TOYOTA GT86 2018 Accessories, Audio & Navigation (in English)
[x] Cancel search | Manufacturer: TOYOTA, Model Year: 2018, Model line: GT86, Model: TOYOTA GT86 2018Pages: 144, PDF Size: 4.66 MB
Page 33 of 144
33
2. AUDIO SYSTEM
Highlander_Navi_MXS
2
AUDIO SYSTEM
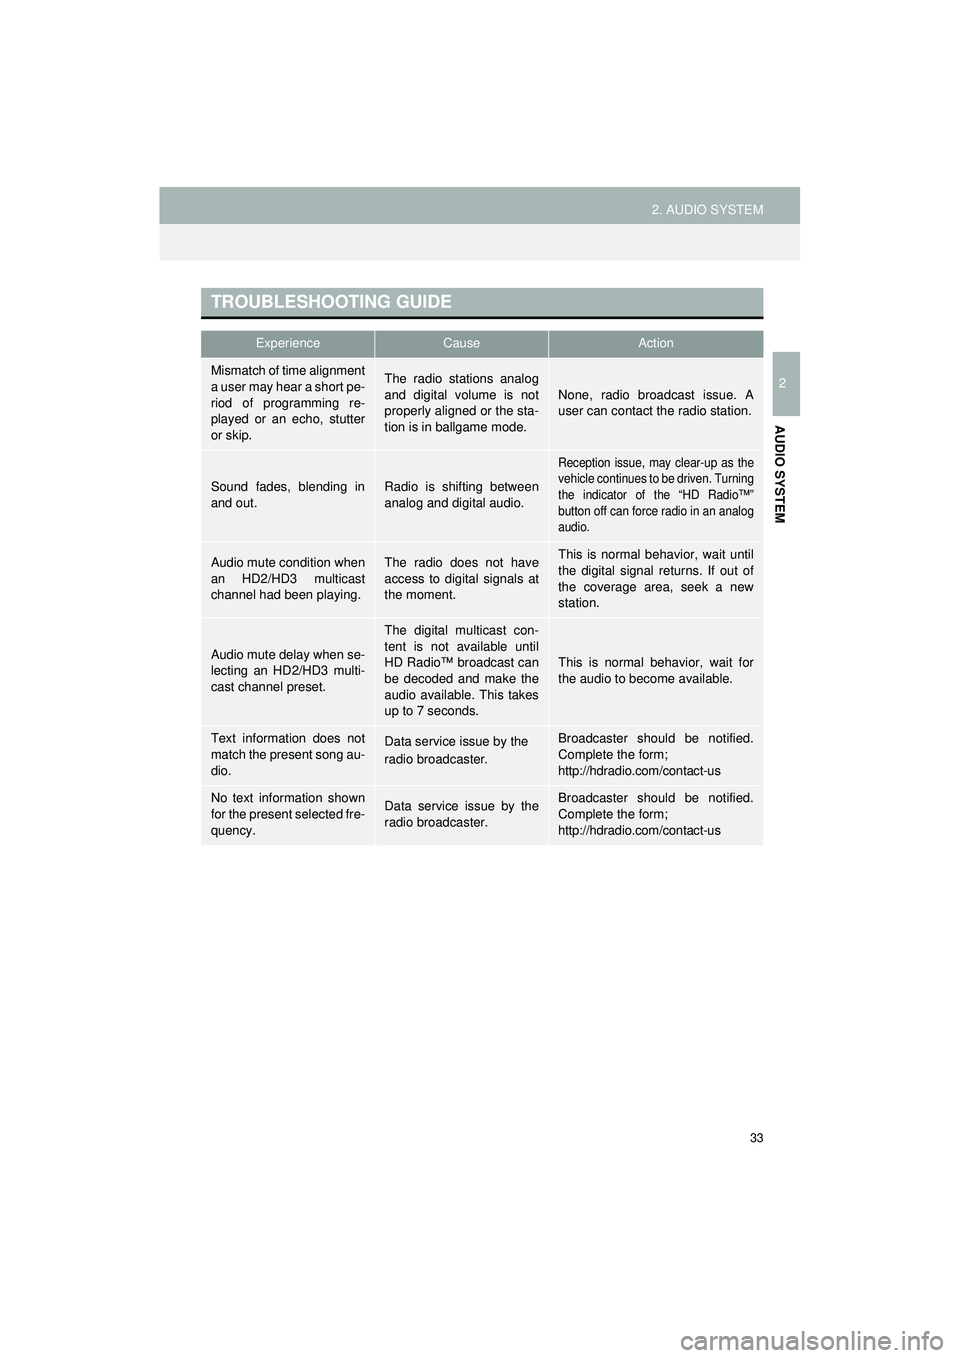
TROUBLESHOOTING GUIDE
ExperienceCauseAction
Mismatch of time alignment
a user may hear a short pe-
riod of programming re-
played or an echo, stutter
or skip.The radio stations analog
and digital volume is not
properly aligned or the sta-
tion is in ballgame mode.None, radio broadcast issue. A
user can contact the radio station.
Sound fades, blending in
and out.Radio is shifting between
analog and digital audio.
Reception issue, may clear-up as the
vehicle continues to be driven. Turning
the indicator of the “HD Radio™”
button off can force radio in an analog
audio.
Audio mute condition when
an HD2/HD3 multicast
channel had been playing.The radio does not have
access to digital signals at
the moment.This is normal behavior, wait until
the digital signal returns. If out of
the coverage area, seek a new
station.
Audio mute delay when se-
lecting an HD2/HD3 multi-
cast channel preset.
The digital multicast con-
tent is not available until
HD Radio™ broadcast can
be decoded and make the
audio available. This takes
up to 7 seconds.
This is normal behavior, wait for
the audio to become available.
Text information does not
match the present song au-
dio.Data service issue by the
radio broadcaster.Broadcaster should be notified.
Complete the form;
http://hdradio.com/contact-us
No text information shown
for the present selected fre-
quency.Data service issue by the
radio broadcaster.Broadcaster should be notified.
Complete the form;
http://hdradio.com/contact-us
Page 35 of 144
35
2. AUDIO SYSTEM
Highlander_Navi_MXS
2
AUDIO SYSTEM
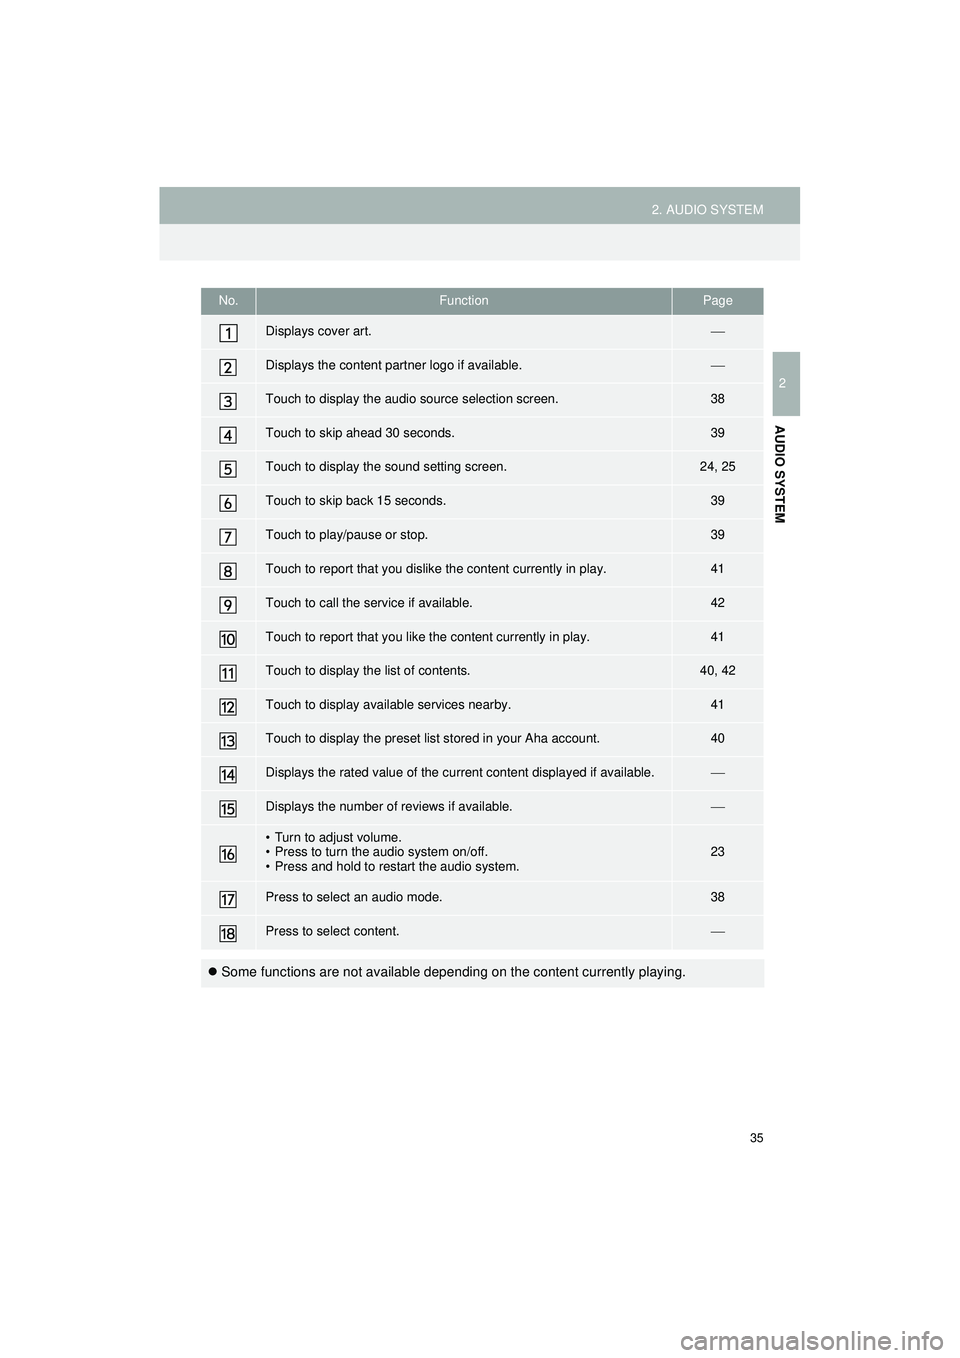
No.FunctionPage
Displays cover art.
Displays the content partner logo if available.
Touch to display the audio source selection screen.38
Touch to skip ahead 30 seconds.39
Touch to display the sound setting screen.24, 25
Touch to skip back 15 seconds.39
Touch to play/pause or stop.39
Touch to report that you dislike the content currently in play.41
Touch to call the service if available.42
Touch to report that you like the content currently in play.41
Touch to display the list of contents.40, 42
Touch to display available services nearby.41
Touch to display the preset list stored in your Aha account.40
Displays the rated value of the current content displayed if available.
Displays the number of reviews if available.
• Turn to adjust volume.
• Press to turn the audio system on/off.
• Press and hold to restart the audio system.23
Press to select an audio mode.38
Press to select content.
Some functions are not available depending on the content currently playing.
Page 39 of 144
39
2. AUDIO SYSTEM
Highlander_Navi_MXS
2
AUDIO SYSTEM
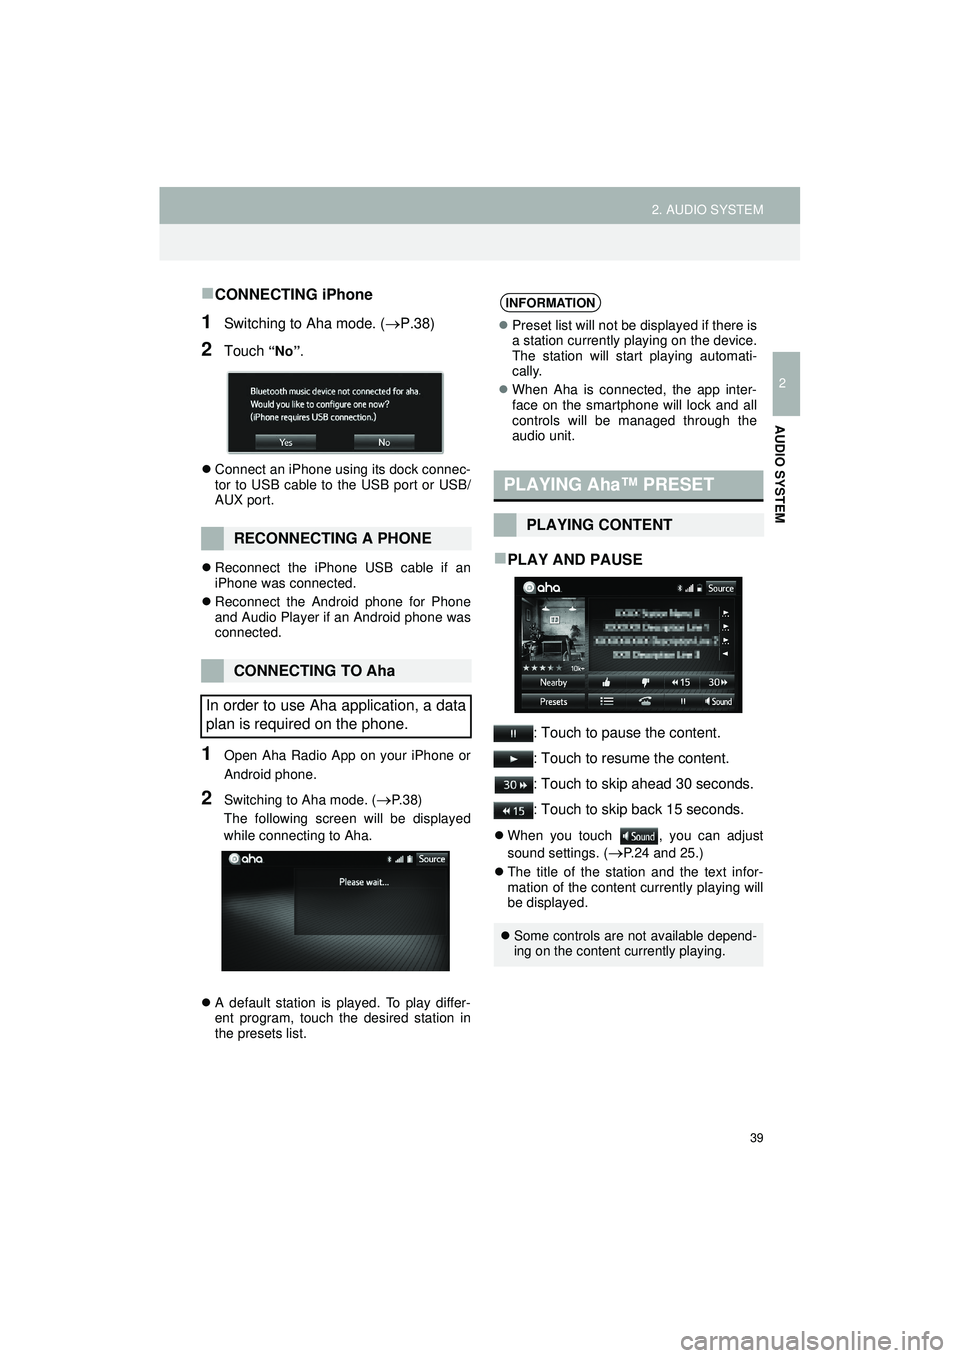
CONNECTING iPhone
1Switching to Aha mode. (P.38)
2Touch “No” .
Connect an iPhone using its dock connec-
tor to USB cable to the USB port or USB/
AUX port.
Reconnect the iPhone USB cable if an
iPhone was connected.
Reconnect the Android phone for Phone
and Audio Player if an Android phone was
connected.
1Open Aha Radio App on your iPhone or
Android phone.
2Switching to Aha mode. (P. 3 8 )
The following screen will be displayed
while connecting to Aha.
A default station is played. To play differ-
ent program, touch the desired station in
the presets list.
PLAY AND PAUSE
: Touch to pause the content.
: Touch to resume the content.
: Touch to skip ahead 30 seconds.
: Touch to skip back 15 seconds.
When you touch , you can adjust
sound settings. (
P.24 and 25.)
The title of the station and the text infor-
mation of the content currently playing will
be displayed.
RECONNECTING A PHONE
CONNECTING TO Aha
In order to use Aha application, a data
plan is required on the phone.
INFORMATION
Preset list will not be displayed if there is
a station currently playing on the device.
The station will start playing automati-
cally.
When Aha is connected, the app inter-
face on the smartphone will lock and all
controls will be managed through the
audio unit.
PLAYING Aha™ PRESET
PLAYING CONTENT
Some controls are not available depend-
ing on the content currently playing.
Page 46 of 144
46
2. AUDIO SYSTEM
Highlander_Navi_MXS
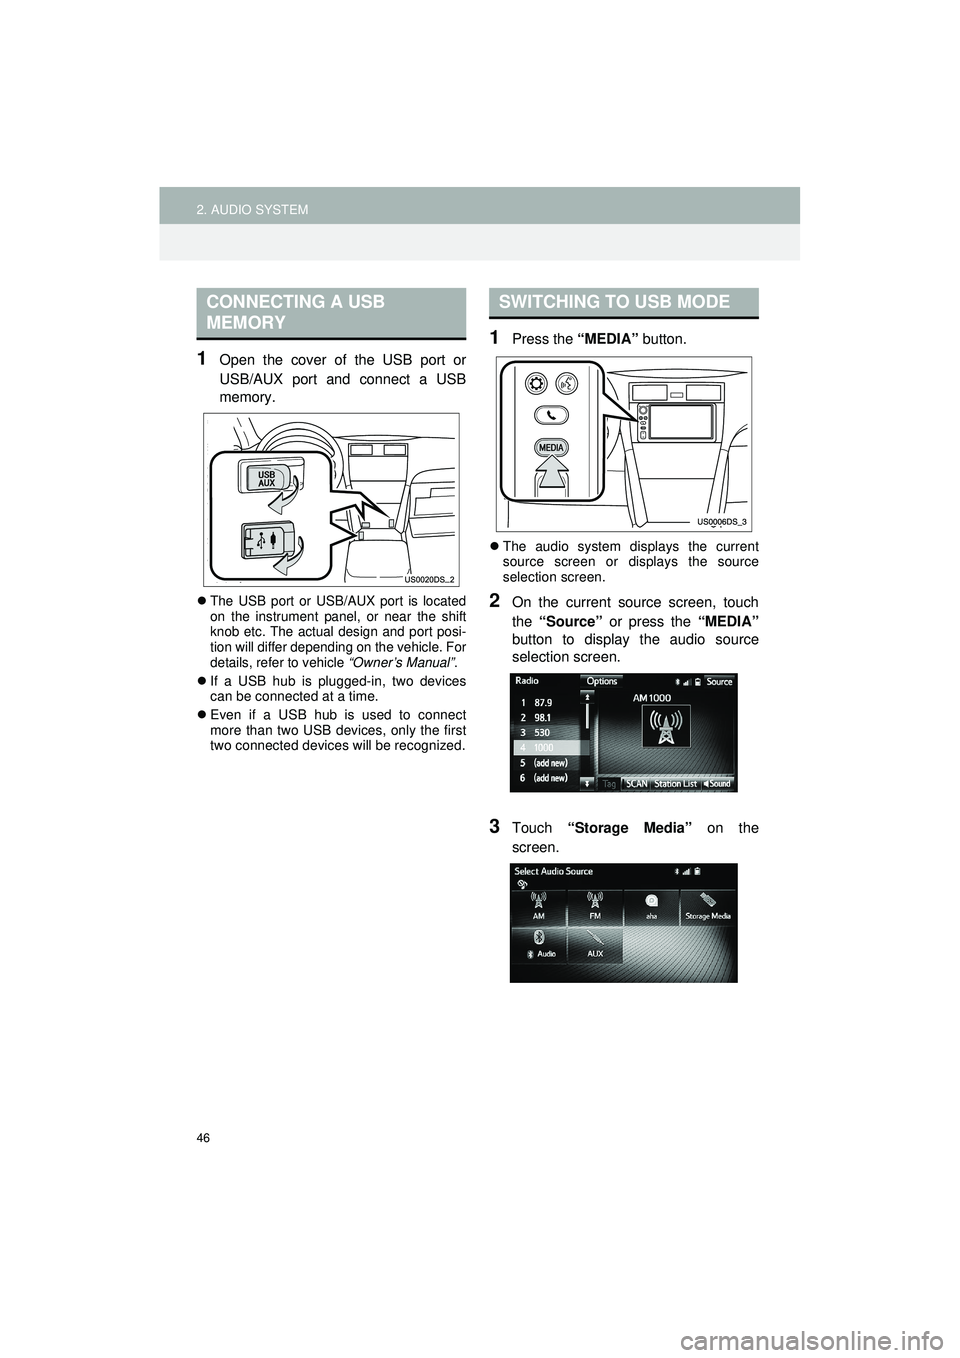
1Open the cover of the USB port or
USB/AUX port and connect a USB
memory.
The USB port or USB/AUX port is located
on the instrument panel, or near the shift
knob etc. The actual design and port posi-
tion will differ depending on the vehicle. For
details, refer to vehicle “Owner’s Manual”.
If a USB hub is plugged-in, two devices
can be connected at a time.
Even if a USB hub is used to connect
more than two USB devices, only the first
two connected devices will be recognized.
1Press the “MEDIA” button.
The audio system displays the current
source screen or displays the source
selection screen.
2On the current source screen, touch
the “Source” or press the “MEDIA”
button to display the audio source
selection screen.
3Touch “Storage Media” on the
screen.
CONNECTING A USB
MEMORYSWITCHING TO USB MODE
Page 53 of 144
53
2. AUDIO SYSTEM
Highlander_Navi_MXS
2
AUDIO SYSTEM
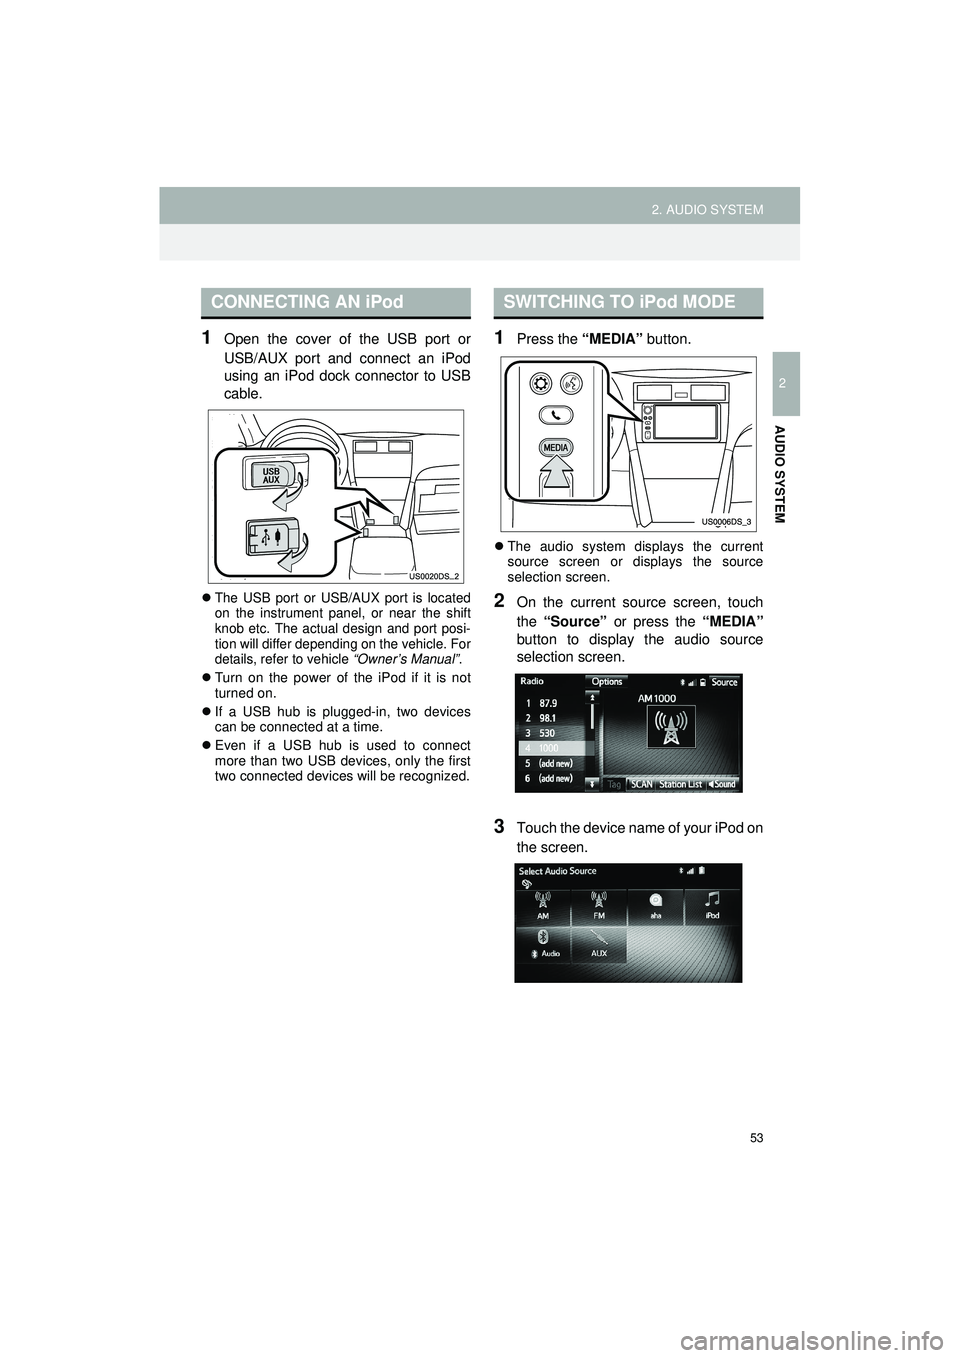
1Open the cover of the USB port or
USB/AUX port and connect an iPod
using an iPod dock connector to USB
cable.
The USB port or USB/AUX port is located
on the instrument panel, or near the shift
knob etc. The actual design and port posi-
tion will differ depending on the vehicle. For
details, refer to vehicle “Owner’s Manual”.
Turn on the power of the iPod if it is not
turned on.
If a USB hub is plugged-in, two devices
can be connected at a time.
Even if a USB hub is used to connect
more than two USB devices, only the first
two connected devices will be recognized.
1Press the “MEDIA” button.
The audio system displays the current
source screen or displays the source
selection screen.
2On the current source screen, touch
the “Source” or press the “MEDIA”
button to display the audio source
selection screen.
3Touch the device name of your iPod on
the screen.
CONNECTING AN iPodSWITCHING TO iPod MODE
Page 67 of 144
67
2. AUDIO SYSTEM
Highlander_Navi_MXS
2
AUDIO SYSTEM
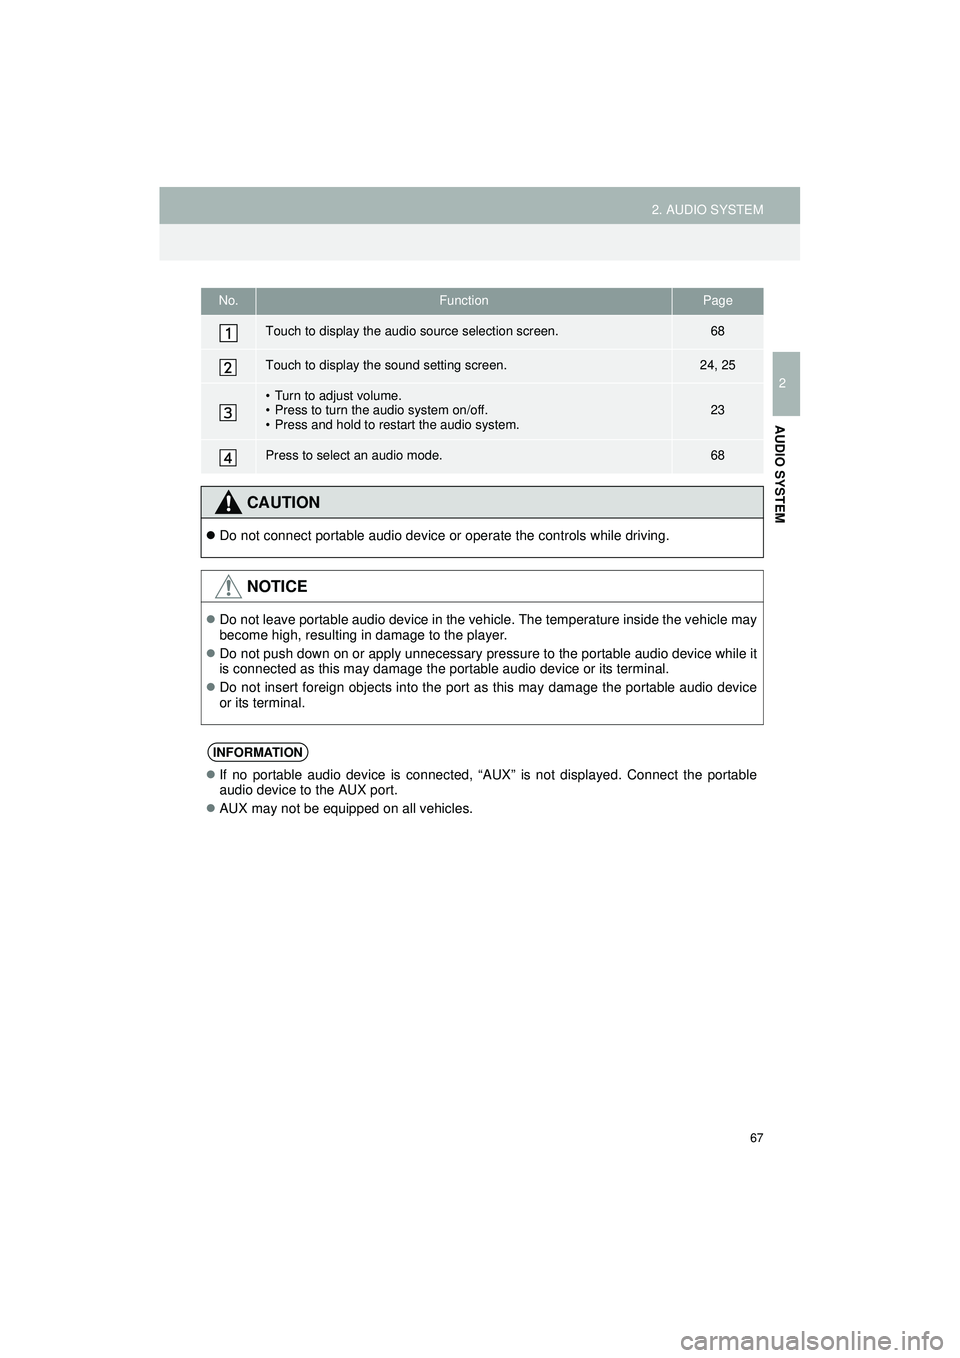
No.FunctionPage
Touch to display the audio source selection screen.68
Touch to display the sound setting screen.24, 25
• Turn to adjust volume.
• Press to turn the audio system on/off.
• Press and hold to restart the audio system.23
Press to select an audio mode.68
CAUTION
Do not connect portable audio device or operate the controls while driving.
NOTICE
Do not leave portable audio device in the vehicle. The temperature inside the vehicle may
become high, resulting in damage to the player.
Do not push down on or apply unnecessary pressure to the portable audio device while it
is connected as this may damage the portable audio device or its terminal.
Do not insert foreign objects into the port as this may damage the portable audio device
or its terminal.
INFORMATION
If no portable audio device is connected, “AUX” is not displayed. Connect the portable
audio device to the AUX port.
AUX may not be equipped on all vehicles.
Page 80 of 144
80
3. VOICE COMMAND SYSTEM
Highlander_Navi_MXS
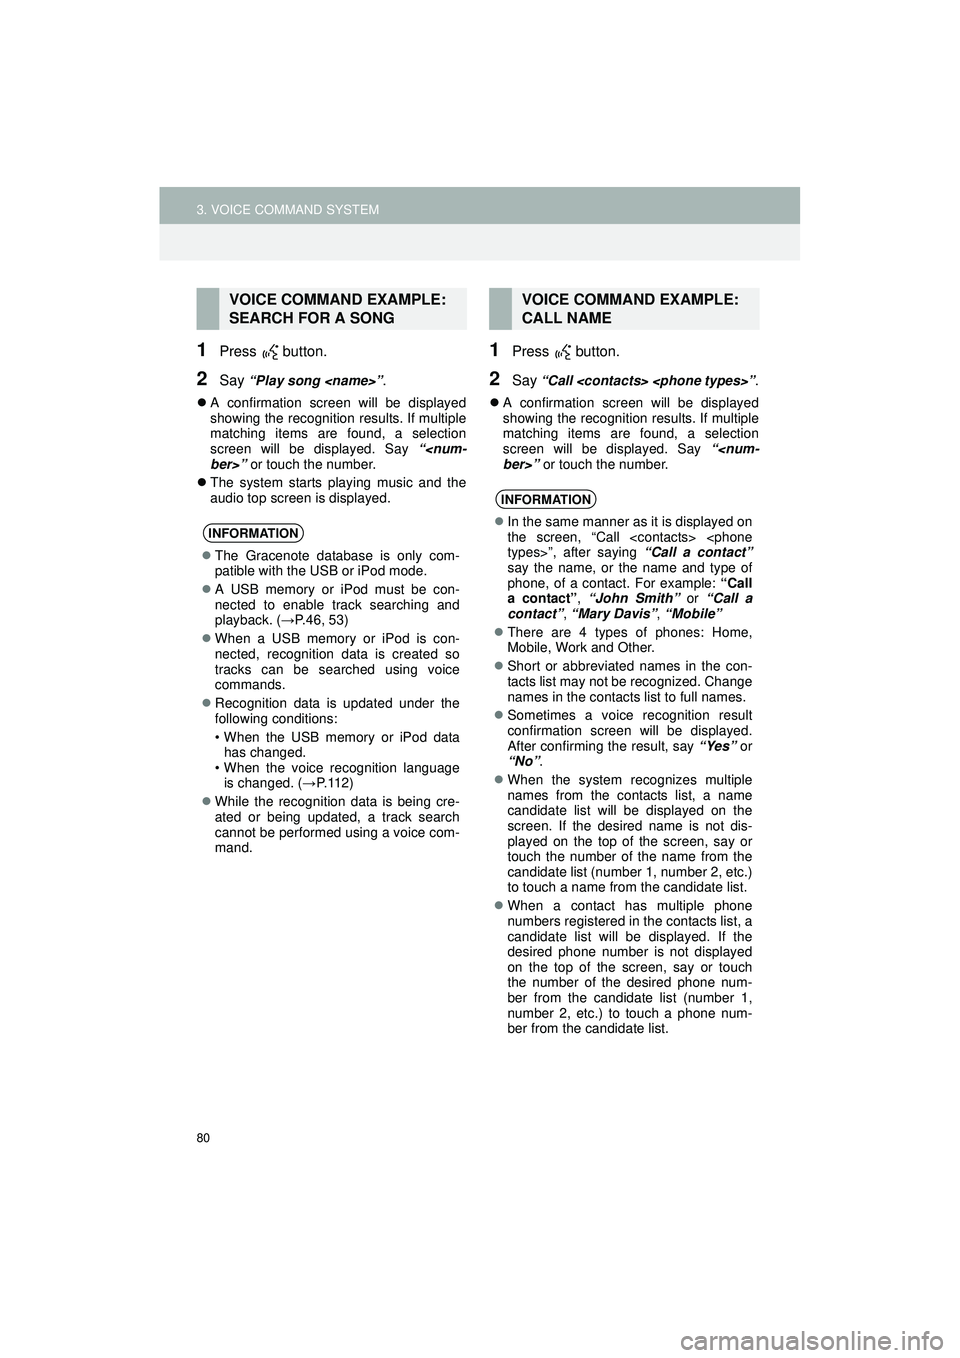
1Press button.
2Say “Play song
A confirmation screen will be displayed
showing the recognition results. If multiple
matching items are found, a selection
screen will be displayed. Say “
The system starts playing music and the
audio top screen is displayed.
1Press button.
2Say “Call
A confirmation screen will be displayed
showing the recognition results. If multiple
matching items are found, a selection
screen will be displayed. Say “
VOICE COMMAND EXAMPLE:
SEARCH FOR A SONG
INFORMATION
The Gracenote database is only com-
patible with the USB or iPod mode.
A USB memory or iPod must be con-
nected to enable track searching and
playback. ( →P.46, 53)
When a USB memory or iPod is con-
nected, recognition data is created so
tracks can be searched using voice
commands.
Recognition data is updated under the
following conditions:
• When the USB memory or iPod data
has changed.
• When the voice recognition language is changed. ( →P. 1 1 2 )
While the recognition data is being cre-
ated or being updated, a track search
cannot be performed using a voice com-
mand.
VOICE COMMAND EXAMPLE:
CALL NAME
INFORMATION
In the same manner as it is displayed on
the screen, “Call
say the name, or the name and type of
phone, of a contact. For example: “Call
a contact” , “John Smith” or “Call a
contact” , “Mary Davis” , “Mobile”
There are 4 types of phones: Home,
Mobile, Work and Other.
Short or abbreviated names in the con-
tacts list may not be recognized. Change
names in the contacts list to full names.
Sometimes a voice recognition result
confirmation screen will be displayed.
After confirming the result, say “Yes” or
“No” .
When the system recognizes multiple
names from the contacts list, a name
candidate list will be displayed on the
screen. If the desired name is not dis-
played on the top of the screen, say or
touch the number of the name from the
candidate list (number 1, number 2, etc.)
to touch a name from the candidate list.
When a contact has multiple phone
numbers registered in the contacts list, a
candidate list will be displayed. If the
desired phone number is not displayed
on the top of the screen, say or touch
the number of the desired phone num-
ber from the candidate list (number 1,
number 2, etc.) to touch a phone num-
ber from the candidate list.
Page 139 of 144
139
Display_audio_U_1st
A
AAC ......................................................... 73
Aha™ ....................................................... 34Availability of service ............................ 37
Connecting an Android phone.............. 38
Connecting an iPhone .......................... 37
Connecting for Aha™ ........................... 38
Installing the Aha™ application ............ 37
Playing a program ................................ 39
Provide feedback ................................. 41
Selecting a program ............................. 40
Switching to Aha mode ........................ 38
ASL .......................................................... 24
Audio system operating hint .................... 70
File information..................................... 72
iPod ...................................................... 71
Radio .................................................... 70
Terms ................................................... 73
Automatic sound levelizer ........................ 24
AUX device .............................................. 66
Connecting a portable audio device ..... 68
Playing a portable audio device ........... 68
Switching to AUX mode ....................... 68
B
Balance .................................................... 25
Basic Function ......................................... 14
Bluetooth
® audio...................................... 56
Listening to Bluetooth® audio............... 64
Registering/Connecting a Bluetooth®
audio player ...................................... 60
Status display ....................................... 63
Switching to Bluetooth
® audio mode.... 60 Bluetooth
® phone
Calling Bluetooth® phone ..................... 94
Profiles ................................................. 92
Receiving on the Bluetooth
® phone ..... 99
Registering Bluetooth® phone .............. 91
Status display ....................................... 90
Talking on the Bluetooth
® phone ....... 100
Bluetooth® phone message function ..... 103
Calling the message sender ............... 106
Checking a message .......................... 104
Receiving a message ......................... 104
Replying to a message (Quick reply) ................................... 105
Bluetooth
® settings ................................ 113
Deleting devices ........................ 114, 115
Editing the devices information .......... 116
C
Calling on the Bluetooth® phone
By call history ....................................... 95
By Contacts list..................................... 96
By dial pad............................................ 97
By Favorites list .................................... 94
By Voice recognition............................. 98
Casual speech recognition....................... 82
Command list ........................................... 83
Contact list ............................................... 89
D
Display settings ...................................... 131
DSP (Digital signal processing) ............... 24
E
EQ ............................................................ 24
Error messages........................................ 75 iPod ...................................................... 75
USB ...................................................... 75
F
Function Index ......................................... 15
ALPHABETICAL INDEX