display TOYOTA GT86 2018 Owners Manual (in English)
[x] Cancel search | Manufacturer: TOYOTA, Model Year: 2018, Model line: GT86, Model: TOYOTA GT86 2018Pages: 28, PDF Size: 1.62 MB
Page 3 of 28

1
INDEX
Engine maintenance 8
Fuel tank door release
& cap 7
Hood release
8
Indicator symbols
5
Instrument cluster
4
Instrument panel
2-3
Instrument panel light control
8
Keyless (and remote) entry
6
Smart Key system
7
OVERVIEW
FEATURES & OPERATIONS SAFETY & EMERGENCY FEATURES
Air conditioning/heating 18
Automatic transmission
9
AUX/USB port
17
Clock
16
Cruise control
10
Cup/bottle holders
15
Door locks
16
Driving modes
10-11
Hill-start Assist Control (HAC)
11
Lights & turn signals
12
Manual transmission
9
Multi-Information Display (MID)
14
Parking brake
9
Power outlets
17
Rear view monitor system
19
Seat adjustments-Front
13
Seats-Fold down rear seats
13
Seats-Head restraints
12
Steering lock release
19
Steering wheel switches
15
Tilt & telescopic steering wheel
16
Trunk release
16
Windows
13
Windshield wipers & washers
12 Floor mat installation
23
Seat belts
20
Spare tire & tools
21
Star Safety System™ 22-23
Tire Pressure Monitoring
(warning) System (TPMS)
20
PAIRING BLUETOOTH® PHONE FOR
THE FIRST TIME 24-25
OVERVIEW
FEATURES & OPERATIONS
SAFETY & EMERGENCY FEATURES
Page 4 of 28
2
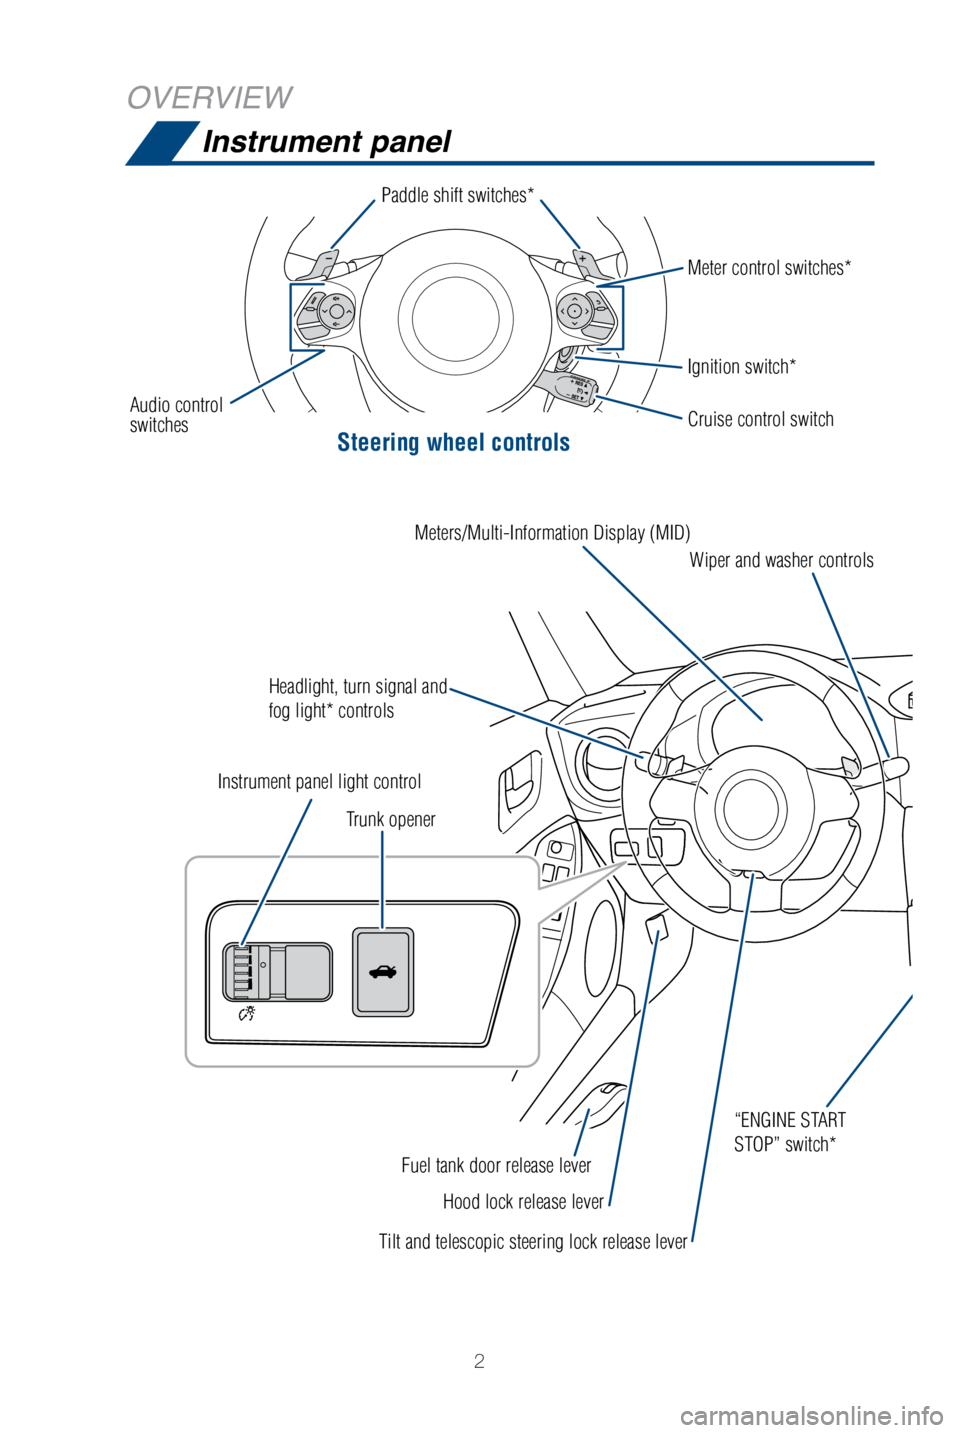
Instrument panel
Steering wheel controls
OVERVIEW
Paddle shift switches*
Audio control
switches Ignition switch* Meter control switches*
Headlight, turn signal and
fog light* controls Wiper and washer controls
Meters/Multi-Information Display (MID)
Tilt and telescopic steering lock release lever Hood lock release lever
Fuel tank door release lever “ENGINE START
STOP” switch*
Trunk opener
Instrument panel light control Cruise control switch
Page 6 of 28
4
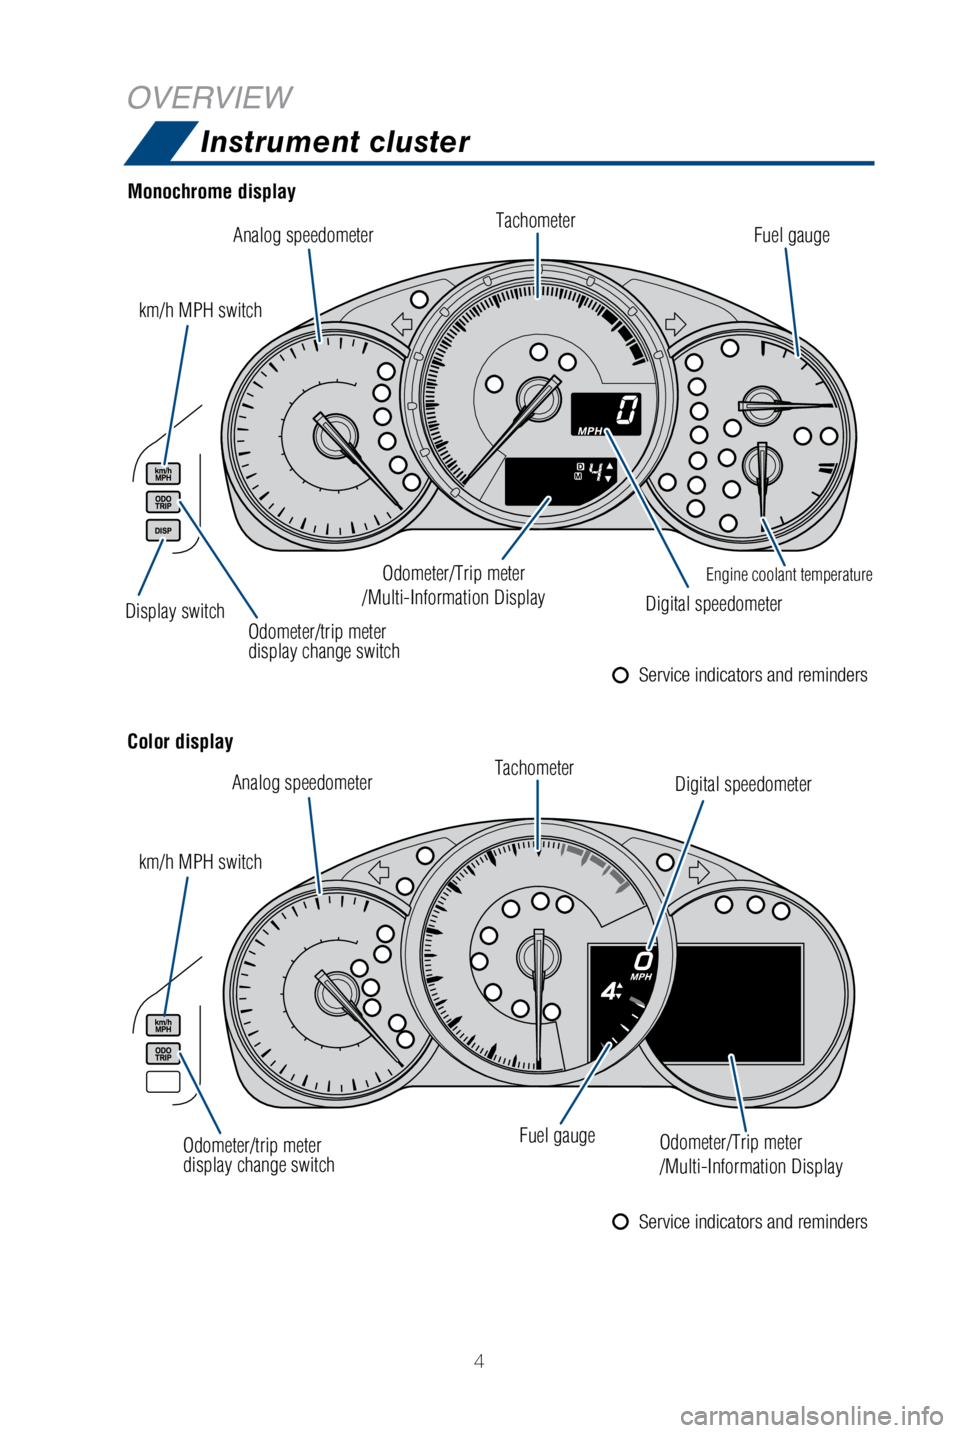
Instrument cluster
Display switch
Monochrome display
Color display
Analog speedometer
Analog speedometer
km/h MPH switch
km/h MPH switch
Odometer/trip meter
display change switch
Odometer/trip meter
display change switch Tachometer
Tachometer Fuel gauge
Fuel gauge
Engine coolant temperature
Digital speedometer Digital speedometer
Odometer/Trip meter
/Multi-Information Display
Odometer/Trip meter
/Multi-Information Display
Service indicators and reminders
Service indicators and reminders
OVERVIEW
Page 16 of 28
14
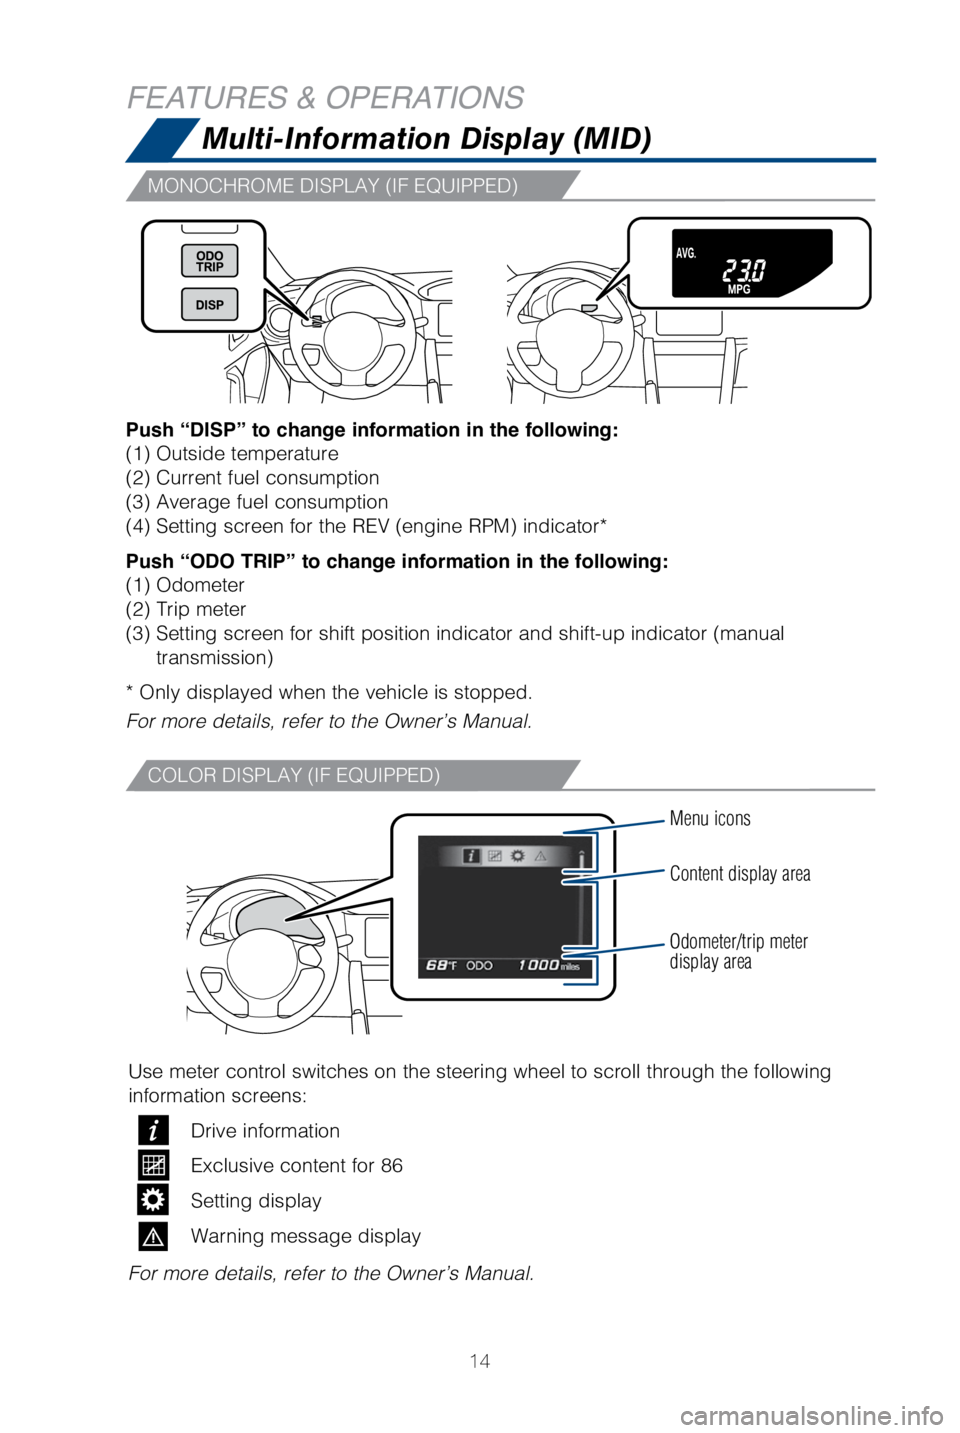
Multi-Information Display (MID)
Push “DISP” to change information in the following:
(1) Outside temperature
(2) Current fuel consumption
(3) Average fuel consumption
(4) Setting screen for the REV (engine RPM) indicator*
Push “ODO TRIP” to change information in the following:
(1) Odometer
(2) Trip meter
(3) Setting screen for shift position indicator and shift-up indicator\
(manual
transmission)
* Only displayed when the vehicle is stopped.
For more details, refer to the Owner’s Manual.
Menu icons
Content display area
Odometer/trip meter
display area
Use meter control switches on the steering wheel to scroll through the f\
ollowing
information screens:
Drive information
Exclusive content for 86
Setting display
Warning message display
For more details, refer to the Owner’s Manual.
FEATURES & OPERATIONS
MONOCHROME DISPLAY (IF EQUIPPED)
COLOR DISPLAY (IF EQUIPPED)
Page 17 of 28
15
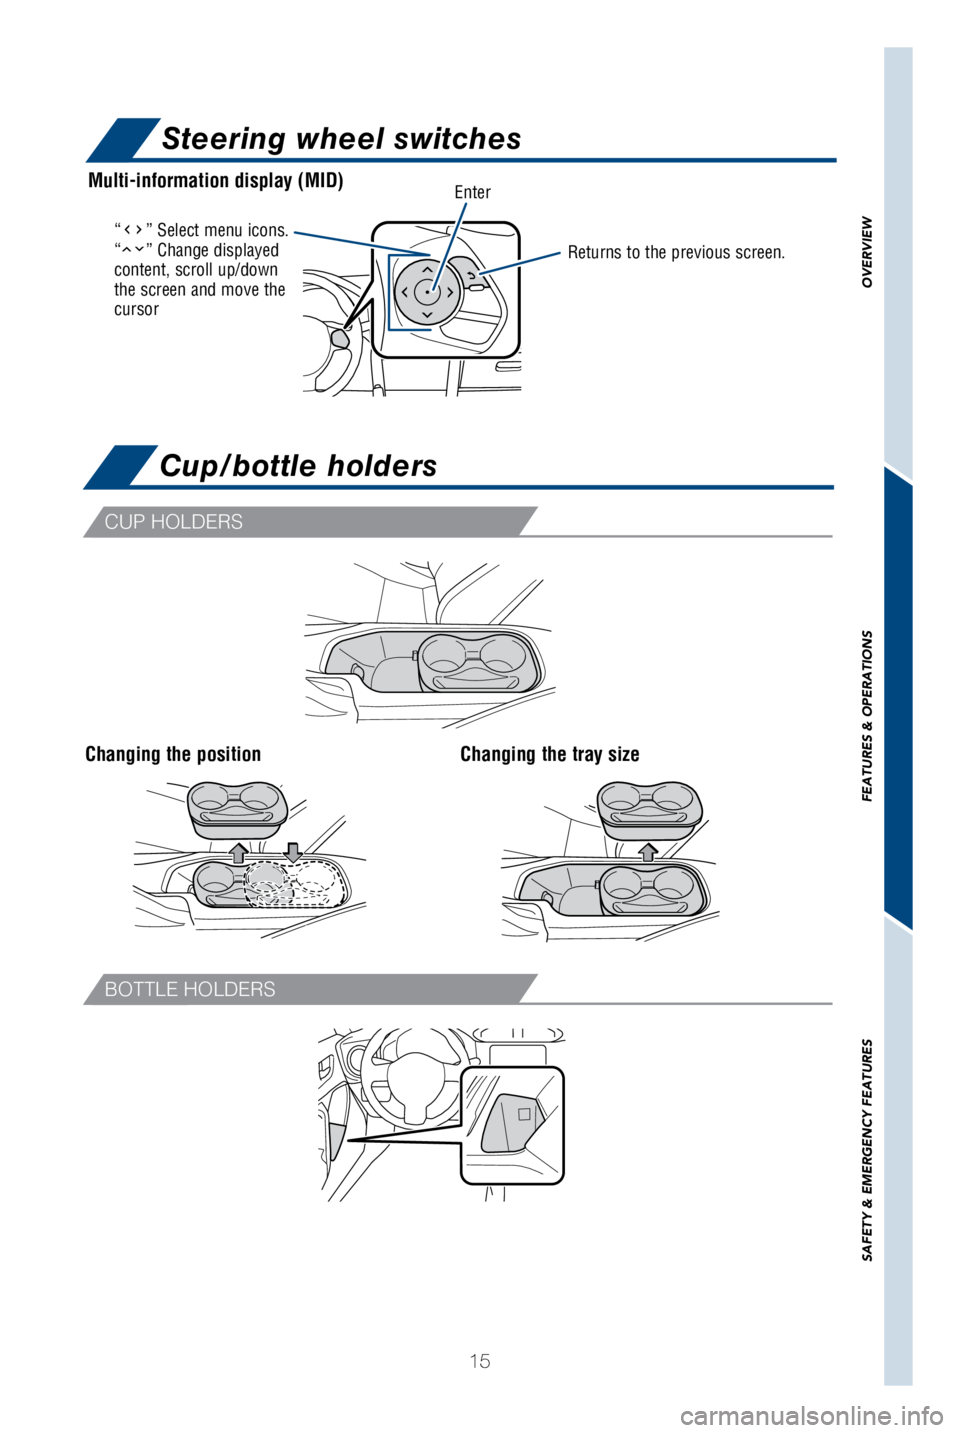
“” Select menu icons.
“” Change displayed
content, scroll up/down
the screen and move the
cursorReturns to the previous screen.
EnterMulti-information display (MID)
Steering wheel switches
Cup/bottle holders
Changing the positionChanging the tray size
CUP HOLDERS
BOTTLE HOLDERS
OVERVIEW
FEATURES & OPERATIONS
SAFETY & EMERGENCY FEATURES
Page 20 of 28

18
FEATURES & OPERATIONSAir conditioning/heating
For more details, refer to the Owner’s Manual.
Airflow vent
“
” and “” mode uses outside air only Rear window defogger
Recirculate cabin air
(outside air when OFF)
Climate control OFF Recirculate cabin air
(outside air when OFF)Rear window and outside
rear view mirror defoggers
Air Conditioning ON/OFF
Windshield airflow
Defogging
windshield
Airflow vent
Temperature selector
(driver side)
Temperature selector
(front passenger side)
Automatic climate control ON
Adjust the temperature setting, and airflow
vents and fan will adjust automatically.
Fan speed/Airflow
vent display
Temperature display
(driver side)
Temperature display
(front passenger side)
“DUAL” button
Indicator ON: Separate temperature
settings for driver and passenger.
Indicator OFF: Synchronize temperature
settings for driver and passenger. Air Conditioning ON/OFF
Fan speed Temperature selector
Manual air conditioning
Automatic air conditioning
Page 21 of 28
19
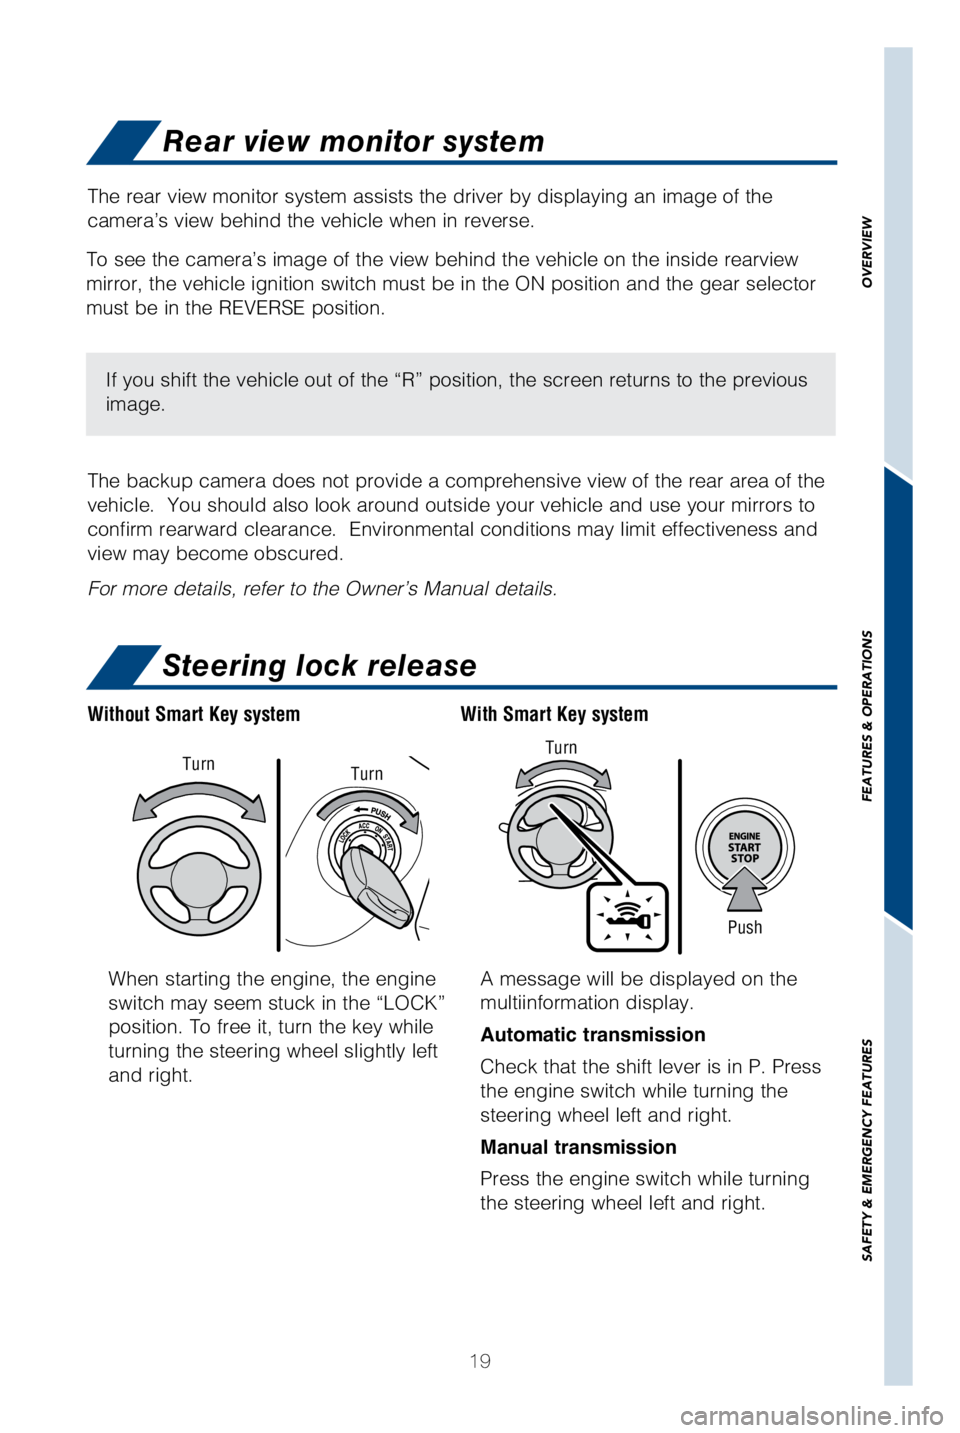
When starting the engine, the engine
switch may seem stuck in the “LOCK”
position. To free it, turn the key while
turning the steering wheel slightly left
and right.A message will be displayed on the
multiinformation display.
Automatic transmission
Check that the shift lever is in P. Press
the engine switch while turning the
steering wheel left and right.
Manual transmission
Press the engine switch while turning
the steering wheel left and right.
With Smart Key system
Without Smart Key system
Push
Turn
Turn
Turn
Rear view monitor system
Steering lock release
The rear view monitor system assists the driver by displaying an image o\
f the
camera’s view behind the vehicle when in reverse.
The backup camera does not provide a comprehensive view of the rear area\
of the
vehicle. You should also look around outside your vehicle and use your \
mirrors to
confirm rearward clearance. Environmental conditions may limit effectiv\
eness and
view may become obscured.
For more details, refer to the Owner’s Manual details.
To see the camera’s image of the view behind the vehicle on the insid\
e rearview
mirror, the vehicle ignition switch must be in the ON position and the g\
ear selector
must be in the REVERSE position.
If you shift the vehicle out of the “R” position, the screen retur\
ns to the previous
image.
OVERVIEW
FEATURES & OPERATIONS
SAFETY & EMERGENCY FEATURES
Page 26 of 28
24
PAIRING BLUETOOTH® PHONE FOR THE FIRST TIME
Touch Screen Display Audio and Display Audio with Navigation1
To use the hands-free system3, it is necessary to pair a Bluetooth®2
phone with the system. Once the phone has been paired, it is possible to
use the hands-free system
3. (NOTE: The Bluetooth®2 pairing process for
Non-Navigation and Navigation1 units differ, as noted below)
You can pair up to 4 devices.
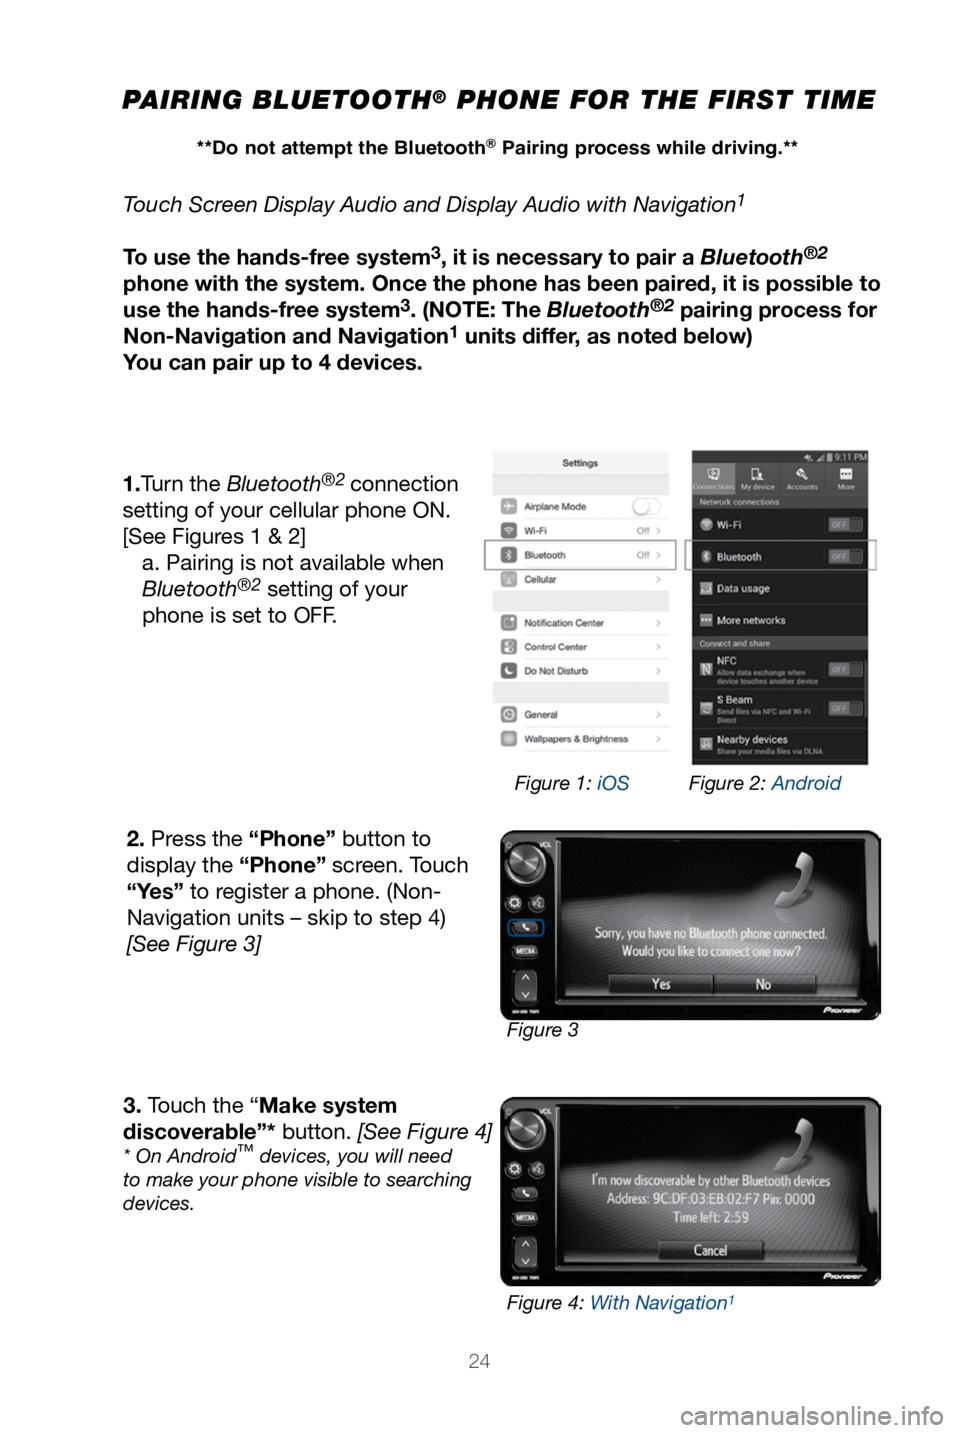
1.Turn the Bluetooth
®2 connection
setting of your cellular phone ON.
[See Figures 1 & 2] a. Pairing is not available when
Bluetooth
®2 setting of your
phone is set to OFF.
2. Press the “Phone” button to
display the “Phone” screen. Touch
“Yes” to register a phone. (Non-
Navigation units – skip to step 4)
[See Figure 3]
3. Touch the “Make system
discoverable”* button. [See Figure 4]
* On Android™ devices, you will need
to make your phone visible to searching
devices.
Figure 3 Figure 1: iOS
Figure 2: Android
Figure 4: With Navigation
1
**Do not attempt the Bluetooth® Pairing process while driving.**
Page 27 of 28
25
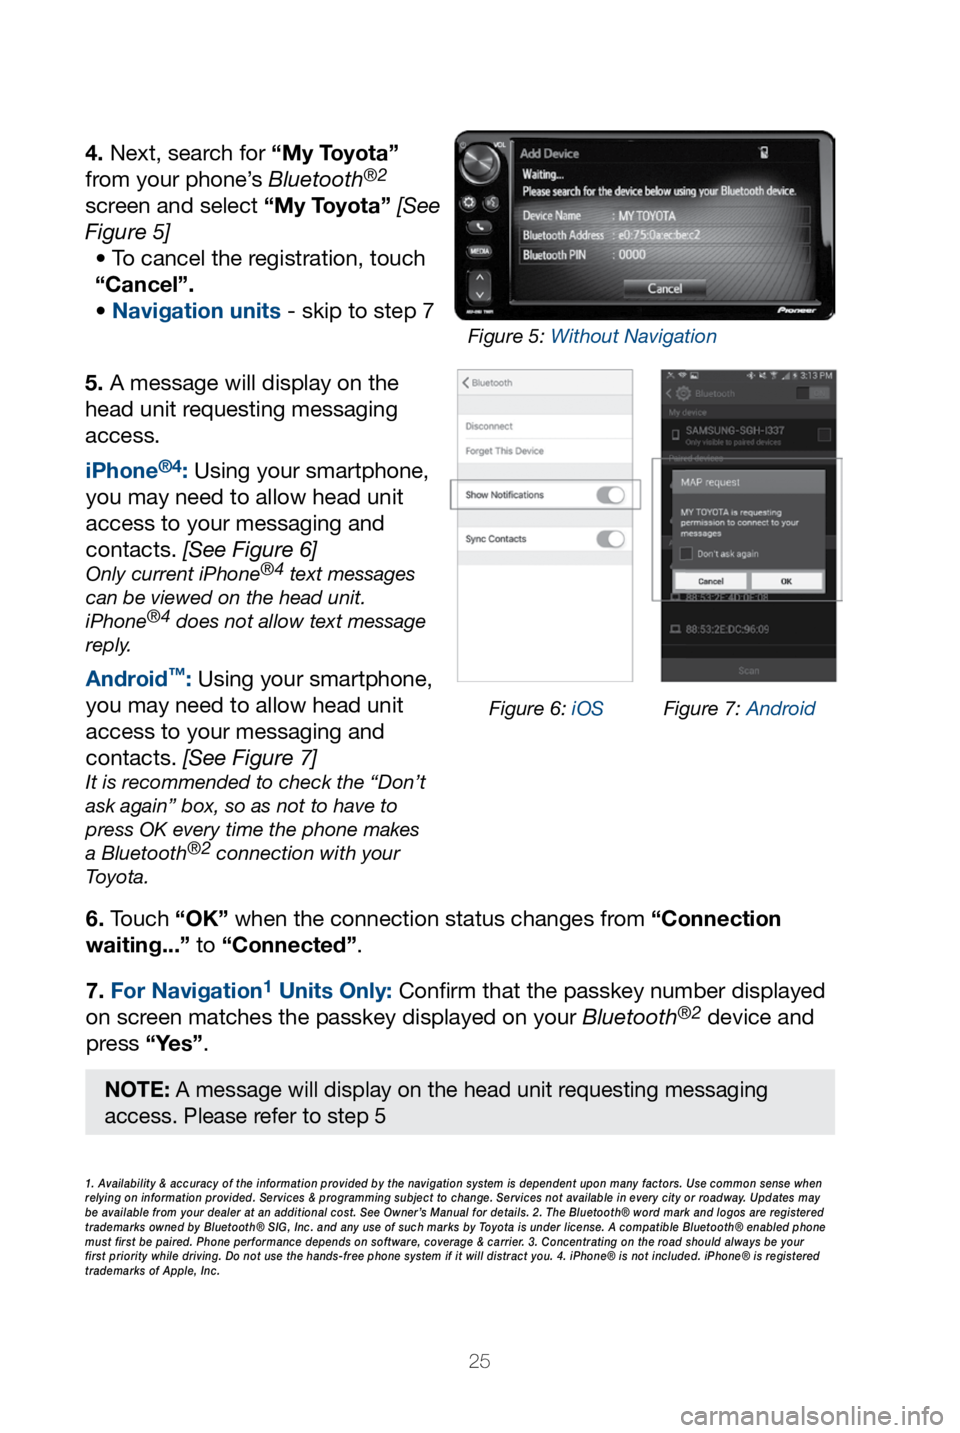
5. A message will display on the
head unit requesting messaging
access.6. Touch “OK” when the connection status changes from “Connection
waiting...” to “Connected”.
7. For Navigation
1 Units Only: Confi rm that the passkey number displayed
on screen matches the passkey displayed on your Bluetooth®2 device and
press “Yes”. iPhone
®4: Using your smartphone,
you may need to allow head unit
access to your messaging and
contacts. [See Figure 6]
Only current iPhone®4 text messages
can be viewed on the head unit.
iPhone
®4 does not allow text message
reply.
Android™: Using your smartphone,
you may need to allow head unit
access to your messaging and
contacts. [See Figure 7]
It is recommended to check the “Don’t
ask again” box, so as not to have to
press OK every time the phone makes
a Bluetooth
®2 connection with your
Toyota.
4. Next, search for “My Toyota”
from your phone’s Bluetooth®2
screen and select “My Toyota” [See
Figure 5]
• To cancel the registration, touch
“Cancel”.
• Navigation units - skip to step 7
1. Availability & accuracy of the information provided by the navigation sys\
tem is dependent upon many factors. Use common sense when
relying on information provided. Services & programming subject to change. Services not available in every city or roadway. Updates may
be available from your dealer at an additional cost. See Owner’s Manual for details. 2. The Bluetooth® word mark and logos are regis\
tered
trademarks owned by Bluetooth® SIG, Inc. and any use of such marks by\
Toyota is under license. A compatible Bluetooth® enabled phone
must first be paired. Phone performance depends on software, coverage & \
carrier. 3. Concentrating on the road should always be your
first priority while driving. Do not use the hands-free phone system if \
it will distract you. 4. iPhone® is not included. iPhone® is registered
trademarks of Apple, Inc.
Figure 6: iOS Figure 7: Android
Figure 5: Without Navigation
NOTE: A message will display on the head unit requesting messaging
access. Please refer to step 5