TOYOTA HIGHLANDER 2008 XU40 / 2.G Owners Manual
HIGHLANDER 2008 XU40 / 2.G
TOYOTA
TOYOTA
https://www.carmanualsonline.info/img/14/6395/w960_6395-0.png
TOYOTA HIGHLANDER 2008 XU40 / 2.G Owners Manual
Trending: reset, engine, wiper blades, interior lights, maintenance, torque, jacking
Page 261 of 577
260 3-1. Using the air conditioning system and defogger
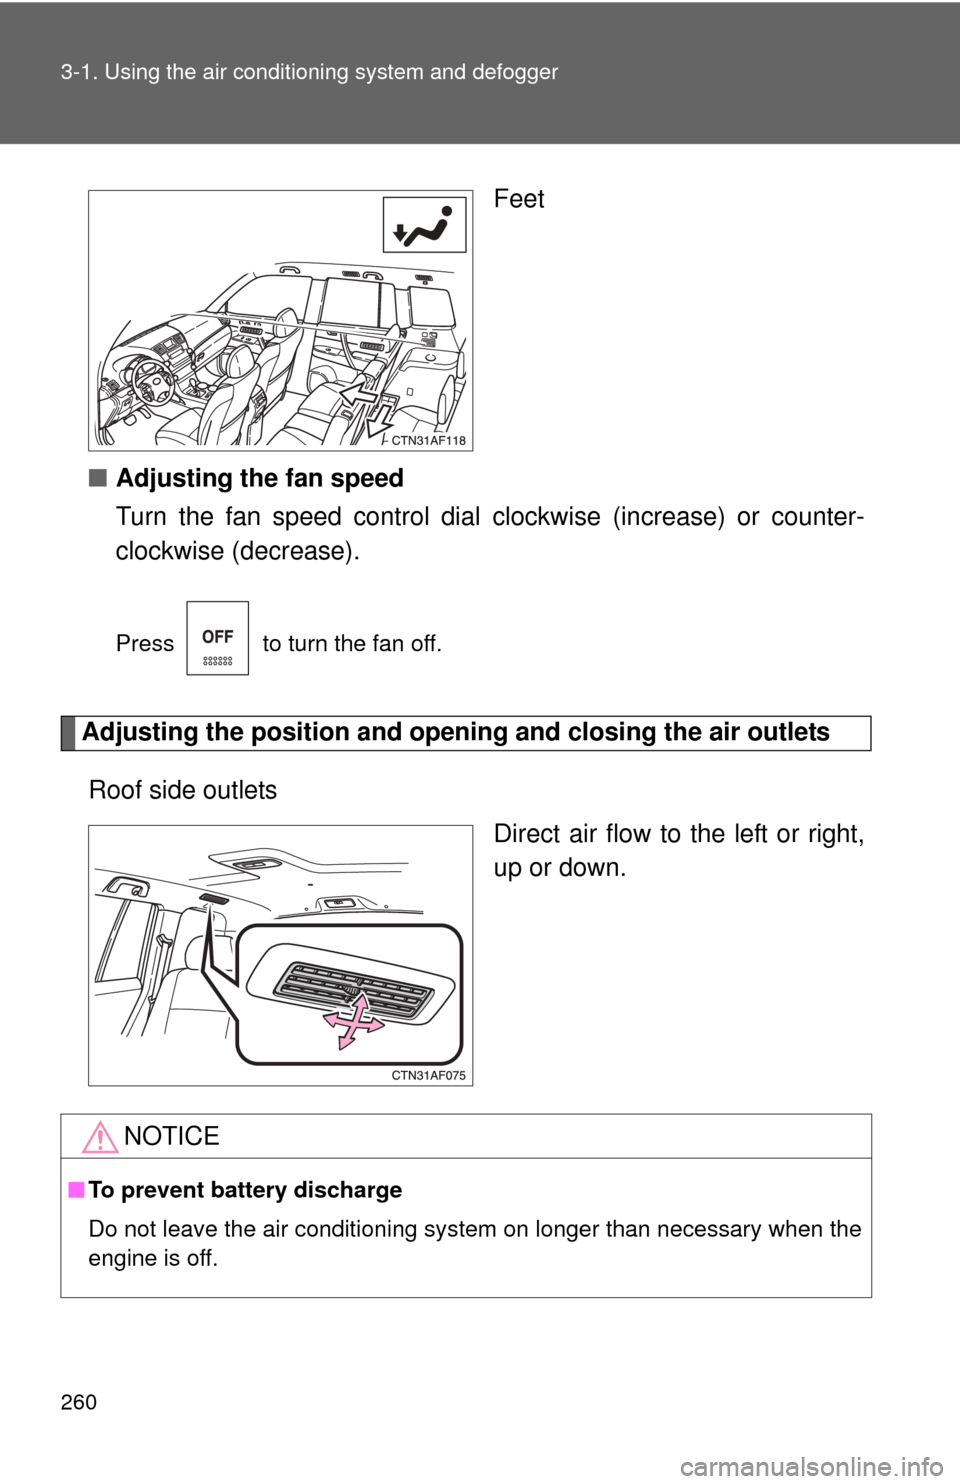
Feet
■ Adjusting the fan speed
Turn the fan speed control dial clockwise (increase) or counter-
clockwise (decrease).
Press to turn the fan off.
Adjusting the position and openi ng and closing the air outlets
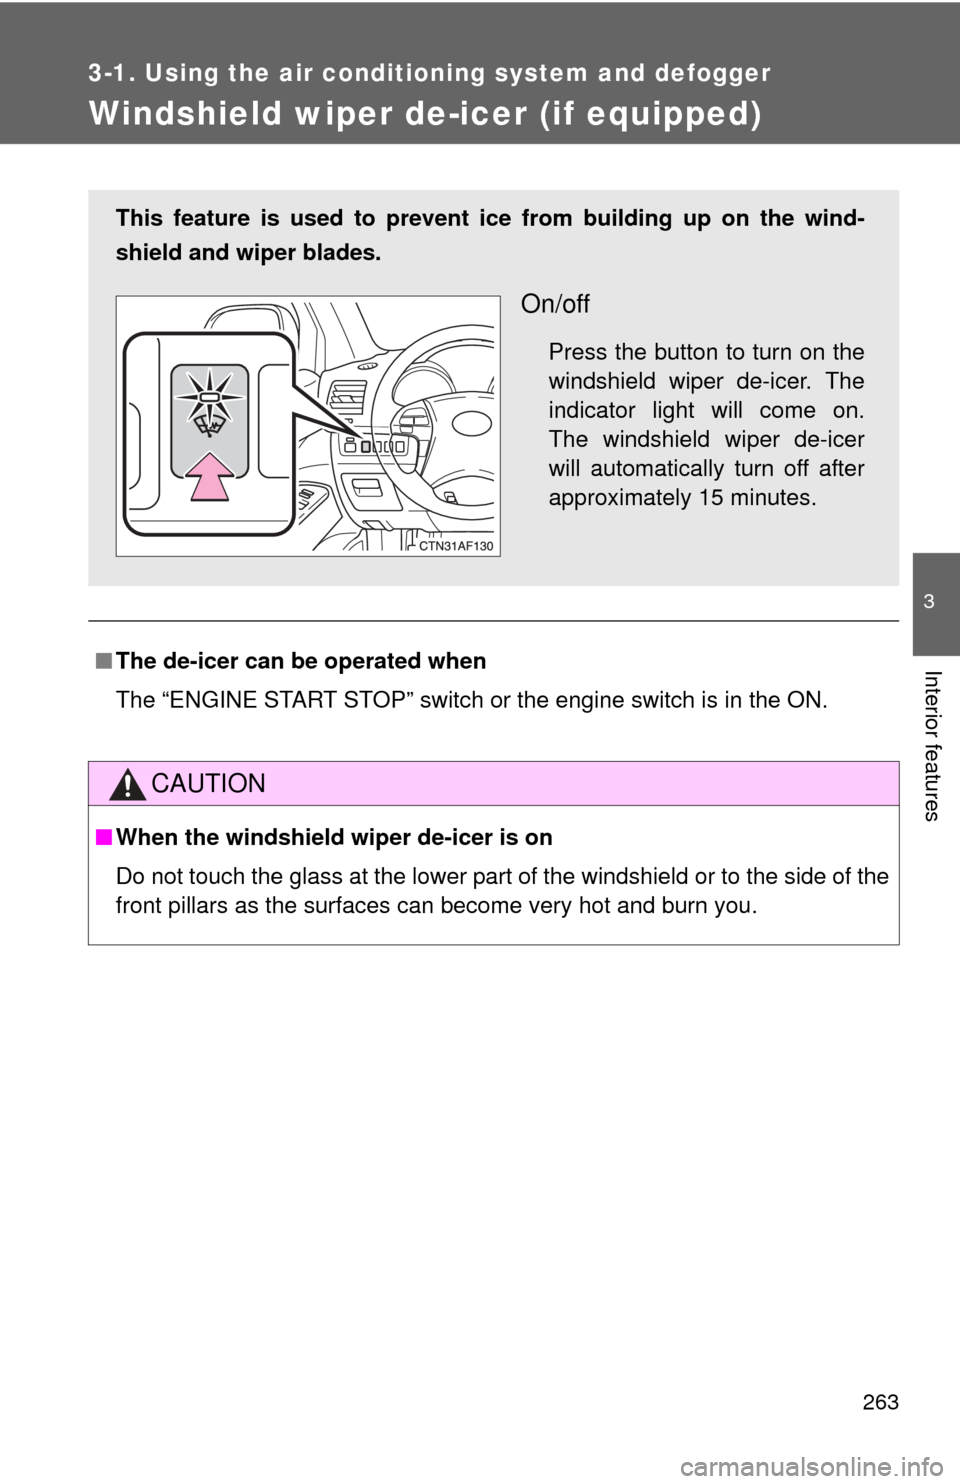
Roof side outlets Direct air flow to the left or right,
up or down.
NOTICE
■To prevent battery discharge
Do not leave the air conditioning system on longer than necessary when the
engine is off.
Page 262 of 577
261
3-1. Using the air conditioning system and defogger
3
Interior features
Rear window and outside rear view mirror defoggers
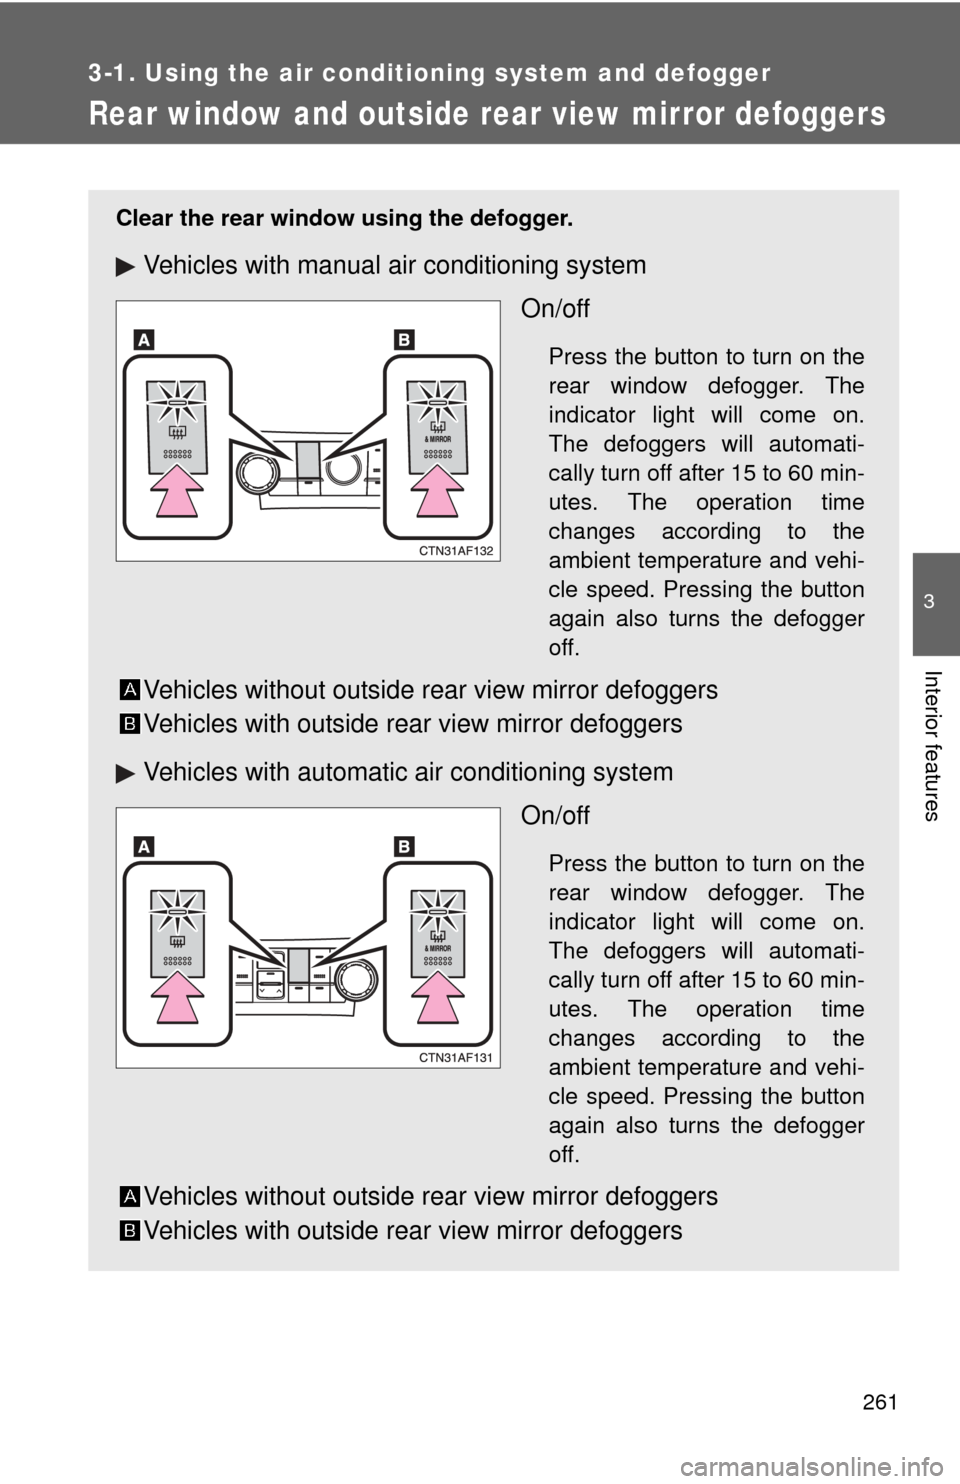
Clear the rear window using the defogger.
Vehicles with manual air conditioning systemOn/off
Press the button to turn on the
rear window defogger. The
indicator light will come on.
The defoggers will automati-
cally turn off after 15 to 60 min-
utes. The operation time
changes according to the
ambient temperature and vehi-
cle speed. Pressing the button
again also turns the defogger
off.
Vehicles without outside rear view mirror defoggers
Vehicles with outside rear view mirror defoggers
Vehicles with automatic air conditioning systemOn/off
Press the button to turn on the
rear window defogger. The
indicator light will come on.
The defoggers will automati-
cally turn off after 15 to 60 min-
utes. The operation time
changes according to the
ambient temperature and vehi-
cle speed. Pressing the button
again also turns the defogger
off.
Vehicles without outside rear view mirror defoggers
Vehicles with outside rear view mirror defoggers
Page 263 of 577
262 3-1. Using the air conditioning system and defogger
■The defogger can be operated when
The “ENGINE START STOP” switch or the engine switch is in the ON.
■ Outside rear view mirror defoggers (vehicles with outside rear view
mirror defoggers)
Turning the rear window defogger on will turn the outside rear view mirror
defoggers on.
CAUTION
■ Outside rear view mirror defoggers (vehicles with outside rear view
mirror defoggers)
The surfaces of the outside rear view mirrors become hot. Do not touch
them to prevent from burning yourself.
Page 264 of 577
263
3-1. Using the air conditioning system and defogger
3
Interior features
Windshield wiper de-icer (if equipped)
■The de-icer can be operated when
The “ENGINE START STOP” switch or the engine switch is in the ON.
CAUTION
■When the windshield wiper de-icer is on
Do not touch the glass at the lower part of the windshield or to the side of the
front pillars as the surfaces can become very hot and burn you.
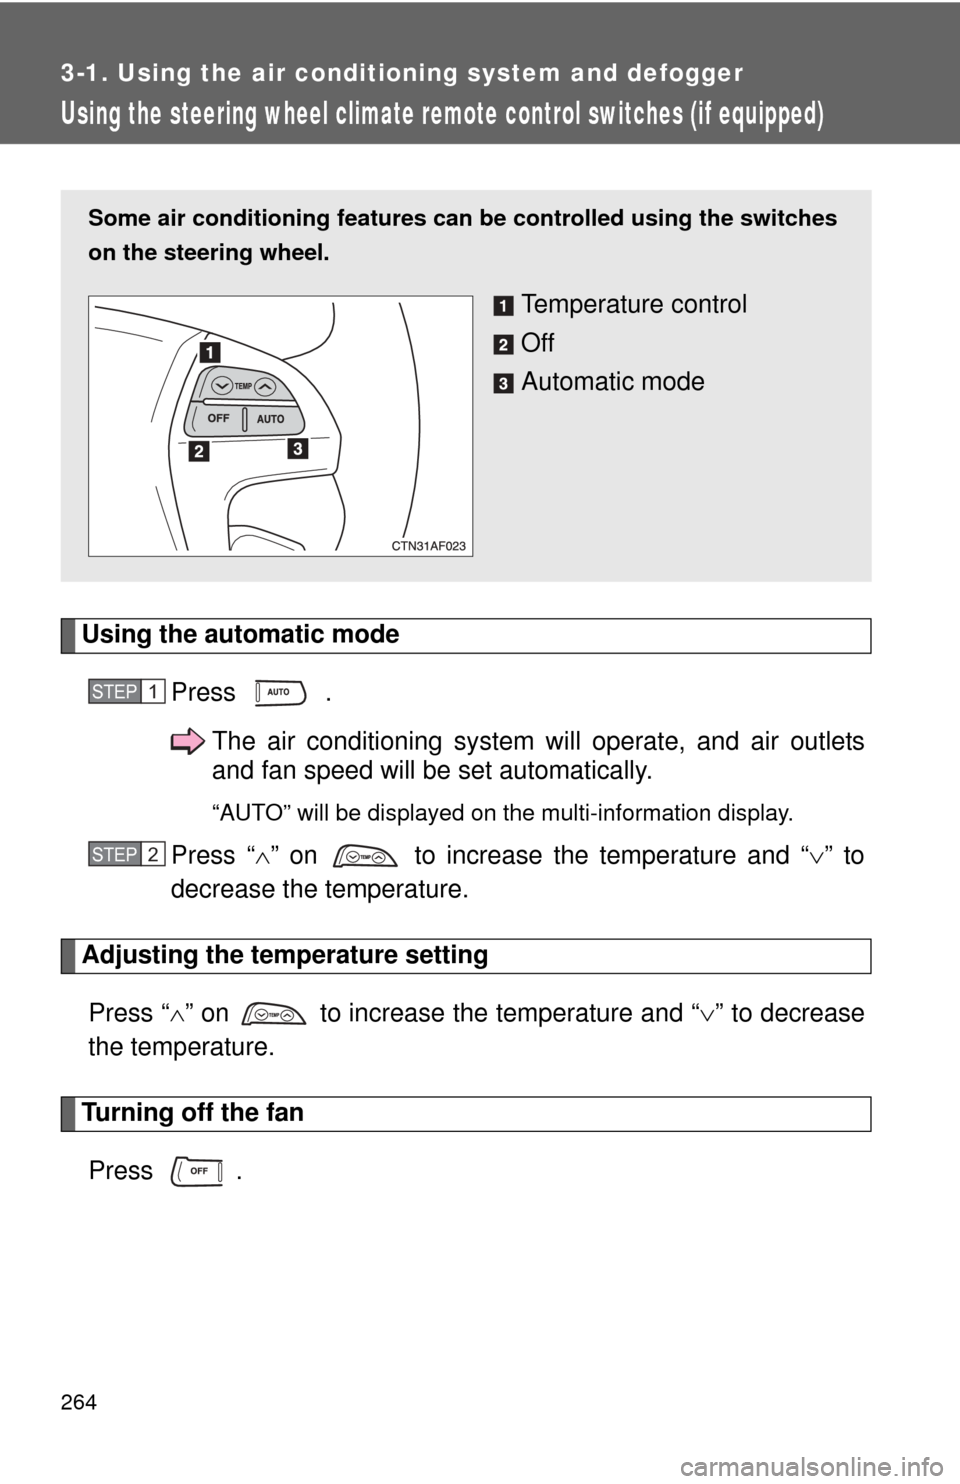
This feature is used to prevent ice from building up on the wind-
shield and wiper blades.
On/off
Press the button to turn on the
windshield wiper de-icer. The
indicator light will come on.
The windshield wiper de-icer
will automatically turn off after
approximately 15 minutes.
Page 265 of 577
264
3-1. Using the air conditioning system and defogger
Using the steering wheel climate remote control switches (if equipped)
Using the automatic modePress .The air conditioning system will operate, and air outlets
and fan speed will be set automatically.
“AUTO” will be displayed on the multi-information display.
Press “” on to increase the temperature and “ ” to
decrease the temperature.
Adjusting the temperature setting
Press “ ” on to increase the temperature and “ ” to decrease
the temperature.
Turning off the fan
Press .
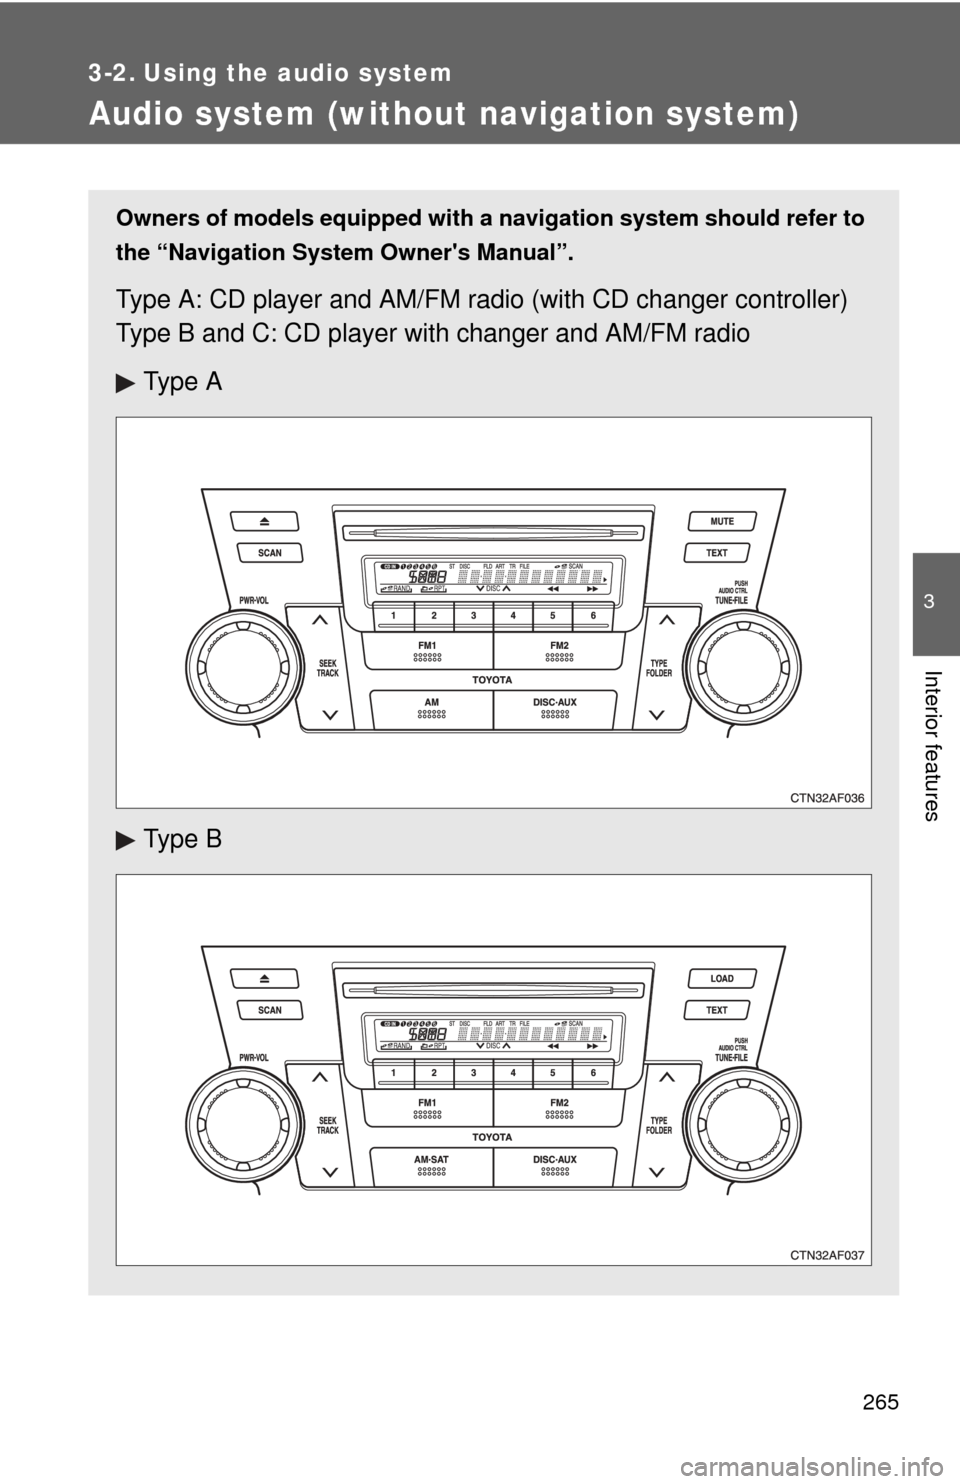
Some air conditioning features can be controlled using the switches
on the steering wheel.
Temperature control
Off
Automatic mode
STEP1
STEP2
Page 266 of 577
265
3
Interior features
3-2. Using the audio system
Audio system (without navigation system)
Owners of models equipped with a navigation system should refer to
the “Navigation System Owner's Manual”.
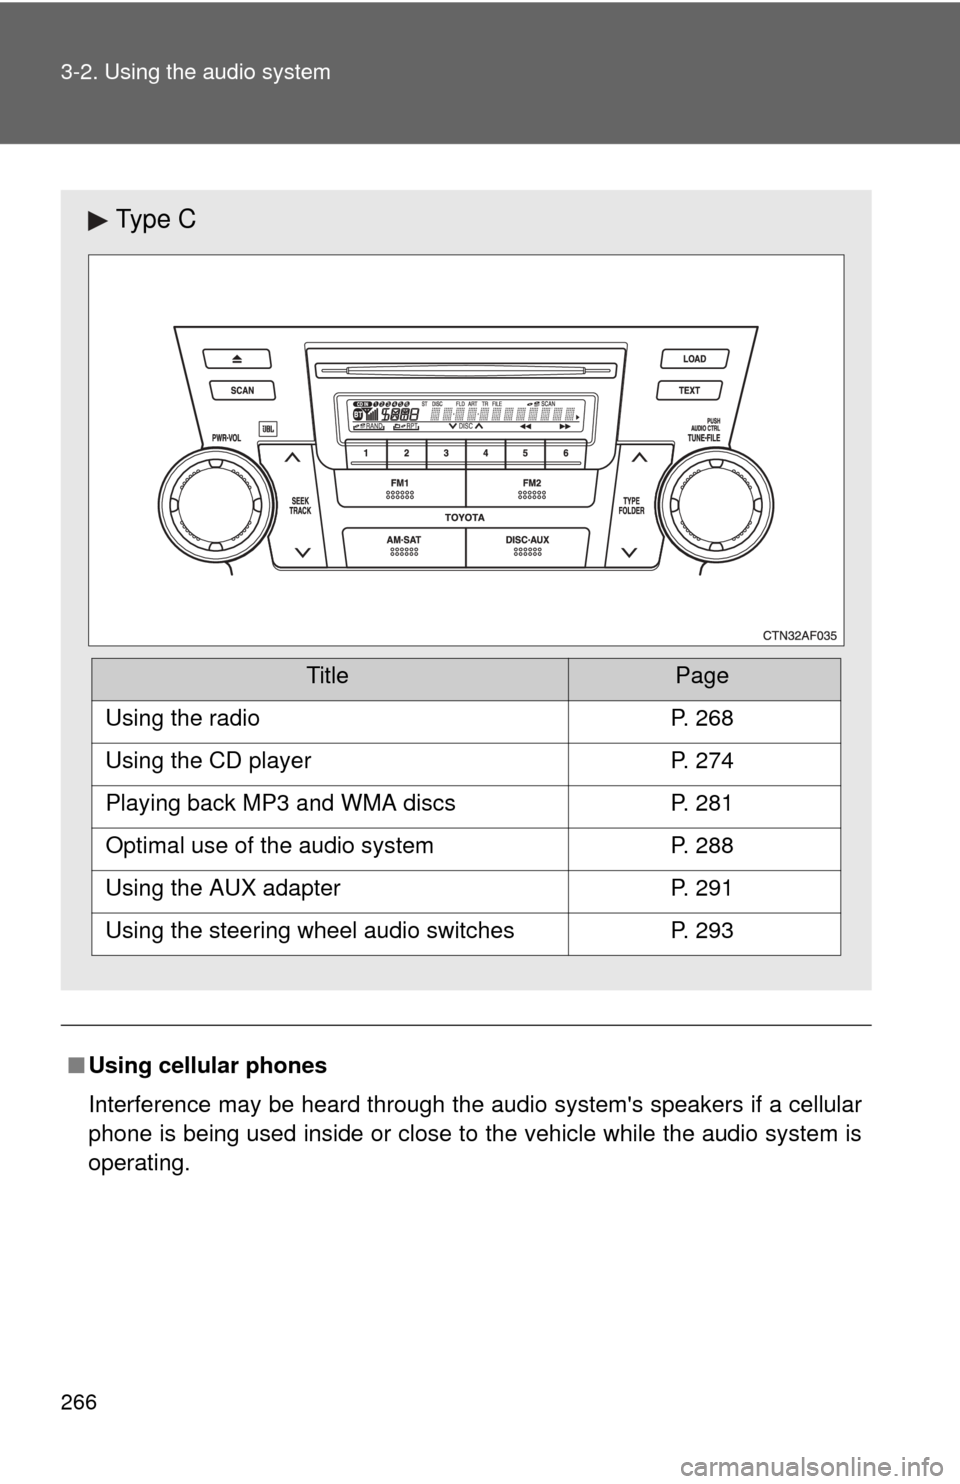
Type A: CD player and AM/FM radio (with CD changer controller)
Type B and C: CD player with changer and AM/FM radio
Ty p e A
Ty p e B
Page 267 of 577
266 3-2. Using the audio system
■Using cellular phones
Interference may be heard through the audio system's speakers if a cellular
phone is being used inside or close to the vehicle while the audio syste\
m is
operating.
Ty p e C
TitlePage
Using the radioP. 268
Using the CD playerP. 274
Playing back MP3 and WMA discsP. 281
Optimal use of the audio systemP. 288
Using the AUX adapterP. 291
Using the steering wheel audio switchesP. 293
Page 268 of 577
267
3-2. Using the audio system
3
Interior features
CAUTION
■
For vehicles sold in U.S.A. and Canada
●Part 15 of the FCC Rules
FCC Warning:
Any unauthorized changes or modifications to this equipment will void the
user’s authority to operate this device.
● Laser products
• Do not take this unit apart or attempt to make any changes yourself.
This is an intricate unit that uses a laser pickup to retrieve information
from the surface of compact discs. The laser is carefully shielded so
that its rays remain inside the cabinet. Therefore, never try to disas-
semble the player or alter any of its parts since you may be exposed to
laser rays and dangerous voltages.
• This product utilizes a laser. Use of controls or adjustments or performance of procedures other
than those specified herein may result in hazardous radiation expo-
sure.
NOTICE
■ To prevent battery discharge
Do not leave the audio system on longer than necessary with the engine is
off.
■ To avoid damaging the audio system
Take care not to spill drinks or other fluids over the audio system.
Page 269 of 577
268
3-2. Using the audio system
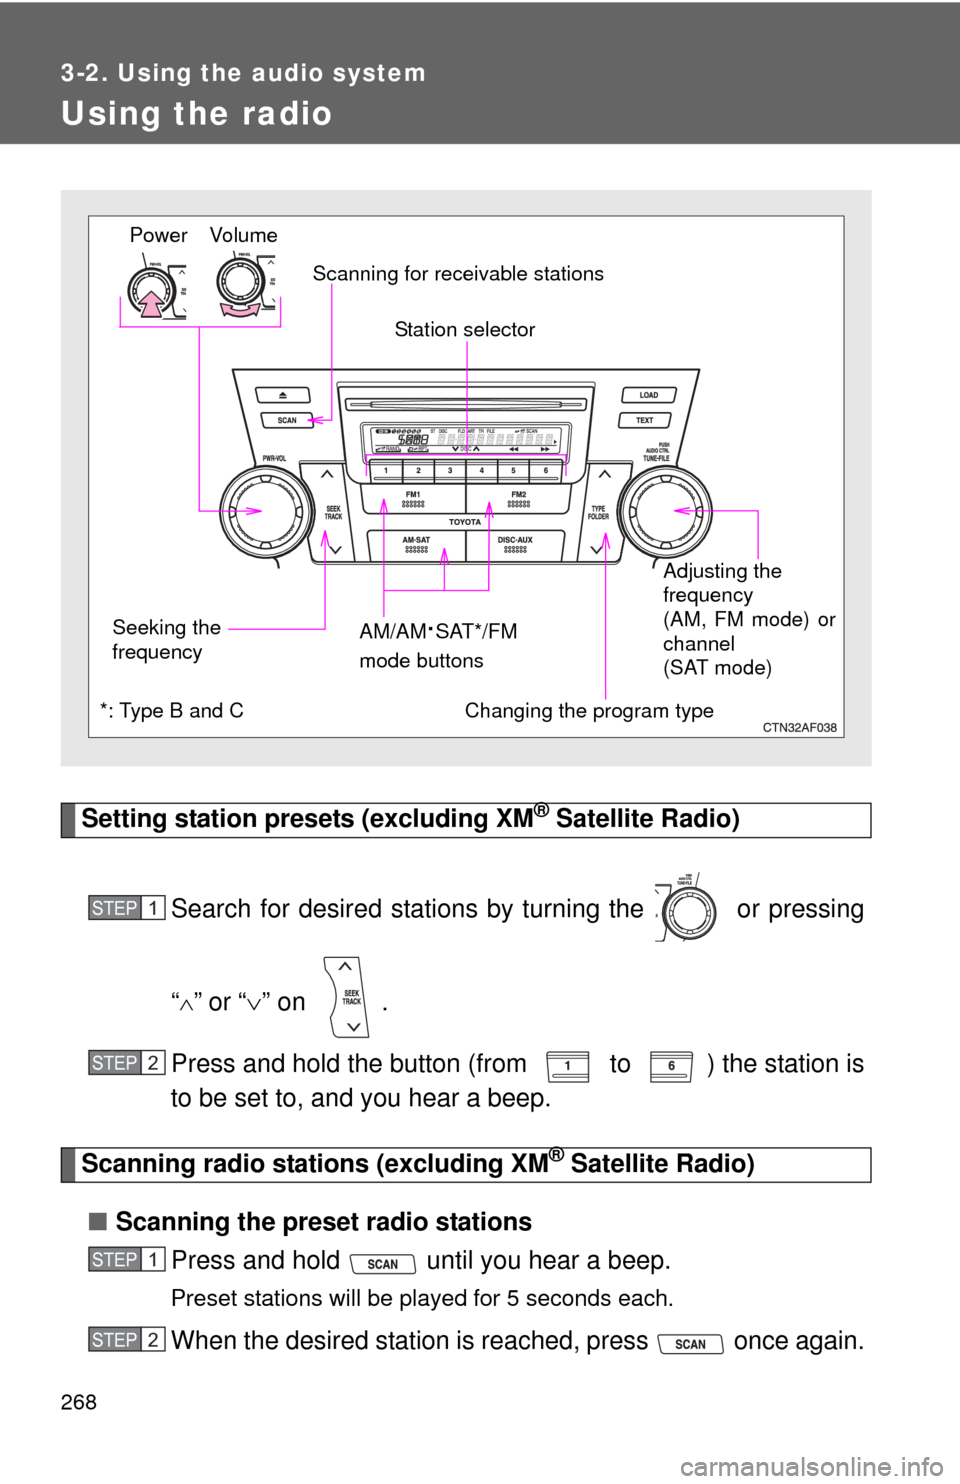
Using the radio
Setting station presets (excluding XM® Satellite Radio)
Search for desired stations by turning the or pressing
“
”or “ ” on .
Press and hold the button (from to ) the station is
to be set to, and you hear a beep.
Scanning radio stations (excluding XM® Satellite Radio)
■ Scanning the preset radio stations
Press and hold until you hear a beep.
Preset stations will be played for 5 seconds each.
When the desired station is reached, press once again.
Vo lu m e
Seeking the
frequency Station selector
AM/AM
·SAT*/FM
mode buttons Adjusting the
frequency
(AM, FM mode) or
channel
(SAT mode)
Power
Scanning for receivable stations
Changing the program type*: Type B and C
STEP1
STEP2
STEP1
STEP2
Page 270 of 577
269
3-2. Using the audio system
3
Interior features
■
Scanning all radio stations within range
Press
.
All stations with reception will be played for 5 seconds each.
When the desired station is reached, press once again.
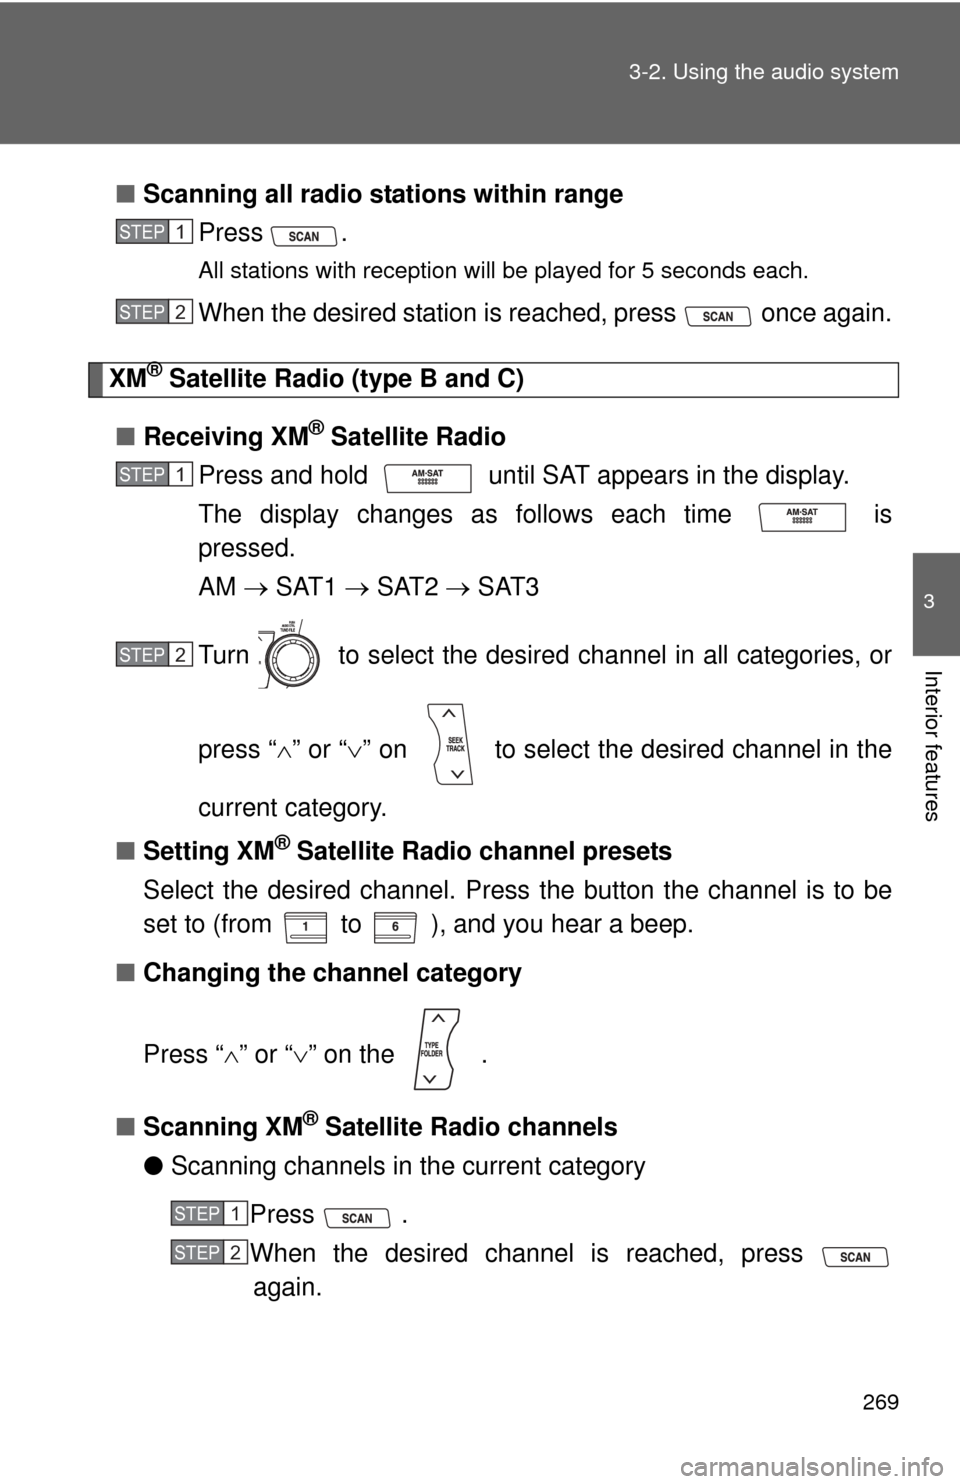
XM® Satellite Radio (type B and C)
■ Receiving XM
® Satellite Radio
Press and hold until SAT appears in the display.
The display changes as follows each time is
pressed.
AM SAT1 SAT2 SAT3
Turn to select the desired channel in all categories, or
press “ ” or “ ” on to select the desired channel in the
current category.
■ Setting XM
® Satellite Radio channel presets
Select the desired channel. Press the button the channel is to be
set to (from to ), and you hear a beep.
■ Changing the channel category
Press “ ” or “ ” on the .
■ Scanning XM
® Satellite Radio channels
● Scanning channels in the current category
Press .
When the desired channel is reached, press again.
STEP1
STEP2
STEP1
STEP2
STEP1
STEP2
Trending: airbag off, change language, start stop button, transmission, heater, child lock, door lock
