audio TOYOTA HIGHLANDER 2014 XU50 / 3.G Navigation Manual
[x] Cancel search | Manufacturer: TOYOTA, Model Year: 2014, Model line: HIGHLANDER, Model: TOYOTA HIGHLANDER 2014 XU50 / 3.GPages: 356, PDF Size: 28.61 MB
Page 161 of 356
161
7. REAR SEAT ENTERTAINMENT SYSTEM OPERATION
3
AUDIO/VISUAL SYSTEM
MP3/WMA
1Press “ ” or “ ” on the “FOLDER”
button until the desired folder number
appears.
Press and hold “ ” on the “FOLDER”
button, the top file stored in the top folder
in the disc will be selected.
1Each time “RPT” is selected, the
mode changes as follow:
Audio CD
“RPT” (track repeat) Off
MP3/WMA
“RPT” (file repeat) “FLD.RPT” (folder re-
peat) Off
1Each time “RAND” is selected, the
mode changes as follow:
Audio CD
“RAND” (random) Off
MP3/WMA
“RAND” (1 folder random) “FLD.RAND”
(1 disc random) Off
MP3 file compatibility
• Compatible standards
MP3 (MPEG1 LAYER3, MPEG2 LSF
LAYER3)
• Compatible sampling frequencies
MPEG1 LAYER3: 32, 44.1, 48 (kHz)
MPEG2 LSF LAYER3: 16, 22.05, 24
(kHz)
• Compatible bit rates (compatible with
VBR)
MPEG1 LAYER3: 64, 80, 96, 112, 128,
160, 192, 224, 256, 320 (kbps) MPEG2
LSF LAYER3: 64, 80, 96, 112, 128, 144,
160 (kbps)
• Compatible channel modes: stereo, joint
stereo, dual channel and mono
WMA file compatibility
• Compatible standards
WMA Ver. 7, 8, 9
• Compatible sampling frequencies
32, 44.1, 48 (kHz)
• Compatible bit rates (only compatible
with 2-channel playback)
Ver. 7, 8, 9: CBR 48, 64, 80, 96, 128,
160, 192 (kbps)
SELECTING A FOLDER
REPEAT PLAY
RANDOM PLAYBACK
MP3 AND WMA FILES
MP3 (MPEG Audio LAYER3) is a stan-
dard audio compression format. Files
can be compressed to approximately
1/10 of their original size by using MP3
compression.
WMA (Windows Media Audio) is a Mi-
crosoft audio compression format. This
format compresses audio data to a
size smaller than that of the MP3 for-
mat.
There is a limit to the MP3 and WMA
file standards and to the media/formats
recorded by them that can be used.
Page 162 of 356

162
7. REAR SEAT ENTERTAINMENT SYSTEM OPERATION
Compatible media
Media that can be used for MP3 and WMA
playback:
• CD-ROM/R/RW
•DVD-ROM/R/RW
Playback in some instances may not be
possible, depending on the status of the
disc. Playback may not be possible or the
audio may jump if the disc is scratched or
marked with fingerprints.
Compatible disc formats
The following disc formats can be used.
• Disc formats: CD-ROM Mode 1, CD-
ROM XA Mode 2 Form 1
• File formats: ISO9660 Level 1, Level 2
(Romeo, Joliet), UDF (2.01 or lower)
MP3 and WMA files written in any format
other than those listed above may not
play correctly, and their file names and
folder names may not be displayed cor-
rectly.
Items related to standards and limitations
are as follows.
• Maximum directory hierarchy: 8 levels
• Maximum length of folder names/file
names: 20 characters
• Maximum number of folders: 255
(including the root)
• Maximum number of files per disc: 512
File names
• The only files that can be recognized as
MP3/WMA and played are those with the
extension .mp3 or .wma.
Multi-sessions
As the audio system is compatible with
multi-sessions, it is possible to play discs
that contain MP3 and WMA files.
ID3 and WMA tags
ID3 tags can be added to MP3 files, mak-
ing it possible to record the track title, art-
ist name, etc.
The system is compatible with ID3 Ver.
1.0, 1.1, and Ver. 2.3 ID3 tags. (The num-
ber of characters is based on ID3 Ver. 1.0
and 1.1.)
WMA tags can be added to WMA files,
making it possible to record the track title
and artist name in the same way as with
ID3 tags.MP3 and WMA playback
When a disc containing MP3 or WMA files
is inserted, all files on the disc are first
checked. Once the file check is finished,
the first MP3 or WMA file is played. To
make the file check finish more quickly, we
recommend you do not write in any files
other than MP3 or WMA files or create any
unnecessary folders.
If the discs contain a mixture of music data
and MP3 or WMA format data, only music
data can be played.
Extensions
If the file extensions .mp3 and .wma are
used for files other than MP3 and WMA
files, they will be mistakenly recognized
and played as MP3 and WMA files. This
may result in large amounts of interfer-
ence and damage to the speakers.
Playback
• To play MP3 files with steady sound
quality, we recommend a fixed bit rate of
128 kbps and a sampling frequency of
44.1 kHz.
• Playback may not be possible in some
instances, depending on the characteris-
tics of the disc.
• There is a wide variety of freeware and
other encoding software for MP3 and
WMA files on the market, and depending
on the status of the encoding and the file
format, poor sound quality or noise at the
start of playback may result. In some
cases, playback may not be possible at
all.
• When files other than MP3 or WMA files
are recorded on a disc, it may take more
time to recognize the disc and in some
cases, playback may not be possible at
all.
Page 163 of 356
163
7. REAR SEAT ENTERTAINMENT SYSTEM OPERATION
3
AUDIO/VISUAL SYSTEM
4. PLAYING AN SD CARD*
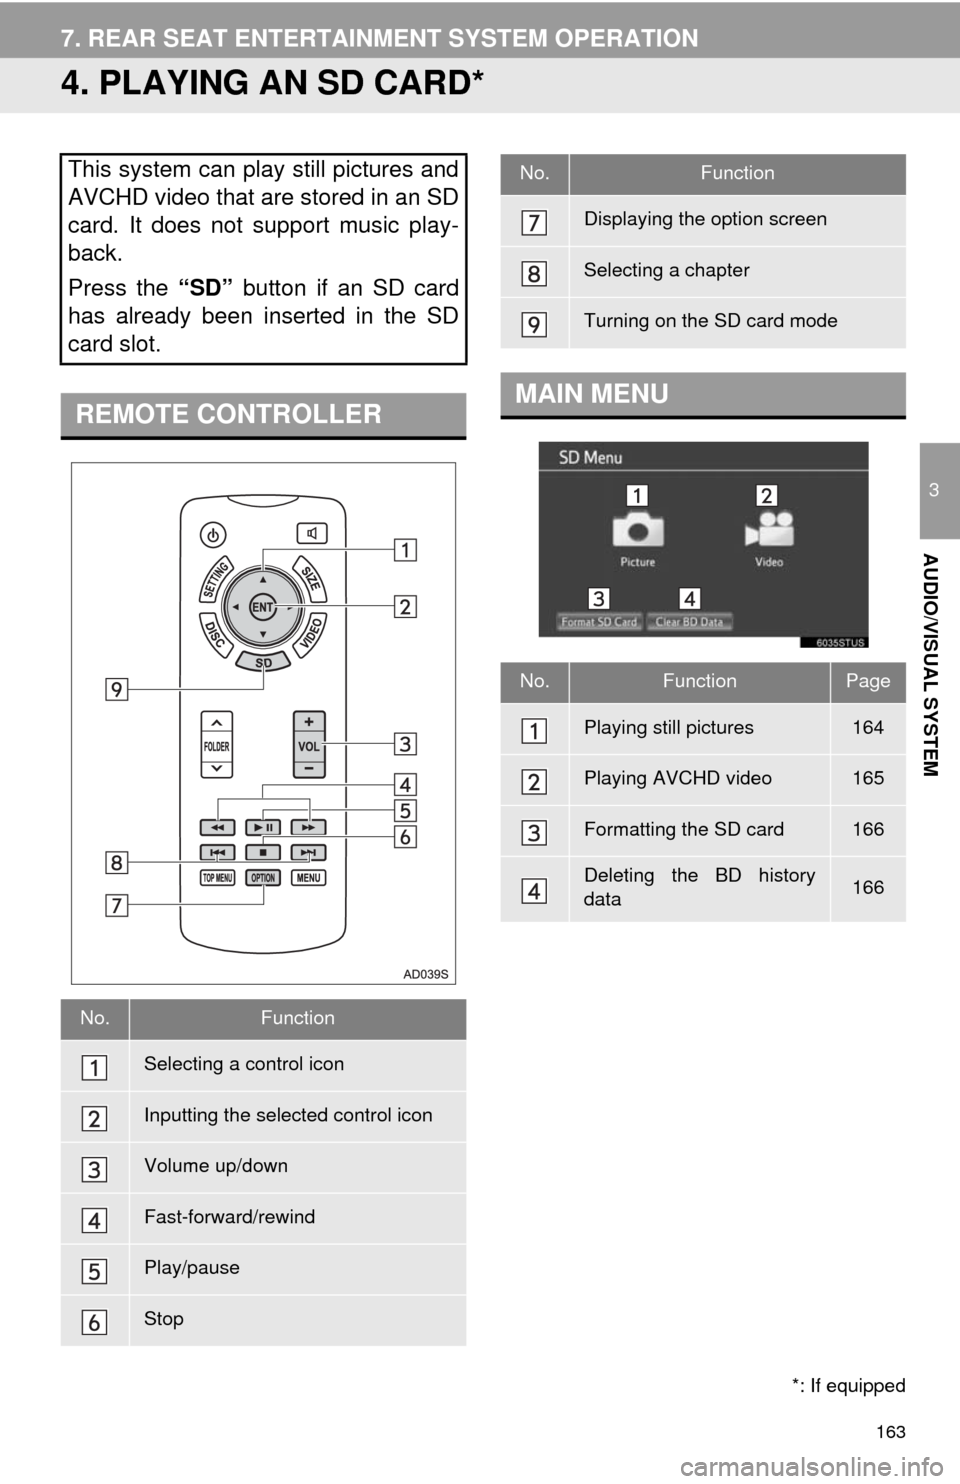
This system can play still pictures and
AVCHD video that are stored in an SD
card. It does not support music play-
back.
Press the “SD” button if an SD card
has already been inserted in the SD
card slot.
REMOTE CONTROLLER
No.Function
Selecting a control icon
Inputting the selected control icon
Volume up/down
Fast-forward/rewind
Play/pause
Stop
*: If equipped
Displaying the option screen
Selecting a chapter
Turning on the SD card mode
MAIN MENU
No.FunctionPage
Playing still pictures164
Playing AVCHD video165
Formatting the SD card166
Deleting the BD history
data166
No.Function
Page 165 of 356
165
7. REAR SEAT ENTERTAINMENT SYSTEM OPERATION
3
AUDIO/VISUAL SYSTEM
■ROTATING THE STILL PICTURES
1Select or to rotate a
still picture.
The rotate information will be maintained
until the system is turned off or the SD
card is removed.
■ZOOM OUT THE STILL PICTURES
1Select to zoom out the still pic-
tures.
Select again to cancel zoom out.
This function is only available for small-
sized still pictures.
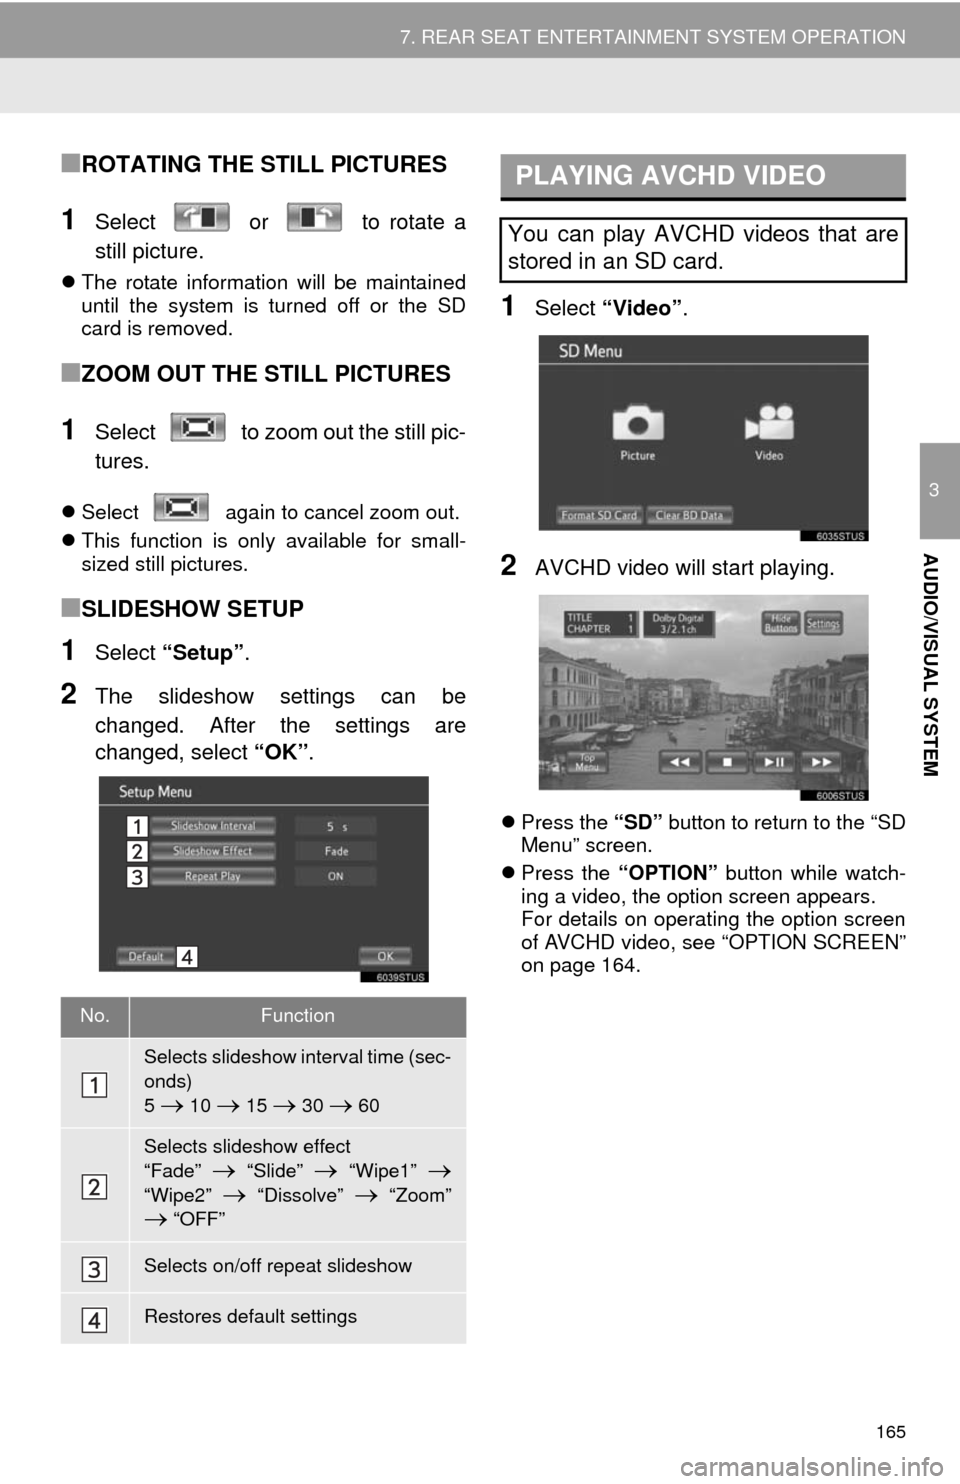
■SLIDESHOW SETUP
1Select “Setup”.
2The slideshow settings can be
changed. After the settings are
changed, select “OK”.
1Select “Video”.
2AVCHD video will start playing.
Press the “SD” button to return to the “SD
Menu” screen.
Press the “OPTION” button while watch-
ing a video, the option screen appears.
For details on operating the option screen
of AVCHD video, see “OPTION SCREEN”
on page 164.
No.Function
Selects slideshow interval time (sec-
onds)
5
10 15 30 60
Selects slideshow effect
“Fade”
“Slide” “Wipe1”
“Wipe2” “Dissolve” “Zoom” “OFF”
Selects on/off repeat slideshow
Restores default settings
PLAYING AVCHD VIDEO
You can play AVCHD videos that are
stored in an SD card.
Page 167 of 356
167
7. REAR SEAT ENTERTAINMENT SYSTEM OPERATION
3
AUDIO/VISUAL SYSTEM
WA R N I N G
●SD cards
• Keep away from children. These are
small and if swallowed by a child they
can cause choking.
NOTICE
●Failure to follow the precautions below
may result in damage to the SD cards or
the SD card slot.
• Do not insert anything other than an
SD card into the SD card slot.
• Do not stick levels or stickers on SD
card. There is a possibility that it may
become impossible to eject the SD
card from inside the slot.
• Do not handle an SD card with wet
hands. Doing so may cause electric
shock or a malfunction.
• Do not allow hands or metal objects to
contact the interface pins of SD cards.
• Do not place SD cards on the instru-
ment panel, on any place with direct
sunlight or in areas with a lot of mois-
ture.
• Do not use SD cards in any place
where static electricity or electric noise
adversely affects SD cards. This may
cause data corruption or data loss.
• Always place the SD card in its storage
case when not in use.
Page 168 of 356
168
7. REAR SEAT ENTERTAINMENT SYSTEM OPERATION
5. USING THE VIDEO MODE*
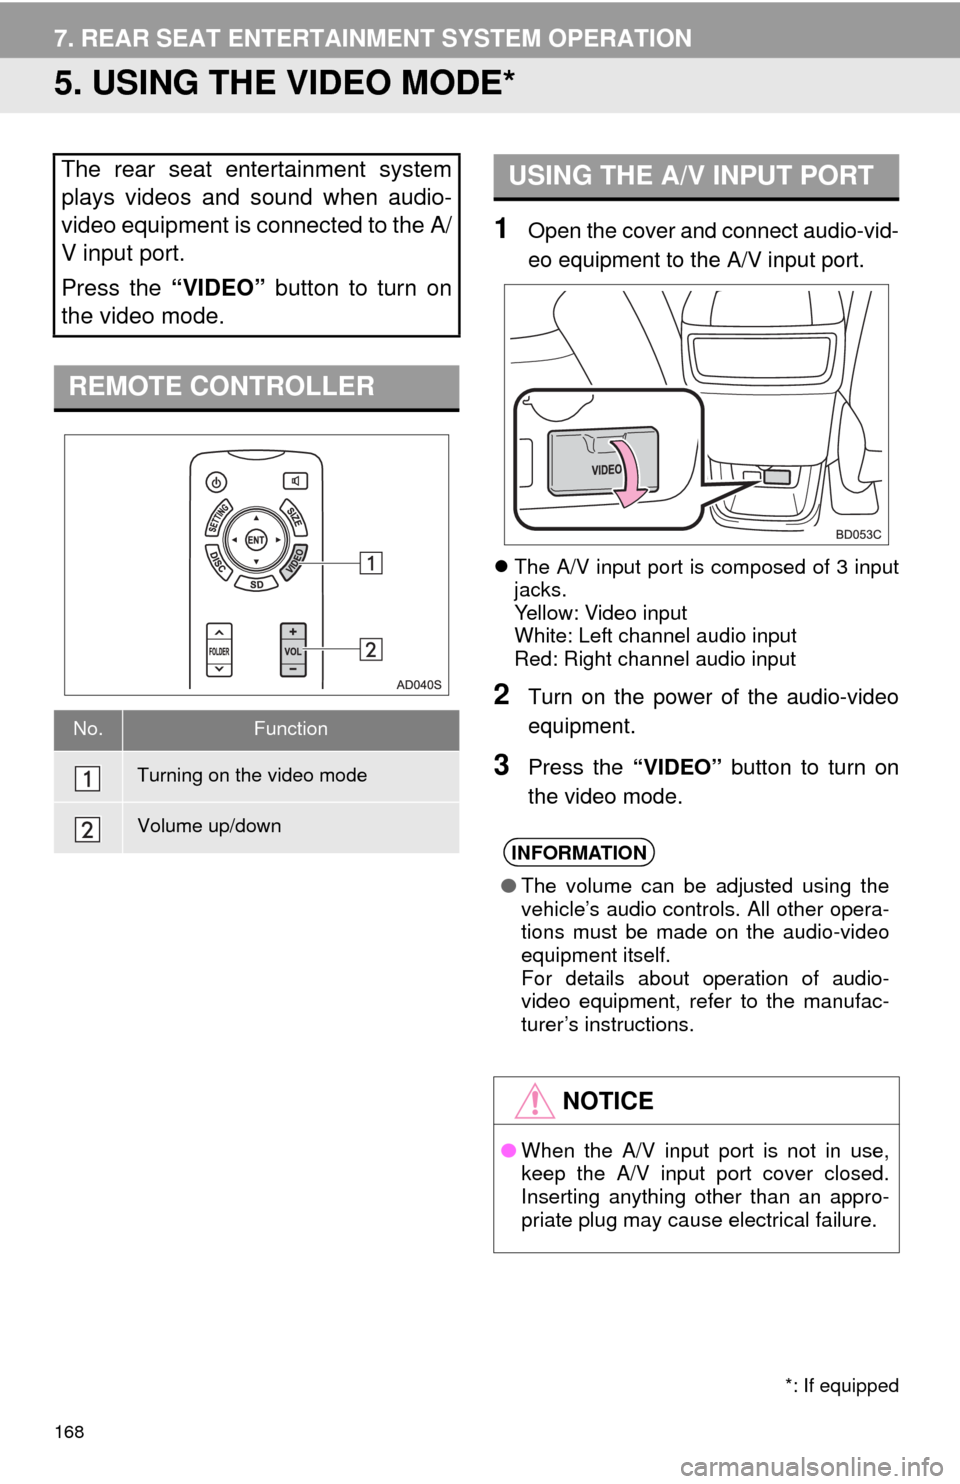
1Open the cover and connect audio-vid-
eo equipment to the A/V input port.
The A/V input port is composed of 3 input
jacks.
Yellow: Video input
White: Left channel audio input
Red: Right channel audio input
2Turn on the power of the audio-video
equipment.
3Press the “VIDEO” button to turn on
the video mode.
The rear seat entertainment system
plays videos and sound when audio-
video equipment is connected to the A/
V input port.
Press the “VIDEO” button to turn on
the video mode.
REMOTE CONTROLLER
No.Function
Turning on the video mode
Volume up/down
*: If equipped
USING THE A/V INPUT PORT
INFORMATION
●The volume can be adjusted using the
vehicle’s audio controls. All other opera-
tions must be made on the audio-video
equipment itself.
For details about operation of audio-
video equipment, refer to the manufac-
turer’s instructions.
NOTICE
●When the A/V input port is not in use,
keep the A/V input port cover closed.
Inserting anything other than an appro-
priate plug may cause electrical failure.
Page 170 of 356
170
1. VOICE COMMAND SYSTEM OPERATION
1. VOICE COMMAND SYSTEM
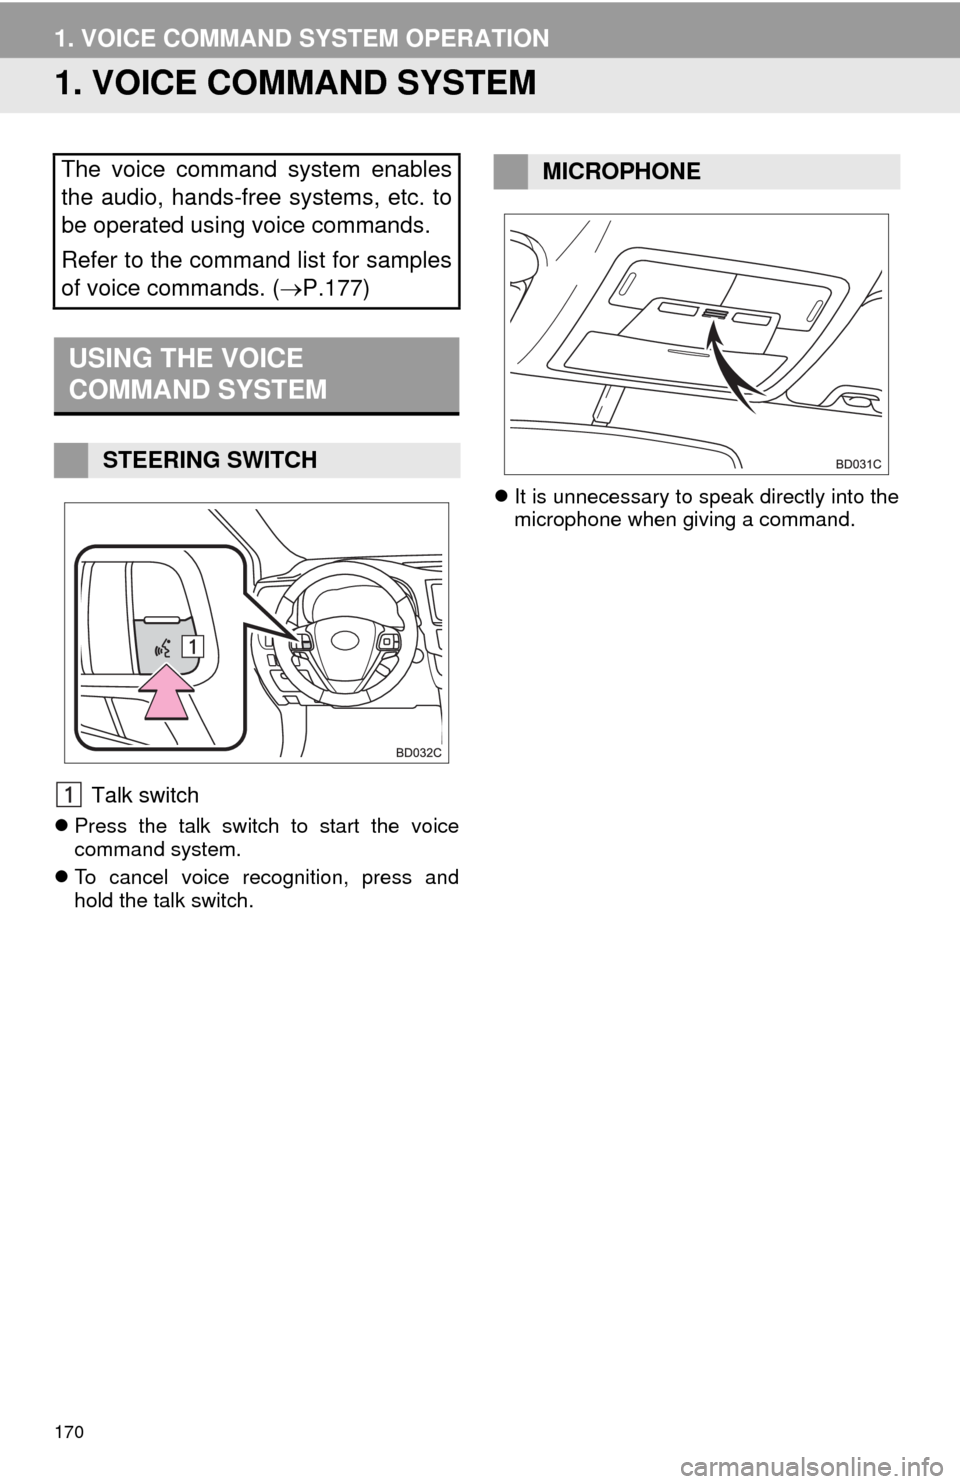
Talk switch
Press the talk switch to start the voice
command system.
To cancel voice recognition, press and
hold the talk switch.It is unnecessary to speak directly into the
microphone when giving a command.
The voice command system enables
the audio, hands-free systems, etc. to
be operated using voice commands.
Refer to the command list for samples
of voice commands. (P.177)
USING THE VOICE
COMMAND SYSTEM
STEERING SWITCH
MICROPHONE
Page 174 of 356
174
1. VOICE COMMAND SYSTEM OPERATION
1Press the talk switch.
2Say “Play song
A confirmation screen will be displayed
showing the recognition results. If multiple
matching items are found, a selection
screen will be displayed. Say “
The system starts playing music and the
audio top screen is displayed.
1Press the talk switch.
2Say “Call
A confirmation screen will be displayed
showing the recognition results. If multiple
matching items are found, a selection
screen will be displayed. Say “
VOICE COMMAND EXAMPLE:
SEARCH FOR A SONG
INFORMATION
●The Gracenote database is only com-
patible with the USB or iPod mode.
●A USB memory or iPod must be con-
nected to enable track searching and
playback. (P.101, 105)
●When a USB memory or iPod is con-
nected, recognition data is created so
tracks can be searched using voice
commands.
●Recognition data is updated under the
following conditions:
• When the USB memory or iPod data
has changed.
• When the voice recognition language
is changed. (P. 5 7 )
●While the recognition data is being cre-
ated or being updated, a track search
cannot be performed using a voice com-
mand.
VOICE COMMAND EXAMPLE:
CALL NAME
INFORMATION
●In the same manner as it is displayed on
the screen, “Call
say the name, or the name and type of
phone, of a contact.
For example: “Call a contact”, “John
Smith” or “Call a contact”, “Mary
Davis”, “Mobile”
●There are 4 types of phones: Home,
Mobile, Work and Other.
●Short or abbreviated names in the con-
tacts list may not be recognized. Change
names in the contacts list to full names.
●Sometimes a voice recognition result
confirmation screen will be displayed.
After confirming the result, say “Yes” or
“No”.
●When the system recognizes multiple
names from the contacts list, a name
candidate list will be displayed on the
screen. If the desired name is not dis-
played on the top of the screen, say or
select the number of the name from the
candidate list (number 1, number 2, etc.)
to select a name from the candidate list.
●When a contact has multiple phone
numbers registered in the contacts list, a
candidate list will be displayed. If the
desired phone number is not displayed
on the top of the screen, say or select
the number of the desired phone num-
ber from the candidate list (number 1,
number 2, etc.) to select a phone num-
ber from the candidate list.
Page 178 of 356
178
1. VOICE COMMAND SYSTEM OPERATION
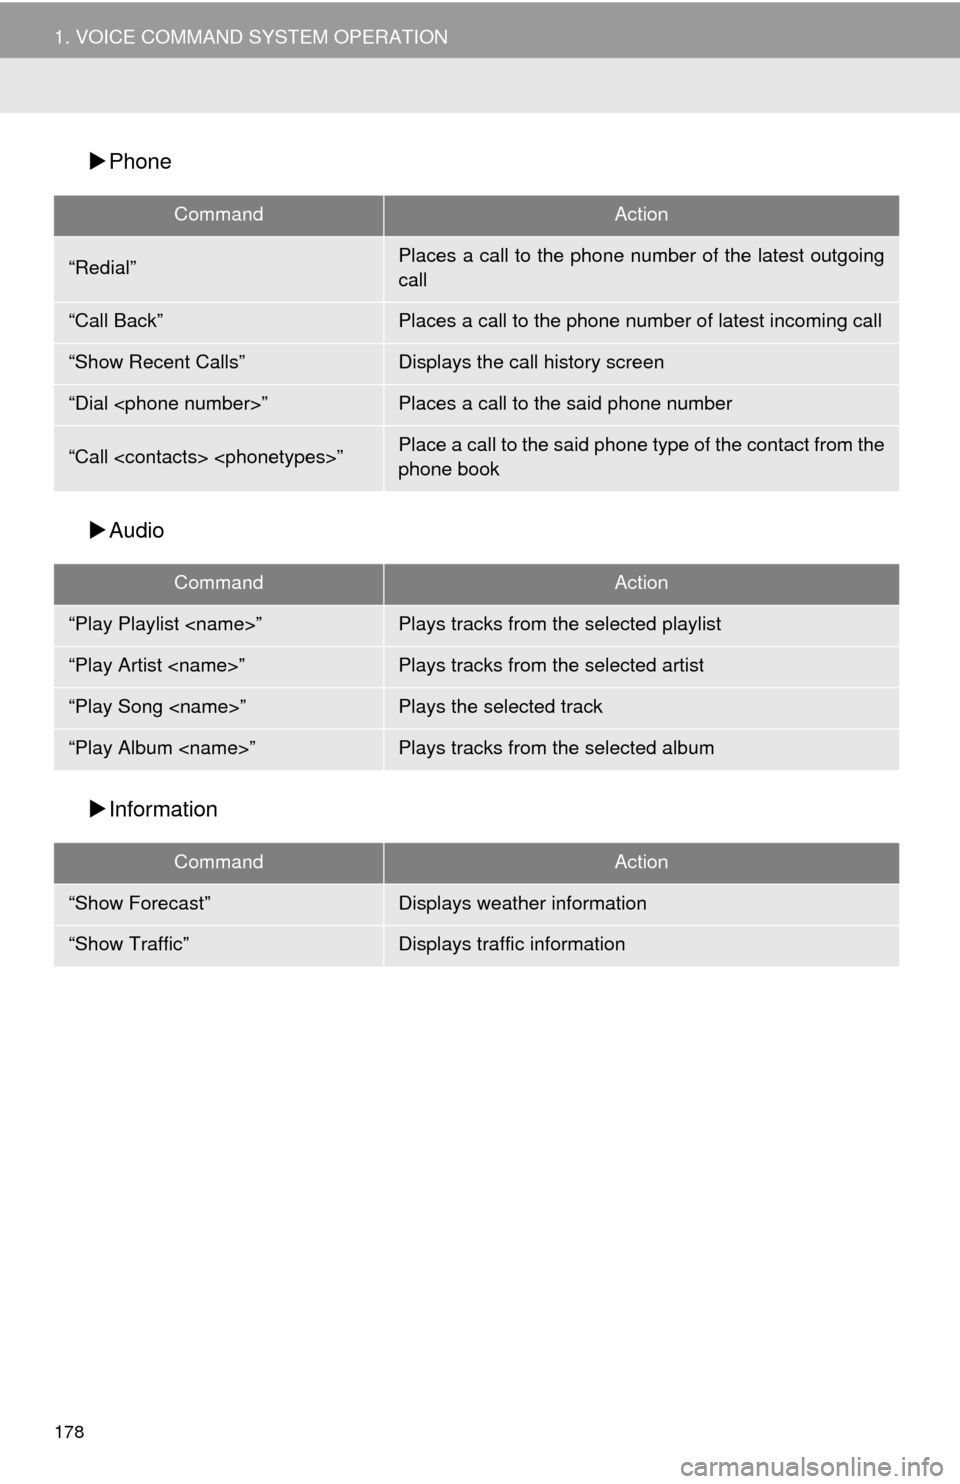
Phone
Audio
Information
CommandAction
“Redial”Places a call to the phone number of the latest outgoing
call
“Call Back”Places a call to the phone number of latest incoming call
“Show Recent Calls”Displays the call history screen
“Dial
“Call
phone book
CommandAction
“Play Playlist
“Play Artist
“Play Song
“Play Album
CommandAction
“Show Forecast”Displays weather information
“Show Traffic”Displays traffic information
Page 184 of 356
184
1. USEFUL INFORMATION
4. Driver Easy Speak*
1Press the “APPS” button.
2Select “Driver Easy Speak” to
change on/off.
1Press the “APPS” button.
2Select “Setup”.
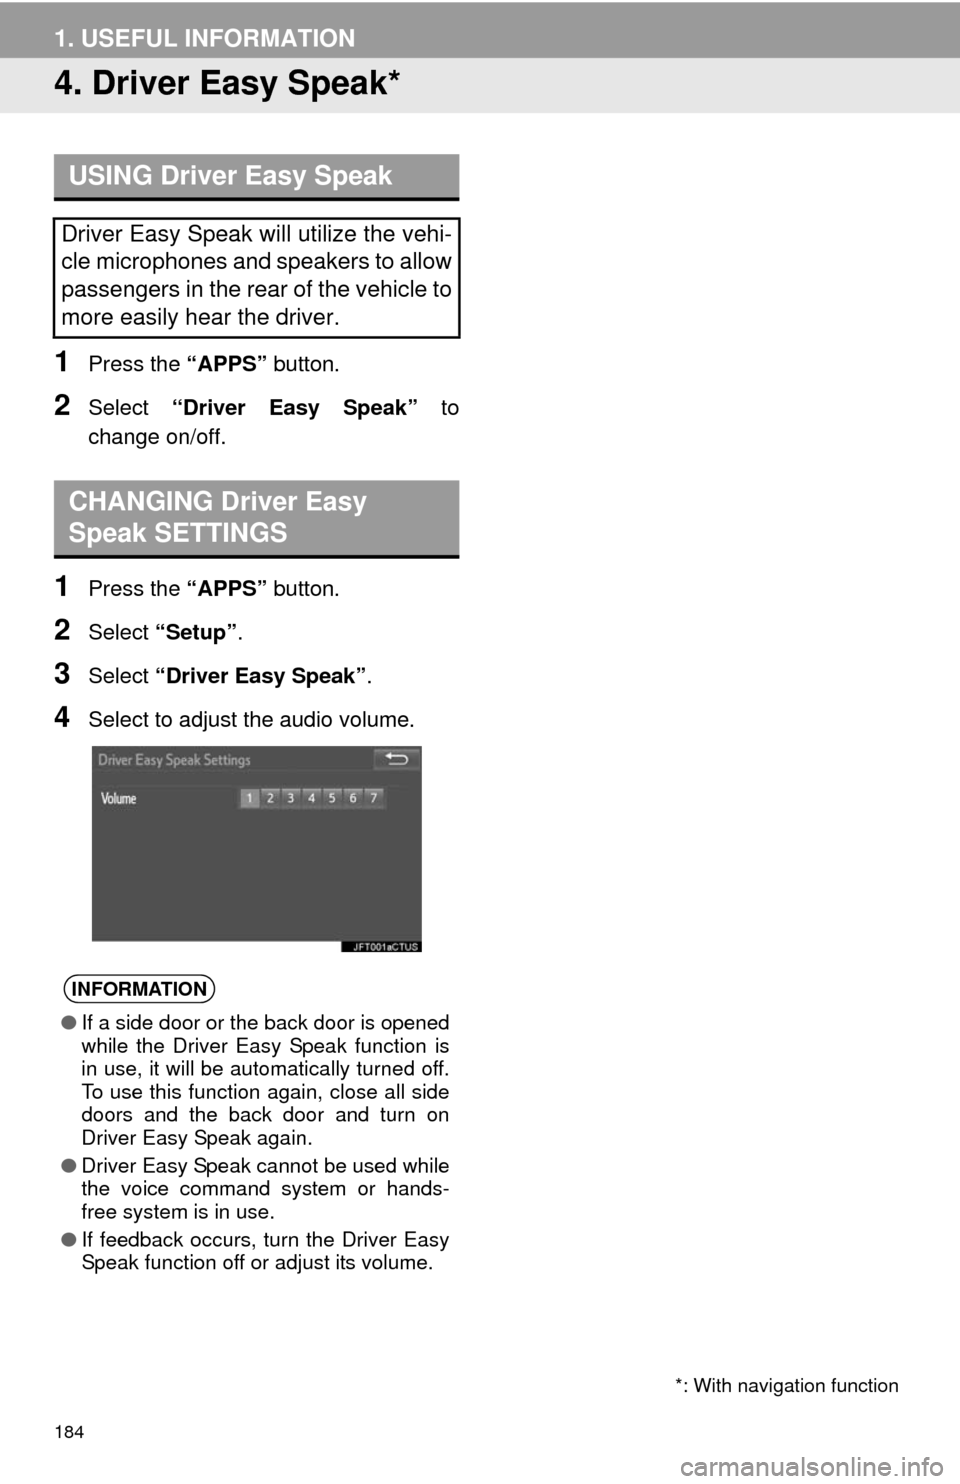
3Select “Driver Easy Speak”.
4Select to adjust the audio volume.
USING Driver Easy Speak
Driver Easy Speak will utilize the vehi-
cle microphones and speakers to allow
passengers in the rear of the vehicle to
more easily hear the driver.
CHANGING Driver Easy
Speak SETTINGS
INFORMATION
●If a side door or the back door is opened
while the Driver Easy Speak function is
in use, it will be automatically turned off.
To use this function again, close all side
doors and the back door and turn on
Driver Easy Speak again.
●Driver Easy Speak cannot be used while
the voice command system or hands-
free system is in use.
●If feedback occurs, turn the Driver Easy
Speak function off or adjust its volume.
*: With navigation function